Appendix B Building Your Own wxWidgets Applications
This appendix shows you how to use Visual Studio for Windows, KDevelop for Linux, and Xcode for Mac OS X to create your own projects in an IDE. There is also a basic discussion of makefiles that applies to any compiler on any platform, a description of the Bakefile makefile-generation system, information on using the wx-config command, and a list of wxWidgets preprocessor symbols you will find useful when writing your applications.
If you’re new to wxWidgets, we recommend that you initially skip this chapter and use DialogBlocks to get started with compiling your own application, as detailed in Appendix C, “Creating Applications with DialogBlocks.”
If your favorite compiler or IDE is not detailed here, or if you just want the quick overview, there are essentially three major sets of files required to build a project using wxWidgets:
1. Include files. The wxWidgets headers must be available to the compiler when compiling your project; otherwise, none of the wxWidgets classes are declared.
2. Library files. The wxWidgets compiled library must be available to link with your compiled program.
3. System files. Whatever system libraries are needed to link for the platform must be linked in with your program.
Important: You must have compiled and built at least one configuration of the wxWidgets library, as covered in Appendix A, “Installing wxWidgets,” prior to proceeding with creating your own wxWidgets projects.
Before covering the step-by-step directions for creating wxWidgets projects with Visual Studio, it should be noted that there are alternatives for generating Visual Studio project files using third-party tools. Although not covered here, utilities like DialogBlocks, wxHatch, wxWinWizard, and wxVisualSetup can be used to generate project files that can be loaded and used in Visual Studio. If you want detailed control over your project or need to make specific modifications, however, it may be necessary to have an understanding of the individual settings.
Microsoft Visual Studio enables you to quickly and easily build wxWidgets projects by adding just a few wxWidgets directories and files into your project settings. Although the exact location for each setting is slightly different in each version of Visual Studio, the options are named roughly the same; please look at nearby options or consider alternate wordings if the setting isn’t listed exactly as specified here.
1. Create a new Win32 Project or Solution. Choose the most minimal options available.
2. Open the Project Settings/Properties dialog.
3. Find the Preprocessor Definitions under the C/C++ Settings. You will want to be sure that all of the following are defined: WIN32, __WXMSW__, _WINDOWS. If you are using a debug version of wxWidgets to build your project, you will also need to define _DEBUG, __WXDEBUG__. Note that some versions of Visual Studio will not show the C/C++ options until a C or C++ source file has been added to the project.
4. Find the Additional Include Directories under the C/C++ settings and enter both the core include directory (such as c:wxWidgetsinclude) and the include directory for the library configuration that you are using (such as c:wxWidgetslibvc_libmswu). This configuration-specific include directory must be included for the compiler to find the setup.h that specifies what features are enabled for that build.
5. Find the Additional Libraries Directories under the Link Settings and enter the directory where the compiled wxWidgets library files are located (such as c:wxWidgetslibvc_lib).
6. Find the Additional Dependencies or Object Modules setting to specify additional libraries to link with your application. The wxWidgets library names will vary depending on your build configuration but will follow the library naming conventions outlined in the installation appendix. For example, for the debug build, you would need to link at least wxmsw26d_core.lib and wxbase26d.lib. Depending on which wxWidgets features you are using, you may need to link with more of the libraries: wxbase26d_net.lib, wxbase26d_odbc.lib, wxexpatd.lib, wxjpegd.lib, wxmsw26d_adv.lib, wxmsw26d_grid.lib, wxmsw26_gl.lib, wxmsw26d_html.lib, wxmsw26d_xrc.lib, wxmsw26d_xml, wxpngd.lib, wxregexd.lib, wxtiffd.lib, and wxzlibd.lib. Again, remember the build configuration postfixes for the build you are using. You can always look at the compiled library files for a complete list of libraries.
7. The Win32 libraries that you need to link, depending on your build configuration and what features you have enabled, could include some or all of the following: kernel32.lib, user32.lib, gdi32.lib, winspool.lib, comdlg32.lib, advapi32.lib, shell32.lib, ole32.lib, oleaut32.lib, uuid.lib, odbc32.lib, odbccp32.lib, winmm.lib, comctl32.lib, rpcrt4.lib, and wsock32.lib. Visual Studio usually adds some or all of these libraries when the project is created. Not all libraries are always needed; for example, if you do not use sockets, you would not need to link wsock32.lib.
8. Find the Run-time Library selection from the C/C++ Code Generation settings and select either Multithread DLL or Multithread Debug DLL. You will not be able to link your program using the single-thread libraries or the non-DLL libraries. If you see a handful of linking errors about Windows symbols already being defined, you probably did not select a DLL run-time library.
9. You can now add your source files to the project, if you have not already done so, and build your wxWidgets application.
If you receive any compile or link errors when building, double-check that you carefully followed all of the steps in the previous section to specify the include directories, the library directories, the wxWidgets and Win32 libraries, and the correct run-time library. You can also compare the project settings in any of the samples to the settings in your own project, looking for any discrepancies. Some developers start with a sample application’s project file so that most of the settings are already defined correctly.
Some common error messages and solutions include the following:
![]()
Cannot open include file: ’wx/wx.h’: No such file or directory— This happens in two situations. One, the library itself hasn’t been compiled yet; see Appendix A. Two, the library’s include directory cannot be found (for example, c:wxWidgetslibvc_libmswd); check that it is listed in the additional include directories.
![]()
Cannot open include file: ’wx/setup.h’: No such file or directory— The library’s include directory cannot be found (such as c:wxWidgets libvc_libmswd); check that it is listed in the additional include directories.
![]()
Cannot open file wxmswXXXX— Either the libraries haven’t been compiled or the wxWidgets libraries cannot be found because the directories have not been added to the additional library paths. Ensure that the library directory containing your compiled wxWidgets library has been added to the additional libraries.
![]() Unresolved symbols to wxWidgets classes—Some or all of the necessary wxWidgets library modules could not be found. Examine the symbols listed to determine the missing libraries, check the previous list of libraries, and add any missing library modules.
Unresolved symbols to wxWidgets classes—Some or all of the necessary wxWidgets library modules could not be found. Examine the symbols listed to determine the missing libraries, check the previous list of libraries, and add any missing library modules.
![]() Unresolved symbols to Windows functions—The linker could not find the Windows symbols needed to link your application. Ensure that the Windows libraries are included in the list of modules to be linked.
Unresolved symbols to Windows functions—The linker could not find the Windows symbols needed to link your application. Ensure that the Windows libraries are included in the list of modules to be linked.
Visual Studio creates two project configurations, debug and release, when you create a new project. Most wxWidgets developers test their applications using a debug build of wxWidgets to benefit from the debug information and the run-time assertions that may indicate certain problems. You will need to reenter most of the settings for each different project configuration that you use keeping in mind which wxWidgets build the project configuration will be using. To save some time, you can copy one configuration rather than manually re-creating all of the settings each time.
The sample applications have over a dozen project configurations if you want to see how the settings may differ for each configuration.
KDevelop, a subproject of the KDE desktop environment, is arguably the most robust, mature, and stable IDE for developing applications on Linux. Not only does KDevelop provide a powerful editor, but it also generates and updates your makefiles for you, saving you a considerable amount of work. You only need to add a few settings to KDevelop’s project settings for it to compile your wxWidgets application.
1. Create a New Project (from the Project menu).
2. Expand C++ and choose Simple Hello World Program or some other minimal project setting. Some newer versions of KDevelop have a wxWidgets project option, but it is not as reliable or as flexible as setting up the project yourself. Finish creating the project in a place of your choosing.
3. Delete any source files created by KDevelop, most likely a simple source file with a main and little else.
4. Open the Project Options from the Project menu and select Configure Options from the pane of options on the left. You should see several tabs, including General, C, and C++.
5. Click on the C++ tab. Paste the results of using wx-config --cxxflags from the command line (see the later section “Using wx-config”), clearing any options that may already be present. These flags are the necessary header includes and defines to build your wxWidgets application.
6. Click on the General tab. Paste the results of using wx-config --libs from the command line. These are the necessary libraries for linking wxWidgets as well as linking the necessary X11, GTK+, and other system libraries.
7. After clicking OK to close the project options dialog, KDevelop will prompt you to re-run configure for this build configuration. Although this is a necessary step later, do not run configure yet.
8. You can now add your wxWidgets source files to the project. You will need to add at least one source file to the project before proceeding to the next step. You can add sources by using the Automake Manager tab. If you haven’t written any code yet, begin your application and then come back to these steps, even if you only write a skeletal program that has a wxApp class and little else.
9. Run automake by selecting Run Automake & Friends from the Build menu.
10. Run configure by selecting Run Configure from the Build menu.
11. You can now build your wxWidgets application. As your application grows, simply add the new files using the Automake Manager, and KDevelop will automatically update the makefiles.
KDevelop allows you to create multiple build configurations. By default, configurations named “debug” and “optimized” are created. If you want to be able to create both debug and release versions of your application, you can place the wx-config flags specifying the different library configurations into separate KDevelop configurations, giving you the flexibility of choosing to build a debug or a release simply by switching your configuration from within KDevelop.
Apple makes it easy for developers to create Mac OS X applications by providing Xcode, a free IDE and front-end for GCC. Xcode is a rich IDE, and this short guide is not intended to replace books or other resources on all of Xcode’s features and options. Fortunately, it takes only a few steps to create an Xcode project and add the necessary build flags for wxWidgets.
1. Create a New Project (File menu).
2. From the New Project Assistant, select Empty Project for the project type.
3. Select the location for your project files.
4. From the Project menu, select New Target and choose Carbon/Application. This will tell Xcode that you are creating an application. You will be asked to provide a name for the target. The Target Info window will then appear, allowing you to change the configuration for the new target.
5. From the Settings drop-down menu, choose Language under GNU C/C++ Compiler, and find the Other C++ Flags option. This is where you will paste the results of using wx-config --cxxflags from the command line (see the later section “Using wx-config”). These flags are the necessary header includes and defines to build your wxWidgets application.
6. From the settings drop-down menu, choose Linking under General, and find the Other Linker Flags option. This is where you will paste the results of using wx-config --libs from the command line. The libs are the necessary libraries for linking wxWidgets as well as linking the necessary Mac OS X system files.
7. You can now add your wxWidgets source files to the project by selecting Add to Project from the Project menu. Because you have provided Xcode with the necessary flags from wx-config, your wxWidgets programs will compile and link right from within Xcode.
Your Xcode project will also contain a file matching your project’s name, ending in .plist. This is an XML file that contains information about your application and is included in your application bundle. On Mac OS X, every application is actually an application bundle, a complete directory with a hierarchy of files that are part of the application. This allows Mac OS X programs to be easily copied and moved as a single icon from Finder while still giving developers a chance to include any needed auxiliary files. For example, interface translations can be a part of the application bundle, so the application can be shown in the user’s native language without downloading any additional files.
Xcode allows you to specify multiple targets and multiple build styles for each target. For example, Xcode automatically creates deployment and development build styles for each target. If you want to be able to create both debug and release versions of your application, you could place the wx-config flags specifying the different library configurations into the build styles rather than the target, giving you the flexibility of choosing to build a debug or a release simply by switching your build style.
Makefiles are available when building with almost any compiler and are largely standardized. Makefile syntax is beyond the scope of this book, but to get started quickly with makefiles, you can create a DialogBlocks project, add suitable configurations and some source files, and select Generate Makefile from the Build menu. Invoke the resulting makefile from the command line with CONFIG=<config> where <config> is one of the configurations listed when you invoke the makefile with the help target.
If you built wxWidgets with configure, your application makefile is likely to contain references to wx-config to supply the correct flags (see the later section “Using wx-config”). For example:
CC = gcc
minimal: minimal.o
$(CC) -o minimal minimal.o `wx-config —libs`
minimal.o: minimal.cpp mondrian.xpm
$(CC) `wx-config —cxxflags` -c minimal.cpp -o minimal.o
clean:
rm -f *.o minimal
Modifying makefiles by hand can quickly become tedious as your project grows. The next section describes how to use Bakefile to generate makefiles for all platforms.
Maintaining a large number of different project files and formats can quickly become overwhelming. To simplify the maintenance of these formats, Vaclav Slavik created Bakefile, an XML-based makefile wrapper that generates all the native project files for wxWidgets. So now, even though wxWidgets supports all these formats, wxWidgets developers need only update one file—the bakefile—and Bakefile handles the rest. Fortunately, Bakefile isn’t specific to wxWidgets in any way—you can use Bakefile for your own projects.
Note that this tutorial assumes that you are familiar with how to build software using one of the supported makefile systems, that you have some basic familiarity with how makefiles work, and that you are capable of setting environment variables on your platform. Also note that the terms “Unix” and “Unix-based” refer to all operating systems that share a Unix heritage, including FreeBSD, Linux, Mac OS X, and various other operating systems.
First, you’ll need to install Bakefile. You can always find the latest version for download at Bakefile’s web site: http://bakefile.sf.net.
It is also available on the CD-ROM included with this book. A binary installer is provided for Windows users, whereas users of Unix-based operating systems will need to unpack the tarball and run Packages for some distributions are also available; check the web site for details.
configure && make && make install
Before you can build wxWidgets software using Bakefile or any other build system, you need to make sure that wxWidgets is built and that wxWidgets projects can find the wxWidgets includes and library files. wxWidgets build instructions can be found by going to the docs subfolder, then looking for the subfolder that corresponds to your platform (such as msw, gtk, mac) and reading install.txt there. After you’ve done that, the following sections provide some extra steps you should take to make sure your Bakefile projects work with wxWidgets.
After you’ve built wxWidgets, you should create an environment variable named WXWIN and set it to the home folder of your wxWidgets source tree. (If you use the command line to build, you can also set or override WXWIN at build time by passing it in as an option to your makefile.)
In a standard install, you need not do anything as long as wx-config is on your PATH. wx-config is all you need; see “Using wx-config” later in this appendix.
Now that everything is set up, it’s time to take Bakefile for a test run. It is recommended that you use the wxWidgets sample bakefile to get started. It can be found in the build/bakefiles/wxpresets/sample directory in the wxWidgets source tree. Here is the minimal.bkl bakefile used in the sample:
<?xml version="1.0" ?>
<!— $Id: minimal.bkl,v 1.1 2005/01/27 22:47:37 VS Exp $ —>
<makefile>
<include file="presets/wx.bkl"/>
<exe id="minimal" template="wx">
<app-type>gui</app-type>
<debug-info>on</debug-info>
<runtime-libs>dynamic</runtime-libs>
<sources>minimal.cpp</sources>
<wx-lib>core</wx-lib>
<wx-lib>base</wx-lib>
</exe>
</makefile>
It’s a complete sample ready to be baked, so go into the directory mentioned previously and run the following command.
On Windows:
bakefile -f msvc -I.. minimal.bkl
On UNIX:
bakefile -f gnu -I.. minimal.bkl
It should generate a makefile (makefile.vc or GNUmakefile, respectively), which you can use to build the software. You can then build the software using the command nmake -f makefile.vc or make -f GNUmakefile respectively. Now let’s take a look at some of the basic Bakefile concepts that you’ll need to know to move on from here.
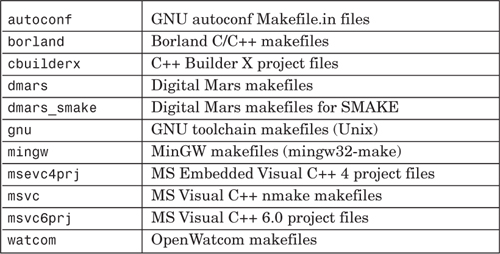
As mentioned earlier, Bakefile builds makefiles for many different development environments. The -f option accepts a list of formats that you would like to build, separated by commas. Valid values are shown in Table B-1.
You may notice that in the sample folder, there is also a file called configure.in. That file is the input for autoconf, which creates the configure scripts that you often see when you build software from source on Unix-based platforms. People use configure scripts because they make your Unix makefiles more portable by automatically detecting the right libraries and commands to use on the user’s operating system. This is necessary because there are many Unix-based operating systems and they are all slightly different.
Bakefile does not generate a configure or configure.in script, so if you want to use these scripts with your Unix-based software, you will need to learn how to use autoconf. Unfortunately, this topic deserves its own a book and is beyond the scope of this tutorial, but a free book on the subject can be found online at: http://sources.redhat.com/autobook/.
Note that you do not need to use automake when you are using Bakefile, just autoconf, as Bakefile essentially does the same thing as automake.
Every project needs to have a target or targets, specifying what is to be built. With Bakefile, you specify the target by creating a tag named with the target type. The possible names for targets are shown in Table B-2.

Note that the previous sample is an “exe” target. After you create the target, all the build settings, including flags and linker options, should be placed inside the target tag as they are in the minimal.bkl sample.
Obviously, you need to be able to add source and include files to your project. You add sources using the <sources> tag (as shown previously), and you add include directories using the <include> tag. You can add multiple <sources> and <include> tags to add multiple source files, or you can add multiple sources and includes into one tag by separating them with a space, like this:
<sources>minimal.cpp minimal2.cpp minimal3.cpp</sources>
If your sources are in a subfolder of your Bakefile, you use the slash character to denote directories, even on Windows. (For example, src/minimal.cpp.) For more options and flags, please consult the Bakefile documentation in the doc subfolder of Bakefile or on the Bakefile web site.
What if you want to offer a debug and a release build? Or separate Unicode and ANSI builds? You can do this in Bakefile by creating options. To create an option, use the <option> tag. A typical option has three important parts: a name, a default value, and a comma-separated list of values. For example, here is how to create a DEBUG option that builds debug by default:
<option name="DEBUG">
<default-value>1</default-value>
<values>0 1</values>
</option>
You can then test the value of this option and conditionally set build settings, flags, and so on. For more information on both options and conditional statements, please refer to the Bakefile documentation.
Most projects will reuse certain settings, or options, in their makefiles, such as DEBUG or static/dynamic library options. Also it is common to have to use settings from another project; for example, any project that uses wxWidgets will need to build using the same flags and options used to build wxWidgets. Bakefile makes these things easier by letting users create Bakefile templates, where you can store common settings.
Bakefile ships with a couple of templates, found in the presets subfolder of your Bakefile installation. The simple.bkl template adds a DEBUG option to makefiles so that you can build in release or debug mode. To add this template to your project, simply add the tag <include file="presets/simple.bkl"/> to the top of your bakefile. Then, when creating your target, add the template="simple" attribute to it. Now, when you have built the makefile, your users can write commands like
nmake -f makefile.vc DEBUG=1
or
make -f GNUmakefile DEBUG=1
in order to build the software in debug mode.
To simplify the building of wxWidgets-based projects, wxWidgets contains a set of bakefiles that automatically configure your build system to be compatible with wxWidgets. As you’ll notice in the previous sample, the sample project uses the wx template. After you’ve included the template, your software will now build with wxWidgets support.
Because the wxWidgets presets don’t exist in the Bakefile presets subfolder, Bakefile needs to know where to find these presets. The -I command adds the wxpresets folder to Bakefile’s search path.
If you regularly include Bakefile presets in places other than the Bakefile presets folder, then you can set the BAKEFILE_PATHS environment variable so that Bakefile can find these Bakefiles and include them in your project. This way you no longer need to specify the -I flag each time you build.
Lastly, it’s important to note that the Win32 wx project bakefiles come with some common build options that users can use when building the software. These options are shown in Table B-3.
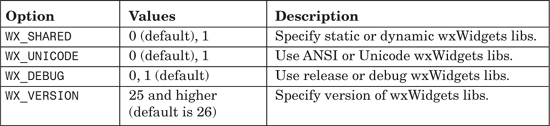
Note that these options are not needed under Unix because wx-config can be used to specify these options.
If you have a large project, you can imagine that the calls to Bakefile would get more and more complex and unwieldy. For this reason, a script called bakefile_gen was created, which reads in a .bkgen file that provides all the commands needed to build all the makefiles your project supports. A discussion of how to use bakefile_gen is beyond the scope of this tutorial, but it deserves a mention because it can be invaluable to large projects. Documentation on bakefile_gen can be found in the Bakefile distribution.
This concludes our basic tutorial of the cross-platform Bakefile build system management tool. From here, please be sure to take a good look at the Bakefile documentation to see what else it is capable of. Please post questions to the Bakefile mailing list, or if you have questions specific to the wxWidgets template Bakefile, send an email to the wxWidgets mailing list. See the Bakefile and wxWidgets web sites for information on how to subscribe to these lists.
Enjoy using Bakefile!
When you build wxWidgets using configure and make, wxWidgets creates a special script called wx-config, which produces the necessary compiler flags for compiling and linking wxWidgets programs, and manages returning the correct flags when you have multiple versions of the wxWidgets libraries installed in the same location (such as /usr/local). You can use wx-config from makefiles or run it by hand to see what flags you need to insert into your IDE settings. If you’re using Visual Studio, BC++, or MinGW without MSYS, you won’t use wx-config.
If you look in your wxWidgets build directory, you will see wx-config there, and also in /usr/local/bin if you ran make install.
The flags that produce the necessary compile and link settings are --cxxflags and --libs, respectively. For example, on Mac OS X, the output of each could be
$ wx-config --cxxflags
-I/usr/local/lib/wx/include/mac-unicode-release-static-2.6
-I/usr/local/include/wx-2.6 -D__WXMAC__ -D_FILE_OFFSET_BITS=64
-D_LARGE_FILES -DWX_PRECOMP -DNO_GCC_PRAGMA
$ wx-config --libs
-L/usr/local/lib -framework QuickTime -framework IOKit -framework Carbon
-framework Cocoa -framework System /usr/local/lib/libwx_macu_xrc-2.6.a
/usr/local/lib/libwx_macu_html-2.6.a /usr/local/lib/libwx_macu_adv-2.6.a
/usr/local/lib/libwx_macu_core-2.6.a
/usr/local/lib/libwx_base_carbonu_xml-2.6.a
/usr/local/lib/libwx_base_carbonu_net-2.6.a
/usr/local/lib/libwx_base_carbonu-2.6.a -framework WebKit -lexpat -lz
-lpthread -liconv -lwxregexu-2.6 -lwxtiff-2.6 -lwxjpeg-2.6-lwxpng-2.6
Without passing these flags to the compiler and linker when building your own applications, you are likely to receive hundreds of errors because the compiler won’t know anything about the wxWidgets classes that your program is using.
If you did not install the wxWidgets files into /usr/local, you will need to use wx-config “in-place,” meaning that it will produce absolute paths to that build’s files right from the build directory. This should be done by passing the ---inplace flag to wx-config with whatever flags you are requesting. Even if you did run make install, nothing prevents you from using the in-place flag with a particular build of wxWidgets. When running in-place, you do not need to pass any build configuration parameters because an in-place wx-config knows only about one build, the build from which you are running wx-config in-place.
When you have built and installed multiple configurations of wxWidgets, you can specify to wx-config which configuration’s build flags you would like returned. For example, if you are creating both debug and release builds of your project, you should be sure to get the correct flags for each configuration from wx-config, for example:
wx-config --debug=no
or
wx-config --debug=yes
Many options are available to choose specific build configurations. The most commonly used flags are
wx-config [--inplace] [--unicode[=yes|no]] [--debug[=yes|no]] [--
version[=VERSION]] [--release] [--static]
You can also retrieve a list of available configurations using wx-config –list.
A full list of flags is available by using wx-config --help.
Although wxWidgets defines a lot of symbols, there is only a handful that you are likely to need to use in your projects. Sometimes, it may be necessary to execute certain code only on certain platforms or under certain conditions, such as the following:
#ifdef __WXMAC__
// Do something Mac-only
#endif
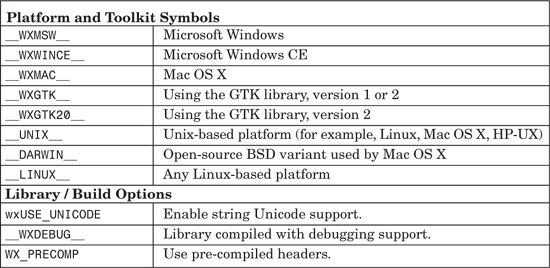
For your convenience, Table B-4 lists the common symbols and when they are defined. Additional symbols may be defined by the ports not covered in this book (such OS/2, Palm, and Cocoa).
The use of defined symbols ties in very closely to wxWidgets’ directory structure, as discussed in Appendix A. Consider for a moment that you can include a single file, regardless of the target platform, and yet wxWidgets always uses the correct platform information. Nearly all of the header files in include/wx have a block like the following (taken from combobox.h):
#if defined(__WXUNIVERSAL__)
#include "wx/univ/combobox.h"
#elif defined(__WXMSW__)
#include "wx/msw/combobox.h"
#elif defined(__WXMOTIF__)
#include "wx/motif/combobox.h"
#elif defined(__WXGTK__)
#include "wx/gtk/combobox.h"
#elif defined(__WXMAC__)
#include "wx/mac/combobox.h"
#elif defined(__WXCOCOA__)
#include "wx/cocoa/combobox.h"
#elif defined(__WXPM__)
#include "wx/os2/combobox.h"
#endif
By using the symbols defined for various platforms or toolkits, one common header file can include the correct platform-specific header without you needing to perform these tedious checks yourself. Simply include the correct header in include/wx, and wxWidgets does the rest. For example, you would only need to use one line to add the necessary headers to support combo boxes:
#include "wx/combobox.h"
However, it would still be very tedious to add the headers for all of the wxWidgets classes that you use in each source file. wxWidgets provides include/wx/wx.h, which itself includes many of the commonly used class headers. There is also include/wx/wxprec.h, which you need to include when using precompiled headers on supported platforms. For example:
// For compilers that support precompilation, includes "wx.h".
#include <wx/wxprec.h>
#ifndef WX_PRECOMP
// Include your minimal set of headers here, or wx.h
#include <wx/wx.h>
#endif
... now your other include files ...
If your code must work across different versions of wxWidgets, it’s useful to know about the macro wxCHECK_VERSION(major, minor, release). It succeeds if the version that the source is being compiled against is at least the version specified. For example:
#if wxCHECK_VERSION(2,5,5)
// Anything for wxWidgets 2.5.5 and above
#else
// Anything for wxWidgets 2.5.4 and below
#endif