Building the Architectural Prototype: Part 1
Part 1 of building the architectural prototype for our EJB solution covers the setup of the environment and the use of a visual modeling tool to facilitate the early aspects of code generation.
Baselining the Environment
Our environment in this evolution of the prototype will be BEA's WebLogic application server. Note that the BMP and CMP implementations will work on any commercial or open-source EJB container that complies with the EJB 2.0 specification. Toward that end, I will show little of anything that is unique to WebLogic. In the appendices I will review the console monitor that BEA provides, as well as a unique deployment descriptor.
As in the previous chapter, you should be able to install the EJB solution right from the download. It is packaged in a standard Enterprise Archive (EAR) file, thus complying with the EJB 2.0 specification. EAR files contain both Web Archive (WAR) files and Enterprise JavaBean Java Archive (JAR) files. The name of the file for Remulak is ejb20_remulak.ear.
Visual Modeling: Its Mission for the Project
Let me stand on my soapbox once again: Too many Java projects fail because the developers' desire to produce code far outweighs the importance of sound project planning and a precise understanding of the application's requirements.
To reemphasize what was stated earlier, if you have come this far in the book and have not seen the benefit of using a visual modeling tool, this chapter either will finally convince you or merely cement your already positive conclusion. Besides the obvious benefits of having a repository of artifacts and a consistent approach to creating them, the visual modeling tool really excels in getting the programming effort started. It also gets high marks for the ongoing evolution of the application by bringing code artifacts back into the model.
In this book we have used Rational Rose as the visual modeling tool. Note, however, that many excellent visual modeling tools on the market support Java code generation, in particular for the EJB environment. Another tool I like a lot—Together Control Center—is produced by TogetherSoft. But be forewarned: These products are quite expensive.
Note
This chapter will benefit you greatly even if you don't choose to use a visual modeling tool because I review all of the code in any case.
Like its many competitors in the marketplace, this generation of Computer-Aided Software Engineering (CASE) tools is a skeleton-generation product. Modeling tools are focused on analysis, design, or a combination of the two. Unfortunately, I have been the victim, in a previous life, of being “welded” to my modeling tool, always forced to take the code output it produced and forced again to get it to run in a production environment. These integrated CASE tools demanded that the user learn a new language that would eventually translate into code (e.g., COBOL, C, or C++)—usually not a pretty picture.
The current generation of skeleton-generation tools provides both the analysis and the design transition support, but only the code structure and framework are generated from the model. I really like this approach. It allows the project to apply the rigor of keeping true to the structure of the application design, while not dictating the solution for the how. For instance, it will put in place the class structures, operation signatures, and available message paths to calculate an order discount but not force me to tell it how to calculate the discount. My once negative opinion of integrated modeling tools has been swayed into the positive. In summary, you need a visual modeling tool that generates code in your language of choice.
Visual Modeling: Its Mission for Program Code Generation
Rational Rose generates code strictly from the information found in the class diagram, along with some physical attributes that we give the UML component that has been assigned to realize, or implement, the class.
There is a completed Rose model that you can use if you have a copy of Rational Rose. You can enter each class by hand, along with all of its support material (attributes, operations), or you can use my model as a start to generate your code. I highly recommend the latter.
Reviewing the Setup Issues
We need to revisit the class diagram for Remulak Productions and see how some of the components have been arranged. This review will facilitate how we work with the diagram, and it will help us better manage all aspects of the code generation. Figure 12-2 shows Remulak Productions' model, remulakjava.mdl.
Figure 12-2. Rose model organization

On the right-hand side of Figure 12-2 is the overall package diagram broken down by the increments, with a note attached describing the use-cases that are being realized. In the browser tree view on the left-hand side, there are now packages under each increment that weren't there before. These packages reflect the physical layering decided on in Chapters 10 and 11.
I reemphasize here that in practice you shouldn't worry about being totally accurate with your signature layouts. The model delivered with the book is complete. Just remember that in reality this knowledge will grow with the code. Actually, I find the best source for the signatures are the programmers themselves. Because we will reengineer our code back into the model, everything will eventually be in sync. For instance, when adding input parameters for operations, you can specify their data types. However, don't bother to add them to the class diagram because when we reverse-engineer the code, Rose will fill in that information for us. We want to get to the code as soon as we can.
Modifying the Code Generation Parameters
With Rose we will generate the code to implement our solution using container-managed persistence (CMP). Before we tell our tool to generate code, we need to tweak some of the Java code generation options that Rose provides. Figure 12-3 shows the Options dialog box for Remulak Productions' model.
Figure 12-3. Changing the code generation properties

To get to this screen, do the following:
1. |
Select Tools from the menu. |
2. |
Select Options from the drop-down list box. |
3. |
Select the Java tab. |
Note that the drop-down menu in Figure 12-3 for Type indicates several things (class, role, and so on). These are all the default options defined at these various levels. We first want to change an option for the type of attribute. To do this we change the PropertyType attribute from Not A Property to Simple. This action will result in get and set operations being defined for each of the class attributes. We'll do the same thing for the type of role, changing its PropertyType attribute as well.
While on the role type, we want to add an item value for ContainerClass. This attribute defines what type of container to use when dealing with one-to-many or many-to-many relationships between classes. Let's use java.util.ArrayList instead of Vector. Although Vector would work just fine, all the operations that it supports are synchronized and the synchronized keyword is not allowed in Enterprise JavaBeans. So for the type of role, your screen should look something like what you see in Figure 12-4.
Figure 12-4. Changing type properties for role

A Final Pass at Attributes and Operations
Before actually generating code for Remulak, we need to make a pass through our target classes and tie up any loose ends in the areas of attributes and operations. As mentioned in the previous section, the signature issues are not as great a concern as having good coverage of our attributes is. Figure 12-5 shows the Rose attribute dialog box. Here I'm setting the properties for the customerNumber attribute found in the Customer class. For the Type attribute I have selected java.lang.String from the drop-down list. Notice also that the Bean Property type has defaulted to Simple in accordance with the changes made in Figure 12-3.
Figure 12-5. Attribute definitions

Converting Classes to Enterprise JavaBeans
It's now time to move beyond our logical view of the class diagram and begin to transform it into more of a design view. Because we are implementing our beans in an EJB container, we need to take a class, such as Address, and convert it into an EJB-compliant class.
To do this, first we need to open the class diagram and select a class—say, Address. After selecting the class, we do the following:
1. |
Right-click on the class. |
2. |
Select Java / J2EE from the drop-down list box. |
3. |
Select EJB: Open Specification. |
What will appear next is the dialog box shown in Figure 12-6.
Figure 12-6. EJB dialog box in Rose

The dialog defaults to making the class an entity bean and container-managed. Notice that there is an option to make it a session bean as well. Our use-case control classes will be session beans, but we'll say more about that later. I also changed the default bean name. Rose takes the class name and adds EJB to the end. I changed the name to AddressBean.
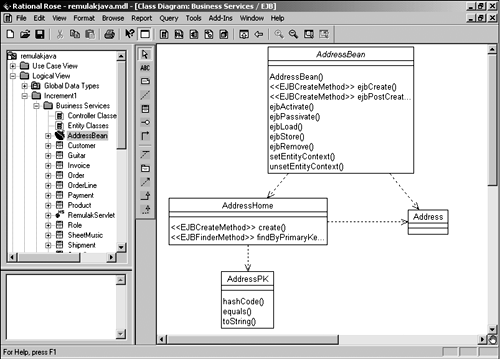
After you have selected OK, the class will be converted to an entity-type EJB. Three classes are created as a result of the Rose dialog. In the case of the Address class, these classes are AddressBean, Address, and AddressHome. An AddressPK class will be created as well, but it will be needed only if the class is identified, from the relational perspective, as having a compound primary key or if it is of a complex type, such as another object. Figure 12-7 is a view of the Address class after it has been converted to an EJB.
Figure 12-7. Address class after invocation of EJB configuration dialog

EJBs are completely lifecycle driven, meaning that most of the operations that are generated by the conversion wizard are operations that are called, on your behalf, by the EJB container. Our mission in this chapter is to be able to query on a Customer object and display Role and Address objects. As a result, we need to perform this same function on the Customer and Role classes. I won't cover those here, but they follow the same procedure as Address.
