
Lesson Files | FCP4 Book Files > Lessons > Lesson 9 Project file |
Media | None |
Time | This lesson takes approximately 60 minutes to complete. |
Goals | Capture source footage Log clips Adjust clip settings Choose capture settings Choose User Preference settings Set capture preferences |
Capturing video is the first step in preparing your footage for editing. When capturing, there are other options to consider, such as logging information for each clip and choosing a destination for the captured clips. There are different ways to approach logging and capturing video. You can capture with or without a lot of logging information. But the better you organize this information while logging, the easier it may be to find clips while editing. However, you can also quickly input without logging any additional information and add it later in the Browser.
To begin, you will launch Final Cut Pro and create a new project to use for capturing.
Launch Final Cut Pro by clicking on its icon in the Dock.
When launching Final Cut Pro, any project that was active when you last quit the program will also open.
Close any open projects.
Remember that when no sequences are open, the Canvas and Timeline windows close because there are no open sequences to display.
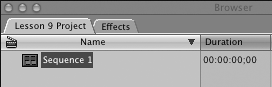
Choose File > New Project to create a new project.
An Untitled Project tab appears in the Browser window along with a default sequence, Sequence 1.
To rename and save this project, choose File > Save Project As, and type Lesson 9 Project as the new name. Navigate to the Lessons folder on your hard drive and click Save to save the project there.
Capturing obviously requires additional hardware, referred to as a capture device, which can be either a digital camera or tape deck. Final Cut Pro can capture and control an NTSC or PAL FireWire device, such as a DVCam or DVCPRO VTR deck, using just a FireWire cable. You can also capture other video formats using a third-party capture card or analog-to-digital converter with FireWire output.
The first step in capturing your source material is to connect your tape playback source, also called a capture device, to the computer through a FireWire cable. The FireWire cable usually has a different connector on each end of the cable. One end is smaller and goes into the camera or deck. The larger connector goes into your computer's FireWire port. If your deck or camera has a large FireWire port, you will need a FireWire cable with a large connector on each end.
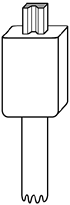
To DV source

To computer
You can also connect your camera or deck to a separate video monitor or television set, or through a VCR, just as you would if you were screening a tape. However, this is not necessary because you can simply use the preview image area within the Final Cut Pro Capture function.
Once the video source is connected, you can control the camera or tape deck using controls in the Final Cut Pro interface. As you screen the material, you can mark the areas you want to capture. Marking source material for capture is very similar to marking clips for editing.
All capturing is done in the Log and Capture window in Final Cut Pro. The Log and Capture window has two main areas: the Preview area on the left, where you screen and mark your source tape, and the Logging area on the right, where you log information about your clips and make selections about where and how you will capture footage.
Choose File > Log and Capture, or press Cmd-8.

TIP
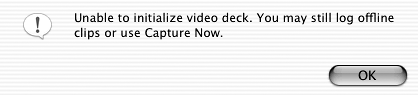
If you see the following message window, double-check that you have properly connected your source to your computer's FireWire port and turned it on.
The Preview area of the Log and Capture window defaults in size to the size of the Canvas window. To change the size of the Log and Capture window, you must first change the size of the Canvas window, or the Viewer and Canvas windows together. This must be done while the Log and Capture window is closed.
Close the Log and Capture window by clicking the red Close button on the upper left of the window.
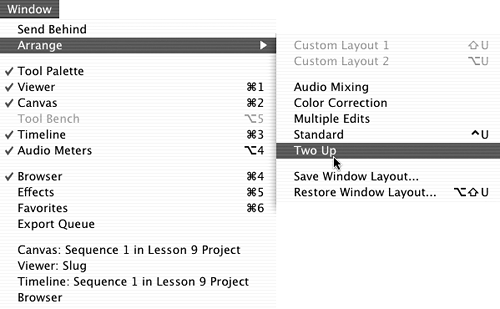
To make the Log and Capture window larger, first choose Window > Arrange > Two Up to enlarge the size of the Viewer and Canvas together.
Choose File > Log and Capture to reopen the window again.
A much larger Log and Capture window is displayed.
Playing and marking In and Out points in your source material is done in the Preview area of the Log and Capture window. If the capture device is connected through FireWire or a third-party capture card with a device control cable, you will have direct control of the device, meaning you can play and control it from within the Final Cut Pro interface. If not, you will have to control the device manually.
To get started viewing the source material, put a source tape into your camera or deck.
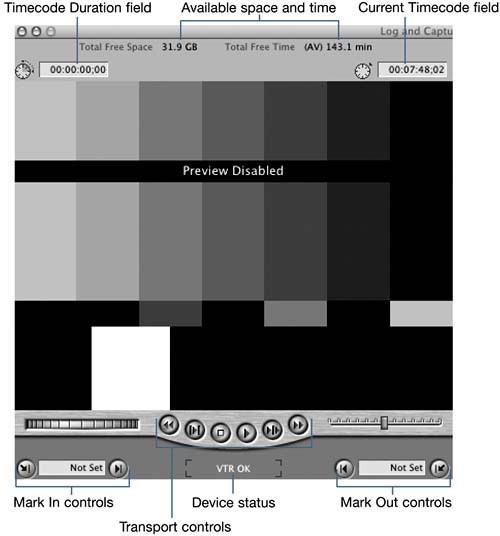
The Preview area is similar in layout to the Viewer window. It has Timecode Duration and Current Timecode fields above the image area, a set of Transport controls below the image area, plus Shuttle and Jog controls. The Mark buttons and fields are in the lower left and lower right of the Preview area. In between the Mark controls is a Device status that indicates whether you have control over the capture device. In addition, the total amount of free hard drive space and time appears in the upper-middle area of the screen.
Click the Play button in the Preview area to play the tape.
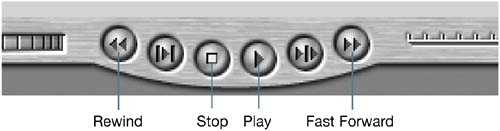
Click the Stop button to pause the tape.
Click the Stop button again to stop the tape.
When a tape in a camera or deck is stopped, the tape unwraps from the video heads. But the image in the Preview window displays a freeze of the most recent frame played.
Press the spacebar to play the tape, and the Play button lights up.
Press the spacebar again to pause the tape, and the Stop button lights up.
Click the Rewind or Fast Forward buttons to move quickly backward or forward.
Rewind your source tape to the beginning to prepare for the capture process.
Marking a tape source is similar to marking a clip in the Viewer. In fact, you use the same Mark buttons or shortcut keys (I and O). The primary difference is that when you mark a clip in the Viewer, you make tight marks around the action you want to edit into the sequence. When you capture a clip, you mark a few seconds before the action and a few seconds after the action. This adds the additional pad, or handles, to the clip that you can use when adjusting edits in the Timeline.
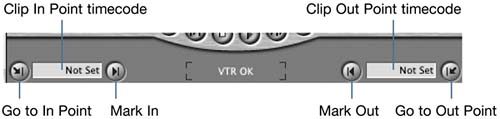
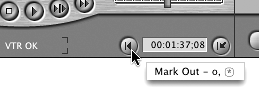
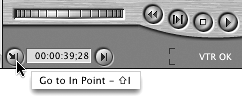
In the Preview Mark area are Mark In and Mark Out buttons, Go to In Point and Go to Out Point buttons, and timecode fields for the In and Out points.
Play the tape to the section you want to capture.
Press the spacebar or click the Play button to pause the tape at this point.
Click the Mark In button or press the I key to set an In point.
The timecode for your mark appears in the Clip In Point timecode field. Unlike the Viewer marks, this mark will not appear in the image area, and there is no scrubber bar to scrub to the marks.
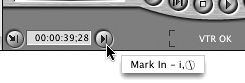
To adjust this mark and create a 2-second clip handle, click in the Clip In Point timecode field, type –2. (minus two followed by a period), and press Return.
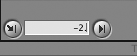
Typing –2. sets a new Mark In 2 seconds earlier than the previous mark, giving you a 2-second pad, or handle, before the desired action begins.
Press the spacebar or click the Play button to move forward to where this portion of the action ends.
Click the Mark Out button at this point, or press the O key, to set the Out point.
To create extra pad after the Out point, type +2. (plus two followed by a period) in the Clip Out Point timecode field and then press Return to add a 2-second handle to the Out point of this clip.
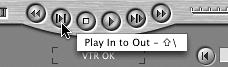
Once you have marked a section of the source tape, you can view the material between those marks to preview what you will be capturing. To do this, you use the same play buttons as you do in the Viewer. The Play In to Out button plays the marked selection from In to Out. Or you can jump to the mark points using the Go to In Point or Go to Out Point buttons.
Click the Play In to Out button in the Preview area.
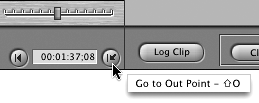
Click the Go to In button next to the Clip In Point timecode field.
Click the Go to Out button next to the Clip Out Point timecode field.
Click the Play Around Current Frame button.
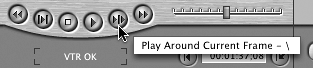
As in the Viewer, the Play Around Current Frame command will play material a little before and after the playhead's current location. In this case, it will play around the Out point.
Now that you have marked a source clip, you are ready to log information about that clip. The more information you log at the capture stage, the more you will have in the Browser columns for reference later as you edit. When you work with many clips on a complex project, you will appreciate the extra time you spent logging. But as you learned in the previous lesson, you can also add logging information after you have already captured the clip.
Look at the Logging area and see if you recognize any of the logging information topics you saw as Browser columns in the previous lesson.
When you capture a clip, the actual media will be saved to your hard drive, but the clip icon linking you to that media will be saved to the current project in the Browser. Now you can choose how you will organize the new clips. Your first option is to send the clips to a new bin as you capture. Or, you can capture the clips into the project tab area and organize them into appropriate bins later.
In either case, Final Cut Pro needs to know where to place the clip icons. This destination is called the log bin. You can have only one log bin active at any given time, no matter how many projects you have open. If you want to move quickly, you can capture all your clips into your project in the Browser and organize them later. If you want to organize as you capture, you can create bins for each category and assign them as log bins (for example, a separate bin for each tape captured).
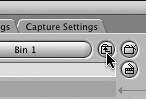
Position the Browser so you can see both the Capture and Browser windows at the same time while doing these steps.
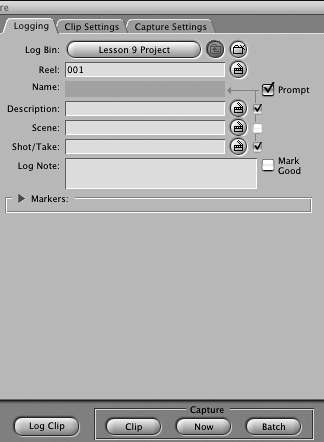
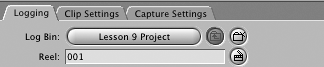
In the Logging tab of the Log and Capture window, the project name, Lesson 9 Project, appears on the long, oval Log Bin button.
A slate icon appears in the Browser window at the far left of the Name column heading, which indicates that this project is the current logging bin.
At this point, you can capture all your clips into your project and organize the clips into bins after you've captured them. However, if you want to explore the other option of capturing to new bins, continue with the following steps.
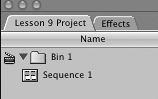
Click the New Bin button to the far right of the Log Bin button.

When you click this button, a new bin is created in the current project with the default name, Bin 1. The Logging Bin slate icon now appears next to this bin in the Browser to identify it as the target location for your new clips.
In the Logging tab, click the large Log Bin button with the new bin name on it.
The new bin opens as a separate window, which allows you to view just the new clips you are capturing without mixing them up with other clips already in your project.
Close this window by clicking the red Close button in the upper-left corner.
In the Logging tab next to the Log Bin button, click on the Up bin button.
This takes the Log Bin destination up to a higher level, in this case back to the project level.
In the Browser, rename the bin Test Capture.
The slate icon is now attached to the project, not to the Test Capture bin. However, you can assign the slate to the new bin.
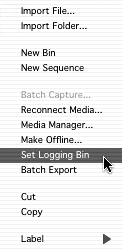
To assign the Test Capture bin as the log bin, select it in the Browser and choose File > Set Logging Bin.
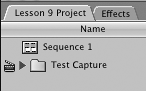
The slate icon now appears to the left of the Test Capture bin.
NOTE
You can also Ctrl-click the bin in the Browser and select Set Logging Bin from the contextual menu.
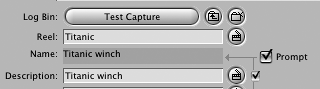
Certain information is required before you can capture a clip. For example, you must enter a reel number and a clip name, or Final Cut Pro will not capture the clip. You can use a simple numbering system for reel numbers, or you can enter a reel name. The clip name is derived from any or all of the entry fields: Description, Scene, and Shot/Take.
Enter an appropriate reel number or name for your source tape, or just leave the default 001 reel number.
Try to click in the Name field.
The Name field is not for entering information, just displaying it. The name is actually compiled from any combination of the three descriptive fields below it.
Enter a description of the clip in the Description field, such as Titanic winch.
TIP
When naming clips, think of descriptive names that will help you distinguish between that clip and another while you are editing.
To the right of the Description field is a check box next to a slate button. Make sure the box is checked. When it's checked, the information in the Description field will automatically update the Name field.
Press Tab or Return.
The Description information now becomes part of the name.
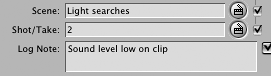
Enter Scene information, such as Light searches.
Click the check boxes next to each line on and off to see how the name changes in the Name area.
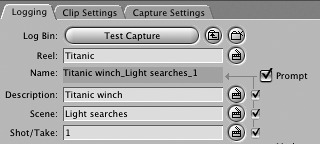
Any one, or all three, of the descriptive entries can feed into the full clip name.
Next to the Shot/Take entry, click the slate button, also called a clapboard.
Every time you click on any of the slates, the next consecutive number is added to the descriptive entry. This is true even if no number was originally entered. To change to another number, click the number to highlight it and type in the new number.
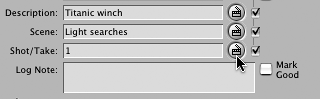
Click the Prompt check box on and off. Leave the box selected.
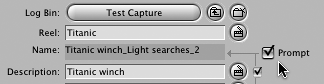
With the Prompt box selected, Final Cut Pro will display the information you've entered before logging the clip so you can check it, change it, or add to it before you complete the logging process.
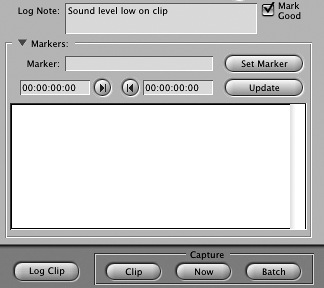
Enter a note about the clip, such as Sound level low on clip and click the Mark Good box.
The log note will appear in the Log Note Browser column, and a check will appear in the Good column for this clip. The Good check can help you quickly identify what you decided was a valuable clip.
In Lesson 7, you used markers to create subclips of a longer clip. You can also add markers as part of the logging process, which can be a helpful way to begin marking a longer clip in preparation for making subclips during editing. For example, if you have multiple takes of a scene, adding markers during the logging process will allow you to find these scenes more quickly. But you can always add markers later while you are organizing your bins or editing.
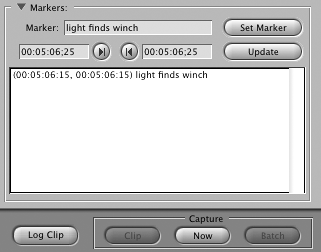
Click the triangle next to Markers on the Logging tab to expand the marker information pane.
With an In point selected on your source tape, play the tape from the In point and click the Set Marker In button wherever you want to place a marker on the clip you are capturing.
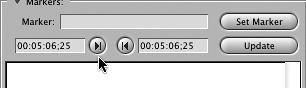
Enter a name for the marker in the Marker field.
Click Set Marker. The marker information will display in the field below.
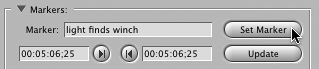
The timecode designating the marker location appears in the information fields. You are clear to add a new marker in the clip.
In the Logging portion of the Log and Capture window are three tabs. Each of these represents a step in preparing the path to capturing. You have been working in the Logging tab to enter information about a clip. In the other two tabs, you select the type of device from which you will be capturing, the destination of the media clips once you capture them, and the settings for the clip itself.

In the Clip Settings tab, you make selections about how you want to capture a clip and how you want it to look. Do you want to capture just the video, just the audio, or both? How do you want to capture the audio—as mono tracks, as separate channels, or as a stereo pair?
If you are capturing DV footage, the material is already in digital form, so no enhancements can be made during the capture process. Later, however, you can make color changes to a clip by applying a filter to it. You will do this in Lesson 15. If you are working with a capture card to capture material from other formats, such as Digibeta, Beta SP, or even High Definition, you can control other aspects of a clip, such as luminance and hue, and so on.
Click the Clip Settings tab in the Log and Capture window.
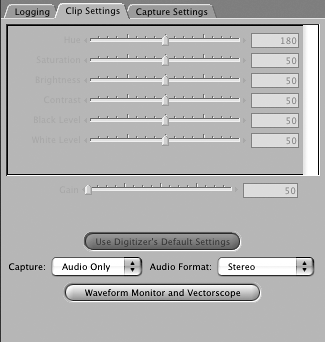
Click the Capture pop-up menu and select Aud+Vid, for audio plus video.
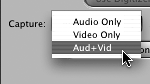
This will capture both the audio and video from your source tape. To capture just one or the other, choose the appropriate option.
Click the Audio Format pop-up menu and choose Stereo.
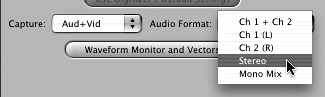
Because DV audio is digitally recorded, the selections you make when you capture it are about how you want Final Cut Pro to handle the audio while editing. Selecting Stereo here will allow you to treat both audio tracks as one clip in the Timeline. They will also appear on just one Audio tab in the Viewer. This can be helpful in editing because however you adjust one track, the other track in the stereo pair will automatically be adjusted the same way. If you want to control the two audio tracks individually, choose Ch 1 + Ch 2. If you want just the audio from one channel or the other, choose that channel.
For example, if you used the DV camera mic for recording audio, choose Stereo. If you used separate mic inputs for Channel 1 and Channel 2 on the camera, choose Ch 1 + Ch 2, which would give you control over the individual tracks.
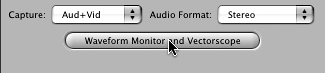
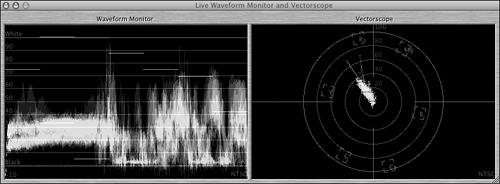
If there are color bars at the head of your source tape, click the Waveform Monitor and Vectorscope button to view them.
A Live Waveform Monitor and Vectorscope window appears where you can look at your incoming source levels. The waveform monitor on the left measures the brightness (luminance and black levels) of your incoming video; the vectorscope measures the color (saturation and hue). Working with these scopes is covered in depth in Apple Pro Training Series: Advanced Editing and Finishing Techniques in Final Cut Pro 4.
Before you capture a clip, you have to choose how you will control the playback device, how you will capture the footage, and where you will place it on your hard drive or FireWire drive. There are several preset options, but if you are using a capture card, other options will also be available. The selections in the Capture Settings tab can also be selected in the Audio/Video Settings windows.
Click the Capture Settings tab in the Log and Capture window.
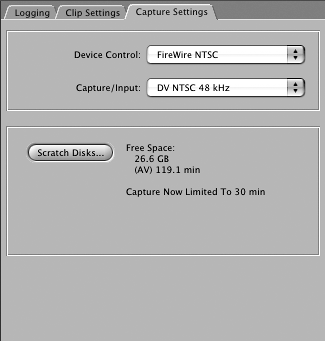
Click the Device Control pop-up menu and select FireWire NTSC, FireWire PAL, or another appropriate option.
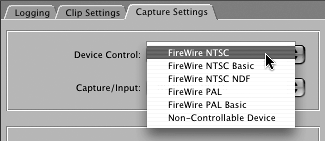
If you are capturing from a device that cannot be controlled through FireWire, select the appropriate preset, or select Non-Controllable Device.
Click the Capture/Input pop-up menu.
This is where you select how you will capture your source footage. You can capture at a full-resolution quality in either NTSC or PAL, or you can capture at a lower quality OfflineRT resolution.
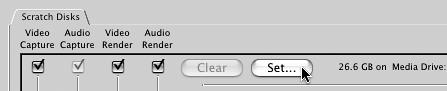
To select the destination for your captured media, click the Scratch Disks button.
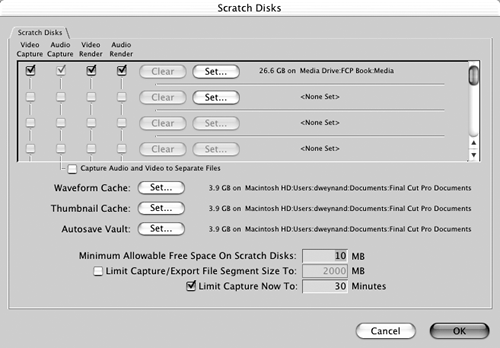
A window opens where you can set the path to the targeted scratch disk, or drive, to which you will be saving your media files. The current scratch disk is listed along with the amount of current available free space on that drive. You can choose a different scratch disk for audio and video, and for render files, which you will create in a later lesson. For now, capture them all to one destination.
To change the currently selected scratch disk, click Set.
A file browser appears, where you can select a different scratch disk than is currently set.
Navigate to where you want to save your captured files and click Choose, then click OK in the Scratch Disks window.
Choose Final Cut Pro > System Settings, or press Shift-Q.
The first tab of this window is the same Scratch Disk window that appears if you click the Scratch Disks button in the Capture Settings tab. You can set the scratch disk in either location. If the desired scratch disk is set in the System Settings window, and you are not changing it, you do not have to select it in the Capture Settings tab.
Choose Final Cut Pro > Audio/Video Settings, or press Cmd-Option-Q, and click the Device Control tab.
This is another place where you can select the device control. If it is correctly selected here, the same setting will appear in the Device Control area of the Capture Settings tab.
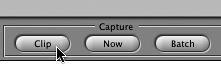
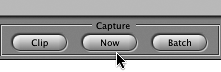
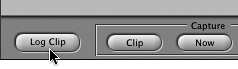
The lower portion of the Logging tab area has three capture buttons Clip, Now, and Batch—and a Log Clip button. These buttons appear regardless of which tab is selected in the Log and Capture window. Each of the capture options converts footage from your tape source into computer media files. The Log Clip button builds a list to be captured later using Batch Capture. Although each capture option creates media clips, they each go about the process differently.

If you have marked In and Out points on your source footage, you have identified a specific clip. The Capture Clip option will capture just the marked portion of your source material.
Mark a new clip from your source footage, or use the clip you marked in previous exercise steps.
Enter or amend the logging information.
Click the Clip button in the Capture box in the lower part of the Logging area.
If the Prompt check box in the Name area was checked, the Log Clip dialog appears. It shows the new clip's name, the Log Note entry, and the Mark Good check box.
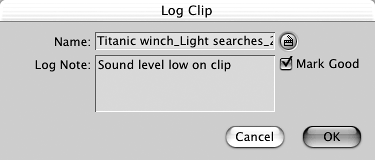
If necessary, make changes to the clip log information, then click OK.
When capturing begins, a window appears that displays the material you are capturing. Don't worry if the image seems jagged at this point. The display during capturing does not always reflect the quality of the captured image.
To stop the capture process at any time, press the Esc (Escape) key.
A second way to capture is to use the Capture Now option. This option is helpful when you want to capture unmarked portions of your source tape as one long clip. You can play the tape and capture as you view it. It's also helpful if you do not have FireWire control over a source device, such as a non-digital camera, that must be played through a digital converter box.
Enter the next clip name and reel number in the Logging fields.
Cue the source tape about 10 seconds before the action begins in the footage you would like to capture.
Play the tape from that point.
This is a less exact method than the Capture Clip option, so make sure you give yourself adequate pad before and after the action you want to capture.
Press the Esc (Escape) key when you want to stop capturing.
To limit the amount of time you can capture in one stretch, click the Capture Settings tab and then the Scratch Disks button.
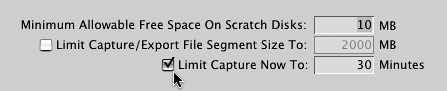
The default for Limit Capture Now is 30 minutes. To change this to a lesser or greater amount of time, just enter the amount and click OK.
Another helpful option when using the Capture Now approach is DV Start/Stop Detect. This function allows you to create subclips at whatever point the recording stopped and started—you can capture a long clip and then make subclips of it after capturing.
To apply DV Start/Stop Detect, follow these steps:
Capture the clip and open it in the Viewer.
Choose Mark > DV Start/Stop Detect.
Markers will appear on the clip wherever the original tape was stopped and started during recording.
In the Browser, select a marker and choose Modify > Make Subclip.
A new subclip is created from the location of this marker to the next marker.
Batch Capture and Log Clip are used together to streamline the process of marking and capturing footage. Rather than mark one clip and capture it, then mark another and capture it, you can play the source tape and mark and log clip after clip, then capture all the logged clips at one time.
The first step is to log each individual clip, complete with reel names and descriptive notes. These clips are placed in the log bin just as any other clip would be, except they have a red diagonal line over them to indicate that they are offline media. This means that the clip information is there, but not the media content, because the media has not yet been captured. When you have completed logging all the clips you want to capture, you can then capture them all at once using Batch Capture. Using all of your logged information, Batch Capture seeks out each clip and creates the respective QuickTime media file necessary for editing.
Mark a new section of footage and enter the information in the Logging window as you did before, but do not click a Capture button.
If the Prompt box was checked in the logging area, the Log Clip window will open, reminding you of your logging information. Click OK. A new clip appears in the Browser with a red line through it.
Mark another portion of footage and enter that information in the Logging window.
Click the Log Clip button again.
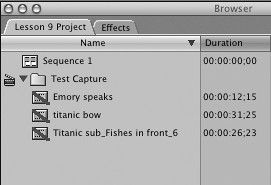
Continuing this process will create a cumulative list of each clip you log. Each entry will appear in the Browser with a red line through it, indicating that the QuickTime file for that clip has not yet been captured.
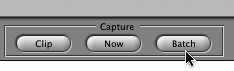
Before using Batch Capture, select the clips that you logged in the Browser. After the clips are selected, you can click the Batch button in the Log and Capture window.
Click and drag a marquee around the clip icons with the red lines through them.
Click the Batch button in the Log and Capture window.
A Batch Capture settings window opens. This is where you choose which logged clips you want to capture and how.
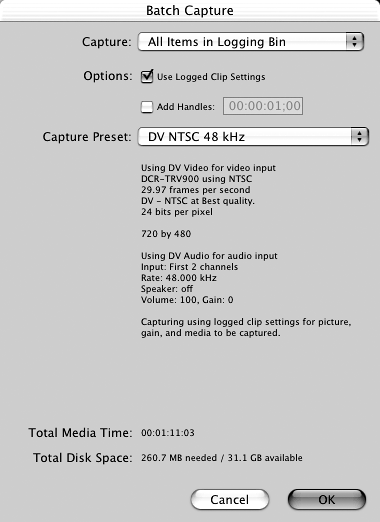
There are four options in the Batch Capture settings window:
Capture—. Click the pop-up menu to select which clips you want to capture (All Selected Items or All Items in Logging Bin).
Options: Use Logged Clip Settings—. Click this box to capture the clips with all the settings that were present when you originally logged the clip.
Options: Add Handles—. Click this box to add additional handles to the current logged clip.
NOTE
If you added additional handle material when you first marked the clip, you would not add extra handles here. If you prefer to mark your clip action tight and then log the clip, you can use this option to automatically add extra handles (maybe two seconds) of material on the head and tail of the clip.
Capture Preset—. From this pop-up menu select a different capture preset if you decide to change the settings for all of the logged clips you are capturing.
Beneath the Capture Preset option are calculations based on the capture settings you select.
Make the appropriate selections and click OK.
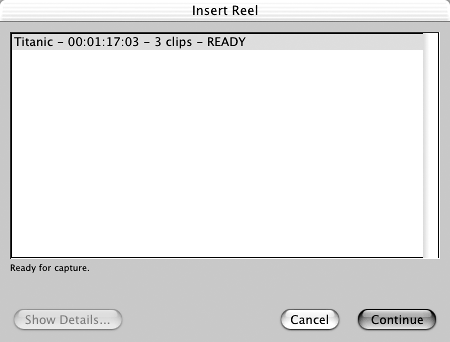
The Insert Reel dialog appears, saying you are ready to capture.
Click Continue.
The tape cues and captures each highlighted clip in the Browser. When all clips on that reel have been captured, an Insert Reel window opens again.
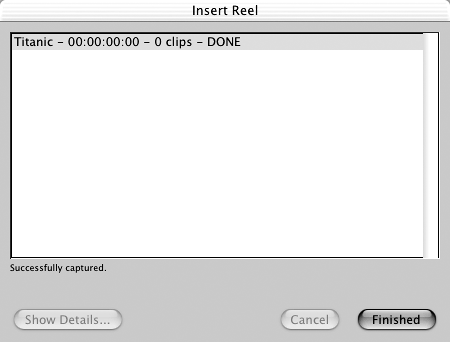
If all of the clips have been captured, click Finished.
NOTE
If your list contains footage from another reel or tape, Final Cut will prompt you to change reels or tapes and continue.
When Batch Capture is completed, each of the clip icons in the Browser will have footage connected to it, and the red lines will be gone.
NOTE
Batch Capture has other powerful applications, such as recapturing an entire edited sequence. This is covered in Lesson 21.
Certain user preferences will affect how you capture your video. Some of these preferences help you troubleshoot or work around difficult video. Others smooth the capturing process.
The User Preferences window contains options that relate to capturing. You don't have to change these options unless you run into difficulty capturing your source material. Review the options so you will know what each of the capture settings does.
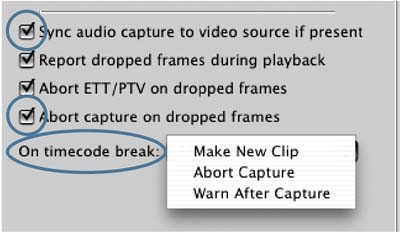
Sync audio capture to video source if present—. This option ensures sync for audio captured from a genlocked audio deck.
Abort capture on dropped frames—. If Final Cut Pro notices any frames of video being dropped or left out while capturing your source material, it will stop the capture process and report the dropped frames.
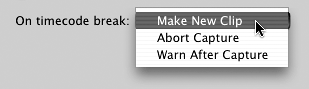
On timecode break—. If there is a break in the source-tape timecode, you have the option to make Final Cut Pro do one of three things: start a new clip at the timecode break, abort the capture process, or warn you that there was a timecode break after capturing is over.
If during the capturing process Final Cut detects a problem with any of the selected capture preferences, it will stop capturing and report what is wrong in an onscreen message.
How to connect a playback device to your computer
How to mark and log your source material
How to capture source material
How to choose the correct capture preference settings
How to capture your video to a separate hard drive