
Lesson Files | FCP4 Book Files > Lessons > Lesson 13 Project |
Media | Titanic folder, New Year's Eve folder |
Time | This lesson takes approximately 60 minutes to complete. |
Goals | Add additional audio tracks in the Timeline |
Adjust audio levels | |
Work with Keyframes in the Timeline | |
Mixing audio in the Timeline | |
Using the Audio Mixing tool | |
Record a voice-over |
Combining music and sound effects with an existing track can add richness to the entire sequence. In Final Cut Pro, you can work with up to 99 tracks of audio in one sequence. There are Timeline audio controls to help create and manage multiple tracks of audio, as well as a separate Audio Mixer tool you can use to mix the audio tracks as you play through the sequence. In addition, you can manipulate the volume level of a clip and create a fade up or down directly on the clip in the Timeline.
To get started in Lesson 13, you will open the project for this lesson.
Choose File > Open, or press Cmd-O. Choose the Lesson 13 Project file from the Lessons folder on your hard drive.
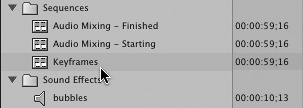
Play the Audio Mixing - Finished sequence to see and hear what you will create in this lesson.
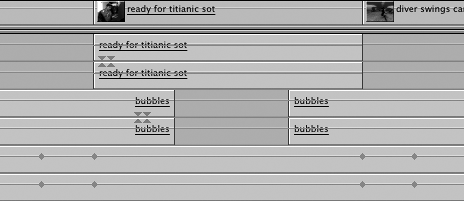
This sequence has several tracks of audio that have been mixed together to create a balance between the tracks. In the sound level overlays, you see that some of the tracks have different levels within the same clip. In this lesson, you will create your own mixed version of these tracks.
NOTE
Above each sot clip, a green render bar appears, indicating that an effect has been applied. In this case, it is a color correction filter to improve the original clip color. You will learn to color correct images in Lesson 15.
Play the Audio Mixing - Starting sequence to hear the audio before we add the sound effects and music tracks to the mix.
How you organize your audio tracks will depend on the type of project you are editing. For example, if you are editing a music video, the mixed music track would most likely be on tracks A1 and A2. But if you're editing a narrative piece, such as a documentary or news story where dialogue is important, you might organize your audio clips by building downward starting with the dialogue. Generally, dialogue clips are on tracks A1 and A2 because they are attached to the video clips on the V1 track. The stereo music tracks might go on the lowest available tracks because they are often added last to the final sequence. Sound effects clips can be grouped together on middle tracks. The important thing is to make sure you have a plan.
You will use this same strategy to build your own audio mix in the next exercise.
Prior to mixing all the sounds in your project, you must first add tracks to the Timeline to hold the audio clips you will edit and mix. There are several ways to do this. In this exercise, you will add sound effects and music to the existing dialogue tracks.
Click the Audio Mixing - Starting tab in the Timeline window.
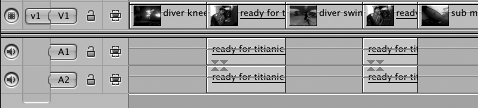
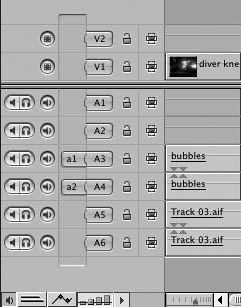
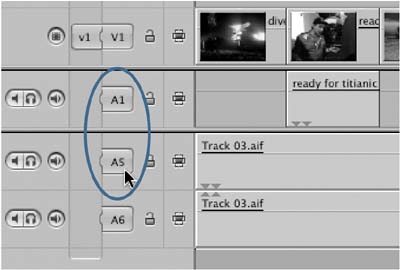
Currently, this sequence has only two tracks of dialogue audio.
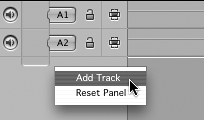
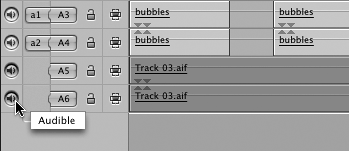
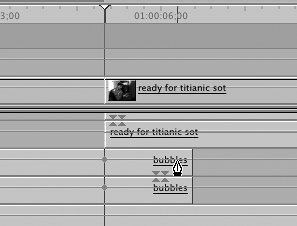
Ctrl-click the gray space below the A2 track, and select Add Track from the contextual menu to create the A3 track. Repeat this step one more time to create the A4 track.
In the Browser, click the disclosure triangle of the Sound Effects bin and open the bubbles clip into the Viewer. To allow for clip handles, set an In point near the middle of the clip.
Unlike the bubbles mono clip you worked with in a previous lesson, this clip is a stereo pair.
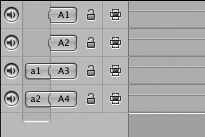
Make sure the a1 and a2 Source controls are patched to the A3 and A4 destination tracks.
Place the playhead over the first clip in the Timeline and mark the clip by pressing X (or by clicking the Mark Clip button in the Canvas).
This will set an In and Out point in the Timeline for the sound effect clip.
Click the red Overwrite button at the bottom of the Canvas window to perform the edit.
Another way to add new audio tracks is to drag a clip into the space where you want to create new tracks. When you do this, Final Cut Pro will automatically create the new tracks.
Click the triangle to display the contents of the Music bin in your Browser.
Drag the Track 03.aif audio clip from the Browser directly to the Timeline in the space below track A4, drag to the head of the sequence, and release the clip as an Overwrite edit. Click in the Timeline and press Shift-Z to see the sequence in full view.
A5 and A6 Destination controls now appear in the Track Control area.
TIP
If you want to add a group of tracks to the Timeline at one time, you can choose Sequence > Insert Tracks. In the Insert Tracks window, you can specify whether you want to add audio or video tracks, how many, and where they will be inserted.
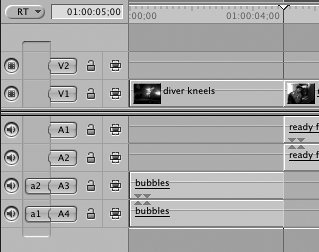
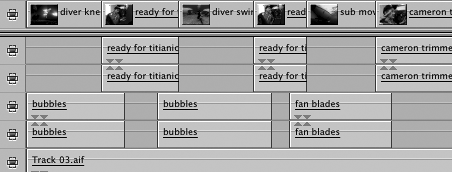
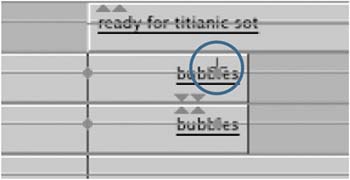
Continue editing sound effect clips to the A3 and A4 tracks under the cutaway shots in the sequence.
Park the playhead over the third clip in the Timeline, diver swings cam, and press X to mark In and Out points. Make another Overwrite edit of the bubbles clip at this location.
As you did with the bubbles clip, mark an In point midway in the fan blades clip. Edit the fan blades clip to the Timeline under the sub moves fast clip.
Park the playhead over the lights go on clip in the Timeline just at the moment when the middle light turns on, and edit the camera flash sound effect here.
Park the playhead at the head of the titanic bow clip and edit the entire waterphone sound effect clip at this location.
When you finish adding sound effects, the audio tracks should look like a checkerboard pattern with effects under clips that do not have dialogue.
As you prepare to mix your tracks, you will need to focus on just one or two tracks at a time, to check audio levels or the placement of the clips on those tracks. There are a few ways you can zero in on or isolate an individual track or tracks. You can click the Audible button, which turns sound off or on for an entire audio track. But there are other controls that are useful when working with multiple tracks of audio. These are the Solo and Mute controls. These additional controls can be hidden from view in the Timeline track control area until you are ready to use them, which is often during the audio mixing process.
Click the Audible buttons for the A5 and A6 tracks and play the sequence. Then click them again to make the tracks audible once again.
Click the Audio controls control in the lower-left corner of the Timeline.
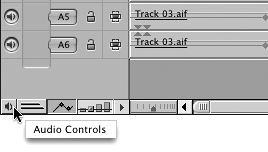
This will expand the Audio controls area of your Timeline window to reveal the Mute and Solo buttons.
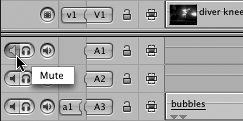
To listen to the sequence without the music, click the A5 and A6 Mute buttons. Play the sequence.
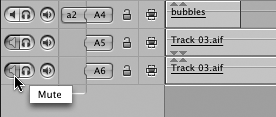
When selected, the Mute buttons turn yellow, but there is no visible change to the tracks as there is when you click the Audible button for a track.
Click the A5 and A6 Mute buttons again to hear the sound for those tracks.
NOTE
When muting audio tracks that are a stereo pair, you need to mute both tracks of the pair. If you mute only one track, you will still hear the sound from the second track in the pair. In this exercise, the dialogue tracks, sound effects tracks, and music tracks are all stereo pairs.
Sometimes, rather than muting a track, you may choose to isolate a track and listen to it solo. For example, you may want to focus on the volume level of the music track to hear how it sounds by itself with the video track. The Solo button will allow you to isolate one or more tracks while simultaneously muting all of the other tracks. Like the Mute button, the Solo button can be toggled off or on even while the sequence is playing.
Click the A5 and A6 Solo buttons.
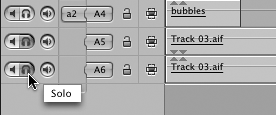
The headphone icons in the Solo buttons turn red while the Mute buttons for all the other tracks turn yellow.
Keep tracks A5 and A6 Solo, and play the sequence again. While the track is playing, click the yellow Mute button for track A1.
The speaker part of the Mute button will turn yellow, but the sound remains mute. This is because the Solo button overrides the Mute button if you try to use them at the same time.
Click the A1 Mute to restore the speaker to black. Then click the Solo buttons for tracks A1 and A2.
You will be able to hear Tracks A1 and A2 along with tracks A5 and A6. For the same result, you could turn off the Solo buttons and mute tracks A3 and A4.
Restore all the tracks to normal.
Now that you have several tracks in your sequence, you can use the Solo and Mute controls to help you focus on individual tracks. For example, when you solo the sound effects clips and play the sequence, you will hear that they cut off abruptly when the shots change. To remedy this, you will extend the In point earlier and the Out point later for each sound effect clip. Extending these clips will give you room to fade the audio in and out in a later exercise. You can also drag these clips in the Timeline to reposition them if you don't have enough handles at the head or tail of the clip.
Click the Solo buttons for the A3 and A4 tracks and play the sequence.
The sound effects cut off abruptly when the shots change.
Drag the In and Out points of the bubbles and fan blades clips to make them overlap the dialog clips. You can do this two ways:
Drag the edit points with the default Selection tool.
Extend the edit point by placing the playhead at the desired location, selecting the edit point, and pressing E.
NOTE
Since you edited the entire duration of the waterphone clip into the Timeline, it has no handles, and its edit points cannot be extended.
As you work with multiple audio and video tracks, you may occasionally want to have just one or two tracks in constant view. Maybe it's the narration track you're using as a reference for multiple video tracks or a music track that has markers referencing music beats. No matter how many tracks you work with, you can choose to make one track static to keep it in constant view.
Look at the right edge of the Timeline, and if no blue scroll bar appears, click the third or fourth Track Height column to make the tracks taller.
Drag the audio tracks scroll bar up and down to see the audio tracks.
Above the scroll bar is the static track region. Drag the lower static tab down until a box outlines the first dialogue track.
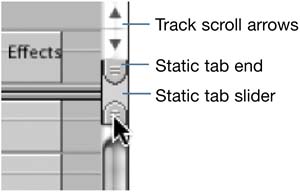
Now drag the audio blue scroll bar up and down.
As you drag the other audio tracks up or down, the track you made static remains in view.
To return to the default Timeline track layout, drag the lower static tab up into the first tab area and let go.
Click the 2nd Track Height control in the Timeline or to your personal Timeline layout preference.
In a previous lesson on audio, you learned how to use the Razor Blade tool to divide a clip and add several edits where there was only one. Here you will use that same technique to add a different ending to the current music track, which will improve the timing of the music at the end of the sequence.
Play the last 10 seconds of the sequence and listen to how the music ends. Turn off solo for A3 and A4 if necessary.
The song repeats several bars at the end before the big finish.
Press Option-Cmd-W to make the audio waveforms visible in the Timeline.
Snap the playhead to the last edit of the Timeline where the freeze frame of Al begins, and press Cmd-+ several times to zoom in on the music track at this location.
NOTE
Make sure no clips are selected in the Timeline, or you will zoom in on the selected clip or clips.
Editing music may take some practice. A jump cut in a song can be as obvious as a jump cut in video. Always try to edit music between notes or beats. Use the waveform as a visual guide to making clean edits within music.
Press the Play Around Current button in the Canvas, the backward slash key, or the J, K, and L keys to listen to that portion of the music.
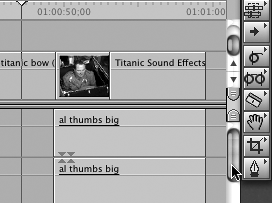
Drag the playhead or use the left or right arrow keys to position the playhead where the end of the song repeats. You should be able to see the point where the music changes by looking at the waveform on the music track.
Press B to select the Razor Blade tool, and cut the music track at the playhead location. It should be close to 01:00:54:07.
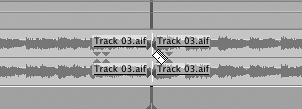
Play the music from the end of the titanic bow clip and park the playhead where you hear the first ending phrase of the song. It may be close to 01:00:49:25. Use the Razor Blade tool to cut the music track here.
You now have three music clips: the beginning of the song, the first ending, and the repeated ending with the big finish.

Press Shift-Z to see the sequence in full view.
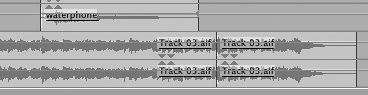
Press A to select the default Selection tool. Select the middle music clip and press Shift-Delete to delete the middle section along with the gap.
Listen to your music edit to make sure it sounds right. If you need to adjust it, use the Ripple or Roll tool to move the edit points forward or backward a few frames.
When you've finished editing the music, press Option-Cmd-W to turn off the waveforms in the Timeline and press Cmd-S to save the changes to your project.
Now that you have several audio tracks in your Timeline, you can mix them together to create one cohesive sound. In this lesson, you will mix the volume levels of all the tracks so that each sound can be heard in balance with the others. You learned in Lesson 11 how to adjust the sound levels for a clip in the Viewer and the Timeline. In the following exercises, you will animate those levels so they rise and fall at certain points within the sequence.
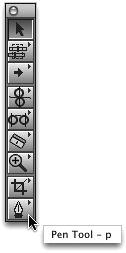
When you change or animate the volume of an audio clip over time, you set points where you want the change in volume to occur. These points are called keyframes. You can set keyframes anywhere in a sound clip by clicking where you want the audio sound level to make a change. The tool that is used to create keyframes is the Pen tool.
To prepare for the next exercise, perform the following steps.
Duplicate the Audio Mixing - Starting sequence in the Browser and name the copy Keyframes. You will be using the Audio Mixing - Starting sequence again later in this lesson.
Double-click the Keyframes sequence in the Browser to open it in the Timeline.
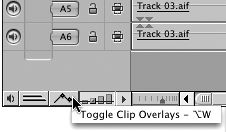
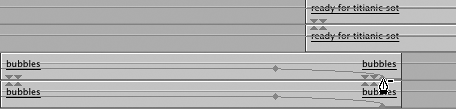
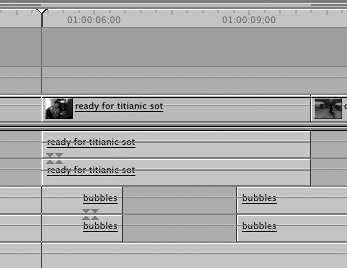
Click the Clip Overlays control to toggle on the pink sound level lines.
A frequent use of keyframes is the creation of audio fades, which you applied in the previous lesson to the beginning and end of a sequence using a Cross Fade transition. Using keyframes allows you to create the same effect, making a sound clip fade up or down. But with keyframes, you have a great deal of latitude in adjusting the length and position of the fade. For this exercise, you will create keyframes in the sound effects clips and cause them to fade in and out to smooth the transition. You will use the Pen tool, located at the bottom of the Tool palette.
Park the Playhead between the first two video clips.
This is the position where the bubbles sound effect will begin to fade out.
Click the Pen tool in the Tool palette, or press P.
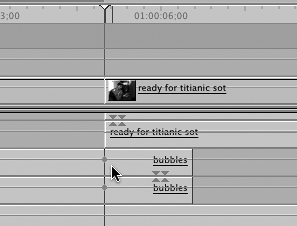
In the Timeline A3 or A4 track, move the Pen tool over the overlay line in the first bubbles clip.
The tool looks like a pen only when the pointer is over the clip's overlay line.
Click the Pen tool at the playhead position. Make sure you click on the clip overlay line.
A pink keyframe appears on the line at the playhead position. Since the bubbles clip is a stereo pair, setting a keyframe on one track automatically places one on the other track at the same location.
Move the Pen tool toward the end of the bubbles clip and click again.
TIP
Try not to set your keyframe on the very edge of the clip. If your keyframe is too close to the edge, it will be difficult to reposition. Always leave some wiggle room.
Now that you've set keyframes, you can change their values by dragging up or down.
Move the Pen tool over the second keyframe you just created until you see the tool change to a crosshair.
The crosshair is not a selectable tool. It is a part of the Pen function and allows you to move a keyframe.
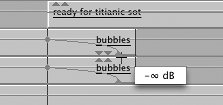
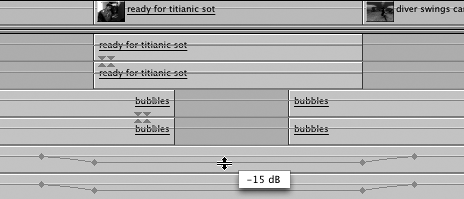
Use the crosshair to drag the keyframe down to its lowest volume level at the bottom of the clip.
A yellow information box appears reflecting the amount you are lowering the decibels of the audio at that keyframe point. The sideways 8 is an infinity sign, which indicates that the sound is at the lowest possible level.
Play the bubbles clip and listen to it as it fades out.
You can also place keyframes on the sound level lines for a clip in the Viewer. This can be helpful when you want to set keyframes based on the waveform display. But in the Viewer, you don't have the same visual reference to the other clips' placement in the sequence.
Apply the preceding steps to fade the sound of the second bubbles clip and the fan blades clip in and out.
Once you've set keyframes in a clip, you will most likely want to adjust either the position of the keyframe or the sound level it represents. In this exercise, you will make adjustments to the keyframes you just set in the sound effects clips. To reposition a keyframe, you can either use the Pen tool or the default Selection tool. Both tools will turn into a crosshair when positioned over a keyframe.
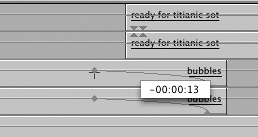
With the Pen tool still selected, move the pointer over the first keyframe in the first bubbles clip at the beginning of the fade out.
When you see the crosshair tool, drag the keyframe left along the overlay line about 15 frames. Play the clip and look at the volume level in the Audio Meters.
Press A to select the default Selection tool.
Move the pointer over the straight horizontal portion of the overlay line until you see the resize tool appear.

To lower the volume of this clip, drag the straight horizontal portion of the clip overlay line down to about –12 dB. Play the clip.

TIP
If you try to adjust a keyframe location close to the playhead, the keyframe you are moving will try to snap to the playhead. Press N to toggle Snapping off in your Timeline, or click the Snapping button in the Timeline window button bar.
Now that you know how to set and move keyframes, it's a good idea to learn how to delete them. One method of deleting keyframes is using the Pen– (minus) tool located in the Tool palette next to the Pen tool.
Select the Pen– tool from your Tool palette, or press PP.
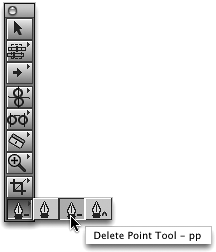
In the first bubbles clip, click the second keyframe with the Pen– (minus) tool.
The keyframe disappears, and the keyframe overlay line moves to the position of the previous keyframe.
Save your project.
Add back the keyframe on the first bubbles clip and adjust it at an appropriate location based on the video edit point.
Adjust the other sound effects clips' keyframes so they fade up just before the cutaway cuts in and fade out just after the cutaway cuts out.
Adjust the volume levels of the other sound effects so they are all in the same range.
TIP
As you adjust the sound levels for different types of clips, try to be consistent about the range or dynamic level you want a particular group of clips to fall within. For example, you may decide to have the dialogue tracks hit between –6 and –12 dB, the sound effects between –12 and –18 dB, and the music at –12 dB. Finding the right dynamic level for each audio track is the fine art of mixing.
In addition to fading in and out, you can also use keyframes to fade up or down at certain points in the middle of a clip. For example, when Al starts talking in the sound bites, you don't want the music to fade out altogether. You just want to hear it at a lower volume in the background so you can focus on what Al is saying. But when Al isn't speaking, you want to hear the music at a higher volume again.
When you adjust or animate the volume level up and down in this way, each new change requires another keyframe. If you want the audio to even out or plateau at a certain level, you need two keyframes, one to hold the previous level and one to set the new level. In this exercise, you will set keyframes to fade the music down and under Al during each sound bite, and then fade it up full when he's not speaking. To set keyframes in this exercise, you will use just the default Selection tool.
Press A to select the default Selection tool.
For this exercise, mute the A3 and A4 tracks so you won't be distracted by the sound effects clips.
Move the playhead to the edit point between the first two video clips in the Timeline. This is the beginning of Al's first dialogue.
Press and hold Option and move the pointer over the overlay line at the playhead position.
The pointer automatically converts to a Pen tool.
Click on the music track overlay line at the playhead position to add a keyframe at this location. Release the Option key until you are ready to set another keyframe.
Move the playhead to the end of the first dialogue clip. Press Option and click the overlay line to set another keyframe.

NOTE
It is helpful to position the playhead where you want to set a keyframe, but it is not a necessary step in setting a keyframe.
You now have two keyframes on the music track. These keyframes line up with Al's audio on tracks A1 and A2.
Add a keyframe one second before the first keyframe in the music track and another keyframe one second after the last keyframe.
You now have two pairs of keyframes on either side of the first dialogue clip.
Click the overlay line between the two sets of keyframes and lower the volume plateau.
A yellow information box appears to indicate the new audio level. See what it sounds like with the plateau set to –15 dB.
Changing audio levels by setting keyframes gives you the maximum control over the sound levels in your audio clips.
Before you continue adding keyframes to the music track, play the A1 and A2 dialogue tracks to see if they are at a good volume level.
Using the preceding steps, and either the Pen tool or the Selection tool, add keyframes to lower the music whenever there is a dialogue clip in A1 and A2.
Listen to your mix and adjust the plateau levels so you can hear the dialogue clearly above the music.
Now that you understand how to set keyframes and mix audio manually in the Timeline, you're ready to mix tracks in real time using the Audio Mixer tool. When you play the sequence, the Audio Mixer tool responds to your touch as you control audio faders to fade a track, or tracks, up or down. In the process of fading tracks, Final Cut Pro adds keyframes to the overlay line automatically, to reflect how and where you changed the sound levels. These keyframes are added to the Timeline when you stop playing the sequence. You can choose one of three levels of keyframe complexity. You will perform a mix using each setting.
You can access the Audio Mixer in two ways. One way is to select the Audio Mixing window layout, which incorporates the Audio Mixer into the interface. You can also choose the Audio Mixer under the Tools menu. This opens the Audio Mixer as a separate window that you can place wherever you like.
Choose Tools > Audio Mixer, or press Option-6. Drag the Audio Mixer tool to the left to sit over the Browser window area.
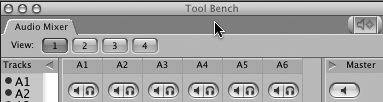
When you open the Audio Mixer, it appears within the Tool Bench window as a tab. You will work with other tools from the Tools menu at different times during your editing. When open, they appear within the Tool Bench window as tabs.
Close the Tool Bench window by clicking the OS X Close button.
To open the window as part of a pre-arranged layout, choose Window > Arrange > Audio Mixing.
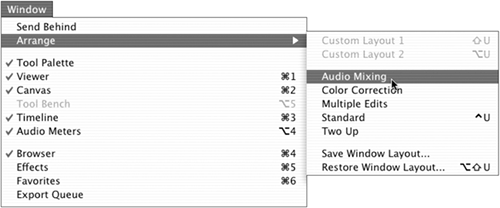
In this layout, the Tool Bench window is automatically placed in the upper-right corner of the interface. The Browser moves to the lower left, and the Timeline becomes smaller.
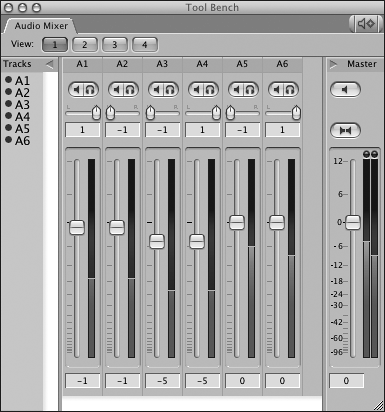
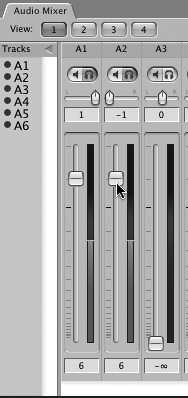
Notice that there are six audio tracks represented in the Audio Mixer, the same number of tracks you have in your sequence.
In the Browser, duplicate the Audio Mixing - Starting sequence, rename it Mixing Tool, and double-click to open it in the Timeline.
To reduce the Browser size and increase the Timeline area, drag the right edge of the Browser window to the left as far as it will go. Click in the Timeline and press Shift-Z to see the sequence in full view.
In the Audio Mixer, make sure the Record Audio Keyframes button in the upper-right Button bar is deselected so that no keyframes will be created for the moment while you practice.
Click the Solo button for track A1 and play the sequence. Click it again to turn Solo off for that track.
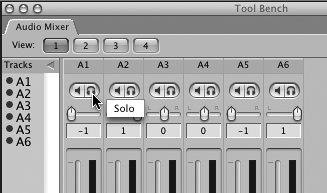
The Solo and Mute buttons here work the same as they do in the Timeline Audio Controls panel.
Each track has a fader that adjusts the audio level for that track. The fader will adjust a given track's level at the position of the playhead. If tracks are a stereo pair, both tracks will move in tandem.
In the Timeline, click the Audio Mixing - Finished sequence tab and play it from the beginning. Watch the faders move up and down automatically as the sound levels in the clips change.
The track faders move in response to the keyframes and sound levels currently set in the clips.
Raising or lowering the track faders accomplishes the same thing as raising or lowering the pink level lines of a clip. They both can adjust the dB level of a clip from infinity to +12. But remember these are only relative decibel levels. Notice in the Audio Mixer that the track meters go above 0 dB. This is so you can see how far above zero an audio clip is peaking.
Click the Mixing Tool sequence tab and park the playhead over the first dialogue clip in tracks A1 and A2. Drag the A1 fader for this clip up and watch the pink sound level line on the clip in the Timeline change. Drag the fader down. If necessary, click the Clip Overlays control in the Timeline to turn on the overlay lines.
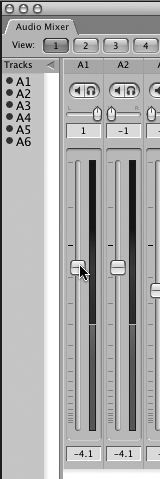
As you drag, the dB level in the box below the fader changes to reflect how much higher or lower you have changed the sound from its original 0 dB level. You can also enter a value here and press Return, which will move the fader to that level.
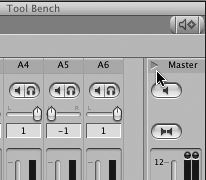
Once the individual mix levels are set for each track, you can adjust the overall output level for your sequence by using the Master fader on the far right of the Audio Mixer window. You can also mute all tracks at once using the Master Mute button.
If the Master fader is not open, click the disclosure triangle in the upper-right corner to reveal it. Click this triangle to hide it, then again to reveal it.
Play the sequence from the beginning and, as it plays, drag the Master fader up and down to raise and lower the overall sound level. Make sure the combination of all tracks never exceeds 0 dB.
NOTE
The actual dB level of a clip or sequence can only be determined by observing the green to red colored meters, not the position of the fader controls.
The Master fader controls the level of your entire mix. Any changes made to the Master fader will affect the level of the mix as it's played back or output to tape. For this lesson, you will focus on balancing or mixing the individual tracks, and not outputting them to tape.
Now you are ready to mix the sequence in real time using the Audio Mixer. Before you begin mixing, you will first set the levels of the dialogue tracks without using keyframes. Then you will use the dialogue levels for reference as you bring the music track into the mix, this time using keyframes. With the Record Audio Keyframes option on, the Audio Mixer will automatically set keyframes on a clip as you drag the faders.
The Audio Mixer can be a powerful tool, but it requires some practice before you can achieve the desired results. And sometimes, controlling the individual keyframes manually will give you the best result.
Make sure the Mixing Tool sequence is active in the Timeline.
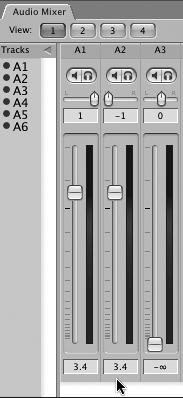
In the Audio Mixer, solo the A1 and A2 tracks and drag the A1 (or A2) fader to make each dialogue clip fall within the –9 to –12 dB range.
Click the Record Audio Keyframes button in the Audio Mixer to turn it on.
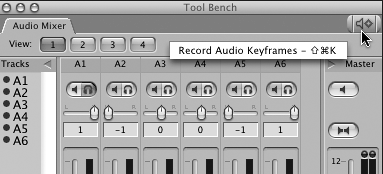
With this option on, any adjustments you make by dragging a track fader will add keyframes to the clip in the Timeline.
Choose Final Cut Pro > User Preferences and in the Editing tab, locate the Record Audio Keyframes option. Make sure the Record Audio Keyframes box is checked. Click the pop-up menu and select Peaks Only, and click OK.

Each option adds more or less keyframes to the sequence clips as you mix your tracks. You will experiment with each one.
In the Browser, duplicate the Mixing Tool sequence three times. Name the copies Mixing Tool - Peaks, Mixing Tool - Reduced, and Mixing Tool - All.
Open the Mixing Tool – Peaks sequence in the Timeline, and solo the A5 and A6 tracks to add them to the mix.
TIP
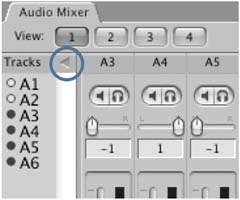
If you are working with several tracks and can't see them all at one time, you can deselect a track in the Tracks selection pane to hide that track. You can also hide the pane by clicking its disclosure triangle.
Since mixing with the Audio Mixer happens in real time, take a moment to think about the process. First you will begin to play the sequence, then click and hold the A5 (or A6) fader button and watch the playhead move in the sequence. As the playhead approaches the first dialogue clip, you will drag the A5 fader down and under the dialogue and then back up to its original level when the dialogue has finished. Continue holding the fader button and repeat the process at each dialogue clip. Only when the sequence has finished will you release the mouse.
Follow these steps to create a live mix:
Move the playhead to the head of the sequence and play it. Click and hold the A5 fader. Do not release the mouse until the sequence has completed playing.
As the playhead approaches the first dialogue clip, drag the A5 fader down so you can clearly hear the dialogue but still hear the music in the background.
When the dialogue is finished, drag the A5 fader back up to its original level.
Keep watching the playhead, and as it approaches the second dialogue clip, drag the A5 fader again down and under and then back up full.
When the sequence is finished playing, release the mouse.
In the Timeline, keyframes appear identifying the peaks in the music clip where you raised and lowered the faders. You can raise or lower these keyframes to make adjustments to your mix, reposition them, or manually add new keyframes as you did in a previous exercise.
You can also choose to record All Keyframes or Reduced Keyframes as you create a live mix.
In the Browser, double-click the Mixing tool – Reduced sequence to open it in the Timeline.
Choose Final Cut Pro > User Preferences. Click the Record Audio Keyframes pop-up menu, select Reduced, and click OK.
Mix the audio again following the same steps as before.
This time you see more keyframes. As in the previous example, these keyframes can be manually adjusted or deleted directly in the Timeline.
Open the Mixing Tool – All sequence into the Timeline.
Choose Final Cut Pro > User Preferences, and this time, choose All from the Record Audio Keyframes pop-up menu.
Repeat the process of mixing the music to dialogue.

This time, the music track shows keyframes for every slight movement of the faders.
NOTE
Although the All keyframe option reflects the most accurate performance of your mix, the number of keyframes it creates would make it very difficult to apply any manual corrections. To create a mix and then make manual changes to it, the Reduced or Peaks Only options are most likely the best.
Compare the different Mixing Tool sequences and consider which Record Audio keyframes option works best for you.
Depending on your project, you may find it necessary to record a voice-over to your sequence, perhaps to try out a narration or simply to provide a track you can use for timing purposes as you cut video for a documentary or news story. To record a voice-over in Final Cut Pro, you can use a digital camera or other audio recording device, such as a USB microphone, PCI card, or internal mic on a laptop computer. Recording an audio track this way creates a new clip directly in the Timeline. To create the voice-over clip, you will use the Voice Over tool.
If you are using an external microphone or camera mic, connect the device to your computer.
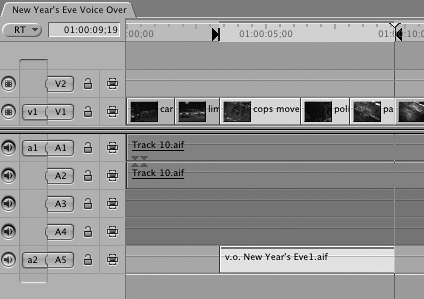
Duplicate the New Year's Eve sequence, name it New Year's Eve Voice Over, and open it in the Timeline. Add an additional audio track to the Timeline to record your voice-over.
You will record a voice-over on A5 announcing the start of New Year's Eve in Times Square and another one toward the end of the sequence when the ball drops.
Move the playhead to the head of the cops move barricade clip, where you will begin recording the voice-over. Press I to create an In point.
Move the playhead to the end of pan crowd times sq and mark an Out point.
Make sure A5 is the targeted track and turn off the green Audible lights for all four audio tracks so you don't record the music playing in the background as you record your voice-over track.
Choose Tool > Voice Over to open the Voice Over tool window.
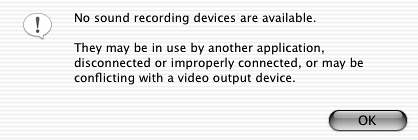
If Final Cut Pro does not detect a recording device, a warning window appears.
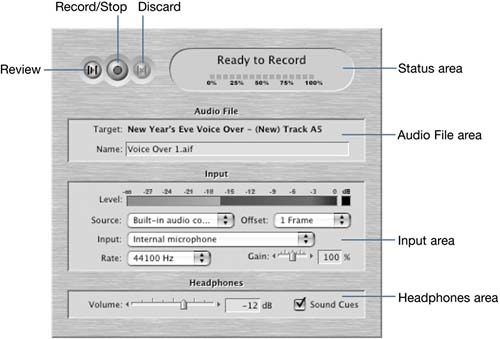
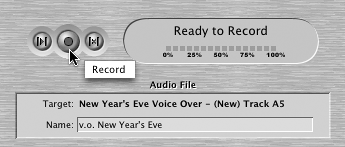
If Final Cut Pro detects a microphone source, the Voice Over tool window appears. This window in divided into four areas: Status, Audio File, Input, and Headphones.
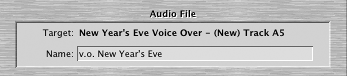
In the Audio File area, type v.o. New Year's Eve as the name for this voice-over track.
NOTE
Look at the Target information above the Name area and make sure it reflects the A5 track in the voice-over sequence. The Voice Over function records only one channel of audio, or mono audio. It does not record in stereo.
In the Input area, select the correct source from the Source pop-up menu. If it's DV, choose 48000 Hz from the Rate pop-up menu and 3 Frames from the Offset pop-up menu.
Start talking to set the Headphone level as well as the Gain level in the Input area.

Select the Sound Cues check box.
Selecting the Sound Cues check box will cause beeps to sound during the five-second countdown before recording, and again as a signal prior to the Out point.
TIP
If you're not using headphones, and you have Sound Cues selected, the beeps will be picked up and recorded as part of your clip. Deselect the Sound Cues option and instead watch the Starting countdown in the Record area to see when recording begins and ends.
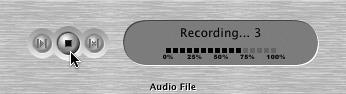
When you are sure you are ready to record, look for the Ready to Record signal in the Status area. Here's what will happen. You will press the Record button. The playhead will immediately jump backwards five seconds for the pre-roll while the Ready to Record window will turn yellow and count down from five. It will then turn red and begin recording
Press the Record button and record the following line with your best network announcer voice: “Ladies and gentlemen, it's New Years Eve.”
The recording ends automatically at the Out point, and the new voice-over clip appears in the Timeline.
Play the clip back by clicking the Review button or by playing the sequence in the Timeline.
You can stop recording and start again by clicking the Stop button and then clicking the Record button. Each time you record a new version, or take, a new clip is placed in another track in the Timeline and is labeled with the next-highest number.
As always, save your project frequently throughout your editing session.
How to solo and mute audio tracks
How to work with audio controls
How to make tracks static
How to add audio tracks
How to mute and solo multiple audio tracks
How to apply audio keyframes
How to adjust audio keyframes
How to delete audio keyframes
How to create fades
How to mix audio tracks manually
How to work with Audio Mixer
How to work with the audio
How to use the Voice Over tool