
Lesson Files | FCP4 Book Files > Lessons > Lesson 15 Project |
Media | Sahara folder, Titanic folder, New Year's Eve folder |
Time | This lesson takes approximately 90 minutes to complete. |
Goals | Understand and apply filters Preview filters Modify and remove filters Render filters Share and save filters Color correct clips Apply filters to multiple clips Apply audio filters |
Filters are another group of effects you can apply to your clips in addition to transitions. They provide you with the ability to enhance images by altering the look or color of a clip. You can also use filters to correct image color and distort images to create interesting effects. There are numerous filters that can be applied to video clips and several that can be applied to audio clips.
To get started in Lesson 15, you will launch Final Cut Pro by clicking on the program icon in the Dock and then opening the project for this lesson.
Unlike a transition that alters the way you move from one clip to the next, a filter changes something about the content of a clip, either how it looks or acts.
Filters can be applied to clips in the Viewer or Timeline. In the Timeline, a filter can be applied to a single clip, a group of clips, a range of material, or an entire track. You can even apply multiple filters to a clip to create a more complex effect. Filters, like transitions, are located within the Effects tab in the Video Filters bin or under Video Filters in the Effects menu.
Click the Without Filters sequence tab and play the sequence.
No filters have been applied to any of these clips.
Click the With Filters sequence tab and play that sequence.
A different filter has been applied to each of these clips. One filter added a solarized look to the clip, one added a border, one added a mirror effect, one divided the clip into replicas of itself, one gave an image a sepia look, one made a clip black and white, and one highlighted the edges within an image. These are just a preview of filter possibilities.
TIP
In order to see as many filter effects play in real time on your computer as possible, click the RT (real time) pop-up menu in the Timeline and make sure Unlimited RT is selected. You can also lower the Playback Video Quality if you see dropped frames during playback. These options will be discussed more fully in the “Previewing and Rendering Filters” section in this lesson.
From the Sequences bin in the Browser, open the Blurry Vistas sequence and play it.
Close the Without Filters and With Filters sequences.
You apply a video filter almost exactly as you would a video transition. You can drag it from the Video Filters bin in the Effects tab directly to a clip in the Timeline. You can also select the clip in the Timeline and choose a filter from the Effects menu. But unlike transitions, which are applied to an edit point, filters are applied to the body of the clip. Some filters will require rendering in order to play them in real-time play speed. But you can also preview them the way you did transitions.
In the Timeline, park the playhead on the first clip, leaves falling.
As with transitions, parking the playhead on the clip allows you to see how that clip is changed as you apply a filter.
In the Browser, select the Effects tab and click the triangle next to the Video Filters bin.
Click the triangle next to the Stylize bin to display its contents.
All the filters within this bin can create stylized and often extreme changes to the appearance of a clip.
Drag the Find Edges filter icon to the first clip in the sequence, but don't release the mouse.
When you drag the filter to the clip, a brown selection outline appears around the clip to indicate that you are applying a filter.
Release the filter on the clip.
The Find Edges filter creates an effect of extreme contrast that outlines the edges of the image in the clip.
Above the ruler area in the Timeline, a colored render bar appears, which indicates the render status for that clip. If the render bar is green, the clip will play in real time without dropping frames. If it's orange, the clip will play in real time but may drop frames along the way. If it's red, the clip must be rendered to view it at all.
Park the playhead at the head of the clip and play the clip, or press Option-P to preview it.
To use the menu approach to applying a filter, select the second clip, river, and park the playhead over it to see its changes.
Choose Effects > Video Filters > Stylize > Find Edges.
The filter is applied to the selected clip, and you see the change in the Canvas.
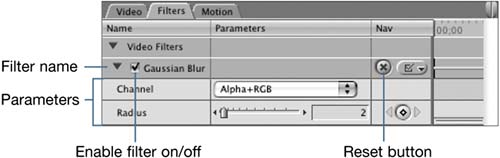
Every filter has a set of parameters that you can modify to create the effect you want. These parameters appear in the Filters tab in the Viewer. Here you can modify parameters, delete the filter, turn it off or on, save it as a favorite, or apply the same filter to another clip in the Timeline.
But before you can make any of these changes, you open the clip from the Timeline into the Viewer, just as you do if you are making other changes to the clip.
In the Timeline, park the playhead on the leaves falling clip and double-click to open it in the Viewer.
Click the Filters tab.
Click the Video Filters triangle several times to hide and display the Video Filters applied to this clip. Click the Find Edges triangle to hide and display its parameters.
Click the box next to Find Edges to toggle the filter off and on.
When the box is deselected, you see the image in the Canvas without the filter applied. When it's selected or enabled, you see the image with the filter effect applied. Toggling a filter off or on does not delete it from the clip. It simply allows you to view the clip with or without it.
Each filter has its own set of parameters that you can modify in different ways. You can use a slider, enter a numerical value, or tweak a number incrementally using the adjust arrows on either end of the slider. Some filters may use rotation wheels for angle adjustments or color pickers for color selection.
In the Filters tab, drag the Amount slider to 20 to decrease the amount of effect applied to the image. Look at the image in the Canvas.
The Amount slider controls the blend between the original clip and the Find Edges effect.
Click in the Amount entry box, type 50, and press Tab or Return.
The Amount slider moves in tandem with the numerical entry box. Look at the image in the Canvas to see the change.
Click the Invert check box and note the change to the image.
The invert check box lets you toggle between a light-on-dark or a dark-on-light effect.
Click the Invert check box again, and click the red Reset button to return to the default parameter settings for this filter.

For Find Edges, the default amount is 100.
Set the Amount to 65 to give the image a more dramatic look.
You can combine several different filters to create a unique or special effect. How they affect the image depends on the order in which they are applied. Let's add some additional filters to the Blurry Vistas sequence that will further change its appearance.
Make sure the leaves falling clip is still open in the Viewer.
Choose Effects > Video Filters > Distort > Pond Ripple.
To use the drag-and-drop approach, drag the Pond Ripple filter from the Video Filters bin in the Effects tab into the Viewer or onto the clip in the Timeline and release the mouse.
Press Option-P to preview this combined effect in the Canvas.
In the Viewer Filters tab, there are now two filters. Click on the Find Edges enable box and press Option-P to preview the clip without the Find Edges filter.
With the playhead over the leaves falling clip, change the Pond Ripple parameters to the following suggested settings:
Radius: 85
Ripple: 7
Amplitude: 13
Acceleration: 1.95
Toggle the Find Edges filter back on and preview the changed effect.
Click on the Find Edges and Pond Ripple triangles to collapse their parameter settings.
Now let's add one more—a blur effect.
In the Browser, click the triangle of the Blur bin and drag Gaussian Blur to the leaves falling clip.
The clip's image in the Canvas is slightly blurry because of the Gaussian Blur filter, which adds a blur evenly to the entire image. Sometimes, blurred images are used behind text to make the text stand out more. Applying the three filters to the leaves falling clip makes the clip a good background for opening text.
In the Filters tab, drag the Radius slider to 10 to increase the blur.
Find Edges was the first filter applied to this clip. The Pond Ripple was applied second. The Blur was applied third, but the order of the clips in the Viewer can make a difference.
Click on the Gaussian Blur filter name and drag it up above Pond Ripple. When a dark bar appears above Pond Ripple, release the mouse.
Now Gaussian Blur appears between Find Edges and Pond Ripple. This means that the Gaussian Blur is being applied to Find Edges but not to Pond Ripple, and Pond Ripple is no longer blurry.
Drag the Pond Ripple filter above the Gaussian Blur filter, and the circles of the pond become blurry again.
Filters are applied in the order they appear under the Video Filters heading in the Filters tab. The first filter in the list is always the first applied, and the last filter will be applied to all the filters that come before it in the list.
Although many filter effects can play back in real time, some can only approximate playing in real time and may drop frames along the way. Approximating real-time play can be helpful when you're setting filter parameters but distracting when you want to see all the frames in the sequence play smoothly. There are different options you can use to preview and render clips in your sequence.
The RT pop-up menu you looked at earlier in this lesson has three different Playback Video Quality settings. Changing these options will either play the clip back at a higher quality (more likely to drop frames), or at a lower quality (less likely to drop frames).
Click the RT pop-up menu in the Timeline and make sure Unlimited RT is selected along with the highest possible Playback Video Quality level. Play the leaves falling clip.
At the highest playback quality level, you may see some stuttering in the playback.
Select Unlimited RT and Low Playback to see as many of the real-time effects as possible and play the sequence. Play the leaves falling clip again.
NOTE
Any changes made to the RT window are stored in the System settings and apply to all open sequences.
In the RT pop-up menu, the options you choose will enable you to view the sequence at either the highest possible quality or with the most real-time effects, but not necessarily both.
TIP
Selecting Unlimited RT and High Playback quality gives you the best possible quality but may drop frames. If you would rather see more real-time effects in exchange for a lesser playback quality, select Unlimited RT and Low Playback quality. If you want the best quality and you never want to drop any frames, select Safe RT and High.
There is also another preview option in addition to pressing Option-P. This is the QuickView tool, which opens in the Tool Bench window.
Choose Tools > QuickView, or press Option-8.
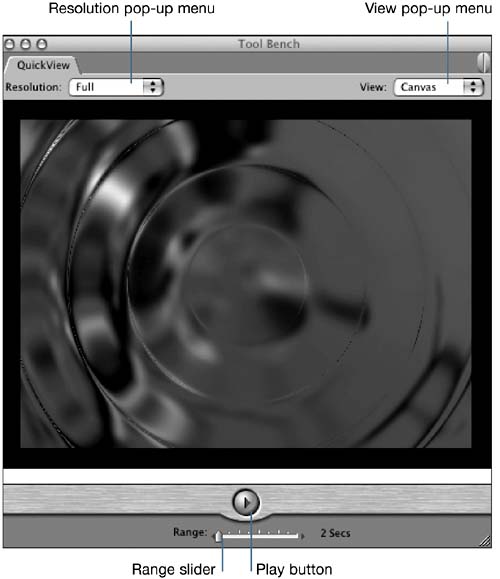
As with the RT pop-up, in the QuickView tab you have a choice between seeing an effect preview at full resolution and taking longer to process or opting for a lower resolution and a faster processing time.
In the QuickView tab, click the Resolution pop-up menu and select Full; make sure View is on Canvas and move the Range slider to 3 seconds. Click the Play button.
The first time QuickView plays through the clip, it caches it from whatever source is selected in the View pop-up menu. This preview is stored in the computer's RAM. As it plays through the clip again, the clip plays in real time.
Move the Tool Bench window over the Browser.
You can render a selected clip or clips, a marked portion of a sequence, or an entire sequence. When you render a clip with an effect, that rendered item is saved on the Render scratch disk.
Select the leaves falling clip in the current sequence.
Choose Sequence > Render Selection and make sure Unlimited is checked. Then choose Sequence > Render Selection > Both, or press Cmd-R, and play the sequence.
Continue adding filters to the clips in the sequence.
Add Pond Ripple and Gaussian Blur to the second clip, river.
Add the Find Edges, Gaussian Blur, and Pond Ripple filters to the third clip, sand storm.
Open each clip and give them all the same degree of blur.
Give them each a different set of Pond Ripple settings.
Add a one-second cross dissolve at each edit transition point.
To see the clips play every frame in real time, select them and choose Sequence > Render Selection > Both, or press Cmd-R. If no clips are selected in the Timeline, you can choose Sequence > Render All > Both, or press Option-R. Play the sequence with its new filters.
Press Cmd-S to save the project and the new render files.
As you have seen, you can enable a filter by clicking the on/off box next to the filter's name. This does not, however, remove it from the clip—just from temporary view. There are two ways to remove a filter from a clip: in the Viewer Filters tab and in the Timeline using a contextual menu.
In the Sequences bin in the Browser, duplicate the Blurry Vistas sequence and rename the copy Filters Removed. Open this sequence in the Timeline.
In the Filters Removed sequence, park the playhead on the first clip, leaves falling, and double-click to open it in the Viewer.
In the Viewer, click the Filters tab and make sure the parameters of all filters are displayed.
Click on the Gaussian Blur name bar.
That filter and the parameter names beneath it become highlighted and appear dark.
Press the Delete key.
That one filter is removed immediately and the image without that filter appears in the Canvas.
Remove the Pond Ripple filter from this clip the same way: select and delete it. Remove the Blur as well.
With no filters applied to this clip, it returns to its normal state.
Park the playhead on the second clip in the Timeline, river, to see the changes in the Canvas. Double-click this clip to open it in the Viewer and click the Filters tab to see the filters.
To remove all the filters attached to this clip, click the Video Filters category name. When the filters below become highlighted, press Delete.
Another way to delete all the filters attached to a clip is to use the contextual pop-up menu from that clip in the Timeline.
Park the playhead on the third clip, sand storm, and Ctrl-click on the clip.
One of the options in this contextual menu is called Remove Attributes. Attributes refer to any changes that have been made to the clip, whether it's adding a filter, adjusting the audio level or speed, or any other change.
Select Remove Attributes.
A Remove Attributes window appears. There is a column for Video Attributes and another for Audio Attributes. Since there is no audio in this clip, all of these options are grayed-out.
Click the Filters box and click OK.
All filters are removed from this clip.
Like transitions, filters can be copied, pasted, and saved. Saving filters also uses the Favorites bin in the Effects tab. But copying and pasting filters introduces some new options.
Once you apply a filter to a clip and change its parameters to give it a special look, you can share that filter with other clips. Sharing filters begins with copying. When you copy a clip, you copy everything about it—its audio and video content along with any attributes that were attached to it. But when you paste, you have choices about the attributes you want to apply from the copied clip.
If it's still open, click on the Blurry Vistas sequence tab in the Timeline, or open it from the Sequences bin in the Browser.
The clips in this sequence have filters that we'll copy and apply to a clip in a different sequence.
Select the first clip, leaves falling, and press Cmd-C to copy it.
Click on the Filters Removed sequence tab in the Timeline and park the playhead on the first clip.
Ctrl-click the first clip, leaves falling, and select Paste Attributes.
The Paste Attributes window opens. This window is similar to the Remove Attributes window, with a few exceptions. They both have video and audio columns with available attributes. But the Paste Attributes window indicates the clip source at the top of the window. It also has a check box to Scale Attribute Times, which will be discussed in Lesson 16. Only the attributes applied to that clip when it was copied can be selected—the other attributes are grayed-out.
Click the Filters check box, and click OK.
This clip now has the same three filters applied to it as the clip you copied from the Blurry Vistas sequence.
Double-click the leaves falling clip to open it in the Viewer, and click the Filters tab.
The three filters are listed in the Filters tab. Let's add one more filter to this clip.
Choose Effects > Video Filters > Border > Basic Border.
This filter puts a default black border on the clip, which you will change to a golden color. In the Filters tab, the new filter has been added to the list of other filters.
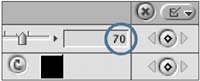
In the Basic Border parameters, set the Border to 70.
To make the border's color the same as one of the golden leaves, click the Select Color eyedropper and click on a leaf in the Canvas image area.
In the Timeline, copy the leaves falling clip and paste its attributes to the next two clips using steps 2, 4, and 5. Press Option-P to preview.
If you changed a filter's default parameters and want to apply them to other clips, you can drag the changed filter to the Favorites bin, just as you did your favorite transitions. But there may be times when you want to save the entire clip, with filters applied, to use again in the same or other sequences.
To save the Pond Ripple filter from the first clip, double-click the leaves falling clip to open it in the Viewer, then click the Filters tab.
In the Browser, click the Effects tab and then click the triangle to display the contents of the Favorites bin.
In the Viewer, drag from the Pond Ripple name line to the Favorites bin and release the mouse when the bin becomes highlighted.
Drag the Basic Border filter to the Favorites bin the same way.
Drag the Gaussian Blur filter to the Favorites bin.
Once you save filters in the Favorites bin, you can apply them to other clips in other sequences to use the same settings as this clip.
You can apply the same filter to more than one clip. The actual process of applying a filter to a group of clips is exactly the same as if you were apply ing the filter to one clip. The only difference is in selecting the clips to be modified. You can select multiple clips just as you do when selecting and moving clips. You can also use two different tools in the Tool palette to select a group or an entire track of clips.
From the Browser, open the Sahara Vistas sequence and play it. Park the playhead over the golden valley clip. Notice its vast array of colors.
Each image in this sequence is colorful, but you will apply the Desaturate filter to all the clips to remove the color, creating an “Ansel Adams,” black-and-white look.
Double-click the sand storm clip to open it in the Viewer and click the Filters tab.
To add a Desaturate filter to this clip, choose Effects > Video Filters > Image Control > Desaturate. Move the slider to see the levels of desaturation, and then completely desaturate the clip.
Desaturate is a filter that removes the color from a clip and turns it into a black-and-white image. You can control the amount of color, or chroma, that is removed from the picture, making the image colors pale, hyper-realistic (very saturated), or totally black and white.
To apply this filter to the rest of the clips in the sequence at one time, select the remaining clips. You can do this a few different ways:
Use the default Selection tool to drag a marquee around the second through the last clip.

Click the second clip in the sequence and Shift-click the last one.
From the Favorites bin in the Effects tab, drag the Desaturate filter to the Timeline and drop it on any one of the selected clips.
When you drag a filter over a group of selected clips, they all appear with the filter outline just as if you were applying one filter to a single clip.
Play the sequence to see the black-and-white Ansel Adams sequence.
Press Cmd-S to save your project.
You can also apply filters to the audio portion of a clip the same way you apply video filters: by dragging the filter from the Audio Filters bin in the Effects tab or choosing an option from the Effects menu. You can use an audio filter to help improve overall audio quality or to create a special effect such as an echo. You can also add a corrective filter to remove a specific sound. Let's apply a few audio filters to a sequence.
Open the Audio Filters sequence and play it.
This is the Sahara Vistas - Dissolve sequence from Lesson 12 without sound effects. Let's change the narrator's audio in the different faces clip so he sounds like his voice is ethereal.
Double-click the different faces clip to open it in the Viewer.
Click the Filters tab, and choose Effects > Audio Filters > Final Cut Pro > Reverberation to apply a filter from the Effects menu.
The audio filter is displayed under the Stereo 1 Filters heading in the Filters tab. The Reverberation filter has four parameters that are each controlled by sliders or by entering a numerical value in the boxes. Let's use the default settings of Effect Mix = 50, Effect Level = 0, Brightness = 0, and Type = Room (medium).
Play the different faces audio clip in the Timeline.
The default Reverberation filter makes the narrator sound like he's larger than life.
Click the Effects tab and click the Audio Filters triangle to display its contents. Display the contents of the Final Cut Pro folder.
The audio filter icon is a speaker with an overlay covering it.
To make the narrator sound like he's speaking to a crowd, drag the Echo filter to the winter audio clip.
When the Echo filter is dragged onto the audio tracks of this clip, the audio tracks become outlined, just as they do when dragging a video filter to a clip.
Play the clip in the Timeline.
Play the winter audio clip.
Now the narrator sounds like he's speaking to a crowd.
Press Cmd-S to save the project.
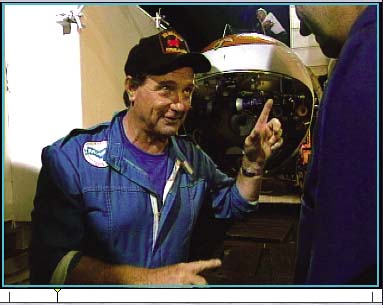
There are several video filters that can help correct a clip's color or overall look. Some of these filters can change the color balance of an image, adjust the luminance and black levels, add more color, or take color away. In these exercises, you will work with the Al Giddings sot clips. You will also work with the New Year's Eve sequence, which was shot on 35mm film and transferred to DV. Film colors are not as bright or saturated as video, and sometimes the balance of colors needs adjusting. You will also work with different ways to see your image before and after a filter has been applied.
Before you make color adjustments to a clip, you need to understand a few basic color principles. First of all, video is an additive color system, meaning that all colors added together will create white. So your reference to white is very important. If your white balance is off, the overall balance of colors in the image will be off as well.
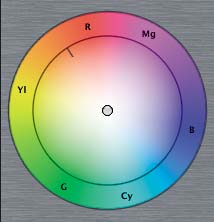
Another aspect of color correction is the hue of the image. Hue is the color itself, sometimes represented by a name (red) but most often represented by a number on a 360-degree color wheel. (See Figure 1 on page 563.) Each color comes up at a different location around the wheel. For instance, the three primary colors in video are red, green, and blue, and they fall at 0 degrees, 120 degrees, and 240 degrees.
There are different types of color wheels. Some display more than just the hue. They reflect the saturation of a color. Saturation is the amount of hue present in an image. For all colors, 0 percent saturation shows the color as white. If red is fully saturated at 100 percent, decrease the saturation to 50 percent and you get rose. Decrease it to 25 percent and you get pink. Each of these colors is part of the red family in that they share the same hue, but not the same amount of saturation.
The value of an image is the amount of lightness or darkness present. A 100 percent value is the highest or brightest level, whereas 0 percent gives you black, regardless of the hue or saturation numbers. Therefore, red at 25 percent saturation and 25 percent value looks dark pink.
If the colors in a clip don't appear quite right, it may be because the color balance of the image is off. That can happen if the step of white balancing a camera was skipped prior to shooting the original material, or if the lighting for the shoot was hard to control. In the Al Giddings documentary footage, it must have been very difficult to control the lighting and follow Al around on deck as events progressed. There are a few different ways you can change the color balance of an image. In this exercise, you will work with the Color Corrector 3-way filter, which is a real-time filter.
Open the Titanic SOTs sequence and play it.
This is the same sequence you worked with in Lesson 13, but in this sequence, the corrective filters have been removed. You will now add a color correction filter to the sot clips to improve the color.
Park the playhead over the first ready for titanic sot clip and double-click to open it into the Viewer. Click the Filters tab.
Choose Effects > Video Filters > Color Correction > Color Corrector 3-way.
The Color Corrector 3-way filter appears in the Filters tab, but the parameter details are not in view. Instead you see a button named Visual under the Parameters column and a separate tab called Color Corrector 3-way in the Viewer. There is a very good reason for this.
Click the triangle next to the Color Corrector 3-way enable box and drag the vertical scroll bar down to see all the parameters. Then click the triangle again to hide those parameters.
These parameters control the color of an image, but there is a much easier approach—a more visual approach.
Click the Visual button next to the Color Corrector 3-way name, or click the Color Corrector 3-way tab.
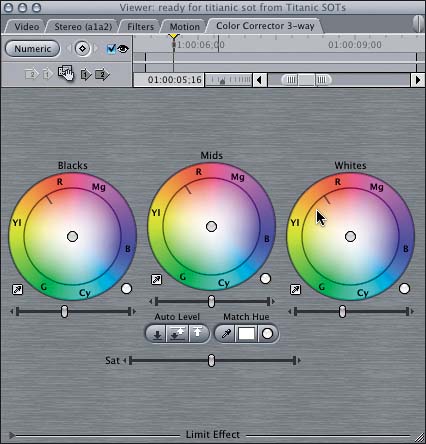
Although this filter is very complex and has lots of parameters, it also has a streamlined visual interface. Working within the visual interface lets you focus on the look of the image without getting distracted by the numbers you saw in the standard numeric interface.
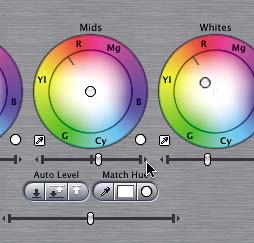
Look at the visual interface for the Color Corrector 3-way filter. (See Figure 2 on page 563.)
There are three wheels that control the Blacks, Mids, and Whites of the image and a Saturation slider beneath the wheels. There is also a Limit Effect area that can be used to change or control a specific color in an image.
One way to improve the color of the ready for titanic sot clip is to reset or redefine what true white is in the clip's image.
Under the Whites color wheel, click the small Select Auto-balance Color eyedropper.
You use this tool to select a new white reference from the image in the Canvas.
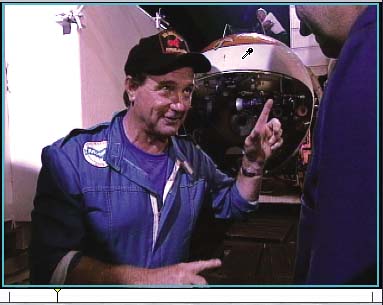
In the Canvas, click the white area of the sub in the back of the middle of the image. (See Figure 3 on page 563.)
Clicking on a white area of the Canvas image rebalances all the colors as though the white you clicked was true white. Look at the Whites color wheel. The track ball in the center of the wheel has moved away from red and blue toward yellow and green. (See figure 4 on page 563.)
Drag the Whites track ball up toward yellow to further adjust the color balance.
Look at the image with and without the Color Corrector 3-way filter enabled by clicking the on/off box. Leave the filter on.
Drag the Saturation slider to the right to add a bit more saturation to the colors in this image.
Reset the Hue to its default position by clicking the reset button on the lower right of the wheel.
Use the Select Auto-balance Color eyedropper to choose a different white value in the same image. Try these possibilities:
Click the white wall behind Al.
Click the white on Al's shirt patch or shirt zipper.
Click the white behind the man on the right.
Adjust the Whites track ball to fine-tune the color.
Adjust the saturation as needed.
Copy this clip and paste the Filter attributes to the other sot clips in the sequence.
In addition to viewing an effect in the Canvas, there are two ways you can view the color changes and other filters you apply to a clip. One is to change the layout of the interface to include a set of scopes that display certain properties of an image, such as luminance, chroma, and so on. Another way is to open a Frame Viewer, which can display portions of two single frames in a split-screen configuration.
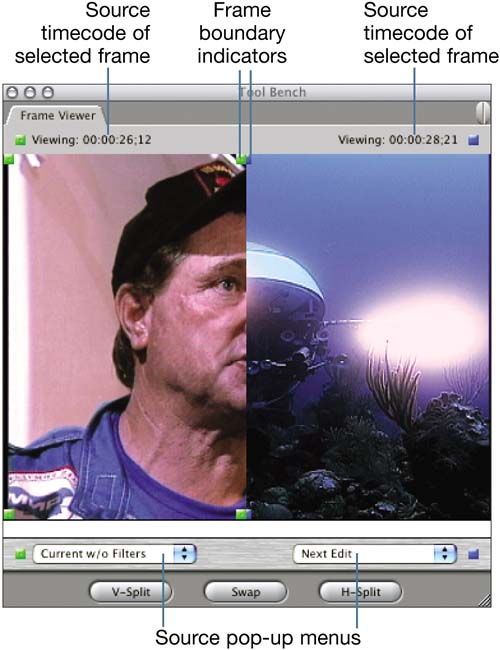
In the Timeline, move the playhead to the cameron trimmed sot clip. Choose Tools > Frame Viewer, or press Option-7. (See Figure 5 on page 564.)
The Frame Viewer appears as a tab in the Tool Bench window. This configuration shows the current image on the left, where the playhead is parked, and the next edit in the sequence on the right. But the Frame Viewer opens with whatever frame options you chose when you previously used it.
For the moment, reposition the Frame Viewer window over the Browser by dragging it from the top of the window title bar area.
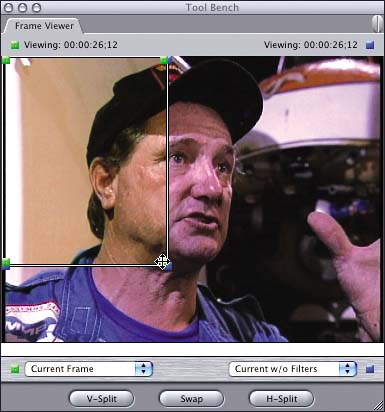
In the lower left of the window, click the Frame Viewer pop-up menu and choose Current Frame.

This displays the current modified image in the left side of the Frame Viewer.
In the right Frame Viewer pop-up menu, choose Current w/o Filters.
In the Frame Viewer, you see the color corrected image on the left and the original or uncorrected image on the right.
You can change the size of each frame by dragging the boundary indicator.
Drag the green frame boundary indicator in the middle of the Frame Viewer to the left to see more of Al's neck. (See Figure 6 on page 564.)
From the right Frame Viewer pop-up menu, select 2nd Edit Forward to compare the corrected version of the ready for titanic sot clip with the next sot clip in the sequence.
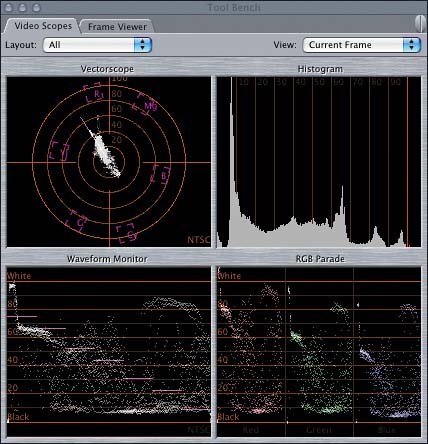
To use video scopes to aid in the color correction of a clip, choose Window > Arrange > Color Correction. (See figure 7 on page 564.)
The Tool Bench window is automatically positioned in the upper-right corner, and the Browser is moved to the lower left of the interface. Now there are two tabs in the Tool Bench: the Frame Viewer, which you opened previously, and the Video Scopes tab. Either of these tabs can be pulled away to create its own separate window.
Click the Layout pop-up menu and select Waveform to view just the luminance levels of your image.
TIP
Broadcast luminance levels should not exceed 100 percent. To find the highest luminance level in an image, move the pointer in the waveform to the upper-most pixels and look at the percentage box in the upper-right corner.
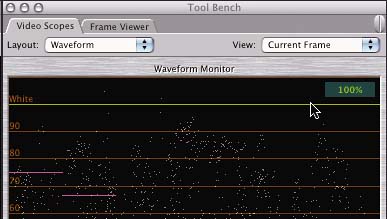
You can also click the View pop-up menu to select the image you want to view in the scopes.
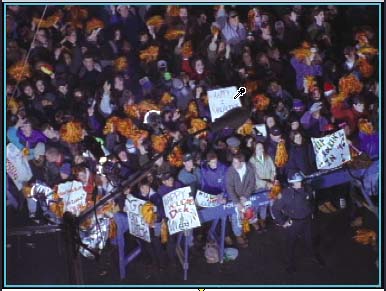
You can also use the Color Corrector 3-way filter to change the contrast of an image. In the New Year's Eve sequence, which was shot on 35mm film, some of the images look a little dark or milky and could be improved by changing their contrast.
From the Browser, double-click the New Year's Eve sequence and play it.
This is the sequence you worked with when you used the Voice Over tool.
Park the playhead over the pom poms wave clip and double-click it to open it in the Viewer. Click the Filters tab.
Choose Effects > Video Filters > Color Correction > Color Corrector 3-way. Click the Visual button.
First, to reset the white balance for this clip, click the Whites Select Auto-balance Color eyedropper and click on one of the large white signs in the image in the Canvas window.
To change the contrast of this image so it's not so dark, drag the Mids slider to the right or click the right adjustment arrow at the end of the slider.
Move the playhead to the confetti falls clip and double-click it to open it in the Viewer.
Apply the Color Corrector 3-way filter to this clip and reset the white balance as you did before.
To make this clip look less milky, drag the Mids slider to the left or click the left adjustment arrow.
There are many other ways you can affect the color and luminance of an image. Take some time to explore those video filters in the Color Corrections and Image Control categories.
The With Filters sequence you viewed at the beginning of the lesson has a good sampling of video filters that can acquaint you with additional filter categories. In the following list, the filter that was applied to each clip is listed along with its video filter category. Open the Without Filters sequence and apply these filters to the appropriate clips.
Clip | Filter |
|---|---|
landscape | Stylize > Solarize |
blue nose hawk | Perspective > Mirror |
snake in sand | Image Control > Sepia |
digging mouse | Stylize > Replicate |
lizard eye move | Border > Bevel |
scorpion | Stylize > Posterize |
small cat | Image Control > Desaturate |
feathered ears | Stylize > Find Edges |
How to apply a video filter
How to work with the Filters tab
How to view filter changes
How to modify and remove a filter
How to copy, paste, and save filters
How to render filters
How to make color adjustments to an image
How to use a Frame Viewer
How to select the color correction layout
How to apply audio filters
How to apply filters to multiple clips
How to use selection tools
How to change color and white balance
How to adjust video levels