
Lesson Files | FCP4 Book Files > Lessons > Lesson 18 Project |
Media | Sahara folder, Titanic folder |
Time | This lesson takes approximately 75 minutes |
Goals | Work with Zoom and View options |
Work in Image+Wireframe mode | |
Create motion effects in the Canvas | |
Adjust motion parameters in the Motion tab | |
Copy and paste motion attributes | |
Animate motion parameters | |
Create a motion path with keyframes | |
Modify a motion path |
An entire world of editing and compositing possibilities opens when you begin to change motion parameters for a clip. Sometimes these changes will correct something about an image, such as cropping out a portion of an image you do not want. Sometimes you change motion parameters to create a simple motion effect, such as changing the size and position of a clip to create the newscaster's picture-in-picture effect. But you can also create highly complex motion effects utilizing multiple images whose motion parameters are animated over time.

One frequently used effect is to make a group of images share a common motion attribute.
To get started in Lesson 18, open the project for this lesson.
Choose File > Open, or press Cmd-O, and choose the Lesson 18 Project file from the Lessons folder on your hard drive.
Play the Motion Effects Finished sequence in the Timeline to see the motion effects you will create in this lesson.
Each comp in this sequence has been rendered to play back smoothly in real time. If a red render bar appears above any of the clips, mark that portion of the Timeline, re-render the comps, and then play them.
Click the Motion Effects Starting sequence tab, where you will begin your work.
Here the clips have not been rendered. You will render them after you have completed building the comps.
As you begin to apply motion effects to a sequence clip, how you view the clip in the Canvas becomes important. For example, you may want to resize and reposition an image so it appears closer to the edge of the image area but is still safe to broadcast. Or you may need to zoom out in the Canvas to position a clip outside the image area. You may even want to change a clip's position by dragging the clip in the Canvas. Adjusting how you look at a clip does not make any changes to the clip's motion parameters. The exercises in this section will introduce you to each of the different viewing options.
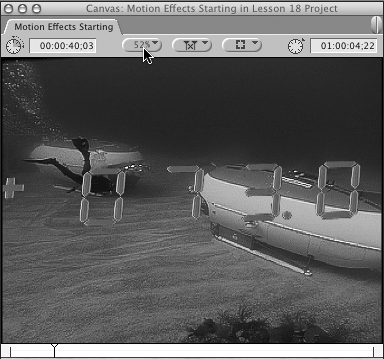
Both the Viewer and Canvas can display a clip's image in a variety of sizes. You can zoom in or zoom out of the image area, just as you zoom in and out of the sequence in the Timeline. You do this by selecting an option in the Zoom pop-up menu in either the Viewer or Canvas. Changing the zoom percentage of a clip allows you to see around the viewable image area, which is helpful when repositioning a clip. Zooming is also helpful when refining filter parameters to take a closer look at what is happening on a pixel level.
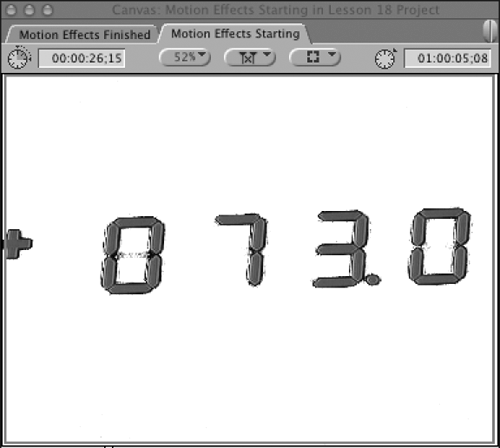
Park the playhead in the middle of the first clip, red display cu.
In the Canvas, click the Zoom pop-up menu.
The default to see the entire image area in the window is Fit to Window. With this option selected, you can drag the corner of the Canvas window larger or smaller and the image area always remains in full view. This is true for the Viewer as well.
From the Zoom pop-up menu, select 25%.
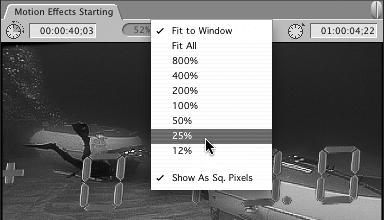
The image area becomes smaller and you see a larger gray area around it. Nothing in the gray area is seen when you output your sequence. The gray area is a work space you will use when you move clips across the image area over time.
In the Zoom pop-up menu, choose 200%.
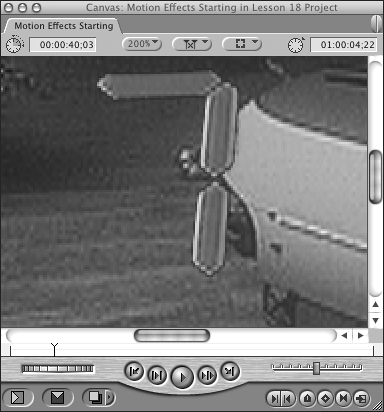
The image appears much larger in the Canvas and is no longer seen in full view. Blue scroll bars appear on the bottom and right of the Canvas window to scroll to other portions of the image.
Press H to change the pointer to the Hand tool. In the Canvas image area, drag the Hand tool to position one of the red numbers so you see it in full view.
To make additional changes to the Luma Key filter you placed on this clip in a previous exercise, press A to select the default Selection tool and then double-click the red display cu clip from the Timeline to open it in the Viewer.
Click the Filters tab and note where the current settings for Threshold and Tolerance are. Then drag the Threshold slider to the far left and click the right adjustment arrow until you reach a threshold of –85, where the key should look fairly clean but not completely clean.
Click the Canvas Zoom pop-up menu and select Fit to Window to restore the image to full view.
The Viewer and Canvas windows each have a set of view options that allow you to change how you view an image in the window. You can change the background behind the image area, determine the type of overlays that are seen over the image, or choose whether you want to work with the image, just a wireframe representation of the image, or both.
Unless you drop a portion of an image out or move an image off-screen, you don't necessarily see the background behind the image area. But there are times when changing the background can be very helpful and necessary, such as when you want to refine a key or matte, or size and position an image at an exact horizontal or vertical location. There are different backgrounds to use for different purposes.
In the Timeline, with the playhead still over the first comp, Ctrl-click the diver two subs clip and deselect Clip Enable to turn off visibility for this clip only.
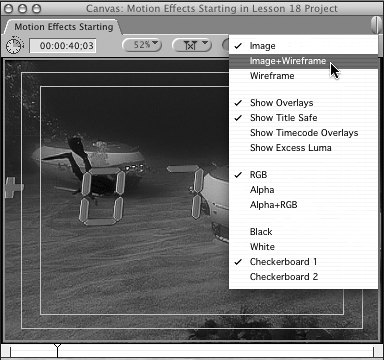
Click the View pop-up menu in the Canvas.
The background behind the numbers is whatever is selected in the View pop-up menu. The default background is Black and is most likely checked.
Select White from the pop-up menu.
With a white background selected and the V1 track visibility off, you can see very clearly whether the area around the numbers has keyed out completely.
In the Viewer Filters tab, click the Threshold right adjustment arrow until the background is pure white but the numbers have not dropped out.
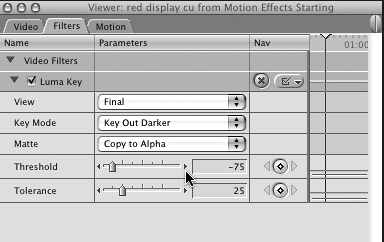
Drag the Tolerance slider to see how it affects the key. Leave it on 25.
If you see any change, it will be subtle.
Click the Canvas View pop-up menu and select Checkerboard 1.
NOTE
Backgrounds can also be selected by choosing View > Background. There you have additional color background options.
Checkerboard backgrounds provide a helpful reference when changing the size and position of an image. Also, when you see the checkerboard pattern behind the image, that part of the image will be output to tape as black.
NOTE
The two checkerboard options differ in that one starts with a light gray square in the upper-left corner and the other starts with a dark gray square.
Another view option is for overlays. You have used end-of-clip and end-of-sequence overlays as a reference during your editing. Another helpful overlay when working with motion effects is the Title Safe overlay. When selected, this gives you a reference point for where your viewable action must fall in order to be safely broadcast to home monitors.
Make sure the red display cu clip is selected in the Timeline, and toggle Clip Enable to make visible the diver two subs clip.
Click the View pop-up menu and deselect Show Overlays. Then select it again.
When Show Overlays is selected, a turquoise outline appears around the clip's outer edge to indicate that the playhead is over a selected clip. This outline will become a valuable visual aid when you work with motion effects.
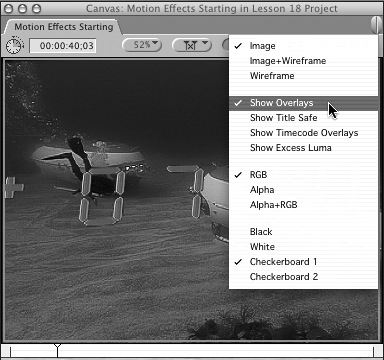
With Show Overlays selected, click the View pop-up menu again and select Show Title Safe.
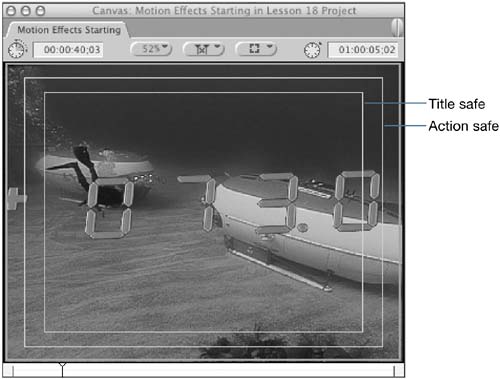
All titles, text, or messaging that is important to see when broadcast should fall within the inner outlined area. All action that is important to see should fall within the outer outlined area. This is sometimes referred to as action safe.
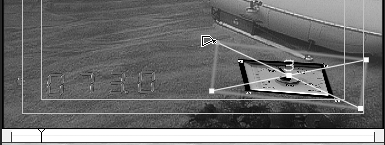
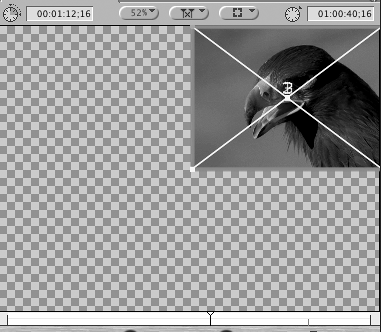
The Image+Wireframe view is very helpful when working with motion effects. With this view active, you can control several motion parameters directly on the clip itself.
In the Canvas, click the View pop-up menu and select Image+Wireframe.
When active, a large X appears over the selected clip's image area.
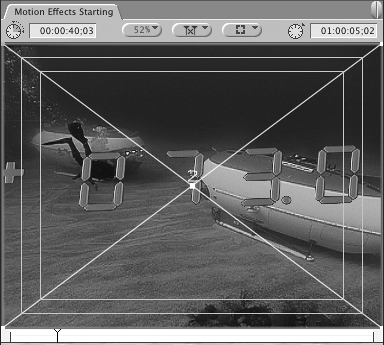
Every clip has a set of motion parameters that can be adjusted to create a motion effect. The motion parameters appear in the Motion tab of the Viewer. But you can also adjust certain motion parameters directly on the clip itself as long as Image+Wireframe view is selected.
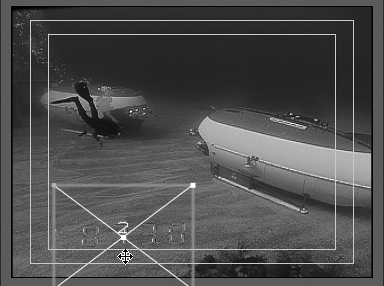
When you change the size of a clip, you are adjusting the Scale parameter for that image. When you adjust the position of the clip, you are adjusting where the Center point of the clip is located in the image area. There are visual clues in the Image+Wireframe view that you use to adjust these and other parameters. In this exercise, you will size and position the numbers in the red display cu clip so they fit in the lower-left corner at a much smaller size.
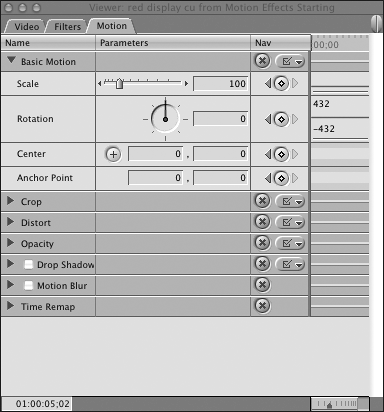
Make sure the red display cu clip is still open in the Viewer, and click the Motion tab to reveal the motion parameters.
Move the Scale slider to change the size of the red display cu clip to about 38.
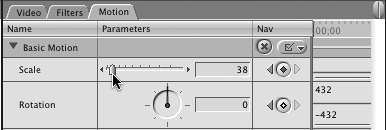
To adjust scale on the image itself, move the pointer over any of the Scale handles in the wireframe corners and drag in to make this image a little smaller.
To position this clip into the left corner, drag from within the image area. Place the text just above the title safe line and press Option-P to preview the comp.
Now move the playhead to the second comp and select the square meter clip.
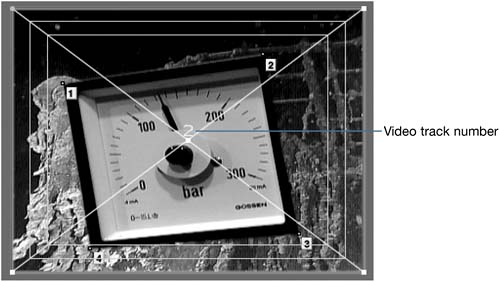
A number appears in the center of the wireframe to indicate the video track of the selected clip. The square meter clip is on V2.
Drag one of the Scale handles to make this clip smaller and then drag from inside the clip to position it into the upper-right corner, within the title safe region.
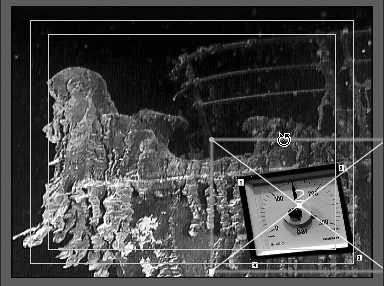
In the Motion tab, click the Center crosshair button and click in the upper-left area of the Canvas image.
This places the center of the image wherever you click.
In the Canvas, drag the image to the lower-right corner within the title safe region.
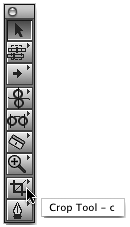
In addition to the Scale and Center parameters, you can adjust the Rotate, Crop, and Distort parameters in the Canvas window as well. Crop and Distort have their own tools in the Tool palette that you use when working in the Canvas Image+Wireframe view.
With the square meter clip still selected, move the pointer over the left side of the wireframe until you see the Rotate tool appear.
Drag up and right, as though you were turning a steering wheel, to rotate the image until its bottom edge is parallel to the title safe line.
Motion parameters utilize three axes of movement to create effects. If you move an image left or right, you are moving along the X axis, or horizontal line of motion. If you move an image up or down, you are moving along the Y axis, or vertical line of motion. When you zoom in or out, or rotate around a central point, that point is the Z axis.
Preview the comp or view it using the QuickView tool. If you need to make any changes to the matte itself, double-click the square meter clip and click the Filters tab.
Move the playhead to the first comp and select the red display cu clip.
The plus sign on the left side of this image looks cut off. It would probably be better to crop it out of the image altogether.
With the red display cu clip still open in the Viewer, click the Motion tab, and then click the Crop disclosure triangle.
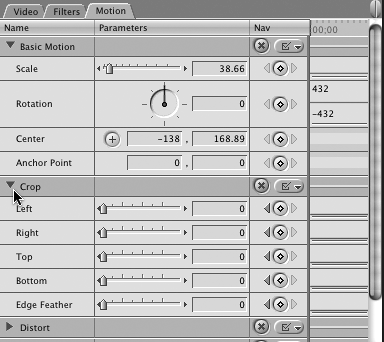
You can crop each side of the image by using the sliders. You can also crop directly on the image by dragging a wireframe line with the Crop tool (C).
Drag the Crop Left slider to the right until you no longer see the red plus sign in the Canvas image. Then drag the entire clip to the left to reposition it so the first number is in the title safe corner.
To add the square meter to the first comp, copy the square meter clip and paste it onto the V3 track at the head of the sequence. Make sure the v1 source is patched to the V3 destination.
Double-click the square meter clip to open it in the Viewer and click the Motion tab.
Make this version of the square meter appear more rectangular and less square by adjusting the Distort parameters. Click the Distort triangle to reveal its sliders. Drag the Aspect Ratio slider left to about –130, until the image is a rectangle.
Changing the Aspect Ratio in the Distort parameters changes all sides simultaneously. But you can also enter Distort information for where you want the corner pixel to be located, or simply use the Distort tool and drag an individual corner to that location. Let's further refine the rectangular meter by applying the Distort tool directly to the clip in the Canvas.
Press D to select the Distort tool, or click and hold the Crop tool in the Tool palette and select it there. Move the pointer into the Canvas and drag each individual corner until the square meter image is a true rectangle. Press Option-P to preview the comp.
Press A to return to the default Selection tool, and press Cmd-S to save your changes.
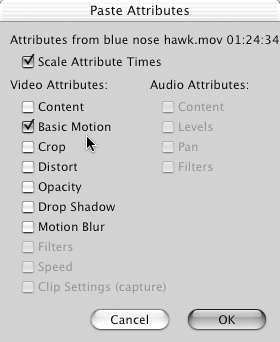
If you are working with a group of images, and you want them to share a common motion attribute, such as size or position (Scale and Center), or even rotation, you can adjust the parameters in one clip and copy and paste those attributes to another, just as you did with filters. Unlike filters, however, the Motion attributes are broken down into specific motion parameters. You can paste a crop setting but choose not to paste a distort setting. Scale, Center, and Rotation are combined into the Basic Motion parameter set.
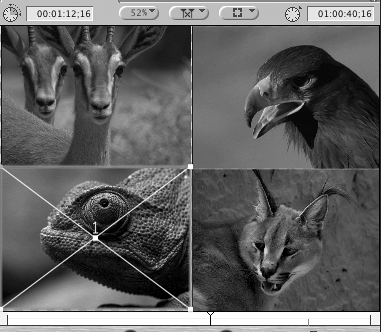
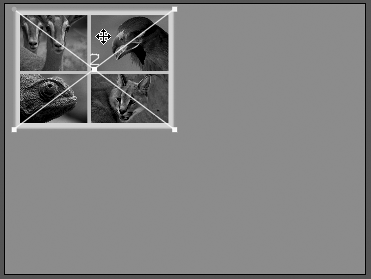
In this exercise, you will make changes to one freeze frame clip of a Sahara animal and apply it to three other freeze frame clips. When stacked on top of each other in the Timeline, these clips can be combined into a comp resembling a postcard. You could, of course, use any clip with motion in it rather than a freeze frame.
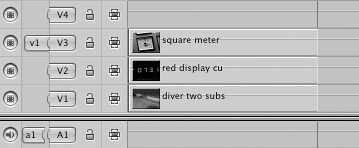
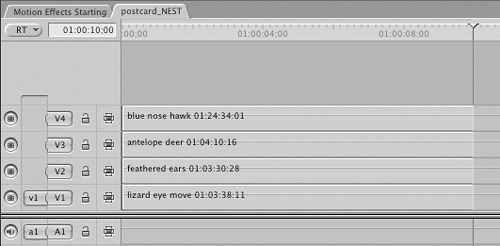
In the Browser, click the Freeze Frames bin triangle and double-click to open the lizard eye move clip. In the Timeline, move the playhead past the second comp and edit the marked 10 seconds of this freeze to the V1 track.
Edit the feathered ears clip onto the V2 track directly above the lizard eye move clip. Edit the antelope deer clip on the V3 track, and the blue nose hawk on the V4 track.

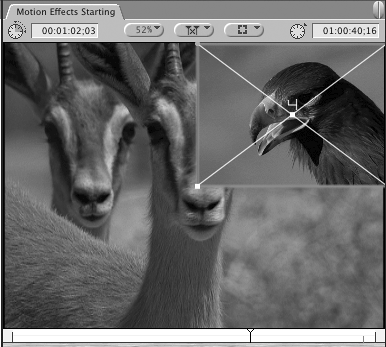
Make sure the playhead is over the four clips and double-click the top clip, blue nose hawk, to open it in the Viewer. Click the Motion tab.
Enter 55 percent for the Scale and drag the image into the upper-right corner of the Canvas.
When the upper clip is scaled down in size, the clip beneath it becomes visible. This is another way to build a comp, by combining images that are smaller than the full image area.
With the blue nose hawk clip selected, press Cmd-C to copy it.
Select the lower three freeze frame clips and Ctrl-click any one of them. From the contextual menu, choose Paste Attributes.
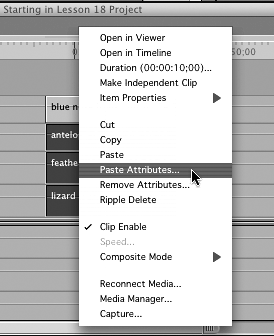
From the Paste Attributes window, click the Basic Motion check box to paste the size and position of the blue nose hawk to the selected clips. Click OK.
In the Canvas, it appears as if the three clips disappeared, but in fact they are all stacked behind the blue nose hawk clip. Notice the combination of numbers in the center point of the wireframe X.
In the Timeline, select the V3 clip, antelope deer.
In the Canvas, the number 3 appears in the center of the clips.
Now that all four freeze frames are the same size, you need to position them into different quadrants. Since they are stacked on top of each other, you have to first select the clip in the Timeline that you want to move. For the moment, don't worry about background pixels showing through between the images. You will be adding a border around the clips to cover that.
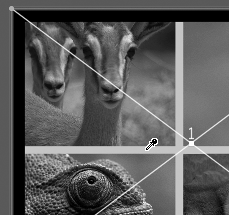
Hold down Shift and drag the antelope deer clip left to fill the upper-left quadrant. Select the V2 clip in the Timeline, hold down Shift, and drag this clip down into the lower-right quadrant. Select the V1 clip and drag it diagonally into the lower-left corner of the Canvas.
To make the lizard eye move face in toward the center of the image, select it in the V1 track and choose Effects > Video Filters > Perspective > Flop.
To add a border to these clips and possibly conceal any imperfections of alignment, select the blue nose hawk clip and choose Effects > Video Filters > Border > Basic Border. Double-click the clip to open it in the Viewer and click the Filters tab. Use the Select Color tool to choose a light color from the bird's beak or mouth.
Copy the blue nose hawk clip and select the other three freeze frame clips. Ctrl-click one of the selected clips and select Paste Attributes from the contextual menu. Click Filters from the Paste Attributes window and click OK.
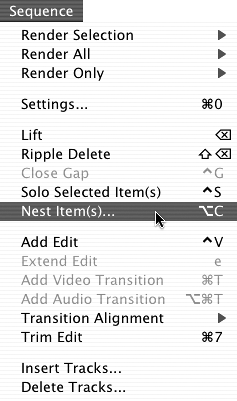
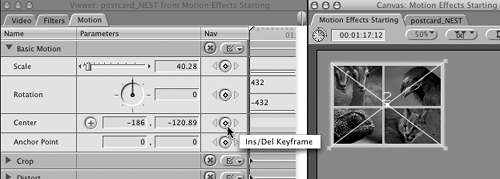
Like filters, each of the motion parameters can be animated in either the Timeline or the Viewer. If keyframes are set in one place, they will also appear, and can be adjusted, in the other. Keyframes can be applied to single clips, or they can be applied to a group of clips that have been nested together. To continue building on the current postcard comp, you will first combine all the tracks into a nested sequence and then apply keyframes to that nest.
When you create a nested sequence, you are combining a group of clips together, either video or audio, into a separate sequence, that can then be treated in the Timeline as if it were a single clip. A nested sequence can be created from any number of tracks (vertically), or any number of clips (horizontally) in the Timeline. Once the group of clips is contained as a nested sequence, you can then edit this clip into another sequence, or apply filters or motion effects to the nest, which applies the changes to the nested sequence as if it were a single clip.
In the current sequence, select all four freeze frame animal clips.
Choose Sequence > Nest Items, or press Option-C.
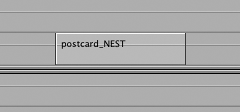
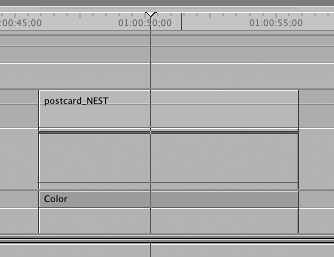
Name the nest postcard_NEST and click OK.

In the Timeline, the four clips have become one clip called postcard_NEST, and the new sequence appears in the Browser.
TIP
Adding the word Nest to the clip name and capitalizing it makes it easy to recognize in the sequence.
To make a change to an individual clip in the nest—for example to make changes to the layout of the four images—double-click the nested clip.
A new postcard_NEST sequence appears with the individual clips in the nest. These clips can be adjusted on an individual level.
Make an adjustment to one clip and then click the Motion Effects Starting sequence tab to view the change in that sequence.
Now that these four clips are nested together, you can treat this clip as you would any other single clip, but any filters or motion effects you apply to it are applied to all the clips as a group, not individually. You will add a border around the nest clip, change the size, and add a color matte behind it as a background. This will create a postcard effect.
In the Motion Effects Starting sequence, select the postcard_NEST clip in the Timeline and look at the Canvas window.

The wireframe is now around the entire image, so any motion effect changes you make to this clip will be applied to the nest of clips as a whole and not to the individual clips.
To place a border around this nest, choose Effects > Video Filters > Border > Basic Border.
To open this nest in the Viewer to change the border color, Option-double-click the postcard_NEST clip. Click the Filters tab, and with the Select Color tool, select the same color from the current border in one of the clips in the Canvas.
Click the Motion tab and change the Scale to 75.
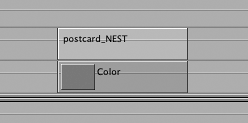
In the Viewer, click the Video tab. Click the Generated Items pop-up menu and select Matte > Color. Under the Control tab, use the Select Color tool and click a darker gold color, perhaps from the feathered ears or antelope deer clip.
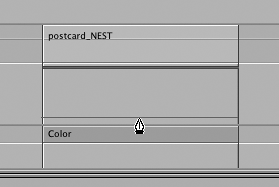
Click the Video tab in the Viewer and drag the Color clip to the Timeline onto the V1 track next to the postcard_NEST clip. Then drag the postcard_NEST clip up to the V2 track and slide it on top of the Color matte clip.
Press Cmd-S to save your changes.
Mattes are very versatile and can be used in many different ways in your sequence. For example, you can crop the edges of a matte to create a box, rectangle, or even a thin colored line you can place or animate over another clip.
Before you begin setting motion keyframes, you will set up the Timeline to view the Clip Keyframes and Time Graph, similar to the way you did when you set keyframes for filters.
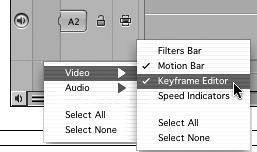
In the Timeline, click the Clip Keyframes control to view the motion and filter bar area of the clips.
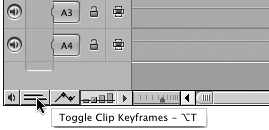
Ctrl-click the Clip Keyframes control and select Video. Make sure Motion Bar and Keyframe Editor are checked. You can deselect the Speed Indicators and Filters Bar, since you will not be working with them in this lesson.
In the Timeline, you can customize the layout for setting keyframes in the following ways:
Drag the audio/video divider down to make more room for video.
Make the V1 track smaller by dragging its boundary line in the track controls area. Make the V2 track taller.
Increase the height of the keyframe editor area by dragging the V2 keyframe editor column.
Zoom into the nested clip so you have a larger horizontal work area.
Dynamically expand the Viewer window to the left to expose more of the Viewer keyframe Timeline area.
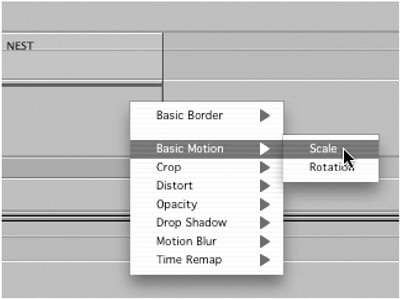
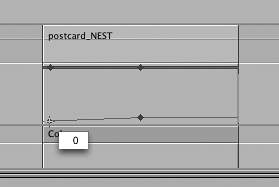
Ctrl-click in the keyframe editor space under the postcard_NEST clip and select Basic Motion > Scale from the contextual menu.
A thin keyframe line appears under the clip.
Park the playhead in the middle of the clip, and Option-click on the Scale keyframe line to set an ending keyframe for this size at this location.
Option-click at the head of the Scale keyframe line to set a starting keyframe at that location. Drag that keyframe down to zero.
Drag the playhead through the first half of this clip to see how the scale of this clip will change from the first keyframe to the second. Press Shift-K and Option-K to move forward and backward between the two keyframes.
When the playhead is over a keyframe, the wireframe lines in the Canvas turn green.
TIP
To save this specific set of keyframes as a favorite, select the clip in the Timeline and choose Effects > Make Favorite Motion, or press Ctrl-F. The motion will be saved in the Effects Favorites bin in the Browser.
Let's add a rotational spin to this move.
Ctrl-click again in the keyframe editor area and this time select Basic Motion > Rotation from the contextual menu.
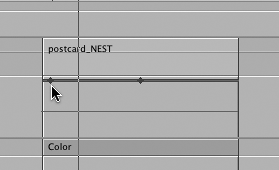
A higher Rotation keyframe line appears in the keyframe editor, and the Scale keyframe line disappears. However, you still see where the Scale keyframes are located in the blue Motion bar beneath the clip.
TIP
If it is important in your project for one set of keyframes, such as scale, to be placed at the exact position of another set, perhaps rotation, then you will need to move to a specific keyframe location and use the Keyframe button in the Viewer window. Option-clicking is easy and direct but is not as precise.
Move the playhead to the first keyframe and Option-click on the Rotation keyframe line to set a rotation keyframe at this location.
Option-double-click the postcard_NEST clip to open it in the Viewer. Click the Motion tab and make sure that the Rotation field is at zero.
Move the playhead to the second keyframe in the Motion bar and Option-click on the Rotation line to add another keyframe. In the Motion tab, enter 348 as the Rotation value, or degrees.
NOTE
One complete rotation is 360 degrees. To make the clip rotate twice during this timeframe, you would enter 720 as the Rotation value. You can also drag the rotation wheel or rotate the image directly in the Canvas.
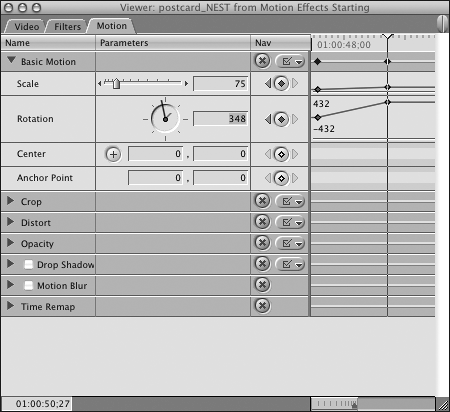
Click the playhead at different places between the two keyframes to see the changing progress of the clip's rotation. Press Cmd-S to save your changes.
You can also see the rotation value change in the Rotation field in the Viewer as you move the playhead through the clip.
In the preceding exercise, you animated two motion parameters but did not change position in either of them. The image stayed centered in the middle of the screen. When you animate the position of an image over time, you create a motion path along which the image travels. Motion paths can be as simple as a straight line where the image moves across the screen from one point, or keyframe, to another. Or it can include several keyframes that dictate very specific twists and turns.
In this exercise, you will create a second version of the postcard_NEST and Color matte comp. You will copy the clips, remove the current attributes, and create a motion path to move the postcard image on and off the screen.
To set up this exercise, do the following:
Select both the postcard_NEST and Color clips and press Cmd-C to copy them.
Move the playhead past the current clips, target V1, and press Cmd-V to paste the clips into a blank area of the Timeline.
Option-double-click the second postcard_NEST clip (the copy) to open it in the Viewer and click the Motion tab.
Ctrl-click the Clip Keyframe control in the Timeline, choose Video, and deselect the Keyframe Editor, since you will not be using that to create the motion path.
Ctrl-click the postcard_NEST clip (copy) and select Remove Attributes from the contextual menu. Click the Basic Motion check box and click OK.
In the Timeline, the blue Motion bar does not appear under the clip, and in the Canvas, the postcard image is full-screen and without any rotation.
Drag a corner of the postcard in the Canvas to make this clip about 40 percent of its original size and reposition it into the upper-left corner of the image area.
With this clip resized and repositioned, the blue Motion bar appears beneath the clip in the Timeline.
In the Timeline, move the playhead to the beginning of the clip. To set a keyframe at this location for this position, click the Center Keyframe button in the Motion tab of the Viewer.
When the keyframe is set, the small square in the center of the image turns green.
Move the playhead to the last frame in the clip and make sure you see the last frame overlay in the lower-right corner. Drag the clip into the lower-right corner.
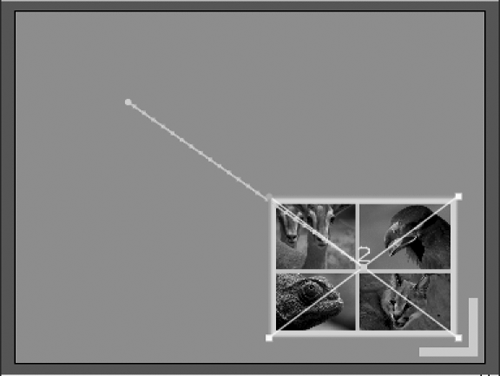
A line with tic marks stretches from the first keyframe to the new location. This is the motion path of this clip and represents the clip's movement over time. With one keyframe set as a reference point, anytime you move the playhead to a different location in the clip, and then move the position of the image, a second keyframe for that position is automatically added.
Preview or render and play from the beginning of the clip.
Press Option-K to move back to the first keyframe location in the clip. Press Shift-K to move forward to the next, or in this case, the last keyframe.
A motion path can be modified by adding or deleting a keyframe, or even by dragging the motion path itself. The motion path can also be made to speed up in certain places and slow down in others. And the keyframe corners can be changed from corner points to curves. Creating complex motion paths is an art. The following steps will expose you to some of the possibilities.
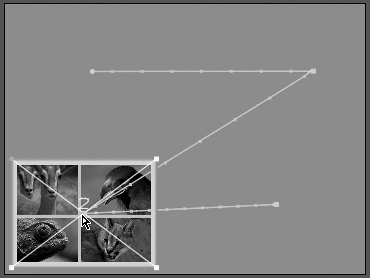
To change the current diagonal path into a motion in the shape of a Z, you will need to add two new keyframes to the existing path.
In the Timeline, park the playhead to the left of the middle of the postcard_NEST clip.
In the Motion tab, click the Center Keyframe button to set a new keyframe at this location.
Move the playhead to the right of the middle of the clip and set another keyframe at this location.
In the Canvas, drag the second keyframe up and to the right to position it as the upper-right corner of the Z-shaped motion path.
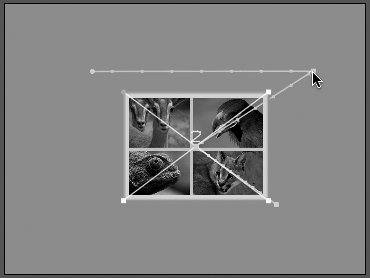
Drag the third keyframe down and to the left to be the lower-left corner of the Z. Preview the clip.
To turn this Z path into a backward S path, Ctrl-click the second keyframe and select Ease In/Ease Out from the contextual pop-up menu.
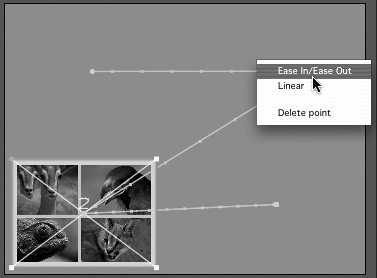
The corner is rounded into a curve with two Bézier handles. Dragging the handles up and down, and in and out, will change the slope and width of the curve.
Change the third keyframe to a curved corner to complete the backward S. Preview the clip.
TIP
To change the velocity with which the clip moves in and out of the keyframe area, drag the purple Velocity handles that sit along the Bézier handles of the keyframe. Dragging toward the keyframe will slow the clip down around the keyframe; dragging away from the keyframe will speed up the motion around the keyframe.
To move the entire motion path or adjust its position in the image area, press Shift-Cmd and drag the image, along with its motion path, further down in the Canvas image area.
Though it may take a while, render the clips and play them in real time.
Click the postcard_NEST sequence tab. Copy the four freeze frame clips and paste them into a new sequence. Set the Canvas Zoom to 25 percent.
Move the playhead to the last frame of the clips and select all the clips. Press Ctrl-K to set a keyframe at this location for each clip.
Move the playhead to the first frame of the clips.
Drag each clip individually out of the image area.
New keyframes will automatically be added at this location for these new positions.
Play or render the comp.
Always save your project before you close it or quit Final Cut Pro.
How to work with Zoom and View options
How to work in Image+Wireframe mode
How to create motion effects in the Canvas
How to adjust motion parameters in the Motion tab
How to copy and paste motion attributes
How to animate motion parameters
How to create a motion path with keyframes
How to modify a motion path