
Lesson Files | FCP4 Book Files > Lessons > Lesson 21 Project |
Media | Sahara folder, Titanic folder |
Time | This lesson takes approximately 60 minutes to complete. |
Goals | Adjust audio and video levels |
Manage your render quality | |
Export a sequence for the Web | |
Export a sequence for DVD | |
Export a sequence for CD | |
Output a sequence to tape | |
Output a window burn | |
Recapture an offline project | |
Back up a project |
Once a sequence is complete, with titles and effects all in, it's time to finish and output it. The finishing stage is when you look at your sequence with a different eye. It's less about editing, and more about making your program look and sound its best. Once this has been accomplished, you are ready to output the sequence. Outputting can include creating a tape of the sequence or exporting it for use in different ways, such as on the Web or as a DVD. Along the way, you will want to consider archiving the project and managing the project media.
Since this lesson is about outputting a completed sequence, you will work with sequences that represent work you've already completed in other lessons.
Choose File > Open, navigate to Lesson 21, and open the Lesson 21 Project file.
Close any open projects.
Play the Sahara Intro – Finished sequence in the Timeline.
You will output this finished sequence using different methods.
Play the Titanic Sound Effects sequence in the Timeline.
You will prepare the audio and video of this sequence for output.
During the editing process, you often deal with audio and video from different sources that were recorded at different levels and under different conditions. Perhaps you were given a narration recorded in a studio and ambient sound recorded in the field. Or you worked with some footage shot indoors at night and some outdoors in the bright sunlight. After you've made your creative decisions and finished editing your sequence, you can turn your attention to manipulating the video and audio so that all of the individual clips work together as a whole.
The video and audio levels should not be too high or too low. As you know, audio levels over 0 dB can create a distorted sound. And high video levels may result in video that is not broadcast safe, meaning it exceeds the limits of the FCC standards.
One of the most important considerations when dealing with audio levels is to maintain consistency throughout your sequence. In an earlier lesson, you used the Audio Mixer to balance tracks and create a good mix between your tracks. You also adjusted the sound level overlay lines directly on the clips to change the sound level for each clip. When you get to the finishing stage, you may realize that you need to make further adjustments to groups of clips before outputting the entire sequence. This can be done using the Gain Adjust window.
NOTE
Remember, computer speaker volume can be independently adjusted and is therefore not a reliable measure of the absolute level of a clip's sound.
Before you begin adjusting audio levels, choose Windows > Arrange > Audio Mixing to open the Audio Mixer into the interface. In the Timeline, click the control that reveals the Audio Controls panel.
Play the Titanic Sound Effects sequence and focus on the sound level of the music track.
In the Audio Mixer, mute tracks A3 and A4 and select both music tracks.
In this clip, there are keyframes for the fade under areas, and each sound plateau line is at a slightly different volume level.
Choose Modify > Levels, or press Option-Cmd-L.
In the Gain Adjust window, enter an Adjust gain by value of 6 dB and leave the Make Changes option on Relative. Watch the volume levels in the Timeline as you click OK.
Each sound plateau level is raised by the same relative amount, and the changes in volume created by the keyframes are preserved.
When you make a relative dB adjustment, the levels of the clips change by the amount you enter relative to their setting before the adjustment. For example, a relative adjustment of 4 dB on a clip that is set at –4 dB will change it to 0 dB. A relative adjustment of 4 dB on a clip that is set at –2 dB will change it to +2 dB.
NOTE
If you select Absolute in the Make Changes pop-up menu, Final Cut Pro will set the exact same audio level for the entire duration of each selected clip. This means that changes of volume within a clip created by keyframes will be deleted, since no change of value is allowed.
Raising the music level to a strong level now makes Al's sot clips sound too low.
Select the four sot clips where Al is speaking.
Choose Modify > Levels again, and this time enter an Adjust gain by value of 3 dB. Play the sequence.
This raised the sound levels of all the selected clips by the same relative amount.
Toggle the mute buttons for tracks A3 and A4 and listen to the sequence. Use the same approach to raise all the sound effects clips 6 dB.
TIP
The Gain Adjust window can also be used to raise or lower the sound levels for the entire sequence. Click in the Timeline and select Cmd-A to select all the clips. Then open the Gain Adjust window and enter the change.
You may need to make changes to raise or lower the overall output level of the sequence. For this you use the Audio Mixer Master fader. Adjusting the Master fader will not affect the volume level overlays of the clips in the Timeline, only the output volume level as the sequence is played back to tape or written to a movie file.
Play the sequence and drag the Master fader up and then back to its original position.

Notice that as you move the Master fader, the individual track faders do not move or change in response. The track faders reflect the relative levels of the individual sound clips, whereas the Master fader represents and controls the absolute output level.
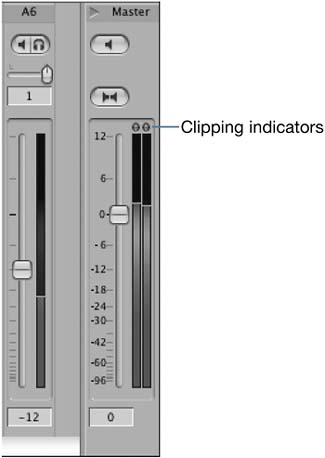
When adjusting the audio level of your sequence, the one absolute rule is never to allow the audio to peak over 0 db. Final Cut Pro can help you pinpoint exactly where the audio is peaking in your sequence by placing a marker in the Timeline at each peak.
Play the sequence once again and watch the Master fader in the Audio Mixer to see if there are any peaks in the sequence.
This is a very short sequence, and it's easy to see where the audio peaks occur by watching the Master fader clipping indicators. If you had a long sequence, it might be much more difficult to listen, watch, and pinpoint exactly where these peaks occur.
With the Timeline active, choose Mark > Audio Peaks > Mark.
A progress bar appears while Final Cut Pro examines the sequence. When the detection is complete, markers are placed in the Timeline ruler area wherever the audio peaks occur in the sequence. If the peak is sustained for more than an instant, a long mark—or mark with a duration—appears over the clip to indicate the length of the peaking audio.
Move the playhead over the marker above the camera flash sound effect clip and zoom in to get a better view.
NOTE
When the playhead is over an audio peak marker, Audio Peak appears as an overlay in the Canvas to identify it.
Select the camera flash clip and choose Modify > Levels, or press Cmd-Option-L.
In the Gain Adjust window, enter an Adjust gain by value of –5 dB and leave the Make Changes option on Relative. Click OK and play the clip.
The camera flash clip no longer causes the audio to peak.
If there are any other peak markers in the sequence, select the clip and adjust its levels appropriately using the Gain Adjust window.
To clear the audio peak markers from the Timeline, choose Mark > Audio Peaks > Clear.
One of the most common problems with video levels is that the whites of an image, or the luminance levels, are sometimes too bright. This can be a serious consideration because the FCC mandates that no video should be broadcast with a luminance level over 100 percent, which is considered to be broadcast safe. If a sequence does go over 100 percent, the video level is clipped during broadcast, similar to the way audio is clipped when it peaks over 0 dB. Also, a luminance level that is too high can bleed into the audio tracks and cause distortion.
To prepare the video portion of your sequence for output, you will need to monitor the luminance levels of your clips and then lower those levels that are too bright. Final Cut Pro has a tool called Range Check that will check both the luma and chroma of a clip to determine whether they are within an acceptable broadcast range. The Video Scopes tool is used as a reference for image levels.
With the Titanic Sound Effects sequence still active, choose Window > Arrange > Color Correction.
Click the Layout pop-up menu in the upper-left corner of the Video Scopes window and select Waveform.
The Waveform Monitor allows you to see the luminance values of the current frame.
Broadcast standards specify a maximum luminance level that any video should reach. This is represented in the Waveform Monitor as 100%.
Move the pointer up and down over the Waveform Monitor.
A yellow horizontal line follows the movement of the pointer, and a number in the upper-right corner displays the luma percentage of the current pointer location in the scope.
Move the playhead over the diver swings cam clip and choose View > Range Check > Excess Luma, or press Ctrl-Z.
A green circle and a checkmark appear in the Canvas, indicating that the luminance levels for that frame are broadcast safe and below 100 percent.
Park the playhead over the diver kneels clip.
An inrange icon appears with a checkmark and an upward arrow. This flags the frames of video that contain luma levels between 90 to 100 percent, but do not exceed 100. The green zebra stripes indicate the parts of the image that are nearing or touching the 100 percent ceiling.
Move the playhead over the ready for titanic sot clip.
The exclamation mark and the yellow triangle indicate that some white levels are above 100 percent. The red zebra stripes show the areas of the image that are above 100.
Choose Effects > Video Filters > Color Correction > Color Corrector 3-way.
Double-click the ready for titanic sot clip to open it into the Viewer and then click the Color Corrector 3-way tab.
Click a few times on the small triangle to the left of the Whites luminance slider.
Watch the Waveform Monitor as the luminance values decrease.
Continue clicking the triangle until most of the luminance values are below 100 and the exclamation changes to a checkmark. Move the playhead to a few different frames to make sure they are all broadcast safe.
Restore the interface by choosing Window > Arrange > Standard, or pressing Ctrl-U.
While you are editing a sequence, system performance is of the utmost importance. You want to be able to make creative decisions and see the results of those changes as quickly as possible. At times during editing, it may be less important to see the video at full quality, and more important to figure out placement and timing. When you are outputting a sequence, however, speed is no longer as important as quality. It is worth your while at this point to let the computer build full-resolution render files and play back the sequence at the best possible quality.
Click the RT pop-up menu and make sure Safe RT is selected.
When you select Safe RT, the render bars above the clips with effects become red.
Click the RT pop-up menu again and under Playback Video Quality, select High.
Click once again and make sure Full Quality is checked under the Record To Tape subheading.
Choose Sequence > Settings and click the Render Control tab.
Make sure all items are checked under the Render & Playback heading. Also make sure Frame Rate and Resolution are set at 100%.
You are now set up for optimal render and playback quality to output your finished sequence.
In Final Cut Pro, you have numerous options to export your finished sequence. Your workflow may include sending a Final Cut Pro sequence out to the Web, DVD, or another application. Keep in mind there is always more than one way to configure your export settings. Preparing media for digital distribution is an exercise in compromise between quality and performance. The higher the data rate, the higher the quality, but the worse the performance. Through practice and trial and error, you will have to decide for yourself the correct balance based on your distribution medium and your intended audience.
For distribution to the Web, you have to know how your audience will get on line. Will they use dial-up modems or broadband connections? Will they have the patience to wait for a download, or will they lose interest if the movie isn't displayed immediately? The answers to these questions will help you determine the correct settings for your Web video.
Open the Sahara Intro - Finished sequence
Choose File > Export > Using QuickTime Conversion.
Name the movie Sahara Web and navigate to the Exports folder as the destination.
From the Format pop-up menu, select MPEG-4.
MPEG-4 is capable of high levels of compression while maintaining good image quality. This makes it a good format for distributing media on the Web.
By leaving the settings at their defaults, you will create a movie that will download from the Internet in a reasonable time with a broadband connection, depending, of course, on its length.
NOTE
To lower the quality of the movie so it can be downloaded easily from a 56k modem, or to increase the quality for use with a T1 or faster connection, you can click on Options and modify the data rate, frame size, and frame rate. You can also choose one of the preset settings in the Use pop-up menu.
Click Save.
When the movie has finished exporting, choose Final Cut Pro > Hide Final Cut Pro to hide the interface.
From the Desktop, navigate to the Exports folder and double-click on the Sahara Web file that you just created.
The movie opens in QuickTime Player.
Play the movie and evaluate its quality.
If you are going to distribute your sequence on DVD, your video will at some point need to be converted to MPEG-2, because that is the format used to create video DVDs. If you have DVD Studio Pro on your computer, MPEG-2 will appear as a format option in the Final Cut Pro QuickTime Conversion export window. Some authoring programs convert a QuickTime file to MPEG-2 for you. If the DVD authoring program you are working with does this, you can export your sequence as a QuickTime Movie using current settings. Otherwise you have to convert your sequence to MPEG-2.
Return to Final Cut Pro by clicking its icon in the Dock.
Click the Timeline to make it active, and then choose File > Export > Using Compressor.
The Compressor application launches, and the Batch window appears. The Final Cut Pro project name and sequence name are listed in the Source Media column.
In the Batch Name field, enter For DVD.
Click the Preset pop-up menu and choose MPEG-2 60min High Quality Encode > All.
Two items appear in the Preset Column, the Destination Column, and the Output Filename column. The first item represents your audio, and the second item represents your video.
Click the Destination pop-up menu for the audio and choose Other.
Navigate to the Media > Exports folder and click Open.
The new destination appears in the Destination column.
Repeat steps 5 and 6 for the video.
Double-click the audio filename under the Output Filename column and type sahara uncompressed audio.
Double-click the video filename and type sahara dvd video.
Your sequence is now ready to be exported. To complete this process, you would click Submit to initiate the export. When the exporting is complete, you would import your MPEG-2 file into a DVD authoring program to build your DVD. Since MPEG-2 compression can be a lengthy process, for now you will quit out of Compressor and return to Final Cut Pro.
A video that plays on a CD is similar to a Web video, except that a CD can usually maintain larger data rates, and therefore better quality than Web video. In the following exercise, you will export a half-screen version of your sequence that you can burn onto a CD.
Choose File > Export > Using QuickTime Conversion.
Name the file Sahara CD and navigate to the Media > Exports folder.
Leave the Format set at QuickTime Movie and click the Options button.
Under the Video heading, click the Settings button and choose Sorenson Video from the pop-up menu.

Make sure Limit data rate to is unchecked.
Leave the other settings at their defaults, and click OK.
Under the Video heading, click the Size button, and click the Use custom size option.
Enter 320 for width and 240 for height, and click OK. This is half the size of a typical television image, which is 640x480.
Leave Sound settings at their defaults, uncheck Prepare for Internet Streaming, and click OK.
Click Save. This file can now be burned to a DVD.
When outputting your sequence to tape, Final Cut Pro can work with a wide variety of tape formats. It can output through FireWire to DV, DV50, and DVCPRO. It can output to other tape formats, from VHS, to DigiBeta, or even High Definition, as long as you have the additional hardware to support it. You will usually record a master copy of your sequence to the same tape format you started with, but you also might want to make a viewing copy on VHS, or whatever format your audience requires.
As part of the output to tape, you will generally record additional material, consisting of color bars and tone, program slate, countdown, and black, before the sequence begins. This is collectively called leader material and is added in different ways depending on the output method you choose.
NOTE
Before you begin outputting, make sure your record device is hooked up to your computer and turned on.
As in exporting, you can output a partial sequence using In and Out points in the Timeline, or the entire sequence.
There are three ways to output your sequence to tape:
Manual Record
Print to Video
Edit to Tape
The first two methods, Manual Record and Print to Video, are available through any FireWire recording device. The third method, Edit to Tape, is only available with devices that can be controlled by timecode.
The easiest way to output to tape is simply to play the sequence and press Record on the connected camera or deck. This is referred to as a manual recording process. You use this option when you want to make a quick dub to tape. This is the simplest but least precise output method. It is very much a “what you see is what you get” proposition. To record manually, you must have any pre-program, or leader elements, such as bars and tone, slate, black, countdown, and so on, edited before the head of your sequence in the Timeline. And you must also mix down your audio and render any unrendered video.
Make sure the Sahara Intro – Finished sequence is selected in the Timeline.
Click the Generated Items pop-up menu and select the appropriate Bars and Tone format for your sequence and recording device. Insert five seconds of Bars and Tone at the head of the sequence.
To create a slate, add a text edit and enter Sahara Documentary, today's date, your name as editor, and the length of the actual sequence. Make an Insert edit between the Bars and Tone clip and the first clip of the sequence.
To add black before and after the sequence, click the Generated Items pop-up menu and select Slug. Edit five seconds at the head and tail of the sequence.
NOTE
You don't have to edit leader material before the sequence to record it manually. But it's good to have at least five seconds of black at the head and tail of a sequence.
If necessary, press Option-R to render everything in the Timeline.
Park the playhead at the head of the Timeline.
The output of the Timeline begins wherever the playhead is parked. You will record a freeze frame of the playhead location until you play the sequence. When the playhead reaches the last frame of the sequence, it will again freeze on that frame. This is why it's good to have a slug of black after your sequence ends.
Cue up your record device and begin recording.
After at least five seconds, play the sequence.
When the taping is complete, allow additional seconds of black to be recorded and stop the recording device.
The Print to Video option allows you to select the pre-program leader elements from a list before outputting to tape. During the output process, Final Cut Pro will automatically generate these items as though they were edits in your sequence. This option is a good choice when you want to take advantage of the automatic leader options but don't have a device that can be controlled by timecode.
Click the Titanic Sound Effects sequence tab in the Timeline.
Choose File > Print to Video, or press Ctrl-M.
There are four parts to this window: the Leader, Media, Trailer, and Duration Calculator areas. In each area, you can check a box to include that option in the output or choose an option from the pop-up menus. You can also enter a specific amount of time for items.
In the Leader area, click the Color Bars box and change the duration to 20 seconds.
Click in all the boxes in the Leader section. Since this is a sample output, shorten the durations to Black=2, Slate=5, and Black=2.
In the Slate pop-up menu, select Text and type the sequence name, today's date, and your name in the text box to the right.
Click the Preview button to test the audio level going in to your recording device. If the level is not high enough, adjust it using the dB slider.
In the Media area, select Entire Media from the Print pop-up menu to output the entire Timeline contents, and click on Loop.
In the Trailer area, click Black and change the duration to 10 seconds.
Check the Duration Calculator to see how long the total output will be and make sure the tape you have selected is as long as this amount.
Click OK.
A progress bar appears as the output is configured and prepared.
When Final Cut Pro is ready to play back the sequence and other elements, a message will appear telling you to begin recording. Click OK.

Begin recording from your recording device and after about five seconds, click OK to start the playback and output of your sequence and elements.
The third way you can output your sequence to tape is to use the Edit to Tape method. It is similar to Print to Video in that the same set of leader and other options appear for you to select and include with your output. The primary difference is that the Edit to Tape window also has transport buttons for controlling the deck and marking an In point where you will begin recording your sequence.
In a professional environment, this can be especially helpful. For example, you may want to begin recording your program exactly at 1:00:00:00. If so, you can backtime the amount of time you need for your pre-program elements, maybe one or one-and-half minutes, and begin recording those elements at that specific time, say 58:30:00 or 59:00:00. Then your sequence will hit at precisely 1:00:00:00.
Choose File > Edit to Tape.
If you do not have a controllable device connected, a warning window will appear.
If properly connected, the Edit to Tape window opens.
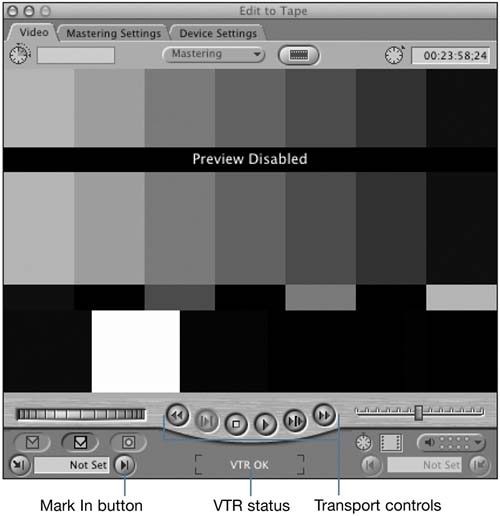
Click the Play button in the Preview area, play the tape and click the Mark In button, or press I, to mark where you want to begin recording.
Click the Mastering Settings tab and choose your settings just as you did in the Print to Video exercise.
Click the Video tab and drag the Sahara Intro – Finished sequence from the Browser to the preview area of the Edit to Tape window, select Assemble, and release the mouse.
When the Ready for playback dialog box appears, click OK to start the recording process.
The tape is automatically cued up, and the first elements of the output are recorded starting at the In point you marked.
Close the Edit to Tape window.
Often during the editing and output process, there is a request or need for a screening tape that has a visual timecode reference for the sequence superimposed on top of the image. This visual timecode display is sometimes called a window burn. A window burn of your sequence is very helpful when others need to screen your sequence and provide feedback referencing precise locations, or when working with a deck that cannot read timecode from the tape. To create a window burn, you must first nest your sequence and then apply a Timecode Print filter.
Click the Timeline and choose Edit > Select All, or press Cmd-A.
Choose Sequence > Nest Items.
Name the nest Sahara Intro – NEST, and click OK.
All the clips in the Timeline are nested into a single track of video and two tracks of audio.
Select the new nest and choose Effects > Video Filters > Video > Timecode Reader.
This applies a Timecode Reader filter to the entire sequence.
With the nest selected, Option-double-click the nested sequence in the Timeline to load it into the Viewer, and click the Filters tab.
Click a few different places in the Timeline and make sure the visual timecode display in the Canvas image area matches the Timecode Location field in the upper right of the Canvas.
Make changes to the size, color, opacity, and location of the timecode so it is easily seen over the video in the sequence.
Output the sequence with the added filter to tape using any one of the output methods described earlier in this lesson.
If you were working with a larger project and needed more hard drive space to store your media, you may have chosen to capture your footage at an offline resolution. If so, and once you complete editing with the offline media, part of the finishing phase will involve recapturing your video at full quality. This exercise takes you through the process of creating an offline version of your final sequence and setting it up for recapture.
NOTE
If you have created your own offline sequence, you can follow these steps, or simply save this exercise for later reference.
Open your offline project and select your finished offline sequence in the Browser window (or select the Sahara Intro – Finished sequence for practice), and choose File > Media Manager.
The Media Manager window appears.
Under the Media pop-up menu, choose Create offline.
Under the Set sequences to pop-up menu, select the format your full quality video will be.
Make sure Delete unused media from duplicated sequence is checked.
Check Use Handles and enter a duration of 1 second.
Uncheck the box next to Include affiliate clips outside selection.

Select whatever you prefer under the Base media file names on pop-up menu, and click OK.
Give your project a name, navigate to an appropriate folder, and click Save.
When your new project opens up, double-click the new offline sequence.
Your sequence opens up, but your media files are offline, though the generated items are still connected.
Select your offline sequence in the Browser and choose File > Batch Capture.
When the Batch Capture window opens, select the format for your full quality video under the Capture Preset pop-up menu, and click OK.
Follow the prompts to insert the appropriate tapes and recapture your project.
NOTE
If you are going to finish your project on a different editing system, you can output an edit decision list, or EDL, that can be read by other platforms and programs. The other editing system will use the EDL information to capture and configure your sequence just as you edited it in Final Cut Pro.
After you have fine-tuned and output your sequence, it is time to back up your project. It is important to have a backup strategy, not only for when you are finished with a project but all along the way. If the Autosave Vault is active, Final Cut Pro will automatically save a backup of your project at set time intervals as you work. In addition to this automatic backup system, here are a few other strategies to keep in mind.
Store your project files on a separate drive from your Autosave Vault. That way if either drive goes down, you will always have your project on the other drive.
Save a few different versions of your project throughout the life of the project. This reduces the chance of file corruption by ensuring that you don't work on the same physical file for an extended period of time.
Back up your project every few days to removable media, such as CDs, Zip disks, an iPod, or other FireWire devices. You can even back up your project to a server. The idea is to protect the project and yourself in case your computer or drive goes down.
As always, save your project frequently throughout your editing session.
How to adjust your video and audio levels
How to manage your render quality
How to export your sequence for DVD, CD, or the Web
How to output to tape
How to make a timecode window burn
How to recapture an offline project
How to back up your project
How to manage project media