
Lesson Files | FCP4 Book Files > Lessons > Lesson 4 Project |
Media | Titanic folder; Sahara folder; Music folder |
Time | This lesson takes approximately 90 minutes to complete. |
Goals | Build a sound track |
Replace edits | |
Edit from the Browser | |
Mark edit points in the Timeline | |
Delete clips and gaps in your sequence | |
Backtime an edit | |
Scrub clips in the Browser | |
Learn storyboard editing |
Overwrite and Insert edits are the basic building blocks of the editing process, but there are additional editing options that will broaden the scope of what you've learned. These options include a new type of edit, the Replace edit, plus building a sound track, adding cutaways, marking in the Timeline, deleting clips and gaps, editing from the Browser, and storyboard editing.
The lesson explores a number of editing options, including Replace edit.
To prepare for this lesson, you will launch Final Cut Pro, open the project for this lesson, and play one of the finished sequences.
Choose File > Open, or press Cmd-O.
Choose the Lesson 4 Project file from the FCP4 Book Files > Lessons folder on your hard drive.
Click the triangle to expand the SOT Clips bin.

The names of these clips all end with sot, which stands for sound on tape. An sot clip contains dialog of someone speaking on camera, as opposed to just natural or background sound.
If you want to close any other projects that may be open from a previous session, Ctrl-click their name tabs in the Browser and select Close Tab from the contextual menu.
In the Timeline, play the SOT Finished sequence. This is one of the sequences you will create in this lesson.
This footage is from a CBS special called Titanic – Treasure of the Deep. Al Giddings and his crew went to the bottom of the ocean in MIR subs to shoot footage of the Titanic. In this sequence, Al and the crew have not yet found the site.
In the Browser, create a new sequence and name it SOT Build.
Double-click to open the new SOT Build sequence in the Timeline.
In earlier lessons, you added narration and music tracks to a sequence. But sequences are often built around someone speaking on-camera with a sound track composed of several sound bites, or individual sot clips that represent a complete sentence or thought. In this exercise, you will mark and edit sound bites from the Al Giddings documentary footage.
From the SOT Clips bin in the Browser, open the anatole sot clip into the Viewer and play it.
This is an audio/video clip and has both a Video and Stereo (a1a2) tab in the Viewer. The single Stereo (a1a2) tab indicates that two tracks of source audio (a1 and a2) are combined as a stereo pair.
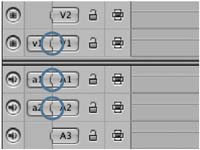
In the Timeline track control area, the v1, a1, and a2 Source controls are connected to, or patched, to the V1, A1, and A2 Destination controls.
Play the clip again and mark an In point before Al Giddings begins to speak on the intercom. Mark an Out point after he finishes speaking.
Place the playhead at the head of the Timeline, and edit the clip into the sequence as an Overwrite edit.
Notice the line beneath the clip name on each track. This indicates that the clip tracks are linked together.
Click once on the V1 portion of the clip in the Timeline.
Deselect the clip, and click in either one of the audio tracks.
Again, all tracks become selected.
Open the cam rolling sot clip. Mark an In point after Al says, “Roger that…,” just before he says, “Roger,” for the second time. Set an Out point by entering 4.15 in the Timecode Duration field. Place it in the Timeline at the end of the first clip.
Open the debris vis bad sot clip and mark an In point at the beginning of the sound bite and an Out point after he says, “…out here in the debris field.” Edit the clip to the Timeline as an Overwrite edit.
Open and mark the sound bites in the following clips, then edit them to the Timeline as Overwrite edits to complete building the sound track for this sequence.
birthday sot
Mark the In point at the head of the clip and the Out point after “…your birthday.”
right ocean sot
Mark an In point before he starts speaking and an Out point after he says, “Over.”
right ocean sot
In the same clip, mark a new In point just before the person off camera begins speaking and an Out point after Emory stops talking.
Press Cmd-S to save your project.
In the sequence you just created, the sound track begins to tell a story. But the current sequence is disjointed since the clips jump from one shot of one man talking to a similar shot of another man talking. When you cut between two similarly framed shots, you create what is called a jump cut. Jump cuts are jarring to the viewer and should be avoided.
In this exercise, you will use video from other clips to overwrite and cover some of the talking heads video while keeping the sound track intact. These edits are referred to as cutaways because you cut away to something else to cover the jump cut. Footage used to cover jump cuts is also referred to as cover footage or sometimes B-roll footage.
To edit video clips or cutaways over this existing sound bite material, you will mark In and Out points directly in the Timeline to identify the portion of material you want to replace or overwrite. Marking in the Timeline uses the same I and O shortcuts as marking in the Viewer, but you can also use the Timeline mark buttons, which are located in the Canvas window.
To make an edit, you need to know three things:
Duration of an edit
Location of an edit
Source content (if duration is created in the Timeline)
When you made edits to the Timeline in previous lessons, you identified the edit duration by marking In and Out points in the Viewer, and you identified the location of the edit by moving the playhead to a specific point in the Timeline. These three points—the Source In, Source Out, and playhead position—determined the duration, location, and content of this edit. This is referred to as 3-point editing. Three-point editing is the term used whenever you edit a clip to the Timeline using any combination of three edit points to determine the duration, location, and content of a clip.
Three-point edits can be determined in different ways. For example:
In point and Out point marked in the Viewer (duration and content) plus a start point in the Timeline determined by the placement of the playhead or a Timeline In point (location)
In point and Out point marked in the Viewer (duration and content) plus a stop point in the Timeline determined by a Timeline Out point (location)
In point and Out point marked in the Timeline (duration and location) and just an In point marked in the Viewer (content)
In point and Out point marked in the Timeline (duration and location) and just an Out point marked in the Viewer (content)
You will use these different methods to make 3-point edits in the following exercises.
For this exercise, you will first set one mark (the In point) in the Timeline to determine edit location. You will then mark an In point and an Out point in the Viewer to determine the duration and content of the cutaway clip. Before you begin editing, you will duplicate the current SOT Build sequence so that you can come back to it later for additional practice.
In the Browser, locate the SOT Build sequence in the Sequences bin. Ctrl-click it and select Duplicate from the contextual menu. Name this sequence Cutaways and double-click it to open it in the Timeline.
To cover the first jump cut in the sequence, move the playhead to the first frame of the second clip, cam rolling sot.
In the Timeline, Mark an In point at the head of the clip by clicking the Canvas Mark In button or pressing the I key.
An In point appears in the Canvas scrubber bar, in the Canvas image area, and in the ruler area of the Timeline. In the Timeline, the clips following the In point appear lighter.
TIP
You remove a mark in the Timeline just as you do in the Viewer, by using Option-I to remove the In point, Option-O for the Out point, or Option-X to remove both marks.

To edit just video to the V1 track, click the A1 and A2 track Destination controls to disconnect the source audio tracks.

At this point, you have determined the location of the edit, but not the duration or content.
In the Browser, click the triangle to expand the Titanic Cutaways bin and double-click to open the moving cam lights cu clip in the Viewer.
Mark an In point just before the right arm starts to open, and set a duration of 4:15.
These marks identify the duration of the edit as well as the content.
Drag the clip from the Viewer to the Canvas Edit Overlay and perform an Overwrite edit, or you can click the Overwrite edit button or press the F10 shortcut.
Play the clip in the sequence.
Press Cmd-S to save the project.
A second way to create a 3-point edit is to mark both an In and an Out point in the Timeline to identify clip location and duration and mark just one edit point in the Viewer to specify clip content, or where the clip will begin. The source clip will automatically stop at the Out point in the Timeline.
In the Timeline, mark an In point on the first frame of the third clip, debris vis bad sot.
Mark an Out point just before the man in the middle of the image starts to move forward to look out the window.
The In and Out points in the Timeline define the location and duration of the new clip. Timecode durations for marks in the Timeline appear in the Canvas Timecode Duration field.
From the Browser, open the debris around sub clip, and mark an In point at the beginning of the clip to identify the start of source content.
Edit this clip into the sequence as an Overwrite edit.
In the Timeline, the first frame of the source clip is placed at the In point of the Timeline. The Out point in the Timeline determines where the clip stops, or how much of the clip is used (duration).
Like setting marks in the Viewer, you can also set an In point in the Timeline and enter a duration in the Canvas Timecode Duration field to determine the Out point.
To cover the jump cut between the two right ocean sot clips, mark an In point on the first frame of the last clip in the sequence.
In the Canvas Timecode Duration field, enter 6. (six followed by a period) and press Return.
An Out point is automatically entered in both the Timeline ruler area and the Canvas scrubber bar.
Open the sea bottom cu clip. To use this clip from the beginning, you do not need to mark the clip.
Edit this clip into the Timeline as an Overwrite edit.
The third method to create a 3-point edit is used when the placement of the last frame of a source clip is more important than the first. In this case, you mark In and Out points in the Timeline to create the edit location and duration, and mark an Out point in the Viewer on what is to be the last frame of the clip content. Final Cut Pro aligns the source clip's Out point with the Out point in the Timeline and uses whatever portion of the clip it needs to fill the distance back to the Timeline In point. In editing, this is referred to as backtiming a clip.
In the Timeline, play the debris vis bad sot clip, and mark an In point just before the man on the right (Al Giddings) turns his head to look at the camera.
Mark an Out point on the last frame of the clip.
TIP
An easy way to find an Out point is to press the down arrow key to go to the first frame of the next clip, then press the left arrow key to move back one frame. Look for the last frame indicator in the lower right of the Canvas image area.

By looking at the marked duration in the Canvas Timecode Duration field, you can see how much source content you will need to cover the duration of this edit.
From the Browser, open the cam stirs debris clip, and mark just an Out point at the end of this clip.
Edit this clip into the sequence as an Overwrite edit and play the clip.
The Out point of the source clip is aligned with the Out point in the sequence.
Press Cmd-S to save your project and edit decisions.
In the preceding exercise, you marked the Timeline to replace portions of clips in the Timeline. But you can also replace the full length of a clip in the Timeline with other content. You do this with the Replace edit function. Replace edit replaces any clip in the Timeline with a new source clip from the Viewer. The clip length and position in the Timeline remain the same. So whatever new source clip you replace it with must be at least the same duration as the clip that is being replaced. If you don't select a source clip that's long enough to replace the Timeline clip completely, a message will appear saying “Insufficient content for edit.”
An important consideration when making Replace edits is where the playhead is located in both the source clip in the Viewer and in the sequence clip in the Timeline. The Replace edit function depends on the alignment between the two playhead positions. There are three ways to create a Replace edit:
Starting from the head of a sequence clip and replacing forward
Starting from the tail of a sequence clip and backtiming
Starting from a specific point within a clip and replacing from that point both backwards and forwards
In the following exercises, you will duplicate the original sequence and Replace the video in three of the sound bite clips.
In this first Replace edit exercise, you will park both the Viewer and Time line playheads on the first frame of the two clips that are involved in the Replace edit. Here, the replace function starts with the first frame of the new clip and fills forward for the full duration of the clip you are replacing in the Timeline.
In the Browser, locate the SOT Build Short sequence and duplicate it. Name the duplicate SOT Replace and double-click it to open it in the Timeline. Close all other open sequences and play the SOT Replace sequence.
This sequence is a shortened version of the SOT Build sequence you created earlier in this lesson.
To edit just video to the Timeline, make sure the A1 and A2 Destination controls are disconnected from the Source controls.
Using the Replace edit function, you will replace the video of every other clip in this sequence, beginning with the second clip.
In the Timeline, park the playhead on the first frame of the fourth clip, birthday sot.
From the Browser, open the fish swim sub clip and play it. Park the playhead at the head of this clip.
Drag the source clip to the blue Replace section in the Canvas overlay, release the mouse, and play the edit.

The entire video portion of the Timeline sequence clip is replaced by source content starting at the Viewer playhead position.
NOTE
The fish swim sub clip is not underlined, indicating that it is not linked to the audio clips below it. If you click on it, it will be selected but the audio clips will not.
You can also use the Replace edit function to backtime a replacement clip into position. This is similar to the 3-point backtiming exercise except that here you are replacing an entire clip. You will place the Timeline playhead on the last frame of a clip in the sequence. In the Viewer, you will park the playhead on the frame you wish to align with the Timeline playhead. Final Cut Pro will line up the two clips and fill in, or backtime, from that point.
In the Timeline, place the playhead on the last frame of the last clip, right ocean sot (the second one). Make sure you see the last frame indicator in the Canvas.
Open the diver swings cam clip in the Viewer and play it. Position the playhead toward the end of the clip where the diver turns his head to finally look through the camera.
This time, click the blue Replace edit button to edit the clip as a replace edit.
Play the new edit.
The last frame on which you parked the Viewer playhead now appears as the last frame in the sequence. All earlier material is filled in automatically to cover the duration of the sequence clip.
You can also mark a replacement frame anywhere in the middle of a clip, on a specific point of sound or action. For example in this exercise, Al Giddings says, “The video camera is on…,” in one of the sound bites. You can position the playhead at that location in the Timeline, and in the Viewer, position the playhead on a clip when the video camera light actually turns on. Using Replace edit in this situation will align or sync those two points of action.
In this case, rather than filling from first frame forward or last frame backward, Final Cut Pro will fill out the frames before and after the playhead to fill the existing clip duration.
In the Timeline, play the cam rolling sot clip, and park the playhead after Al says, “The video camera is on.” This is the point you want to match with new video.

Open the lights go on clip into the Viewer and play the clip. Park the playhead toward the beginning where you see a light first start to come on.
In this situation, there does not appear to be enough source content for the edit. That is, the distance from the start of the source clip to the playhead position is not as long as the distance from the start of the sequence clip to its playhead position.
Click the Replace edit button.

When you try to use a Replace edit here, a message appears saying you don't have enough content.
Play the source clip again, and this time position the playhead where the third light begins to turn on.
Click the Replace edit button, or press F11.
Play the sequence.
The light turns on at the same time Al says the camera is on.
Press Cmd-S to save project changes.
Deleting clips in the Timeline produces two results. You can delete a clip and leave a gap the length of the clip behind. Or you can delete a clip and the gap at the same time. You can select and delete an entire clip, or you can use In and Out points to determine just a portion of a clip to delete.
You can also mark a portion of the entire sequence, which might include several clips, and delete that chunk of material.
When you delete from the Timeline and leave a gap, you are lifting material out of the Timeline, but not changing anything else. This type of delete is called a lift. When you delete a clip and the gap together, you create a rippling effect that pulls up the following clips in the sequence.
In the Browser, duplicate the SOT Build sequence created earlier in this lesson. Rename it SOT Deletes and open it in the Timeline.
This is the first, longer version of the sound bites sequence you cut together.
In the Timeline, click the birthday sot clip to select it.
Press the Delete key.
The clip is removed, or lifted, from the sequence, but the space it occupied remains, leaving a gap. Whenever a gap in the sequence occurs, Final Cut Pro will continue to play through it, acting as though it is a black clip.
Now delete this clip by pressing Shift-Delete. You can also use the forward Delete key on an extended keyboard.
The clip, along with the gap, is removed, and all the clips that follow are moved up in its place. Deleting this gap created a ripple effect in the Timeline.
As a general editing rule, when you decide against a shot, you will usually want to remove the clip along with its gap by using Shift-Delete. But if you need to hold the place a clip occupied for sequence timing purposes, you would lift the clip by using just Delete.
You can apply these same deleting techniques to a group of clips or to a marked portion of the sequence.
In the current SOT Deletes sequence, mark an In point in the second audio clip, cam rolling sot, before Al says, “The video camera is rolling.”
Mark an Out point on the last frame of the debris vis bad sot audio clip.
Press Delete to lift the material and leave a gap.
Press Cmd-Z to undo the delete.
Press Shift-Delete to remove the material along with the gap.
This pulls the following clip up to the last frame of the clip you changed.
Play this area of the sequence.
When you mark In and Out points in the Timeline, you have already seen how the selected tracks between those edit points become lighter. This helps you see what tracks will be affected when you delete. But by toggling the AutoSelect control in the Timeline, you can deselect a track so it will not be affected when you delete. Autoselecting a clip can also be used at other times, such as copying and pasting only one track of a clip.
Press Cmd-Z to undo the last delete.
The material between the edit points appears in the Timeline as it originally did.
In the Timeline track control area, click the AutoSelect control for the V1 track.
In the Timeline clip area between the In and the Out points, the V1 track portion is no longer lighter. This portion of the track will not be affected by the delete action you take.
Press the Delete key.
The selected audio tracks between the In and Out points are deleted.
Press Cmd-Z to undo this delete.
This time, toggle the AutoSelect control back on for the V1 track but toggle it off for either the A1 or A2 track.
Since these two tracks are a stereo pair, when you toggle the AutoSelect off for one, they both are deselected.
Press Delete again.
This time, just the video track is deleted. You could use the Replace edit function to fill this gap with another clip.
Gaps are not clips, but you can select and delete them like clips. There are also shortcuts to move to gaps so you can find gaps anywhere in your sequence. This may seem obvious, but you may be zoomed into a clip and can't see the gap in your sequence view. Checking for gaps before you output to tape prevents leaving any black spaces in your sequence.
Open SOT Build sequence.
In the track control area, make sure the AutoSelect control is active for all the tracks.
Click the birthday sot and Cmd-click the cam rolling sot clip, and press Delete.
Click in the second gap area to select it.

With the second gap selected, press Delete.
Unlike what happens when you delete a clip, pressing Delete alone will remove the gap and pull up the following clips.
Press Cmd-Z to return the gap to the sequence.
Press Home to move the playhead to the beginning of the sequence.
To move to the next gap in the sequence from the playhead position, choose Mark > Next > Gap, or press Shift-G.
Navigating to a gap moves the playhead to the first frame of that gap.
Press Shift-G again to move to the next gap.
Press Option-G to move back from the current playhead position to the previous gap.
To remove this gap another way, choose Sequence > Close Gap, or just select the gap and press Delete as you did before.
Storyboards are used to explain the flow of a story with pictures or drawings. For example, to explain how a scene will look when it's cut together, an artist sketches intended camera shots and places them side by side as individual frames. This allows the director to imagine more clearly what the film will look like or anticipate what problems may arise during the shoot.
In Final Cut Pro, you can also arrange, or storyboard, clips. Storyboard editing begins in the Browser. You select clips you want to use in your sequence and place them in a new bin. You work with thumbnail images of your clips as though you were working on a jigsaw puzzle of your story. Then you arrange the clips, or storyboard them, according to how you would like to see them in the sequence, and you drag them to the Timeline as a group.
For this exercise, you will work with the Sahara Intro clips you used in a previous lesson. You will begin by organizing the project elements.
In the Browser, create a new sequence and name it Storyboard Edits. If necessary, drag its icon into the Sequences bin and double-click it to open it in the Timeline.
Close all other open sequences by Ctrl-clicking their tabs in the Timeline and selecting Close Tab.
In the Browser, click the bin triangles to close those bins displaying clips.
You have scrubbed clips in the Viewer window by dragging the playhead through the scrubber bar. But you can also scrub a clip in the Browser when it is in a particular icon view. Scrubbing a thumbnail clip in the Browser requires a new tool, the Scrub tool, which shares the same square in the Tool palette as the Zoom In and Zoom Out tools (magnifying glass).
Double-click the Sahara Intro bin icon to open it as a separate bin window.
If that bin appears in list view, Ctrl-click in the name column and select View as Large Icons. If necessary drag the lower-right corner of the Sahara Intro bin window down and out over the Viewer area so you can see the clips in this bin.
In the Tool palette, click and hold the Zoom In tool, and select the Scrub tool.
The Scrub tool has left and right (forward and backward) arrows on the icon.
With the Scrub tool, click the camels in desert clip in the Browser and drag across the image to the right to scrub through the clip content.
When you drag, the tool icon disappears so you can see the content of the clip. Dragging right moves you forward and dragging left moves you backward in the clip.
Click the snake in sand thumbnail and drag it left and right.
When you release the clip after scrubbing through it, the thumbnail image reverts back to the first frame of the clip. The thumbnail image remains dark because the image is still selected.
To see a clear thumbnail image, deselect the clip by clicking in the gray area with the Scrub tool or by pressing Cmd-Shift-A.
Scrub through a few other clips in this bin.
When you capture media from your original source tapes, you often begin a few seconds before a specific action begins. This extra footage gives you additional material, or handles, for adding dissolves or fade-ups in the editing process. It also ensures that the start of any action is clear and complete.
In a thumbnail image, a clip is always represented by the image of the first captured frame. This is called the poster frame because it represents a clip visually the way a poster represents a movie. But sometimes the poster frame of the captured clip does not indicate the action that follows. For example, you may have a clip of someone skating, but because you included a few extra seconds at the head of the clip when capturing, you don't see the skater in the thumbnail image. There are several ways you can change a clip's poster frame to identify the content of the clip more accurately.
With the Scrub tool, scrub through the digging mouse clip until you see the mouse appear, but don't release the mouse. This is the frame you will use to represent this clip.
While still holding on to this frame, press and hold down the Control key, then release the Scrub tool, then release the Control key.
Deselect the clip to see a clearer image of the new thumbnail representation.
Repeat steps 1–3 to create new poster frames for each of the clips except the audio narration and the bug buried clip.
You can also set a new poster frame for a clip in the Viewer.
With the Scrub tool, double-click the bug buried clip.
The clip opens in the Viewer, and the Viewer window pops in front of the Sahara Intro clips window.
In the Viewer, move the playhead to where the bug emerges from the sand.
Choose Mark > Set Poster Frame, or press Ctrl-P.
The thumbnail image updates in the Sahara Intro bin window.
Click the Sahara Intro bin window to make it active.
Now you're ready to put together a picture puzzle of your sequence. Where you place the images in the bin will determine how they eventually line up in the Timeline sequence. Final Cut Pro starts with the first clip at the top-left corner of the bin and reads across the line. It then drops down to the next row, and so on, like reading a book. In the previous lesson, you dragged clips from the Viewer directly to the Timeline one at a time. But in storyboard editing, you drag a group of clips into the Timeline directly from a bin.
To convert your pointer back to the default arrow Selection tool, either click the Selection tool in the Tool palette or click in the Timeline and then press A.
Size the Sahara Intro bin window so you can see all the clips in the bin.
Organize and position the clips so you start and end with one of the camels clips. Put the furry animals together, followed by the scaly reptiles, then the birds. Be creative with the scorpion and bug, and drag the narration and music clips out of the way in a corner.
As you arrange the clips, make sure the rows slant down from left to right. Higher clips, even though they are on the same row, will actually go first when you edit the group to the Timeline. Higher overrides the left-to-right order.
In the Sahara Intro bin, use a marquee to select all the clips except the music and intro narration clips.
Drag one of the selected clip icons down into the Timeline, but don't release the mouse.
The entire group of selected clips moves together.
Position the clips at the head of the sequence as an Overwrite (downward arrow/solid clip box) edit and release the mouse.
NOTE
Depending on the size of your Timeline, you may not see all of the clips in full view. If not, continue with the edit and then press Shift-Z to bring the sequence into full view.

All the clips are positioned in the Timeline just as they were in the Storyboard bin. If a clip is marked in the bin, just the marked portion will be edited.
Close the storyboard bin window by clicking the OS X Close button.
Play the sequence.
Always save your project before you close it or quit Final Cut Pro.
How to edit a sound track
How to edit using Timeline edit points
How to backtime an edit
How to delete clips and gaps in your sequence
How to use replace edits
How to use the Scrub tool
How to lay out a storyboard of your clips
How to drag a clip or group of clips into the Timeline