
This chapter covers FAQs relating to the generic workbench and its APIs. Workbench is the term used for the generic Eclipse UI. Originally the UI was called the desktop, but because Eclipse was a platform primarily for tools rather than for stationery, workbench was deemed more suitable. In Eclipse 3.0, tools are no longer the sole focus, so the term Rich Client Platform, is starting to creep in as the term for the generic, non-tool-specific UI. After all, people don’t want to play mine sweeper or send e-mails to Mom from such a prosaically named application as a workbench. A rich client, on the other hand, is always welcome at the dinner table.
Many of the important workbench concepts, such as editors, views, and actions, generate enough questions that they deserve their own chapters. This chapter focuses on general questions about integrating your plug-in with the various extension hooks the workbench provides.
Denizens of the Eclipse newsgroups, clearly expressing frustration with the overwhelming sea of terms, have been known to ask, “What is the Eclipsian word for X?,” or “What is that thingy called in Eclipse Speak?.” In an effort to assuage the suffering of new users, the following is a mile-high view of the pieces of the Eclipse UI.
The term used to represent the entire UI is workbench. The workbench itself has no physical manifestation, but the workbench object is used to access most of the general APIs and services available in the generic UI. The workbench is displayed in one or more workbench windows. These basic top-level windows make up an Eclipse application. Note that dialogs, wizards, and other transient pop-ups are not called workbench windows.
At the top of each window is the title bar, typically a native widget with a title and controls for resizing and closing. Next comes the menu bar, and after that is the cool bar. The cool bar is a fancy term for a bar of buttons that can be dragged around and reorganized across multiple lines. On the left, right, or bottom, depending on user preference, is the fast view bar, where fast views—iconified views—are stored. At the bottom is the status line, where various bits of information are shown; the far-right corner of the status line is called the progress indicator.
The main body of a workbench window is represented by the workbench page, which in turn is made up of workbench parts, which come in two varieties: views and editors. The initial size and orientation of the parts in the page are determined by a perspective.
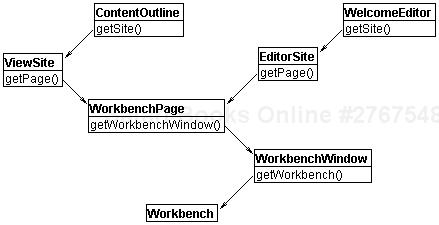
Parts interact with the rest of the window via their site. The site is not a visible entity but simply an API mechanism to separate the methods that operate on the view from the methods that operate on controls and services outside the view. This allows the workbench implementers to add new features to the sites without breaking all the plug-ins that implement the parts. Figure 9.1 Spider graph shows how a view (ContentOutline) and an editor (WelcomeEditor) each has its own site, which is hosted by a page, inside a workbench window, owned by the workbench.
In addition, sites bring together that functionality that different parts of the workbench had in common but could not be expressed well in a single inheritance hierarchy.
The ISelectionService tracks all selection changes within the views and editors of a workbench window or page. By adding a listener to this service, you will be notified whenever the selection changes. Selections in views are typically returned as IStructuredSelection instances, and selections in editors typically implement ITextSelection. You should avoid any expensive computation from within a selection listener, because this event fires quite frequently as the user is moving around in the UI and typing in editors. A more efficient approach is to avoid adding a listener, and simply asking the selection service for the current selection when you need it.
You can also ask for the selection in a particular view by passing the view ID as a parameter to the getSelection method:
IWorkbenchPage page = ...;
//the current selection in the entire page
ISelection selection = page.getSelection();
//the current selection in the navigator view
selection = page.getSelection(IPageLayout.ID_RES_NAV);
//add a listener
ISelectionListener sl = new ISelectionListener() {
   public void selectionChanged(IWorkbenchPart part,
      ISelection sel) {
      System.out.println("Selection is: " + sel);
   }
};
page.addSelectionListener(sl);
//add a listener to selection changes only
//in the navigator view
page.addSelectionListener(sl,
   IPageLayout.ID_RES_NAV);
IWorkbenchPage implements ISelectionService directly. You can also access a selection service to track selection within a workbench window by using IWorkbenchWindow.getSelectionService.
To find out what view or editor is selected, use the IPartService. As with ISelectionService, you can add a listener to this service to track the active part or simply query it whenever you need to know. Note, saying that the part is active does not imply that it has focus. If a dialog opens on top of the workbench window, the active part does not change, even though the active part loses focus. The part service will also notify you when parts are closed, hidden, brought to the top of a stack, and during other lifecycle events.
Two types of listeners can be added to the part service: IPartListener and the poorly named IPartListener2. You should always use this second one as it can handle part-change events on parts that have not yet been created because they are hidden in a stack behind another part. This listener will also tell you when a part is made visible or hidden or when an editor’s input is changed:
IWorkbenchPage page = ...;
//the active part
IWorkbenchPart active = page.getActivePart();
//adding a listener
IPartListener2 pl = new IPartListener2() {
   public void partActivated(IWorkbenchPartReference ref)
      System.out.println("Active: "+ref.getTitle());
   }
   ... other listener methods ...
};
page.addPartListener(pl);
IWorkbenchPage implements IPartService directly. You can also access a activation service by using IWorkbenchWindow.getPartService.
Many workbench APIs are accessible only from IWorkbenchWindow or IWorkbenchPage. This generally raises the question, How do I get a reference to a window or a page? As it turns out, the answer isn’t always straightforward There appears to be an obvious API on IWorkbench for getting this:
IWorkbench wb = PlatformUI.getWorkbench();
IWorkbenchWindow = win = wb.getActiveWorkbenchWindow();
IWorkbenchPage page = win.getActiveWorkbenchPage();
However, if you read the fine print on these methods, you’ll see that they will return null if the active shell is not a window. This means that when a dialog or other shell has focus, you might not be able to sue these APIs to access the active window or page.
To avoid getting null windows and pages, you can get your hands on a window or a page in another way. From within the implementation of any view or editor, you can do the following:
IWorkbenchPage page = getSite().getPage();
From an action defined in a workbench action set, you can access the window from the init method:
class MyAction implements IWorkbenchWindowActionDelegate {
   private IWorkbenchWindow window;
   ...
   public void init(IWorkbenchWindow win) {
      this.window = win;
   }
}
Similarly, actions contributed to the popupMenus extension point always have an initialization method that sets the current part before the action’s run method is called. All wizard extension points also have an IWorkbenchWizard init method that supplies the wizard with the current workbench window before the wizard is launched. In short, if you look carefully, you can almost always get at the current window or page, no matter where you are in the Eclipse UI.
The status line has two areas for showing progress. The status line manager has a progress monitor that can be used when you want to block the user from continuing to work during an operation. This progress bar is used as follows:
IActionBars bars = getViewSite().getActionBars();
IStatusLineManager statusLine = bars.getStatusLineManager();
IProgressMonitor pm = statusLine.getProgressMonitor();
pm.beginTask("Doing work", IProgressMonitor.UNKNOWN);
pm.worked(1);
.... the actual work is done here...
pm.done();
If the amount of work to be done can be estimated ahead of time, a more intelligent value can be passed to beginTask, and calls to worked can be used to provide better progress feedback than a continuous animation.
The far right-hand side of the status line is used to show progress for things happening in the background. In other words, when progress is shown here, the user can generally continue working while the operation runs.
Eclipse 3.0 introduced a central new workbench progress service. This service combines the advantages of busy cursors and Progress dialogs by switching from one to the other, depending on the length of the long-running task. The service also handles a further wrinkle caused by the introduction of background jobs. It is now possible for a short-running task to become blocked by a longer-running job running in the background, owing to contention for various resources. When this happens, the progress service opens a richer Progress dialog with a details area showing all running background jobs. This allows the user to see what is happening and to cancel either the foreground or the background task, depending on which is more important.
The service is used much like the SWT BusyIndicator. Simply pass an IRunnableWithProgress instance to the busyCursorWhile method. The UI will prevent further user input and report progress feedback until the runnable completes. Note that the runnable executes in a non-UI thread, so you will have to use asyncExec or syncExec to execute any code within the runnable that requires access to UI widgets:
IWorkbench wb = PlatformUI.getWorkbench();
IProgressService ps = wb.getProgressService();
ps.busyCursorWhile(new IRunnableWithProgress() {
   public void run(IProgressMonitor pm) {
      ... do some long running task
   }
});
This progress service was introduced to unify a number of progress-reporting mechanisms in Eclipse 2.1. JFace provides a Progress Monitor dialog, SWT provides a busy indicator, and the workbench provides a progress indicator on the status line. Each of these mechanisms has its own advantages and disadvantages. The busy cursor is the least obtrusive and works well for tasks that typically take a second or less. The Progress dialog provides much more information and allows the user to cancel but is visually distracting, especially on short tasks as it pops up over the user’s work. The status line progress monitor is a bit less obtrusive but doesn’t give an obvious indication that the UI is not accepting further input, and the space for presenting progress indication is very constrained. The new progress service tries to achieve a balance by automatically adapting between a busy cursor and a dialog, depending on the situation.
When pressing Ctrl+j in a text editor, the editor enters incremental find mode and prints messages in the status bar in the lower left-hand corner. This can be done from within any view as follows:
IActionBars bars = getViewSite().getActionBars();
bars.getStatusLineManager().setMessage("Hello");
Editors can access the status line via IEditorActionBarContributor, which is given a reference to an IActionBars instance in its init method. The contributor is accessed from an editor by using
IEditorPart.getEditorSite().getActionBarContributor();
Note that the status line is shared by all views and editors. When the active part changes, the status line updates to show the new active part’s message.
Parts can also specify an error message on the status line, using the method setErrorMessage. The error message, if provided, always takes precedence over any non-error message that was previously shown. When the error message is cleared, the non-error message is put back on the status line.
The workbench provides the org.eclipse.ui.decorators extension point, for contributing label decorators. These decorators can either be entirely declarative, or they can contribute an implementation of the interface called ILightweightLabelDecorator to perform the decoration. The mechanics of implementing decorators are well described in the online Eclipse articles and in the platform documentation.
Suppose that your viewer contains model elements for which other plug-ins have defined label decorators. To make those decorations appear in your viewer, you need to install a decorating label provider. Assuming that you have already written your own basic label provider, simply do the following to add declarative decorations from other plug-ins:
ILabelProvider lp = ... your basic label provider
ILabelDecorator decorator = PlatformUI.getWorkbench().
      getDecoratorManager().getLabelDecorator();
viewer.setLabelProvider(
      new DecoratingLabelProvider(lp, decorator));
You can force the workbench to exit by calling the close method on IWorkbench. This is the same behavior as would occur if the end user had selected File > Exit. If you want the workbench to close and immediately restart—for example, if a new plug-in has been installed and you have a plug-in that does not support dynamic plug-ins—you can instead call the restart method.
Note that although API exists for exiting and restarting the workbench, this measure is fairly drastic and should not be employed lightly. As support for dynamically installed plug-ins increases, it will become increasingly unacceptable to restart the workbench to install new plug-ins. At the very least, before calling either of these methods, you should prompt the user as to whether he or she want to exit.
The IAdaptable mechanism in Eclipse can be used to add visual presentation to your model objects without introducing UI code in your model layer. This follows the layering principle followed in the Eclipse Platform, where core code has no dependency on UI code. To do this, your model objects must implement the IAdaptable interface. This is typically achieved by simply subclassing PlatformObject, but if that’s not possible, you can implement the interface directly. See the javadoc of PlatformObject for more details.
In your UI layer, you need to register an adapter factory that can return an implementation of IWorbenchAdapter for your model objects. If your adapter doesn’t need to maintain any state, it’s a good idea to make it a singleton to avoid creating extra objects for each model element. See the class WorkbenchAdapterFactory in the org.eclipse.ui.ide plug-in for an example of an adapter factory that creates IWorkbenchAdapter instances for IResource objects.
Once you have defined and registered such a factory, you can simply use WorkbenchContentProvider and WorkbenchLabelProvider in any tree or table viewer that contains your model objects. These special providers delegate their implementations to the underlying model objects by asking their IWorkbenchAdapter to compute the label or children of the elements.
JFace provides infrastructure for creating and presenting preference pages within a Preference dialog. Pages implement IPreferencePage, usually by subclassing the default implementation PreferencePage or FieldEditorPreferencePage. The org.eclipse.ui.workbench plug-in defines an extension point for contributing preference pages to the workbench preference dialog, typically available via Window > Preferences. Note that you can use the preference page infrastructure without even using the preferences extension point if you want to present preference pages outside the standard workbench Preference dialog.
Note
FAQ 161 How do I launch the preference page that belongs to my plug-in?
eclipse.org article “Preferences in the Eclipse Workbench UI (Revised for 2.0)”
eclipse.org article “Simplifying Preference Pages with Field Editors” eclipse.org article “Mutatis Mutandis—Using Preference Pages as Property Pages”
Go to Platform Plug-in Developer Guide > Programmer’s Guide > Preference pages
The workbench provides two facilities for presenting the properties of an object: the Property dialog and the Properties view.
The Property dialog is invoked by selecting an object and pressing Alt+Enter or by selecting File > Properties. The workbench provides an action, PropertyDialogAction, that you can add to your own view’s menu for opening the Property dialog. The Property dialog contains pages contributed by the org.eclipse.ui.propertyPages extension point. Plug-ins can contribute pages in this way for any type of domain object.
The Properties view, also known as the property sheet, is not populated using an extension point but is activated through API, by the PDE editors, or manually, through Window > Show View. This view, like the Outline view, asks the active workbench part to contribute its contents. When a part becomes active, the property sheet asks it to adapt to IPropertySheetPage, using the IAdaptable mechanism:
IWorkbenchPart.getAdapter(IPropertySheetPage.class);
If it wants a completely customized property page, the part can respond to this request and provide its own page. If the part does not provide a page, the property sheet presents a default page that solicits key/value pairs from the active part’s selection. This again uses the IAdaptable mechanism to ask the selected element whether it wants to contribute properties. This time it asks the element for an implementation of IPropertySource. The property source is responsible for providing its keys and values, changing values, and restoring default values.
Note
FAQ 126 How do I use IAdaptable and IAdapterFactory?
FAQ 293 How do I store extra properties on a resource?
eclipse.org article “Take control of your properties” eclipse.org article “Simplifying Preference Pages with Field Editors”
eclipse.org article “Mutatis mutandis—Using Preference Pages as Property Pages”
Go to Platform Plug-in Developer Guide > Programmer’s Guide > IDE UI Concepts
The Property dialog appears when you select an object in a view and choose Properties... from the context menu or File menu. If you want such an action for your own view or editor, you can simply add an instance of org.eclipse.ui.dialogs.PropertyDialogAction to your view’s context menu. This action will compute what property pages are applicable for the current selection and then open a dialog on those property pages.
You can also open a Property dialog on a set of property pages of your own choosing. This works exactly like the JFace Preference dialog: You supply the dialog with a PreferenceManager instance that knows how to build the set of pages to be shown. The only difference with the Property dialog is that you must also supply it with the current selection:
ISelection sel = ... obtain the current selection
PropertyPage page = new MyPropertyPage();
PreferenceManager mgr = new PreferenceManager();
IPreferenceNode node = new PreferenceNode("1", page);
mgr.addToRoot(node);
PropertyDialog dialog = new PropertyDialog(shell, mgr, sel);
dialog.create();
dialog.setMessage(page.getTitle());
dialog.open();
Some special kinds of wizards have to be registered with the platform in your plugin.xml file. These wizards are found under the File > New, File > Import, and File > Export menu actions. These wizards are declared using the org.eclipse.ui newWizards, importWizards, and exportWizards extension points, respectively. Once you have declared your wizard with the appropriate extension point, the platform will take care of displaying it in the appropriate places. Following is an example declaration of a new wizard:
<extension
      point="org.eclipse.ui.newWizards">
   <wizard
         name="New Addition"
         class="org.eclipse.faq.examples.AddingWizard"
         id="org.eclipse.faq.examples.addingWizard">
   </wizard>
</extension>
This wizard will appear by default under File > New > Other.... To make the wizard appear under the new-project category, add the attribute project="true" to the extension declaration.
To add your own wizard category, use
<category
    id="org.eclipse.faq.examples.MyWizard"
    name="FAQ Wizards">
</category>
<category
    id="org.eclipse.faq.examples.WizardSubCategory"
    name="More Specific FAQ Wizards">
    parentCategory="org.eclipse.faq.examples.MyWizard"
</category>
You shouldn’t. The principle of lazy plug-in activation is very important in a platform with an open-ended set of plug-ins. All plug-in writers like to think that their plug-in are important enough to contravene this rule, but when an Eclipse install can contain thousands of plug-ins, you have to keep the big picture in mind. Having said that, you can use a mechanism to activate your plug-in when the workbench starts. In special circumstances or for hobby plug-ins that aren’t meant for wider use, you can use the org.eclipse.ui.startup extension point to activate your plug-in as soon as the workbench starts up.
The startup extension point allows you to specify a class that implements the IStartup interface. If you omit the class attribute from the extension, your Plugin subclass will be used and therefore must implement IStartup. This class will be loaded in a background thread after the workbench starts, and its earlyStartup method will be run. As always, however, your Plugin class will be loaded first, and its startup method will be called before any other classes are loaded. The earlyStartup method essentially lets you distinguish eager activation from normal plug-in activation.
Note that even when this extension point is used, the user can always veto the eager activation from the Workbench > Startup preference page. This illustrates the general Eclipse principle that the user is always the final arbiter when conflicting demands on the platform are made. This also means that you can’t rely on eager activation in a production environment. You will always need a fallback strategy when the user decides that your plug-in isn’t as important as you thought it was.
If you’re writing a plug-in with UI components, it should be a subclass of AbstractUIPlugin. This superclass already provides you with an empty image registry accessible by calling getImageRegistry. When the registry is first accessed, the hook method initializeImageRegistry will be called. You should override this method to populate your image registry with the image descriptors you need. You don’t have to use this registry if you don’t need it, and because it is created lazily on first access, there is no performance overhead if you never use it. Here is an example of a plug-in that adds a sample.gif image to its image registry:
public class ExamplesPlugin extends AbstractUIPlugin {
   public static final String PLUGIN_ID =
                               "org.eclipse.faq.examples";
   public static final String IMAGE_ID = "sample.image";
   ...
   protected void initializeImageRegistry(
                                ImageRegistry registry) {
      Bundle bundle = Platform.getBundle(PLUGIN_ID);
      IPath path = new Path("icons/sample.gif");
      URL url = Platform.find(bundle, path);
      ImageDescriptor desc =
                   ImageDescriptor.createFromURL(url);
      registry.put(IMAGE_ID, desc);
   }
}
In general, you should not rely on images defined in other plug-ins as they could be changed or removed at any time. The exception to this rule is an image that has been declared by a plug-in as an API. The convention is to create an interface called ISharedImages that defines IDs for all images that you want to declare as API. Several plug-ins, including org.eclipse.ui.workbench, org.eclipse.jdt.ui, and org.eclipse.team.ui, declare such an ISharedImages class. Here is an example snippet that options the folder icon from the workbench’s shared image API:
IWorkbench workbench = PlatformUI.getWorkbench();
ISharedImages images = workbench.getSharedImages();
Image image = images.getImage(ISharedImages.IMG_OBJ_FOLDER);
If you want to share images from your plug-in as API, you should define your own ISharedImages class with constants for all the images you want to make public.
A Progress view was introduced in Eclipse 3.0 to provide feedback for activities occurring in the background. This view also allows the user to cancel background activity and to find out details when errors occur in the background. The progress animation icon on the right-hand side of the status line is also associated with this view. The icon is animated whenever anything is running in the background. There is no API for reporting progress directly to any of these progress indicators.
These indicators are used to show progress reported by Job objects. The only way to report progress in these areas is to create and schedule a background job. When a Job instance is executed, an IProgressMonitor instance is passed to the run method. Any progress sent to this monitor, including task and subtask names and units of work completed, will be shown in the Progress view. Use this monitor just as you would use a monitor in a Progress dialog.
If you have an existing plug-in that uses a ProgressMonitorDialog, you can easily switch to using the Progress view by rewriting your operation as a org.eclipse.core.runtime.Job. Assume that your original code looks like this:
IRunnableWithProgress op = new IRunnableWithProgress() {
   public void run(IProgressMonitor monitor) {
      runDecathlon(monitor);
   }
};
IWorkbench wb = PlatformUI.getWorkbench();
IWorkbenchWindow win = wb.getActiveWorkbenchWindow();
Shell shell = win != null ? win.getShell() : null;
new ProgressMonitorDialog(shell).run(true, true, op);
The equivalent code using org.eclipse.core.runtime.Job would look like this:
class DecathlonJob extends Job {
   public DecathlonJob() {
      super("Athens decathlon 2004");
   }
   public IStatus run(IProgressMonitor monitor) {
      runDecathlon(monitor);
      return Status.OK_STATUS;
   }
};
new DecathlonJob().schedule();
Both use an IProgressMonitor to report progress to the user. The major difference is that the ProgressMonitorDialog is a modal dialog and blocks access to the entire UI during the execution of runDecathlon. When a Job is used, it will run in the background, and the user can continue working on something else.
Although the changes required here appear to be simply cosmetic, keep in mind that there are subtle implications to running your operation in the background. Foremost, you must ensure that your operation code is thread safe in case two copies of the operation start running simultaneously. You also need to think about whether your background operation will be in contention with other ongoing processes for exclusive resources, such as Java object monitors. Contention between threads can block the user interface; worse, it can lead to deadlock. Read up on your concurrent programming before you venture down this path.
If you create and schedule a simple job, its run method will be called outside the UI thread. If you want to schedule a job that accesses UI widgets, you should subclass org.eclipse.ui.progress.UIJob instead of the base Job class. The UI job’s runInUIThread method will, as the name implies, always be invoked from the UI thread. Make sure that you don’t schedule UI jobs that take a long time to run because anything that runs in the UI thread will make the UI unresponsive until it completes.
Although running a UI job is much like using the SWT’s Display methods asyncExec and timerExec, UI jobs have a few distinct advantages.
They can have scheduling rules to prevent them from running concurrently with jobs in other threads that may conflict with them.
You can install a listener on the job to find out when it completes.
You can specify a priority on the job so the platform can decide not to run it immediately if it is not as important.
A wealth of Eclipse UI guidelines exists. Mentioning any in this single FAQ would seem to do no justice to Nick Edgar, Kevin Haaland, Jin Li, and Kimberley Peter. Please refer to their online Eclipse article “Eclipse User Interface Guidelines.” In their seminal work, they brush on such topics as icon sizes and color palettes, wizards, editors, dialogs, commands, views, perspectives, windows, properties, widgets, navigators, tasks, preferences, outlines, properties, bookmarks, text editors, the flat-look design, accelerators, best practices, and a checklist for developers.
In fact, the 100-page article is a great source of inspiration for any plug-in developer. Study it before you create any Eclipse plug-in with a visual representation to avoid mistakes made by others and to learn from the experts how to design high-quality UI designs.
Owing to evolution in the use of Eclipse, some interfaces had to be extended with additional functionality. However, because of the dynamic nature of Eclipse, with many products relying on existing plug-ins, changing the signature of an interface requires that all the downstream plug-ins be not only recompiled but also fixed to implement the new methods required by the interface change.
This evolutionary side effect posed a big dilemma: cause all plug-ins to break and require intrusive enhancements from customers or introduce a totally new interface containing only the new functionality? Eclipse has chosen the second option. When you press Ctrl+Shift+T to locate a type and enter I*2, you will be shown a list of 20 such interfaces.
Note that additional overhead can occur. For instance, in class org.eclipse.ui.internal.PluginAction, special code needs to verify that the target implements the interface:
public void runWithEvent(Event event) {
   ...
   if (delegate instanceof IActionDelegate2) {
      ((IActionDelegate2)delegate).runWithEvent(this, event);
      return;
   }
   // Keep for backward compatibility with R2.0
   if (delegate instanceof IActionDelegateWithEvent) {
      ((IActionDelegateWithEvent) delegate).
         runWithEvent(this, event);
      return;
   }
   ...
}
The code gets messy owing to an early decision to name the interface differently. Although interfaces were added to Java to separate types from their implementations, in the case of a successfully adopted platform such as Eclipse, they are not resilient to evolution. Changing them breaks too much existing code. If subclassing is used, the contract can easily be enhanced with a default implementation in the base class. The subclasses would not have to be changed or even recompiled.