
Prior to the introduction of RCP, most of the Eclipse community was focused on developing plug-ins for a particular Eclipse application called the workbench. Eclipse, however, has always supported the ability to create your own stand-alone applications based on the Eclipse plug-in architecture. Eclipse applications can range from simple headless programs with no user interface to full-blown IDEs. In Eclipse 3.0, the platform began a shift toward giving greater power and flexibility to applications built on the Eclipse infrastructure. This chapter guides you through the process of building your own Eclipse application and explores some of the new Eclipse 3.0 APIs available only to applications.
Technically, an Eclipse application is a plug-in that creates an extension for the extension point org.eclipse.core.runtime.applications. However, the extension point is fairly special. Only one application gets to run in a given Eclipse instance. This application is specified either on the command line or by the primary feature. After the platform starts up, control of the VM’s main thread is handed over to the application’s run method. The application’s entire lifecycle occurs within the scope of this method. When the run method returns, the platform shuts down.
The application is essentially the boss; it’s the Eclipse analog of the C or Java main method. All other plug-ins in the configuration plug into the application. What goes into the run method is entirely up to you. It can be a graphical application, which will create a user interface and run some kind of event loop, or a completely headless application that runs without interacting with a user.
Because a running Eclipse instance has only one application in it, the philosophy of building applications is very different from the approach when building plug-ins. Essentially, the flexibility given to plug-ins must be mitigated by the fact that other plug-ins in the system may have competing requirements. The laws of plug-in behavior are designed to allow plug-ins to interact in ways that do not impinge on the behavior of other plug-ins. Such constraints are not as important for the application, which can have the final say when the needs of various plug-ins don’t intersect. Whereas plug-ins are citizens of the Eclipse Platform, the application is king. For example, because the application is always started first, the lazy-loading principle doesn’t apply to it. The application can customize the menus and toolbars programmatically rather than using the various workbench extension points. The application can also determine whether views and editors have title bars and whether views can be closed or resized.
The Eclipse SDK is one particularly well-known example of an Eclipse application. To explore how it works, start by looking at the IDEApplication class in the org.eclipse.ui.ide plug-in.
To create an application, you need a plug-in that adds an extension to the org.eclipse.core.runtime.applications extension point. An example application definition from a plugin.xml file is as follows:
<extension
   id="helloworld"
   point="org.eclipse.core.runtime.applications">
   <application>
      <run class="org.eclipse.faq.HelloWorld"/>
   </application>
</extension>
The class attribute of the run element must specify a class that implements org.eclipse.core.boot.IPlatformRunnable. Here is the source of a trivial application:
public class HelloWorld implements IPlatformRunnable {
   public Object run(Object args) throws Exception {
      System.out.println("Hello from Eclipse application");
      return EXIT_OK;
   }
}
To run the application, you need to specify the fully qualified ID of your application extension definition, using the application command-line argument when launching Eclipse:
eclipse -application org.eclipse.faq.helloworld.helloworld
The fully qualified extension ID is computed by prepending the plug-in ID to the simple extension ID from the plugin.xml file. In this example, the plug-in ID is org.eclipse.faq.helloworld, and the simple extension ID is helloworld.
When you look at the collection of plug-ins in the Eclipse SDK, you’re confronted with a daunting list. People wanting to create their own applications using Eclipse naturally ask how this list can be pared down so that only the essential plug-ins remain. If you take this exercise to its extreme, you’ll be left with a tiny Eclipse kernel consisting of the following:
startup.jar. This file contains a single class used to bootstrap the platform. Its sole purpose is to find and invoke the plug-in responsible for starting the platform.Boot or configurator. A plug-in is responsible for finding and loading the plug-in configuration, the set of plug-ins and fragments that are going to be used in a given application. If no configuration exists, the configurator creates one that includes all plug-ins in the
pluginsdirectory on disk. Theorg.eclipse.core.bootplug-in implemented this functionality in Eclipse 2.1. In Eclipse 3.0, this task can be delegated to any plug-in but by default is done by theorg.eclipse.update.configuratorplug-in.org.eclipse.core.runtime. The runtime plug-in is the heart of the running Eclipse Platform. When it starts, this plug-in parses theplugin.xmlfiles for all plug-ins in the configuration and builds an in-memory registry. The runtime plug-in also contains a number of useful utility classes that are used by almost all plug-ins:IPath, IStatus, IProgressMonitor, and so on. The runtime plug-in is also responsible for finding and invoking the chosen Eclipse application. Think of the runtime plug-in as thejava.langandjava.utilof the Eclipse Platform.Runtime plug-ins. The runtime uses a few plug-ins as implementation details that vary according to the release you are using. Up to and including Eclipse 2.1, the runtime plug-in needed an XML parser to parse the
plugin.xmlfiles. This parser is contained in theorg.apache.xercesplug-in. In Eclipse 3.0, the runtime is built on top of a framework called OSGi, which is contained in threeorg.eclipse.osgiplug-ins. You generally don’t need to know anything about these plug-ins as they are used “under the covers” to implement the runtime’s functionality.
And there you have the minimal Eclipse configuration. Starting with this set, you can begin adding any plug-ins you need, such as SWT, JFace, and the platform UI, or other plug-ins you need to build your application.
Here’s a little trick for figuring out what prerequisite plug-ins are needed by a given plug-in in the platform:
Open the External Plug-ins and Fragments import wizard.
In the list of plug-ins to import, select the one(s) you need for your application. For example, select
org.eclipse.uiif you want generic UI features, or selectorg.eclipse.jdt.uiif you want the Java tools.Select Add Required Plug-ins.
You now you have a list of all prerequisites, recursively, for the plug-in you need. This trick is useful because the exact lists of prerequisites for a plug-in can vary between releases of Eclipse. If you ask someone to tell you exactly what plug-ins are needed for a particular kind of application, the answer is not likely to be valid across multiple release of Eclipse.
This same technique can also be used when the time comes to deploy your application. If you install your application plug-ins in the base development environment, you can then use the plug-in import wizard to recursively compute the required set of plug-ins for your application. This allows you to deploy your application with a minimal footprint, as all unused plug-ins are removed. However, it is possible that your end user may want to use functionality in plug-ins that are not even referenced by your application plug-ins, so be careful of what you chop out.
An Eclipse RCP application has full control over how the user interface is created. The locus of control for an RCP application—the place where all configuration starts—is the WorkbenchAdvisor class. Your subclass of WorkbenchAdvisor controls the initial layout and appearance of the workbench window, as well as what commands appear in the menus and toolbars. Here is an example of a bare-bones RCP application:
public class MinimalRCPApp extends WorkbenchAdvisor
   implements IPlatformRunnable {
   public String getInitialWindowPerspectiveId() {
      return "org.eclipse.faq.minimalperspective";
   }
   public void preWindowOpen(
                  IWorkbenchWindowConfigurer wwc) {
      configurer.setShowMenuBar(false);
      configurer.setShowFastViewBars(false);
      configurer.setShowStatusLine(false);
      configurer.setShowCoolBar(false);
   }
   public Object run(Object args) throws Exception {
      Display d = PlatformUI.createDisplay();
      int ret = PlatformUI.createAndRunWorkbench(d, this);
      if (ret == PlatformUI.RETURN_RESTART)
         return EXIT_RESTART;
      return EXIT_OK;
   }
}
This application creates a blank workbench window with no toolbars, no menus, no status line, and no views or editors (Figure 13.1). The application will run until the user closes the workbench window.
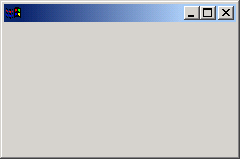
The application’s run method is the one we’ve seen in previous application examples. You need to specify the name of the class with this method when declaring your application in the plugin.xml file. This example creates a workbench and runs the event loop by calling createAndRunWorkbench. The preWindowOpen method is your opportunity to customize the basic appearance of the window. Finally, the ID of the initial perspective to be displayed must be specified using the getInitialWindowPerspectiveId method.
That’s all there is to it! The rest of an RCP application is developed just like any other plug-in. You need to create one or more perspectives and populate them with the views and editors that apply for your application. These are created by using the standard org.eclipse.ui extension points, all of which are available in a custom application.
A binary download of the RCP can be obtained for any Eclipse build from the eclipse.org downloads page. This download does not contain an application, but it can be set as the target platform for your own RCP application from the Plug-in Development > Target Platform preference page.
Your RCP application must specify what menus and actions, if any, to include by default in the main workbench window menu bar. This is done by overriding the WorkbenchAdvisor fillActionBars method. Note that although other plug-ins are always free to create their own menus, it is common for plug-ins to assume the existence of some basic menus. You are responsible for creating the menus that you expect all plug-ins to your application to contribute to.
Here is a simple example of an advisor that creates two menus—Window and Help—and adds a single action to each:
public void fillActionBars(IWorkbenchWindow window,
   IActionBarConfigurer configurer, int flags) {
   if ((flags & FILL_MENU_BAR) == 0)
      return;
   IMenuManager mainMenu = configurer.getMenuManager();
   MenuManager windowMenu = new MenuManager("&Window",
      IWorkbenchActionConstants.M_WINDOW);
   mainMenu.add(windowMenu);
   windowMenu.add(ActionFactory.MAXIMIZE.create(window));
   MenuManager helpMenu = new MenuManager("&Help",
      IWorkbenchActionConstants.M_HELP);
   mainMenu.add(helpMenu);
   helpMenu.add(new AboutAction());
}
Note how the menu IDs are taken from IWorkbenchActionConstants. It is important to use the standard menu IDs as plug-ins contributing to the actionSets extension point will be expecting these standard IDs. The action added to the Window menu is taken from the standard set of actions available from org.eclipse.ui.actions.ActionFactory. You will find many of the standard perspective, view, and editor manipulation actions here. The AboutAction in this snippet is a simple custom action that displays program information and credits, conventionally added by most applications at the bottom of the Help menu.
For simplicity, this snippet creates new actions each time fillActionBars is called. In a real application, you should create the actions only once and return the cached instances whenever this method is called. Because actions often add themselves as selection or part-change listeners, creating multiple action instances would introduce performance problems. The data cache provided by IWorkbenchWindowConfigurer is a common place to store action instances. Because each workbench window has its own configurer instance, this is an ideal place to store state specific to a given window. You can use a convenience method such as the following to lazily initialize and store your created actions:
//configurer is provided by initialize method
private IWorkbenchConfigurer configurer = ...;
private static final String MENU_ACTIONS = &menu.actions&;
private IAction[] getMenuActions(IWorkbenchWindow window) {
   IWorkbenchWindowConfigurer wwc =
      configurer.getWindowConfigurer(window);
   IAction[] actions = (IAction[]) wwc.getData(MENU_ACTIONS);
   if (actions == null) {
      IAction max = ActionFactory.MAXIMIZE.create(window);
      actions = new IAction[] {max};
      wwc.setData(MENU_ACTIONS, actions);
   }
   return actions;
}
It is common practice to factor out action management code into a helper class and then store an instance of this helper class in the window configurer’s cache.
When actions are contributed via the actionSets extension point, key bindings are configured by associating the action with a declarative command. In this case, no code is required to hook the action to the key binding. However, if you programmatically create actions in an RCP application, you have to register actions yourself. This requires two steps. First, you need to specify the command ID for your action. If you are using built-in actions from an action factory, they usually have the command ID already set. If you create your own action, as a subclass of Action, you need to set the command ID yourself by calling the setActionDefinitionId method inherited from Action. Typically this is done from your action’s constructor.
Now that your action is linked to a command, you need to register the action with the platform. You should do this the first time the platform calls your implementation of WorkbenchAdvisor.fillActionBars:
public void fillActionBars(IWorkbenchWindow window,
   IActionBarConfigurer configurer, int flags) {
   ...
   if (maximizeAction == null) {
      maximizeAction = ActionFactory.MAXIMIZE.create(window);
      configurer.registerGlobalAction(maximizeAction);
   }
   menu.add(maximizeAction);
}
The method registerGlobalAction will let the platform know that your action exists. When the key binding is invoked by the user, it will now be able locate and run your action.
When you create an RCP application using a workbench advisor, you are still constrained to using the standard Eclipse UI constructs of views, editors, and perspectives. If you have very different UI requirements but still want to use the plug-in infrastructure, you can always create an application built on only SWT and JFace. This has been possible since the first release of Eclipse as SWT and JFace have no other dependencies outside the base runtime plug-in. JFace provides a basic ApplicationWindow with optional menus, toolbar, and status line.
Configuration of a JFace application works through subclassing rather than plugging in an advisor. Your application needs to subclass the JFace class called ApplicationWindow and override the various methods that are used to customize the appearance and behavior of the window. The following is a simple JFace application window from the FAQ Examples plug-in. As with other applications, you begin by creating a class that implements IPlatformRunnable:
public class JFaceApp implements IPlatformRunnable {
   public Object run(Object args) throws Exception {
      Display display = new Display();
      JFaceAppWindow window = new JFaceAppWindow();
      window.open();
      Shell shell = window.getShell();
      while (!shell.isDisposed()) {
         if (!display.readAndDispatch())
            display.sleep();
      }
      return EXIT_OK;
   }
}
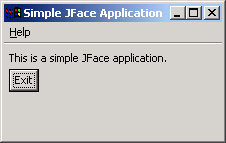
JFaceAppWindow is a subclass of the framework class ApplicationWindow. The subclass creates a simple window with a menu bar, a status line, and a single button inside the main window that is used to exit the application (Figure 13.2).
Complete source for the class can be found in the FAQ Examples plug-in, but here is the basic structure:
public class JFaceAppWindow extends ApplicationWindow {
   public JFaceAppWindow() {
      super(null);
      addMenuBar();
      addStatusLine();
   }
   protected void configureShell(Shell shell) {
      super.configureShell(shell);
      shell.setText("Simple JFace Application");
   }
   ...
}
The subclass also needs to override the createContents method to create the SWT widgets that will appear in the window’s main content area. Override createMenuManager to populate the window’s menus, createToolBarManager to populate the toolbar, and so on. If you browse through the ApplicationWindow class, you will see that many other hook methods allow your application to customize the appearance of the top-level window.
Plug-in metadata, as well as other data associated with an Eclipse application, is usually stored inside the platform instance location. This location is also known as the instance data area or the workspace. There are a number of ways that your application can specify this location:
Pick a fixed location and specify it using the
-datacommand-line argument on startup (for example, from your own native launcher or launch script).Pick a location and specify it programmatically when your application starts.
Let the default location be used. By default, the data area will be under the current working directory on startup in a subdirectory called
workspace. This typically corresponds to theeclipsebase directory.Prompt the user to specify a location on startup. This should be done from your application’s
runmethod before you callPlatformUI.createAndRunWorkbenchto open the workbench.
If you define a location programmatically (either by prompting the user or by other means), you must then set it as follows:
URL choice = ... pick a data location
Location loc = Platform.getInstanceLocation();
if (loc.setURL(choice, true))
   //success!
else
   //location is in use, or is invalid
If your end-user is allowed to manipulate the command line directly, there are other things you need to keep in mind. For example, the user may have already picked a location using -data. In this case, Location.isSet() will return true, but you are still responsible for locking the location using Location.lock() to prevent other instances of your application from trying to use the same location concurrently. To see all of the cases that need to be considered take a look at how the Eclipse IDE application does it. Look at IDEApplication.checkInstanceLocation to see all the subtleties of checking and prompting for an instance location.
Yes, you can, if you are very careful. In Eclipse 3.0, the base Eclipse runtime was designed to be able to run without any data location at all. If you have a carefully crafted RCP application, you might be able to get away with not having a data location. To launch an Eclipse application with no data location at all, use the special -data @none command-line argument:
eclipse -data @none -application your.app.id
If you do this, an error will occur if any plug-in attempts to access the platform instance location, including the plug-in metadata location. In other words, this configuration makes sense only for a tightly controlled application in which you are absolutely certain that the instance location will never be used.
One advantage of this approach is that multiple instances of your application can run simultaneously without forcing the user to pick a different data location for each one. For most RCP applications, this type of configuration is too constrictive. A better approach for applications that don’t need to store any interesting state is to pick a random location in a scratch directory, such as the directory provided by System.getProperty(“java.io.tmpdir”). This will ensure that your application does not fail if a plug-in is installed that does want to access the instance location.