
The topic of how to use Eclipse for typical Java development is beyond the scope of this FAQ list. We focus more on the issues Eclipse users may run into when developing new plug-ins for the platform. Also, as a plug-in developer, you need to be familiar with the ways in which Eclipse is used. To achieve seamless integration with the platform, your plug-in must respect common usage patterns and offer the same level of functionality that users of your plug-in have come to expect from the platform. This chapter focuses on user-level issues of interest to plug-in developers as users or as enablers for other users of the platform.
For a comprehensive guide to using Eclipse, refer to other books such as The Java Developer’s Guide to Eclipse by Sherry Shavor et al. (Addison-Wesley, 2003).
Use the menu for Navigator: the small triangle in the Navigator title bar. Select Filters... and check the type of files you want to hide. This technique also applies to the JDT’s Package Explorer.
If your plug-in must store metadata in the project content area, consider adding a filter to this list, using the org.eclipse.ui.ide.resourceFilters extension point. The filter specifies a file name pattern and a Boolean attribute specifying whether the filter should be on by default. As an example, the Java development tools add a filter using this mechanism to hide Java class files generated by the compiler.
The Navigator provides a view of the workspace and shows resources available on the file system. From the Navigator, files can be opened in an editor. When multiple editors are opened, it can be difficult to keep track of where the related resources are in the Navigator. For this reason, the Navigator has support to synchronize its tree view with the currently edited resource.
To link resources between the Navigator and the editors in the workbench, locate the Link button in the Navigator toolbar at the top of its UI. The Link button is an icon with two arrows pointing to each other. Move the mouse over it; hover help should read Link with Editor. This technique also applies to the JDT’s Package Explorer.
If you are creating views with input linked to the selection in other views or editors, consider introducing a similar link option in your view’s toolbar. The platform has been grappling with this issue of view linking for years, and we have found that letting the user decide is the only viable option. A view that always links its input will usually cause the user to lose context, as the view continually jumps around, scrolls, and changes its selection. Very few users will leave linking turned on all the time but will instead toggle it on and off again to find the item they are currently editing.
The keyboard can be used in several ways to traverse between editors.
A pop-up list of all open editors in most recently used order will be shown when you press Ctrl+F6 and don’t release the Ctrl key. Move backward in this list using Ctrl+Shift+F6.
Create new key bindings for the Next Editor and Previous Editor commands in the Workbench > Keys preference page, under the Window category. Many users find that binding these commands to Ctrl+’ and Ctrl+Shift+’ (the key directly above Tab on U.S.-English keyboards) makes editor switching much like the Alt+Tab and Alt+Shift+Tab that many window managers use to switch applications.
Use Alt+Left and Alt+Right—or click the Forward and Back buttons in the toolbar—to move around in the editor navigation history, much as you would in a Web browser.
Press Ctrl+Shift+E to open a dialog of all open editors, type the first letter of the editor input name to pick the editor of choice from the list, and press Enter. This is a quick way to get random access in a large group of open editors.
Press Ctrl+E (Eclipse 3.0 only) to open a drop-down list of open editors when the tabs do not fit on the screen. Start typing the editor name in this list to pick the editor you want to activate.
Press Alt+F to open the file menu; then press the number of the editor of choice from the editor history list at the bottom of the menu. This is the easiest way to jump quickly to an editor that has recently been closed.
Press Ctrl+Shift+R to open the Open Resource dialog and find your editor in the list (or Ctrl+Shift+T for Java types). This can be used to switch to an editor whether or not it is already open.
This seemingly long list of choices has probably been the most hotly debated usability issue in Eclipse over the years. Attempts to change or remove any of these features in the past have resulted in passionate criticism, with everyone having a favorite technique for navigating the environment. The lesson for plug-in developers? Sometimes, you have to provide more than one way to do the same thing. Always keep keyboard-only users—and this includes visually impaired users—in mind. The Eclipse team has been known to have mouse-free days, when mice are unplugged to make sure that everything in the environment is accessible without a mouse.
Eclipse allows you a great deal of flexibility in how the views and editors are presented in the workbench. With the mouse, views can be docked as fast views in toolbars, grouped together in stacks, and dragged around to different areas. Any view can also be maximized by double-clicking its title bar or pressing Ctrl+M, or it can be minimized to show only its title bar.
With editors, you can likewise resize or organize in a number of ways. All editors must be grouped together in one area, but they can be split horizontally or vertically within that area to show multiple editors simultaneously. Editors can also be maximized, by double-clicking the title bar or pressing Ctrl+M, or minimized to show only its title bar.
Many of these actions can be mapped to a key binding from the Workbench > Keys preference page. Look at the commands in the Window category to see what commands can be bound to your own key sequences. Most part-manipulation commands are also found in the part context menu, accessible by pressing Alt+– (Alt+minus).
Eclipse is not only a Java development environment. To deal with everything that can be launched with it—Java programs, JUnit tests, Enterprise JavaBeans (EJBs), even Eclipse itself—Eclipse defines the concept of launch configurations. When you click the Run button, click on Java Application, fill out the details, and click Run. The next time, your program will be launched automatically when you click the Run button (or press Ctrl+F11). To alter your launch configuration or to create a new one, select the Run... menu option, in the Run button drop-down menu. Alternatively, you can edit a launch configuration by holding down Ctrl and clicking on the launch you want to edit in the Run or Debug button drop-down list.
The other Run button—the one with the toolbox—is for launching external development tools and scripts, such as Ant, from within Eclipse. Generally, this icon is for launching tools that operate on the resources in your workspace rather than for launching programs you are building in your workspace.
JDT uses the autobuild facilities provided by the platform. If a resource changes, the platform checks the project description file (see .project in your projects). When the file contains a reference to the Java builder, the builder gets notified of the change and will then compile the Java source file and its dependents. The following project description file snippet shows that the Java builder is associated with the project:
<buildSpec>
   <buildCommand>
      <name>org.eclipse.jdt.core.javabuilder</name>
      <arguments>
      </arguments>
   </buildCommand>
</buildSpec>
If a workspace gets large—say, tens of thousands of files—the process of checking each project, activating all registered builders, and discovering whether anything needs to be rebuilt owing to a single resource save may have a considerable impact on the responsiveness of the workbench. In these situations, autobuild can be turned off through Window > Preferences > Workbench > Perform build automatically on resource modification.
Even for smaller workspaces, turning off autobuilding may be a useful feature. For instance, when importing a large number of plug-ins from CVS, it may make sense to turn off autobuilding first. After all files are checked out, autobuilding is turned on again, and all pending builds are run in one swoop.
Use the menu for Package Explorer: the small triangle in the explorer’s title bar. Select Filters... and uncheck Referenced Libraries.
If you use the context menu on a project to inspect the project’s properties, the Java Build Path page will have a field for the Default output folder. The initial value is the bin directory directly under your project. Similarly, the Source tab provides access to the location of your source input folder(s).
The Java perspective filters out the output folder from the Package Explorer. If you like, you can use the Navigator view to browse the output folder.
Table 3.1 lists some frequently used but perhaps lesser-known keyboard shortcuts in the context of Java editing.
Table 3.1. Frequently used JDT keyboard shortcuts
Shortcut | Action |
|---|---|
Alt+Left Alt+Right | Navigate in the editor history. |
Ctrl+Shift+P | Go to matching bracket. |
Ctrl+Shift+Up Ctrl+Shift+Down | Go to previous/next member. |
Ctrl+L | Go to a given line in the editor. |
Ctrl+S | Save current editor and build. |
Ctrl+, Ctrl+. | Go to previous/next result/error. |
Ctrl+Alt+H | Open call hierarchy on a method. |
Alt+Up Alt+Down | Move current selection up or down. |
Ctrl+E | Switch to another editor. |
F3 F4 | Open declaration or type hierarchy. |
Ctrl+T Ctrl+F3 | Pop-up type hierarchy or structure. |
Ctrl+Shift+T | Open a type declaration. |
Ctrl+Space | Content Assist. |
Alt+Shift+M | Extract selection into method. |
Alt+Shift+R | Rename currently selected element. |
Ctrl+F Ctrl+I Ctrl+K | Find, incremental find, find again. |
Ctrl+H | Open search dialog. |
Ctrl+Shift+/ Ctrl+Shift+ | Comment/uncomment selection. |
Ctrl+M | Maximize/minimize current editor. |
Ctrl+Shift+M Ctrl+Shift+O | Add/organize imports. |
F11 Ctrl+F11 | Debug/run most recent launch. |
See Help > Help Contents > Java Development User Guide > Reference > Java Development tools (JDT) Basics > JDT Actions for a list of keyboard shortcuts provided by the Java development tools.
See the Workbench > Keys preference page to reassign shortcuts or assign shortcuts to common actions.
Activate the editor area, and then click the toolbar button labeled Show Source of Selected Element Only.
People sometimes click this button by accident and end up stuck in a state in which the Java editor will show only a single method or field at once. This feature of the Java editor makes it much easier to work in large Java files. By focusing on a single method at once, you have a much less cluttered editor area. Note that you can still view the entire file when in this state by deselecting the selected element in the Outline view. Smalltalkers will recognize this as one of the many innovations Eclipse inherited from its non file-centric Smalltalk IDE ancestors.
Opening a given type in an editor can be done in many ways.
If you see the type in your editor, move the caret inside the name, or select the type and press F3. This works inside javadoc comments.
Hold down the Ctrl key and move the mouse around inside a Java editor. You will notice types turning into hyperlinks: blue underlined names, just like in a Web browser.
To open a dialog with a list of available types, press Ctrl+Shift+T.
To open its type hierarchy, select a type in a Java editor, and press F4.
To open a type hierarchy on any type, press Ctrl+Shift+H.
To quickly navigate to a given type in the Package Explorer, give focus to the tree, and start typing the name of the type. The Explorer will automatically scroll to the type, assuming that the type is visible and has not been filtered out of the view. This works in Windows only.
Note that when opening a type hierarchy, there is a preference on the Java preference page to open the type in a new type hierarchy perspective versus simply opening a view. This is useful in conjunction with the preference to open perspectives in a new window on the Workbench > Perspectives preference page. This allows you to browse a hierarchy without cluttering and losing context in the editors and views in your main window.
By activating Window > Preferences > Java > Code Formatter, you can create a new formatting profile. The choices for the various layout characteristics show the depth and breadth of the JDT code formatter. Full control exists over indentation, placement of braces, whitespace, blank lines, control statements, line wrapping, and comments. With the code formatter preference settings, a profile can easily be customized, saved, and shared with a team of developers to maintain a consistent company style.
The JDT compiler is tightly integrated with the rest of the JDT. Extracting the compiler out of the JDT and properly integrating a different compiler is not trivial. A quick approach is to disable the Java builder from the project’s Builders property page, and replace it with an Ant task that calls javac or another compiler. However, we strongly advise you to go with the installed compiler. It knows exactly how to interact with the rest of Eclipse—for instance, by assisting in the creation of tasks, quick fixes, and source decorators. It is one of the fastest, most complete Java compilers available. Finally, the JDT compiler can generate class files even when the source contains compilation errors.
By activating Window > Preferences > Java > Compiler, you have full control over the reporting style of the compiler, severity of error conditions, what to do with unused code, and how to treat javadoc comments.
Using the Preference page, you can also select the JDK compliance level of the compiler, the version of generated class files, and whether the compiler should generate debugging symbols.
In the Java perspective, a menu called Refactor is enabled. It contains all possible refactoring operations currently implemented by the JDT. All operations are listed, even though they may not be applicable to the current selection. When a given element is selected in the Java editor, the context menu will show the refactoring operations that are specifically applicable to the selection. Refer to the Help > Help Contents > Java Development User Guide > Refactoring support for a comprehensive discussion on what refactoring techniques are available, how to preview a refactoring, and how to undo/redo refactorings.
It is important to realize the existence of the underlying mechanisms that allow for refactoring. For instance, when a given method is being renamed, all source files that have a reference to the method will have to be visited and their reference to the renamed method changed. The only way to do these kinds of refactorings in a scalable and manageable way is by using an underlying model of the Java source being refactored. Such a model is commonly referred to as a Document Object Model (DOM).
Frequent refactorings for which you may want to remember the keyboard shortcuts are rename with shortcut Alt+Shift+R and extract method with shortcut Alt+Shift+M. You can create or change key bindings for all refactorings from the Workbench > Keys preference page.
Note
FAQ 340 How do I support refactoring for my own language?
IBM developerWorks article on refactoring (http://ibm.com/developerworks)
When extending Eclipse, plug-in authors are confronted with an overwhelming selection of API to choose from. In the good old days, books could be published with API references, and programmers could study the material and recite the proper incantations to drive the relatively simple APIs. With modern APIs, this is no longer possible. There simply is too much to read and remember. Content Assist to the rescue!
Content Assist can take the guesswork out of coding in a number of ways:
Finding a given type. Assume that you are writing some code and want to use a button in your UI. You start typing the letter “B” and don’t remember the rest of the word. Simply press Ctrl+Space, and the Java tooling will present you with a list of all types that start with the letter “B.” The list starts with
Boolean. Keep typing, and the list narrows down. After typingBut, you get to choose betweenjava.awt.Buttonandorg.eclipse.swt.widgets.Button. Choose the one you like, and the editor inserts the class and inserts an import statement for the class at the same time.Finding a given field or method. After typing a dot after a certain expression, Content Assist will suggest all possible fields and methods applicable to the expression’s result type. This functionality is very useful for discovering what operations can be applied to a given object. Combined with pervasive use of getters and setters, browsing an API is really simple. For the
Buttonexample, continuations forgetshow all attributes that can be obtained from a button. The ones starting withsetshow the attributes that can be modified. Another frequent prefix used while writing plug-ins isaddto add event listeners. Having Content Assist at your fingertips definitely improves coding speed by combining intuition with content-assisted browsing.Entering method parameter values. When entering Ctrl+Space after the “(” for a method call, Content Assist will provide the expected type name for each parameter. When you advance to the next parameter—by pressing a comma—the Content Assist hints move along with you. This is especially useful for overloaded methods with ambiguous signatures and for methods with many parameters.
Overriding inherited methods. Invoke Content Assist when the cursor is between method declarations. Proposals will be shown for all possible methods that can be overridden from superclasses.
Generating getters and setters. Between two method declarations, type
get, and invoke Content Assist. Proposals will be shown for creating accessor methods for any fields in the class that do not yet have an accessor. The same applies for generating setter methods by invoking Content Assist on the prefixset.Creating anonymous inner classes. Eclipse likes loose coupling and hence works a lot with listeners that are registered on demand. The listeners implement a given interface with methods that are called when the event of interest happens. Typical usage is to declare an anonymous inner class, as in this example:
button.addSelectionListener(new SelectionAdapter() {
    public void widgetSelected(SelectionEvent e) {
        // do something here
    }
});
Here is how an experienced Eclipse user might enter that code using Content Assist.
but<Ctrl+Space> select 'button'
.add< Ctrl+Space> select 'addSelectionListener'
new Sel<Ctrl+Space> select 'SelectionAdapter'
() { <Ctrl+Space> select 'widgetSelected'
Note that Content Assist is also available inside javadoc comments and can help when declaring fields and can assist with named local variables and method arguments. In FAQ 336 we explain how Content Assist is implemented in Eclipse.
Also note that Content Assist can be fully customized from the Java > Editor preference page.
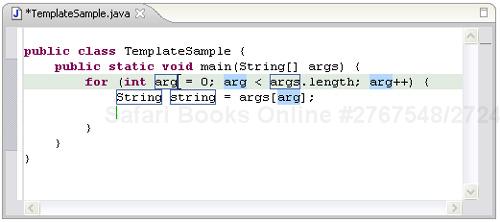
The Eclipse editor framework has excellent support for templates, and we don’t mean the C++ kind.
In Eclipse, templates are fragments of code that can be inserted in an editor to ease the entering of repetitive code. Code templates are accessed and used in the same way as Content Assist. In the following example, we entered for, then pressed Ctrl+Space. We chose iterate over array with temporary value and pressed the Tab key to advance to the first variant in the inserted template (Figure 3.1). When we enter a new name for the index variable, all occurrences in the template are automatically changed also.
Another powerful, and quite useful, example is the following: Select a couple of statements, press Ctrl+Space and select try catch block to encapsulate the current selection with an exception handler.
New templates can also be defined. Templates can be imported and exported, allowing them to be shared among multiple developers in a team.
See Window > Preferences > Java > Editor > Templates and press F1 for relevant help on this topic.
Whenever it detects an error, the Java editor highlights the error using a wavy red line under the offending code and a marker in the left editor margin. Moving the mouse over the underlined code or the marker will indicate the error. The marker can be selected with the left mouse to activate the Quick Fix pop-up, indicating actions that can be undertaken to repair the error. Alternatively, pressing Ctrl+1 will activate Quick Fix from the keyboard.
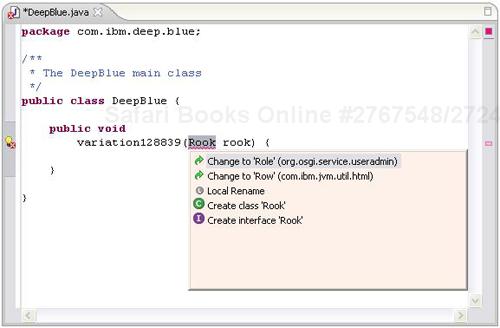
Quick Fixes can be used to make typing much faster. Let’s assume that you are using Eclipse to rewrite Deep Blue and are writing variation 128839. At some point during editing, you need access to the Rook class. You have not yet written a declaration for Rook, so when you use it in your code, a problem marker will indicate the nonexistence of the type. The marker is normally a simple red cross to indicate an error. If a Quick Fix is available, a small light bulb is shown on top of the error marker.
The JDT can detect syntax errors but is also smart enough to guess what you could do to correct the problem. As can be seen in Figure 3.2, the JDT can create the class for us with a single mouse click.
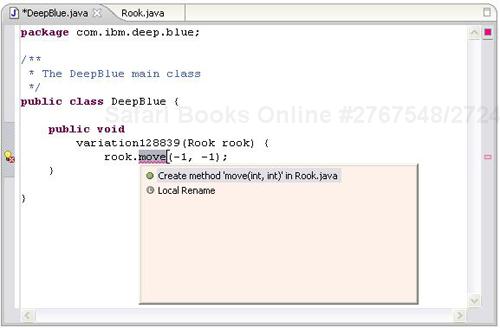
A major tenet of Extreme Programming is to write test cases first. In other words, use cases are specified first; then the implementation is provided. Quick Fixes help in this process. For instance, we start using our Rook class as if it has a move method. Of course, the editor will complain and place a marker next to the reference to the nonexistent method. However, the editor also guesses what we want to do with the method (Figure 3.3).
In a similar fashion, Quick Fixes can be used to add fields to classes, add parameters to methods, help with unhandled exceptions, and generate local variable declarations. Quick Fixes are designed to allow you to continue the creative process of designing API while using it, a major component of Extreme Programming.
A full list of available Quick Fixes is given at Help > Help Contents > Java Development User Guide > Concepts > Quick Fix. Updating quick fixes as you type can be computationally intensive, so you can turn this off via Window > Preferences > Java > Editor > Annotations > Analyze annotations while typing.
Eclipse has built-in support for launching applications and for debugging Java applications but no inherent support for profiling. However, support for profilers can be implemented by using a special launch configuration. Commercial products, such as WebSphere Studio Application Developer, do this by adding profiling support to their set of plug-ins. Much of this work is being standardized and moved down into the open source Eclipse subproject called Hyades.
A couple of individual profiler projects and products are under way. The Eclipse Colorer profiler with elaborate reporting views may be of interest to people who want to experiment with profiling Java code from Eclipse. This profiler can be downloaded under the CPL from SourceForge.
See FAQ 314 for a discussion of how profilers are implemented.
Note
FAQ 314 When do I use a launch delegate?
Eclipse Profiler (http://eclipsecolorer.sourceforge.net/index_profiler.html)
If you know how to run your Java program, you can debug it. Assuming that you just ran your Java program, press F11, and the most recently executed launch configuration will be launched under control of the Eclipse Java debugger. Breakpoints can be set in any Java editor by double-clicking in the left margin of the editor or by using the context menu in the left margin to toggle the breakpoint on this line.
Because it is a Java program, Eclipse can also be debugged in a similar fashion. F11 also honors runtime workbenches and allows debugging in exactly the same way. In combination with hot code replace, plug-in development can be done in a very incremental fashion: Run an inner Eclipse using the debugger, fix the code of your plug-ins, and continue using the inner Eclipse with the new code without even restarting the inner workbench. You gotta see it to believe it!
In the Debug view, use the context menu on the process in question, and select Properties.... From this dialog you can see the exact command line that was passed to the JVM. If you launched in debug mode, there will be some extra command-line arguments that instruct the JVM to run in debug mode. To show the Debug view, you can use Window > Show View > Debug > Debug.
Hot code replace (HCR) is a debugging technique whereby the Eclipse debugger transmits new class files over the debugging channel to another VM. In the case of Eclipse development, this also applies to the VM that runs the runtime workbench. The idea is that you can start a debugging session on a given runtime workbench and change a Java file in your development workbench, and the debugger will replace the code in the receiving VM while it is running. No restart is required, hence the reference to “hot.”
HCR has been specifically added as a standard technique to Java to facilitate experimental development and to foster iterative trial-and-error coding. HCR only works when the class signature does not change; you cannot remove or add fields to existing classes, for instance. However, HCR can be used to change the body of a method. HCR is reliably implemented only on 1.4.1 VMs and later, or using any version of the IBM J9 VM. J9 is available in IBM products such as Websphere Studio Device Developer.
First, set a breakpoint at a given location. Then, use the context menu on the breakpoint in the left editor margin or in the Breakpoints view in the Debug perspective, and select the breakpoint’s properties. In the dialog box, check Enable Condition, and enter an arbitrary Java condition, such as list.size()==0. Now, each time the breakpoint is reached, the expression is evaluated in the context of the breakpoint execution, and the breakpoint is either ignored or honored, depending on the outcome of the expression.
Conditions can also be expressed in terms of other breakpoint attributes, such as hit count.
The JDT contributes to the search framework by adding a Java Search tab to the Search dialog (activated with the Search menu or by pressing Ctrl+H. Methods can be searched for by name and return type. The first word you enter in the Search dialog is interpreted as the method name, and the second word is interpreted as the method’s return type. By specifying * String and checking Method and Declarations, you will find all methods with a String return value (Figure 3.4).

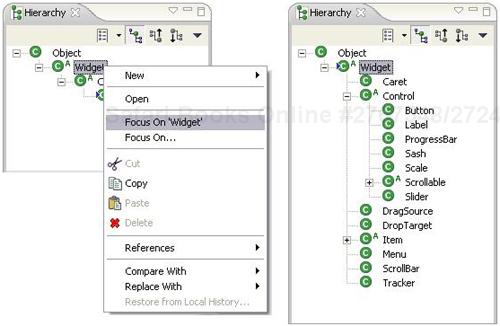
The Hierarchy view shows types, their subtypes, and their supertypes. In Figure 3.5, we pressed Ctrl+Shift+H and entered Button. This shows the inheritance hierarchy of Button.

To see the full inheritance hierarchy of another type in the hierarchy, use the Focus On command in the context menu. For example, to see the inheritance hierarchy of Widget, select Widget and choose Focus On ’Widget’ from the context menu (Figure 3.6).
You can select any package, type, or method in the various Java views and open it in the Hierarchy view from the context menu. You can also select a working set in the Hierarchy view to limit the displayed elements to a particular portion of the workspace.
Open the context menu on the project, and select Properties > Java Build Path > Libraries. From here, you can add JAR files to the build path, whether they are inside your workspace or not. You can also add a class folder, a directory containing Java class files that are not in a JAR. Note that plug-in development has more restrictions on where build path entries can come from. For plug-in projects, you should always let the plug-in development tools organize your build path for you. Simply select the plugin.xml file, and choose PDE Tools > Update Classpath from the context menu.
The .project file contains important information about your project, including what kind of project it is, what builders it contains, and what linked resources are attached to it. It is generally advisable to store this file in your code repository or to include the file if you zip the project up to give to a colleague. This will allow another user who is importing or loading the project to obtain this important information. If you don’t, the project will appear in the other user’s workspace as a simple project, with no builders or linked resources. Similarly, other plug-ins store important project metadata in the project content area, typically with a leading period on the file name. For example, the Java development tools store the project’s build path in a file called .classpath. Plug-ins put their metadata in the project content area for a reason: to allow this information to be exported and loaded into other workspaces.
To exclude resources from management under CVS version control, a .cvsignore file can be placed in the parent folder of a resource. Each folder has to specify its own .cvsignore file as there is no logic for path-relative resource specification.
The Navigator has UI support for CVS exclusion in its context menu for any resource in a project. Follow Team > Add to .cvsignore to the dialog that allows selection based on the name of the resource, a wildcard, or a custom pattern to match multiple resources.
The .cvsignore file is not an Eclipse invention. Its syntax is defined by CVS, and the Eclipse team plug-ins simply pass the file on to CVS when sharing a project.
A number of steps are needed to get a Java project properly set up to share with teammates in a repository.
Make sure that the
.projectand.classpathfiles are under version control. These files must be stored in the repository so that other users checking out the projects for the first time will get the correct type of project and will get the correct Java build path.Avoid absolute paths in your
.projectand.classpathfiles. If you are using linked resources, make sure that they are created using path variables (see the Workbench > Linked Resources preference page). If your project has references on its build path to external libraries, make sure that they are specified using a classpath variable (see the Java > Build Path > Classpath Variables preference page).Make sure that the Java builder’s output directory (conventionally called
bin) is not under version control. In CVS, you can do this by creating a.cvsignorefile in the project root directory containing the name of the output directory.
You may discover that serializable classes compiled with Eclipse are not compatible with the same classes compiled using javac. When classes compiled in Eclipse are written to an object stream, you may not be able to read them back in a program that was compiled elsewhere. Many people blame this on the Eclipse compiler, assuming that it is somehow not conforming properly to spec. In fact, this can be a problem between any two compilers or even two versions of a compiler provided by the same vendor.
If you need object serialization, the only way to be safe is to explicitly define the serialVersionUID in your code:
class MyClass implements Serializable {
    public static final long serialVersionUID = 1;
}
Then, whenever your class changes shape in a way that will be incompatible with previously serialized versions, simply increment this number.
If you don’t explicitly define a serialVersionUID, the language requires that the VM generate one, using some function of all field and method names in the class. The problem is, the compiler generates some synthetic methods that you never see in your source file, and there is no clear specification for how these synthetic method names are generated. Any two compilers are likely to generate different method names, and so the serialVersionUID will be different. Bottom line: Always define the serialVersionUID explicitly in your source files.