
Software developers are passionate about their tools and especially the way in which those tools fit their ideals. The Eclipse workbench is amazingly versatile in its ability to accommodate different development tasks and varying developer preferences. Each release of the Eclipse platform adds more preference settings that enable deeper customization of capabilities and styles, and there is exponential growth in the number of plug-in contributions that extend Eclipse for new and specialized tasks.
But this versatility can be overwhelming to Eclipse newcomers. Powerful customization features may go unnoticed for months, simply because users did not know to look for them. This chapter provides a tour of Eclipse customization through perspectives and preference settings. More radical customization is possible by adding new plug-in contributions to Eclipse; this topic is described in Chapter 9, “Updating the Eclipse IDE.”
In this chapter, we'll see how to
Use multiple perspectives to organize task-specific views
Create new perspectives for your unique development tasks and work style
Choose from the many views and editors provided by Eclipse
Set preferences to fit your individual needs and work habits
Set preferences shared by your project team
There is nothing magical about Eclipse perspectives; each perspective simply defines a collection of Eclipse views and action sets organized in a layout that suits its assigned task for a typical user. You may use a perspective as-is, or you may clone and modify it to better suit your needs. As a first step, you should get familiar with the default perspectives and start working with their initial configurations—the defaults represent best practices learned by experienced Eclipse users.
Eight perspectives are defined in the standard Eclipse SDK download:
Resource. This is the default perspective when opening Eclipse and is useful for browsing all workspace resources; that is, projects and their contents.
Java. Primary views and menu/toolbar commands used during Java development.
Java Browsing. Very useful for exploring large projects; contains views for projects, packages, types, and members.
Java Type Hierarchy. Includes a subset of the Java perspective used to explore class inheritance.
Debug. Views used while debugging your Java programs.
CVS Repository Exploring. Used while opening and exploring CVS repositories, especially when discovering shared projects to be imported into your workspace.
Team Synchronizing. Used while synchronizing your file modifications with a CVS (or other) version control repository.
Plug-in Development. Specialized views used while developing new plug-in contributions for Eclipse.
Because Eclipse is an extensible platform, more perspectives may be available in your configuration that were contributed by new plug-ins or by third-party products that are built on the Eclipse platform.
The perspective bar is similar to a standard toolbar, but it is specialized to show an icon for each perspective that is open in your workbench. A perspective bar with four open perspectives is shown in Figure 4-1. The current perspective—Java in this case—is highlighted in the list, and a fourth perspective icon is hidden (indicated by the >> icon). Switch perspectives by clicking on the desired icon or on the >> icon to get a pull-down list of those not visible.
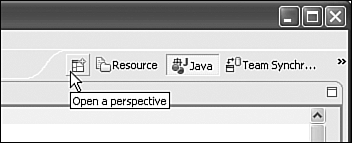
Figure 4-1. Eclipse perspective bar with four open perspectives. The Java perspective is currently displayed.
Each open perspective is represented as a page in the current window, and only one page can be viewed at a time. Alternatively, you can set your workbench preference to open each perspective in a new window. See Window > Preferences > Workbench > Perspectives.
As you work with Eclipse, you will probably switch perspectives frequently. During development, the Java perspective will consume the majority of your time, with frequent excursions through the Debug perspective. After joining an established work team, the CVS Repository and Java Browsing perspectives help you to quickly become a contributing member. In addition, you may visit the Team Synchronizing perspective several times a day to update your snapshot of the repository, to commit changes, or to review differences between your files and the repository.
The customizable components of any perspective consist of views,editors , and commands. You can easily add or remove these by selecting from the complete set provided by the plug-ins installed in your workbench.
Each perspective will retain your customizations between Eclipse sessions. You also can create and save specialized perspectives with names without losing the built-in perspective. Just open a related perspective (or use the Resource perspective as the most generic starting point) and then add, remove, and rearrange until you are happy. Select Window > Save Perspective As… and enter the name of your new perspective.
As you expand the number of plug-in contributions within your Eclipse workbench, the number of perspectives, views, menus, and toolbar options will become quite large. You may find that some of these options are not relevant to your current work, and you might prefer to minimize distraction by hiding them. For example, if you are not writing new plug-ins for Eclipse, you can hide functions that are designed exclusively for helping you in this activity. If you are using Eclipse for work other than Java development (e.g., UML modeling or Web site development), then you can hide the Java development features.
Select the Window > Preferences menu option to open the dialog shown in Figure 4-2 and then select Workbench > Capabilities. Different capabilities may be available, depending on which plug-ins are installed. Only some of your workbench features are configurable as capabilities, but this is a new capability of Eclipse 3.0, and more capabilities may be added later.
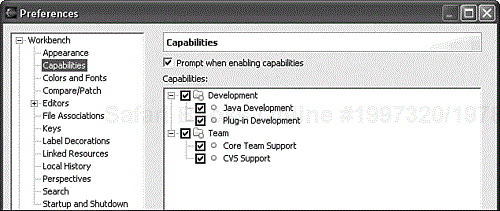
A capability defines a related set of perspectives, views, and command sets whose functionality is related to a particular development task. When you disable a capability, all of its related features are removed from view, but they remain installed pending future activation.
A view displays information about the contents of your workbench. For example, the Navigator view displays a list of projects and other resources in your workspace. A view might appear by itself or stacked with other views in a tabbed notebook. You can change the layout of a perspective by opening and closing views and by docking them in different positions in the workbench window.
The views available within your workbench are organized into named categories such as Basic, Java, Debug, Ant, and Team. To see a complete list of views, select Window > Show View > Other…. The most commonly used views from the Basic category are
Navigator. Displays a general-purpose view of projects, folders, and files in your current workspace; useful in any perspective.
Properties. Customized by workbench plug-ins to display and edit name/value properties for any resource or object. When this view is showing, you will see its content change to reflect what is selected in other views or editors.
Outline. Customized by plug-ins to display a structural view of resource contents. For example, it can display an outline of methods in a Java class file or an outline of tasks in an Ant build file.
Problems. Displays a list of problems found in a resource; for example, compilation errors and warnings in a Java file.
Tasks. Displays a list of tasks to be performed, along with a reference to the resource and line number for each task. Useful as reminders of work remaining in your programs or documentation.
Bookmarks. Displays bookmarks for quick reference and navigation to specific lines in a file.
It is common for a view's display to be coordinated with selections in other views or editors. Selecting an item in the Outline view may cause an editor to display the corresponding location and also update the Properties view with details of that item.
The Properties and Outline views may be customized by plug-ins installed in your workbench. Each view provides functionality that is specialized for particular resource types and may contain radically different contents that depend on the current selection in other views or editors. The benefit to you is that your workbench does not need to be cluttered with a dozen related views that show property and structure data for wide-ranging resources such as Java files, XML files, or UML models. They all share the same view and adapt to the current selection.
Each view has an optional toolbar and menu that is separate from those on the main workbench window. A view menu, if present, is accessed by clicking on the triangle icon at the right end of the view toolbar. The view toolbar for the Package Explorer is shown in Figure 4-3.
Views may be maximized to fill the entire workbench window area by clicking the maximize icon on the view or by double-clicking on the view tab. You can also minimize a view, which reduces it to the title bar and allows other views or editors to expand into the view area. If several views are stacked in a tab folder—two views are stacked in Figure 4-3—then they are maximized or minimized as a complete group of tabs.
Three of these basic views have related behavior: Problems,Tasks , and Bookmarks all display a list of markers, where each marker is linked to one line in a file. Double-clicking on a marker opens an editor for the associated file and positions the cursor at that line.
Each of these three kinds of markers can be further specialized by contributed plug-ins. For example, the Java plug-in adds a Java Problem, which is a specific kind of problem, typically representing a compile error or warning. Other plug-ins may contribute markers that are also subtypes of these three basic categories. An XML editor might contribute an XML validation error as a specialized kind of problem.
When working with large projects in a team environment, you may find your Problems view filled with hundreds of warnings caused by deprecated methods, unused import statements, and so on. This is especially true when a few of your co-workers are not using Eclipse to write clean code and instead are leaving this mess for you!
Filter commands are available in many Eclipse views to help you cope with information overload. The Navigator view can filter the resources that are displayed, and the Problems,Tasks , and Bookmarks views filter the markers that are displayed. All of these filters are useful as your projects grow in size and complexity. To set a view's filters, select the Filters… toolbar icon or menu. The filter dialog for the Problems view is shown in Figure 4-4.
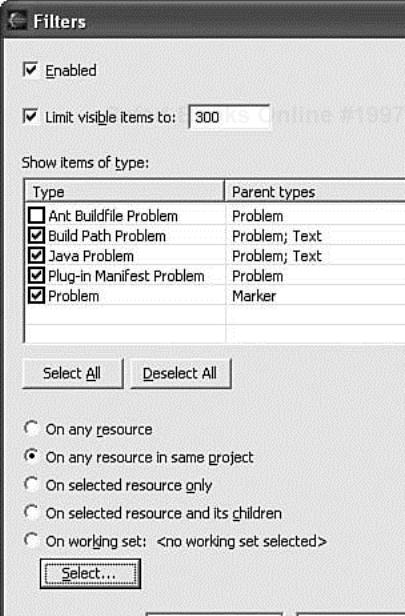
The best solution for filtering your list of problems will depend on the structure of your projects and the kind of problems you encounter. If your workspace is divided into multiple projects (possibly having dependencies for resolving build references), a very helpful technique is to restrict the view of problems to other resources in the same project as the Java class or package selected in Package Explorer view. The default view shows problems for your entire workspace. As shown in Figure 4-4, change On any resource to On any resource in same project to help you reduce information overload. Or choose On selected resource and its children for a narrower selection, such as restricting the view to problems in one class or to all classes in a package.
Filters for the Tasks and Bookmarks views are similar to those for the Problems view, except that the Problems view may be filtered by severity, whereas Task markers may be filtered by priority and status. The list of marker types depends on the workbench plug-ins that are installed. The problem marker types shown in Figure 4-4 are available in the standard Eclipse SDK, which includes specialized types for Java, Ant, and plug-in development.
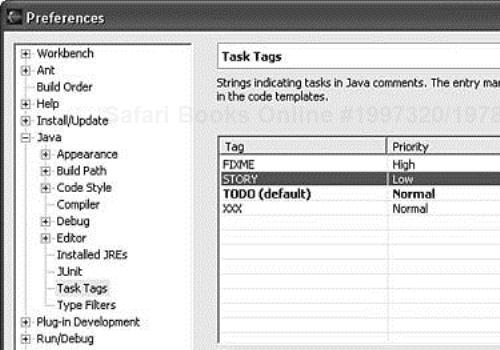
The Tasks view includes a helpful customization for Java developers. When a Java project is built, the parser automatically scans for Java task tags in your code comments. You can configure the task tag names and their priorities using the Java > Task Tags preferences, as shown in Figure 4-5. Three tags are provided by default (FIXME, TODO, and XXX), and we added a STORY tag to support our agile development process.
This new tag is defined with a Low priority to enable stories to be filtered out while working on coding activities. You can also filter the Tasks view to display only tasks containing the word “STORY” when you are reviewing requirements and their implementation. The Tasks view is shown in Figure 4-6. This view is not open by default. Open it by selecting the menu Window > Show View > Other… > Basic > Tasks. Notice that we added a STORY task tag within the class comment block and that two TODO tasks are included with notes about changes needed in the fields.
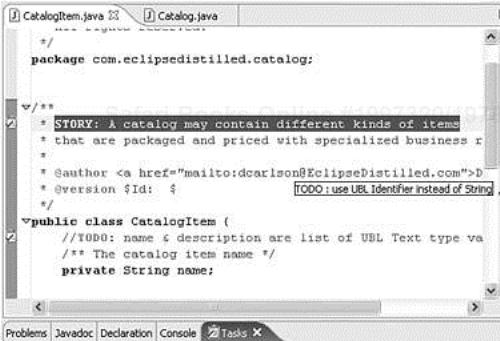
The right margin of your Java editor displays small blue rectangles indicating the location of task markers. This is a compressed index area showing all task markers in the file, including those out of view. Click on one of these task markers to navigate to that location in your file. As shown in Figure 4-6, you can hover over a task marker to see its description even if the task tag itself is not within the visible editor area.
Adding, removing, and repositioning views in your perspectives is quick and intuitive. To add a view, select the Window > Show View menu. The submenu list is defined as part of the current perspective to include those views most likely to be used when working in that perspective. To get a list of all views, select Other… from the submenu.
A new view will be added to your workbench window. If the same view had been previously opened, the workbench remembers its prior location and opens it there. If the view is already open but is hidden from visibility behind another tab, it is brought to the front.
To move a view, click the left mouse button on the view tab and drag it to the desired location. Release the mouse when finished. While dragging, you'll see an outline border for the destination; move the mouse to different regions over another view—top, bottom, left, or right edge—and get an understanding of the possibilities for positioning views. You can split a view area vertically by dropping the new view on the left or right side of an existing view, or you can split it horizontally by dropping near the top or bottom. To create a stack of views in a tabbed folder, just drop the view into the center of another view. You have a lot of flexibility.
Eclipse also supports tear-off views that appear in individual windows separate from the main workbench. Simply drag an existing view outside of the workbench window and release the mouse. To reintegrate the view into your workbench, drag it back into the workbench window area.
Any view may be set to display as a fast view. All fast views are displayed as icons on the fast view bar, as shown on the bottom of your workbench in Figure 4-7. This perspective has three fast views for JUnit,Outline , and Tasks—you'll become familiar with these icons quickly. Clicking on one of these icons causes the fast view to pop out from the fast view bar and overlay the other views. Click anywhere outside of the fast view to hide it. To convert any view into a fast view, right-click on its tab and select Fast View from the context menu.
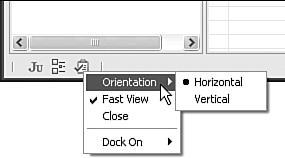
Some views are best shown in a vertical orientation (e.g., an Outline), whereas others need to be horizontally oriented (e.g., the Properties or Tasks views). The fast view bar's context menu allows you to make this choice for each fast view. The fast view bar itself may be docked on the left, right, or bottom of the workbench window.
A fast view remembers its location within the workbench window if you later choose to restore that view location and thus remove it from the fast view bar. To do this, select Fast View from the context menu of a view icon in the fast view bar.
As a Java developer, most of your time will be spent in the Java file editor. This editor provides menu and toolbar commands, syntax highlighting, and many other features that are customized for Java source code files. But other editors are also available. A generic text editor can be used with any text file, and a Java class file editor can open (but not modify) compiled byte code files to display their attributes and method signatures.
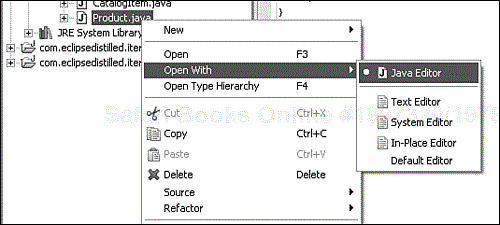
Double-clicking on a file in the Navigator view will open the default editor. Or, as shown in Figure 4-8, select the Open With context menu and pick one of the other editors that are available.
If there is no associated editor for a resource, then a system editor is selected by referencing the operating system file type assignments. For example, files ending with .xml or .html will be opened in the default Web browser. This external editor is launched in a new window, not within an Eclipse workbench view.
On Windows, the workbench will first attempt to launch an external editor in place as an OLE document. This type of editor is referred to as an embedded editor. For example, if you have a .doc file in the workbench and Microsoft Word is registered as the editor for .doc files in your operating system, then opening the file will launch Microsoft Word as an OLE document within the workbench editor area. The workbench menu bar and toolbar will be updated with options for Microsoft Word.
You can assign or reassign the default editor for any file type using the Workbench > File Associations preference page. If you would like to edit XML or HTML files within Eclipse, you can assign those extensions to the generic Eclipse text editor or use the file context menu to pick the Text Editor instead of the default System Editor.
Other open source or commercial plug-ins are available that extend your Eclipse workbench with custom editors for XML, HTML, and other file types. The Eclipse Web Tools Platform project will include editors for these types of files and others.
You can split the editor area of your workbench if you would like to view or edit two or more files simultaneously. Left-click on an editor tab and drag it to the top, bottom, left, or right margin. You'll see an outline of the proposed new editor location. To accept it, release the mouse button. To restore a single editor area, close the files in one of the partitions or drag them back into the center of the primary location.
You cannot split the window to show two editors for the same file. This is a frequently requested enhancement for Eclipse, so it may be available in a future version.
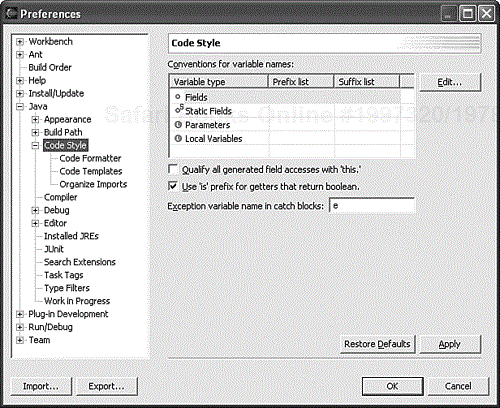
We have already touched on a few preference settings in this and previous chapters. Let's take a step back and review the general capabilities and use of Eclipse preferences. You can review or modify preference settings for all Eclipse plug-ins using a shared dialog; select the menu Window > Preferences. The standard set of preferences is shown in Figure 4-9.
The standard Eclipse 3.0 SDK workbench contains over 60 preference pages, which are organized into a hierarchy of categories. Additional preference settings are added with each new release, allowing you to control hundreds of details about the way Eclipse works. When you install a new plug-in, it will typically contribute a new category of preference settings to this window.
As an Eclipse newcomer, you should start with the preference defaults and modify a few settings while exploring the topics in this book. As you get comfortable with the preference categories, it will become natural to explore and adjust preferences while working on specific tasks in the workbench.
Most preference settings are limited to the current workspace. If you have several workspaces for your projects, each will have separate preference settings. However, this is not always desirable. You may want to use the same preferences for several workspaces, or you may want unique preferences for individual projects in a workspace.
To accommodate this, Eclipse defines three preference scopes:
Configuration. These preference settings are saved in your Eclipse installation directory and are shared by all workspace instances.
Workspace Instance. Each workspace instance defines preferences shared by all of its projects. This is the default preference scope.
Project. Some preference settings may be limited to one project.
The separation of these three levels of preference scope is still a work in progress in the Eclipse platform. More control over the scope of preference settings will be available in future releases. If unspecified, the preference scope is probably limited to your current workspace.
Share your hard work with others! Contribute your preferences as best practices for your project team or jump-start new team members with coding styles that are unique to your tools and design.
You can export all of your workspace preference settings by pressing the Export… button on the Preferences dialog, as shown in Figure 4-9. You can then import these into another workspace by opening that workspace in a new Eclipse workbench and pressing the Import… button in this dialog. To share them with your team, send the preference export file as an email attachment or check it into your team version control repository.
Eclipse defines many keyboard shortcuts. You can customize any of these shortcuts using the preference page Workbench > Keys.
For those of you who are already familiar with Emacs editor bindings, these are also predefined. Switch to the Emacs keyboard shortcuts on the same preference page by changing the Active configuration setting from “Default” to “Emacs.”
It's easy to get lost in the details of so many customization and preference settings. One helpful way to think about these choices is to distinguish between settings related primarily to individual biases, experiences, or quirks and those settings that directly affect the style, structure, or compliance of code that is written. The latter group of preferences should be agreed upon and shared by all members of a project team.
The following list is not an exhaustive summary of individual preference categories, but it gives you a starting point when considering your alternatives.
Keyboard shortcuts
Workbench and editor appearance, colors, and font
Perspective layout and view selection
View filters
Linked resource locations
Team preferences are equally beneficial to individual developers, but they also have an impact on coordinated teamwork and shared code.
Don't get tunnel vision within one perspective and try to force all of your work into a single set of views. Take advantage of using several perspectives, where each is organized to maximize productivity for related tasks. Create or customize perspectives to fit your needs.
Explore the range of specialized views that are available in Eclipse. Using the right view or set of views can increase your productivity significantly.
Use filters in the Package Explorer view and the marker views (Problems,Tasks , and Bookmarks) to cope with information overload.
Personalize Eclipse to fit your style and work. Match your habits from other editors or IDEs and explore the many options in Eclipse.
Share your best practices and team standards with all members by exporting preferences and sharing project settings.