
Eclipse was created to improve developer productivity and to get results quickly. So let's get started! There are many options for customizing your workbench and setting preferences that determine its default behavior. We start developing the product catalog application using only the installation defaults, and then the remaining chapters in Part 1 explain how to give Eclipse your personal touch and how to set up larger projects.
In this chapter, we'll see how to
Install and start the Eclipse workbench.
Create a new Java project.
Use the Java class wizard to create several classes.
Run your application within the workbench.
If you have not already done so, download the Eclipse SDK from http://www.eclipse.org.
Be sure to get the Eclipse SDK download; the alternative “platform runtime” download configuration includes only the base workbench and omits all Java development tools. In addition to the Eclipse SDK, you must have installed Java JDK 1.4 or later before starting Eclipse. You will find four categories of Eclipse downloads:
Latest Release. Releases are builds that have been declared major releases by the development team—for example, “R3.0”. Releases are the right builds for people who want to be on a stable, tested release and don't need the latest greatest features and improvements.
Stable Build. Stable builds are integration builds that have been found to be stable enough for most people to use. They are usually based on significant project milestones. The latest stable build is appropriate for people who want to stay up-to-date with what is going on in the latest development stream and don't mind putting up with a few problems in order to get the latest features and bug fixes.
Integration Build. Periodically, component teams will reach what they believe is a stable, consistent state, and they indicate that the next integration build should take this version of the component. Only advanced Eclipse users should work on these builds.
Nightly builds. Nightly builds are produced every night from whatever has been released into the HEAD stream of the CVS repository. They are completely untested and will almost always have major problems.
If you are new to Eclipse or are working on production development, then the latest release build is your best choice. This book is based on the Eclipse 3.0 release. The examples in this book were prepared using Windows XP; however, builds with identical capability are also available for Linux, Solaris, AIX, HP-UX, and Mac OSX.
Eclipse is not distributed with an automated installer that creates a desktop icon and program startup group. Instead, just unpack the ZIP archive. This will create an eclipse directory at your selected location, typically at C:eclipse for Windows computers.
Within this folder, you will find an executable file named eclipse.exe on Windows. You can browse to this location and run the program here, but it's most convenient to create a desktop shortcut icon for starting Eclipse. Running this program should display the dialog shown in Figure 2-1.
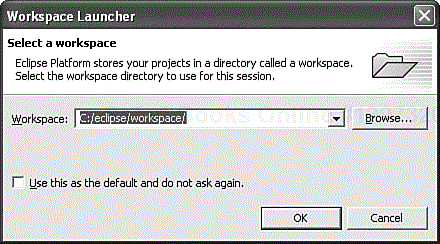
You should avoid using this default location nested within the Eclipse installation directory. Instead, enter a workspace location such as the following:
C:EclipseDistilledworkspace
You should increase the amount of heap memory allocated to Eclipse. This is not required, but it will speed up execution when developing and debugging large applications. To allocate 256MB, change your startup command (or target in your desktop icon) to read as follows:
C:eclipseeclipse.exe –vmargs –Xmx256M
You might have several versions of Java installed on your computer and need to specify which one is used to run Eclipse. If this is the case, add the –vm option on the Eclipse startup program and provide the JVM command path. Also add the -showlocation option to include the current workspace path on the workbench title. Your startup would now appear similar to this:
C:eclipseeclipse.exe -showlocation
    -vm c:j2sdk1.4.2_02injavaw.exe -vmargs –Xmx256M
When you start Eclipse, you are greeted with a Welcome page that provides links to several tutorials and examples. We'll bypass the introductory tour and go straight to development, so click the arrow icon in the upper-right corner of the Welcome screen, which will take you to the workbench as shown in Figure 2-2. This is called the Resource perspective.
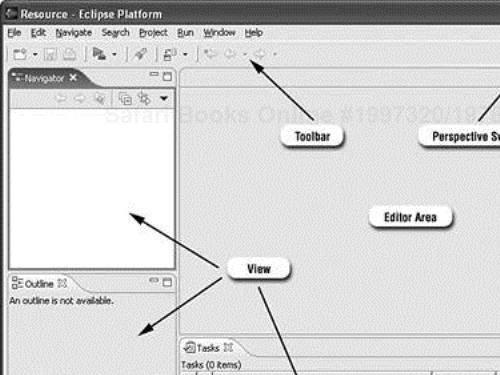
An Eclipse perspective defines a selection of views and their layout within the workbench window. Several perspectives are available, where each is configured for a particular task, such as Java development, debugging, or browsing CVS repositories. This initial resource perspective is the most generic and may be used to view and edit files in any kind of project.
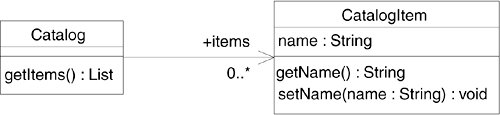
We are now ready to start the first iteration of our product catalog application. Our first goal is to get something running and learn how to work in Eclipse, so we'll start very simply. A class diagram for the first project is shown in Figure 2-3.
The following tasks are completed in this section:
Switch to the Java perspective.
Create a Java project.
Customize code templates used by the Java class wizard.
Create two Java classes that implement Figure 2-3.
Create a class with a
main()function to test our design.
We'll move through these first steps in quick succession. Most of your Java development work will be done in the Java perspective. Get there by selecting the menu Window > Open Perspective > Java. You will now see both the Java and Resource icons appear in the perspective switcher located in the upper-right corner of the workbench window. Depending on your screen resolution, one or more icons may be hidden, and you'll see a >> symbol on the right. If so, click on the left edge of the perspective switcher and drag it left until all perspective icons are showing.
There are several changes to the views that are available in the Java perspective—we'll get to those shortly. Look for three wizard icons in the center of the toolbar, as shown in Figure 2-4.
Wizards are used extensively in the Eclipse workbench to give guidance when performing multi-step activities. Some of these steps are invisible to you but are an essential part of configuring new resources or creating project files.
These three wizards perform the following tasks:
Create a New Java Project.
Create a New Java Package.
Create a New Java Class.
We'll follow a common convention and use qualified names for projects in the Eclipse workspace that reflect the primary Java package contained in each project. Our product catalog project is thus named com.eclipsedistilled.catalog. The qualified name convention is useful to assure unique self-describing names of projects shared in a source control repository such as CVS. You can shorten the name to catalog or use other descriptive names such as product-catalog without affecting the way we write code within this project.
Click the New Java Project wizard to create a project that will contain Java code.
Enter the project name:
com.eclipsedistilled.catalogCheck option: Create separate source and output folders.
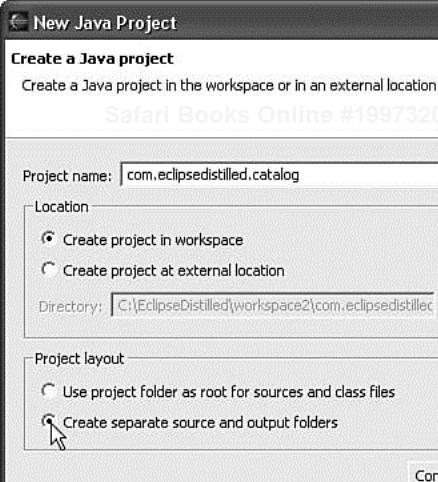
Click Finish to create the project. There are additional pages in this wizard that allow you to configure project dependencies and libraries, but we will configure those options later.
The project wizard is shown in Figure 2-5. Be sure to check the layout option to Create separate source and output folders. This option creates an src folder to contain all source code and a separate bin folder to contain the compiled class files. Without this option, .java and .class files are co-mingled in the same folders.
Select the project folder in the Package Explorer view. A Java project folder is indicated by an open folder icon with an overlaid “J.”
Click the New Java Package wizard to create a new Java package.
Enter the package name:
com.eclipsedistilled.catalog.
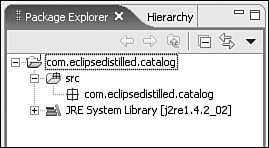
Your Package Explorer view will now look similar to Figure 2-6. Within the workspace directory on your file system, three nested directories are created inside the project folder, named com, eclipsedistilled, and catalog. The Package Explorer view shows these names concatenated into one package name similar to the way you see it in your Java source code.
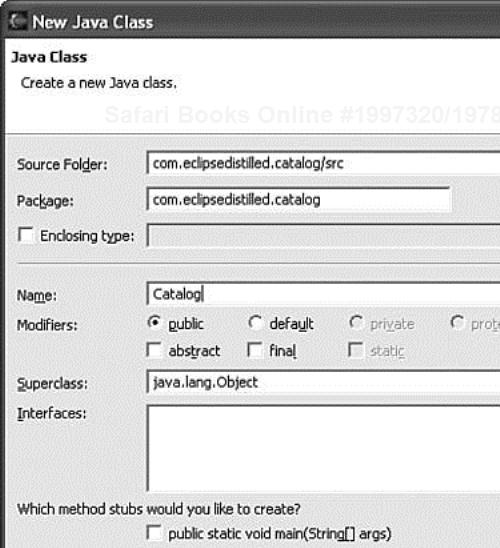
Select the
com.eclipsedistilled.catalogpackage within thesrcfolder in the Package Explorer view. A Java package is indicated by an icon resembling a box wrapped with string.Click on the New Java Class wizard to create a new Java class.
Enter the class name:
Catalog.Click Finish to create the class.
The New Java Class wizard is shown in Figure 2-7. Other options are available for creating inner classes, specifying a superclass, implementing interfaces, and generating method stubs.
Your Java perspective will now look similar to Figure 2-8. The Java file editor contains a new class that is created from a template and filled in with your selections from the wizard. Like most aspects of Eclipse, you can customize this template to modify the content of default comments. This is our next task.
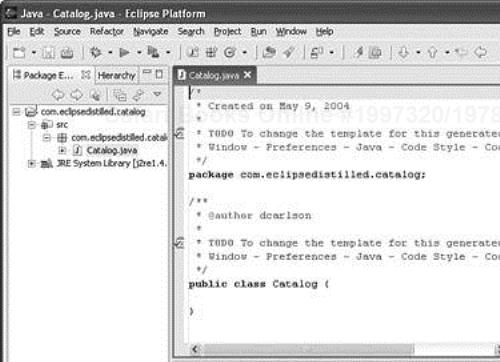
Eclipse contains many code generation templates that you can customize, but two of these should be modified right at the beginning because they affect every new file. In Figure 2-8, you can see the default comment inserted at the top of every new Java file and also the comment inserted immediately before the class declaration. Both comments contain TODO notes suggesting that you modify them.
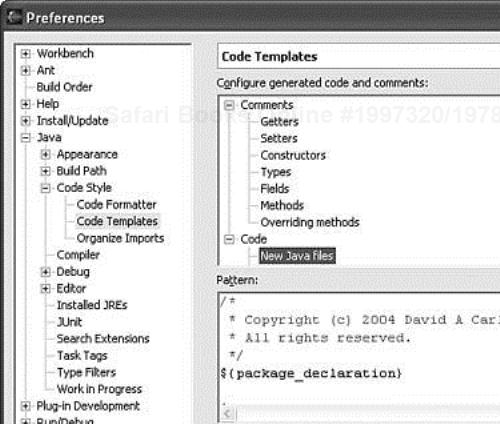
Select the menu Window > Preferences, and then in the resulting dialog select Java > Code Style > Code Templates.
Select Code > New Java files, as shown in Figure 2-9.
Click the Edit… button, which opens the dialog shown in Figure 2-10. Modify the comment block, but at least for now, do not change the template parameters following the comment. Click OK.
Select Comments > Types.
Click the Edit… button to modify the class declaration comment. You might want to include standard Javadoc tags such as
@authorand@version. Click OK.Click OK to save the new preferences.

The quickest way to get these new comments into your first class file is to delete and re-create it. Select the Catalog class in the Package Explorer view and press delete. Then repeat the previous step to create this same class, where you will now see the new comments.
Our initial implementation also requires a second class:
We'll keep these classes very simple for now and focus on getting this program running. Open the editor for Catalog.java and edit it as follows to add an items field and getItems() method.
com.eclipsedistilled.catalog/Catalog.java
package com.eclipsedistilled.catalog;
import java.util.List;
import java.util.Vector;

public class Catalog {
    private List items = new Vector();

    public List getItems() {
        return items;
    }
}
Open the CatalogItem.java file and add a name field with associated getName() and setName() methods.
com.eclipsedistilled.catalog/CatalogItem.java
package com.eclipsedistilled.catalog;

public class CatalogItem {
    /** The catalog item name */
    private String name;

    public CatalogItem(String name) {
        setName(name);
    }

    public String getName() {
        return name;
    }
    public void setName(String name) {
        this.name = name;
    }
}
When finished making changes in an editor, press Ctrl+S, press the Save icon on the toolbar, or select File > Save from the workbench menu. You may not realize it at this point, but your code is already compiled! The project is rebuilt automatically whenever a Java source file is saved. Switch back to the Resource perspective by clicking on its icon in the perspective switcher. In the Navigator view shown in Figure 2-11, expand the src and bin folders where you will see a compiled .class file for each .java file. We'll dig into this automated build capability in Chapter 6, “Java Project Configuration.” Return to the Java perspective to prepare for the next task.

The project represents the domain model for our product catalog, and we may or may not add an implementation for a user interface. When following an agile development methodology, we should write a JUnit test suite for this project. We'll take this approach in Part 2 of this book.
For now, create a new class named Main with a main() method. Our implementation includes a command-line prompt where you can add new items to the catalog and request a list of the current contents. Click the New Java Class wizard, enter the name Main, and check the option public static void main(String[] args). Then use the editor to fill in the method as follows:
com.eclipsedistilled.catalog/Main.java
package com.eclipsedistilled.catalog;
import java.io.BufferedReader;
import java.io.IOException;
import java.io.InputStreamReader;
import java.util.Iterator;

public class Main {

    public static void main(String[] args) {
        Catalog catalog = new Catalog();
        List items = catalog.getItems();

        while (true) {
            System.out.print("command? ");
            BufferedReader reader = new BufferedReader(
                    new InputStreamReader(System.in));
            String data = null;
            try {
                data = reader.readLine();
                if (data == null || data.length() == 0) {
                    System.out.println("done.");
                    return;
                }
            } catch (IOException e) {
                e.printStackTrace();
                System.out.println("exiting.");
                return;
            }

            if (data.startsWith("add ") && data.length() > 4) {
                String name = data.substring(4);
                CatalogItem item = new CatalogItem(name);
                catalog.getItems().add(item);

            } else if (data.startsWith("list")) {
                CatalogItem item;
                for (Iterator iterator = items.iterator();
                        iterator.hasNext();) {
                    item = (CatalogItem) iterator.next();
                    System.out.println("Product: "
                        + item.getName());
                }
            } else {
                System.out.println(
                    "usage: add <item name> || list");
            }
            System.out.println();
        }
    }
}
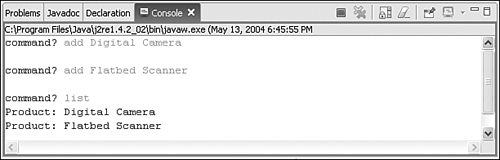
Now let's run it! Eclipse includes a Console view that displays output written to System.out and System.err. You can use it to run and test any Java application that would be executed from the command line outside of Eclipse.
Open the Console view by selecting Window > Show View > Console.
In the Package Explorer view, right-click on the
Main.javaclass and select Run > Java Application.The prompt
command?will appear in the console.Click in the Console view, type “add Digital Camera”, and then press Enter. Repeat for other products.
Type “list” to display a list of all products in the catalog.
Press Enter without typing any command, and the program will terminate.
The Console view appears as in Figure 2-12 while the program is running. You can easily tell the difference between an application that has terminated and one that is running or suspended while waiting for input because the heading of the Console view changes to include <terminated> before the program name. If <terminated> does not appear, you can press the Terminate toolbar icon on the Console view.
Eclipse also includes excellent capabilities for debugging programs. We'll look at the Debug perspective in Chapter 7, “Debugging Your Code.”
Because Eclipse is an open source project, you have an inside view of the ongoing development. But most newcomers should not download the nightly or integration builds. Stay with the latest release or maybe a stable build.
Eclipse starts in the default Resource perspective. Switch to the Java perspective for most development work.
Use the Java perspective wizards to create new projects, new packages, and new class files.
Customize the code generation templates that are used to insert code into a new Java file.
Run your application within the Eclipse workbench and use the Console view for command-line input and output.