Embedding XSLT Transformations in Python
XML is frequently used to store the “core” version of a document while transformations are used to integrate the data into other systems. For example, you may receive a purchase order as XML over the Web and dispatch it in several different directions (and in different formats) to your other data systems. You may parse the XML inserting the data into Oracle tables, transform it to HTML, add it to an internal web site, transform the purchase order into another flavor of XML, and pass it on to your suppliers.
Regardless of where you’re sending your XML, the ability to perform XSLT transformations at runtime is critical. The 4XSLT package works nicely from inside your Python programs. In this section, we create a Python CGI executable for use within Linux and Apache, or in any web server that is configured to run external CGI programs.
The process involves two stylesheets, one XML document, and one
CGI executable. The first stylesheet converts the XML document into HTML
for your browser. The second stylesheet converts the XML document into
HTML for your browser, but adds additional HTML allowing you to edit the
text of the XML document and update it on the server. The Python CGI
script exists to run the XML through the appropriate stylesheet based on
your actions. The script also takes care of updating the source XML on
disk. In order for the script to run correctly, it must be placed in a
directory where the web user (user nobody on Apache and Unix) has permission to
write a new XML file.
Creating the Source XML
For starters, we need to create an XML document. Further updates to the XML can be accomplished through the web browser once you’ve created the CGI script. For now, you can get by with the following code saved to disk as story.xml:
<?xml version="1.0"?>
<story>
  <title>Web Sites Use XML</title>
  <body>
  It is no surprise, web sites are using XML these days.
  </body>
</story>
Be sure to save the document as story.xml so that the CGI script can find it when applying stylesheets.
Creating a Simple Stylesheet
The first stylesheet used by the CGI script displays the
XML as simple HTML in the browser. It uses the XSLT apply-templates method, and contains a form
button labeled Edit Me that reloads the CGI script. When the CGI
executes in edit mode, it uses the second stylesheet to present the
edit form. The simple stylesheet is shown below in Example 6-6. Be sure and save it
to disk as story.xsl.
<?xml version="1.0" encoding="iso-8859-1"?>
<xsl:stylesheet version="1.0"
xmlns:xsl="http://www.w3.org/1999/XSL/Transform">
<xsl:template match="story">
<html>
<head><title>The Story Page</title></head>
<body><xsl:apply-templates/>
</body>
</html>
</xsl:template>
<xsl:template match="title">
<h1><xsl:apply-templates/></h1>
</xsl:template>
<xsl:template match="body">
<p><xsl:apply-templates/></p>
<p>
<form action="xslt.cgi" method="get">
<input type="hidden" name="mode" value="edit"/>
<input type="submit" value="Edit Me"/>
</form>
</p>
</xsl:template>
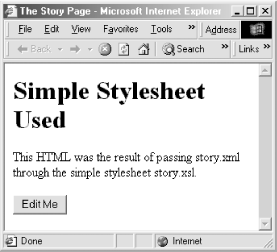
</xsl:stylesheet>Figure 6-3 shows the transformed XML within a web browser.
Creating a Stylesheet with Edit Functions
The second stylesheet is similar to the first, except this time the contents of the XML are placed within form fields that are editable within your browser. When the form is submitted, the CGI script updates the XML file on disk, and then reprocesses it through the simple stylesheet sending the result back to the browser.
The editing stylesheet is shown in Example 6-7. Be sure to save this to disk as edstory.xsl.
<?xml version="1.0" encoding="iso-8859-1"?>
<xsl:stylesheet version="1.0"
xmlns:xsl="http://www.w3.org/1999/XSL/Transform">
<xsl:template match="story">
<html>
<head><title>The Story Page</title></head>
<body>
<form action="xslt.cgi" method="get">
<xsl:apply-templates/>
</form>
</body>
</html>
</xsl:template>
<xsl:template match="title">
<h1><xsl:value-of select="."/></h1>
<p>New Title:
<input type="text" name="title" length="20"/>
</p>
</xsl:template>
<xsl:template match="body">
<p>New Body:
<textarea rows="10" cols="50" name="body">
<xsl:value-of select="."/>
</textarea>
<input type="hidden" name="mode" value="change"/>
<p><input type="submit"/></p>
</p>
</xsl:template>
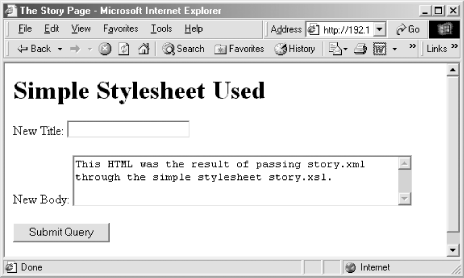
</xsl:stylesheet>Figure 6-4 shows the edit form displayed in a web browser. Selecting the submit button updates the XML file on disk and reapplies the simple transformation.
Creating the CGI Script
The xslt.cgi script pulls the stylesheets together and coordinates the processing and updating of the XML on disk. While this application lets you edit and display XML in your browser, it only consists of a single CGI script and two XSL sheets. The source data that may constantly change is also stored on disk as XML.
XSLT transformations can be done programmatically using the
xml.xslt.processor.Processor class
(provided 4XSLT is installed, as shown earlier). When the CGI script
launches, it imports and instantiates the XSLT processor:
#!/usr/local/bin/python # xlst.cgi import cgi import os import sysfrom xml.xslt.Processor import Processor# parse query string & instantiate xlst proc query = cgi.FieldStorage( )xsltproc = Processor( )
Using the XSLT processor in the CGI is simple. Two methods are exposed to establish a stylesheet and perform a transformation returning the result as a string:
xsltproc.appendStylesheetUri("story.xsl")
html = xsltproc.runUri("story.xml")
The appendStylesheetUri method is used to
establish which stylesheet is used during a transformation. The
runUri method performs the
transformation against a source XML document and returns the result as
a string.
The CGI script does not get around to transformations until it figures out what you’re trying to do. Your choices are communicated to the script using a query string passed to the server as part of the request.
Selecting a Mode
After the CGI has fetched the QUERY_STRING, it’s used to determine which
mode (edit, change, or display) you are selecting. In the case of no
mode whatsoever, the script sends back a complaint and exits:
mode = query.getvalue("mode", "")
if not mode:
  print "<html><body>"
  print "<p>No mode given</p>"
  print "</html></body>"
  sys.exit(0)
In the case of a show
command, the simple stylesheet and source XML are loaded by the XSLT
processor and the resultant HTML is sent to the browser:
if mode[0] == "show":
  # run XML through simple stylesheet
  xsltproc.appendStylesheetUri("story.xsl")
  html = xsltproc.runUri("story.xml")
  print html
In the case of an edit
command, the XML is processed through the editing stylesheet, which
adds the necessary form markup. This is nearly identical to a show command, but this time the name of the
stylesheet is different.
elif mode[0] == "edit":
  # run XML through form-based stylesheet
  xsltproc.appendStylesheetUri("edstory.xsl")
  html = xsltproc.runUri("story.xml")
  print html
If you were to press the submit button after editing the XML,
the result would be sent to the server along with a change command. The script would then update
the XML file on disk, reapply the transformation, and send the results
back to your browser.
elif mode[0] == "change":
  # change XML source file, rerun stylesheet and show
  newXML  = '<?xml version="1.0"?>
'
  newXML += "	<story>
	<title>"
  newXML += query.getvalue("title")[0] + "</title>
"
  newXML += "	<body>
"
  newXML += query.getvalue("body")[0] + "
	</body>
</story>
"
  fd = open("story.xml", "w")
  fd.write(newXML)
  fd.close(  )

  # run updated XML through simple stylehseet
  xsltproc.appendStylesheetUri("story.xsl")
  html = xsltproc.runUri("story.xml")
  print html
If the script doesn’t have write access when running as the web user, it fails.
Example 6-8 shows the complete listing of xslt.cgi.
#!/usr/local/bin/python
# xlst.cgi

import cgi
import os
import sys

from xml.xslt.Processor import Processor

# parse query string & instantiate xslt proc
query = cgi.FieldStorage(  )

xsltproc = Processor(  )

print "Content-type: text/html
"

mode = query.getvalue("mode", "")
if not mode:
  print "<html><body>"
  print "<p>No mode given</p>"
  print "</html></body>"
  sys.exit(  )

if mode[0] == "show":
  # run XML through simple stylesheet
  xsltproc.appendStylesheetUri("story.xsl")
  html = xsltproc.runUri("story.xml")
  print html

elif mode[0] == "change":
  # change XML source file, rerun stylesheet and show
  newXML  = '<?xml version="1.0"?>
'
  newXML += "	<story>
	<title>"
  newXML += query.getvalue("title")[0] + "</title>
"
  newXML += "	<body>
"
  newXML += query.getvalue("body")[0] + "
	</body>
</story>
"
  fd = open("story.xml", "w")
  fd.write(newXML)
  fd.close(  )

  # run updated XML through simple stylehseet
  xsltproc.appendStylesheetUri("story.xsl")
  html = xsltproc.runUri("story.xml")
  print html

elif mode[0] == "edit":
  # run XML through form-based stylesheet
  xsltproc.appendStylesheetUri("edstory.xsl")
  html = xsltproc.runUri("story.xml")
  print html