
The BillSummary Example
To pull together some of the validation techniques presented in this chapter, we develop an example application that utilizes a DTD, flat-file conversion, and XML validation.
In the following set of programs, we develop an Internet system that parses a flat file submitted by a web browser, converts the flat text to XML, validates the XML, stores the XML to disk under a unique ID for publishing, and communicates success or failure back to the browser (or HTTP) client. Such an arrangement can act as an HTTP-based interface for converting flat files to XML (and making the resultant XML files available over HTTP) in a distributed system.
To accomplish this, use Python’s CGI libraries to grab a flat file from an HTTP request. Use string and file APIs to parse the flat file submitted by the browser, and a DOM implementation to construct a document object based on the flat file’s contents. A validating parser is used to ensure that the constructed DOM faithfully adheres to the established Bill Summary DTD.
All of the files for this example are available as part of the examples archive.
The files used in this example should be placed in a CGI-capable directory on your web server. In this section, we create the following files:
- flatfile.html
Allows you to send the flat file to CGI script using a browser. BillSummary.txt, the flat file, is preloaded as the form submission.
- FlatfileParser.py
A class that parses the flat file and returns a DOM document.
- ValidityError.py
- BillSummary.dtd
- flat2xml.cgi
A CGI that accepts the flat file, converts it to XML, validates it, publishes it to disk (and therefore HTTP) and communicates the results back to the browser.
The CGI script flat2xml.cgi is the real workhorse and pulls everything together. It’s presented in its entirety at the end of the section.
The Flat File
The flat file we use in this application is a sample billing statement from a fictitious consulting corporation. As a typical small business might, this particular imaginary company has used spreadsheet software for invoices and exporting them as text. Our job is to allow something useful to eventually happen with these invoices. Your goal is to migrate the forms into XML for easier manipulation in the future. Converting them to XML and making them available via HTTP is a good start. The text shown in Example 7-7, BillSummary.txt, is used throughout this section extensively.
#
# Bill Summary
#
Bill Summary, Format 1.2
Section: Customer
customer-id: 34287-AUHE-39383947579
name: Zeropath Corporation
address1: 123 Zeropath Street
address2:
city: Redmond
state: WA
zip: 98052
phone: 425-555-1212
billing-contact: Larry Boberry
billing-contact-phone: 425-555-1212

Section: Bill Highlights
bill-id: 3453439789-6454-77
customer: 34287-AUHE-39383947579
customer-name: Zeropath Corporation
total-hours: 80
hours-rate: 150
total-svcmtrls: 950
total-bill-amount: 12950

Section: Item
item-id: 8289893
bill-id: 3453439789-6454-77
item-name: Continued Project Work (Backend)
total-hours: 40
total-svcmtrls: 450

Section: Item
item-id: 8289894
bill-id: 3453439789-6454-77
item-name: Continued Project Work (UI)
total-hours: 40
total-svcmtrls: 500
Once we have this file on disk, we can begin the process of creating a web form that sends this flat file over the wire via HTTP. We explore this particular application in the remaining sections of this chapter.
The Web Form
We first develop a web form to let you submit your flat files for XML conversion. If a company’s invoices are uploaded onto a shared disk as flat files each day, a batch process can pick them all up, and submit them via HTTP to your conversion application.
Choosing HTTP as your interface leaves communication pathways open for a variety of clients (i.e., browsers across the Internet, applications speaking HTTP from behind a firewall, etc.). You can have people submit text-based invoices directly from their browsers, or they can send them programmatically using intelligent clients that know how to speak HTTP.
The web form is a simple HTML document, as shown in
Example 7-8. The area to
pay attention to is the form tag
and its method and action. These elements define where the
browser sends the flat text when you press the submit button. A
textarea tag is used to contain the
flat file, and the text from Example 7-7 is then present as
the default text when you load the form.
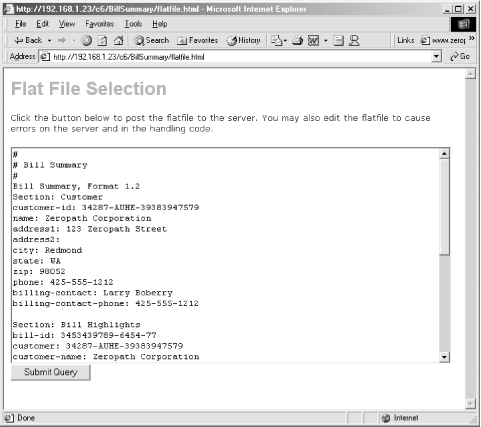
<html>
<body bgcolor="#FFFFFF" text="#000000">
<h1>Flat File Selection</h1>
<p>Click the button below to post the flat file to
   the server.  You may also edit the flat file to
   cause errors on the server and in the handling
   code.
</p>
<p>
<form action="flat2xml.cgi" method="POST">
<textarea name="flatfile" rows=20 cols=80>
#
# Bill Summary
#
Bill Summary, Format 1.2
Section: Customer
customer-id: 34287-AUHE-39383947579
name: Zeropath Corporation
address1: 123 Zeropath Street
address2:
city: Redmond
state: WA
zip: 98052
phone: 425-555-1212
billing-contact: Larry Boberry
billing-contact-phone: 425-555-1212

Section: Bill Highlights
bill-id: 3453439789-6454-77
customer: 34287-AUHE-39383947579
customer-name: Zeropath Corporation
total-hours: 80
hours-rate: 150
total-svcmtrls: 950
total-bill-amount: 12950

Section: Item
item-id: 8289893
bill-id: 3453439789-6454-77
item-name: Continued Project Work (Backend)
total-hours: 40
total-svcmtrls: 450

Section: Item
item-id: 8289894
bill-id: 3453439789-6454-77
item-name: Continued Project Work (UI)
total-hours: 40
total-svcmtrls: 500

</textarea>
<br><input type=submit>
</form>
</p>
</body>
</html>
When loaded in a browser, the web page generated from the code in Example 7-8 appears as shown in Figure 7-1.
Starting the CGI
You should now have two components of the example: a
sample flat file representing a billing summary, and an HTML web form
that sends the flat file over HTTP to a Python script named flatfile.cgi, as identified by the form element’s action attribute.
Before we dive into the complex CGI complete with validation, let’s simply test your CGI waters and confirm that you’re able to receive the flat file from your web browser. Example 7-9 offers a good milestone for establishing CGI execution and browser connectivity. Your CGI needs to capture the flat file out of the HTTP request and send it back to the user to demonstrate that everything is working well. XML and validation come afterward. The baseline CGI should look something like the early version of flat2xml.cgi shown in Example 7-9.
#!/usr/local/bin/python
# flat2xml.cgi

import cgi
import os
import sys

#
# Start HTTP/HTML Output
#
print "Content-type: text/html"
print
print "<html><body>"

#
# Parse query string for flat file
#
try:
  query = cgi.FieldStorage(  )
  flatfile = query.getvalue("flatfile", "")[0]
except:
  print "Conversion request not found or incorrectly formatted."
  print "</body></html>"
  sys.exit(0)

#
# Display flat file
#
print "<h1>Flat File</h1>"
print "<p>Flat file received:</p> "
print "<p><pre>" + flatfile + "</pre></p>"
print "</body></html>"
Most of Example 7-9
is fairly basic Python. The contents of the flat file are sent by the
browser in the form of a GET
request as the variable flatfile
inside the form. If it is unavailable, an error occurs. When Example 7-9 is up and running,
you should see a screen similar to the one shown in Figure 7-2.

In the following sections, we build on this base functionality and add conversion of the flat file to XML. Validation of the XML follows to ensure that everything is going as planned.
Conversion and Validation
To convert the flat file to XML, we first need to parse the file. While parsing a unique flat file format may seem tedious, there is no getting around this aspect of XML integration. In fact, the tediousness of having to parse every “one-off” flat file structure is perhaps the leading impetus behind XML. XML enforces a format that is easily parsed by all applications. The good news is that the flat files should take essentially the same structure in any given system, and you can write a single chunk of parsing routines for each type of flat file you encounter.
Converting text to XML
The flat file used in this example is organized into
sections, with additional data filling in each section. We cannot be
completely sure how many sections there will ultimately be in the
document, as that number depends on the number of “consulting hours”
that are placed on the customer’s bill. The FlatfileParser you create needs to be
flexible; it can’t assume a rigid ordering of sections within the
document, or their uniqueness or grouping with other sections. To
accomplish its goal of taking flat text and organizing it into an
XML document, the FlatfileParser
uses the DOM implementation to
create a DOM structure to hold the various pieces of text that the
FlatfileParser extracts:
#
# FlatfileParser.py
#
from xml.dom     import implementation

class FlatfileParser:
  def parseFile(self, fileAsString):
The class FlatfileParser has one method, named
parseFile. This method takes a
single string representing the contents of a file. Python also
features the StringIO class,
which allows a string to support read and write operations, such as
a file. StringIO is a good choice
for this class, but to keep things simple, we work with a complete
string in this example.
The next couple of steps are critical. Here, we create a new
DOM document as BillSummary, and
retrieve its root element. We append children to the element as our
FlatfileParser works the flat
text:
# Create DocType Declaration
doctype = implementation.createDocumentType('BillSummary', '',
                                            'BillSummary.dtd')

# Create empty DOM Document and get root element
doc = implementation.createDocument('', 'BillSummary', doctype)
elemDoc = doc.documentElement
The implementation class is imported from xml.dom.implementation, and its createDocumentType method is used to
construct a BillSummary type
referencing a file called BillSummary.dtd (shown in Example 7-12). A document
object is created with the createDocument method adding the freshly
created doctype as a parameter.
Finally the document’s root element is retrieved via the doc.documentElement method.
Now that the basis for the document is created, the code can loop over the lines in the file, examining the contents. New sections result in new section elements, and the data within these elements results in new children for the section elements. Here is a cross-section of the structure of the flat file:
Section: Bill Highlights
bill-id: 3453439789-6454-77
customer: 34287-AUHE-39383947579
customer-name: Zeropath Corporation
total-hours: 80
hours-rate: 150
total-svcmtrls: 950
total-bill-amount: 12950
In your FlatfileParser,
encountering a “Section” string creates a new element. This element
is then added to the document and set as the “current” element. All
other lines of the document, such as bill-id and total-hours, are added to the “current”
element as children until a new “Section” is discovered. The first
half of the code checks to see if you’re dealing with a Section
element. If it finds that this is true, the second half of the code
dumps the current line to XML as an element and CDATA pair:
# Read in each line of flat file for processing
for line in fileAsString.splitlines(  ):
  # Test to see if we're in a section or not
  if bInElement:
    # Check to see if we're leaving a section
    if ':' in line:
      # Append section element, reset section switch
      elemDoc.appendChild(elemCurrent)
      bInElement = 0
    else:
      # Parse a section line on ':'
      k,v = line.split(':', 1)

      # Create element name and child text from key/value pair
      elem = doc.createElement(k.strip(  ))
      elem.appendChild(doc.createTextNode(v.strip(  )))

      # append element to current section element
      elemCurrent.appendChild(elem)
The code first checks to see if you have encountered a
blank line or completed a Section. If it finds you have not, the
current line is assumed to be a child of the current section and is
split upon its colon (:). The
doc.createElement method is then
used to create the element and its tag name from the left half of
the text string, while the character data of the element is appended
as a child, and is taken from the right half of the text string.
This process continues until there are no lines left in the
file.
What the previous code snippet doesn’t show is what happens
when bInElement is false (zero in the case of Python). Based
on the structure of the flat file, when bInElement is false it’s time to start a
new section. The code then searches for another “Section” string.
When found, it is converted to an element and set as the “current”
element, and bInElement is
flipped back to true.
# Create a new element based on which section of
# the flat file we are in...
if line.startswith("Section: Customer"):
  elemCustomer = doc.createElement("Customer")
  bInElement = 1

  # Set current working element for the Customer section
  elemCurrent = elemCustomer

if line.startswith("Section: Bill Highlights"):
  elemBillHighlights = doc.createElement("BillHighlights")
  bInElement = 1

  # Set current working element for the BillHighlights section
  elemCurrent = elemBillHighlights

if line.startswith("Section: Item"):
  elemItem = doc.createElement("Item")
  bInElement = 1

  # Set current working element for the Item section
  elemCurrent = elemItem
For every line of code that you have in your file, the
FlatfileParser assumes that you
are within a section or dealing with a section’s children. If
miscellaneous data appears after a section and before a new one, it
is ignored because the parsing loops you have created only consider
things based on what section they are in. Finally, when the document
has no more lines left within it, the new DOM document is
returned:
return doc
Example 7-10
shows the complete listing of FlatfileParser.py. The CGI script shown
later in this section uses the FlatfileParser class.
#
# FlatfileParser.py
#
from xml.dom     import implementation

class FlatfileParser:
  def parseFile(self, fileAsString):

    # Create DocType Declaration
    doctype = implementation.createDocumentType('BillSummary', '',
                                                'BillSummary.dtd')

    # Create empty DOM Document and get root element
    doc = implementation.createDocument('', 'BillSummary', doctype)
    elemDoc = doc.documentElement

    # boolean text parsing switch to help
    # navigate flat file
    bInElement = 0

    # Read in each line of flat file for processing
    for line in fileAsString.splitlines(  ):
      # Test to see if we're in a section or not
      if bInElement:
        # Check to see if we're leaving a section
        if ':' in line:
          # Append section element, reset section switch
          elemDoc.appendChild(elemCurrent)
          bInElement = 0
        else:
          # Parse a section line on ':'
          k,v = line.split(':')

          # Create element name and child text from key/value pair
          elem = doc.createElement(k.strip(  ))
          elem.appendChild(doc.createTextNode(v.strip(  )))

          # append element to current section element
          elemCurrent.appendChild(elem)

      # Create a new element based on which section of
      # the flat file we are in...
      section = line.strip(  )
      if section == "Section: Customer":
        elemCustomer = doc.createElement("Customer")
        bInElement = 1

        # Set current working element for the Customer section
        elemCurrent = elemCustomer

      if section == "Section: Bill Highlights":
        elemBillHighlights = doc.createElement("BillHighlights")
        bInElement = 1

        # Set current working element for the BillHighlights section
        elemCurrent = elemBillHighlights

      if section == "Section: Item":
        elemItem = doc.createElement("Item")
        bInElement = 1

        # Set current working element for the Item section
        elemCurrent = elemItem

    return doc
Validating the XML
You may be wondering what XML is produced by running
the FlatfileParser against the
sample text shown in Example
7-7. If you apply FlatfileParser against BillSummary.txt, you should wind up with
a DOM that looks like BillSummary.xml, shown in Example 7-11 (provided you
display your DOM with PrettyPrint
or the like).
<?xml version='1.0' encoding='UTF-8'?>
<!DOCTYPE BillSummary SYSTEM "BillSummary.dtd">
<BillSummary>
  <Customer>
    <customer-id>34287-AUHE-39383947579</customer-id>
    <name>Zeropath Corporation</name>
    <address1>123 Zeropath Street</address1>
    <address2>
    </address2>
    <city>Redmond</city>
    <state>WA</state>
    <zip>98052</zip>
    <phone>425-555-1212</phone>
    <billing-contact>Larry Boberry</billing-contact>
    <billing-contact-phone>425-555-1212</billing-contact-phone>
  </Customer>
  <BillHighlights>
    <bill-id>3453439789-6454-77</bill-id>
    <customer>34287-AUHE-39383947579</customer>
    <customer-name>Zeropath Corporation</customer-name>
    <total-hours>80</total-hours>
    <hours-rate>150</hours-rate>
    <total-svcmtrls>950</total-svcmtrls>
    <total-bill-amount>12950</total-bill-amount>
  </BillHighlights>
  <Item>
    <item-id>8289893</item-id>
    <bill-id>3453439789-6454-77</bill-id>
    <item-name>Continued Project Work (Backend)</item-name>
    <total-hours>40</total-hours>
    <total-svcmtrls>450</total-svcmtrls>
  </Item>
  <Item>
    <item-id>8289894</item-id>
    <bill-id>3453439789-6454-77</bill-id>
    <item-name>Continued Project Work (UI)</item-name>
    <total-hours>40</total-hours>
    <total-svcmtrls>500</total-svcmtrls>
  </Item>
</BillSummary>
One important aspect missing from our example thus far is the
actual DTD. In order for flat files to convert to XML, and to
subsequently have the XML deemed valid, there must be a DTD. The DTD
for the BillSummary document is
straightforward. It uses the concepts of content models and element
ordering, discussed in Chapter
2.
You must have the DTD saved as BillSummary.dtd in order for validation to succeed. BillSummary.dtd is presented in Example 7-12.
<!ELEMENT customer-id (#PCDATA)>
<!ELEMENT name (#PCDATA)>
<!ELEMENT address1 (#PCDATA)>
<!ELEMENT address2 (#PCDATA)>
<!ELEMENT city (#PCDATA)>
<!ELEMENT state (#PCDATA)>
<!ELEMENT zip (#PCDATA)>
<!ELEMENT phone (#PCDATA)>
<!ELEMENT billing-contact (#PCDATA)>
<!ELEMENT billing-contact-phone (#PCDATA)>
<!ELEMENT bill-id (#PCDATA)>
<!ELEMENT customer (#PCDATA)>
<!ELEMENT customer-name (#PCDATA)>
<!ELEMENT hours-rate (#PCDATA)>
<!ELEMENT total-bill-amount (#PCDATA)>
<!ELEMENT item-id (#PCDATA)>
<!ELEMENT item-name (#PCDATA)>
<!ELEMENT total-hours (#PCDATA)>
<!ELEMENT total-svcmtrls (#PCDATA)>

<!ELEMENT Customer (customer-id, name, address1, address2,
                    city, state, zip, phone, billing-contact,
                    billing-contact-phone)>

<!ELEMENT BillHighlights (bill-id, customer, customer-name,
                          total-hours, hours-rate, total-svcmtrls,
                          total-bill-amount)>

<!ELEMENT Item (item-id, bill-id, item-name, total-hours,
                total-svcmtrls)>

<!ELEMENT BillSummary (Customer, BillHighlights, Item*)>
If you turn back to val.py, presented in Example 7-6, you can use it to
check the validity of your freshly created BillSummary.dtd and your example
BillSummary.xml (that is if you
typed it in, or extracted it from the FlatfileParser). If you have the XML as a
saved file, you can test it accordingly:
C:pythonxmlc6>python val.py BillSummary.xml
Creating a validation handler
Now that you have a FlatfileParser, a generated XML version,
and a DTD to hold it against, you need a validation handler for
xmlproc. The XMLValidator class features a method
called set_error_handler. You can
use this method to supply XMLValidator with an error handler that
does the things you need it to, such as write errors to your
HTTP/HTML client.
To implement the ErrorHandler, derive an object from its
interface and override the methods you wish to implement as part of
your error scheme. Your error handler writes simple text messages
wrapped in HTML. Example
7-13 shows the complete listing of ValidityError.py, which implements an
ErrorHandler-compliant
object.
from xml.parsers.xmlproc.xmlapp import ErrorHandler

"""
ValidityErrorHandler -- implement xmlproc's ErrorHandler Interface
"""
class ValidityErrorHandler(ErrorHandler):

  def warning(self,msg):
    print "<p><b><font color=#FF0000>Warning received!:</b></font>"
    print "<br>" + msg + "</p>"
    self.errors = 0

  def error(self,msg):
    print "<p><b><font color=#aa0000>Error received!:</b></font>"
    print "<br>" + msg + "</p>"
    self.errors = 1

  def fatal(self,msg):
    print "<p><b><font color=#aa0000>Fatal Error received!:</b></font>"
    print "<br>" + msg + "</p>"
    self.errors = 1
Each method of the error handler accepts a message. It writes
the message to the web page with verbiage describing what type of
error it is (warning, error, or fatal). Each method also flips a
switch (self.errors) so that the
CGI script can tell if errors have occurred.
Now that the handlers, DTD, and XML files are in place, we can return to the CGI for completion.
Completing the CGI
When we last left flat2xml.cgi, we instructed it to simply dump the flat file back out as text to confirm that your CGI setup is working correctly. Now we go back and add some real functionality to the setup. At the end of this section, the full listing of the CGI is presented in Example 7-14.
Defining success and error functions
The CGI script is the great coordinator in this sample
application. The web server launches the CGI upon a page request,
and the CGI in turn imports modules and classes and begins the
process of completing the task. In the beginning, however, the CGI
completes the imports and establishes success and failure methods:
#!/usr/local/bin/python
# flat2xml.cgi

import cgi
import os
import sys

from FlatfileParser      import FlatfileParser
from xml.dom.ext         import PrettyPrint
from xml.parsers.xmlproc import xmlval
from ValidityError       import ValidityErrorHandler

# customer failure message
def failure(msg):
  print "<h1>Failure</h1>"
  print "<p><b>Post received, Failure called:"
  print msg + "</b></p>"

# customer success message
def success(msg):
  print "<p><b>XML Document Received, is valid, and "
  print "has been written to disk. "
  print "Message: " + msg + "</b></p>"
The success function is
called after the document has been successfully converted,
validated, and stored to disk using the Customer ID number as part
of the filename. The failure
function is called whenever the CGI encounters a fatal error,
although it is up to the caller to end the CGI when failure returns.
The next step is to prepare the HTTP/HTML output, and start communicating back to the browser. The CGI script works on a series of conditions that either result in a successful message sent to the browser, or a fatal error message stopping the script. To get the HTML started, use a few print statements:
#
# Start HTTP/HTML Output
#
print "Content-type: text/html"
print
print "<html><head>"
print "<link rel=stylesheet type=text/css href=bs.css>"
print "</head><body>"
The <head> element
contains a link to a stylesheet that adds some text coloration to
the example.
Converting the flat file to XML
The code to convert the flat file to XML is primarily
inside the FlatfileParser created
earlier. Use the Python CGI API to grab the flat file from the query
string:
# # Parse query string for flat file # try:querys = cgi.FieldStorage( )flatfile = query.getvalue("flatfile", "")[0]except: failure("Conversion request not found or incorrectly formatted.") print "</body></html>" sys.exit(0) # instatiate flat file parser & display fileffp = FlatfileParser( )print "<h1>Flat File</h1>" print "<p>Flat file received:</p> " print "<p><pre>" + flatfile + "</pre></p>"
After instantiating the FlatfileParser, use the parseFile method to convert the text to
XML:
#
# Convert flatfile to XML
#
print "<h1>Conversion</h1>"
BillSummaryDOM = ffp.parseFile(flatfile)
CustomerIdElement = BillSummaryDOM.getElementsByTagName("customer-id")
if CustomerIdElement:
  # go after the Customer Id
  CustomerId = CustomerIdElement[0].firstChild.data
  print "<p>Converted to XML...</p>"
else:
  # No id found, boot document now
  failure("Unable to detect customer-id in DOM instance.")
  print "</body></html>"
  sys.exit(0)
Notice there is additional logic after the BillSummaryDOM, created to grab the
customer ID element. Before you go through the trouble of validating
the document, you need to save it to disk under a special identifier
so that it’s available to other systems from the web server,
including the validator. To do
this, extract the Customer ID character data from the customer-id element within the DOM. If it
is present, the code moves along; if it’s absent, a fatal error
occurs and the script exits.
Validating the converted XML
Provided the document was well-formed enough to extract the ID, you can begin the process of validation. Validation gives the application a chance to ensure that the document conforms to standards and will not cause problems in the system. Assuming the ID is found, you can move into the validation step, which involves saving the document to disk, as shown here:
# Validate the DOM
#
print "<h1>Validation</h1>"
try:
  # Write document to disk based on Customer Id
  fd = open(CustomerId + ".xml", 'w')
  PrettyPrint(BillSummaryDOM, fd)
  fd.close(  )
except:
  # Problem writing document?
  failure("<p>Unable to write XML document to disk.</p>")
  print "</body></html>"
  sys.exit(1)
The PrettyPrint function is
used to write the DOM into the file descriptor. The work is carried
out within a try and except block to catch any file I/O
problems before they propagate out of the script and cause an
Internal Server Error for the browser to see. Next comes the actual
instantiation of XMLValidator:
# instantiate parser
xv = xmlval.XMLValidator(  )

# instantiate the error handler
veh = ValidityErrorHandler(xv.app.locator)

# set up parser, call parse method
xv.set_error_handler(veh)
xv.parse_resource(CustomerId + ".xml")
If there are any errors during the validation steps, your
custom error handler, ValidityErrorHandler, presents errors to
the browser and continues to process.
Displaying the XML
Regardless of validity errors, the CGI script displays
the XML to the browser in the HTML page with the help of the
<pre> and <xmp> tags. If you are not familiar
with these, the <pre> tag
instructs the browser to display the text that follows the tag as
preformatted text, preserving whitespace. This is a good tag to use
when showing code snippets. But XML can be tricky, as the browser
can mistake it for unsupported HTML tags. This is where the <xmp> tag comes in handy—originally
intended for example HTML, it works to escape any text that is
enclosed in `<' and `>' type characters, as shown
here:
# Display XML Document
print "<h1>XML Document</h1><pre><xmp>"
PrettyPrint(BillSummaryDOM)
print "</xmp></pre>"
To make sure the DOM is displayed as raw XML in the HTTP
stream, use the PrettyPrint
function imported from xml.dom.ext. This method “prints” the XML
into any file-like object you provide; however, if nothing is
provided beyond the DOM, then the file-like object is assumed to be
sys.stdout.
If there are no validation errors during your script’s
execution, a successful end occurs. However, if for some reason
validation errors stack up, even when your flat file and XML make it
past all of the other hurdles, the script still fails. Remember that
the ValidityErrorHandler was
configured with an error switch so that external objects could track
its success rate. The CGI script uses this error switch to determine
if there are any validation errors:
# confirm response to user
#
if veh.errors:
  failure("Validation Error(s).")
else:
  success("Success.")

# Finish Up
print "</body></html>"
If any validation errors are riding in ValidityErrorHandler, the script calls the
failure method. Example 7-14 shows the
complete version of flat2xml.cgi.
#!/usr/local/bin/python
# flat2xml.cgi

import cgi
import os
import sys

from FlatfileParser      import FlatfileParser
from xml.dom.ext         import PrettyPrint
from xml.parsers.xmlproc import xmlval
from ValidityError       import ValidityErrorHandler

# customer failure message
def failure(msg):
  print "<h1>Failure</h1>"
  print "<p><b>Post received, Failure called:"
  print msg + "</b></p>"

# customer success message
def success(msg):
  print "<p><b>XML Document Received, is valid, and "
  print "has been written to disk. "
  print "Message: " + msg + "</b></p>"

#
# Start HTTP/HTML Output
#
print "Content-type: text/html"
print
print "<html>"
print "<body>"

#
# Parse query string for flat file
#
try:
  query = cgi.FieldStorage(  )
  flatfile = query.getvalue("flatfile", "")[0]
except:
  failure("Conversion request not found or incorrectly formatted.")
  print "</body></html>"
  sys.exit(0)

# instatiate flat file parser & display file
ffp = FlatfileParser(  )
print "<h1>Flat File</h1>"
print "<p>Flat file received:</p> "
print "<p><pre>" + flatfile + "</pre></p>"

#
# Convert flatfile to XML
#
print "<h1>Conversion</h1>"
BillSummaryDOM = ffp.parseFile(flatfile)
CustomerIdElement = BillSummaryDOM.getElementsByTagName("customer-id")
if CustomerIdElement:
  # go after the Customer Id
  CustomerId = CustomerIdElement[0].firstChild.data
  print "<p>Converted to XML...</p>"
else:
  # No id found, boot document now
  failure("Unable to detect customer-id in DOM instance.")
  print "</body></html>"
  sys.exit(0)

#
# Validate the dom
#
print "<h1>Validation</h1>"
try:
  # Write document to disk based on Customer Id
  fd = open(CustomerId + ".xml", 'w')
  PrettyPrint(BillSummaryDOM, fd)
  fd.close(  )
except:
  # Problem writing document?
  failure("<p>Unable to write XML document to disk.</p>")
  print "</body></html>"
  sys.exit(1)

# instantiate parser
xv = xmlval.XMLValidator(  )

# instantiate the error handler
veh = ValidityErrorHandler(xv.app.locator)

# set up parser, call parse method
xv.set_error_handler(veh)
xv.parse_resource(CustomerId + ".xml")

# Display XML Document
print "<h1>XML Document</h1><pre><xmp>"
PrettyPrint(BillSummaryDOM)
print "</xmp></pre>"

#
# confirm response to user
#
if veh.errors:
  failure("Validation Error(s).")
else:
  success("Success.")

# Finish Up
print "</body></html>"
Running the Application in a Browser
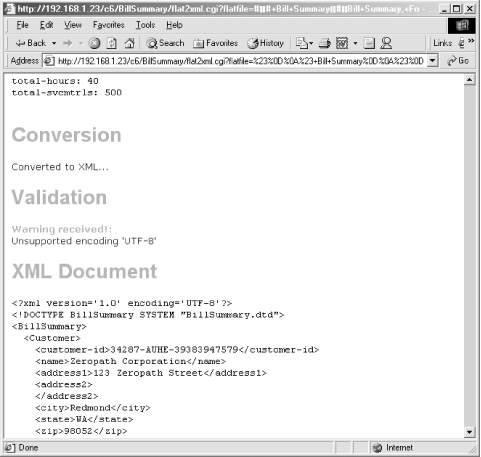
The CGI script can have a variety of different outcomes based on whether you edit the text before sending it. As is, the flat file is well-formed in the text box when you load flatfile.html. It produces HTML output as shown in Figure 7-3.
However, if you were to edit the text before sending it, you would see wildly different results. For example, if you delete half of the Bill Highlights section and merge it into the first section, you generate a mess of validity errors as shown in Figure 7-4.
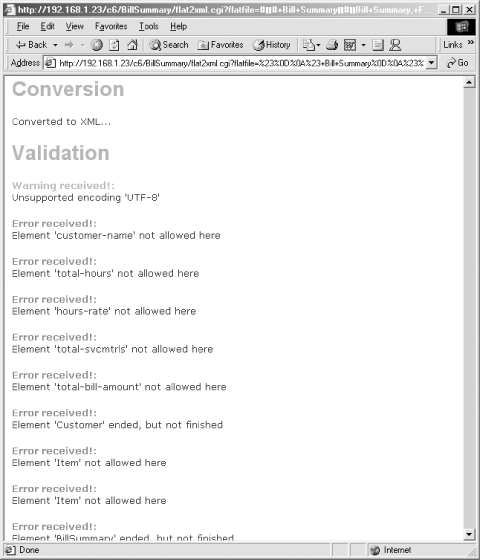
The errors you just introduced were caused by your arbitrary deletions of large swatches of content. The CGI captured the problems by using validation. The errors shown in Figure 7-4 clearly illustrate the validity errors in the document, and can be triggered to fire events in other parts of your system. In a real situation, you would have a certain business logic that would dictate what to do if a piece of data is missing. For example, in your business it might not be too bad if a document looks good but is missing a date field. However, if the document is missing an account number, it might be a fatal flaw requiring a different course of action. The level of logic you enforce may have something to do with the complexity of the document you’re working with. This entire example is based around an XML document created from scratch. When creating documents from scratch you are able to tailor them to your exact situation (perhaps too much so). If you decide to work with a standardized dialect, there are even more stringent considerations and requirements for your documents, and your transactions may have to flow along the lines of someone else’s business logic.