
Writing code to interact with a running application requires knowledge of what is going on behind the scenes in that application and what resources are available to you at runtime. This chapter will acquaint you with what is going on behind the scenes in NetBeans.
One of the reasons many user interface
components
in NetBeans are explorer views is that explorer views have a concept
of a Node or set of Nodes being
activated. At any time, only one window has input focus, meaning that
it is responding to the keyboard. Many windows contain tabbed
panes—the component comprising each individual pane is a
TopComponent. Whichever tab is displayed in the
window that has focus is the active TopComponent.
Many TopComponents display
Nodes in one way or another. Multiple
Nodes in an explorer view can be selected (by
Shift- or Control-left-clicking them). The Nodes
that are selected in the active TopComponent are
“activated.” The
activated nodes provide the context by which
NetBeans decides what actions should be available, by enabling or
disabling menu items and toolbar buttons. They also determine what
properties should be shown in the global property sheet. For
context-sensitive actions such as Compile, it is this context that determines if
the action can be performed and what the target of that action is.
Note that in the Code Editor, the
selected node is determined by the cursor position. If you were to
expand a Java class Node in Explorer
→
Filesystems, you would find a
Node for the method you are editing. This
is the selected Node if the
cursor is within that method’s body in the editor,
and if you had edited the file since you last compiled it, the
Compile action would be enabled. On
the other hand, if you are changing the editor colors, and the
selected Node is a Node
representing settings for display colors in the Editor, the Compile
action should not be enabled—that’s not a
thing you can compile.
In the case of multiple selection, the available actions are the
intersection of the actions possessed in common by all of the
activated Nodes. Each such action can decide for
itself whether it will be enabled on the multiple selection—for
example, Compile will work as easily
on five Java sources as one, whereas Customize
Bean works only on one class at a time and so will appear
in the context menu but be disabled (grayed out). The global property
sheet displays only properties shared by all the selected nodes. If
all the nodes have the same value for a property, that value will be
displayed, and otherwise you will see, for example,
<Different Values>.
At any time, your code can find out what
the activated
Nodes are by calling
TopManager.getDefault( ).getWindowManager( ).getRegistry( ).getActivatedNodes( ).
A Node owns an arbitrary set of
cookies.
A cookie can be any Java class that implements the empty
Node.Cookie marker interface. Cookies provide a
generic way to look up arbitrary functionality associated with a
node. If you know about a given subinterface of
Node.Cookie that has a method
you’re interested in calling, you can ask any
Node whether it can supply an instance of an
implementation of this class by calling
someNode.getCookie(SomeCookie.class). In this
sense, Cookies are for anything you want to use
them for. For example, if you had a Node that
represented a C++ source file, you might want to create a cookie
class that provided access to a structural, parsed analysis of that
class.
Cookies in NetBeans are actually quite simple and solve several important problems. The first is that they allow for separation of data storage and business logic—an object representing some data is not required to also implement all functions pertaining to that data.
Secondly, they allow for the dynamic addition and removal of behavior, providing a sort of dynamic multiple inheritance at runtime.
Thirdly, since they are based on interfaces (or abstract classes),
not concrete classes, they can hide the implementation details of the
class that actually implements the Cookie.
Finally, another reason for cookies is reuse of implementation: There
are a number of cookie implementations in the APIs (usually with
class names such as SomeSupport) which module
authors can subclass and customize. This provides convenience to
module authors and reduces memory footprint—cookie authors need
not reinvent the wheel.
One of the most common uses of Cookies is to
implement actions. A brief look at some of the
Node.Cookie implementations defined in the
Open APIs
gives a pretty good sense of common uses for
Cookies: CloseCookie,
ExecCookie, OpenCookie,
PrintCookie, SaveCookie,
EditCookie. So, if you press F9 to compile, the decision tree is something
like this:
What is the currently selected node?
Does it have a
CompilerCookie?If yes, compile, if not, beep.
Now let’s take the case where you have an HTML file and a Java file selected in Explorer. The decision tree is only slightly different:
What are the currently selected nodes?
Does each one have a
CompilerCookie? (No, you can’t compile an HTML file.)No, one of these
Nodes does not have a compiler cookie. Beep.
In the next section, you will have the opportunity to browse some
objects within the running IDE and see what
Cookies they
support.
Mount the directory
examples/extending-netbeans/sources/current-node-viewer/
from the
downloadable
sources associated with this book. In this directory in the
util package is a small Java class called
CurrentNodeViewer. Run this class with internal
execution.[10] It displays a window that
simply displays text information about whatever
Node is selected. Now, with that window open, try
selecting random nodes and components of the IDE with the mouse or
keyboard—try options in the Tools
→
Options window. Move the cursor around in the
code in the Editor window and notice
that the selected Node changes as you move from
method to method. Spend five or ten minutes selecting other nodes and
components in the IDE and observe the list of
Cookies available, the node classes, and so on.
You can begin to get a better sense of exactly what is going on under
the hood as you interact with NetBeans.
In particular, open any source file in the editor. Place the cursor
at the top of the file and type a character or two so that the file
now needs to be saved. Notice that the list of
Cookies available in the CurrentNodeViewer
window has changed—a SaveCookie has been
added to the list of available Cookies. If you
press Control-S to save it, the SaveCookie will
disappear from the list.
The Bean Browser is another tree-based style
of explorer view, but considerably
more powerful in its ability to browse hierarchies of
Nodes, using introspection to allow you to drill
much deeper than just observing those objects that are exposed
directly in the user interface, as you did with the previous example.
The Bean Browser is included in the Open APIs Support module. It
allows you to browse and manipulate live nodes within the IDE and
uses introspection to examine non-node objects surfaced as properties
by nodes. To open the Bean Browser, right-click a
Node in an explorer view, and choose
Tools
→
Bean Browse
→
Bean Browse
Node. A new Bean Browser window will open, rooted on that
node. You can also browse starting from a set of common jumping-off
points in NetBeans by choosing Bean Browse
Master (see Figure 17-1).
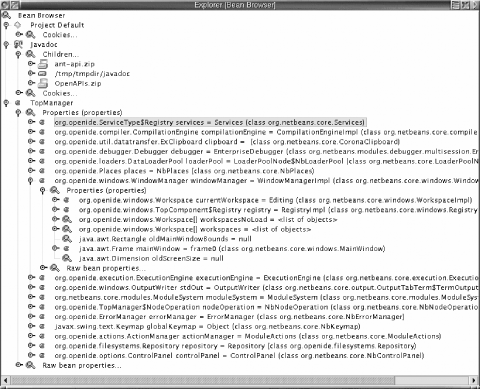
When you open a Node in the Bean Browser, you may
see a set of several Nodes underneath it that can
include:
- Properties
Items this object exposes as properties according to its
BeanInfo. Properties of primitive types, such as strings, are skipped.- Children
Child
Nodes of this node, which can be browsed as well by expanding them in the tree.- Instance of SomeClass
If the
Nodegives you access (via anInstanceCookie—more on that in Chapter 15) to an instance of some object.- Cookies
The
Cookies theNodehas in its cookie set—if you tried theCurrentNodeViewerexample before, you may be beginning to get a sense of howCookies are used inside NetBeans.
Tip
What you see is not necessarily the entire set of
Cookies the Node has, but only
those declared in the Open APIs and thus known to the Bean Browser. Since Cookies
must be requested by class, there is no way to read the entire set of
Cookies a Node or
DataObject possesses. This is an API limitation. A
module that defines a new kind of cookie can, however, register it
with the Bean Browser so it will appear on nodes that hold it. See,
for example, the downloadable sources for the Minicomposer
example.
- Raw Bean Properties
Properties of the object available simply by calling getter methods, and ignoring any declared
BeanInfo. Properties of primitive types are exposed, and even properties with non-public getters are shown, so you can find out as much as possible about an object.
Note
For a deeper sense of what lives under the hood in NetBeans, try the
Bean Browse Master menu item
mentioned above, and explore the Nodes you see
there. The Bean Browser is a powerful tool for getting to know the
internals of NetBeans, and quickly finding what
Cookies and properties are available on an object
your module needs to interact with.
The Bean Browser can also be used to test your own JavaBeans classes—there is an execution service the Open APIs Support module installs which will create an instance of a JavaBean (a class which has a no-argument constructor) and open a Bean Browser rooted on your JavaBean—so you can test non-visual classes visually using introspection, and also drill down through any JavaBeans your initial bean exposes as properties. To use this functionality, select your JavaBean class in Explorer, and, on the Execution tab of its property sheet, set the Executor property to Test Beans.
If you test a bean using this executor, the bean class must not be available in an enabled module. If it is, you will be testing the module’s version of the class, rather than the version you are editing in Filesystems. For an explanation of why this is so, see Chapter 15.
A common use of Nodes
is
to represent DataObjects. A
DataObject is an object which owns some textual or
binary content, such as a Java source file or an image.
DataObject is NetBeans’
abstraction for things that contain data. A
DataLoader registers itself with the system as
being able to load a particular file type. When a new file is found,
all of the registered loaders are asked if they can recognize/load
this file type, until one is found that can.
DataLoaders are factories for
DataObjects.
Like Nodes, DataObjects also
support cookies. In fact, a DataNode, which is the
standard Node implementation to represent
DataObjects, by default uses the cookie set of the
DataObject to provide cookies.
If you call someNode.getCookie(OpenCookie.class),
you can find out whether an instance of
org.openide.cookies.OpenCookie is in the set of
cookies of the Node you’re
calling this method on, and therefore, whether the Open action can be
performed (OpenCookie implements a method,
open( ), for this purpose).
A good way to think of what you see in NetBeans when editing is that
you have a Node which represents a
DataObject which represents one or more
FileObjects, such as a .java
file and its associated .class file(s). In the
Editor, in turn, you are looking at
a Document which represents the data contained by
the DataObject.
When you deal with files in the IDE, you never
are
dealing with java.io.File. NetBeans contains a
virtual wrapper around files,
org.openide.filesystems.FileObject. This
abstraction is what allows NetBeans to do the following:
Transparently support different sources of file-like objects, such as CVS, FTP-based filesystems, and JAR/ZIP archives so that module code does not have to care how or where the data is stored.
Be extended to support other types of filesystems without affecting modules that will operate on those files.
The filesystems paradigm takes its cue from the filesystem model of the Unix operating system. On Unix systems, one “mounts” a device, such as a hard drive partition, or a directory on a remote server via NFS (Network File System). That device then appears to be just another subdirectory of the root filesystem. (Microsoft Windows takes a different approach, using letters to specify devices, for example, the C: drive.)
Filesystems work very much like UNIX mount points do; that is, the
user “mounts” a directory, and thus
adds it to the set of directories that can be seen and interacted
with inside NetBeans. The mounted filesystem can be of any type that
is supported in NetBeans, such as a local directory, a JAR or ZIP
file, or a remote CVS repository. Since Filesystems can be extended,
the mounts can use other types of storage, too, if there are
providers installed for them. For example, there is an experimental
module for mounting FTP (File Transfer Protocol) servers. If you have
the remotefs module installed, you will be able to
mount the contents of an FTP server as well. Once a filesystem is
mounted, you can browse its files and subdirectories and read and
write files in it.
The Filesystems hierarchy you see in
the Explorer was originally labeled
Repository in the GUI, and for
backward compatibility reasons is still called that in the Open APIs.
To retrieve the set of filesystems mounted in the IDE, call
org.openide.filesystems.Repository.getDefault( ).
When you interact with files, you will be dealing with
org.openide.filesystems.FileObject. For
filesystems that somehow represent directories on disk, you can use a
utility method FileUtil.toFile( ) to get the
actual java.io.File represented by a file object.
However, unless you absolutely must work with this object, it is
preferable to use the methods of FileObject. The
toFile( ) method returns null when given a file
object that does not correspond to a file on disk,
such as an entry in
a JAR file.
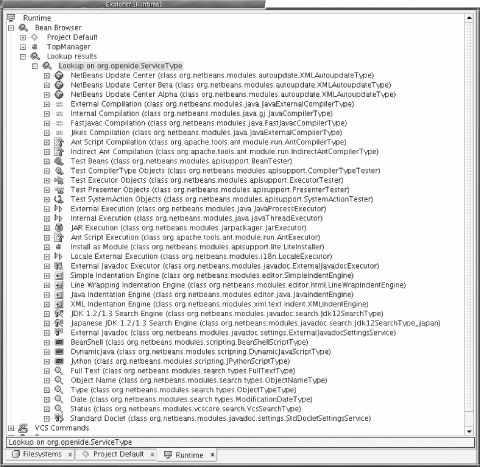
A lot of the things an IDE will
need
to do involve performing a series of operations on a file or set of
files. NetBeans has an abstraction called
ServiceType (shown in the browser in Figure 17-2) to deal with this.
The following are the basics of services:
Services are JavaBeans that perform a specific function registered as services inside NetBeans.
Services are not singletons—multiple instances with different configurations can exist (for example, two instances of the External Execution service that pass different parameters to the JVMs they launch).
A common usage of services is to implement processes that are launched and produce results in stages, such as compilation, execution, or text searches across files. This is not their only use, but typical of the needs of an IDE. If you are writing functionality that can have multiple standard sets of parameters that should coexist in the runtime simultaneously, services will probably be useful to you.
Instances of a service type can also be associated with individual
files, if supported by the DataObject that
represents the file. For example, you can set a default compilation
service IDE-wide, but override this on a class-by-class basis in each
file’s property sheet. A reference to the service in
question is stored in the file’s attributes.
Lookup is one of the newer APIs in the
NetBeans paradigm. Its power is in its absolute genericness. It is
exactly what its name implies—a way to look things up; the
NetBeans yellow pages. You ask a lookup implementation for all of the
objects that are assignable to a given Java class. There is a default
implementation (Lookup.getDefault( )), which is
generally what you will use. Other types of queries are possible,
such as string based keys, but these are less commonly used.
When you do a lookup, you get back zero or more objects that match
that query. The global default Lookup
implementation does nothing on its own, but delegates to lookup
implementations registered by modules and the core. This fairly
simple entry point provides a way to locate almost any interesting
object available in NetBeans’ JVM and provides a way
to do so by interface. Modules need only make some objects of a given
interface available via lookup, and they are then available to any
module that knows the interface they implement. A simple way to make
objects findable via the default Lookup
(Lookup.getDefault( )) is to simply add
.instance file entries to the system
filesystem’s Services/ folder
for the objects in question.
Lookup supports two types of queries: simple
queries, in which a Class is passed, and an object
returned; and complex queries, where a
Lookup.Template is passed and a
Lookup.Result is returned.
If you are interested in the changes over time to the result of a
lookup, you can use the more complex query method. Then hold and
attach a listener to the Lookup.Result object. If
new objects matching your query become available in the
Lookup instance you queried, or old ones
disappear, you will be notified.
Lookup has no UI of its own—it is entirely an under-the-hood technology. As of NetBeans 3.3, the Bean Browser provides a UI for querying and rendering the results of a lookup.
Cookies, ServiceType.Registry
and other registry classes in the Open APIs are the historical
precursors to Lookup, and the proliferation of
such classes in the APIs for looking up various kinds of objects
demonstrates the need for exactly the generic sort of infrastructure
the Lookup API provides. If your module creates sets of objects that
another module may need to locate and use, consider using lookups
to
achieve this.
Options are JavaBeans whose properties
are
settings the user can modify, such as editor colors, abbreviations,
compiler settings, and the like. The parent class for all options is
org.openide.options.SystemOption. Options are not
Nodes, although an option is generally represented
in the UI using the node delegate from an
InstanceDataObject, which gets its properties from
the underlying JavaBean. For options such as Editor Settings, which
has child options, there is the class
org.openide.options.ContextSystemOption, which has
a method SystemOption[ ] getOptions( ) that
returns an array of suboptions.
Options are singletons—there should be only one instance of an
option class in the NetBeans JVM at a time. Options support
PropertyChangeListeners, which are notified when
the user changes a property of an option. If you write code that
needs to respond to changes in the options your module installs,
simply look up the option instance that your module installed (this
is specified in the module layer) and attach a listener to it, as in
Example 17-1.
Example 17-1. Locating a SystemOption
MyOption opt = (MyOption)SharedClassObject.findObject(MyObject.class, true);
// Can equivalently write:
// opt = (MyOption)Lookup.getDefault( ).lookup(MyOption.class);
PropertyChangeListener listener = ...;
opt.addPropertyChangeListener(listener);
We’ve discussed the concept of layers with regard to Filesystems. Options take advantage of this infrastructure and are stored in the system filesystem. Depending on the type of option and user preferences, options may be stored in the default or project layers of the system filesystem (for a discussion of these layers, see Chapter 14). Options are stored to disk within seconds of a modification being written and are loaded on demand during a new session.
Options are installed via your module’s XML layer,
using .settings files, by putting them in one of
the subfolders of Services/. Normally, you will
also make a symbolic link (.shadow file) from
some part of UI/Services/ to the settings file,
to cause the option to appear in the Options window. A symbolic link is represented
by org.openide.loaders.DataShadow and consists of
two lines of text: the relative path of the target file in its
containing filesystem; then the unique name of that filesystem
(FileSystem.getSystemName( )), which for settings
will always be
SystemFileSystem.
NetBeans provides a number of standard UI components and base classes for creating your own components that will interact well with the rest of the environment. Using them and letting NetBeans runtime do the work of managing them is one of the things that enhances productivity for developers using the NetBeans platform to create their own applications.
Any large application probably has at least several windows—and often those windows will contain tabs or some other mechanism so that each window serves not one purpose, but several related purposes. A means of managing these windows and components is necessary. The requirements become even more extreme when the application is large and extensible—any module can add components to existing windows, create new windows, and so forth.
NetBeans solves this problem by providing a window and component management system. This system manages creating windows, managing components within windows, and storing their position and content on shutdown. It also provides a degree of user-level control over windows. The basics of NetBeans’ windowing system are:
The fundamental visual control module authors work with is the component, not the window. The system will take care of creating windows and putting components into them. The basic component module authors will use to create their own components is a subclass of
javax.swing.JComponent, which can interact with NetBeans’ window system. It is calledorg.openide.windows.TopComponent.Windows are almost exclusively tabbed containers. Windows can contain multiple components, and there is a switching mechanism available to the user to change between components. A component that is contained in a window is said to be docked into that window.
The APIs completely encapsulate windows—there is minimal access to physical windows via the APIs. Module authors deal with the interface
org.openide.windows.Mode, which represents windows on the user desktop and allows some superficial access to physical window properties such as position. Programmatically, you don’t request that a given window be displayed, but rather that a givenTopComponentbe displayed. It will be displayed in whatever window currently contains it, or a new window if necessary.Windows live in workspaces (
org.openide.windows.Workspace). A workspace is a set of windows and the components they contain, rather like a virtual desktop. Workspaces are user-switchable, and the current workspace can also be changed programmatically when the user changes tasks.There are some standard windows that modules can add components to, such as the Explorer window. Modules may also define their own workspaces and modes.
Modules may define new
Modes and dockTopComponents into them.There is an XML specification for defining workspaces and modes, by which workspaces, modes, and the components they contain exist as files in the system filesystem. The preferred way to install windows and workspaces is using this specification, rather than programmatically.
The name of the interface for windows, Mode, is a
curious one—why would anyone think of a window as a mode? Mode
is shorthand
for
docking mode. In other words, it is
really not a window—it is a place
components can be docked. A Mode is
not a graphical component, it is a wrapper for
one—a wrapper that hides almost all details of the underlying
container component.
This all probably sounds rather draconian—NetBeans rules your components with an iron fist! What the design imparts is a huge amount of flexibility. Both MDI (multiple document interface—application windows live inside one big window) and SDI (single document interface—each window is a separate OS-level window) are supported, along with combinations thereof. That would never be possible if modules created and managed their own windows independently. As a module author, you don’t have to be concerned about window management; you design your components, and, if necessary, specify where you’d like them to live, and you’re done. It is this window management system that makes that possible: If too much about the physical containers components live in were exposed by the APIs, it would have encouraged module authors to make assumptions about the type of containers their components live in. As a result, MDI support could never have been retrofitted to the existing API.
The windowing system further allows users to configure their
environment to suit their work style. A
TopComponent in one window can be docked into
(moved to) another window or be cloned to create a duplicate of the
original. Users can create new workspaces and populate them with the
components they want.
A component can be docked into a mode with constraints. For example,
a Mode can be divided into regions such as north,
south, east, west, and center. The window will have tabbed containers
in each location divided by sliders.
Working with TopComponents, the fundamental GUI
component of NetBeans’ windowing system, is easy.
Design a TopComponent as you would a window, with
whatever contents you want. The simplest way to display a
TopComponent is to call
someTopComponent.open( ). Creating
Modes is also easy, either programmatically or via
XML. If your module creates a number of components for users to
interact with, as does the Debugger module, it may make sense for
your module to create its own Mode to contain
these components and add it to the View Menu. If interacting with components it
installs is a fundamentally different task from other activities
within NetBeans, your module may also create its own workspace.
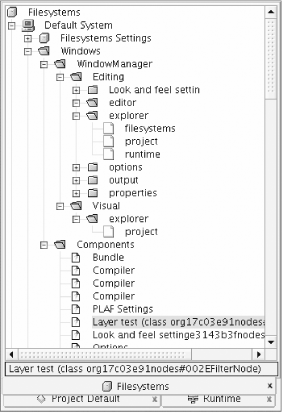
All components of the window system are
browsable
as folders and files within the system filesystem and can be
manipulated via the system filesystem in the Explorer window. Open
the Windows/ folder. You will see two folders,
WindowManager/ and
Components/. WindowManager/
contains a set of folder representing workspaces. If you open one of
the workspace folders, you will see folders for each
Mode open on that workspace (see Figure 17-3). You can open those folders and see the
components that live in each Mode. Each tab that a
window contains shows up as a file inside a folder representing the
Mode that contains it.
The second child folder of Windows/ is called
Components/. It exists because the same
TopComponent may be open on one or more
workspaces. It contains files representing all of the available
TopComponents in the system. A
TopComponent can be open only once on a given
workspace, but may be shared across several workspaces.
To see the interface between the windows you see onscreen and this set of virtual files in action, try the following: If the global Properties window is not open, open it using View → Properties. Open the folder under Windows/WindowManager/ that represents the workspace currently visible in NetBeans. Find the folder called Properties/ and open it. You will see a file inside it, also called Properties. Delete this file. The open Properties window will disappear.
You can also use copying and pasting to rearrange your workspaces from within these folders. It is by installing files into these folders that modules can add items to the Explorer or Editor windows, create new workspaces, and otherwise manipulate the window system.
Actually using XML to manipulate the window
system is a
bit less straightforward than programmatic calls, so we will try to
clarify here how it works. The first thing that is not apparent from
browsing the system filesystem is that each workspace is a pair of
objects—a folder and an XML file that is not visible when you
browse the system filesystem (although you can see most of its
contents on the property sheet when you select a folder representing
a workspace or mode). There are separate XML DTDs for the window
manager, workspaces, modes, and references to
TopComponents (see Table 17-1).
Files using these DTDs also have their own specific extensions. New
versions of these DTDs are sometimes published with minor revisions.
Always check for the latest DTD applicable to your version of
NetBeans.
Table 17-1. XML files controlling the window system in the system filesystem
|
Type of file |
Defines |
Extension |
DTD |
URL for DTD |
|---|---|---|---|---|
|
reference |
A unique ID that should be shared with a file representing the TopComponent in question in the folder identifying the mode it will be docked into. The ID will match the name (sans extension) of the instance file. Also defines the state (opened or closed) and docking constraints (such as “center”). These aspects can be defined separately for each window system style (MDI and SDI). |
.wstcef |
-//NetBeans//DTD Top Component in Mode Properties 1.0//EN |
http://www.netbeans.org/dtds/tcref1_0.dtd |
|
Mode |
The mode’s size (relative bounds), frame type (MDI/SDI), container type (for example, split), and the active mode. |
.wsmode |
-//NetBeans//DTD Mode Properties 1.0//EN |
http://www.netbeans.org/dtds/modeproperties1_0.dtd |
|
Workspace |
Display name for the workspace, mode z-order as a comma-delimited list, the name of the toolbar configuration for this workspace, and the active mode. |
.wswksp |
-//NetBeans//DTD Workspace Properties 1.0//EN |
http://www.netbeans.org/dtds/workspaceproperties1_0.dtd |
|
Window Manager |
Screen width and height (for use by the window system in positioning windows), global UI scheme (MDI or SDI), and which workspace is active. |
.wswmgr |
-//NetBeans//DTD Window Manager Properties 1.0//EN |
http://www.netbeans.org/dtds/windowmanagerproperties1_0.dtd |
Say that you have a module that needs to create a new workspace
called MyWorkspace, create a new
Mode on it called MyMode on it, and add some
TopComponents defined in the module to it. You
need to:
Add a folder called MyWorkspace to Windows/WindowManager/ to represent the new workspace.
Add a matching MyWorkspace.wswksp XML file conforming to the workspace DTD, also to Windows/WindowManager/.
Add a folder called MyMode to Windows/WindowManager/MyWorkspace/ to represent the new
Mode.Add a matching MyMode.wsmode XML file conforming to the mode DTD, also to Windows/WindowManager/MyWorkspace/.
Add .instance or .settings files for all of the
TopComponents that should initially be docked into yourModeto Windows/Components/.Add .wstcref files to the folder you created to represent your
Mode, referring with their IDs to the names of the files you just added to WindowManager/Components/.
To add files with actual XML contents to the system filesystem, just create each of the preceding XML files somewhere in your module JAR. Then define them in your module layer, each file definition in the layer having a URL attribute that points to the actual XML file in the JAR:
<file name="MyFile.xml" url="MyFileData.xml"/>
For an example of defining a Workspace,
Mode, and TopComponents, see
Table 17-1. For further details on these formats,
see the prose overview of the Window System API, available from the
main overview page of the Open APIs Javadoc.
Note that it is easy to accomplish programmatically the same things we just described. The downside of this is that your module installer class will have to do these things when it is installed, and there is no guarantee that a user will use your workspace and components—yet they have now been lugged into memory. Also your workspace and components will not be removed automatically if your module is uninstalled. However, for testing purposes, it may be useful to show your windows quickly. The rough equivalent in Java code of the XML definitions will look like this:
Workspace w = TopManager.getDefault( ).getWindowManager( ).createWorkspace(
  "myworkspace",
  NbBundle.getBundle(MyTopComponent.class).getString("CTL_MyWorkspaceName"));
Mode m = w.createMode(
  "mymode",
  NbBundle.getBundle(MyTopComponent.class).getString("CTL_MyModeName"),
  new URL("nbresloc:/com/foo/mymodule/myMode.gif"));
TopComponent tc = new MyTopComponent( );
m.dockInto(tc);
One limitation of the programmatic approach is that the APIs do not
support docking with constraints—that is, you cannot dock into
the left, right, top, or bottom of a Mode, only
into the center. The XML approach is the preferred approach for
production code; the preceding Java code simply speeds testing
and
developing a module.
Note
If creating the necessary XML files seems intimidating, you can let
NetBeans do the work for you. Simply write Java code to instantiate
your UI components and run it with internal execution. Run your code
and configure the UI components as you wish (positioning, docking,
and so on). This will cause the Workspace,
Mode, and TopComponent XML
files to be created under the Windows/ folder of
the system filesystem. You can simply browse the system filesystem,
copy the files into your module, and add the appropriate entries to
the module layer to point at these files.
Some renaming may be necessary to make them agree with the
definitions in your module (for example, a
TopComponent that is opened with
someTopComponent.open( ) will use the display name
of the TopComponent for the mode and resulting
filename), but this is a small task. You will probably want to
manually tune the XML files a bit—for example, the XML lets you
specify relative sizes of components (percentages), whereas
automatically saved XML definitions might just use pixel-based
absolute sizes.
Another easy way to make professional-looking window system XML files is to find a module in the NetBeans sources that installs a similar workspace or modes and components. Copy its XML definitions and adjust them to match your module.
When you want to add an item to a menu, what are you really trying to do? You are creating another action that users can perform. That is to say, the goal is the functionality, not the presentation of that functionality.
The basics of actions are:
Actions have icon, display name, and enabled properties. If any of these change, the change is automatically propagated to all presenters (components such as menu buttons and toolbar buttons representing the action).
There are a number of typical patterns for determining if an action should be enabled in NetBeans, such as the active
Nodes orTopComponent. Classes such asNodeAction,CookieAction, andCallbackSystemActioncan be subclassed, and come with built-in logic for managing enablement depending on the state of NetBeans.NetBeans action classes support context-based help, unlike the Swing action classes they subclass. For the details of this, see Chapter 27.
Actions can be accessed via scripting, including passing arguments such as a specific node selection. For more details on scripting, see the scripting project (http://scripting.netbeans.org/) on the netbeans.org web site.
As with the preceding windowing system, NetBeans provides an abstraction (extending the standard in the Swing Actions API to work with NetBeans’ action management system), which allows you to concentrate on the logic and not worry about the presentation unless you really want to.
It’s generally accepted in computerdom that
it’s better design to separate the presentation of
an action from its implementation, and that is what NetBeans does. If
you look in Tools
→
Options
→
IDE Configuration
→
Look and Feel
→
Actions, you will find a hierarchy of
Nodes representing different actions, such as
Save. Also in the Options tree, you’ll find
folders for Menus and Toolbars. The Nodes in all
these trees are produced by InstanceDataObjects
representing the same SystemAction classes. Thus,
you implement your action once, and how it is presented to the user
can be independent of the implementation of the action itself.
Actions and their counterparts in menus and toolbars can be installed
declaratively in the XML layer specified by a
module’s manifest—so you
don’t even have to write Java code to add your
action to a menu or toolbar.
And if you do need to control how your action is presented to the user, you have all the control you could want by using presenters .
One of the few places it can be generally
useful to
instantiate your own UI components is for toolbar and menu
presenters—components that exist in a menu or toolbar and
represent actions. There are default implementations of these that
will be usable in most cases: If you subclass
org.openide.actions.CallableSystemAction to
implement whatever you want to happen when a user invokes your
action, all you need to do is supply an icon and display name for the
action, and standard menu items and toolbar buttons will be created
for you when needed automatically.
If you do want to install a custom component in a toolbar or menu,
rather than using the default toolbar buttons and menu items, simply
override getToolbarPresenter( ) or
getMenuPresenter( ) in your action class
and return
appropriate Swing components from each of these methods.
Occasionally, you may need to create a custom property editor component. For example, imagine you are writing a module that requires the user to set a URL. If the URL is badly formatted, the right thing to do is to tell the users this upfront and give them the chance to correct it. All settings within NetBeans are handled via property editors. The JavaBeans specification provides an infrastructure for registering property editors for different Java classes.
To create a custom property editor, simply write a
PropertyEditor subclass that returns your
component for getCustomEditor( ), and register it
as defined in the JavaBeans specification or return it from
Node.Property.getPropertyEditor( ).
NetBeans is fully
internationalized, and the convention
is for all user-visible strings to be stored in resource bundles
(.properties files), so that they can be easily
translated into other languages. NetBeans employs a utility class
called NbBundle to simplify managing
internationalized strings for module developers.
NbBundle is a utility class in the Open APIs that
simplifies resource access and handles issues of multiple class
loaders. It is based closely on Java’s standard
ResourceBundle utility. The mechanics of using it
are fairly straightforward: Create a resource bundle called
Bundle.properties in the same directory
(package) as the class that will be referencing it. You will be
passing a Class object along with the bundle key
when asking for a value. The Class will allow
NbBundle to locate the bundle file by looking in
the same package.
In NetBeans programming, the name
Bundle.properties is the default name for a
bundle holding strings used in the same Java package. In your source
code, you can use NbBundle.getMessage( ) to
retrieve messages by key. To use Java message formats such as
Say {0} to user, just pass additional arguments to
getMessage( ). Creating versions of your module
for different languages or regions becomes much easier this way. Just
add a new file, for example,
Bundle_cs.properties:
# MyAction
LBL_Action=Ahoj
Since some text that is visible to the user in NetBeans is specified in XML files and manifest files, there are methods for localizing these as well as using resource bundles. For a detailed discussion, see Chapter 27.
One reason to use NbBundle in preference to the
JRE’s own ResourceBundle is that
it supports a special technique called
branding (see Chapter 28):
if you are using NbBundle, someone else can just
include a branded variant of your bundle in the IDE and use it to
customize your text easily.
Wizards are multi-step modal dialog
boxes
that allow the user to perform a complex operation that is better
divided into steps. Wizards aim to be user-friendly and convenient;
on the left, they list the steps involved in the process, so the user
knows where they are and where they are going. A wizard is
represented by a WizardDescriptor and is made up
of WizardDescriptor.Panels containing UI
components, including instructions on each step. The wizard is
managed by a WizardDescriptor.Iterator, which
instantiates the panels of the wizard and manages their order. If you
need the user to perform a complex operation, consider using a wizard
instead of (or in addition to) the property sheet.
Each panel in a wizard has an isValid( ) method
that determines if the Next or
Finish buttons should be enabled.
The Finish button will be enabled in
addition to Next if the panel is a
subclass of WizardDescriptor.FinishPanel—use
that for panels the user can exit from early. If there is data for
the user to fill out, you can fire change events when the user
changes the data. In isValid( ), evaluate the data
to see if it is complete, and the user can continue to the next panel
(or finish).
Tip
The interface WizardDescriptor.Panel has a method
called isValid( ). Unfortunately
java.awt.Component also has an isValid( ) that will collide with the method declared in
WizardDescriptor.Panel. Therefore, it is not a
good idea to have Component subclasses directly
implement WizardDescriptor.Panel.
Panels can also be dynamically added to and removed from wizards as it is in use. You can see this in the New wizard. In its first panel, you choose a type of object. If it is a Java class, there may be additional panels to set up what class you inherit from, and so on. If it is an HTML file, then the second panel where you specify the file is the last one. The iterator can fire change events when the list of panels changes.
Finally, wizard panels can also be created declaratively in a
module’s XML layer—a folder will represent a
wizard, and .instance files within that folder
will represent its panels. An example of this is the Setup Wizard—modules can add panels to
this wizard simply by adding them to the XML. The class that
accomplishes this is called WizardFolder. It is
not currently part of the Open APIs; modules providing wizards that
need to be extended are quite rare. If you need to do this,
provisionally copy the implementation from
org.netbeans.core.ui.WizardFolder and propose on
[email protected] that it be moved into a shared
location.
We’ve talked about a number of object types your code will likely interact with inside the IDE. So how do you find live instances of them? How do you programmatically access them?
As we move toward NetBeans 3.4, the primary way to find objects of interest given a known interface is by using the Lookup API:
Lookup.getDefault( ).lookup(some.interesting.Interface.class)
However, there are a number of older methods that are also useful. If
you tried the Bean Browser earlier in this chapter, you may have
noticed that one of the items in the Bean Browser window was called
TopManager.org.openide.TopManager
is a singleton class, and a static method called getDefault( ) gives you the default instance of this class.
TopManager has non-static methods that allow you
to access various objects within NetBeans, such as
SystemOptions, services, Nodes,
Workspaces, and so on.
Many of the objects you will be looking for are accessible via the
Places API, which can be accessed via the methods
TopManager.getDefault( ).getPlaces( ).folders( )
and TopManager.getDefault( ).getPlaces( ).nodes( ). These get you instances of the classes
Places.Folders and
Places.Nodes, which in turn have methods for
getting commonly needed objects or sets of objects. For example, to
get the Actions folder (visible in
Tools
→
Options
→
IDE Configuration
→
Look & Feel ), you would call:
DataFolder actions = TopManager.getDefault( ).getPlaces( ).folders( ).actions( );
More generally, get the system filesystem (an instance of
org.openide.filesystems.FileSystem) this way:
FileSystem sfs = Repository.getDefault( ).getDefaultFileSystem( );
Now you can reference any folders directly by name as follows:
DataFolder actions = DataFolder.findFolder(sfs.findResource("Actions"));In Chapter 14 we asked you to browse the system filesystem to get a sense of what it is used for. Here we will identify some of the folders that have specific meanings, in which your modules may need to install files.
You will see a myriad of different folders and subfolders in the system filesystem. Some folders are defined by the NetBeans Open APIs; others are used by certain modules or the core for their own purposes. It is impossible to enumerate every folder you might find, since any module can add to the list. However, there are a number of folders that figure prominently in NetBeans module development that you should know about. Try looking through these folders in your own NetBeans installation and examine some of the files in them. You can always use the Bean Browser to get more information on a file, such as its (data object’s) cookies, using Tools → Bean Browse → Bean Browse Node.
There are many other folders defined and used by the NetBeans core and various modules, but the preceding list should help you become familiar with the most important ones and the basic style of defining objects in the system filesystem. Particular APIs and modules that use a folder for a public purpose should document the name of the folder and its interpretation.
- Actions/ (and subfolders)
The “actions pool.” All actions defined by modules should be placed in this area, organized by subfolders, as instance files. Since the pool is read-only for users, it can serve to hold rarely-used actions that might be needed in menus, toolbars, or keyboard shortcut bindings. In the future, this pool might be replaced by Templates/Actions/; see Appendix D for more details.
- Editors/ (and subfolders)
Information about installed editor kits. See Appendix A for information on extensibility of text editing. Editors/AnnotationTypes/ is defined by the NetBeans Open APIs for adding kinds of visual annotations to documents, for example error markings or breakpoints. Editors/
TYPE/, whereTYPEis a MIME type such astext/x-java, contains several files, such as the kit instance, editor settings, toolbar and context menu configurations, and more.- Menu/ (and subfolders)
The menu bar of the NetBeans main window. Each subfolder, for example Menu/File/, represents one menu; instance files and sub-subfolders represents menu items or submenus.
- Modules/
Contains XML files describing the status of known modules, both enabled and disabled. Read about a common use of this folder in Chapter 28.
- Mount/ (and subfolders)
Contains instance files representing mounted filesystems. The default
org.openide.filesystems.Repositoryis constructed from allFileSysteminstances in this folder and its subfolders. In Chapter 27 you can see an example of mounting a filesystem using this folder.- Palette/ (and subfolders)
The Component Palette as used by the NetBeans Form Editor. See an example of this folder’s use in Chapter 27.
- ParserDB/
Parser database files used by the Source Editor to implement Java language code completion and other features. Discussed in Chapter 27.
- Projects/ (and subfolders)
Each subfolder holds one user project. Beneath a project folder is a Files/ subfolder containing files and symbolic links (*.shadow) used in the project, as they appear in the Project Name tab in the Explorer window. A project will also have a system/ subfolder that holds project-specific settings. This mechanism was discussed in Chapter 14.
- Services/ (and subfolders)
Instances of many types of objects that should appear in lookup, as detailed in Chapter 15. Subfolders are used to group objects by type in many cases.
- Shortcuts/
Contains instances of actions, where the name of the file indicates a keyboard shortcut to which the action should be bound.
- Templates/ (and subfolders)
Templates for new kinds of files and other objects that might be created by the user. Most subfolders represent templates for normal user files, such as Java sources or text files. Other subfolders mirror folders in the system filesystem and permit the corresponding type of object to be made—for example, Templates/Mount/ for types of mountable filesystem, or Templates/Services/CompilerType/ for prototypes of configurable compiler services.
- Toolbars/ (and subfolders)
Similar to Menu/, subfolders of this folder contain action instances used to construct the toolbars in NetBeans’ main window.
- UI/ (and subfolders)
User-visible hierarchies that modules may add to. UI/Services/ comprises the displayed nodes in the Options window. In NetBeans 3.4, UI/Runtime/ forms the Runtime tab of the Explorer window.
- Windows/ (and subfolders)
The complete configuration of the window system—workspaces, positions, and styles of windows, and the exact configuration of each window and tab.
- xml/ (and subfolders)
Special kinds of functionality associated with XML public IDs (“DOCTYPEs”). xml/entities/ serves as an entity catalog inside NetBeans to find local copies of important DTDs. xml/lookups/ maps public IDs to Java classes called processors that can interpret the XML formats and create live objects from the XML data.
The NetBeans runtime is a powerful engine for applications, at the
heart of which are some simple paradigms: Files can be virtual, can
represent Java class instances, and the system will notice changes in
those files; Nodes allow you to aggregate related
objects in a way suitable for presentation; Nodes
provide a concept of selection or context for determining what
functionality should be available; and DataObjects
provide an abstraction layer for aggregating related data.
With this background, we are ready to try creating a somewhat more sophisticated module in the next chapter.
[10] The directory includes an .nbattrs file with the attributes set correctly for NetBeans 3.3. If you are using a later version, and have any difficulties running it, copy sources to a new directory and compile and run it from there.