
Since the NetBeans project is open source and makes an effort to be friendly to people building all kinds of applications, you have the opportunity to create a custom distribution of NetBeans, or even a rather different application reusing some NetBeans code.
The first serious question is whether creating your own distribution is necessary or even advisable. There are some good reasons to do it:
NetBeans includes a number of modules your users do not want or need.
NetBeans does not include a number of modules you produce that your users need, and it would be silly to force them to get vanilla NetBeans and then download these modules.
You want the application to look like yours. This is known as a desire for branding.
You wish to suppress some pieces of the NetBeans UI that are not appropriate for your purposes. For example, nothing you are interested in involves compilation; why should users see a Build menu they will never use?
Your desired application does not really resemble an IDE at all. You just want to reuse some pieces of the NetBeans platform, for example the Filesystems library, the module activation system, or the Explorer GUI.
In light of these considerations, remember that the decision to create a distribution, rather than just supplying modules that can be added to a normal NetBeans installation, should not be taken lightly. There are disadvantages, too, depending on your target audience:
New NetBeans releases do not automatically translate into new foundations for your product. You might be able to upgrade the underlying NetBeans version easily, but it will not be as smooth as if you distribute a module (for which the NetBeans team tries to guarantee compatibility).
If you have removed some NetBeans modules, users who really do want them might have a harder time getting them (netbeans.org does not routinely host NBMs of standard modules, since it is assumed users already have them).
If you have suppressed basic parts of the NetBeans UI (such as the Build menu), users will be unable to work with other standard modules or modules from other organizations, even if they want to.
You will probably need to supply documentation for basic functions of the application that would otherwise be covered in the NetBeans online help.
More development and testing time will be consumed, compared to shipping individual modules.
With these cautions, let us look at what is involved in creating a NetBeans distribution. Naturally the amount of complexity will depend mostly on how far you are planning to deviate from the structure of the NetBeans IDE.
NetBeans is licensed under the
http://www.netbeans.org/about/os/license.html
Sun Public License (SPL). This is a variant of the Mozilla Public
License. In fact, the primary differences are that where the Mozilla
license says Netscape, the SPL says
Sun
Microsystems and that the SPL provides for
the documentation being part of the open source project as well. Note
that this is not the more restrictive Netscape
Public License (NPL) that grants special rights to the Netscape
company with regard to Mozilla (and which is being phased out) or the
dual-licensing scheme, which is being phased in as of this writing.
The license allows you to freely redistribute NetBeans, including or not including whatever modules or pieces of code you wish, either commercially (as a for-pay product, probably including some modules or code of your own) or for free. The only significant restriction it imposes is that source code you modify that was already under the SPL has to stay under the SPL, and if it is distributed in binary form, it has to be made available somehow in source form, too. There is no limitation when removing SPL files or when adding your own non-SPL files; only modifying existing SPL files triggers this clause.
You should have no legal licensing problems if everything you distribute is licensed under the SPL, a commercial license, or licenses such as the BSD or Apache licenses. There may be issues with distributing code under the GNU Public License (GPL) along with the IDE. A full discussion of the knotty issues associated with licensing is beyond the scope (and liability) of this book, so we will leave it to you and your lawyer to deal with that discussion.
If you have comments or questions of a private nature regarding licensing, such as sometimes come up when preparing a commercial distribution, feel free to send them to [email protected] for a personal response. However, most questions of this type, assuming there is no particular reason for them to be kept private, should be sent to the [email protected] general-purpose mailing list.
Which version of NetBeans should your distribution be based on? There is no single answer, though some guidelines can be given.
Most redistributors should use a NetBeans stable release, such as 3.2.1 or 3.3.2. This choice provides the greatest reliability in a platform. It is best to choose the most recent available release: you get the latest and hopefully most feature-rich code, bugs left unresolved in earlier releases may well be fixed in the latest one, you will get much better support on the NetBeans mailing lists if you are using code close to what is currently being worked on by the developers, and the configurability of the NetBeans sources and their friendliness toward redistributors increases with each release, sometimes substantially (as with 3.3).
It may happen that an earlier release suits your purposes better
because of bugs introduced in a later release; if so, please tell the
NetBeans development team about it (on
[email protected])! Bug-fix-only releases such as
3.3.2 are often made, and your pet peeve might get solved in the next
one. Minor, isolated problems that have already been fixed by
developers in working sources may be best handled by applying a patch
to the latest release—these are often available right in the
bug report in Issuezilla, or if not please ask for one to be added to
it. Core and Open API patches in the form of JAR files may be placed
in lib/patches/ in a NetBeans distribution;
module patches may be placed in
modules/patches/
modulename
where modulename is the code name base of the
module, for example org.netbeans.modules.java. See
Chapter 15 for an explanation of module patches.
If you are feeling more adventurous, you might want to build on top of newer development sources. The most current is the CVS trunk, to which new revisions are freely committed every day. It will surely have some bugs, but not critical ones—it should be buildable and runnable at all times. A compromise between new features and stability is the http://qa.netbeans.org/processes/q-builds-program.html Q-Build, a build made weekly that is based on the development trunk but in which the most egregious bugs introduced (or found) during that week have been fixed.
It may happen that you need to make extensive modifications or apply selected bug fixes in your version of the NetBeans sources. It could be cumbersome to try to keep a local copy of the sources and make patches to these, as you are not directly tied to the NetBeans CVS repository (so, for example, merging to a newer stable version would be more complex). If you wish to have a private branch made for your own purposes in the NetBeans CVS repository, just ask on [email protected]. Only SPL-licensed sources can be kept in such a branch, but what to do in this branch is at your discretion. Just avoid committing large numbers of new files or adding large numbers of CVS tags because such operations can slow down or clutter the repository for other users.
Finally, you might decide to base a distribution on another NetBeans distribution. For example, you may want to use some of the features of an edition of Sun’s Forte for Java IDE. Such a choice could give you access to additional modules not available in NetBeans, though it might also complicate the process of creating a distribution. Such a choice is outside the scope of this book, but if you take this course, just contact the vendor you wish to build on (for example, Sun welcomes such partnerships and has a program to support them).
If you are basing your distribution on an official NetBeans release, source snapshots of these can be downloaded in *.tar.gz or *.zip formats from the NetBeans web site. Do not forget to download the “extra binaries” (non-SPL files such as third-party libraries) that correspond to them.
You can also get sources using CVS. All NetBeans development work is done on the cvs.netbeans.org server. For example, if you want to retrieve a copy of the sources used to build Release 3.3.x, use the following sequence of commands:
$mkdir -p ~/nb-src-33/nb_all
$cd ~/nb-src-33/nb_all
$cvs -d :pserver:[email protected]:/cvs login
Press Enter
$cvs -d :pserver:[email protected]:/cvs co -rrelease33 standard
should check out sources
$mkdir ~/nb-src-33/nbextra
$cd ~/nb-src-33/nbextra
$unzip /tmp/NetBeansIDE-release331-extbin.zip
More details on building NetBeans are available in Chapter 1.
If you are making a custom distribution including some standard NetBeans modules and some of your own, it may be easiest to run the normal NetBeans build process with appropriate substitutions. In effect, work with your modules from the perspective of the build process as if they were hosted on netbeans.org (of course if you are contributing a module to NetBeans, you will do this anyway).
Making such changes should not be difficult. Start with a complete and buildable NetBeans source distribution. Now choose a new subdirectory where your module or modules will be held—for example, mystuff/. If you have more than one module you want to build, you may want to create a subdirectory in that for each such module; it is up to you.
Each module subdirectory must then have a
build.xml build script that does everything
necessary to build that module when its netbeans
target is called, placing all desired build products in a
subdirectory named netbeans/. Conversely, a
clean target ought to remove any files created by
the build. The NetBeans http://nbbuild.netbeans.org/ant-extending.html
Extending Ant Builds page discusses the exact contract with each
subdirectory in more detail and gives pointers to a number of tasks
and idioms you may want to use.
You need to do one more thing: in the master build script
nbbuild/build.xml, add a target
all-
modulename for each
module you have that might be included in a build. If you put it in
the subdirectory mystuff/, use
all-mystuff. If it was nested in
mystuff/module1/, use
all-mystuff/module1. This target should call a
subbuild in your module directory. It may depend on other
all-* targets if your module needs other modules
to be built before it can be built; at least
all-openide should be included for any NetBeans
module—for example:
<target name="all-mystuff" depends="all-openide,all-othermodule">
  <echo message="Building module mystuff..."/>
  <ant dir="../mystuff" target="netbeans"/>
</target>
Here then is a summary of the file structure you will end up with:
| nbbuild/ |
| nbbuild/build.xml—patched by you |
| nbbuild/ |
| openide/ |
| core/ |
| ant/ |
| applet/ |
| mystuff/module1/build.xml—1st build script |
| mystuff/module1/manifest.mf—JAR manifest, conventionally |
| mystuff/module1/src/—sources, conventionally |
| mystuff/module1/netbeans/modules/my-first-module.jar—build product |
| mystuff/module1/netbeans/—anything else such as parser database files, etc. |
| mystuff/module2/—another module |
The NetBeans http://www.netbeans.org/devhome/sources/structure.html Source Structure guidelines give conventions for how source files in modules ought to be arranged for consistency.
Now you just need to include your modules in a build:
$ cd nbbuild
$ant -Dmodules=... real-clean
removes all build products
$ant -Dmodules=ant,...,mystuff/module1,mystuff/module2
build should complete in a few minutes
$cp -v NetBeans-*.zip /dist
It can be cumbersome to type the complete list of modules to include
in the build every time you run it. So you can also add a
config to the configmods task
in the init target of the master build script, say
including some standard NetBeans modules and some of your own. In
NetBeans 3.3:
<configmods property="modules" selectedconfig="${moduleconfig}">
  <!-- existing configurations, then add yours: -->
  <config name="myapp"
         modules="mystuff/module1,mystuff/module2,editor,classfile,clazz,java"/>
</configmods>
(In NetBeans 3.4 nbbuild/build.properties is used for this purpose instead.) Then you need only type:
$ant -Dmoduleconfig=mystuff
same result as above
To make a minimal configuration of NetBeans (just the basic
platform), just use -Dmodules= for 3.3.x sources
or -Dmoduleconfig=platform starting with 3.4.
If you want to begin building against a different version of
NetBeans, it should suffice just to cvs update the
NetBeans source directories and resolve any textual conflicts that
might have occurred in nbbuild/build.xml. This
style may also be appropriate if for some reason you need to patch
existing NetBeans Java sources to get the results you want—but
branding (described in Section 28.8) was designed to support
many common types of customization more easily and maintainably than
patching.
Here is a quick summary of the steps needed to add your modules to the NetBeans build process:
Get NetBeans sources and make sure you can build them as is.
Create some subdirectories for your modules. Make a build script for each module.
Add the names of your modules to the master list.
Optionally create a module configuration for your application.
Run the NetBeans build with your modules (or module configuration) selected.
A different approach to take is to begin with a pre-built IDE and add your built module or modules to it. This is easiest if you are not trying to remove any modules from the baseline distribution, for then you would need to know exactly which files are associated with each module in the distribution—though you can find this out starting in NetBeans 3.3 by looking at the file update_tracking.xml in the root of a build. Starting with a pre-built IDE may be necessary if you are basing your distribution on something other than vanilla NetBeans, for example an edition of Sun’s Forte for Java IDE. As of NetBeans 3.4, you can also download a small platform build designed for this purpose.
Such an approach may also be useful if you do not want to become too involved in the NetBeans build process and have your own means of creating your module. In this case all you should need to do is copy your module JAR and any other supporting files into the proper places in the IDE build, and it should be ready to run.
To be best-behaved, however, two other things should be done to the resulting build to indicate the presence of your module. Both of these things are done automatically by special tasks in the NetBeans build process, but if you are adding modules manually, you will need to do these things manually as well.
First, create an XML file in the system/Modules/ directory named according to your module’s code name base, and looking something like Example 28-1:
Example 28-1. Adding a Module: sample system/Modules/com-yourcorp-modulename.xml
<!DOCTYPE module PUBLIC "-//NetBeans//DTD Module Status 1.0//EN"
                        "http://www.netbeans.org/dtds/module-status-1_0.dtd">
<module name="com.yourcorp.modulename">
  <param name="autoload">false</param>
  <param name="enabled">true</param>
  <param name="jar">your-module.jar</param>
  <param name="origin">installation</param>
  <param name="release">1</param>
  <param name="reloadable">false</param>
  <param name="specversion">1.0</param>
</module>
Be sure to get the version information right:
specversion must match your JAR’s
OpenIDE-Module-Specification-Version, and
release should be included if and only if your JAR
has a major release number after a slash in
OpenIDE-Module. Autoload modules (Chapter 27) have autoload set to
true and must have no enabled
parameter, and must have an origin of
installation/autoload.
If this file is not present in the installation, the module will still be turned on when a user runs the IDE—but the file will be created in the user directory, adding a little clutter. For the first start of the IDE the module will also be listed as a “new” module. So it is a little cleaner to create this file in advance.
The other desirable thing to do is to add information about the files
associated with your module (or modules) to the
update_tracking.xml file mentioned previously.
Each module element should correspond to one
potential NBM bundle of the module and should include basic metadata
about the module as well as a list of all the files associated with
it (including checksums). Ensuring that the update tracking XML file
matches the actual state of the installation is useful because it
helps Auto Update manage files better when new NBMs are installed,
and in the future may permit incremental patching rather than
downloading full NBMs. Here is an example addition:
<module codename="com.yourcorp.modulename/1">
  <!-- For install_time attribute, see java.util.Date: -->
  <module_version specification_version="1.0" origin="installer"
                  last="true" install_time="1020709484048">
    <!-- For crc attribute, see java.util.zip.CRC32: -->
    <file name="modules/your-module.jar" crc="1234567890"/>
    <file name="modules/ext/some-lib.jar" crc="2345678901"/>
  </module_version>
</module>
Since generating update_tracking.xml fragments
by hand might be cumbersome, you could also use the Ant task
genlist loaded from
nbbuild/nbantext.jar and used in all module
build scripts.
Naturally, if you are removing any modules from the distribution, you should also remove the matching module XML files and update tracking entries.
Here is a quick summary of the steps involved in adding modules to a stock distribution:
Start with a stock binary distribution of NetBeans or a related product.
Add your module JARs and any supporting files such as libraries to the proper places. Remove module JARs and supporting files for any modules you do not want.
Add an XML file to system/Modules/ for each module you add. Remove a file for each module you remove.
Add a
moduleentry to update_tracking.xml for each module you add. Remove an entry for each module you remove.
Remember, generally you will choose to either add modules by customizing the build process or by manually adjusting a pre-built distribution.
In some situations you may wish to customize the default settings provided by NetBeans for some kind of behavior—without changing the range of behaviors. This is easy to handle. You can select certain settings to override and include them in your distribution. Since NetBeans merges settings from an installation directory as well as a user directory (and sometimes a project directory, too), anything you place in the installation directory will serve as a default for the user.
First, you need to understand what is stored where—an overview
of the NetBeans settings layout is given in Chapter 27. The easiest way to prepare customized
settings is to actually run NetBeans (with a fresh user directory
using the -userdir option) and adjust whatever you
like using the GUI. Shut it down, then select the desired files from
the user directory under system/ and copy them
to the corresponding parts of system/ in your
installation directory (the build). For example,
Services/org-netbeans-modules-java-settings-JavaSettings.settings
currently holds general settings for the Java sources module. (Such
paths can be expected to be fairly stable, since they need to be in
order to support upgrades of user directories between releases.)
In more advanced cases, if you know the technical details of how a customization is stored and what formats it can take, you can prepare more sophisticated changes. For example, using the Window System documentation relating to its XML persistence format, you can set up additional workspaces just by adding some files to your distribution. Or you can create special Java executors or compilers with particular program paths and arguments, and so on.
However, in general, you will just want to add new modules to support such things and place the added or modified settings in the layer; this will be easier and more powerful. As an example, without any added module, you could add a configuration for a new Java external compiler type that runs your optimized compiler (shipped in the distribution for out-of-the-box use). But you would be limited to the format substitution keys that the standard Java external compiler type defines: debugging and optimizing switches, classpath setting, and so on. Perhaps you want to refine the options available in the Property Sheet for the compiler relating to optimization: not just on or off, but intermediate settings. Or perhaps a different executable needs to be selected according to the user’s platform. In such cases it is best to create a new subclassed compiler type based on the one used in the Java module (the basic pattern to follow was given in Chapter 24). This could provide more or fewer options, preconfigure some defaults programmatically, and more.
Branding is a general system used in NetBeans to permit alternate distributions of the application to selectively customize many aspects of its appearance and behavior. It is based closely on the internationalization infrastructure described in Chapter 27, and details of its workings are given on the NetBeans web site (http://www.netbeans.org/devhome/docs/i18n/index.html#5).
The first step in branding your distribution is to choose a
branding token. This is a short suffix akin to
a locale abbreviation. For example, if your distribution is the
MacroModeler, you could choose the token
macmod—whatever you like. Branded resources
will be identified with this suffix much like localized resources
are. For example, if the plain NetBeans resource is a properties file
Bundle.properties, your
variant of it would be named
Bundle_macmod.properties. This could override
certain text keys in the bundle.
If you have finer-grained subdivisions within a product suite, you may wish to brand some resources generally for your organization and others more specifically for one product. This is done by using a compound branding token separated by underscores. For example, if you have a MacroModeler Basic Edition and a MacroModeler Advanced Edition, you could create a Bundle_macmod.properties giving some overrides applicable to all MacroModeler editions; Bundle_macmod_basic.properties for things applicable only to the basic edition, and similarly Bundle_macmod_adv.properties for the advanced edition. There could be further subdivisions as well.
Branding is orthogonal to locale. While Bundle_macmod.properties applies to the MacroModeler in the default locale (normally English), there may be a Japanese translation as well. NetBeans already includes Japanese translations (maintained by Sun’s Forte for Java team), for example Bundle_ ja.properties, and as you read this book, there may be others contributed by users around the world. Bundle_macmod.properties will take precedence over this when running MacroModeler in Japanese locale; to provide the MacroModeler for Japanese users, you create a Bundle_macmod_ ja.properties file listing Japanese translations of the overrides given in Bundle_macmod.properties. Note that the branding suffix must precede the locale suffix when both are used.
Any resource that is requested using NbBundle can
be branded automatically, as well as localized. In NetBeans, property
files with localizable text are retrieved using
NbBundle. Similarly, images such as icons can be
loaded with it. The URL protocol nbresloc: does
this automatically, so
nbresloc:/org/netbeans/modules/foo/icon.gif will
find an icon
org/netbeans/modules/foo/icon_macmod.gif if you
have provided one. XML layers from modules are also localized and
branded automatically. So in most cases, if there is a resource used
in the NetBeans core or a standard NetBeans module that you want to
override, you can do it with branding—if not, file a bug about
it! (And then work around it by adding a direct patch for the
resource in your distribution.)
One key advantage of branding is that branded resources are kept
physically separate from the
“pristine” originals. For example,
if modules/foo.jar contains the resource
org/netbeans/modules/foo/Bundle.properties, you
can brand it by creating a JAR file
modules/locale/foo_macmod.jar containing
org/netbeans/modules/foo/Bundle_macmod.properties.
Always remember that the JAR resource path has to contain the
branding suffix, and the name of the JAR file must match that of the
original except for being located one directory down in a
subdirectory named locale/ and including the
branding suffix in its name before the .jar
extension. This naming convention is the same as the convention used
to separate locale-specific JAR files during internationalization.
You can physically separate subdivided branding JARs in the natural
way: modules/locale/foo_macmod.jar with some
customizations as well as
modules/locale/foo_macmod_basic.jar and
modules/locale/foo_macmod_adv.jar with further
refinements.
How is branding turned on? By default, NetBeans runs unbranded,
meaning branded resources are ignored (and branded JARs not opened).
If you want to run with a certain branding for testing, pass it on
the command line using -branding
yourtoken. Your users will not
know to do this, of course, so you can set it as the default branding
by creating a file lib/branding in your
distribution, which should have one line listing the branding token
(for example macmod_basic). NetBeans will find it
and use it as a default unless -branding overrides
it.
The effect is that you can apply many kinds of customizations to NetBeans, making it look and act like a different product, without touching the NetBeans source code or even modifying files in the NetBeans installation—take a complete NetBeans release, add your branded JAR files and the lib/branding file, and you are done. You can just keep a ZIP of your branding additions and unpack it on top of a NetBeans build or release. This is a great way to insulate yourself from minor changes in NetBeans source code—no need to keep running patches. If the location or meaning of a JAR or resource within a JAR changes from one NetBeans release to the next, you will have to update your branding patches to match it. Such changes tend to be infrequent, however—branding tuned for one release will probably work tolerably well on the next one, or need only modest revision.
When replacing complete resources such as images, it is easy to create a branding variant with the correct name and add it to your JAR. Overriding parts of a resource such as a bundle file is more subtle; as these techniques are discussed in the next section, tools will be mentioned to make it easier.
The most elementary form of branding applies to atomic resources such as images. For example, in NetBeans the splash screen is loaded from lib/core.jar in the file org/netbeans/core/resources/splash.gif. To brand it, just create a new splash screen and put it in a file named (for example) lib/locale/core_macmod.jar under org/netbeans/core/resources/splash_macmod.gif.
Tip
Actually in the specific case of the splash screen, you will usually
want to take another step. NetBeans writes status information on the
splash screen during startup. It also shows the splash screen in the
About dialog box. If your splash is a different size or if it needs
to place this text in a different place or in a different color for
best visibility, these things can be overridden, too. Brand
org/netbeans/core/Bundle.properties (also
from lib/core.jar) and replace
keys such as SPLASH_WIDTH,
SplashRunningTextBounds,
AboutTextColor, and so on (see comments in that
file).
Changing text strings loaded from bundles is not much harder. Remember all Java code should be retrieving displayable messages using some variation of this syntax:
String msg = NbBundle.getMessage(ThisClass.class, "LBL_something");
Other things that load messages from a bundle (localized module
manifest strings, XML workspace names, and so on) also go through
NbBundle. To brand such a message, assuming it
came from Bundle.properties, just create a
Bundle_macmod.properties containing
just this key and its branded value. Here is a
sample base Bundle.properties:
LBL_something=Show in NetBeans source editor
LBL_something_else=Make read-only
And here is a label for your branded distribution; this would go in Bundle_macmod.properties:
LBL_something=Show in MacroModeler source editor
When NetBeans is looking for a resource key, it always searches in more specific branded (or localized) bundles first, finally defaulting to the unmarked bundle. Remember that compound branding tokens are searched in a logical order, so you could also provide some more specialized keys, such as in Bundle_macmod_adv.properties:
LBL_something=Show in MacroModeler Advanced source editor
If you are branding a lot of keys from one bundle, you may find it convenient to use the NetBeans resource bundle support. Locate the original bundle from NetBeans sources in the Explorer. Create a new “locale” (really your branding token) by selecting Add Locale... from the context menu, and then you can make selected changes in the table view.
Tip
NetBeans will try to copy all the keys from the base bundle for you. Just delete the ones you do not plan to change.
When you are done, move your branded *.properties file to its real destination.
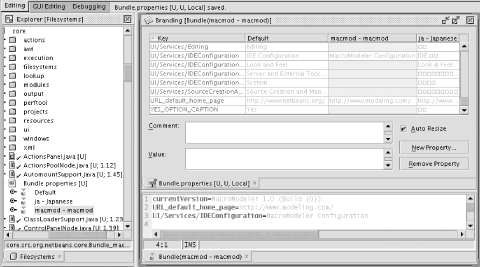
Figure 28-1 shows the core bundle of NetBeans being branded. The Explorer shows the newly added Bundle_macmod.properties as a node macmod - macmod beneath Bundle.properties. The upper part of the split pane on the right shows a table view where you can see all branded values alongside the originals; the lower part of the split pane shows the branded bundle being edited as text at the same time.
Most of NetBeans’ configuration is managed by files
in the system filesystem. For example, the menu bar in the main
window is controlled by subfolders and action instance files beneath
Menu/. Similarly, the complete setup of
workspaces and the positions and contents of the windows within them
is controlled by a hierarchy of XML files in the
Windows/ folder. Branding lets you patch these
things and much more. The key is that when an XML layer from a module
(including also the core layer) is loaded, any branding variants are
also loaded at the same time.[23] All variants
are merged together, with the more specific brandings taking
precedence. The merging is done by
org.openide.filesystems.MultiFileSystem and thus
follows the same behavior used to merge project and user directory
customizations with module-supplied defaults.
Let us start with a simple example. The utilities
module defines the URL data type, recognizing
*.url files (simple files containing just a
URL). One of its features is that a URL file can be shown directly in
a menu or toolbar. The data object has an
InstanceCookie providing an instance of a menu
presenter that, when clicked, displays the contained URL. This makes
it easy to add web links to a menu.
The same module also provides a number of default URLs in the Help menu (at least in NetBeans 3.2 and 3.3). For example, here is one such link (shown as an abbreviated layer file with other parts omitted):
<filesystem>
  <folder name="Menu">
    <folder name="Help">
      <file name="netbeans-web-link.url">
        <![CDATA[http://www.netbeans.org/]]>
        <attr name="SystemFileSystem.localizingBundle"
              stringvalue="org.netbeans.modules.url.Bundle"/>
        <attr name="SystemFileSystem.icon"
              urlvalue="nbresloc:/org/netbeans/modules/url/webLink.gif"/>
      </file>
    </folder>
  </folder>
</filesystem>
Note that the display name and icon of the data object also serve as the name and icon of the menu item.
To modify virtual files using branding, you need to know which module (including the core) they came from. Unfortunately in NetBeans 3.3, there is not a simple way to do this. However, in most cases, it is easy to guess which module would provide a file, based on the kind of functionality it represents; just look at the XML layers of likely suppliers until you find it. A way to find this information directly will be added to the Open APIs Support module for NetBeans 3.4.
It is probable that a branded distribution would want to change this
web link. This is easy enough: just provide a branded layer (like
Layer_macmod.xml) that overrides the contents of
this file. The layer does not need to contain anything else, as all
other files (including some invisible services, and so on) will be
picked up from the plain utilities module:
<filesystem>
  <folder name="Menu">
    <folder name="Help">
      <file name="netbeans-web-link.url">
        <![CDATA[http://modeling.com/]]>
      </file>
    </folder>
  </folder>
</filesystem>
To change the link destination, just package this layer variant in modules/locale/utilities_macmod.jar. In this case the display name and icon stay the same by default; you might also brand the bundle file (org/netbeans/modules/url/Bundle_macmod.properties) and/or brand the icon (org/netbeans/modules/url/webLink_macmod.gif).
Adding new virtual files to the system filesystem using branding is as easy as replacing the contents or attributes of existing files (present in the unbranded base layer); just write the new files you want. Example 28-2 illustrates this.
Example 28-2. Branding: .../Layer_macmod.xml with a new file
<filesystem>
  <folder name="Menu">
    <folder name="Help">
      <attr name="netbeans-web-link.url/some-other-link.url" boolvalue="true"/>
      <file name="some-other-link.url">
        <![CDATA[http://modeling.com/feedback.html]]>
        <attr name="SystemFileSystem.localizingBundle"
              stringvalue="org.netbeans.modules.url.Bundle"/>
        <attr name="SystemFileSystem.icon"
              urlvalue="nbresloc:/org/netbeans/modules/url/webLink.gif"/>
      </file>
    </folder>
  </folder>
</filesystem>
Here we add a new link to the Help menu pointing to a feedback page. The link is configured as a virtual file (file object) with the .url extension used by URL bookmarks.
Example 28-2 also shows that branded layers can add folder ordering constraints involving any files in the folder. Here we request that the newly added feedback link come below the main web site link. In a real situation we would also want to add a second constraint asking that it come above some other known menu item; otherwise, the feedback link might appear anywhere in the menu below the main link, not necessarily immediately after it.
The new file can be given a localized name and icon, too; we will need to add the name to the branded bundle, as shown in Example 28-3. As usual, the ampersands indicate menu mnemonics.
Removing files using branding is not as easy, but doing so is not
difficult once you know how. It is just necessary to create a mask
file that is named by adding the suffix _hidden to
the name of the real file. The mask can just be an empty file and
serves to tell NetBeans (actually MultiFileSystem)
to ignore the masked file—for example:
<filesystem>
  <folder name="Menu">
    <folder name="Help">
      <file name="netbeans-web-link.url_hidden"/>
    </folder>
  </folder>
</filesystem>
This example causes the URL to disappear from the folder and thus the
Help menu. The semantics are logical but a little subtle, so it is
worth looking at what is happening. Whenever a
MultiFileSystem encounters a file in a container
layer whose name shows that it is a mask
(*_hidden), it excludes that mask file from the
list of “real” files in the folder
and also excludes the masked file (if there was one—no harm is
done if the real file did not exist to begin with).[24]
Whole folders can also be masked with one mask file, for example:
<filesystem>
<folder name="Menu">
<!-- Suppress the whole Versioning menu: -->
<file name="Versioning_hidden"/>
</folder>
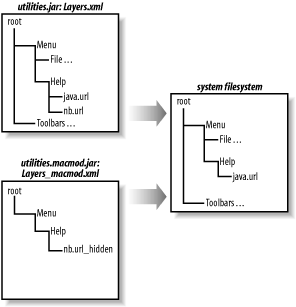
</filesystem>Figure 28-2 shows how layers are combined and files are masked.
While you can of course brand layers manually by typing in the proper XML for your branding layer, it can be cumbersome. You need to keep a copy of the original “base” layer open for comparison, as well as understand how to create mask files, and so on. Testing whether your branding worked correctly might involve creating a new branding JAR and restarting a test copy of the IDE to examine its appearance and behavior.
The Open APIs Support module provides a tool to make the process easier and more visual. Any layer can be opened as text (XML) in the editor; just look for the
icon indicating that an XML file is a layer. You can also manipulate it visually. Expand its node in the Explorer and under the <root folder> that appears, make changes to files just like you would on any mounted filesystem: copy, open in the Editor, delete, change file attributes such as Template, and more. Such changes are applied to the XML, and conversely changes in the XML will appear in the Explorer too.
Tip
Some versions of the XML module can interfere with this structural layer editing feature. Look for any release notes on the Open APIs Support home page at http://apisupport.netbeans.org/.
For branding layers, you can also edit the <root folder> in the Explorer. More commonly, though, what you are really interested in is the result of the branding. To work this way, make sure an additional subnode appears beneath the layer node in the Explorer; this will happen automatically if the Open APIs Support detects that a layer is branding another layer based on its package and name, but consult this module’s online documentation for details (you may be able to add branding views manually as well).
In Figure 28-3 you can see an example of branding in
action. The file Layer.xml from the standard
NetBeans utilities module is shown in the Explorer
on the left, with its file contents expanded in a separate window
(upper-center on the desktop). A branded
Layer_macmod.xml has been created in the same
Java package; you can see its text in the lower center of the desktop
and its file contents in the window in the upper-right, along with
the virtual result of merging it with the base layer.
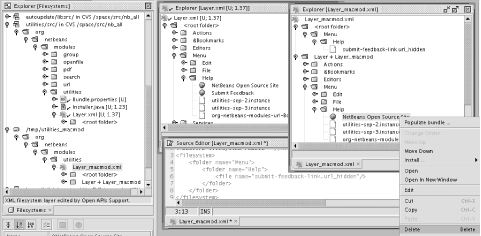
The utilities module adds several items to the
Help menu, including a couple of URLs specific to the NetBeans web
site. In order to ensure that the MacroModeler application does not
show these inappropriate links, you mask the
*.url files. Here a branding layer
Layer_macmod.xml is open. One link named Submit
Feedback has already been masked; there is a mask file in the XML
(visible in the branding layer’s <root folder>), and the corresponding link
does not appear in the merged view beneath Layer + Layer_macmod, which tries to simulate
the final configuration that will be present in the branded
application. Deleting NetBeans Open Source
Site from the merged view will automatically create a
second mask file.
In a similar fashion, you can add or modify files in the merged view, and the proper entries will be made in your branding XML file. You can even change the order of items in folders—try the context menu on the item in the Explorer. To back out a change, simply delete associated elements from the XML and watch the merged view revert to the “pristine” version.
As time goes on, more and more aspects of the configuration of NetBeans are specified in XML layers, rather than ad-hoc configuration schemes or programmatically using Java installation hooks. Besides making it easier to find everything a module does and making module writing more declarative, this trend directly benefits those who create branded applications. Any part of an XML layer may be patched using the branding system, meaning that many aspects of how a given module (or the NetBeans core) works can be customized declaratively without patching Java source code.
You should consult the documentation for the version of NetBeans you are working with to find out exactly what can be configured in a layer and how to do so. As of this writing, certain important aspects of the application are not controlled by branding, and the NetBeans web site lacks a complete registry of items known to be installable via layers. However, the NetBeans core developers and community are working on completing the transition to layers and creating documentation to improve the use of NetBeans as an application platform. Check the http://www.netbeans.org/platform/ platform web site for the latest details.
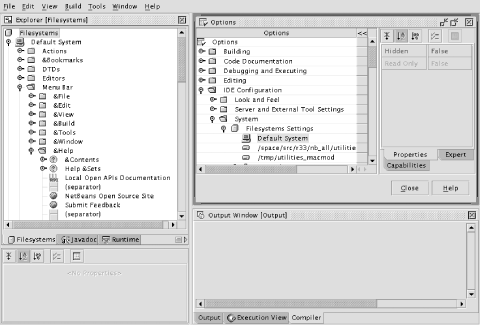
To interactively browse through everything installed in layers in your copy of the IDE, just make the system filesystem visible in the Filesystems tab of the Explorer and look through it (see Figure 28-4).
To illustrate some techniques, let us take an example that could be
used in NetBeans 3.3. The MacroModeler application should be
updatable over the web, and so it is decided to use the standard
NetBeans autoupdate module to support this.
However, the full GUI behavior of this module is deemed too
“heavyweight” for an average
modeling user, who does not want to retrieve or manage arbitrary
module downloads, but just an occasional update of the model editor
and associated utilities from modeling.com. To control the behavior of the
update feature, a branding JAR
modules/locale/autoupdate_macmod.jar should be
created containing just the file
org/netbeans/modules/autoupdate/resources/mf-layer_macmod.xml.
Such a file can be conveniently edited using the Open APIs Support
module, as described in the previous section.
The first concern is to control the set of update servers available. In fact only one is really needed, modeling.com, but the NetBeans module ships with several server settings pointing to netbeans.org. We can simply mask out the unwanted URLs and add a new one:
<filesystem>
  <folder name="Services">
    <folder name="AutoupdateType">
      <!-- Hide the main NetBeans server. -->
      <file name="autoupdate_xml_type.settings_hidden"/>
      <!-- Alpha & beta servers too. -->
      <file name="autoupdate_xml_type_1.settings_hidden"/>
      <file name="autoupdate_xml_type_2.settings_hidden"/>
      <!-- Now add our own. -->
      <file name="com-modeling-updates.settings" url="updates.settings">
        <attr name="SystemFileSystem.localizingBundle"
              stringvalue="com.modeling.Bundle"/>
        <attr name="SystemFileSystem.icon" urlvalue=
        "nbresloc:/org/netbeans/modules/autoupdate/resources/updateAction.gif"/>
        <attr name="url"
              stringvalue="http://www.modeling.com/updates.xml"/>
        <attr name="enabled" boolvalue="true"/>
      </file>
      <!-- (Bundle.properties and updates.settings need to be created too) -->
    </folder>
  </folder>
</filesystem>
Since it is intentional that just this one update server be available, it makes little sense to provide a GUI option for the user to customize the servers. For that matter, in the MacroModeler application, updating is not a prominent feature and ought not be given so much visibility. We can remove update-related items from some places in the UI and also move the menu item from the Tools menu to the File menu (maybe Tools does not seem like the right place for something that has nothing to do with models). Let us add more customizations to the branding layer, using mf-layer_macmod.xml:
<filesystem>
  <!-- Move the menu item: -->
  <folder name="Menu">
    <folder name="Tools">
     <file name="org-netbeans-modules-autoupdate-UpdateAction.instance_hidden"/>
    </folder>
    <folder name="File">
      <!-- Do not forget positioning: -->
      <attr name="Separator4[javax-swing-JSeparator].instance/,
org-netbeans-modules-autoupdate-UpdateAction.instance" boolvalue="true"/>
      <file name="org-netbeans-modules-autoupdate-UpdateAction.instance"/>
      <attr name="org-netbeans-modules-autoupdate-UpdateAction.instance/,
org-netbeans-core-actions-SystemExit.instance" boolvalue="true"/>
    </folder>
  </folder>
  <!-- Do not show a setup wizard panel asking about updates: -->
  <folder name="Wizards">
    <folder name="Setup">
      <file name="org-netbeans-modules-autoupdate-SetupPanel.instance_hidden"/>
    </folder>
  </folder>
  <!-- Nor update settings nor list of servers in the Options dialog: -->
  <folder name="UI">
    <folder name="Services">
      <folder name="IDEConfiguration">
        <folder name="System">
          <file name=
               "org-netbeans-modules-autoupdate-AutoupdateTypes.shadow_hidden"/>
          <file name="org-netbeans-modules-autoupdate-Settings.shadow_hidden"/>
        </folder>
      </folder>
    </folder>
  </folder>
  <!-- Nor permit new servers to be added. -->
  <folder name="Templates">
    <folder name="Services">
      <file name="AutoupdateType_hidden"/>
    </folder>
  </folder>
</filesystem>
We can keep one UI item that is added by the NetBeans module by its layer (mf-layer.xml):
<filesystem>
  <folder name="Welcome">
    <file name="org-netbeans-modules-autoupdate-UpdateAction.instance">
      <attr name="welcomeDescription" urlvalue=
  "nbresloc:/org/netbeans/modules/autoupdate/resources/info-UpdateAction.html"/>
    </file>
  </folder>
</filesystem>
This entry causes a button to appear in the Welcome panel that, when
pressed, launches the update wizard.[25] However, we may want to customize the HTML
description that will appear to the right of the button. This can be
done by including a branded HTML file in our JAR (see Example 28-4); it works because of the
nbresloc URL protocol that automatically searches
for localized and branded variants.
Example 28-4. Branding: org/netbeans/modules/autoupdate/resources/info-UpdateAction_macmod.html
<html>
  <body>
    Get MacroModeler updates and beta plug-ins online.
  </body>
</html>
With such a branded autoupdate_macmod.jar, it is possible to suppress many aspects of the Auto Update user interface that might be distracting in a one-purpose application, yet retain much of the same functionality and make it look and feel integral.
Pat yourself on the back if you have read this far. If anyone offered certification for Qualified NetBeans Engineers, you would be a strong candidate! The appendixes at the end of this book will help you continue on the road to being a NetBeans guru. The first appendix shows you where to look in NetBeans sources for helpful design patterns. Go to the source! No programmer can afford to ignore the examples of others. You will also learn how to extend your module with functionality not covered in the basic Open APIs. After that, you can learn about some handy utility APIs, find out what is on the horizon for future NetBeans releases, learn to thrive in the open source community as a regular contributor to the NetBeans project, and finally take a look at what other individuals and companies are doing with NetBeans now. Best of luck and see you on [email protected]!
[23] It is also possible to give locale variants of layers, but this is rarely used since localizable text strings are normally stored in bundles anyway, rather than directly in the layer.
[24] If the filesystem parameter propagateMasks is
on, it leaves the mask there. This is normally done for technical
reasons when the MultiFileSystem is contained as a
layer in a higher MultiFileSystem and it is
desirable to permit a layer to mask a file in a
“cousin” rather than
“sibling” layer. The topmost
MultiFileSystem has the parameter off so that
masks do not appear in the ultimately visible file list.
[25] The Welcome panel in NetBeans 3.4 is a complete rewrite and cannot be configured by modules. So this particular example will not work in 3.4. However, the same principle is used for other parts of the UI.