Creating an XmlDocument
Although
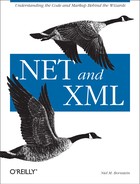
XmlNode sits at the top of the inheritance tree,
XmlDocument is the top-level node in an actual
document object tree. The XmlDocument has child
nodes, which are accessible through the XmlNode
type’s various properties and methods. One of these
child nodes, accessible through the
DocumentElement property, is an ordinary
XmlElement representing the root element of the
tree. There may also be a document type node (such as
<!DOCTYPE inventory SYSTEM
"inventory.dtd">
), represented by an
XmlDocumentType, accessible through the
DocumentType property. Finally, some XML documents
will have an XML declaration (such as <?xml
version="1.0" encoding="utf-8"
standalone="no">), represented by an
XmlDeclaration, and accessible only as an ordinary
child node of the XmlDocument. Figure 5-3 represents a typical XML document tree
structure in memory.
You can create an
XmlDocument in memory either by calling its
constructor or by calling XmlImplementation.CreateDocument(
). Both of these methods are overloaded to take an
XmlNameTable, and the
XmlDocument constructor is also overloaded to take
an XmlImplementation.
Tip
XmlNameTable is used to store atomized element and
attribute names. It provides a more efficient way to compare the
names than using strings. If you create two
XmlDocument instances using the same
XmlImplementation, they will share an
XmlNameTable, making name comparisons more
efficient.
Creating a new
XmlDocument gives you an empty document.
XmlDocument document = new XmlDocument( );
Tip
Technically, the DOM says you shouldn’t be able to
instantiate a node by calling a constructor. However, .NET has
provided an XmlDocument constructor for
convenience.
Now that you have a
document, you’re free to start adding nodes to it.
As specified by the DOM, in addition to serving as a representation
of the XML document, XmlDocument also acts as a
factory for the creation of new nodes. The first thing you might want
to do is to create the XML declaration.
XmlDocument has a CreateXmlDeclaration(
) method that does just that.
This method takes
version,
encoding, and
standalone parameters. There are some
constraints on the values of these parameters: the
encoding parameter must be
null or the name of an encoding supported by the
System.Text.Encoding class; the
standalone parameter must be
null, "yes“, or
"no“; and, as of this writing, the
version parameter must be
"1.0“. CreateXmlDeclaration( )
creates the XmlDeclaration node, but does not
insert it into the tree; you must use AppendChild(
) or a similar method to actually add the node to the
document:
XmlDeclaration declaration = document.CreateXmlDeclaration("1.0",Encoding.UTF8.HeaderName,
null);
document.AppendChild(declaration);Tip
This code snippet sets the document’s encoding to
Encoding.UTF8. In most cases you can safely use
the default encoding of the XmlDeclaration.
However, if you were to save the document to an
XmlWriter that had a different encoding, the
XmlWriter would discard the encoding set in the
XmlDeclaration and use its own instead. This
replacement ensures that the XML can be read back in with the correct
encoding.
Next, you might wish to specify the
document type. Example 5-2 shows a DTD named
inventory.dtd.
<?xml
version="1.0
" encoding="UTF-8"?>
<!ELEMENT inventory (date,items)>
<!ELEMENT date EMPTY>
<!ATTLIST date year CDATA #REQUIRED
month (1|2|3|4|5|6|7|8|9|10|11|12) #REQUIRED
day (1|2|3|4|5|6|7|8|9|10|11|
12|13|14|15|16|17|18|19|
20|21|22|23|24|25|26|27|
28|29|30|31) #REQUIRED>
<!ELEMENT items (item)+>
<!ELEMENT item EMPTY>
<!ATTLIST item quantity CDATA #REQUIRED
productCode CDATA #REQUIRED
description CDATA #REQUIRED
unitCost CDATA #REQUIRED>Warning
The XmlDeclaration and
XmlDocumentType nodes are optional, but if you
choose to use them, they must appear in that order, and before the
document element. If you can’t add them sequentially
in your code using AppendChild( ), you can use the
XmlDocument type’s methods InsertAfter(
), InsertBefore( ), or
PrependChild( ) to ensure that the nodes are in
the correct order. Note that PrependChild( ) is
not a DOM Level 1 or Level 2 method, but a .NET-specific extension.
XmlDocument
has a CreateDocumentType(
) method that, predictably, creates an XML document type.
This method takes a name, a system ID, a public ID, and an internal
subset as parameters, the last three of which can be null. Again, you
must use AppendChild( ) to add the
XmlDocumentType node to the tree:
XmlDocumentType docType = document.CreateDocumentType("inventory",
  null,"inventory.dtd",null);
document.AppendChild(docType);
Warning
If you try to create an XmlDocumentType node but
the specified DTD does not exist, a
FileNotFoundException will be
thrown.
Next, you should create the
document element. CreateElement( ) creates a new
XmlElement but, again, does not insert it into the
XML tree:
XmlElement documentElement = document.CreateElement("inventory");
document.AppendChild(documentElement);
If
you inspect the XmlDocument
instance’s DocumentElement
property, you’ll see that the new
XmlElement has automatically become the document
element because it is the first XmlElement added
to the tree:
XmlElement element = document.DocumentElement;
Console.WriteLine("DocumentElement is " + element.Name);
Tip
At any point, you might wish to examine the document tree as it would appear if serialized to XML. The following code snippet will do that for you with nice human-readable formatting.
XmlTextWriter writer = new XmlTextWriter(Console.Out);
writer.Formatting = Formatting.Indented;
document.WriteTo(writer);
Next,
continue building your XmlDocument, one element at
a time. The next required element is the date:
XmlElement dateElement = document.CreateElement("date");
dateElement.SetAttribute("year","2002");
dateElement.SetAttribute("month","6");
dateElement.SetAttribute("day","22");
document.DocumentElement.AppendChild(dateElement);
You’ll notice that, in
this case, you call AppendChild( ) on the
document’s DocumentElement,
rather than the document itself. Besides being the right way to build
a valid document for this DTD, this is necessary because a document
is only allowed to have one child element. Attempting to append
another child element directly to the document would cause the
following exception to be thrown:
System.InvalidOperationException: This document already has a DocumentElement node.
Continuing, create the items and several
item elements:
// create the items element
XmlElement itemsElement = document.CreateElement("items");
document.DocumentElement.AppendChild(itemsElement);

// create some item elements
XmlElement itemElement = document.CreateElement("item");
itemElement.SetAttribute("quantity","15");
itemElement.SetAttribute("productCode","R-273");
itemElement.SetAttribute("description","14.4 Volt Cordless Drill");
itemsElement.AppendChild(itemElement);

itemElement = document.CreateElement("item");
itemElement.SetAttribute("quantity","23");
itemElement.SetAttribute("productCode","1632S");
itemElement.SetAttribute("description","12 Piece Drill Bit Set");
itemsElement.AppendChild(itemElement);
By now, you should see that you’ve built the following XML document:
<?xml version="1.0" encoding="UTF-8"?>
<!DOCTYPE inventory SYSTEM "inventory.dtd">
<inventory>
  <date year="2002" month="6" day="22" />
  <items>
    <item quantity="1" productCode="R-273" description="14.4 Volt Cordless Drill" />
    <item quantity="1" productCode="1632S" description="12 Piece Drill Bit Set" />
  </items>
</inventory>
That looks fairly good, but is it valid?
You can check with the XmlValidatingReader from
Chapter 2. Remember that one of the
XmlValidatingReader type’s
constructors takes a Stream. You can write the
XmlDocument to a MemoryStream,
flush the Stream to ensure that all the data has
been written, set the Stream
instance’s pointer back to the beginning, and then
pass it to the XmlValidatingReader. You can either
let the XmlSchemaException be thrown and handle it
in a try...catch, or register a
ValidationEventHandler as I did in Chapter 2. In this case I’ll just let
the default InternalValidationCallback do the
work:
Stream stream = new MemoryStream( );
XmlTextWriter textWriter = new XmlTextWriter(new StreamWriter(stream));
document.WriteTo(textWriter);
textWriter.Flush( );
stream.Seek(0,SeekOrigin.Begin);

XmlReader textReader = new XmlTextReader(stream);
XmlReader reader = new XmlValidatingReader(textReader);
try {
  while (reader.Read( )) {
    // Validation only happens when you call Read( )
  }
} catch (XmlSchemaException e) {
  Console.WriteLine(e);
} finally {
  stream.Close( );
}
Tip
You might think that you could use a combination of
XmlNodeReader and
XmlValidatingReader to validate the document.
However, remember that although the
XmlValidatingReader constructor takes an
XmlReader, an ArgumentException
will be thrown if it’s not actually an
XmlTextReader.
Now you can run the program and the
XmlValidatingReader will tell you if
you’ve forgotten anything:
System.Xml.Schema.XmlSchemaException: The required attribute 'unitCost' is missing.
An error occurred at (1, 140).
   at System.Xml.XmlValidatingReader.InternalValidationCallback(Object sender,
ValidationEventArgs e)
   at System.Xml.Schema.Validator.SendValidationEvent(XmlSchemaException e,
XmlSeverityType severity)
   at System.Xml.Schema.Validator.BeginChildren( )
   at System.Xml.Schema.Validator.ProcessElement( )
   at System.Xml.Schema.Validator.Validate( )
   at System.Xml.Schema.Validator.Validate(ValidationType valType)
   at System.Xml.XmlValidatingReader.ReadWithCollectTextToken( )
   at System.Xml.XmlValidatingReader.Read( )
   at CreateInventory.Main(String[ ] args) in C:Chapter 5CreateInventory.cs:line 85
This exception indicates that an attribute required by the DTD is
missing. You can go back and add the missing
unitCost attributes to their respective elements.
Because the DOM allows non-sequential access to the XML tree, you can
actually go back to nodes that you created early in the program and
assign the cost to each item at the end. This might be necessary in
real life if the data were coming from disparate sources—maybe
the list of items comes from a database, while the cost comes from a
flat file; you don’t want to have to scan the entire
file as each row is read from the database.
Since you still have the items element in memory,
you can simply iterate through its child nodes, looking up the
productCode attribute, and adding the
unitCost attribute with the appropriate value. If
the code encounters an unknown productCode, it
will throw an ApplicationException:
XmlNodeList elements = itemsElement.ChildNodes;
foreach (XmlElement currentElement in elements) {
  double cost = 0d;
  string productCode = currentElement.GetAttribute("productCode");
  switch (productCode) {
    case "R-273":
      cost = 189.95;
      break;
    case "1632S":
      cost = 14.95;
      break;
    default:
      throw new ApplicationException("Unknown productCode: "
        + productCode);
  }
  currentElement.SetAttribute("unitCost",cost.ToString( ));
}
There are
other ways you could navigate through the items
element’s child nodes. For example, if there were
other types of child nodes besides elements, or other elements
besides item, you could replace the first line of
code with the following:
XmlNodeList elements = itemsElement.GetElementsByTagName("item");Either way, you now have valid XML:
<?xml version="1.0" encoding="UTF-8"?>
<!DOCTYPE inventory SYSTEM "inventory.dtd">
<inventory>
  <date year="2002" month="6" day="22" />
  <items>
    <item quantity="15" productCode="R-273" description="14.4 Volt Cordless Drill" unitCost="189.95" />
    <item quantity="23" productCode="1632S" description="12 Piece Drill Bit Set" unitCost="14.95" />
  </items>
</inventory>
Finally, you should save the document to a file:
document.Save("inventory.xml");
The XmlDocument.Save(
) method has several overloads. The one used here takes a
filename, creates all necessary FileInfo and/or
XmlWriter instances, and serializes the document
to the file. Other overloads take a Stream, a
TextWriter, or an XmlWriter,
respectively, so you can save the document not only to a variety of
destinations, but even to alternative XML syntaxes, using, for
example, the XmlPyxWriter I showed you in Chapter 4.