Chapter 12. Compound Patterns: Patterns of Patterns

Who would have ever guessed that Patterns could work together? You’ve already witnessed the acrimonious Fireside Chats (and you haven’t even seen the Pattern Death Match pages that the editor forced us to remove from the book[2]), so who would have thought patterns can actually get along well together? Well, believe it or not, some of the most powerful OO designs use several patterns together. Get ready to take your pattern skills to the next level; it’s time for compound patterns.
Working together
One of the best ways to use patterns is to get them out of the house so they can interact with other patterns. The more you use patterns the more you’re going to see them showing up together in your designs. We have a special name for a set of patterns that work together in a design that can be applied over many problems: a compound pattern. That’s right, we are now talking about patterns made of patterns!
You’ll find a lot of compound patterns in use in the real world. Now that you’ve got patterns in your brain, you’ll see that they are really just patterns working together, and that makes them easier to understand.
We’re going to start this chapter by revisiting our friendly ducks in the SimUDuck duck simulator. It’s only fitting that the ducks should be here when we combine patterns; after all, they’ve been with us throughout the entire book and they’ve been good sports about taking part in lots of patterns. The ducks are going to help you understand how patterns can work together in the same solution. But just because we’ve combined some patterns doesn’t mean we have a solution that qualifies as a compound pattern. For that, it has to be a general-purpose solution that can be applied to many problems. So, in the second half of the chapter we’ll visit a real compound pattern: that’s right, Mr. Model-View-Controller himself. If you haven’t heard of him, you will, and you’ll find this compound pattern is one of the most powerful patterns in your design toolbox.
Patterns are often used together and combined within the same design solution.
A compound pattern combines two or more patterns into a solution that solves a recurring or general problem.
Duck reunion
As you’ve already heard, we’re going to get to work with the ducks again. This time the ducks are going to show you how patterns can coexist and even cooperate within the same solution.
We’re going to rebuild our duck simulator from scratch and give it some interesting capabilities by using a bunch of patterns. Okay, let’s get started...
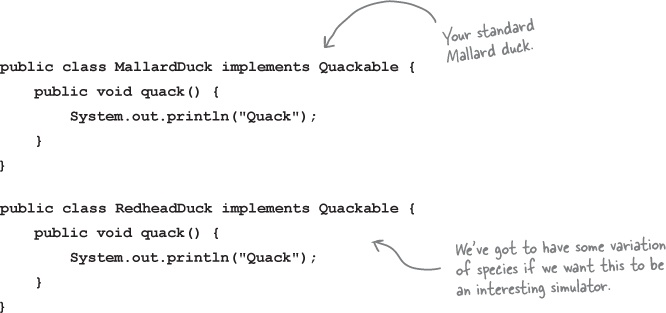
① First, we’ll create a Quackable interface.
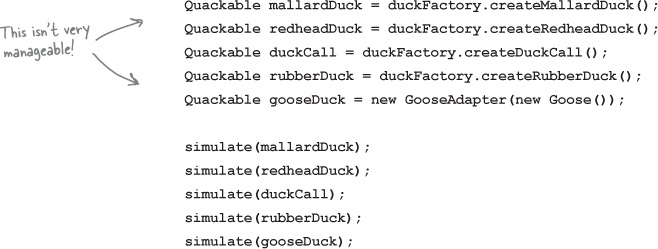
Like we said, we’re starting from scratch. This time around, the Ducks are going to implement a Quackable interface. That way we’ll know what things in the simulator can quack()—like Mallard Ducks, Redhead Ducks, Duck Calls, and we might even see the Rubber Duck sneak back in.
② Now, some Ducks that implement Quackable
What good is an interface without some classes to implement it? Time to create some concrete ducks (but not the “lawn art” kind, if you know what we mean).
This wouldn’t be much fun if we didn’t add other kinds of Ducks too.
Remember last time? We had duck calls (those things hunters use—they are definitely quackable) and rubber ducks.
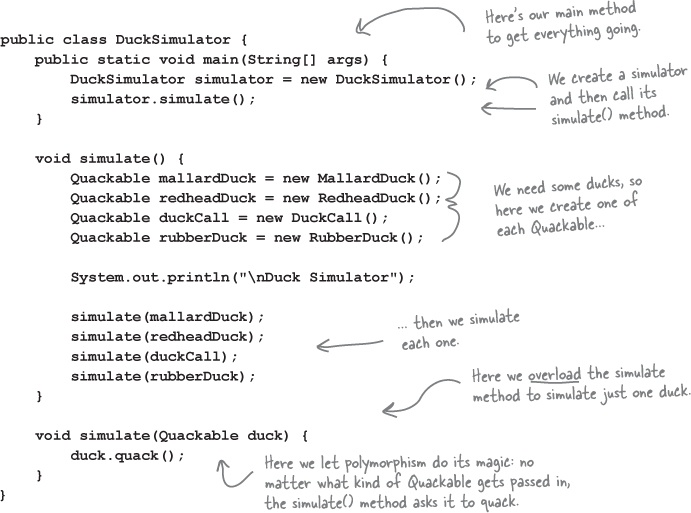
③ Okay, we’ve got our ducks; now all we need is a simulator.
Let’s cook up a simulator that creates a few ducks and makes sure their quackers are working...
Note
They all implement the same Quackable interface, but their implementations allow them to quack in their own way.
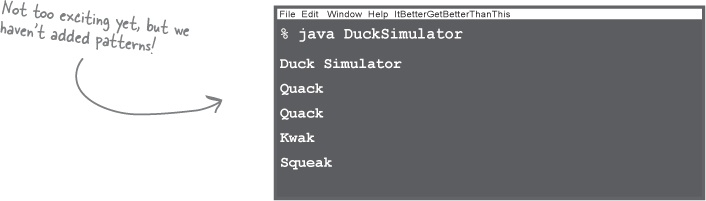
It looks like everything is working; so far, so good.
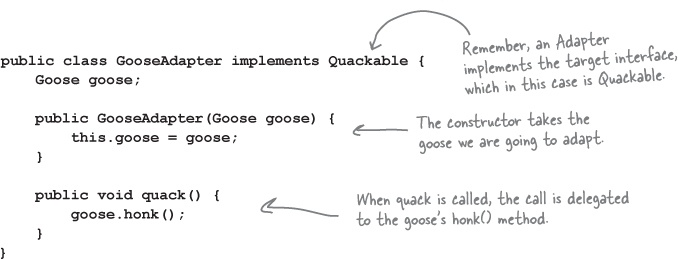
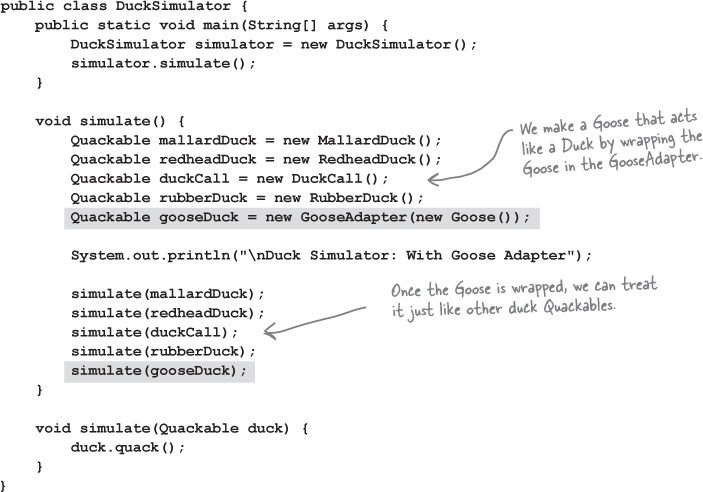
④ When ducks are around, geese can’t be far.
Where there is one waterfowl, there are probably two. Here’s a Goose class that has been hanging around the simulator.
Our simulator expects to see Quackable interfaces. Since geese aren’t quackers (they’re honkers), we can use an adapter to adapt a goose to a duck.
⑥ Now geese should be able to play in the simulator, too.
All we need to do is create a Goose, wrap it in an adapter that implements Quackable, and we should be good to go.
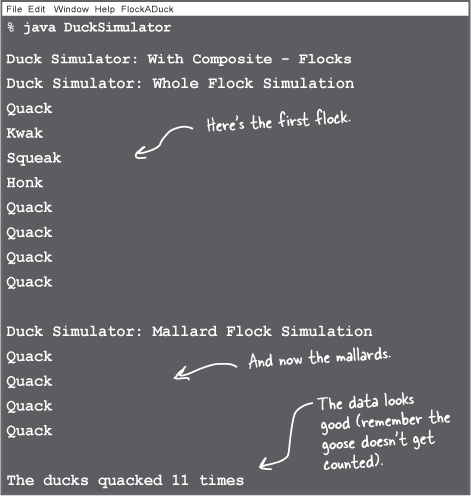
⑦ Now let’s give this a quick run....
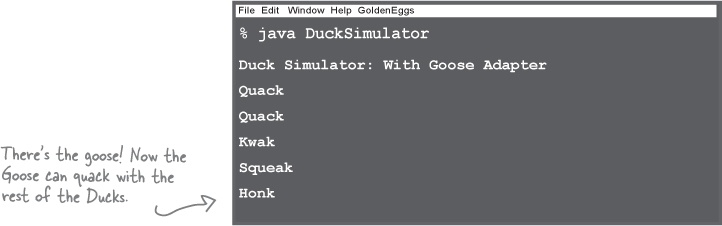
This time when we run the simulator, the list of objects passed to the simulate() method includes a Goose wrapped in a duck adapter. The result? We should see some honking!


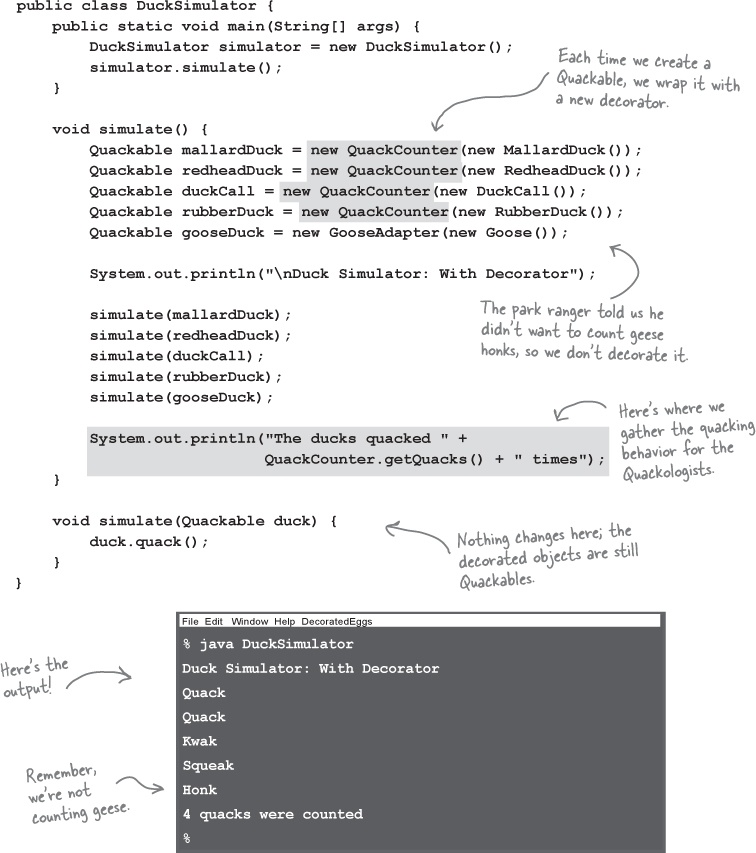
Quackologists are fascinated by all aspects of Quackable behavior. One thing Quackologists have always wanted to study is the total number of quacks made by a flock of ducks.
How can we add the ability to count duck quacks without having to change the duck classes?
Can you think of a pattern that would help?

⑧ We’re going to make those Quackologists happy and give them some quack counts.
How? Let’s create a decorator that gives the ducks some new behavior (the behavior of counting) by wrapping them with a decorator object. We won’t have to change the Duck code at all.
⑨ We need to update the simulator to create decorated ducks.
Now, we must wrap each Quackable object we instantiate in a QuackCounter decorator. If we don’t, we’ll have ducks running around making uncounted quacks.
You have to decorate objects to get decorated behavior.
He’s right, that’s the problem with wrapping objects: you have to make sure they get wrapped or they don’t get the decorated behavior.
Why don’t we take the creation of ducks and localize it in one place; in other words, let’s take the duck creation and decorating and encapsulate it.
What pattern does that sound like?
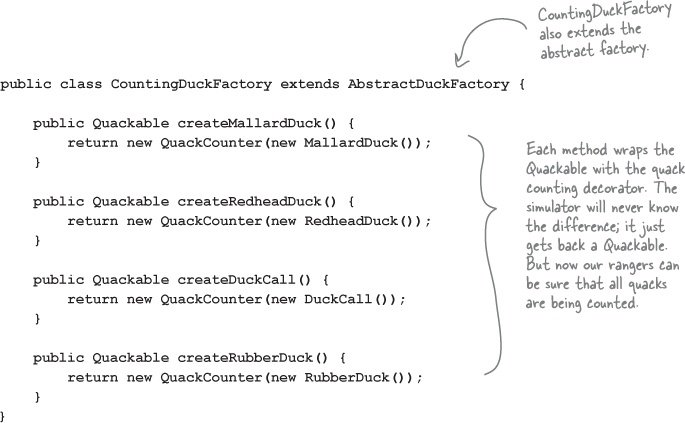
⑩ We need a factory to produce ducks!
Okay, we need some quality control to make sure our ducks get wrapped. We’re going to build an entire factory just to produce them. The factory should produce a family of products that consists of different types of ducks, so we’re going to use the Abstract Factory Pattern.
Let’s start with the definition of the AbstractDuckFactory:
Let’s start by creating a factory that creates ducks without decorators, just to get the hang of the factory:
Now let’s create the factory we really want, the CountingDuckFactory:
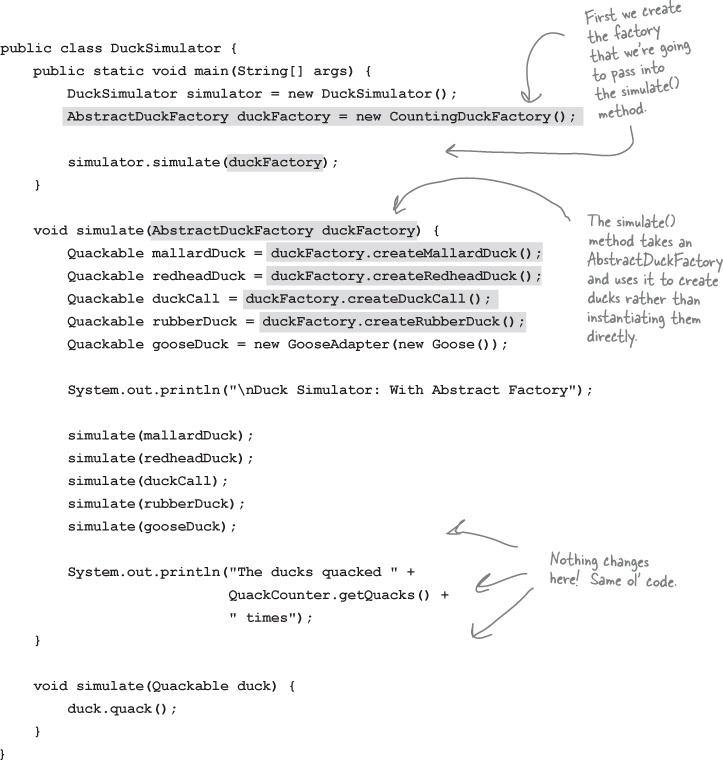
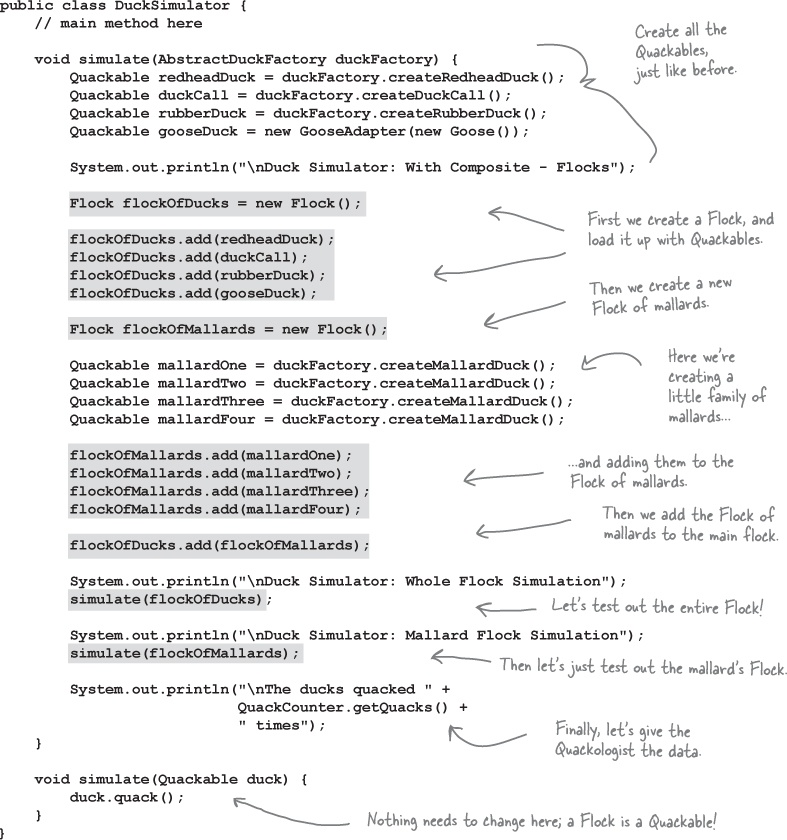
⑪ Let’s set up the simulator to use the factory.
Remember how Abstract Factory works? We create a polymorphic method that takes a factory and uses it to create objects. By passing in different factories, we get to use different product families in the method.
We’re going to alter the simulate() method so that it takes a factory and uses it to create ducks.


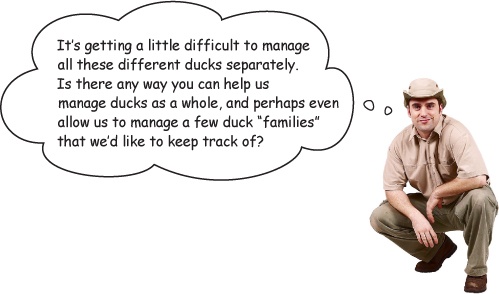
Ah, he wants to manage a flock of ducks.
Here’s another good question from Ranger Brewer: Why are we managing ducks individually?
What we need is a way to talk about collections of ducks and even sub-collections of ducks (to deal with the family request from Ranger Brewer). It would also be nice if we could apply operations across the whole set of ducks.
What pattern can help us?
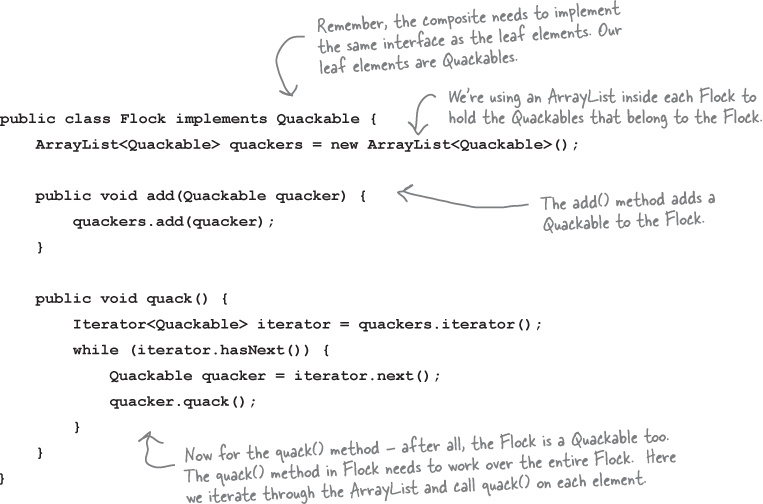
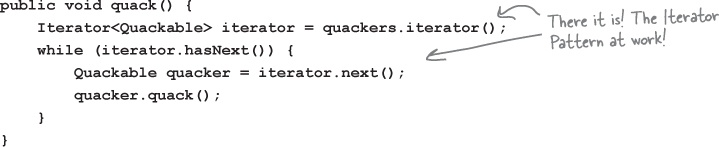
⑬ Now we need to alter the simulator.
Our composite is ready; we just need some code to round up the ducks into the composite structure.
It sounds like the Quackologist would like to observe individual duck behavior. That leads us right to a pattern made for observing the behavior of objects: the Observer Pattern.
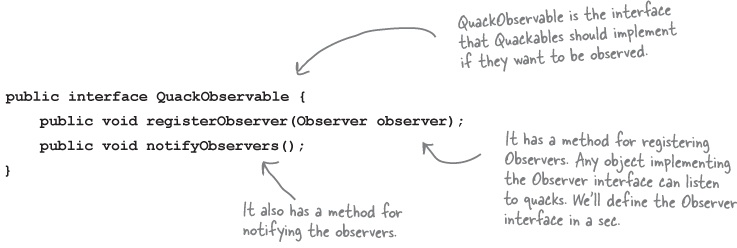
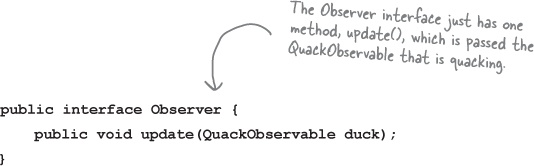
⑭ First we need an Observable interface.
Remember that an Observable is the object being observed. An Observable needs methods for registering and notifying observers. We could also have a method for removing observers, but we’ll keep the implementation simple here and leave that out.
Now we need to make sure all Quackables implement this interface...
⑮ Now, we need to make sure all the concrete classes that implement Quackable can handle being a QuackObservable.
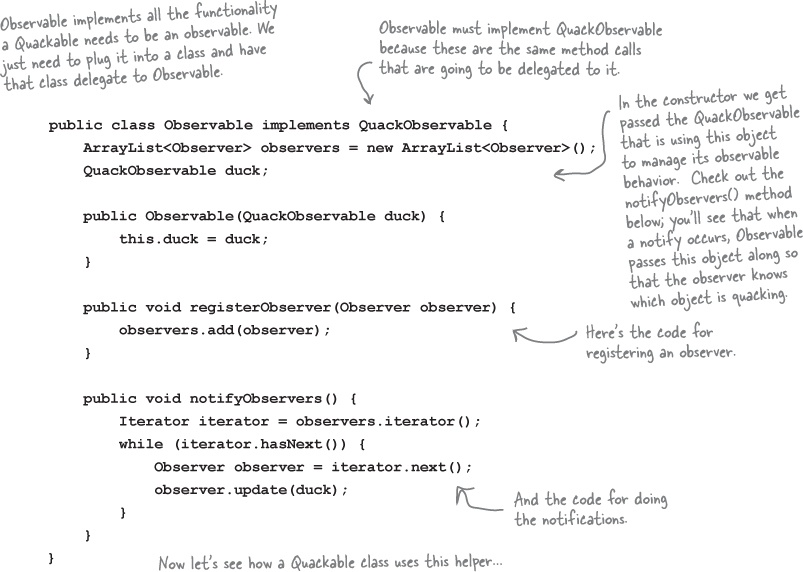
We could approach this by implementing registration and notification in each and every class (like we did in Chapter 2). But we’re going to do it a little differently this time: we’re going to encapsulate the registration and notification code in another class, call it Observable, and compose it with a QuackObservable. That way, we only write the real code once and the QuackObservable just needs enough code to delegate to the helper class Observable.
Let’s begin with the Observable helper class.
⑯ Integrate the helper Observable with the Quackable classes.
This shouldn’t be too bad. All we need to do is make sure the Quackable classes are composed with an Observable and that they know how to delegate to it. After that, they’re ready to be Observables. Here’s the implementation of MallardDuck; the other ducks are the same.


⑰ We’re almost there! We just need to work on the Observer side of the pattern.
We’ve implemented everything we need for the Observables; now we need some Observers. We’ll start with the Observer interface:
Now we need an Observer: where are those Quackologists?!

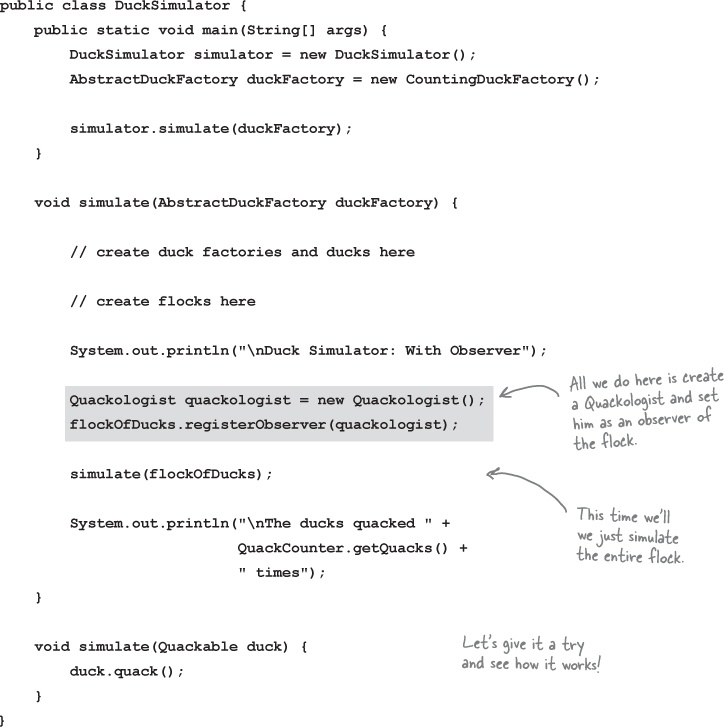
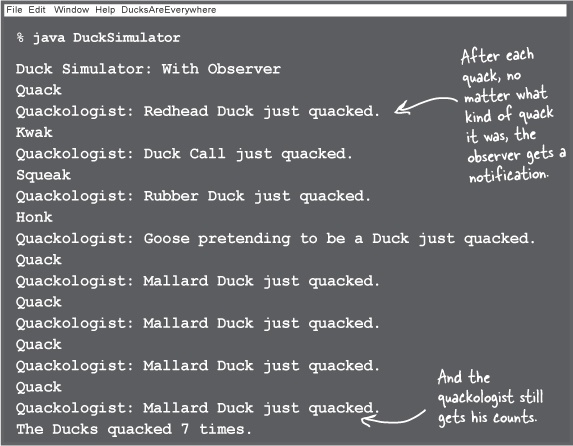
This is the big finale. Five, no, six patterns have come together to create this amazing Duck Simulator. Without further ado, we present the DuckSimulator!
What did we do?
We started with a bunch of Quackables...
A goose came along and wanted to act like a Quackable too. So we used the Adapter Pattern to adapt the goose to a Quackable. Now, you can call quack() on a goose wrapped in the adapter and it will honk!
Then, the Quackologists decided they wanted to count quacks. So we used the Decorator Pattern to add a QuackCounter decorator that keeps track of the number of times quack() is called, and then delegates the quack to the Quackable it’s wrapping.
But the Quackologists were worried they’d forget to add the QuackCounter decorator. So we used the Abstract Factory Pattern to create ducks for them. Now, whenever they want a duck, they ask the factory for one, and it hands back a decorated duck. (And don’t forget, they can also use another duck factory if they want an un-decorated duck!)
We had management problems keeping track of all those ducks and geese and quackables. So we used the Composite Pattern to group Quackables into Flocks. The pattern also allows the Quackologist to create sub-Flocks to manage duck families. We used the Iterator Pattern in our implementation by using java.util’s iterator in ArrayList.
The Quackologists also wanted to be notified when any Quackable quacked. So we used the Observer Pattern to let the Quackologists register as Quackable Observers. Now they’re notified every time any Quackable quacks. We used iterator again in this implementation. The Quackologists can even use the Observer Pattern with their composites.
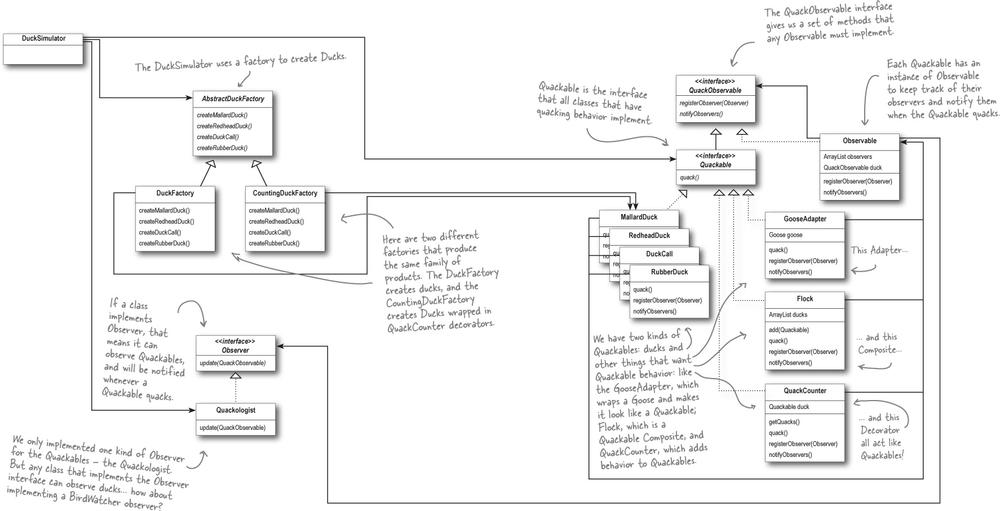
A duck’s eye view: the class diagram
We’ve packed a lot of patterns into one small duck simulator! Here’s the big picture of what we did:
The King of Compound Patterns
If Elvis were a compound pattern, his name would be Model-View-Controller, and he’d be singing a little song like this...
Ear Power
Don’t just read! After all, this is a Head First book... grab your iPod, hit this URL:
http://www.youtube.com/watch?v=YYvOGPMLVDo
Sit back and give it a listen.

No. Design Patterns are your key to the MVC.
We were just trying to whet your appetite. Tell you what, after you finish reading this chapter, go back and listen to the song again—you’ll have even more fun.
It sounds like you’ve had a bad run-in with MVC before? Most of us have. You’ve probably had other developers tell you it’s changed their lives and could possibly create world peace. It’s a powerful compound pattern, for sure, and while we can’t claim it will create world peace, it will save you hours of writing code once you know it.
But first you have to learn it, right? Well, there’s going to be a big difference this time around because now you know patterns!
That’s right, patterns are the key to MVC. Learning MVC from the top down is difficult; not many developers succeed. Here’s the secret to learning MVC: it’s just a few patterns put together. When you approach learning MVC by looking at the patterns, all of a sudden it starts to make sense.
Let’s get started. This time around you’re going to nail MVC!
Meet the Model-View-Controller
Imagine you’re using your favorite MP3 player, like iTunes. You can use its interface to add new songs, manage playlists and rename tracks. The player takes care of maintaining a little database of all your songs along with their associated names and data. It also takes care of playing the songs and, as it does, the user interface is constantly updated with the current song title, the running time, and so on.
Well, underneath it all sits the Model-View-Controller...
A closer look...
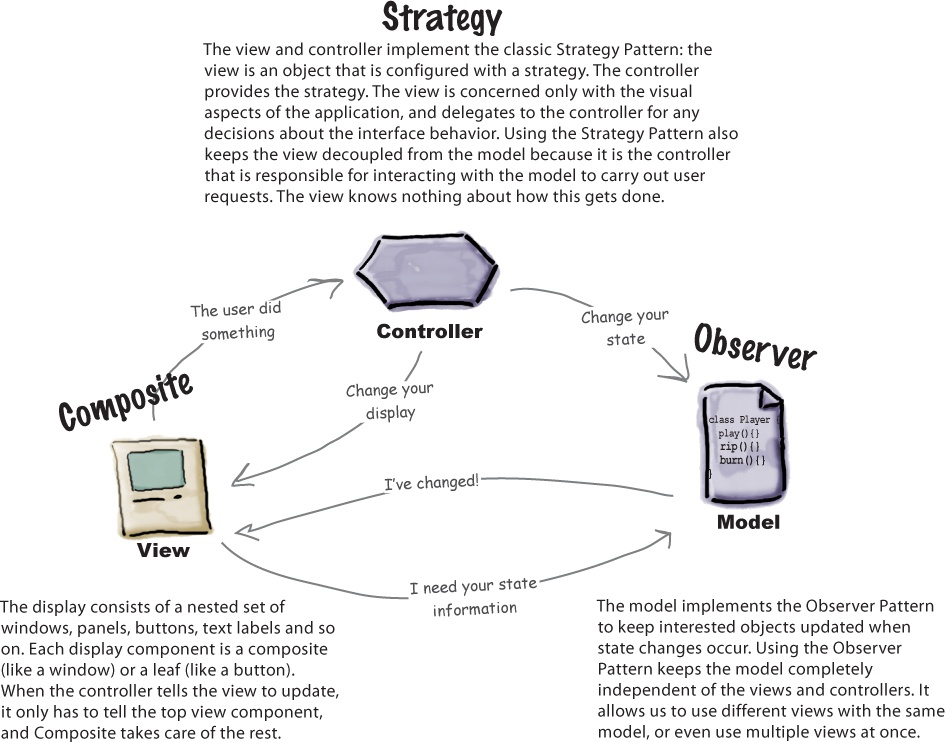
The MP3 player description gives us a high-level view of MVC, but it really doesn’t help you understand the nitty gritty of how the compound pattern works, how you’d build one yourself, or why it’s such a good thing. Let’s start by stepping through the relationships among the model, view and controller, and then we’ll take second look from the perspective of Design Patterns.
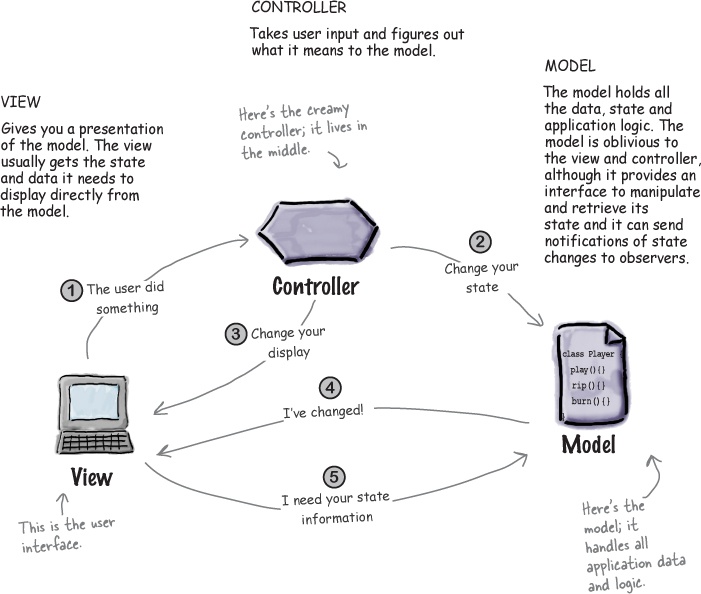
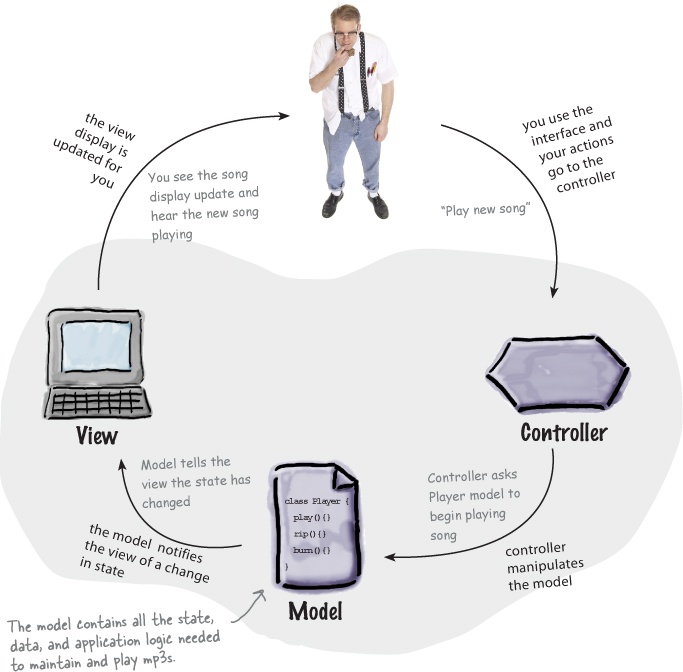
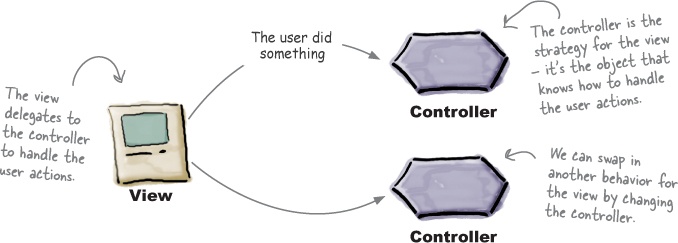
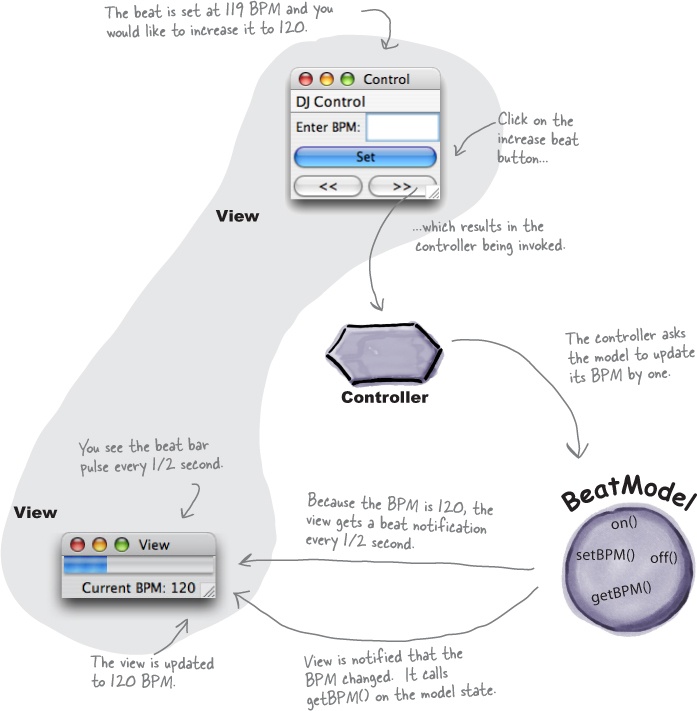
① You’re the user—you interact with the view.
The view is your window to the model. When you do something to the view (like click the Play button) then the view tells the controller what you did. It’s the controller’s job to handle that.
② The controller asks the model to change its state.
The controller takes your actions and interprets them. If you click on a button, it’s the controller’s job to figure out what that means and how the model should be manipulated based on that action.
③ The controller may also ask the view to change.
When the controller receives an action from the view, it may need to tell the view to change as a result. For example, the controller could enable or disable certain buttons or menu items in the interface.
④ The model notifies the view when its state has changed.
When something changes in the model, based either on some action you took (like clicking a button) or some other internal change (like the next song in the playlist has started), the model notifies the view that its state has changed.
⑤ The view asks the model for state.
The view gets the state it displays directly from the model. For instance, when the model notifies the view that a new song has started playing, the view requests the song name from the model and displays it. The view might also ask the model for state as the result of the controller requesting some change in the view.
Looking at MVC through patterns-colored glasses

We’ve already told you the best path to learning the MVC is to see it for what it is: a set of patterns working together in the same design.
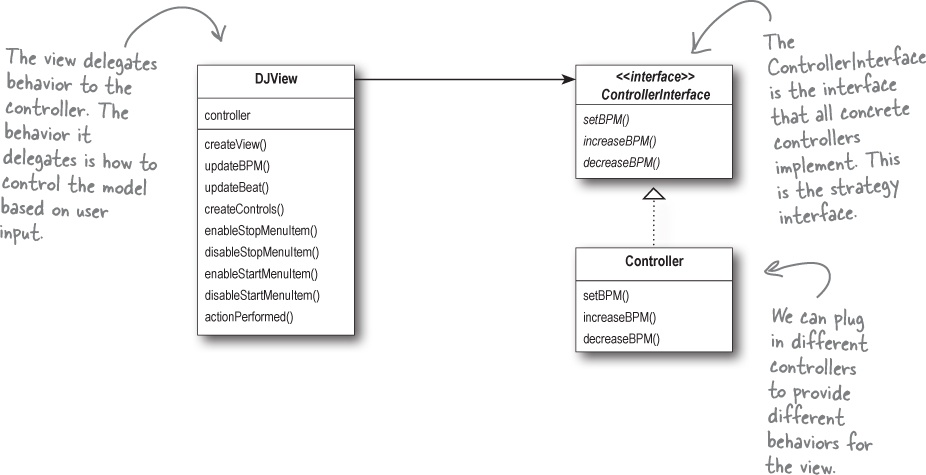
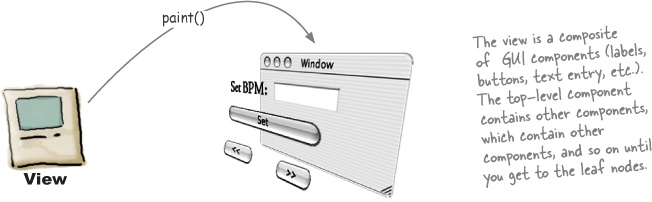
Let’s start with the model. As you might have guessed, the model uses Observer to keep the views and controllers updated on the latest state changes. The view and the controller, on the other hand, implement the Strategy Pattern. The controller is the behavior of the view, and it can be easily exchanged with another controller if you want different behavior. The view itself also uses a pattern internally to manage the windows, buttons and other components of the display: the Composite Pattern.
Let’s take a closer look:

Strategy
Using MVC to control the beat...

It’s your time to be the DJ. When you’re a DJ it’s all about the beat. You might start your mix with a slowed, downtempo groove at 95 beats per minute (BPM) and then bring the crowd up to a frenzied 140 BPM of trance techno. You’ll finish off your set with a mellow 80 BPM ambient mix.
How are you going to do that? You have to control the beat and you’re going to build the tool to get you there.
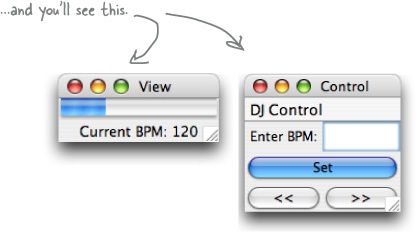
Meet the Java DJ View
Let’s start with the view of the tool. The view allows you to create a driving drum beat and tune its beats per minute...

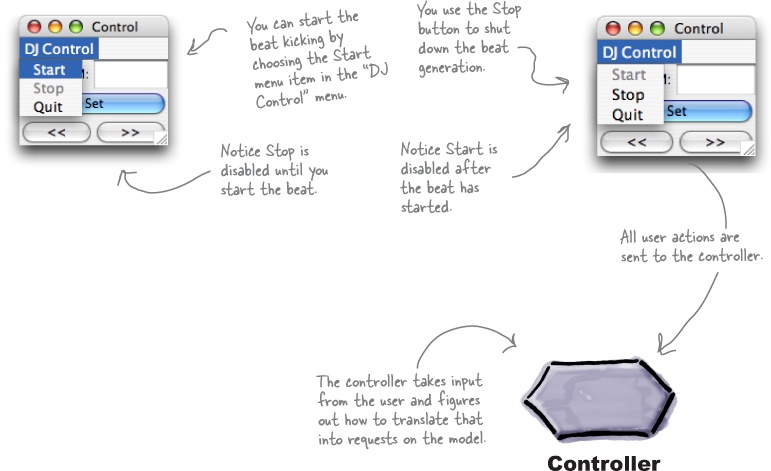
The controller is in the middle...
The controller sits between the view and model. It takes your input, like selecting “Start” from the DJ Control menu, and turns it into an action on the model to start the beat generation.
Building the pieces
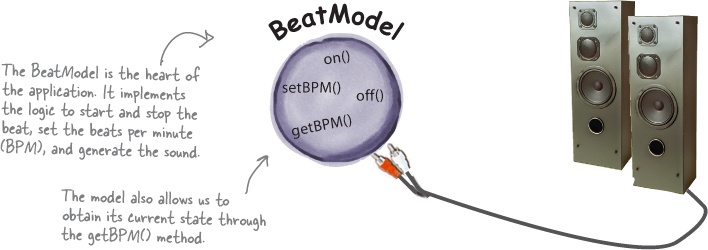
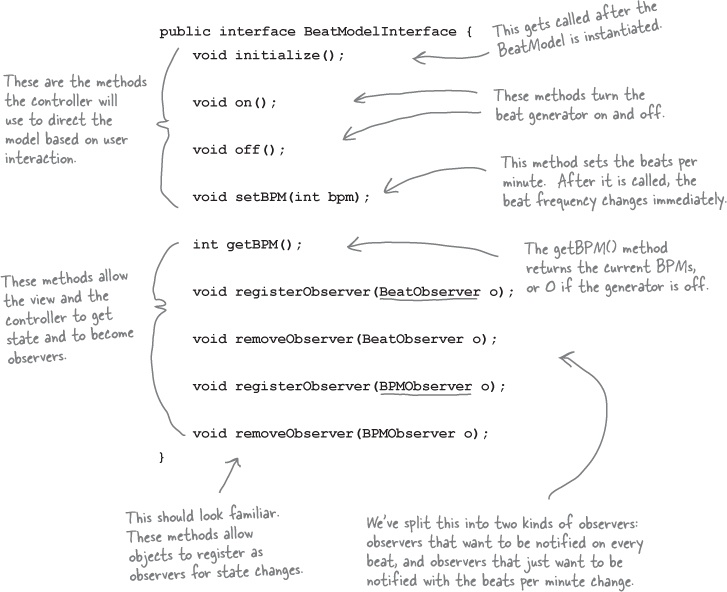
Okay, you know the model is responsible for maintaining all the data, state and any application logic. So what’s the BeatModel got in it? Its main job is managing the beat, so it has state that maintains the current beats per minute and lots of code that generates MIDI events to create the beat that we hear. It also exposes an interface that lets the controller manipulate the beat and lets the view and controller obtain the model’s state. Also, don’t forget that the model uses the Observer Pattern, so we also need some methods to let objects register as observers and send out notifications.

The View
Now the fun starts; we get to hook up a view and visualize the BeatModel!
The first thing to notice about the view is that we’ve implemented it so that it is displayed in two separate windows. One window contains the current BPM and the pulse; the other contains the interface controls. Why? We wanted to emphasize the difference between the interface that contains the view of the model and the rest of the interface that contains the set of user controls. Let’s take a closer look at the two parts of the view:

Brain Power
Our BeatModel makes no assumptions about the view. The model is implemented using the Observer Pattern, so it just notifies any view registered as an observer when its state changes. The view uses the model’s API to get access to the state. We’ve implemented one type of view; can you think of other views that could make use of the notifications and state in the BeatModel?
A lightshow that is based on the real-time beat._____________________________________________
A textual view that displays a music genre based on the BPM (ambient, downbeat, techno, etc.).
____________________________________________________________________________________________
____________________________________________________________________________________________
____________________________________________________________________________________________
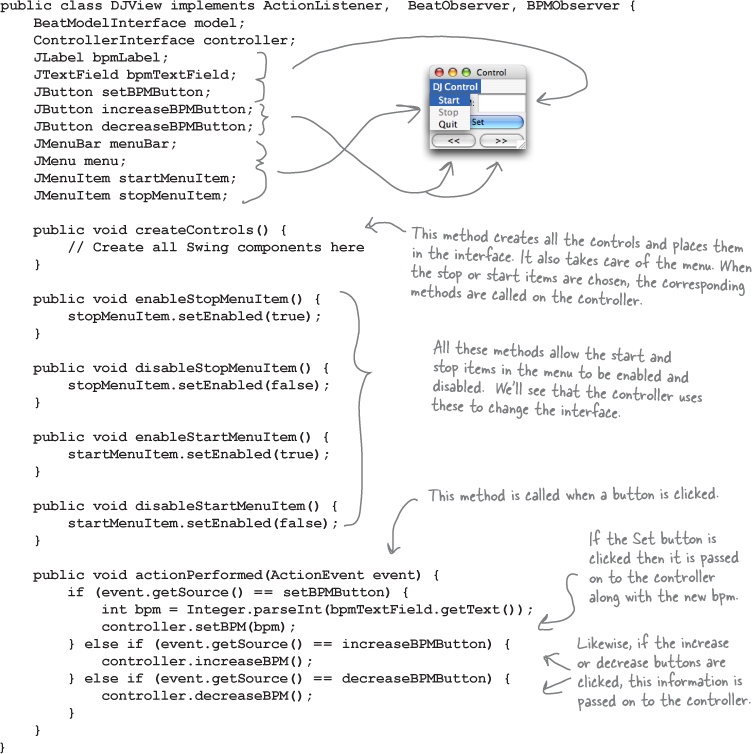
Implementing the View
The two parts of the view—the view of the model, and the view with the user interface controls—are displayed in two windows, but live together in one Java class. We’ll first show you just the code that creates the view of the model, which displays the current BPM and the beat bar. Then we’ll come back on the next page and show you just the code that creates the user interface controls, which displays the BPM text entry field, and the buttons.

Implementing the View, continued...
Now, we’ll look at the code for the user interface controls part of the view. This view lets you control the model by telling the controller what to do, which in turn, tells the model what to do. Remember, this code is in the same class file as the other view code.
Now for the Controller
It’s time to write the missing piece: the controller. Remember the controller is the strategy that we plug into the view to give it some smarts.
Because we are implementing the Strategy Pattern, we need to start with an interface for any Strategy that might be plugged into the DJ View. We’re going to call it ControllerInterface.

Putting it all together...
We’ve got everything we need: a model, a view, and a controller. Now it’s time to put them all together into a MVC! We’re going to see and hear how well they work together.

All we need is a little code to get things started; it won’t take much:

Things to do
① Start the beat generation with the Start menu item; notice the controller disables the item afterwards.
② Use the text entry along with the increase and decrease buttons to change the BPM. Notice how the view display reflects the changes despite the fact that it has no logical link to the controls.
③ Notice how the beat bar always keeps up with the beat since it’s an observer of the model.
④ Put on your favorite song and see if you can beat match the beat by using the increase and decrease controls.
⑤ Stop the generator. Notice how the controller disables the Stop menu item and enables the Start menu item.
Exploring Strategy
Let’s take the Strategy Pattern just a little further to get a better feel for how it is used in MVC. We’re going to see another friendly pattern pop up too—a pattern you’ll often see hanging around the MVC trio: the Adapter Pattern.
Think for a second about what the DJ View does: it displays a beat rate and a pulse. Does that sound like something else? How about a heartbeat? It just so happens that we have a heart monitor class; here’s the class diagram:

Brain Power
It certainly would be nice to reuse our current view with the HeartModel, but we need a controller that works with this model. Also, the interface of the HeartModel doesn’t match what the view expects because it has a getHeartRate() method rather than a getBPM(). How would you design a set of classes to allow the view to be reused with the new model? Jot down your class design ideas below.
Adapting the Model
For starters, we’re going to need to adapt the HeartModel to a BeatModel. If we don’t, the view won’t be able to work with the model, because the view only knows how to getBPM(), and the equivalent heart model method is getHeartRate(). How are we going to do this? We’re going to use the Adapter Pattern, of course! It turns out that this is a common technique when working with the MVC: use an adapter to adapt a model to work with existing controllers and views.
Here’s the code to adapt a HeartModel to a BeatModel:

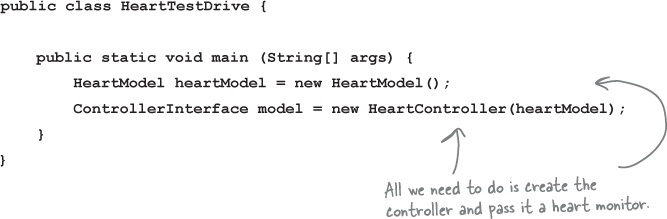
Now we’re ready for a HeartController
With our HeartAdapter in hand we should be ready to create a controller and get the view running with the HeartModel. Talk about reuse!
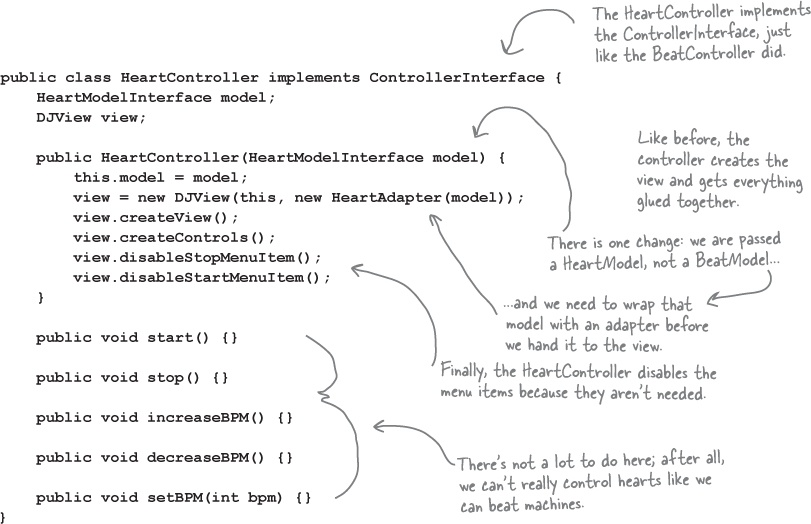
And now for a test run...


Things to do
① Notice that the display works great with a heart! The beat bar looks just like a pulse. Because the HeartModel also supports BPM and Beat Observers we can get beat updates just like with the DJ beats.
② As the heartbeat has natural variation, notice the display is updated with the new beats per minute.
③ Each time we get a BPM update the adapter is doing its job of translating getBPM() calls to getHeartRate() calls.
④ The Start and Stop menu items are not enabled because the controller disabled them.
⑤ The other buttons still work but have no effect because the controller implements no ops for them. The view could be changed to support the disabling of these items.
MVC and the Web
It wasn’t long after the Web was spun that developers started adapting the MVC to fit the browser/server model. The prevailing adaptation is known simply as “Model 2” and uses a combination of servlet and JSP technology to achieve the same separation of model, view and controller that we see in conventional GUIs.
Let’s check out how Model 2 works:
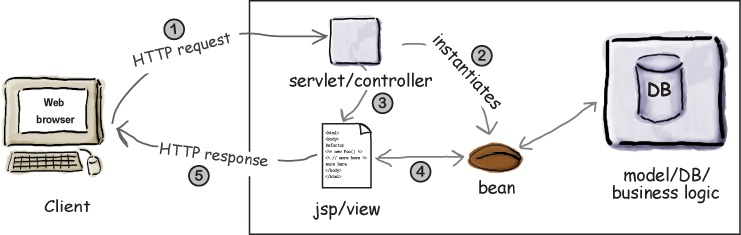
① | You make an HTTP request, which is received by a servlet. Using your web browser you make an HTTP request. This typically involves sending along some form data, like your username and password. A servlet receives this form data and parses it. |
② | The servlet acts as the controller. The servlet plays the role of the controller and processes your request, most likely making requests on the model (usually a database). The result of processing the request is usually bundled up in the form of a JavaBean. |
③ | The controller forwards control to the view. The View is represented by a JSP. The JSP’s only job is to generate the page representing the view of model (❹ which it obtains via the JavaBean) along with any controls needed for further actions. |
④ | The view returns a page to the browser via HTTP. A page is returned to the browser, where it is displayed as the view. The user submits further requests, which are processed in the same fashion. |

Model 2 is more than just a clean design.
The benefits of the separation of the view, model and controller are pretty clear to you now. But you need to know the “rest of the story” with Model 2—that it saved many web shops from sinking into chaos.
How? Well, Model 2 not only provides a separation of components in terms of design, it also provides a separation in production responsibilities. Let’s face it, in the old days, anyone with access to your JSPs could get in and write any Java code they wanted, right? And that included a lot of people who didn’t know a jar file from a jar of peanut butter. The reality is that most web producers know about content and HTML, not software.
Luckily Model 2 came to the rescue. With Model 2 we can leave the developer jobs to the men & women who know their servlets and let the web producers loose on simple Model 2-style JSPs where all the producers have access to is HTML and simple JavaBeans.
Model 2: DJ’ing from a cell phone
You didn’t think we’d try to skip out without moving that great BeatModel over to the Web, did you? Just think, you can control your entire DJ session through a web page on your cellular phone. So now you can get out of that DJ booth and get down in the crowd. What are you waiting for? Let’s write that code!
The plan
① Fix up the model.
Well, actually, we don’t have to fix the model; it’s fine just like it is!
② Create a servlet controller
We need a simple servlet that can receive our HTTP requests and perform a few operations on the model. All it needs to do is stop, start and change the beats per minute.
③ Create a HTML view.
We’ll create a simple view with a JSP. It’s going to receive a JavaBean from the controller that will tell it everything it needs to display. The JSP will then generate an HTML interface.
Geek Bits
Setting up your servlet environment
Showing you how to set up your servlet environment is a little bit off topic for a book on Design Patterns, at least if you don’t want the book to weigh more than you do!
Fire up your web browser and head straight to http://jakarta.apache.org/tomcat/ for the Apache Jakarta Project’s Tomcat Servlet Container. You’ll find everything you need there to get you up and running.
You’ll also want to check out Head First Servlets & JSP by Bryan Basham, Kathy Sierra and Bert Bates.

Step one: the model
Remember that in MVC, the model doesn’t know anything about the views or controllers. In other words, it is totally decoupled. All it knows is that it may have observers it needs to notify. That’s the beauty of the Observer Pattern. It also provides an interface the views and controllers can use to get and set its state.
Now all we need to do is adapt it to work in the web environment, but, given that it doesn’t depend on any outside classes, there is really no work to be done. We can use our BeatModel off the shelf without changes. So, let’s be productive and move on to step two!
Step two: the controller servlet
Remember, the servlet is going to act as our controller; it will receive web browser input in a HTTP request and translate it into actions that can be applied to the model.
Then, given the way the Web works, we need to return a view to the browser. To do this we’ll pass control to the view, which takes the form of a JSP. We’ll get to that in step three.
Here’s the outline of the servlet; on the next page, we’ll look at the full implementation.
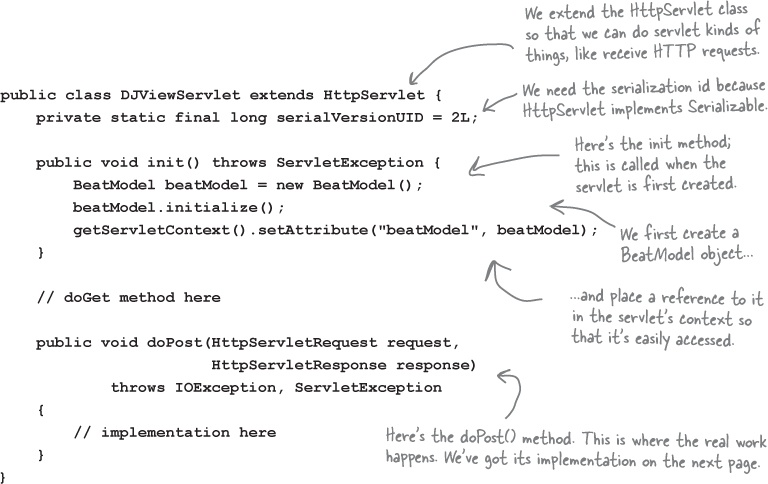
Here’s the implementation of the doGet() method from the page before:

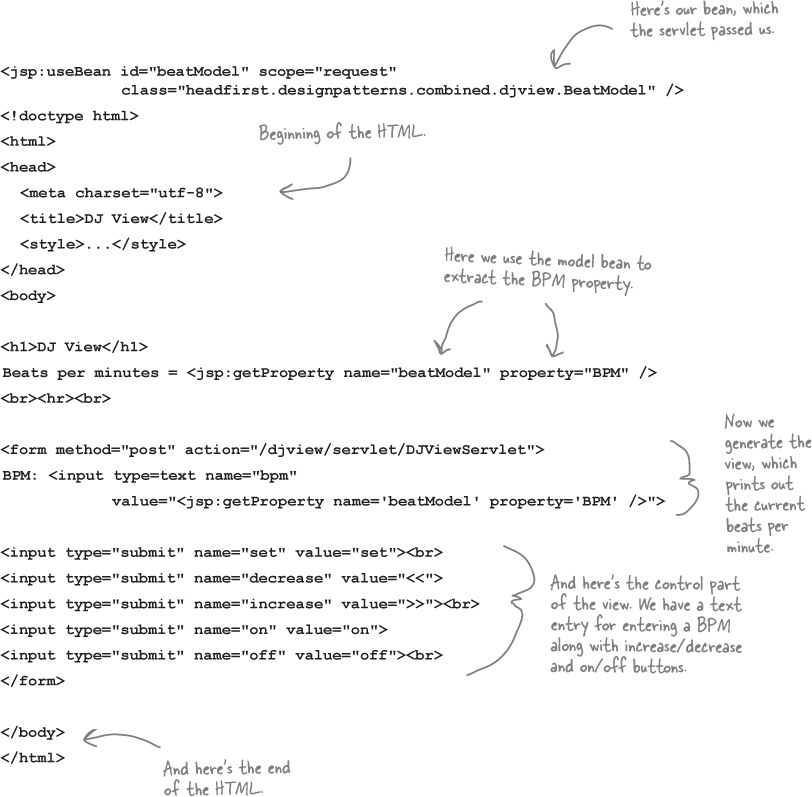
Now we need a view...
All we need is a view and we’ve got our browser-based beat generator ready to go! In Model 2, the view is just a JSP. All the JSP knows about is the bean it receives from the controller. In our case, that bean is just the model and the JSP is only going to use its BPM property to extract the current beats per minute. With that data in hand, it creates the view and also the user interface controls.
Putting Model 2 to the test...
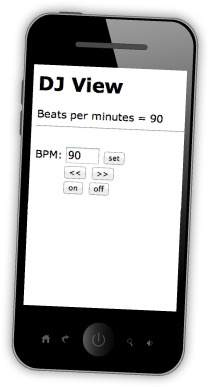
It’s time to start your web browser, hit the DJView Servlet and give the system a spin...
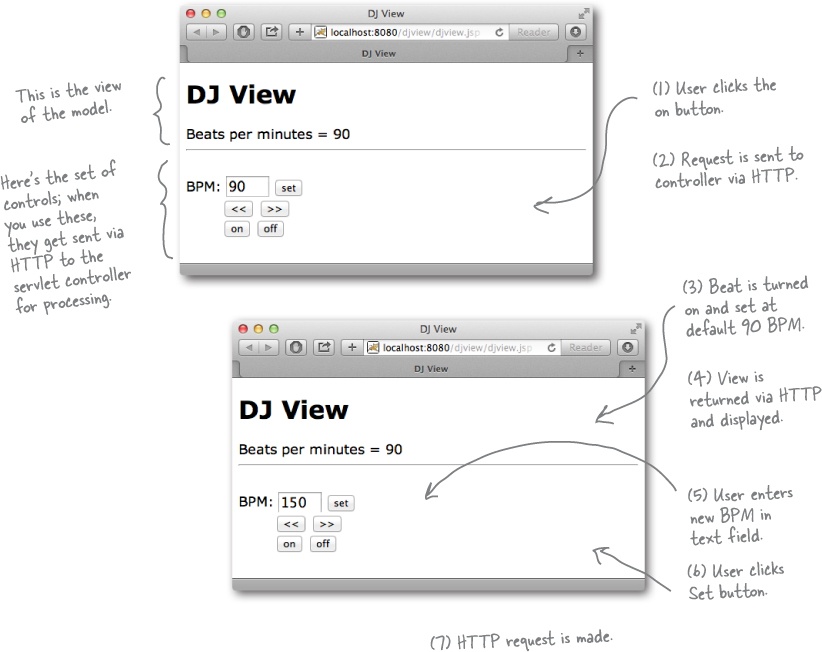
Things to do
① First, hit the web page; you’ll see the beats per minute at 0. Go ahead and click the “on” button.
② Now you should see the beats per minute at the default setting: 90 BPM. You should also hear a beat on the machine the server is running on.
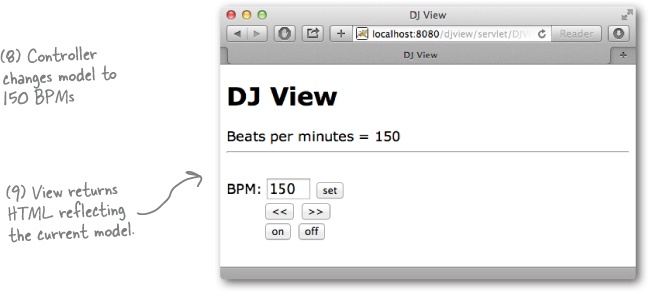
③ Enter a specific beat, say, 120, and click the “set” button. The page should refresh with a beats per minute of 120 (and you should hear the beat increase).
④ Now play with the increase/decrease buttons to adjust the beat up and down.
⑤ Think about how each step of the system works. The HTML interface makes a request to the servlet (the controller); the servlet parses the user input and then makes requests to the model. The servlet then passes control to the JSP (the view), which creates the HTML view that is returned and displayed.
Design Patterns and Model 2
After implementing the DJ control for the Web using Model 2, you might be wondering where the patterns went. We have a view created in HTML from a JSP, but the view is no longer a listener of the model. We have a controller that’s a servlet that receives HTTP requests, but are we still using the Strategy Pattern? And what about Composite? We have a view that is made from HTML and displayed in a web browser. Is that still the Composite Pattern?
Model 2 is an adaptation of MVC to the Web
Even though Model 2 doesn’t look exactly like “textbook” MVC, all the parts are still there; they’ve just been adapted to reflect the idiosyncrasies of the web browser model. Let’s take another look...
Observer
The view is no longer an observer of the model in the classic sense; that is, it doesn’t register with the model to receive state change notifications.
However, the view does receive the equivalent of notifications indirectly from the controller when the model has been changed. The controller even passes the view a bean that allows the view to retrieve the model’s state.
If you think about the browser model, the view only needs an update of state information when an HTTP response is returned to the browser; notifications at any other time would be pointless. Only when a page is being created and returned does it make sense to create the view and incorporate the model’s state.
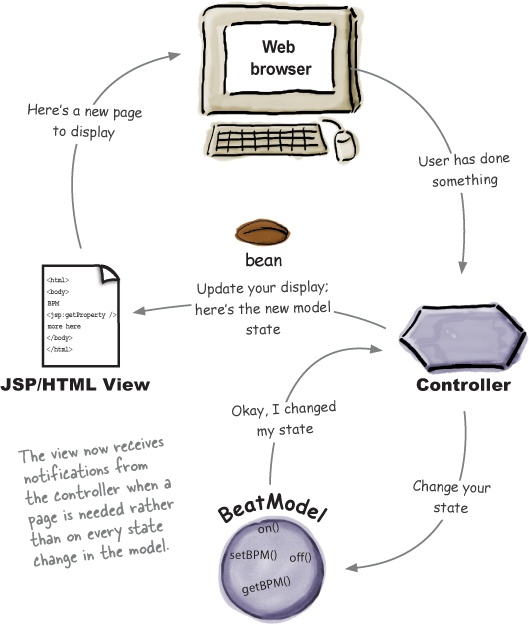
Strategy
In Model 2, the Strategy object is still the controller servlet; however, it’s not directly composed with the view in the classic manner. That said, it is an object that implements behavior for the view, and we can swap it out for another controller if we want different behavior.
Composite
Like our Swing GUI, the view is ultimately made up of a nested set of graphical components. In this case, they are rendered by a web browser from an HTML description; however, underneath there is an object system that most likely forms a composite.
Tools for your Design Toolbox
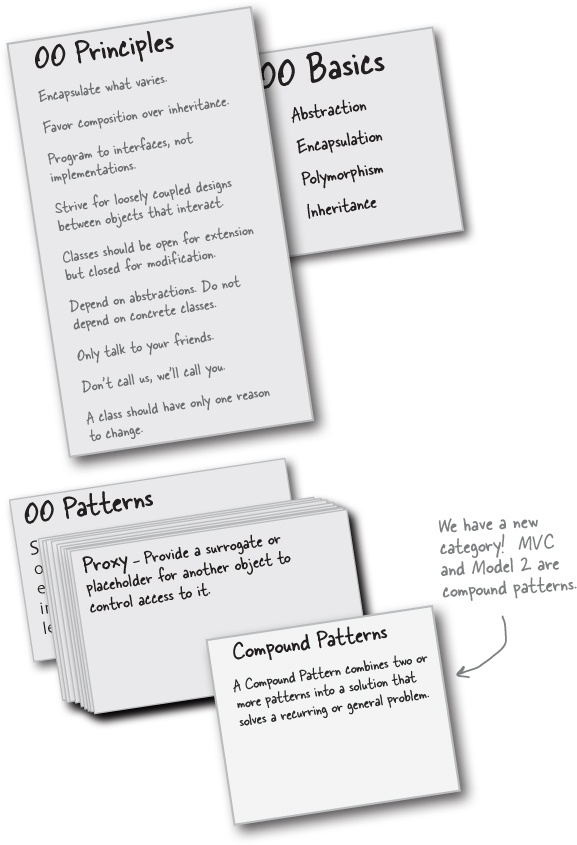
You could impress anyone with your design toolbox. Wow, look at all those principles, patterns and now, compound patterns!
Exercise Solutions
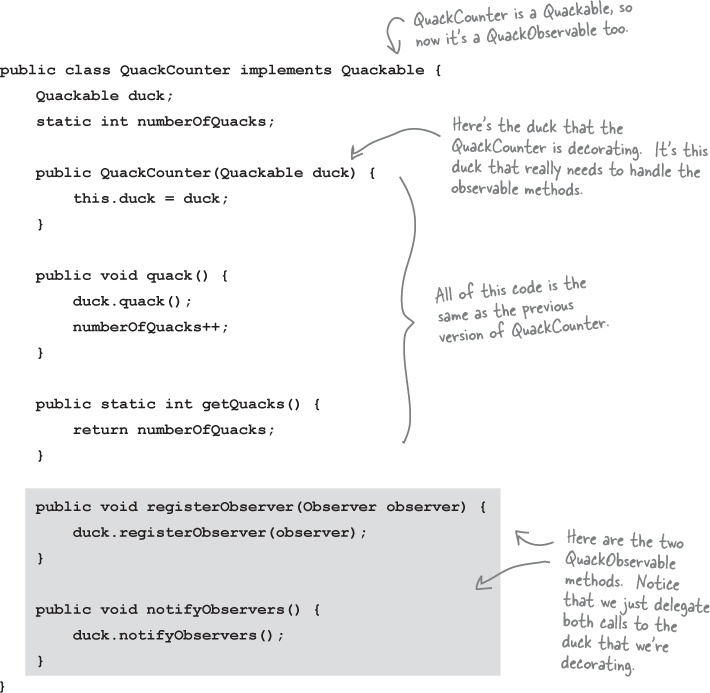
The QuackCounter is a Quackable too. When we change Quackable to extend QuackObservable, we have to change every class that implements Quackable, including QuackCounter:
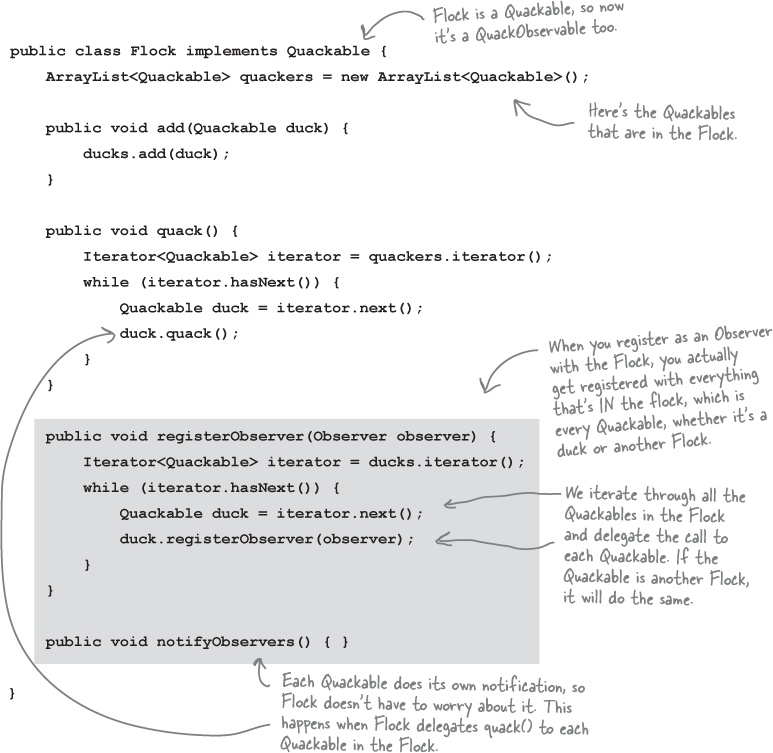
What if our Quackologist wants to observe an entire flock? What does that mean anyway? Think about it like this: if we observe a composite, then we’re observing everything in the composite. So, when you register with a flock, the flock composite makes sure you get registered with all its children, which may include other flocks.