
Chapter 7. Video Hacks
Introduction: Hacks #68-74
Except for the CPU and memory, the video card handles more data more often than any other component in your PC. It’s possible for a 1024768 display with a color depth of 32 bits (4 bytes) refreshed 60 times per second to move tens of megabytes per second—if the entire screen refreshed with new data at each screen refresh interval. This is a lot of data, and it does not include the processing and rendering the video card’s CPU has to handle to generate a constantly dynamic display. Enhancing video performance is most important to graphic designers and gamers, but it can also make Windows less sluggish and clunky for the rest of us.
Overall video performance is affected not only by the speed, quality, and features of the video adapter card (which in some cases you may overclock just as you can your CPU and system RAM) but also by which I/O interface your video adapter uses—ISA, PCI, or AGP (including video adapters built onto the system board).
The ISA and PCI buses can be used for just about every type of I/O device there is, from modems to network to video adapters. A lot of activity is going on within these buses. The 16-bit (2-byte wide) ISA bus runs at 16 MHz, yielding a maximum throughput of 32 megabytes per second (MBps). The 32-bit (4-byte wide) PCI bus runs at 33 MHz, yielding maximum throughput of 133 MBps.
The AGP bus is dedicated specifically to graphics—a straight pipe from the PC’s CPU to the display—and it’s fast! The 64-bit-wide (8-byte) AGP bus runs at 66 MHz, providing 266 MBps throughput; AGP 2x’s throughput is 533 MBps; AGP 4x’s is 1.1 GBps (gigabytes per second); and AGP 8x yields 2.1 GBps throughput, all of it dedicated to graphics. By all means, if you are still using an ISA bus video adapter, it is time to upgrade to at least a PCI adapter, if not a new system board and AGP video.
The hacks in this chapter are all about getting and maintaining the highest video throughput numbers you can, which will affect both 2D normal desktop appearance as well as 3D graphics. Data bus throughput numbers are important because the data has to get from the CPU to the video adapter somehow—the faster the better. In rare cases, overclocking may achieve a 50% increase in video performance, but a 10-20% increase is typical.
The real measure of video performance lies in the results of various benchmark tests, such as the free FutureMark (http://www.futuremark.com) 3DMark test suite. This is the most popular among those who will do nearly anything to boost graphics performance: gamers.
Within 3DMark and similar tests are measurements of several graphics performance qualities. Specifically, the number of pixels (picture elements) processed per second is evaluated for 2D performance testing, and the number of texels (texture elements) processed per second (measured in millions of texels) is evaluated for 3D performance testing. The higher the texel and pixel test results are, the better.
Pixels are the individual dots of light you see on your computer screen, made up of a combination of the three colors used by your video display (red, green, and blue). The data that creates the appearance of each pixel consists of a pixel address (in row and column) and how intense each color is to be. The color depth, or resolution, you can obtain depends on how much data is used to define the brightness of the colors, from 8 bits (256 colors) to 32/24 bits (16.8 million colors—8 of the 32 bits are used for a transparency layer called the alpha channel) and even higher. High pixel data transfer performance is important for overall text and graphics display speed and appearance. Texels are pixels that are given special attributes that help produce a three-dimensional appearance of depth and are treated differently in video data processing to provide this effect; thus it is important to have high texel performance to avoid clunky and rough-looking 3D.
Full-motion video benchmark tests are used to evaluate the video frame rate—our current standard is 24 frames per second—as we see in big-screen movies. Normal broadcast and cable television images refresh the screen twice at 60 times per second, yielding a picture that is completely refreshed at 30 screens or frames per second. In video gaming, the mantra is “Frame rate is everything.” The closer our PC’s video performance gets to live TV, the better (and better yet if it can exceed TV).
Get off the PCI Bus
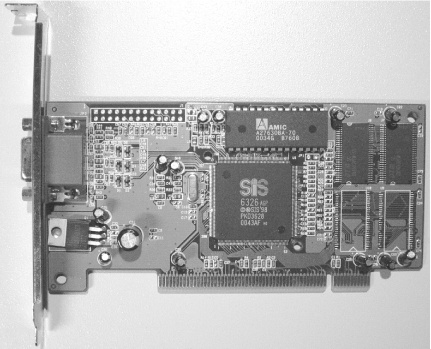
If your PC lacks an AGP port, you are stuck with PCI. You may find a PCI video adapter (see Figure 7-1) with more video RAM and higher performance than the card you have now, but that’s about as far as you can go with PCI. If you have an AGP bus connector on your system board, by all means get down to the computer store and pick up a late model nVidia GeForce or ATI Radeon card to get that well-deserved, long-awaited performance boost. An AGP video adapter can perform 15 times faster than a PCI adapter. It may not improve your game skills, but you’ll better enjoy the playing you do.
Before you simply grab the latest AGP card and plug it into your system, you need to know which level of AGP performance and what voltage your system board’s AGP I/O slot supports. Specifically, will the slot support something better than the original AGP 1x cards? Will it take an AGP 2x, 4x, or 8x card? AGP 8x cards are not backwards compatible, so an AGP 8x card will not run in an AGP 1x, 2x, or 4x slot; the slower slots do not have the proper clocking or voltage to run an 8x card. Plugging an AGP 2x card into a 1x slot will not give you the 2x performance increase you may be expecting; the slot does not provide the higher clock speed for 2x, and similarly a 4x card will not run as fast as it can in a 2x slot.
Upgrade from Built-in Video
Untie yourself from that low-performance built-in adapter by upgrading to an after-market AGP video adapter.
If your system has a built-in video adapter, there is the possibility that some of your main memory is shared over to the video system. This is not a good thing, since system memory is much slower and functions differently than video RAM. The RAM on your video card is typically dual-ported, meaning that it can be written to (by the PC) and read from (by the video processor) at the same time, saving critical timing cycles. When system RAM, which must be written to and read from in separate timing cycles, is used for video, its contents must be moved into video RAM and processed before it can be used for display.
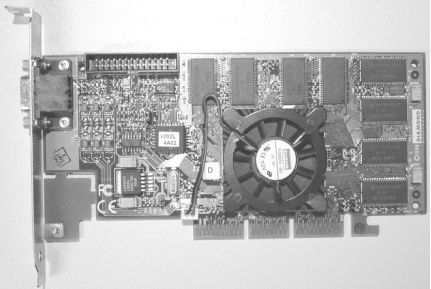
If you have an AGP slot available and can disable the on-board video, get a late model AGP-based video card like the one pictured in Figure 7-2
Don’t Expect Much from AGP Aperture Size
Setting the AGP aperture size is not a performance boost, but it will let your AGP adapter work to its maximum rendering and display capabilities.
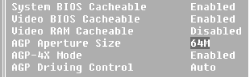
AGP aperture size is a value in BIOS setup, shown in Figure 7-3, that establishes a range of memory-addressing space that may be used for video texturing. It does not:
Immediately set aside the amount of memory the aperture size is set for.
Need to be set proportionate to the amount of system RAM.
Have a direct correlation to video performance.
Additionally, it may be set lower than the amount of RAM on your video card.
When your operating system initializes for an AGP video card, it maps the aperture to a collection of 4 KB pages of main memory. This memory may never be used as you work with your PC, some of it may be used from time to time, or all of it may be used, depending on how graphic-intensive your applications are. These memory blocks are not one big chunk of system memory carved out all at once, nor are they all in one section of memory. Instead, they are fragments, but AGP requires its memory to be addressed as a continuous block—and this block is the AGP aperture, a range of memory above that of the physical system memory used to give AGP its required continuous addressing block to work with. Generally, the AGP aperture may use only half as much system memory as the aperture size is set for and may never use any or all of that amount.
Performance tests run by a number of independent sites (http://www.tweak3d.net/articles/aperture-size/, http://www.cybercpu.net/howto/basic/AGP_aperture_2/, and http://www.adriansrojakpot.com/Speed_Demonz/New_BIOS_Guide/AGP_Aperture_Size.htm) indicate the proper setting to be either 64 or 128 MB. The 3DMark tests I ran showed no performance difference between the two settings, so I leave the AGP aperture set at 64 MB.
Warning
Video performance can be inhibited by the wrong aperture size. Setting the AGP aperture size below 32 MB or above 128 MB has been found to cause system crashes for some experimenters. It is suspected that the video driver requires a minimal aperture size to work in and some cannot handle the larger aperture size, probably due to deficient programming.
Choose the Correct AGP Mode
Tell your system BIOS to throttle up the AGP bus for the best video data throughput.
Most recent video cards support AGP 4x and 8x, but not all system boards do. AGP 1x and 2x run off 3.3 volts, while AGP 4x and 8x use 1.5v power. AGP 4x and 8x cards are keyed so they will not plug into a 1x- or 2x-only slot.
Maximum performance is obtained by using the highest AGP clocking value your system and video card will support. In other words, if you have an AGP 8X card and you have a BIOS parameter that sets the AGP mode (2X, 4X, 8X) that is set to 4X, your AGP card will not be running at its best performance. This parameter may be automatically set by your BIOS (you see only a display of the automatically determined parameter), or you may be able to override the setting to a lower or higher value than appropriate. If your system BIOS defaults to a 1X setting but you have a 2X video card, by all means set the value to 2X. If your system BIOS defaults to a 4X setting but you have an 8X video card, set the value to 8X.
The AGP Mode setting can be found in your BIOS settings (see Table 1-1 in [Hack #3] ), usually under Advanced Settings or Advanced Chipset Features.
Overclock Your nVidia Adapter
Specifically designed for video adapters that use the nVidia chipset, nVidia’s Detonator driver or the RivaTuner utility give you control over your video clock speeds.
The first thing you need to make your nVidia chipset overclockable is a small bit of Windows Registry hacking, which is made simple by downloading a file named geforce_overclock.reg within geforce_overclock.zip (link and content subject to change) from http://www.softpedia.com/public/cat/12/1/12-1-31.shtml. To merge the Registry entries in this file into the Registry:
Download and unzip geforce_overclock.zip.
Locate and double-click the reg file within the zip file to merge it into the Registry.
Click OK and reboot. First part accomplished.
Tip
If you want to manually apply this Registry hack (or if you
can’t find the download), launch regedit.exe (click StartRun and then type
regedit and press Enter),
navigate to (or create) the key HKEY_LOCAL_MACHINESoftwareNVIDIA CorporationGlobalNVTweak, and add a DWORD
value named CoolBits and set its
value to 3.
With the geforce_overclock Registry modification applied, if you already have the nVidia Detonator driver and utility software, you’re all set to begin the overclocking by following these steps:
Right-click the desktop and select Properties.
In the display properties dialog, select the Settings tab
Select the Advanced button.
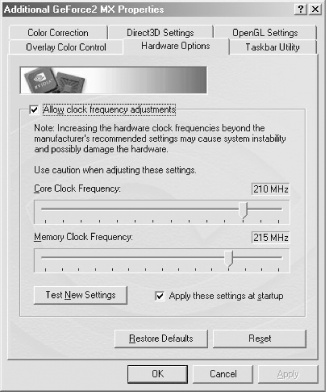
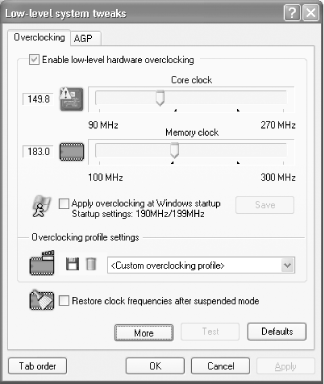
Select the tab with the name of your card, and you will be taken to a dialog with an option named Clock Frequencies, similar to the one in Figure 7-4.
You can now control the frequency of the nVidia’s card memory and core speed independently.
Warning
nVidia and other video card manufacturers warn that overclocking your video card’s CPU or memory can damage it. While no one is specific about the damage overclocking causes, you can expect excessive heat build within the chips that can cause catastrophic failure of the components.
If you overclock your video card, you should invest in and apply a larger heat sink to the video CPU and provide additional cooling across the entire card to help maintain lower overall temperatures and reliability.
If your nVidia Riva-based card doesn’t use the Detonator driver, set you can still ramp up your adapter with the RivaTuner utility shown in Figure 7-5, from http://www.guru3d.com/rivatuner/. RivaTuner is a simple but effective way to speed up your video.
Tip
While most of the current tweaks, Detonator drivers, and overclocking utilities indicate they are for nVidia’s GeForce and Quadro products, as you see here, they work fine on the Riva and Riva TNT products dating back to 1998 also, giving new life to an older but still capable video card.
Overclocking the CPU or “core” speed of your video card yields overall performance and frame-rate improvements proportionate to how much you increase the video card CPU speed—a 10% increase in CPU clock yields an 8-12% performance increase. In my test case, a Riva TNT-based video card running a default 90 MHz displayed an average of 12-13 frames per second (fps) before running the core clock up to 100 MHz. As mentioned earlier in this chapter, frames per second is but one measure of performance. Fps is a great benchmark for full-motion video and gaming action, but the overall quality of textures can still suffer at high frame rates, so your card needs to have high performance in rendering texture elements and smooth texture transitions. In addition, some video presentations are set at a specific frame rate, and no amount of overclocking will improve them. I experimented with an old Diamond Viper 770 card using a Riva TNT chipset and found the frame rate already maxed out at normal speed, and it did not change with higher clock speeds, but other performance measurements and the appearance of benchmarking video tests with 3DMark2001 showed calculated improvements of 8-10% and significant appearance-by-eye improvement after increasing the clock rate by 30%.
Overclock Your ATI Radeon
Perhaps the simplest and safest way to determine and set the highest speeds for your ATI adapters.
The easiest and safest way I found to kick up your ATI video adapter and get a performance increase is with a nicely written, easy-to-use program called ATITool, shown in Figure 7-6.
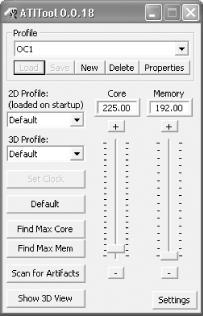
It is available for download from http://www.techpowerup.com/atitool/. ATITool is known to overclock cards with the ATI Radeon 9000, 9200, 9500, 9600, 9700, and 9800 chips, but it should work on other older ATI cards as well. ATITool will test your adapter for both the maximum core video processor speed and the highest memory speed your card will work at reliably. When it finds the fastest and safest values, you can store them away, lock them into the adapter, and have them set every time you boot your PC.
Before overclocking, an ATI Radeon 7000-based video card running at its default 183 MHz core and memory clock speeds in a 533 MHz Pentium III ran at an average of 13.6 fps. Overclocking by 10.3% to 202 MHz provided a performance increase of 12%.
Overclock Anything
PowerStrip, shown in Figure 7-7, detects and allows overclock settings for dozens of different video adapters.
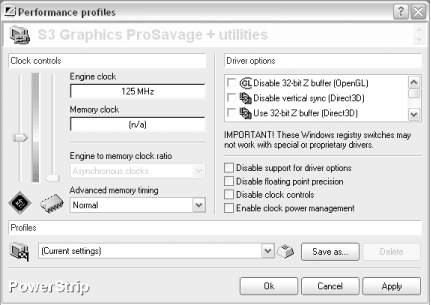
A trial version of PowerStrip is available for download from http://www.entechtaiwan.net/util/ps.shtm. The program runs resident and provides access to its settings through a right-click on its icon in the system tray. Myriad general video monitor and performance settings are available. PowerStrip Version 2.78 can soup up legacy video cards and chips, such as those from 3dfx, Number Nine, Cirrus Logic, Rendition, S3, and Tseng Labs.
Using PowerStrip to overclock an ATI Radeon 7000 card in a 2.1 GHz AMD Athlon system, I measured a 10% frame-rate performance increase for a 10% increase in clock speed. Overall performance changed only 2%, leading me to believe the card was already maxed out due to the high PC system speed.