
Chapter 1. Basic System Board Hacks
Introduction: Hacks #1-10
With the exception of your PC’s unhackable power supply, hacking your PC starts with the lowest level of detail within your system board—from how fast the clock is that makes the CPU tick to how the I/O bus is configured for your hard drives and peripherals. Hacking starts with the Basic Input/Output System (BIOS) setup program, which affects the CPU, memory, chipset, and peripherals.
While some PC users think in terms of exotic mice, expansive flat-panel LCD screens, and high download bandwidth speeds, there are myriad mysteriously-named parameters and features within the system BIOS. These parameters may control everything from CPU and memory clocking to I/O device configurations and system passwords. The right amount of parameter tweaking at the BIOS level can squeeze another few million-instructions-per-second (MIPS) or microseconds of faster video or hard drive performance out of the bones of your system.
Of course, like anything functional, the right bones or foundation elements have to be in place—in this case reliable and capable system components (CPU, chipset, and memory) and a BIOS, the essential innards of any PC, that can be tweaked. Tweaking or hacking a system board is done with software settings in the BIOS setup program, hardware jumpers, or dual-in-line-package (DIP) switches, so you must have the manual for your system board handy to be able to locate the correct jumpers and switches. I recommend you also have a small flashlight handy so you can see, as well as a pair of needle-nosed pliers to move jumpers around, and the right screwdriver to be able to get into your PC’s case. Other than these tools, all you need is a steady hand and attention paid to the keystrokes needed to navigate your PC’s setup program.
Before you hack the system board, CPU, BIOS, peripherals, or operating system, there are a few basic things I need to cover to get you out of any trouble you can get yourself into with the hacks in this and subsequent chapters. Hacking your system BIOS has potential dangers: one slipup and things can quit working. Fortunately there are some easy ways out of most mistakes made at this level of system hacking.
Your PC’s system board typically comes to you “factory fresh” without any tweaks or parameters set to abnormal values. Once you start reconfiguring the system, almost anything can happen—from not being able to boot up at all, to partial boot and system crash, to partial boot and all else is pending a password you forgot or never knew. These hacks will get you around a couple of common mistakes and problems that will inevitably come up as you work with numerous PCs.
Lock Others Out of Your Computer
Of course, the opposite of a password that keeps you out of your system is a password that keeps others out of your system. The BIOS in some PCs may provide no password protection at all, a single password that controls access to BIOS setup and allows the system to boot up, or two passwords—one for access to BIOS setup (a Setup or Supervisor password) and bootup, and the other to control access to booting up only (a User or Boot password). To set a password for your system, look in the setup menus for security settings, as shown in Figure 1-1.
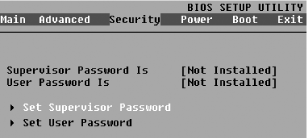
A User or Boot password keeps the system from booting up—a measure of intrusion and system hacking protection. A System or Supervisor password keeps lurkers out of your BIOS settings, and keeps them from changing the User/Boot password.
If you are going to set a User or Boot password, be sure you also set a Setup or Supervisor password so the BIOS settings and boot password cannot be changed and so someone cannot set a Supervisor password to keep you out of the system, requiring you to bypass the BIOS password [Hack #2]. Because there is a back door, the only way to prevent attackers from circumventing the password is to use a case that can be locked shut with a key or a locking cable.
Bypass the BIOS Password
Recover from a CMOS memory-affecting virus or work around a boot-time password by making BIOS forget all it once knew.
A PC goes through a process when it is first turned on: the Power-On Self-Test, or P.O.S.T. Some system boards provide security measures [Hack#1] that demand a password before beginning the P.O.S.T. process or allowing you into the BIOS setup program.
The original IBM-PC (1981) did not provide any security measures or a BIOS setup program; all it had was a P.O.S.T. If you needed to configure a PC, you did it with switches and jumpers. A program to set up the system BIOS and configuration did not come along until the IBM-PC/AT (1984), and it had to be run from a special boot-up diskette. The idea of providing a user interface and access to the system configuration settings within the BIOS did not come along until about 1986. Today no PC system is made without this valuable built-in setup feature. Eventually, the security feature of password-protecting access to the system came along.
If, after turning on your PC, you are prompted for a password instead of greeted with a fancy logo screen or the technical gibberish that suggests the system is getting ready to let you use it, then a security feature has been turned on that we call a " pre-boot password.” Without the right password to get past this point, the system is basically dead in the water—game over, do not pass go and collect $200—unless or until you reset the BIOS setting. But how do you do that without getting past the password to the setup program?
Tip
This hack is also very effective for putting the system board back into “factory stupid” mode where it knows nothing about your system components and forgets all of your parameter tweaks. This is very useful if you’ve performed a hack that renders the system unbootable or unstable.
The goal is to get the system to forget that it needs a password and forget what the password was. The password data is stored with the rest of the system configuration data in a small amount of memory that is kept alive using a small battery or internal power cell. To clear out the data, you need to remove the power from this memory element. This means the system will also lose any system configuration that was saved. You’ll need to later reconfigure the system parameters so you can boot your operating system.
Warning
For this and many subsequent hacks, you will be working with electrical components inside your PC. We want you to get through the entire book and enjoy your computer for a long time without risk of electrical shock or component damage. When the cover is off your PC and you are removing or adding components—be they add-in cards, RAM chips, CPUs, or fans—especially when you are handling the screws to hold things in place, ALWAYS turn the PC’s power OFF and unplug the power cord from the back of the PC.
Disconnecting the power cord removes the risk of exposure to high voltages and accidentally turning the power to the system board on. Disconnecting the power cord also allows the PC chassis to become ungrounded, which reduces the potential difference between any static charge in your body and the chassis so static shocks are less likely.
It is also recommended that you use an anti-static wrist strap connected to the PC’s chassis for further protection of delicate electronic components.
To perform this hack you will need:
A #1 or #2 Phillips-head screwdriver, or (less likely) a T-15 TORX driver or a 1/4” hex nutdriver, to open the case
Needle-nosed pliers if you are working with jumpers
A small flashlight or headlamp
With tools at hand, perform the following steps:
Turn the PC off (this means a total shutdown, not merely standby or hibernate mode) and disconnect the AC power cord.
Remove the cover from your system (this step may require tools, undoing a thumbscrew, or flipping a latch or two).
Refer to the user manual for the motherboard to find out how to “reset CMOS” memory. You may also find a label for specific jumper or switch settings marked on the system board.
Change the switch setting or jumper position to a specific position or remove the jumper entirely as prescribed in the manual to clear or reset the CMOS memory.
Wait 20-30 seconds for the memory to clear out from lack of power.
After 20-30 seconds put the switch or jumper the way it was before for normal use.
Reconnect the power cord and start up the system to see if the settings have changed to defaults.
Shut the PC down, disconnect the power cord, replace the cover, reconnect the power, and power up the PC.
Enter the BIOS setup program to configure the system as needed. This may include setting the date and time, selecting disk drive parameters, and selecting which devices the system uses to boot up with first.
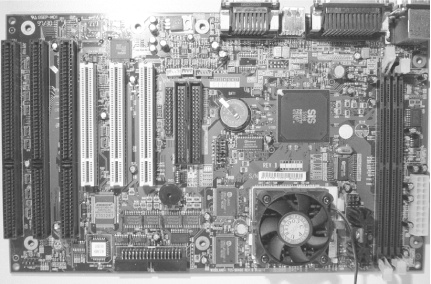
If your system does not have a “reset CMOS” jumper or switch , the only option is to locate and remove the coin-style battery cell (or on some very old PCs, the battery pack), as shown in Figure 1-2, that provides the power to the CMOS memory.
Follow Steps 1 and 2 above, locate the battery, and remove it. Leave the battery out of the system for 20-30 seconds, replace it, and start up the system. The CMOS memory in some systems may retain settings longer than others. If the CMOS memory does not clear and you’re still stuck, you may need to leave the battery out for several hours before reinstalling it.Once the system is able to perform P.O.S.T. and to start booting up the system, you will need to get into the Setup program for the BIOS and make a few basic adjustments, such as:
If you expect to perform more hacks with jumpers, switches, cables, chips, or disk drives, you’ll probably find it convenient to leave the cover off your PC, but beware: we do not want to cause more trouble than we’re trying to solve. You could be exposing yourself to dangerous voltages (inside the power supply) or exposing the internal wires and connections to disk drives and plug-in cards to your tools, screws, and other wires that could come in contact with them. At this stage, spilling your favorite beverage or dropping your tools anywhere inside the PC chassis is not advised.
Tip
You may find one of many possible " backdoor” passwords for your BIOS that allow you access to the system setup program and bypass boot passwords at either of two web sites: http://www.labmice.techtarget.com/articles/BIOS_hacks.html or http://www.pwcrack.com/bios.shtml.
Recover a BIOS That Won’t Boot
Recover from hacking your BIOS into an unbootable state by starting from scratch with safe defaults for the BIOS settings.
The P.O.S.T. was designed to do many things, from taking inventory of the system components to testing them. Through years of PC development the P.O.S.T. has been modified to accommodate many new and special features of system boards, new CPUs and chipsets, a variety of disk drive types, myriad Plug and Play devices, and USB ports, as well as when the BIOS turns over control to which type of bootable device and operating system. Adding the ability to configure various settings has put the BIOS and P.O.S.T. at risk of tampering and corruption.
If your PC simply will not leave P.O.S.T. and start to boot up an operating system, or if it begins to boot up an operating system but you’re getting “no operating system found” or memory errors, or the operating system locks up before you’ve had a chance to use it, chances are something is amiss in the BIOS settings. It’s possible that your system BIOS has gotten really confused by an odd system or power glitch, configuration settings you changed such as overclocking or memory timings, or even a rare CMOS-attacking virus.
Your best bet under these circumstances is to reset the BIOS into a “safe” or default mode, one without special tweaks, adjustments, timing changes, and so forth. You have two choices to effect a default configuration of the BIOS. The first is to clear the BIOS configuration memory [Hack #2] so that things start up fresh with no unusual settings.
Tip
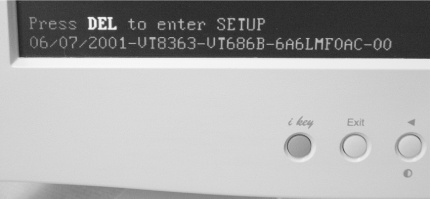
Access to the BIOS setup program varies widely between different BIOS vendors and system board makers. You may see a hint like “Press F2 to enter Setup” appear on your screen as the system runs through P.O.S.T., or the proper key combination may be hidden behind the PC maker’s graphic logo at startup. Refer to your system’s manual or to Table 1-1 for access to the most common BIOS setup programs.
This hack provides another way, which is relevant if you can access the system setup program, by whatever magical combination of button pushing or keystrokes is appropriate for your system board. Table 1-1 shows typical keys used to access the setup program for various systems’ BIOS.
System maker/BIOS brand | Keystrokes to enter setup |
American Megatrends/AMI BIOS | <ESC> |
Award BIOS | <DEL> |
COMPAQ | <F10> |
Dell | <F2> |
Gateway | Varies by brand of BIOS |
HP | <F1> |
IBM | <F1> |
Intel | <F2> |
Phoenix | <F1> |
Miscellaneous/Various | <Ctrl>+S <Ctrl>+<Alt>+S |
Once you have entered the BIOS setup program, you’re going to be looking for a menu selection or key to press to set factory or “safe” defaults for all of the parameters. In some versions of Award BIOS this may be done using the F5 or F6 keys. Figure 1-3 shows a Phoenix BIOS for an Intel system board for which the safe defaults can be restored by pressing the F9 key.
If there is no single keystroke to set all of the parameters to defaults, you will have to accomplish this the second way, by checking each and every parameter and changing them all to default or “auto” settings. Some setup programs provide some very terse “help” on the screen to give you an indication of what the setting should be. If the setup program is of no help, you should refer to the manual that came with your system board or documentation on the manufacturer’s web site. If all else fails, you will need to take extreme measures [Hack #2] .
You may have to make some minor adjustments in the BIOS settings to allow the system to boot up properly, and if you wish to continue tweaking after that, change only one setting at a time and make note of what you change each time so you can determine which tweak causes the problem. The technical term for this process is trial and error!
Boot Faster
Some of the stuff your computer does at boot time is of no use. Disable those features to boot faster.
The system BIOS does a lot of work in the P.O.S.T. phase before it gets your system to the point where it reads boot-up information from a disk drive to load an operating system. Some of the things that happen in P.O.S.T. have nothing to do with system performance other than impeding the process of getting to the operating system to run your applications. Intel, AMD, AMI, Award/Phoenix, and the PC manufacturers were aware of this waste of time, evaluated the events involved, and in many cases took steps to reduce the number of items and the amount of time the startup process takes. To that end there are a handful of changes you can make in order to boot up faster:
- Disable Extended Tests
Many systems offer the option of allowing an in-depth test of system memory and components (an extended test) or zipping through the system and getting to bootup as quickly as possible. With RAM as reliable and economical as it is (and having so much of it) and having Plug and Play operating systems like Windows and, to some extent, current versions of Linux, the Quick Test mode is more than adequate, and preferred for faster boot times. This parameter is shown in Figure 1-4 and specifies the depth, and thus the time involved, for testing system RAM and finding and checking the basic components of the system—COM and LPT ports and such.
- Configure Drive Detection
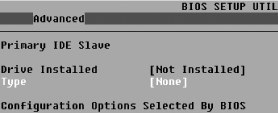
Most BIOSes provide the capability to automatically search for, identify, and configure different types of drives across four possible IDE and Serial ATA connections. This parameter setting usually shows up as AUTO in the IDE configuration choices. If you leave the parameter for all four possible IDE or Serial ATA devices set to AUTO, your BIOS will waste a lot of time searching for nonexistent devices. For faster boot times set the parameter to NONE as shown in Figure 1-5 for any unused interfaces and connections that have nothing attached to them.
- User BIOS Regions
This parameter, if it exists in your setup program, instructs the BIOS to search upper DOS memory (between 640 KB and 1 MB) for the existence of additional BIOS extension code. Such code exists on SCSI host adapters and on network cards that provide the ability to boot from a network server. Most PC users will never encounter a SCSI interface, nor systems configured to boot over a LAN through a network card, so there is no need to set this parameter to anything but No, Off, or Disabled and save yourself a couple more seconds at boot time.
Display a Boot-Time Graphic
Many computers will display a graphic at boot time. Make it one of your own.
Intel and most of the PC OEMs want to remind you who made the system, so they have built in a boot-time graphic as seen in Figure 1-6. Boot-time graphics are an alternative to the technical bits and bytes that have traditionally appeared on PC boot screens. Displaying the graphic takes extra time in order to load up the graphic image stored in the BIOS memory chip and configure the video to display graphics. As techies are interested in faster performance, product logos are not of much interest.

If your system BIOS is stored in FLASH RAM (instead of a conventional old-style EPROM), it may be possible to load your own graphic into the BIOS chip. To perform this hack you need a BIOS that supports boot-time graphics and the appropriate software programs to make the changes and write them into your BIOS FLASH ROM chip. Most implementations of Award BIOS Versions 4.5 and up support boot-time graphics display. You will need a couple of software programs, as follows:
A graphics program to either create a new graphics file or convert an existing one to a 64048016-color uncompressed BMP graphic file for display at bootup (I didn’t say it would or had to be an impressive graphic, just a graphic file)
The appropriate AWDFLASH.EXE program for your system board (from the manufacturer’s web site)
A program to add the graphics file to your BIOS—either the CBROM program from http://www.stormpages.com/crazyape/cbrom.html or AwardMod through http://sourceforge.net/projects/awardmod/.
With these tools available, proceed through the following steps to use CBROM to modify your BIOS file:
Make or obtain a bootable DOS or Windows 95-Me startup diskette.
On a blank diskette, copy the AWDFLASH.EXE program (approximately 28 KB), the CBROM program (78 KB) and your graphics file (approximately 16 KB), with enough room for two copies of your BIOS (256 KB each).
Boot up with the diskette from Step 1. When you finally get a DOS prompt, change diskettes so the diskette of Step 2 is in the diskette drive.
Run the AWDFLASH program and follow the instructions to make a copy of your BIOS file on the diskette. Exit the AWDFLASH program back to the DOS prompt.
Make a copy of the BIOS file you just saved so you’ll have two copies—one to tinker with and one as a backup file.
Run the CBROM program to merge the graphic file into the BIOS file, substituting the appropriate filenames in a single command line as follows:
cbrom yourbios.awd /logo yourlogo.bmp [Enter]
Run the AWDFLASH program and follow the instructions to load your new BIOS file into the BIOS FLASH ROM.
Remove the diskette from the drive and restart the system to enjoy your new boot-up look.
If you choose to use the AwardMod program, which runs in Windows, follow Steps 1-5 above, skip the rest, and then follow these steps:
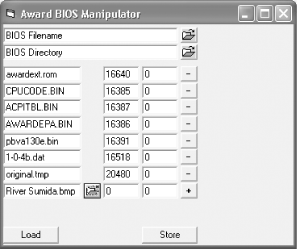
Restart your system to Windows and run the AwardMod program, shown in Figure 1-7.
Select the BIOS filename and directory (on the diskette), and then click the Load button to begin working with the BIOS file.
At the bottom of the listing you’ll see an open file folder icon. Click this icon and browse to find and open your logo BMP file. The filename will appear in the listing.
Click the Store button to merge the logo into a new BIOS file and save it, then exit the program. Make sure the new BIOS file is on the diskette.
Replace the diskette with a bootable diskette, and then reboot the system to DOS.
Switch to the diskette with the FLASH program and new BIOS file.
Run the AWDFLASH program and follow the instructions to load your new BIOS file into the BIOS FLASH ROM.
Remove the diskette from the drive and restart the system to enjoy your new boot-up look.
Warning
The logo-replacement process involves rewriting a major portion of the data stored in the FLASH ROM containing your BIOS. Replacing the original startup graphic with your own certainly adds a bit of class to your system and identifies you as the “creator” of your PC, but it is not without risks.
Make sure you use a stable AC process power source with an Uninterruptible Power Supply (UPS) and that nothing disturbs the system during the FLASH process or your BIOS will be destroyed [Hack #10] .
Be sure to make a backup of your BIOS using the appropriate FLASH ROM tools provided by your system board maker before hacking into logo land. You’ll need the backup file to load the original BIOS back into the system if you make a mistake.
Configure Boot Device Order
Don’t wait for the floppy disk or CD-ROM to time out before the system boots.
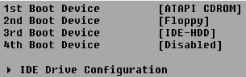
One advantage of modern BIOS and hardware capabilities is that they allow you to boot up from something other than a diskette or hard drive. BIOS can now fetch and run an operating system from an appropriately capable and configured LAN adapter or a bootable CD-ROM. You can tell the BIOS which devices it should try to boot up from, and in what order.
For a faster boot time you probably want your hard drive to be the first device in the list, as shown in Figure 1-8, ignoring the presence of diskettes or bootable CD-ROMs, although some BIOSes will detect the presence of a bootable CD-ROM and offer the option of booting off the CD regardless of the boot device order you set. Skipping the process of looking for a bootable diskette or CD-ROM by telling the BIOS to boot from the IDE hard drive first can shave anywhere from a few seconds to tens of seconds off your boot time.

If you do choose to put the hard drive first in the boot order, you will not be able to boot up from a diskette or CD-ROM. You can come back to this parameter to change the boot device order to boot from a device other than the hard drive, as shown in Figure 1-9, when you need to run a diagnostic program, load a new image onto the hard drive using a program like Symantec’s GHOST, or reinstall the operating system.
If you want to boot from a drive connected to a USB port, you must have a BIOS that supports booting from USB ZIP, USB FDD, USB HDD, or alternate devices as one of the boot options.
Set Your Clock Back
Avoid or test date- and time-related features of your programs by setting the system clock back or ahead in the BIOS.
Setting the system date and time backwards or forwards is one way to see how a program behaves on different dates, ensure that a scheduled event runs, or make sure a program expires when it is supposed to.
Tip
This hack is most useful for testing purposes only. In normal use it is not practical to hold your system clock back or force it forward because scheduled events such as backups, virus scans and updates, file records, and data such as email arrival and send times will become very confused and may not function properly.
This hack will probably not let you bypass the expiration dates of trial software, Windows XP activation, or other rights-management technologies, as many of these programs keep track of radical time setting changes or number of uses in the registry or protected files. I certainly do not advocate such deceptive practices.
You might think that waiting until the operating system is done loading and then using the date and time functions at a DOS prompt or within Windows would be sufficient to fool a specific program, but some programs may not be easily fooled from within Windows.
Don’t wait for the operating system; make these time-altering changes in the BIOS setup program to ensure that the operating system starts with the date or time you want—date and time setting is a basic function within setup. Be careful of changing the date if you’re going to run your real, live accounting software (or other time-specific programs you rely on) or you could end up unbalancing the books.
If you are using the Windows Time service or one of many “atomic clock” programs to obtain an accurate date and time from one of the many online time servers, be sure to disable these in Windows before resetting the date and time in BIOS. Follow these steps to disable the Windows Time service:
Go to StartControl PanelAdministrative Tools.
Double-click Services.
Scroll down to find Windows Time and either double-click on the service name or right-click and select Properties.
At the “Startup type:” box, select Disabled.
Click OK to save the value and close the dialog.
Restart your PC, and then enter the setup program and adjust the date and time to suit your needs before restarting Windows and running your application or tests.
Avoid the Legacy USB Option
Save yourself from boot-up delays and Windows device detection confusion.
The Legacy USB setting tells the BIOS and operating system to detect and enable USB keyboards and mice in the absence of normal PS/2-port devices. Setting this parameter to Yes, On, or Enabled is important and necessary if you have only a USB keyboard and mouse and need to use them in non-Windows operating systems, such as DOS, OS/2, some self-booting diagnostic/maintenance programs, or the early stages of some Linux setups.
If this parameter is on or enabled and you use a normal PS/2-port connected keyboard, with no USB-connected keyboard attached, Windows 95 and 98 may hang up looking for a USB keyboard that does not exist. Disable or turn this setting off, or you could be fighting with the system for a long time and it will probably win. Your system may also boot up faster if it does not have to waste time looking for a nonexistent device.
If you have a conventional or PS/2 keyboard and mouse, you never need to enable this capability. For Windows 98SE, Me, and XP, which have native USB support built in, you need to make sure this parameter is set to No, Off, or Disabled as shown in Figure 1-10.
Hack an Unhackable BIOS
You may be able to find a BIOS upgrade to work around that unhackable, squeaky-clean OEM BIOS.
By this point you may have discovered which feature hacks your BIOS supports, if any. Your PC may contain a “dummied-down” BIOS that provides very few setup options to choose from, while a truly hackable BIOS will give you parameters aplenty.
Most “no name,” “white box,” do-it-yourself PC system boards come littered with hackable bits through switches, jumpers, or the BIOS. These boards are the subject of the majority of hacks, overclocking, modifications, BIOS upgrades, and just plain “geeking out” on what a PC can be made to do. You’ll get hours of enjoyment fiddling with every bit and parameter you can find and perhaps encounter hours or days of frustration if one of your hacks causes you to lose data or massive quantities of that soft, furry stuff atop your head.
If you’ve got an " OEM system”—one with a recognizable and sustained brand name such as Compaq, Dell, Gateway, HP, IBM, NEC, Sony, or Toshiba—chances are you will not find any parameters worth hacking on—you’ve got a “dummied down” BIOS.
The unhackable BIOS exists for one very simple reason: the manufacturer wants this PC to work for the broadest, simplest set of PC users. In other words, it does not want to have to bear the cost of support calls related to hacked BIOS settings. Completely understandable if this is a family PC but very frustrating if you’re a real techie and wish to experiment.
All hope may not be lost. Many vendors use the same or a similar version of system boards that you can get off the shelf or by mail order. For instance, I have an HP Pavilion system that uses an Asus A7V-M and by coincidence an individually boxed Asus A7V I bought to build into my own case. The HP Pavilion A7V-M board uses a “dummied down” Award BIOS, while the boxed board uses a fully hackable Award BIOS. The “dummied down” BIOS in the HP does not allow me to change CPU or memory timing, which are critical to the overclocking hacks [Hack #25] and [Hack #27] .
BIOS upgrades can afford you the benefit of new hacking capabilities, provide fixes to known bugs, or provide support for newer features and hardware such as larger hard drives. Furthermore, these upgrades may come with bootable CD-ROM support that may not be included in the original BIOS.
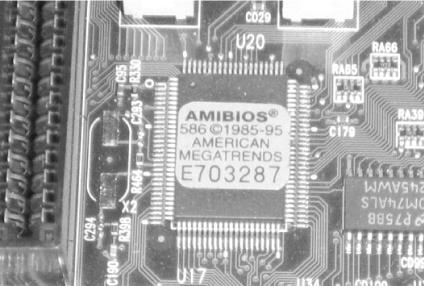
If the P.O.S.T. display for your system board does not show either the AMI, Award, MR BIOS, or Phoenix brand name as appears in Figure 1-11 when it boots up, you’re probably stuck—no hacking allowed. If you do see the brand name of the BIOS you may be in luck, as you may be able to take advantage of this Hack by getting an upgraded BIOS from Unicore at http://www.unicore.com.
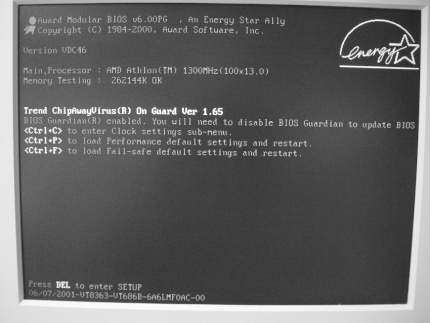
Unicore provides a small program they call the BIOS Agent that can sniff out details of your present BIOS. They also have a list of tips to identify your BIOS if their program cannot do it. The best way to identify your Award BIOS is from the absolute version number that appears at the bottom of your screen at boot time, as shown in Figure 1-12. You can press the Pause/Break key on most PCs to stop the system from booting up so you can copy down this information. From that information, their sales department can tell you if they can provide an upgraded BIOS, and perhaps what additional features you might get with it.
The unfortunate part of getting a new BIOS from Unicore is that you cannot merely download the BIOS code and upload it into your PC as you can with BIOS updates from the motherboard maker. A Unicore BIOS upgrade will come to you in the mail already installed on a memory chip, which reduces the chances of someone pirating their work. If your system board’s BIOS memory chip is soldered onto the board, as shown in Figure 1-13, or is not mounted in a chip socket, as shown in Figure 1-14, you will likely not be able to purchase a BIOS upgrade from Unicore.

Tip
You may notice two sets of numbers referring to the version of Award or Phoenix BIOS running your system. The number at the top of the screen—like 4.51, 6.0PG, etc.—is a gross representation of the base BIOS code set used to create the specific BIOS version you have. You will need to locate and note the longer multicharacter number that indicates the specific version for your system board. For Award BIOS this number is almost always displayed in the lower-left corner of the screen. For Phoenix BIOS this number typically appears near the top of the screen with other system board manufacturer’s information.
Upgrade Your Flash BIOS
Sometimes only after a product gets to market and is used in a lot of different situations can a vendor learn of problems or limitations. Nearly every system board and PC system on the market undergoes at least one significant revision of the BIOS after the product has been released for sale.
Most of us think nothing of seeking out the latest patches and updates for our application software and hardware drivers in hopes of solving a problem, gaining a feature, or boosting performance, but rarely do we think of updating the software and internal drivers that make our system board tick—the system BIOS.
I highly recommend visiting the web site of the manufacturer of your PC system or system board, or even Unicore’s web site, to learn what the latest revision of BIOS is for your PC and the issues the revision addresses. You may find one or more clues that can help you solve problems or gain new or proper functionality of your system for a few minutes of browsing and downloading time.
Tip
Do not bother visiting the BIOS makers’ web sites looking for BIOS updates. AMI and Award/Phoenix supply only the tools and services for system-board and PC-system makers to create their own BIOS code specific to each individual system board.
You wouldn’t think of calling Microsoft, makers of the Visual Studio program development tools, about support or upgrades for software made by Adobe, Intuit, Symantec, or other software makers who use the Visual Studio tools. Nor would you call Sears about problems with your house built with a Craftsman hammer. And so it is with the BIOS companies.
A good resource for identifying your system board is the http://www.motherboards.org web site.
In most cases, except getting a BIOS upgrade from Unicore, getting a BIOS update and the software program to load the update into your PC are free from every system board and PC maker’s web site. Since many of the devices you add to a system after the initial purchase are too new to be known to or supported by system board vendors, BIOS upgrades are issued to fix anything from an all-out serious bug that prevents some aspect of the system board from working, to enhancing the detection or size of certain types of disk drives, to adding extra support for Plug and Play or power management functions. These items should be spelled out in a readme or BIOS revision description file associated with the particular BIOS version you download.
Warning
Updating the system BIOS involves overwriting the BIOS code currently stored on the system board and replacing it with new code. This process has the potential to render your system board useless if there is an error or interruption while the update is occurring. If the BIOS file you download is incomplete or corrupt in any way, you will not be able to properly load the BIOS into the system board.
Part of the overall BIOS upgrade process should include backing up the current BIOS onto disk. If your system does not behave correctly after the upgrade, you can flash it with a new good BIOS file or use the original backed-up BIOS file to go back to a known good state.
Depending on your motherboard’s capabilities, you may or may not be able to recover from a flashing accident. Intel provides a downloadable recovery BIOS, which can recover certain Intel motherboards after a failed BIOS upgrade. You can locate your recovery BIOS by visiting http://downloadfinder.intel.com, navigating to your motherboard, and selecting the recovery BIOS, if one is available.
A typical BIOS file is either 128 or 256 KB in size, though some may be as large as 2 MB, depending on features. The typical BIOS file, along with the program for updating your system board, both fit on a single 1.44 MB DOS- bootable formatted diskette. If you lack a diskette drive for your system, as may be the case for a laptop PC, you can also use a bootable CD containing the BIOS file and update program.
Tip
Some BIOS upgrade programs are available for use under Windows, which, although convenient and more user-friendly, has the risk of failing due to a crash, conflict, or other instability within Windows. I recommend using a DOS-based BIOS upgrade program if it is available.
Some BIOS update programs create their own bootable diskettes and execute the upgrade process automatically so you need only supply the diskette. Once you have downloaded the BIOS file (usually a .BIN file extension type) and BIOS update program to your hard drive, follow the instructions provided with the upgrade (likely proceeding from Step 8 below) or all of the following steps to update your system’s BIOS.
Warning
Be sure your computer is plugged into a UPS (Uninterruptible Power Supply). All it takes is a power outage during a BIOS upgrade to render your motherboard useless.
Prepare a formatted DOS boot diskette. Any version of DOS should do, but making a DOS 6.22, Windows 95, 98, or Me startup diskette would be most common. You can also make an MS-DOS startup disk using the format program in Windows XP, downloading boot diskette images from http://www.bootdisk.com.
If in Windows, double-click My Computer, then double-click the A: drive.
In DOS or Windows, delete the following files from the diskette to make room for the BIOS files:
Copy the specific BIOS (.BIN) file to the diskette.
Copy the BIOS upgrade program to the diskette.
Restart the PC with the diskette in the drive so the system boots from the floppy. You may need to change the boot device order [Hack#6] first.
At the DOS prompt type in the name of the BIOS upgrade program and press the Enter key to run it. You should be presented with a text menu of options.
One of the options should be to copy the existing FLASH ROM BIOS to disk as a backup—do this. (Often the upgrade process will automatically prompt to copy a backup of the BIOS to disk.)
Select the option to program the new BIOS file into the FLASH ROM. If you are presented with the option, and you did not already make a backup of the existing BIOS, do so now.
Follow the prompts to upgrade your BIOS. In some cases, you will need to provide the name of the new BIOS file and let the program copy the file into the FLASH ROM.
When the programming process completes, remove the diskette from the drive and then restart the PC. If your computer displays the BIOS version at boot time, you should notice the new BIOS version appear on screen.
Go into the BIOS setup program. Verify or set the date, time, and other parameters you’re familiar with and then restart the PC. You’re done with the BIOS upgrade.