
A picture may be worth a thousand words, but it takes considerably fewer to display one with Python. The next program, PyView, implements a simple photo slideshow program in portable Python/Tkinter code. It doesn’t have any image processing tools such as PyPhoto’s resizing, but it does provide different tools such as image note files, and it can be run without the optional PIL extension.
PyView pulls together many of the topics we studied in Chapter 10: it uses after events to sequence a slideshow,
displays image objects in an automatically sized canvas, and so on.
Its main window displays a photo on a canvas; users can either open
and view a photo directly or start a slideshow mode that picks and
displays a random photo from a directory, at regular intervals
specified with a scale widget.
By default, PyView slideshows show images in the book’s image file directory (though the Open button allows you to load images in arbitrary directories). To view other sets of photos, either pass a directory name in as a first command-line argument or change the default directory name in the script itself. I can’t show you a slideshow in action here, but I can show you the main window in general. Figure 12-9 shows the main PyView window’s default display.
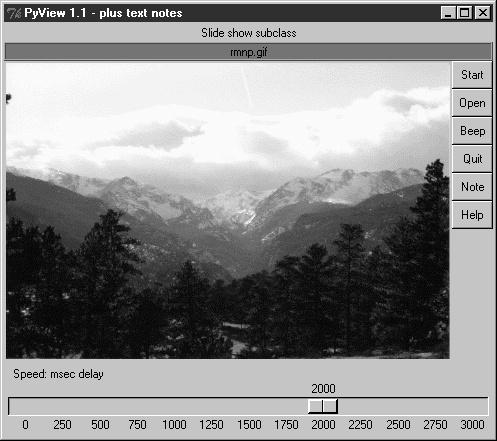
Though it’s not obvious as rendered in this book, the black-on-red label at the top gives the pathname of the photo file displayed. For a good time, move the slider at the bottom all the way over to “0” to specify no delay between photo changes, and then click Start to begin a very fast slideshow. If your computer is at least as fast as mine, photos flip by much too fast to be useful for anything but subliminal advertising. Slideshow photos are loaded on startup to retain references to them (remember, you must hold on to image objects). But the speed with which large GIFs can be thrown up in a window in Python is impressive, if not downright exhilarating.
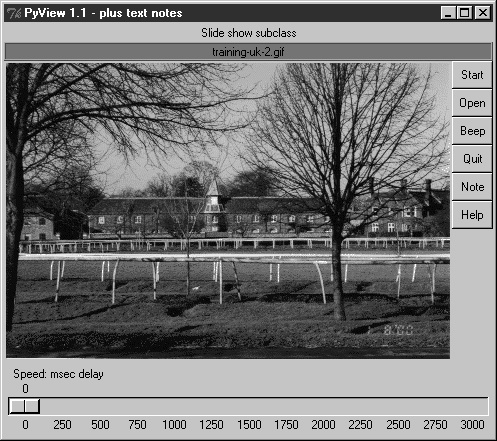
The GUI’s Start button changes to a Stop button during a
slideshow (its text attribute is reset with the widget config method). Figure 12-10 shows the scene
after pressing Stop at an opportune moment.
In addition, each photo can have an associated “notes” text file that is automatically opened along with the image. You can use this feature to record basic information about the photo. Press the Note button to open an additional set of widgets that let you view and change the note file associated with the currently displayed photo. This additional set of widgets should look familiar—the PyEdit text editor of the previous section is attached to PyView to serve as a display and editing widget for photo notes. Figure 12-11 shows PyView with the attached PyEdit note-editing component opened.
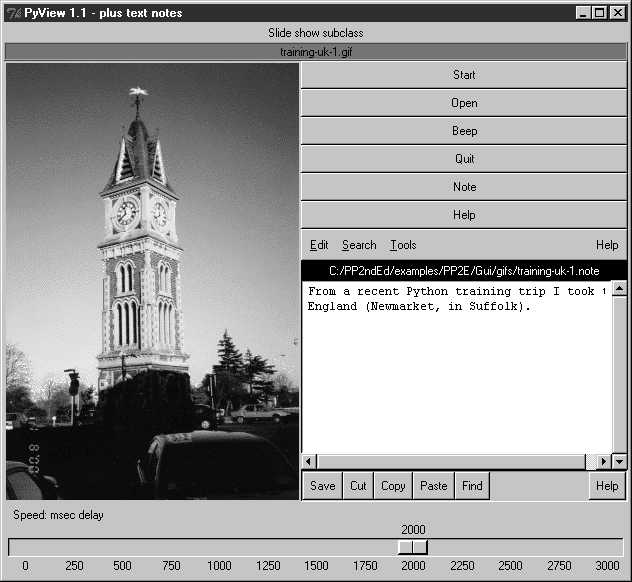
This makes for a very big window, usually best view maximized (taking up the entire screen). The main thing to notice, though, is the lower-right corner of this display, above the scale—it’s simply an attached PyEdit object, running the very same code listed in the prior section. Because PyEdit is implemented as a GUI class, it can be reused like this in any GUI that needs a text-editing interface. When embedded like this, PyEdit’s menus are based on a frame (it doesn’t own the window at large), text content is stored and fetched directly, and some standalone options are omitted (e.g., the File pull down is gone).
The note file viewer appears only if you press the Note
button, and it is erased if you press it again; PyView uses the widget pack and pack_forget methods introduced at the end
of Chapter 10 to show and hide
the note viewer frame. The window automatically expands to
accommodate the note viewer when it is packed and displayed. It is
also possible to open the note file in a PyEdit pop-up window, but
PyView embeds the editor to retain a direct visual association.
Watch for PyEdit to show up embedded within another GUI like this
when we meet PyMailGUI in Chapter
15.
A caveat here: out of the box, PyView supports as many photo
formats as Tkinter’s PhotoImage
object does; that’s why it looks for GIF files by default. You can
improve this by installing the PIL extension to view JPEGs (and many
others). But because PIL is an optional extension today, it’s not
incorporated into this PyView release. See the end of Chapter 9 for more on PIL and image
formats.
Because the PyView program was implemented in stages, you need to study the union of two files and classes to understand how it truly works. One file implements a class that provides core slideshow functionality; the other implements a class that extends the original class, to add additional features on top of the core behavior. Let’s start with the extension class: Example 12-6 adds a set of features to an imported slideshow base class—note editing, a delay scale and file label, and so on. This is the file that is actually run to start PyView.
Example 12-6. PP3EGuiSlideShowslideShowPlus.py
###################################################################
# SlideShowPlus: add note files with an attached PyEdit object,
# a scale for setting the slideshow delay interval, and a label
# that gives the name of the image file currently being displayed;
###################################################################

import os
from Tkinter import *
from PP3E.Gui.TextEditor.textEditor import *
from slideShow import SlideShow
#from slideShow_threads import SlideShow

class SlideShowPlus(SlideShow):
    def _ _init_ _(self, parent, picdir, editclass, msecs=2000):
        self.msecs = msecs
        self.editclass = editclass
        SlideShow._ _init_ _(self, parent=parent, picdir=picdir, msecs=msecs)

    def makeWidgets(self):
        self.name = Label(self, text='None', bg='red', relief=RIDGE)
        self.name.pack(fill=X)
        SlideShow.makeWidgets(self)
        Button(self, text='Note', command=self.onNote).pack(fill=X)
        Button(self, text='Help', command=self.onHelp).pack(fill=X)
        s = Scale(label='Speed: msec delay', command=self.onScale,
                  from_=0, to=3000, resolution=50, showvalue=YES,
                  length=400, tickinterval=250, orient='horizontal')
        s.pack(side=BOTTOM, fill=X)
        s.set(self.msecs)
        if self.editclass == TextEditorMain:          # make editor now
            self.editor = self.editclass(self.master) # need root for menu
        else:
            self.editor = self.editclass(self)         # embedded or pop-up
        self.editor.pack_forget( )                     # hide editor initially
        self.editorUp = self.image = None

    def onStart(self):
        SlideShow.onStart(self)
        self.config(cursor='watch')

    def onStop(self):
        SlideShow.onStop(self)
        self.config(cursor='hand2')

    def onOpen(self):
        SlideShow.onOpen(self)
        if self.image:
            self.name.config(text=os.path.split(self.image[0])[1])
        self.config(cursor='crosshair')
        self.switchNote( )

    def quit(self):
        self.saveNote( )
        SlideShow.quit(self)

    def drawNext(self):
        SlideShow.drawNext(self)
        if self.image:
            self.name.config(text=os.path.split(self.image[0])[1])
        self.loadNote( )

    def onScale(self, value):
        self.msecs = int(value)

    def onNote(self):
        if self.editorUp:                   # if editor already open
            #self.saveNote( )               # save text, hide editor
            self.editor.pack_forget( )
            self.editorUp = 0
        else:
            self.editor.pack(side=TOP)     # else unhide/pack editor
            self.editorUp = 1              # and load image note text
            self.loadNote( )

    def switchNote(self):
        if self.editorUp:
            self.saveNote( )                # save current image's note
            self.loadNote( )                # load note for new image

    def saveNote(self):
        if self.editorUp:
            currfile = self.editor.getFileName()       # or self.editor.onSave( )
            currtext = self.editor.getAllText( )      # but text may be empty
            if currfile and currtext:
                try:
                    open(currfile, 'w').write(currtext)
                except:
                    pass # this may be normal if run off cd

    def loadNote(self):
        if self.image and self.editorUp:
            root, ext = os.path.splitext(self.image[0])
            notefile  = root + '.note'
            self.editor.setFileName(notefile)
            try:
                self.editor.setAllText(open(notefile).read( ))
            except:
                self.editor.clearAllText( )

    def onHelp(self):
        showinfo('About PyView',
                 'PyView version 1.1
July, 1999
'
                 'An image slide show
Programming Python 2E')

if _ _name_ _ == '_ _main_ _':
    import sys
    picdir = '../gifs'
    if len(sys.argv) >= 2:
        picdir = sys.argv[1]

    editstyle = TextEditorComponentMinimal
    if len(sys.argv) == 3:
        try:
            editstyle = [TextEditorMain,
                         TextEditorMainPopup,
                         TextEditorComponent,
                         TextEditorComponentMinimal][int(sys.argv[2])]
        except: pass

    root = Tk( )
    root.title('PyView 1.1 - plus text notes')
    Label(root, text="Slide show subclass").pack( )
    SlideShowPlus(parent=root, picdir=picdir, editclass=editstyle)
    root.mainloop( )
The core functionality extended by SlideShowPlus lives in Example 12-7. This was the
initial slideshow implementation; it opens images, displays photos,
and cycles through a slideshow. You can run it by itself, but you
won’t get advanced features such as notes and sliders added by the
SlideShowPlus subclass.
Example 12-7. PP3EGuiSlideShowslideShow.py
########################################################################
# SlideShow: a simple photo image slideshow in Python/Tkinter;
# the base feature set coded here can be extended in subclasses;
########################################################################

from Tkinter import *
from glob import glob
from tkMessageBox import askyesno
from tkFileDialog import askopenfilename
import random
Width, Height = 450, 450

imageTypes = [('Gif files', '.gif'),    # for file open dialog
              ('Ppm files', '.ppm'),    # plus jpg with a Tk patch,
              ('Pgm files', '.pgm'),    # plus bitmaps with BitmapImage
              ('All files', '*')]

class SlideShow(Frame):
    def _ _init_ _(self, parent=None, picdir='.', msecs=3000, **args):
        Frame._ _init_ _(self, parent, args)
        self.makeWidgets( )
        self.pack(expand=YES, fill=BOTH)
        self.opens = picdir
        files = []
        for label, ext in imageTypes[:-1]:
            files = files + glob('%s/*%s' % (picdir, ext))
        self.images = map(lambda x: (x, PhotoImage(file=x)), files)
        self.msecs  = msecs
        self.beep   = 1
        self.drawn  = None

    def makeWidgets(self):
        self.canvas = Canvas(self, bg='white', height=Height, width=Width)
        self.canvas.pack(side=LEFT, fill=BOTH, expand=YES)
        self.onoff = Button(self, text='Start', command=self.onStart)
        self.onoff.pack(fill=X)
        Button(self, text='Open',  command=self.onOpen).pack(fill=X)
        Button(self, text='Beep',  command=self.onBeep).pack(fill=X)
        Button(self, text='Quit',  command=self.onQuit).pack(fill=X)

    def onStart(self):
        self.loop = 1
        self.onoff.config(text='Stop', command=self.onStop)
        self.canvas.config(height=Height, width=Width)
        self.onTimer( )

    def onStop(self):
        self.loop = 0
        self.onoff.config(text='Start', command=self.onStart)

    def onOpen(self):
        self.onStop( )
        name = askopenfilename(initialdir=self.opens, filetypes=imageTypes)
        if name:
            if self.drawn: self.canvas.delete(self.drawn)
            img = PhotoImage(file=name)
            self.canvas.config(height=img.height(), width=img.width( ))
            self.drawn = self.canvas.create_image(2, 2, image=img, anchor=NW)
            self.image = name, img

    def onQuit(self):
        self.onStop( )
        self.update( )
        if askyesno('PyView', 'Really quit now?'):
            self.quit( )

    def onBeep(self):
        self.beep = self.beep ^ 1

    def onTimer(self):
        if self.loop:
            self.drawNext( )
            self.after(self.msecs, self.onTimer)

    def drawNext(self):
        if self.drawn: self.canvas.delete(self.drawn)
        name, img  = random.choice(self.images)
        self.drawn = self.canvas.create_image(2, 2, image=img, anchor=NW)
        self.image = name, img
        if self.beep: self.bell( )
        self.canvas.update( )

if _ _name_ _ == '_ _main_ _':
    import sys
    if len(sys.argv) == 2:
        picdir = sys.argv[1]
    else:
        picdir = '../gifs'
    root = Tk( )
    root.title('PyView 1.0')
    root.iconname('PyView')
    Label(root, text="Python Slide Show Viewer").pack( )
    SlideShow(root, picdir=picdir, bd=3, relief=SUNKEN)
    root.mainloop( )
To give you a better idea of what this core base class
implements, Figure
12-12 shows what it looks like if run by itself (actually,
two copies run by themselves) by a script called slideShow_frames, which is in this book’s
examples distribution.

The simple slideShow_frames
scripts attach two instances of SlideShow to a single window—a feat
possible only because state information is recorded in class
instance variables, not in globals. The slideShow_toplevels script (also in the
book’s examples distribution) attaches two SlideShows to two top-level pop-up windows
instead. In both cases, the slideshows run independently but are
based on after events fired from
the same single event loop in a single process.