
Chapter 2. Workbench 101
Eclipse’s main window, called the workbench, is built with a few common user interface elements (see Figure 2). Learn how to use them and you can get the most out of the IDE. The two most important elements are views and editors. If you’re already familiar with the Eclipse workbench, you can skim this section or skip to Part III to start programming.

Views
A view is a window that lets you examine something, such as a list of files in your project. Eclipse comes with dozens of different views; see Table 2 for a partial list. These views are covered in more detail in Part VII.
|
View name |
Description |
|
Shows all your projects, Java packages, and files. | |
|
Displays the class and interface relationships for the selected object. | |
|
Outline |
Displays the structure of the currently open file. |
|
Shows compiler errors and warnings in your code. | |
|
Displays the output of your program. | |
|
Shows the description (from comments) of the selected object. | |
|
Shows the source code where the selected object is declared. |
To open a view, select Window → Show View. The most commonly used views are listed in that menu. To see the full list, select Other….
Most views have a titlebar that includes the icon and name for the view, a close icon, a toolbar, and an area for the content (see Figure 3 for an example showing the Outline view). Note that if the view is too narrow, the toolbar will be pushed to the next line. To discover what all the buttons do, move your mouse over a button, and a little window called a tool tip will appear that describes the item.
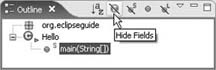
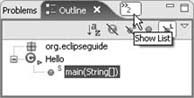
Multiple views can be stacked together in the same rectangular area. The titlebar will show a tab for each view, but only one view can be active at a time. Click on a tab to bring its view to the front. If the window is too narrow to show all the titles, a chevron menu will appear (see Figure 4; the number below the >> shows how many views are hidden). Click on the chevron menu to list the hidden views.
Editors
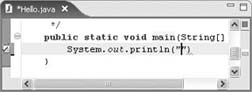
An editor in Eclipse is just like any other editor—it lets you modify and save files. What sets editors in Eclipse apart is their built-in language-specific knowledge. In particular, the Java editor completely understands Java syntax; as you type, the editor can provide assistance such as underlining syntax errors and suggesting valid method and variable names (see Figure 5). Most of your time will be spent in the Java editor, but there are also editors for text, properties, and other types of files.
Editors share many characteristics with views. But unlike views, editors don’t have toolbars, and you will usually have more than one of the same type of editor open (for example, several Java editors). Also, you can save or revert an editor’s contents, but not a view’s. An asterisk in the editor’s titlebar indicates that the editor has unsaved data. Select File → Save or press Ctrl+S to write your changes to disk.
Menus
Eclipse is filled with menus, yet it’s not always obvious how to access them. So, let’s take a quick tour. The most prominent one is the main menu across the top of the Eclipse window. Click on a menu item to activate it or press Alt and the shortcut key for the menu (for example Alt+F for the File menu).
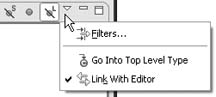
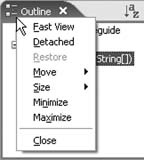
Some views have view menus that open when you click on the downward-pointing triangle icon near the upper right of the view (see Figure 6 for an example).
Another menu is hidden in the titlebar under the icon to the left of the title. Right-click on the icon to access the system menu; this allows you to close the view or editor, move it around, and so forth. The system menu is shown in Figure 7.
Tip
Most commands in Eclipse can be performed in several different ways. For example, to close a view you can either use the system menu or click on the close icon. Use whichever way is most convenient for you.
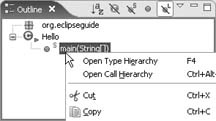
Finally, you can right-click on any item in the content area to bring up the
context menu (see Figure 8). Notice the keyboard shortcuts listed to the right of the menu description. These shortcuts can be used instead of the menu to execute a particular command. For example, instead of right-clicking on main and selecting Open Type Hierarchy, you can just select main and press the F4 key.
Toolbars and Coolbars
A toolbar is a set of buttons (and sometimes other controls) that perform commonly used actions when you click on them. Usually toolbars appear near the top of the window that contains them. A collection of toolbars is called a coolbar (see Figure 9).
Tip
Most Eclipse documentation uses the term toolbar to refer to both toolbars and coolbars, so the rest of this book will do the same unless it’s necessary to make a special distinction between the two.
In the “Views” section, you saw some examples of toolbars that were part of views. The toolbar at the top of the Workbench window is called the main toolbar (seen back in Figure 2). As you edit different files, the main toolbar will change to show tools that apply to the current editor.
Perspectives
A perspective is a set of views, editors, and toolbars, along with their arrangement on your desktop. Think of a perspective as a way of looking at your work that is optimized for a specific kind of task, such as writing programs.
As you perform a task, you may rearrange windows, open new views, and so on. Your arrangement is saved under the current perspective. The next time you have to perform the same kind of task, simply switch to that perspective, and Eclipse will put everything back the way you left it.
To switch perspectives, select Window → Open Perspective or click on the Open Perspective icon (to the right of the main toolbar). This will bring up a list of the most commonly used perspectives; select Other… to see the full list.
Eclipse comes with several perspectives already defined; these are shown in Table 3.
|
Perspective |
Purpose |
|
Arrange your files and projects. | |
|
Develop programs in the Java language. | |
|
Diagnose and debug problems that occur at runtime. | |
|
Explore your code in a Smalltalk-like environment. | |
|
Explore your code based on class relationships. | |
|
Create add-ins to Eclipse. | |
|
Browse a source code repository, including its files and revision history. | |
|
Merge changes you’ve made with those of your teammates. |
Each perspective has a set of views associated with it that are open by default. For example, the Java perspective starts with the Package Explorer view open. If you don’t like the default, close any views you don’t want and open others with Window → Show View.
Tip
Sometimes Eclipse will offer to switch perspectives for you. For example, if you’re in the Resource perspective and create a Java project, it will ask if you’d like to switch to the Java perspective. Usually the best thing is to answer Yes and have it remember your decision so it won’t ask you again.
Perspectives are there for your convenience. Feel free to customize them all you want. To restore a perspective to its factory default, select Window → Reset Perspective. To save your perspective under a different name, select Window → Save Perspective As…. The new perspective will show up in the Window → Open Perspective → Other… menu.
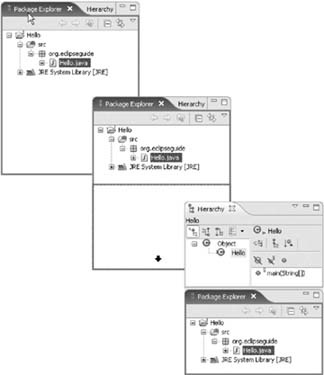
Rearranging Views and Editors
Views and editors can be shown side by side or stacked on top of other views and editors. To move a view or editor, simply click on its titlebar and drag it to a new location (see Figure 10). The only restrictions are that editors have to stay in their own rectangular area, and they can’t be mixed with views. However, you can arrange the views around the editors, and you can even drag views outside of the main Eclipse window (these are called tear-off views). You can also collapse a view to an icon on the edge of the window (this is called a fast view).
Pay close attention to the changing cursor as you drag a window; the cursor shape indicates where the window will end up when you let go of the mouse button. Table 4 shows the cursor shapes and what they mean.
|
Cursor shape |
Final position of the view/editor being dragged |
|
Above the window under the cursor | |
|
Below the window under the cursor | |
|
To the left of the window under the cursor | |
|
To the right of the window under the cursor | |
|
On top of a stack of windows under the cursor | |
|
In the fast view area (it will slide out as needed or when manually clicked) | |
|
Outside the main window |
Tip
By dragging editors, you can show two files side by side. Starting in Eclipse 3.1, you can also edit two portions of the same file by using the Window → New Editor command.
To change the relative size of side-by-side views or editors, move the mouse cursor to the thin dividing line between two of them. The cursor shape will change, indicating you can move that divider by clicking it and dragging it to the desired location.
Maximizing and Minimizing
Sometimes you need to focus temporarily on a single view or editor. For example, you might want to hide all the views and use the whole Eclipse window to look at one large file in the editor. You could resize the editor manually by dragging its edges, but an easier way is to maximize the editor.
Double-click on the view or editor’s titlebar (or click on the maximize icon) to make it expand; double-click again (or use the restore icon) to restore the window to its original size. When a window is maximized, you won’t be able to see any of the other views or editors outside of the current stack.
As an alternative, you can temporarily shrink the other stacks of windows by clicking on the minimize icon (next to the maximize icon at the top of the view or editor). This hides the content area, showing only the titlebar. It works best on horizontal views and editors.
You could spend hours exploring all the options to customize your Eclipse workbench, but that’s not what you’re here for, right? Part III will get you started with Java development in Eclipse.