
8. Network Services
• Understanding the changes in basic network services
• Using Windows Server 2003 as a fax server
What's New
One of the basic functions of any network operating system is to provide network services. In a Transmission Control Protocol/Internet Protocol (TCP/IP)–based network, the most basic of these services range from the core services, such as Dynamic Host Configuration Protocol (DHCP), Windows Internet Naming Service (WINS), and Domain Name Service (DNS)—which provide connectivity and the capability to locate resources—to accessing those resources via methods such as file sharing.
Windows Server 2003 introduces a number of enhancements to these network services. The majority of these enhancements are changes to the various core network service consoles (DHCP, WINS), whereas others add increased functionality (application partitions in Active Directory–integrated DNS). Additional improvements with other network-accessible services have been made primarily to make those services more accessible (fax sharing, shadow copies, EFS file sharing, and sharing of files across the Web). This chapter looks at the improvements to each of these services.
WINS, DHCP, and DNS
WINS in Windows Server 2003 is largely unchanged from WINS in Windows 2000. There have been some minor display improvements primarily for performance, but the service itself functions the same. DHCP introduces a few new management features, but it too is largely unchanged. DNS, on the other hand, has seen some significant improvements.
WINS
WINS is the service used for locating Network Basic Input/Output System (NetBIOS) resources. It provides a dynamic database for maintaining associations between NetBIOS names and IP addresses. The changes to WINS in Windows Server 2003 are primarily enhancement to the Microsoft Management Console (MMC) snap-in for administering WINS. The first notable improvement is in the way WINS records are displayed. In Windows 2000, you have to choose which records to display in the console. You can select to find records by name, owner (the WINS server on which the record was created), or type (which is a subchoice of finding by owner). It is pretty much the same in Windows Server 2003, except that you simply select Display Records and enter the criteria for the records to display: by record owner, by record type, or by record mapping. Filtering by record mapping includes filtering by name, by IP address, and both. The real improvement is in what the console does when you choose to display the records.
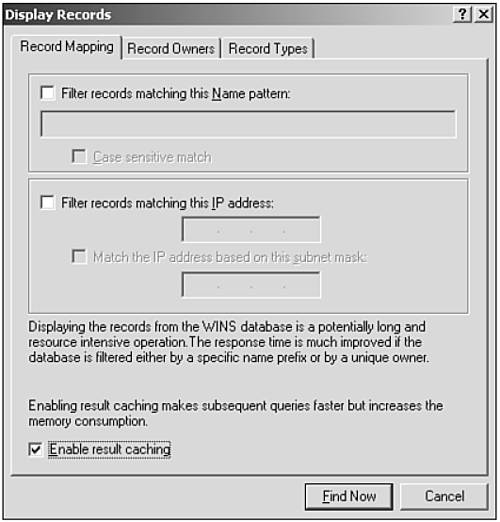
When choosing to display records, you have an option labeled Enable Result Caching, as shown in Figure 8.1. If you don't select this check box, the query is run against the WINS server (or servers, if multiple owners are queried) and the results are displayed. Subsequent queries are also run against the WINS server(s). Depending on the size of the WINS database and the network connectivity between the servers, a significant delay could occur before the results of each and every query are displayed as the query traverses the network. When you select this check box, the WINS records are downloaded to the local machine and cached in memory. Subsequent queries can then find those records in memory without having to query the WINS server across the network again. Thus, with the results cached, subsequent queries to the same data are faster. The caveat is that if the WINS database is particularly large, the amount of memory consumed for caching can actually degrade performance. What actually gets cached depends on the query: If you query WINS records by owner, all the records from that owner are downloaded to the local machine and cached. Any subsequent queries for records from that owner are returned from the cache without the WINS server being queried again; the queries are faster but potentially outdated if anything has changed on the WINS server queried. If the WINS records are queried through a filter (by name, IP address, or type), only the records in the query result set are cached. Subsequent queries for the same result set (or subset) are cached, but queries for other records have to again access the WINS server (across the network).
Figure 8.1. Caching WINS results improves the performance of queries.
Another change in the WINS server in Windows Server 2003 is in the designation of valid replication partners. In previous versions of WINS, administrators had to manually configure push/pull partners to enable replication between two WINS servers. To ease this administrative burden, Windows 2000 introduced a new feature called Automatic Partner Configuration, which allows WINS servers to detect other WINS servers on the network and automatically configure push/pull relationships. If a lot of WINS servers are on the network, this autodiscovery and autoconfiguration could potentially lead to WINS replication chaos because any WINS server could replicate with any other WINS server. Administrators can gain some control over this by specifying a list of WINS servers from which a given WINS server would block replication of records. Windows Server 2003 improves on controlling Automatic Partner Configuration by enabling administrators to designate acceptance of records from particular owners. This is basically the same thing, but instead of having to specify all the servers with which you don't want to replicate, you can simply specify the few servers you do.
BLOCKING WINS REPLICATION
The capability to block replication from particular WINS servers is not exclusive to Automatic Partner Configuration. You can block WINS servers even if you don't use Automatic Partner Configuration; however, there is really no reason to do so because you would be manually configuring the replication partnerships anyway. The ability to specify servers from which to accept replication can also be used to improve the security of your WINS infrastructure. This could prevent someone from putting up a rogue WINS server and replicating with your WINS servers. Previously, the only way to do this was to find out the name or IP address of the rogue server and explicitly block it. However, by the time you have that kind of information, the damage has already been done.
 WEB RESOURCE
For a technical overview of WINS, go to the book's product page at www.informit.com/store/product.aspx?isbn=0672326639. Click the Extras tab and locate article ID A010801.
DHCP
DHCP is the service used to automatically issue IP addresses and configuration information. Like WINS, DHCP is largely unchanged in Windows Server 2003. Most of the improvements are with the DHCP service snap-in. One of the nicest enhancements is the capability to back up and restore the DHCP database right from the console. In previous versions of Windows, DHCP could be configured to back up its database; however, these configurations were performed either by modifying the Registry or with the netsh command. The netsh command still exists and is still used to configure an automated backup interval, but the DHCP snap-in now has the capability to perform a manual backup. More importantly, it provides an easy way to restore a corrupted DHCP database. You simply right-click the DHCP server, select Restore from the pop-up menu, and select the location from which to restore. Windows even prompts you to automatically restart the DHCP service to make the “new” database available.
Some additional niceties in the console are new descriptions on the Dynamic DNS tab, which clarify what each option does. In addition, the console provides the capability to specify the credentials used to authenticate to the DNS server for DNS dynamic updates. There is also a new predefined option (249—classless static routes) that enables definition of static routes for configuring alternative routing paths over and above the default gateway.
There is a significant change in the Windows XP and Windows Server 2003 DHCP client. The Internet Protocol (TCP/IP) Properties dialog box for the network adapter has a new Alternate Configuration tab that allows finer control over the Automatic Private IP Addressing (APIPA) feature. The Windows 2000 DHCP client introduced APIPA, which is the capability of the DHCP client to assign itself an IP address. Basically, if a Windows 2000 client configured for DHCP does not receive a response when it attempts to obtain a lease from a DHCP server, the client automatically assigns itself an IP address in the 169.254.x.x Class B address range.
IP CONFLICTS
If two clients assign themselves the same IP address, an IP address conflict occurs, and one of the clients is incapable of communicating. To prevent this, the APIPA-configured DHCP client broadcasts the IP address it randomly picked. If it doesn't receive a response that anyone is using it, it assigns itself the IP address.
APIPA is great for small businesses and SOHOs (small offices, home offices) on a single network segment. Their clients can make up IP addresses and communicate without needing a DHCP server. In that environment, with everyone on the same subnet, all machines would use the 169.254.x.x address space and could communicate with each other.
APIPA: NONROUTABLE
Clients using APIPA on the same subnet would not be able to communicate with anything off their local subnet, such as the Internet. They would have to use some type of proxy server or Network Address Translation for that.
Although APIPA works well for small networks, it is not a very good option for a large organization that already has a DHCP infrastructure and multiple IP subnets. In such an environment, if a particular client comes up with a 169.254.x.x address, it might be able to communicate with other similar clients on its local subnet but not anything anywhere else, such as the servers, the Internet, and so on.
By default, the APIPA configuration is enabled in Windows 2000 but can be turned off via a Registry key. It's just one more potential headache for administrators. With Windows XP and Windows Server 2003, the DHCP client still defaults to using APIPA, but now you can configure an alternative IP address to use instead of the randomly determined 169.254.x.x address. Basically, it's like being able to configure a static IP address to use in the event that the client cannot obtain a DHCP address. You can think of it as a static backup address for when DHCP is unavailable. One common application for the new Alternate Configuration feature is for laptop users. A laptop user's computer can be set to use DHCP when he or she is in the office and be programmed with a static address for use at the user's home or other location.
Some administrators like to configure servers to use DHCP, too. They create a reservation in DHCP so that the servers always get the same IP addresses, and they rely on DHCP to change other IP configuration settings, such as DNS servers, WINS servers, and so forth. However, if the DHCP server fails, servers might not obtain an IP address at all, which would interrupt network operations. By using the Alternate Configuration tab, you can take advantage of DHCP while still ensuring that each server will have an accurate IP address if the DHCP server isn't available.
WEB RESOURCE
For more information on the DHCP service, go to the book's product page at www.informit.com/store/product.aspx?isbn=0672326639. Click the Extras tab and locate article ID A010802.
DNS
DNS has received a minor makeover for Windows Server 2003, including how Windows Server 2003 handles Active Directory–integrated DNS zones, enhancements to the DNS hierarchy, and improvements to the DNS management console.
Active Directory–Integrated Zones
Probably the single greatest enhancement to the DNS service is the new feature Active Directory–integrated zones. Windows 2000 introduced Active Directory–integrated zones, which store DNS records in the Active Directory database instead of in flat .dns files on the DNS server (like primary and secondary zones). The major benefit of an Active Directory–integrated zone is that the DNS records are replicated to all domain controllers, so in the event of a DNS server failure, you simply install DNS on a domain controller, and the zone appears, as if by magic. In effect, any domain controller has the capability to become a DNS server, and your zone records are protected by Active Directory's replication.
DNS REDUNDANCY
The usual implementation of Active Directory–integrated zones is with multiple domain controllers as DNS servers in a primary/secondary hierarchy. That way, if the primary DNS server goes offline or is too busy, the secondary can immediately take up the slack.
The big drawback to the way Windows 2000 implements Active Directory–integrated zones is that all DNS records in the zone are replicated to every domain controller throughout the domain. This can potentially generate a lot of unnecessary network traffic because not every domain controller is a DNS server and therefore doesn't need the DNS zone replicated. With the new Active Directory Application Partitions tab in Windows Server 2003, you can more finely control the replication of the DNS information.
![]() For more information on the Active Directory Application Partitions tab, see “Replication Improvements, ” p. 82.
For more information on the Active Directory Application Partitions tab, see “Replication Improvements, ” p. 82.
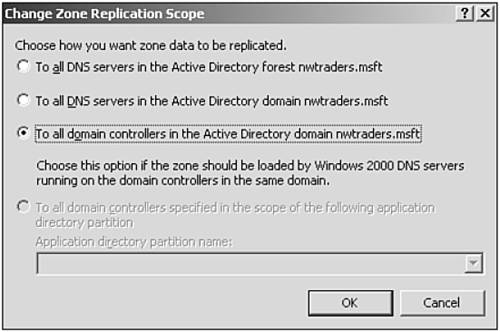
When you use Active Directory–integrated zones on a Windows Server 2003 DNS server, Windows creates two application partitions—one called DomainDNSZones and one called ForestDNSZones—that are used to replicate DNS information throughout the domain or forest. As shown in Figure 8.2, a given zone can be replicated as follows:
• To all DNS servers in the Active Directory forest.
• To all DNS servers in the Active Directory domain.
• To all domain controllers in the Active Directory domain. This is the only option that is compatible with replication to Windows 2000 domain controllers. Windows 2000 domain controllers know nothing about application partitions.
• To all domain controllers specified in the scope of the following application directory partition. This option enables you to load DNS into your own application partition (provided that you have created one) for even tighter control of replication.
Figure 8.2. Windows Server 2003 enables you to control the scope of replication of Active Directory– integrated zones.
Enhancements to the DNS Hierarchy
Several enhancements to DNS provide additional flexibility for designing a DNS infrastructure. One such enhancement is a new zone type: the stub zone. Using a stub zone is a way to provide your DNS clients with references to authoritative servers in another DNS zone. For example, suppose you control the DNS server for a domain named company.com. One of your divisions wants to create a DNS domain named research.company.com. You're happy with that, but you want the division to handle all the administration for its zone. Clients in your domain—company.com—will need to be able to resolve host names in the research.company.com domain, and you need to provide a way for them to do that.
Using secondary zones is one traditional way to do it. You create a research.company.com secondary domain on your DNS servers and pull zone transfers from the authoritative DNS servers maintained by the research division. Those zone transfers can use a lot of bandwidth, though, especially in dynamic DNS zones with a lot of hosts registering A records.
Delegation is, perhaps, a better way. With this method, you create name server (NS) records in the company.com domain. These NS records point to the authoritative name servers for the research.company.com domain. The NS records allow DNS clients in your domain to locate the DNS records for the child domain. However, NS records require static IP addresses, and it's possible that those crazy folks in the research division will change their DNS servers' IP addresses from time to time, leaving your NS records pointing at a vacuum—called a lame delegation.
Stub zones offer an alternative. On your DNS servers, you create a stub zone for the research.company.com domain. The stub zone contains all the NS records for the child domain, and it periodically refreshes this list in kind of a mini-zone-transfer process.
Suppose, then, that research.company.com has three DNS servers: One master and two secondaries. Suppose all three are domain controllers and that the research.company.com domain is Active Directory integrated. As the administrator of company.com, you could create a stub zone on your DNS server. During the configuration of the stub zone, you specify the three research DNS servers as masters for the research.company.com domain. The stub zone will attempt to use all three as sources of information about the research.company.com domain.
The stub zone will actually send DNS queries—as a DNS client would—to the research domain's DNS servers, to obtain an SOA (Start of Authority) record. This confirms that the zone is functioning correctly. Next, the stub zone initiates a TCP-based connection to one of the DNS servers and queries the NS records from the zone. What the stub zone gets by way of reply is a list of glue records, which are simply regular host (A) records for each DNS server in the zone.
STUB ZONE TYPES
Similarly to a secondary zone, a stub zone can be a standard zone or an Active Directory–integrated zone.
Another new infrastructure design feature is the capability to designate forwarders on a per-domain basis. A forwarder is a pointer to a particular DNS server for sending unresolved queries. Ordinarily, if a DNS server is not authoritative for the zone referenced in a DNS query, it contacts or forwards the query to a root (.) server, which then sends the query to successive child domains down the tree until it gets to the authoritative zone. Forwarders enable you to pass the request to other DNS servers that might potentially have or know about the zone without having to start at the root servers. This gives administrators some control over how queries will be resolved, allowing them to design DNS hierarchies to more efficiently respond to queries. A potential problem is that you might want queries for some domains to start at the root but want other domains to send the queries to your internal DNS servers. With Windows Server 2003, you can do both. You can specify individual domains (or all domains) to forward and specify to which servers they get forwarded. You can also specify whether to use recursion for queries to those domains.
DNS RECURSION
Recursion occurs when the DNS server contacts the subsequent DNS servers and returns the response to the client. With no recursion, the DNS server simply tells the client which DNS server to query, and the client queries the new server itself.
DNS Console Improvements
Similarly to the other core networking services, the DNS console in Windows Server 2003 sports some improvements. One nicety is that the built-in DNS console provided includes the Event Viewer snap-in with the DNS event log for monitoring DNS messages. In addition, a new option on the server pop-up menu—Launch Nslookup—launches the nslookup command-line utility for testing DNS query resolution. The Debug Logging tab of the DNS Properties dialog box has also been redesigned with more detailed configuration information. Also, a new tab is available on the DNS Properties dialog box for specifying the types of events to be written to the event log (previously available only by editing the Registry).
An additional security improvement is the capability to manage DNS server permissions at the server level. This enables you to delegate serverwide control of your DNS servers instead of just at the zone level, as in Windows 2000.
WEB RESOURCE
For more information on DNS and how it works, go to the book's product page at www.informit.com/store/product.aspx?isbn=0672326639. Click the Extras tab and locate article ID A010803.
Fax Sharing
To understand the improvements in Fax Services for Windows Server 2003, you need to understand how faxing works in Windows 2000. Because faxing in Windows 2000 is extremely limited, it might be unfamiliar to some administrators, so the following sections go over the basics.
Faxing the Windows 2000 Way
Windows 2000 doesn't make faxing very easy. Basically, you first have to install a fax printer, configure the device, and learn to live with the operating system's limited faxing capabilities.
Installing Fax Printers
In Windows 2000, Fax Services is installed by default. To enable faxing, you simply install a modem. After a modem is installed, a printer called Fax magically appears in the Printers Control Panel. You can install additional modems, but they do not show up as additional fax printers in the Printers Control Panel. Instead, they appear in the Fax Administration console as additional fax devices.
Fax Device Configuration and Routing Options
Each device in the Fax Administration console can be configured to receive incoming faxes, send outgoing faxes, or both. Devices configured as outgoing simply send the fax via the fax device; devices configured to receive incoming faxes require further configuration to designate what to do with the incoming faxes. The Received Faxes configuration options are as follows:
• Print On— The fax gets printed to a local printer.
• Save in Folder— The fax is stored locally in a specified directory on the server.
• Send to Local Email Inbox Profile Name— The fax is sent to the inbox of a mail profile on the server.
EMAIL DELIVERY OF FAXES
To be able to send to a local email inbox, the Fax Services needs to be configured to log on as a user with administrative privileges. In addition, a mail client must be installed and a MAPI profile must be configured for the user profile used by the Fax Services account.
You might have noticed in this description that everything is local: Incoming options are the local printer, local file, or local profile.
Limitations of the Windows 2000 Fax Services
The biggest limitation of Windows 2000 Fax Services is that it cannot be shared. This means that all outgoing faxes need to be sent from the server and all incoming faxes are stored locally on the server in some form. This is all well and good for a client machine, but generally you don't want to have to log on locally to your servers.
Faxing the Windows Server 2003 Way
Windows Server 2003 improves the built-in faxing capabilities of Windows. It improves installation and offers the capability to share fax printers with network users, giving you an effective entry-level network fax solution.
Installing Fax Services
The first clue that faxing in Windows Server 2003 is different from faxing in Windows 2000 is in Fax Services itself. It is not installed by default. Installing a fax modem does not magically generate a fax printer in the Printers, now called Printers and Faxes, Control Panel applet. To enable faxing in Windows Server 2003, you need to install Fax Services by using Add/Remove Windows Components under Add or Remove Programs, just as you would with any other service. After it's installed, a whole host of new features are available.
First, when a modem is installed, the fax printer appears in Printers and Faxes. Unlike in Windows 2000, this fax printer queue can be shared out just like any other print share, enabling remote users to be able to print to it and thereby send outgoing faxes via the fax server.
Fax Device Configuration and Routing Options
The Fax Administration console, now called the Fax Services management console, has been greatly improved. In addition to showing all the fax devices, it has several new configuration properties for controlling the behavior of faxes. For example, you can set different archival settings to maintain copies of sent or received faxes. You can also record incoming and outgoing events, and you can use the Activity Logging and Event Reporting features. Activity Logging enables you to write incoming and outgoing activities to a special log, whereas Event Reporting controls the level of information written to the Windows Application Event Log.
DISPLAYING FAX DEVICES
The Fax Services management console displays all fax devices installed on the server. However, if a new modem is installed, it does not show up as a device in the Fax Services management console until Fax Services is restarted.
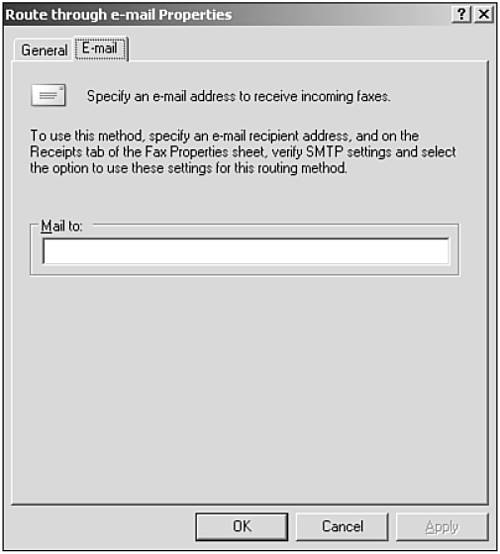
The routing options for incoming faxes have also been extended in Windows Server 2003. As shown in Figure 8.3, you can still print directly to a local printer or save to a local folder as in earlier versions of Windows; however, the incoming email routing option enables routing to any email address via an SMTP server that you configure when you configure the fax properties. You can also arrange multiple devices into device groups. Devices groups are just what they sound like—collections of devices that enable you to treat multiple devices as a single unit. Another new feature is the ability to designate rules; you can create rules to designate faxes destined for a certain region/country and area code to use specific fax devices (or groups of devices).
Figure 8.3. You can route incoming faxes via email.
The fax client, previously the Fax Queue application, has been replaced with the Fax console. With the Fax console, you can send and receive faxes, create cover letters, and so on. Another new console, Fax Monitor, enables you to monitor the status of current faxes, and you can configure it to automatically pop up whenever a fax is sent or received.
PRE-XP CLIENTS AND FAXING
Pre-Windows XP clients can also use the enhanced administration and faxing features of Windows Server 2003 Fax Services by installing the fax client from \servernamefaxclient, which is physically located in \%systemroot%\SYSTEM32clientsfaxclient.
File Sharing
Probably the most significant new feature for file sharing management is the capability to create shadow copies. Shadow copies enable you to save point-in-time copies of files. These captures are performed at the file system level, so they even capture open files.
SHADOW COPY AND DATABASES
Even though shadow copies can capture open files, you should still be careful about using shadow copies with databases. Check with the database manufacturer first to make sure it is safe.
Shadow copies are intended to act as a safety net to enable you to easily recover deleted or modified files without resorting to backups; they are not intended to be the sole method for disaster recovery. Even better, a shadow copy enables the user to restore files, freeing the administrator from the headache of sifting through backup tapes to find a particular version of a file.
Shadow copies are enabled at the volume level (Volume Shadow Copies [VSC]). To enable shadow copies for a particular volume, you simply right-click the volume, click Properties, and then select the Shadow Copies tab. By using this tab, you can create shadow copies for any given volume. When creating a shadow copy, you must choose where to store it. The default is to store shadow copies on the same volume as the original file, but you can configure (on a per-volume basis) the location of shadow copies. It is recommended that you save your shadow copies to a different volume so as not to consume extra space on the original volume. In addition, if the volume fails, you won't lose the files and the copies. You can also specify how much disk space to allow the shadow copies for a particular volume to consume (minimum 100MB). After the shadow copies use up that space, previous shadow copies are overwritten and lost, so you should choose the amount of disk space carefully, based on how much data is in your file shares.
COMMAND-LINE SHADOW COPY ADMINISTRATION
You can also manage shadow copies from the vssadmin command-line utility.
After shadow copies are enabled, the contents of all file shares (including the administrative shares, C$, IPC$, and so on) are saved as shadow copies. The Shadow Copies tab of the System Properties dialog box lists the existing volumes, when the next shadow copy is scheduled to run (if enabled), the number of shares (not including administrative shares) on each volume, and the amount of disk space used by shadow copies. For each volume you can enable or disable shadow copies of all shares on that volume.
SHADOW COPIES: PER-VOLUME ONLY
Shadow copies can be enabled only for entire volumes. They cannot be enabled per share—it's either all or nothing.
You can also schedule when to perform shadow copies (the default is twice per day—weekdays at 7 a.m. and 12 p.m.) or perform them manually.
After shadow copies are enabled, clients can view them. This essentially provides a type of versioning capability because a user can compare changes between an existing file and a shadow copy of the same file.
VIEWING SHADOW COPIES
Clients prior to Windows Server 2003 (including Windows XP and Windows 2000) can also view shadow copies, but they need to install the shadow copies client, which is in the \%systemroot%system32clients wclient directory. Microsoft provides an updated client on its Web site, at www.microsoft.com/windowsserver2003/downloads/shadowcopyclient.mspx.
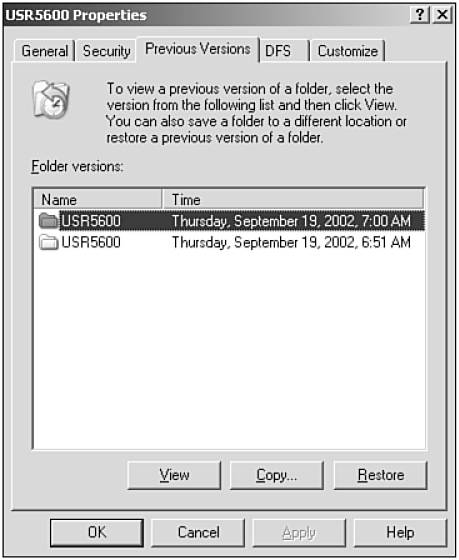
Shadow copies can also be used for a type of disaster recovery. Consider the following scenario. Mary creates a file in a shared folder that has been enabled for shadow copies. The file is there long enough to be captured by a scheduled shadow copy. Another user, Jim, overwrites the original file. Mary accesses the file and realizes that her changes are gone. She can simply click the file and then select File and Folder Tasks, View Previous Versions in Windows Explorer. This opens a dialog box that displays a list of the shadow copies where Mary can choose to view, copy, or restore her original file. Alternatively, she could select the folder (not the file) and then select View Previous Versions, and she would once again be given the option to view, copy, or restore (see Figure 8.4). In this case, clicking View opens a new window and displays the contents of the entire folder from the selected shadow copy. This method is particularly useful for recovering multiple files or deleted files.
Figure 8.4. You can recover accidentally deleted files by using shadow copies.
USING PREVIOUS VERSIONS
To see the option View Previous Versions, the user must connect to the folder via a file share. (\servernamesharename). The file share (or, more precisely, the volume containing the file share) has to be enabled for shadow copies, of course. One more requirement is that the user's Windows Explorer must be configured with the option Show Common Tasks in Folders, not Use Windows Classic Folders.
Windows Server 2003 provides some enhancements to the Computer management console for file sharing administration. One such enhancement is the new Publish tab on the shared folder Properties dialog box. This tab enables resource administrators to publish and maintain information about their file shares in Active Directory, without giving them the Active Directory Users and Computers snap-in. The File Share Wizard has also been improved: The folder path and selection options are clearer, as are the folder caching (now simply called Offline Settings) options.
DEFAULT PERMISSIONS DIFFERENCE
One thing that could potentially cause confusion is that the default permission for file shares is all users (Everyone) read-only—not full control, as in Windows 2000.
Distributed File System
Distributed File System (DFS) is a technology that provides easier access and availability for file shares. The two types of DFS are server based and domain based. Server-based DFS resides on a single server. You can designate a DFS root, which is just a pointer to a file share, and underneath the DFS root, you can create DFS links that point to other file shares. These file shares can be on the same server or on different servers. This enables you to provide a logical shared folder hierarchy, regardless of the actual underlying folder structure.
Domain-based DFS has the same structure of DFS roots and links as server-based DFS, but you can create multiple roots. Domain-based DFS also gives you the ability to provide redundant shares called replicas.
Replicas are copies of the DFS root and link on another server. If replicas are on multiple servers, clients can always access the DFS shares. For example, consider a domain called braincore.net with the DFS root Software that points to a file share on the server Netserver. An additional replica is created on the server Netserver2, which provides fault tolerance for the Software share. Clients access the share via \braincore.netSoftware. The DFS client queries Active Directory and determines which replica server is closest to the client. If one of the servers is down, the client is still capable of accessing the other server. The multiple DFS replicas not only provide fault tolerance for the Software share but also potentially bring the share closer to the user. Site-aware DFS clients (those running Windows 2000 or better) are directed to the DFS link in their own sites.
USING DFS FOR SOFTWARE DEPLOYMENT
DFS is particularly useful for software deployment shares. We once had to deploy Internet Explorer to an entire organization. There was no infrastructure for software deployment, so the only choice was to automate through logon scripts. To ensure local installation and minimize traffic across WAN links, we created the software distribution share for Internet Explorer on servers in every location. We then had to create special scripting to detect where the client was located and direct it to the appropriate server for downloading Internet Explorer. Pretty complex! DFS handles all this automatically.
With DFS, we could handle the same problem by simply creating a DFS root called Software and then creating DFS links for the software application share. We could create replicas of the root and links on multiple servers across the organization. The File Replication Service (FRS) would automatically replicate the content of the application share to all the replicas, providing a consistent copy of the share across all the participating servers. The software installations could be performed by simply connecting to \domainsoftwareapplication. DFS would direct the client to a participating server in the client's own site, so the installation would be performed without crossing WAN links and without complex scripting to detect the client's location.
New DFS Features
At first glance, DFS in Windows Server 2003 appears to be the same as in previous versions. However, some subtle enhancements dramatically increase its functionality. First, you can now create multiple DFS roots on a single server. Previously, although you could create multiple DFS roots in domain-based DFS, each server could host only one root. This meant that to have multiple DFS roots in a domain, you had to use a different server for each of the roots, thus increasing the number of servers required for DFS. In addition, DFS roots can now be published in Active Directory, which makes them easier for users to find. DFS links can also be made available for offline access by Windows XP clients.
In Windows Server 2003, you can designate the DFS replication topology (full ring or hub and spoke) in domain-based DFS. In Windows 2000, DFS replication is either automatic or manual. Manual is just that: The administrator must manually keep the replicas in sync (such as by using robocopy or xcopy). With automatic replication, one server (by default the first one) is designated as the master, and all other replicas synchronize with the master. With Windows Server 2003, the administrator can designate the DFS replication topology. Four choices are available:
• Ring— One replica replicates with another and so on in a chain until the last one replicates back with the first.
• Hub and spoke— Similar to Windows 2000 replication in that there is a central server with which everyone replicates.
• Full mesh— Everyone replicates with everyone else.
• Custom— The administrator can choose who replicates with whom. This provides much more flexibility in the traffic between replicas.
For additional flexibility, you can designate a replication schedule and designate certain files that should not be replicated (called a replication exclusion list).
When multiple replicas exist for a DFS root or link, a client has to choose one of the replicas with which to connect. The way it determines which replica to use is by looking up site information in Active Directory. In Windows 2000, if no DFS replica exists in the same site as the client, the client could choose to connect to a replica in any site. Therefore, a client could potentially attempt to connect to a replica on the other side of the world when there might be a closer replica. Windows Server 2003 includes the capability to specify costs for DFS links. This provides an alternative mechanism for determining which link to use.
Network Attached Storage and Storage Area Network Management
Further file system improvements in Windows Server 2003 include enhancements for network attached storage (NAS) and storage area networks (SANs). Discussions about NAS and SANs can sometimes be confusing because these are two similar acronyms for similar technologies.
Too Many Acronyms
You'd think with all the letters in the alphabet, the IT industry could come up with unique acronyms. However, to add to the confusion, both NAS and SAN are acronyms for two technologies that are unrelated to network attached storage and storage area networks—network access server (NAS) and system area network (SAN). The following sections discuss the differences between these four technologies and then looks at the enhancements in Windows Server 2003 for network attached storage and storage area networks in Windows.
NAS: Network Attached Storage Versus Network Access Server
Network attached storage is a storage method that provides file share access across the network. It is essentially a file server in a box. There is even a class of NAS devices called filers, which are file server appliances. You simply plug them into the network and access the storage device via network shares as if it were a file server. Clients and servers can directly access the data stored on a NAS device across the same network. NAS devices can be used to expand storage capacity of existing file servers. The file servers map file shares to the NAS storage device. The clients connect to a share on the file server, which redirects to the NAS storage device.
A network access server provides authentication for access to remote networks. Generally, NASs are used by ISPs to provide authentication for Internet access. Network access servers have nothing to do with network attached storage other than sharing an acronym.
SAN: Storage Area Network Versus System Area Network
A storage area network connects multiple servers and storage devices (hard drives) over a network. Generally, it consists of one or more hard drive enclosures accessed via fibre channel or small computer system interface (SCSI) with partitions carved out for one or more servers, with no sharing of data between servers. To the server operating system, the SAN appears as a hard drive. Storage area networks are an extension of traditional high-speed directly attached storage devices, but they allow more flexibility in that they can be expanded more easily or repartitioned to more efficiently use the available storage.
A system area network, on the other hand, is a special technology for providing high-speed network connectivity between systems. In Windows 2000 and Windows Server 2003, Datacenter Edition, system area networks can be used to connect data center servers to each other, using special system area network adapters and reliable high-speed gigabit fibre channel connections. In addition, system area networks use Winsock Direct, which provides Winsock applications direct access to the system area network devices, without requiring them to go through the TCP/IP protocol layer. This reduces network overhead and provides high-speed connections between servers.
Windows Server 2003 Improvements for NAS and SAN
Windows Server 2003 provides improvements to all the NAS and SAN technologies. The following sections touch on the improvements for storage area networks and network attached storage.
Storage Area Network Improvements
Windows Server 2003 supports “multipath failover” for a server connected to a SAN, which enables redundant paths from the host server. What does this mean? It means you can have multiple physical connections between the server and the storage array. If a given path (connection) fails, the SAN dynamically uses the remaining path(s), thus providing fault tolerance for the connection between the server and SAN devices.
Windows Server 2003 also provides built-in APIs, called Virtual Disk Services (VDS), for managing SAN devices. Previously, SAN vendors had their own sets of application programming interfaces (APIs) for manipulating their SAN devices. To add more storage devices or to repartition the SAN, you had to use special applications provided by the SAN vendor. With Windows Server 2003, each vendor provides a VDS provider that translates the Windows Server 2003 APIs to the vendor-specific APIs. VDS is an abstraction layer, which makes developing storage management applications for SANs easier because you no longer have to worry about the vendor-specific details. Therefore, you can manage SANs through the Disk management console or command-line utilities, such as diskpart, just as you do any other disk.
For example, you can connect your SAN storage arrays as if they were regular disks. You can create volumes or partitions and assign them drive letters, or not—just as with local disks.
Network Attached Storage Improvements
Windows Server 2003 natively supports connecting to NAS devices. This support isn't immediately obvious because connecting to a NAS device is implemented by simply mapping a file share, just as in Windows 2000. With the native support—unlike in Windows 2000—you don't necessarily need any vendor-specific applications to connect to the NAS device. You can use the Configure Your Server Wizard to install a Web-based console for configuring NAS devices. In addition, Microsoft uses the Windows Server 2003 server operating system as the foundation for its Windows-powered NAS devices, which are available from a number of vendors.
Encrypting File System
Encrypting File System (EFS), a feature of NTFS first introduced in Windows 2000, enables increased security of files by encrypting them so that only those with the correct encryption key are able to view them. Encryption is the process of scrambling something (in this case a file) in a particular way such that you are the only one who can unscramble it. The two types of encryption are symmetric key, in which the same key is used to encrypt and decrypt, and asymmetric key, in which one key (a public key) is used to encrypt and a different key (the private key) is used to decrypt.
EFS Implementation
EFS uses a combination of both symmetric and asymmetric encryption. Each file has its own unique encryption key that is used for encrypting and decrypting the file (symmetric). In addition, each user has his or her own public/private key pair that is used to encrypt/decrypt the file encryption key. The following is what happens when a user encrypts a file:
- The operating system encrypts the file, using the file's unique encryption key.
- The file's encryption key is then itself encrypted, using the user's public key, and is stored in the data definition field (DDF) of the file.
- The file encryption key is also encrypted with the public key of a recovery agent (by default the administrator) and stored in the data recovery field (DRF) of the file. This provides the ability to decrypt the file in case the user loses his or her private key.
This process ensures that the data is secure because only the private key of the user (or the recovery agent) can decrypt the key used to encrypt the file. The problem with this implementation is that it prevents the sharing of encrypted files—even to trusted personnel. In Windows Server 2003 (and Windows XP), the encryption model used by EFS has been expanded to allow the user to designate one or more authorized users. The user can add additional users' public keys to encrypt the file encryption key, thus enabling multiple users to be able to decrypt the file.
Storing Encrypted Files Remotely
Going along with the concept of making encrypted files more available, Windows Server 2003 supports storage of encrypted files on remote servers without having the user's digital certificate installed on the server. Several requirements exist for this to work. First, only Windows XP and Windows Server 2003 support this feature. In addition, both the client and the server must be in the same Windows Server 2003 forest. After the domain is in Windows Server 2003 native mode (meaning there are no more Windows 2000 or Windows NT 4.0 domain controllers), a new Delegation tab is available for computer accounts in Active Directory Users and Computers. Selecting Trust This Computer for Delegation to Any Service (Kerberos Only) allows the computer to support encrypted files remotely. This option enables the computer to impersonate the user. The computer account then has access to the user's private key and is capable of encrypting and de crypting the user's files.
ENCRYPTED FILES ON REMOTE SERVERS
There are a couple things to be aware of if you're using encrypted files on remote servers. First, improper use of the Trusted for Delegation option could pose a security risk. Second, the file is not encrypted across the network; it is decrypted on the server and then transmitted across the network just like any other file. One thing you can do to mitigate this is to use some type of network encryption, such as IP Security (IPSec), to encrypt the network traffic. You can also connect to the remote share via Web Distributed Authoring and Versioning (WebDAV), which can have its own encryption. Connecting via a WebDAV share has the additional benefit that you don't have to designate the computer as being trusted for delegation.
Additional improvements to EFS include the ability to use stronger encryption algorithms (DESX only in Windows 2000 versus DESX or 3DES in Windows Server 2003) and the capability to encrypt offline files.
WebDAV and Remote Sharing
A benefit of file sharing in Windows Server 2003 is an extension to WebDAV. The new WebDAV redirector allows file sharing using normal HTTP, which in turn enables access to network shares across the Internet through firewalls and proxy servers. This new feature is implemented as the Web Sharing tab on the properties dialog box of the folder to be shared. You simply select the Web site and click Share This Folder, as shown in Figure 8.5. (IIS has to be installed first.)
Figure 8.5. You can enable remote file sharing by creating a virtual directory that is accessible via WebDAV.
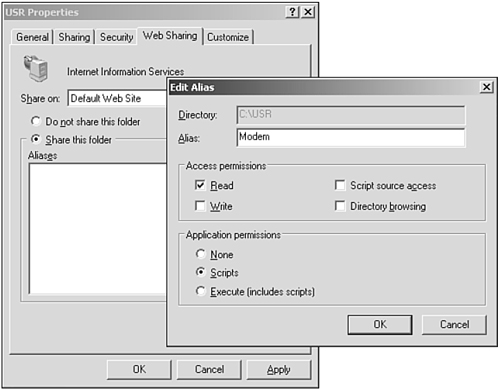
Next, you give the Web share a name—the alias—and designate the permissions (read, write, script source access, directory browsing, and scripts). Doing so creates a new application (a virtual directory enabled as an application) in the specified Web site. Windows XP clients can then map a drive to this WebDAV-enabled virtual directory, which makes the file share available to any application without requiring anything special.