
IN THIS CHAPTER
The Benefits of Automation and Tools
Test Tools
Software Test Automation
Random Testing: Monkeys and Gorillas
Realities of Using Test Tools and Automation
Testing software is hard work. If you've done some testing on your own while reading this book, you've seen that the physical task of performing the tests can take a great deal of time and effort. Sure, you could spend more time equivalence partitioning your test cases, reducing the number that you run, but then you take on more risk because you're reducing coverage, choosing not to test important features. You need to test more, but you don't have the time. What can you do?
The answer is to do what people have done for years in every other field and industry—develop and use tools to make the job easier and more efficient. That's what this chapter is all about.
Highlights of this chapter include
Why test tools and automation are necessary
Examples of simple test tools you can use
How using tools migrates to test automation
How to feed and care for “monkeys”
Why test tools and automation aren't a panacea
Think back to what you've learned about how software is created. In most software development models, the code-test-fix loop can repeat several times before the software is released. If you're testing a particular feature, that means you may need to run your tests not once, but potentially dozens of times. You'll check that the bugs you found in previous test runs were indeed fixed and that no new bugs were introduced. This process of rerunning your tests is known as regression testing.
If a small software project had several thousand test cases to run, there might be barely enough time to execute them just once. Running them numerous times might be impossible, let alone monotonous. Software test tools and automation can help solve this problem by providing a more efficient means to run your tests than by manual testing.
The principal attributes of tools and automation are
Speed. Think about how long it would take you to manually try a few thousand test cases for the Windows Calculator. You might average a test case every five seconds or so. Automation might be able to run 10, 100, even 1000 times that fast.
Efficiency. While you're busy running test cases, you can't be doing anything else. If you have a test tool that reduces the time it takes for you to run your tests, you have more time for test planning and thinking up new tests.
Accuracy and Precision. After trying a few hundred cases, your attention span will wane and you'll start to make mistakes. A test tool will perform the same test and check the results perfectly, each and every time.
Resource Reduction. Sometimes it can be physically impossible to perform a certain test case. The number of people or the amount of equipment required to create the test condition could be prohibitive. A test tool can be used to simulate the real world and greatly reduce the physical resources necessary to perform the testing.
Simulation and Emulation. Test tools are often used to replace hardware or software that would normally interface to your product. This “fake” device or application can then be used to drive or respond to your software in ways that you choose—and ways that might otherwise be difficult to achieve.
Relentlessness. Test tools and automation never tire or give up. They're like that battery-operated bunny of the TV commercials—they can keep going and going and…
All this probably sounds like great news. You could have test tools do all the work for you—turn them loose and wait for the results. Unfortunately, it's not that easy. Houses aren't built automatically, even though carpenters have power saws and nail guns. The tools just make it easier for them to do their work and for the resulting work to be of higher quality. Software test tools operate the same way.
NOTE
Software test tools aren't a substitute for software testers—they just help software testers perform their jobs better.
It's important to note that using test tools isn't always the right answer. Sometimes there's no substitute for manual testing. For now, take in the information about what tests tools can do and how they work. Think about how you might use them to complement your testing tasks. At the end of this chapter, you'll learn about a few limitations and cautions to consider before you embark on using tools on your projects.
As a software tester you'll be exposed to a wide range of testing tools. The types of tools that you'll use are based on the type of software that you're testing and whether you're performing black-box or white-box tests.
The beauty of test tools is that you don't always need to be an expert in how they work or exactly what they do to use them. Suppose that you're testing networking software that allows a computer to simultaneously communicate with up to 1 million other computers. It would be difficult, if not impossible, to perform a controlled test with 1 million real connections. But, if someone gave you a special tool that simulated those connections, maybe letting you adjust the number from one to a million, you could perform your tests without having to set up a real-world scenario. You don't need to understand how the tool works, just that it does—that's black-box testing.
On the other hand, a tool could be set up to monitor and modify the raw communications that occurs among those million computers. You'd likely need some white-box skills and knowledge of the low-level protocol to effectively use this tool.
NOTE
This example brings up an important distinction between two types of tools—non-invasive and invasive. If a tool is used only to monitor and examine the software without modifying it, it's considered non-invasive. If, however, the tool modifies the program code or manipulates the operating environment in any way, it's invasive. There are varying degrees of invasiveness and testers usually try to use tools that are as non-invasive as possible to reduce the possibility that their tools are affecting the test results.
The next few pages will discuss the major classes of testing tools and how they're used. Some examples are based on tools that are included with most programming languages; others are commercial tools sold individually. You may find, however, that your software or hardware is unique enough that you'll have to develop or have someone else develop custom tools that fit your specific needs. They will likely, though, still fall into one of these categories.
A viewer or monitor test tool allows you to see details of the software's operation that you wouldn't normally be able to see. In Chapter 7, “Testing the Software with X-Ray Glasses,” you learned how code coverage analyzers provide a means for you to see what lines of code are executed, what functions are run, and what code paths are followed when you run your tests. A code coverage analyzer is an example of a viewing tool. Most code coverage analyzers are invasive tools because they need to be compiled and linked into the program to access the information they provide.
Figure 15.1 shows an example of another type of viewer—a communications analyzer (or comm analyzer, for short). This tool allows you to see the raw protocol data moving across a network or other communications cable. It simply taps into the line, pulls off the data as it passes by, and displays it on another computer. In this example, you could enter a test case on Computer #1, confirm that the resulting communications data is correct on Computer #3, and check that the appropriate results occurred on Computer #2. You might also use this system to investigate why a bug occurs. By looking at the data pulled off the wire, you could determine if the problem lies in creating the data (Computer #1) or interpreting the data (Computer #2). This type of system is non-invasive to the software. In networking, such a monitor is known as a sniffer because, like an electronic nose, it sniffs the data from the air.

Figure 15.1. A communications analyzer provides a view into the raw data being transferred between two systems.
The code debuggers that come with most compilers are also considered viewers because they allow programmers or white-box testers to view internal variable values and program states. Anything that lets you see into the system and look at data that the average user wouldn't be able to see can be classified as a viewer test tool.
Drivers are tools used to control and operate the software being tested. One of the simplest examples of a driver is a batch file, a simple list of programs or commands that are executed sequentially. In the days of MS-DOS, this was a popular means for testers to execute their test programs. They'd create a batch file containing the names of their test programs, start the batch running, and go home. With today's operating systems and programming languages, there are much more sophisticated methods for executing test programs. For example, Java or a Perl script can take the place of an old MS-DOS batch file, and the Windows Task Scheduler (see Figure 15.2) can execute various test programs at certain times throughout the day.
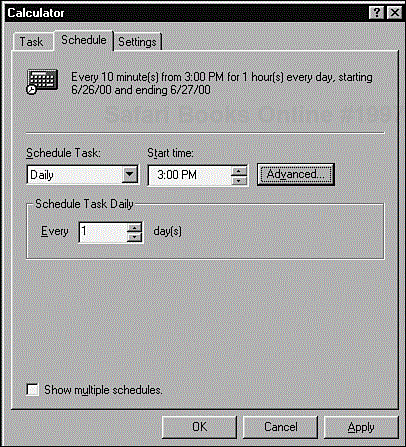
Figure 15.2. The Windows Task Scheduler allows you to schedule when programs or batch files are to run on your PC.
Figure 15.3 shows another example of a driver tool. Suppose that the software you're testing requires large amounts of data to be entered for your test cases. With some hardware modifications and a few software tools, you could replace the keyboard and mouse of the system being tested with an additional computer that acts as a driver. You could write simple programs on this driver computer that automatically generate the appropriate keystrokes and mouse movements to test the software.
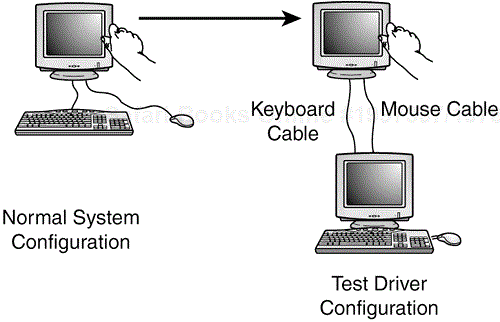
Figure 15.3. A computer can act as a driver test tool to replace the keyboard and mouse of a system being tested.
You might be thinking, why bother with such a complicated setup? Why not simply run a program on the first system that sends keystrokes to the software being tested? There are potentially two problems with this:
It's possible that the software or operating system isn't multitasking, making it impossible to run another driver program concurrently.
By sending keystrokes and mouse movements from an external computer, the test system is non-invasive. If a driver program is running on the same system as the software being tested, it's invasive and may not be considered an acceptable test scenario.
When considering ways to drive the software that you're testing, think of all the possible methods by which your program can be externally controlled. Then find ways to replace that external control with something that will automatically provide test input to it.
Stubs, like drivers, were mentioned in Chapter 7 as white-box testing techniques. Stubs are essentially the opposite of drivers in that they don't control or operate the software being tested; they instead receive or respond to data that the software sends. Figure 15.4 shows an example that helps to clarify this.
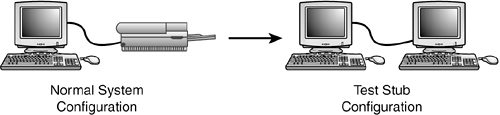
Figure 15.4. A computer can act as a stub, replacing a printer and allowing more efficient analysis of the test output.
If you're testing software that sends data to a printer, one way to test it is to enter data, print it, and look at the resulting paper printout. That would work, but it's fairly slow, inefficient, and error prone. Could you tell if the output had a single missing pixel or if it was just slightly off in color? If you instead replaced the printer with another computer that was running stub software that could read and interpret the printer data, it could much more quickly and accurately check the test results.
Stubs are frequently used when software needs to communicate with external devices. Often during development these devices aren't available or are scarce. A stub allows testing to occur despite not having the hardware, and it makes testing more efficient.
NOTE
You may have heard the term emulator used to describe a device that's a plug-in replacement for the real device. A PC acting as a printer, understanding the printer codes and responding to the software as though it were an actual printer, is an emulator. The difference between an emulator and a stub is that a stub also provides the means for a tester to view and interpret the data sent to it. A stub is a superset of an emulator.
Stress and load tools induce stresses and loads to the software being tested. A word processor running as the only application on the system, with all available memory and disk space, probably works just fine. But, if the system runs low on these resources, you'd expect a greater potential for bugs. You could copy files to fill up the disk, run lots of programs to eat up memory, and so on, but these methods are inefficient and non-exact. A stress tool specifically designed for this would make testing much easier.
Figure 15.5 shows the Microsoft Stress utility that comes with its programming language development software. Other operating systems and languages have similar utilities. The Stress program allows you to individually set the amounts of memory, disk space, files, and other resources available to the software running on the machine.
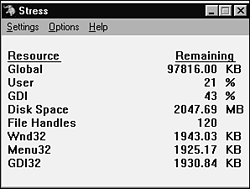
Figure 15.5. The Microsoft Stress utility allows you to set the system resources available to the software you're testing.
Setting the values to zero, or near zero, will make the software execute different code paths as it attempts to handle the tight constraints. Ideally, the software will run without crashing or losing data. It may run more slowly, or tell you that it's running low on memory, but it should otherwise work properly or degrade gracefully.
Load tools are similar to stress tools in that they create situations for your software that might otherwise be difficult to create. For example, commercially available programs can be run on web servers to load them down by simulating a set number of connections and hits. You might want to check that 10,000 simultaneous users and 1 million hits a day can be handled without slowing response times. With a load tool, you can simply dial in that level, run your tests, and see what happens.
Another class of tools is interference injectors and noise generators. They're similar to stress and load tools but are more random in what they do. The Stress utility, for example, has an executor mode that randomly changes the available resources. A program might run fine with lots of memory and might handle low memory situations, but it could have problems if the amount of available memory is constantly changing. The executor mode of the Stress utility would uncover these types of bugs.
Similarly, you could make a slight change to the viewer tool setup shown in Figure 15.1 to create a test configuration as shown in Figure 15.6. In this scenario, the viewer is replaced with hardware and software that allows not only viewing the data on the communications line, but also modifying it. It becomes an interference injector. Such a setup could simulate all types of communications errors caused by data dropouts, noisy or bad cables, and so on.
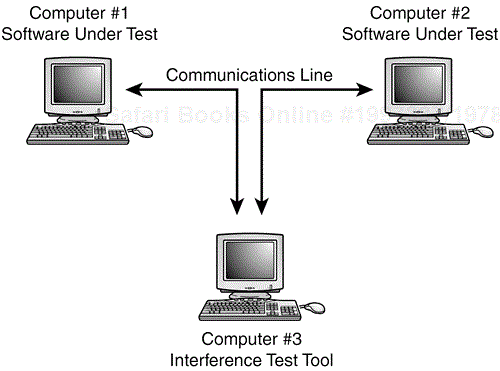
Figure 15.6. An interference injector hooked into a communications line could test that the software handles error conditions due to noise.
When deciding where and how to use interference injectors and noise generators, think about what external influences affect the software you're testing, and then figure out ways to vary and manipulate those influences to see how the software handles it.
You might call this last category of tools analysis tools, a best-of-the-rest group. Most software testers use the following common tools to make their everyday jobs easier. They're not necessarily as fancy as the tools discussed so far. They're often taken for granted, but they get the job done and can save you a great deal of time.
Word processing software
Spreadsheet software
Database software
File comparison software
Screen capture and comparison software
Debugger
Binary-hex calculator
Stopwatch
VCR or camera
Of course, software complexity and direction change all the time. You need to look at your individual situation to decide what the most effective tools would be and how best to apply them.
Although test automation is just another class of software testing tools, it's one that deserves special consideration. The software test tools that you've learned about so far are indeed effective, but they still must be operated or monitored manually. What if those tools could be combined, started, and run with little or no intervention from you? They could run your test cases, look for bugs, analyze what they see, and log the results. That's software test automation.
The next few sections of this chapter will walk you through the different types of automation, progressing from the simplest to the most complex.
The most basic type of test automation is recording your keyboard and mouse actions as you run your tests for the first time and then playing them back when you need to run them again. If the software you're testing is for Windows or the Mac, recording and playing back macros is a fairly easy process. On the Mac you can use QuicKeys; on Windows the shareware program Macro Magic is a good choice. Many macro record and playback programs are available, so you might want to scan your favorite shareware supplier and find one that best fits your needs.
Macro recorders and players are a type of driver tool. As mentioned earlier, drivers are tools used to control and operate the software being tested. With a macro program you're doing just that—the macros you record are played back, repeating the actions that you performed to test the software.
Figure 15.7 shows a screen from the Macro Magic Setup Wizard, which walks you through the steps necessary to configure and capture your macros.
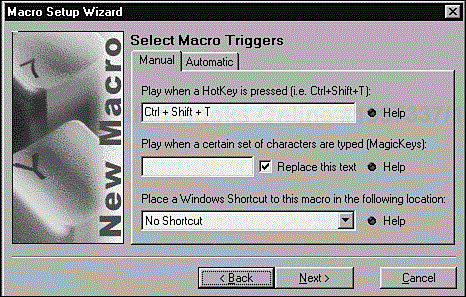
Figure 15.7. The Macro Magic Setup Wizard allows you to configure how your recorded macros are triggered and played back. (Figure courtesy of Iolo Technologies, www.iolo.com.).
The Macro Magic Setup Wizard allows you to set the following options for your macros:
Name. Giving the macro a name provides a way to identify it later. Even for a small software project you could write hundreds of macros.
Repetitions. Repetition testing is a great way to find bugs. You can set the number of times the macro will repeat or loop when it runs.
Triggers. You can set how the macro is started. This can be by a hot key (for example, Ctrl+Shift+T), by a set of typed-in characters (maybe
run macro 1), by clicking a shortcut, when a certain window is displayed (whenever Calculator is started, for example), or when the system has idled unused for a certain length of time.What's captured. You can select to capture (record) just keystrokes or both keystrokes and mouse actions such as moving and clicking.
Playback speed. The macro can play back from up to 20% slower to 500% faster than how you originally recorded it. This is important if your software's performance can vary. What would happen if the software you're testing became a bit slower and the button the macro was to click on wasn't yet onscreen?
Playback position. This option determines if the mouse movements and clicks should be absolute or relative to a certain window onscreen. If you're testing an application that might change onscreen positions, making your movements relative to that application is a good idea; otherwise, the mouse may not click where you would expect.
Now's a good time to experiment with recording and playing back macros. Find and download some macro software, try it out on a few simple programs such as Calculator or Notepad, and see what you think. Think like a tester! What you'll find is that although macros can do some automated testing for you, making it much easier and faster to rerun your tests, they're not perfect. The biggest problem is lack of verification. The macros can't check that the software does what it's supposed to do. The macro could type 100–99 into the Calculator, but it can't test that the result is 1—you still need to do that. This is an issue, sure, but many testers are happy just eliminating all the repetitive typing and mouse moving. It's a much easier job to simply watch the macros run and confirm that the results are what's expected.
Playback speed can be another difficulty with macros. Even if you can adjust the speed of playback, it may not always be enough to keep the macros in sync. A web page may take 1 second or 10 seconds to load. You could slow down your macros to account for the expected worst case, but then they'd run slowly even if the software was running fast. And, if the web page unexpectedly took 15 seconds to load, your macros would still get confused—clicking the wrong things at the wrong time.
NOTE
Be careful if you use a macro recorder to capture mouse movements and clicks. Programs don't always start up or appear in the same place onscreen. Setting the playback position to be relative to the program's window rather than absolute to the screen can help, but even then just a slight change in the GUI could throw off your captured steps.
Despite these limitations, recording and playing back macros is a popular means to automate simple testing tasks. It's also a good place to start for testers learning how to automate their testing.
Programmed macros are a step up in evolution from the simple record and playback variety. Rather than create programmed macros by recording your actions as you run the test for the first time, create them by programming simple instructions for the playback system to follow. A very simple macro program might look like the one in Listing 15.1 (created with the Macro Magic Setup Wizard). This type of macro can be programmed by selecting individual actions from a menu of choices—you don't even need to type in the commands.
Example 15.1. A Simple Macro That Performs a Test on the Windows Calculator
1: Calculator Test #2
2: <<EXECUTE:C:WINDOWSSYSTEM32Calc.exe~~~~>>
3: <<LOOKFOR:Calculator~~SECS:5~~>>
4: 123-100=
5: <<PROMPT:The answer should be 23>>
6: <<CLOSE:Calculator>>
Line 1 is a comment line identifying the test. Line 2 executes calc.exe, the Windows calculator. Line 3 waits up to five seconds for Calculator to start. It does this by pausing until a window appears with the word Calculator in its title bar. Line 4 types the keys 123–100=. Line 5 displays a message prompt stating that the answer should be 23. Line 6 closes the Calculator window and ends the test.
Notice that programmed macros such as this one have some real advantages over recorded macros. Although they still can't perform verification of the test results, they can pause their execution to prompt the tester (see Figure 15.8) with an expected result and a query for her to okay whether the test passed or failed.
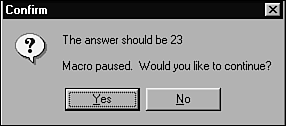
Figure 15.8. Simple programmed macros can't verify the results of a test but can prompt the tester for confirmation. (Figure courtesy of Iolo Technologies, www.iolo.com.).
Programmed macros can also solve many timing problems of recorded macros by not relying on absolute delays but instead waiting for certain conditions to occur before they go on. In the Calculator example, the macro waits for the program to load before it continues with the test—a much more reliable approach.
So far, so good. With programmed macros you can go a long way toward automating your testing. You have a simple macro language to use, generic commands for driving your software, and a means to prompt you for information. For many testing tasks, this is more than sufficient and you'll save a great deal of time automating your tests this way.
You're still missing two important pieces, though, to perform complex testing. First, programmed macros are limited to straight-line execution—they can only loop and repeat. Variables and decision statements that you'd find in a regular programming language aren't available. You also don't have the ability to automatically check the results of your test. For these, you need to move to a comprehensive automated testing tool.
What if you had the power of a full-fledged programming language, coupled with macro commands that can drive the software being tested, with the additional capacity to perform verification? You'd have the ultimate bug-finding tool! Figure 15.9 shows an example of such a tool.
Figure 15.9. Visual Test, originally developed by Microsoft and now supported through IBM, is an example of a tool that provides a programming environment, macro commands, and verification capabilities in a single package.
Automated testing tools such as Visual Test provide the means for software testers to create very powerful tests. Many are based on the BASIC programming language, making it very easy for even non-programmers to write test code.
If you wanted to try typing the string Hello World! 10,000 times, you'd write a few lines of code such as this:
FOR i=1 TO 10000
PLAY "Hello World!"
NEXT I
If you wanted to move your mouse pointer from the upper left of your 640×480 screen to the lower right and then double-click, you could do it like this:
PLAY "{MOVETO 0,0}"
PLAY "{MOVETO 640,480}"
PLAY "{DBLCLICK}"
A testing language can also give you better control features than just clicking specific screen areas or sending individual keystrokes. For example, to click an OK button, you could use the command
wButtonClick ("OK")
You don't need to know where onscreen the OK button is located. The test software would look for it, find it, and click it—just like a user would. Similarly, there are commands for menus, check boxes, option buttons, list boxes, and so on. Commands such as these provide great flexibility in writing your tests, making them much more readable and reliable. The most important feature that comes with these automation tools is the ability to perform verification, actually checking that the software is doing what's expected. There are several ways to do this:
Screen captures. The first time you run your automated tests, you could capture and save screen images at key points that you know are correct. On future test runs, your automation could then compare the saved screens with the current screens. If they're different, something unexpected happened and the automation could flag it as a bug.
Be aware that tests using screen captures can be a huge effort to maintain. Even a single pixel change will cause the screen comparison to fail. Unless your software's user interface is unchanging, you could end up manually comparing and recapturing screens with each run of your tests. That defeats the whole purpose of automation.
Control values. Rather than capture screens, you could check the value of individual elements in the software's window. If you're testing Calculator, your automation could read the value out of the display field and compare it with what you expected. You could also determine if a button was pressed or a check box was selected. Automation tools provide the means to easily do this within your test program.
File and other output. Similarly, if your program saves data to a file—for example, a word processor—your automation could read it back after creating it and compare it to a known good file. The same techniques would apply if the software being tested sent data over a modem or a network. The automation could be configured to read the data back in and compare it with the data that it expects.
As with screen captures, file comparisons can have issues, too. If the file or the file format includes a date, a counter, or other changing values, the file comparison will fail. You'll need to program your automation tool to ignore these differences.
Verification is the last big hurdle to overcome with automated software testing. Once you have that, you can take nearly any test case and create automation that will make trying that case either much easier or completely automatic.
To get more information about several of the popular test automation products available, visit the following websites:
Software Development Technologies at www.sdtcorp.com
Mercury at www.mercury.com
Segue Software at www.segue.com
These packages can be a bit pricey for individuals since they're targeted mainly at corporate testing teams. But, if you're interested in gaining some experience with them, contact the company and ask for an evaluation copy or, if you're a student, ask for a student discount. Most software tool companies will help you out in hopes that you'll like their product and eventually recommend it to others. Another option is to seek out open source automation tools. There are many available but they vary widely in their capabilities and quality so you'll need to investigate which ones might work best for your testing needs.
The test automation tools and techniques that you've learned about so far have concentrated on making your job as a software tester easier and more efficient. They're designed to help you in running your test cases or, ideally, running your test cases automatically without the need for constant attention.
Using tools and automation for this purpose will help you find bugs; while the tools are busy doing regression testing, you'll have time to plan new tests and design new and interesting cases to try. Another type of automated testing, though, isn't designed to help run or automatically run test cases. Its goal is to simulate what your users might do. That type of automation tool is called a test monkey.
The term test monkey comes from the idea that if you had a million monkeys typing on a million keyboards for a million years, statistically, they might eventually write a Shakespearean play, The Adventures of Curious George, or some other great work. All that random pounding of keys could accidentally hit the right combination of letters and the monkeys would, for a moment, look brilliant—much like the one in Figure 15.10.

Figure 15.10. Test monkeys will test forever as long as they have electricity and the occasional banana.
When your software is released to the public, it will have thousands or possibly millions of people using it. Despite your best efforts at designing test cases to find bugs, some bugs will slip by and be found by those users. What if you could supplement your test case approach with a simulation of what all those users would do, before you released your product? You could potentially find bugs that would have otherwise made it past your testing. That's what a test monkey can do.
NOTE
The use of a test monkey to simulate how your customers will use your software in no way insinuates that computer users are related to apes.
The easiest and most straightforward type of test monkey is a dumb monkey. A dumb monkey doesn't know anything about the software being tested; it just clicks or types randomly. Listing 15.2 shows an example of Visual Test code that will randomly click and type 10,000 times.
Example 15.2. Just a Few Lines of Code Can Create a Dumb Monkey
1: RANDOMIZE TIMER
2: FOR i=1 TO 10000
3: PLAY "{CLICK "+STR$(INT(RND*640))+", "+STR$(INT(RND*480))+" }"
4: PLAY CHR$(RND*256)
5: NEXT i
Line 1 initializes the random numbers. Line 2 starts looping from 1 to 10,000 times. Line 3 selects a random point onscreen between 0,0 and 639,479 (VGA resolution) and clicks it. Line 4 picks a random character between 0 and 255 and types it in.
The software running on the PC doesn't know the difference between this program and a real person—except that it happens much more quickly. On a reasonably speedy PC it will run in just a few seconds. Imagine how many random inputs you'd get if it ran all night!
Remember, this monkey is doing absolutely no verification. It just clicks and types until one of two things happens—either it finishes its loop or the software or the operating system crashes. If the software under test crashes, the monkey won't even know it, and will continue clicking and typing away.
NOTE
If you don't believe that a dumb monkey can possibly find a serious bug, try running one on your favorite computer game or multimedia program. It's very likely that it won't last more than a few hours before crashing.
It doesn't seem to make sense that simple random clicking and typing could find a bug, but it does for a couple reasons:
Given enough time and attempts, just like the monkeys writing Shakespeare, the random inputs will eventually stumble onto a magic sequence that the programmers and testers didn't think of. Maybe the monkey enters some data and immediately deletes it or types in a huge string where a short one was expected. Who knows? It will find it, though.
A dumb monkey, with its continuous repetition and use, can expose bugs such as memory leaks that might not occur until many hours or days of normal use. If you've ever used software that seemed to become less and less stable the longer you used it, you've seen a problem that could have been found with a dumb monkey.
Dumb monkeys can be extremely effective. They're easy to write and can find serious, crashing bugs. They lack a few important features, though, that would make them even more effective. Adding these features raises your monkey's IQ a bit, making him semi-smart.
Say that your monkey ran for several hours, logging thousands of random inputs before the software crashed. You'd know there was a problem but you couldn't show the programmer exactly how to re-create it. You could rerun your monkey with the same random seed but if it took several hours again to fail, you'd be wasting a lot of time. The solution is to add logging to your monkey so that everything it does is recorded to a file. When the monkey finds a bug, you need only to look at the log file to see what it was doing before the failure.
TIP
Another solution to track what your monkey does is to set up a video camera to record what happens on the screen. When you notice that the software has failed, just rewind and replay the tape.
It's also a good idea to program your monkey to operate only on the software you're testing. If it's randomly clicking all over the screen, it could (and will eventually) click the exit command and stop the program. Since the monkey doesn't know that the program closed, it'll keep on going. Think about what would happen if the monkey was clicking all over your computer's screen—ouch! Most programmable automation tools provide a way to always target a specific application, or to stop working if the application is no longer present.
Another good feature to make your monkey semi-smart is crash recognition. If you started your monkey running for the night and it found a bug as soon as you walked out the door, you'd lose many hours of valuable test time. If you can add programming to your monkey to recognize that a crash has occurred, restart the computer, and start running again, you could potentially find several bugs each night.
Moving up on the evolutionary scale is the smart monkey. Such a monkey takes the effectiveness of random testing from his less-intelligent brothers and adds to that an awareness of his surroundings. He doesn't just pound on the keyboard randomly—he pounds on it with a purpose.
A true smart monkey knows
Where he is
What he can do there
Where he can go
Where he's been
If what he's seeing is correct
Does this list sound familiar? It should. A smart monkey can read the software's state transition map—the type of map described in Chapter 5, “Testing the Software with Blinders On.” If all the state information that describes the software can be read by the monkey, it could bounce around the software just like a user would, only much more quickly, and be able to verify things as it went.
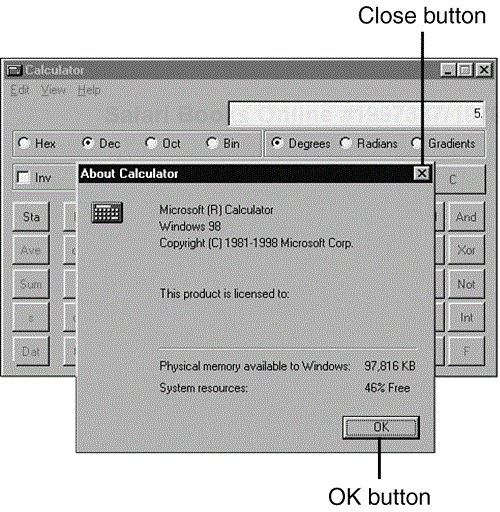
A smart monkey testing the Windows Calculator (see Figure 15.11) would know what buttons are available to press, what menu items are present, and where to type in the numbers. If it clicked the Help menu's About Calculator option, it would know that the only ways out were to click OK or the Close button. It wouldn't randomly click all over the screen, eventually stumbling onto one of them.
A smart monkey isn't limited to just looking for crashing bugs, either. It can examine data as it goes, checking the results of its actions and looking for differences from what it expects. If you programmed in your test cases, the smart monkey could randomly execute them, look for bugs, and log the results. Very cool!
Figure 15.12 shows a smart monkey called Koko, named after the gorilla that could speak in sign language. To program Koko, you feed it the state table that describes your software by defining each state, the actions that can be performed in that state, and claims that determine whether the result of executing an action is right or wrong.
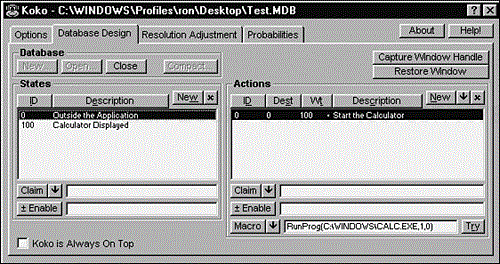
When Koko runs, it drives the software to a known state, randomly selects an action based on a weighting that simulates real-world likelihood, performs that action, and then checks the result. If the action results in the software changing states, Koko knows that and uses a new set of actions that apply to that new state.
With such a system, you could simulate real-world usage of your software, compressing thousands of hours of use into just a few hours. Smart monkeys are truly bug-finding machines!
Before you get all excited and want to run out and start using tools and automation on your tests, you need to read this section and take it to heart. Test automation isn't a panacea. When it is properly planned and executed it can make your testing immensely more efficient and find bugs that would have otherwise gone undiscovered. However, countless test automation efforts have been abandoned and cost their projects dearly when they went astray.
You should consider these important issues before you begin using the techniques described in this chapter:
The software changes. Specifications are never fixed. New features are added late. The product name can change at the last minute. What if you recorded thousands of macros to run all your tests and a week before the product was to be released, the software was changed to display an extra screen when it started up? All of your recorded macros would fail to run because they wouldn't know the extra screen was there. You need to write your automation so that it's flexible and can easily and quickly be changed if necessary.
There's no substitute for the human eye and intuition. Smart monkeys can be programmed to be only so smart. They can test only what you tell them to test. They can never see something and say, “Gee, that looks funny. I should do some more checking”—at least, not yet.
Verification is hard to do. If you're testing a user interface, the obvious and simplest method to verify your test results is capturing and comparing screens. But, captured screens are huge files and those screens can be constantly changing during the product's development. Make sure that your tools check only what they need to and can efficiently handle changes during product development.
It's easy to rely on automation too much. Don't ever assume that because all your automation runs without finding a bug that there are no more bugs to find. They're still in there. It's the pesticide paradox.
Don't spend so much time working on tools and automation that you fail to test the software. It's easy and fun to start writing macros or programming a smart monkey, but that's not testing. These tools may help you be more efficient, but you'll need to use them on the software and do some real testing to find bugs.
If you're writing macros, developing a tool, or programming a monkey, you're doing development work. You should follow the same standards and guidelines that you ask of your programmers. Just because you're a tester doesn't mean you can break the rules.
Some tools are invasive and can cause the software being tested to improperly fail. If you use a tool that finds a bug, try to re-create that bug by hand without using the tool. It might turn out to be a simple reproducible bug, or the tool might be the cause of the problem.
Software test tools and automation can work for any type of software. Most examples presented in this chapter dealt with graphical user interface testing but the same techniques can apply to testing compilers to networks to web servers. Just think about the testing tasks you need to perform and how you could use software to make it easier and faster—those are the areas to automate.
Sometimes you use your bare hand, sometimes you use a flyswatter, sometimes you (maybe inappropriately) use a hammer. Knowing when to use a test tool and which one to use is an important skill for a software tester. Creating and using tools and test automation can be a fun job. It's very cool to see your computer running on its own, cursor flying around, characters being entered automatically. You'll get lots of satisfaction while you're home in bed or out sipping a latté that your automation is chugging along at work, finding bugs.
These quiz questions are provided for your further understanding. See Appendix A, “Answers to Quiz Questions,” for the answers—but don't peek!