
Your music listening experience is about to change. Armed with Windows Media Player, you can do more than just hear the music; you can view it, you can animate it, and you can command it with your voice. You can not only expand your senses, but you can expand your horizons by tuning into and playing Internet radio stations from around the globe. The sound of music is still more important than anything else, but what fun you can have with Media Player!

In this chapter I’ll show you how visualizations, skins, and the color of Windows Media Player can be tweaked to meet your personal preferences, complement your mood, or even match your decor! You’ll learn how to change the look of the player in functional ways too; for instance, viewing detailed information about a song or artist. All it takes is downloading music or popping in a CD, a DVD, or a VCD, and then doing a little customizing.
I’ll show you how you can command Media Player with your voice and set it to play music as you drift off to sleep and awaken you with, you guessed it, music! You’ll also learn how to enhance Media Player with the Windows Media Player 9 Bonus Pack, Microsoft Plus!, and Microsoft Plus! Digital Media Edition. They all offer many more enhancements that will add to your musical experience. Make sure you know what the going price is for your stereo though; you might be ready to sell it in a garage sale when you’re finished with this chapter.
The version of Windows Media Player that was included with Windows XP isn’t the latest version available. If you haven’t done so already, upgrade to Windows Media Player 9 at www.microsoft.com/windowsxp/windowsmediaplayer. If you aren’t sure what version you have, open Windows Media Player, and on the Help menu, click About Windows Media Player. Version 9 is discussed throughout this book.
While you’re visiting the Web site, check out the latest news about Windows Media Player, download instructional videos to see new ways to use Media Player, and find new products. What a deal!
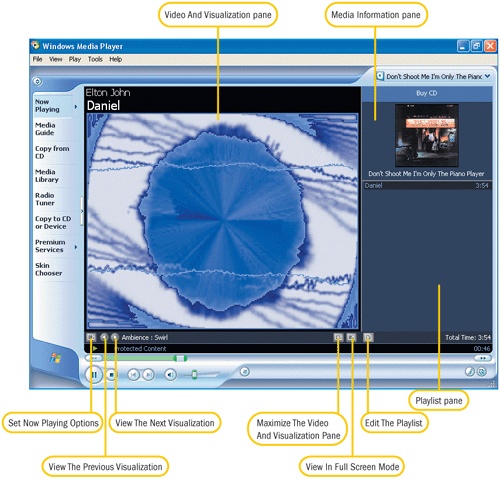
I wanted to name this section "Interfacing with the Interface," but I thought that was a little geeky. Instead of interfacing, let’s just explore. Figure 3-1 shows what Windows Media Player looks like when you first open it. As you look at the various areas and panes, think about all of the things you can do with your music—organize your titles, learn the lyrics to songs, download new videos and music, copy audio tracks to portable devices, create a media library, or listen to streaming radio stations at work. Whatever you want to do, there’s a way to do it from Windows Media Player.
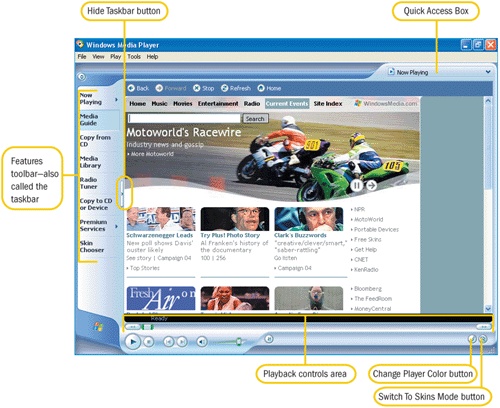
The Windows Media Player interface has several distinct sections and panes. To get the most out of the player, you’ll need to know what is available in all of these sections. These panes (also called areas) contain sections for performing tasks, controlling the playback of music, accessing playlists and CDs, and viewing information about what’s currently playing.
Before you go any further, put the icon for Windows Media Player in the Quick Launch area of the taskbar (if it isn’t there already) so that it is easily accessible:
Right-click the Windows taskbar located at the bottom of the screen and click Properties.
Click the Taskbar tab.
Select Show Quick Launch if it is not selected already. Click OK.
Click Start, point to All Programs, right-click Windows Media Player, and drag the icon to the Quick Launch area of the taskbar. Choose Copy Here.
To open Windows Media Player, double-click this icon.
If you’re connected to the Internet when you open Media Player, http://WindowsMedia.com opens and Media Guide is selected on the Media Player taskbar. If you aren’t connected to the Internet, but a connection has been configured, you’ll be prompted to connect. The Media Player taskbar is in the left pane of the Media Player window. As you can see in Figure 3-1, the taskbar contains a variety of choices, which you can switch among by simply clicking a button once. The following list describes the choices that are available to you from the Media Player taskbar:
Now Playing. View information about what is playing, view a video or visualization, or select songs you want to play. Click the arrow to choose a song by album, artist, genre, playlist, radio station, and more. See "Now Playing!" later in this chapter for more information.
Media Guide. Find music and videos on the Internet, locate information about movies and download video clips, preview new games, access the latest news stories, and catch up on sports scores.
Copy From CD. Play or copy a CD, or copy specific tracks from a CD to your hard drive. Imagine—a single CD with your favorite songs on it. No more juggling CDs while driving! I’ll explain this feature in Chapter 4.
Media Library. Organize your music and media files, create playlists, and find and view album information. If you created any photo stories in Chapter 2, you can view them here too. We’ll explore the powers of the Media Library in detail in Chapter 4.
Radio Tuner. Browse for radio stations by genre, keyword, or zip code. Once you’ve chosen a station, you can add it to your radio preset lists, visit the station’s Web site, or select and play the station. You can also preview and purchase music. Listening to Internet radio is a great way to get news from all over the world, to hear music from other countries, and even to learn a foreign language. See "Keeping in Touch with the World" later in this chapter for more information.
Copy To CD Or Device. Burn CDs from music you’ve stored in the Media Library. You can also copy songs to portable music devices. Learn how in Chapter 6.
Premium Services. Sign up for access to digital media by subscribing to an online subscription service. Subscribing to a service allows you to download movies and music directly to your computer, and to keep everything legal and on the up-and-up. All you need to know about downloading media is in Chapter 4.
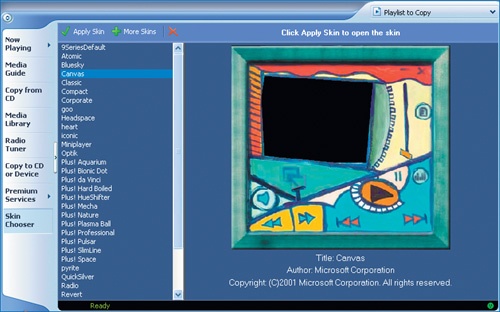
Skin Chooser. Change the look of Media Player by choosing different skins. You can preview each skin by clicking the name of the skin in the middle pane, as shown in Figure 3-2. If you look at the previewed skin closely, you can see the Preview and Next buttons, the Play button, and the Volume button. For more about skins, see "Give Me Some Skin" later in this chapter.
There are a couple of places on the Media Player interface that allow you to access information quickly. One is the arrow next to Now Playing on the taskbar, called the Quick Access Panel button, and the other is the Quick Access Box located at the top right corner of the Media Player window. From either area, you can access music and video clips, and locate specific titles by selecting them from organized playlists. The Quick Access Panel is shown in Figure 3-3.
Playback controls are located at the bottom of Windows Media Player 9. You’ll use these buttons to navigate through a playlist or a CD. Above this row of controls are a few others. The controls are shown in Figure 3-4.
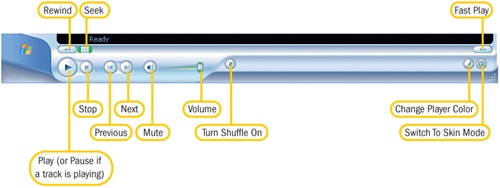
Most of these options are probably familiar to you. Play is used to play a track and Stop is used to stop it. Previous and Next are used to access the previous or next tracks, and the Volume slider changes the volume without your having to actually turn the knob on the speakers. Click Pause or Mute when the boss walks by the office! Some of the other options might not be so familiar though. Here are some of the coolest ones:
Turn Shuffle On. When you want to hear the tracks on a CD played randomly, use Turn Shuffle On. You can also turn shuffle on by clicking Play, and then clicking Shuffle.
Change Player Color. Click here to change the color of the player to suit your mood. You can even match the color of the player to the color of the carpet! You can also change the color by clicking View, pointing to Enhancements, and clicking Color Chooser.
Switch To Skin Mode. To view the player as its skin, click this button. To return to full mode, right-click the player and click Switch To Full Mode. There will be more about skins and the skin mode in the next section. You can also switch to skin mode by clicking View and clicking Skin Mode.
Rewind. Use when you want to rewind a track. Rewinding is a great way to learn to play a particular piece of music on the piano or guitar, or to learn the lyrics to a song. This won’t work for all tracks, and if it doesn’t, try the Seek slider.
Seek. Use this slider to locate a specific part of a song or track.
Fast Play. As with Rewind, use when you want to fast forward a track. This won’t work for all tracks, and when it doesn’t, it simply speeds up the track.
There are three modes for Windows Media Player: full mode, skin mode, and mini player mode. Most of the screenshots shown in this chapter were taken of Media Player in full mode. The basic controls for the player in this mode will appear in the taskbar.
While full mode is the most comprehensive and easiest option for working with Windows Media Player, after you’ve selected some songs to play, the skin mode is a lot more entertaining. But if your boss keeps walking by the office thinking you’re only listening to music and neglecting your work, you should consider the mini player mode, as shown in Figure 3-5. It’s easy enough to switch between the three modes, as listed in Table 3-1, so choose the one that fits you the best.
Table 3-1. Switching Between Display Modes
FROM THIS MODE | TO THIS MODE | DO THIS |
|---|---|---|
Full | Skin | Click the Switch To Skin Mode button located on the bottom right of the player or on the View menu, click Skin Mode. |
Skin | Full | Click the Return To Full Mode button or right-click the player, and then click Switch To Full Mode. |
Full or skin | Mini player | Click the Minimize button. This button might be difficult to locate on a skin; it is a small dash. If no controls are visible after minimizing, right-click an open area of the Windows taskbar, point to Toolbars, select Windows Media Player, and then minimize the player again. |
Mini player | Full or skin | Click the Restore button or double-click the Windows icon. |
Note
To restore Media Player, click the Restore button on the minimized player. Hover the mouse pointer over the controls to see what each button does.
Since you are already familiar with the interface in full mode and since mini player mode only consists of a few basic buttons, let’s move on to skin mode.
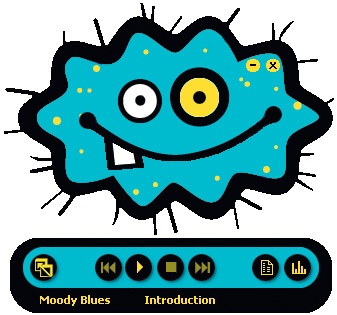
Skin mode is simply another way to view Media Player. With skins, you can customize how the player looks, matching the skin to your mood, your music, or your home or office decor. Each skin offers a specific level of functionality, and while those levels differ, they are generally less than what is offered in full mode. Figure 3-6 shows an example of a skin I like, called "Toothy."
To select and apply a new skin, open Windows Media Player in full mode and click Skin Chooser on the taskbar. Click each of the available skins to see what they look like. You’ll want to choose a pretty straightforward one to begin with, or you might have trouble figuring out how to make it work. Once you’ve decided on a skin, simply click another taskbar button or go ahead and switch by using the Switch To Skin Mode button. Either way, whichever skin you leave selected in the Skin Chooser is the one that will be applied. Microsoft Plus! software also includes skins and visualizations, and there are plenty of free skins on the Internet.
KNEE-DEEP IN SKINS

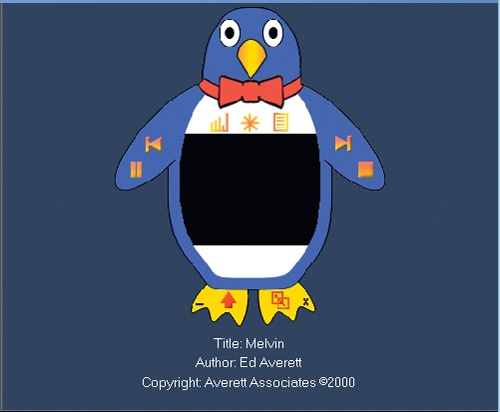
Just how personal do you want to get? With the hundreds of skins available for download from the Internet, you should be able to find one that’s right for you. There are skins that look like gorillas, televisions, goo, retro stereos, and flowers. You’ll also find skins that are modeled after movies including Back to the Future and The Terminator, and after characters like Harry Potter and Lara Croft. The skins are free and easy to download. You just have to know where to look. Here’s one way:
Open Windows Media Player in full mode and click Skin Chooser on the taskbar.
Click More Skins. (If your Web browser doesn’t open automatically, open it yourself and click this link again.) Skins can also be accessed by clicking Tools, pointing to Download, and clicking Skins.
Browse through the page at http://windowsmedia.com/9series/personization/skins.asp and locate a skin that you like.
Click the link for the skin you like to begin the download. When prompted, choose Yes to download and open the file on your computer.
After the download is complete, it will appear in the list of skins in Skin Chooser.
Click View Now in the dialog box to view the new skin.
Besides the skins available from inside Windows Media Player, you can download skins from all over the Internet. Some Web sites you might enjoy include the following:
You can find hundreds more by searching for Windows XP Media Player Skins in Internet Explorer.
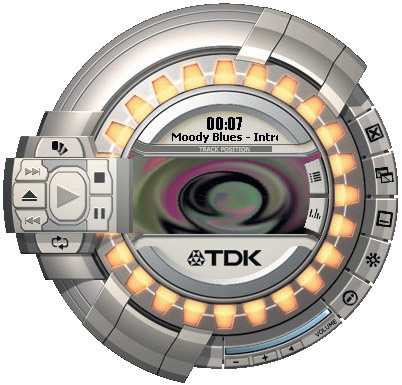
Another great skin source is the free Windows Media Bonus Pack for Windows XP that you can download from http://www.microsoft.com/windows/windowsmedia/download/bonuspack.aspx. At the time this book was written, three awesome skins were available: Stars and Stripes, The Sentinel, and the TDK Digital Mixmaster. Stars and Stripes and The Sentinel are really neat, but the TDK skin is definitely worth the download! The TDK skin includes a separate video module, which offers the ability to resize and zoom video, control video settings, and more.
Once you’ve chosen the skin, you can personalize it in several ways. This particular skin has an option to show an equalizer, which contains several presets for different types of music. There’s Folk, New Age, Classical, Metal, Rap, Grunge, and more. You can get the perfect sound without even trying! You can choose to show the playlist and information about the player too. The equalizer, the playlist information, and information about the player each look like separate remote controls for the player. It’s awesome!
Now that you understand the basics of the Windows Media Player interface, let’s play some music. To see how Media Player works by default, close it first, and then place a CD in the CD-ROM drive. If you’re prompted to choose what you’d like to do with this music CD, choose Play Audio CD Using Windows Media Player. If you’d like to always use Windows Media Player, select Always Do The Selected Action. Click OK. (If Windows Media Player is already open and you place a CD in the drive, the disc will play automatically.)
Tip
If your music CD opened in another program automatically, and there was no prompt to choose Windows Media Player, there’s a way to change that. Open Windows Media Player, click Tools, and click Options. Click the File Types tab, and then click the Select All button. Click OK.
You’ll notice right away that a video plays in sync with the music, as shown in Figure 3-7. This is a visualization, which is created electronically by Windows. Using visualizations, you can give your music a new twist and can experience it in new ways. It’s most effective when you choose visualizations that suit the music playing.
There are several ways to change visualizations. Let’s take a look at how to do that.
With Windows Media Player open and music playing, click Now Playing, then click the View menu, point to Visualizations, and point to Ambience. There are several Ambience choices.
Click any choice.
Repeat steps 1 and 2, experimenting with different categories of visualizations.
Click the Previous Visualization button or the Next Visualization button, labeled in Figure 3-8, to move sequentially through the visualizations.
VISUALIZE THIS!

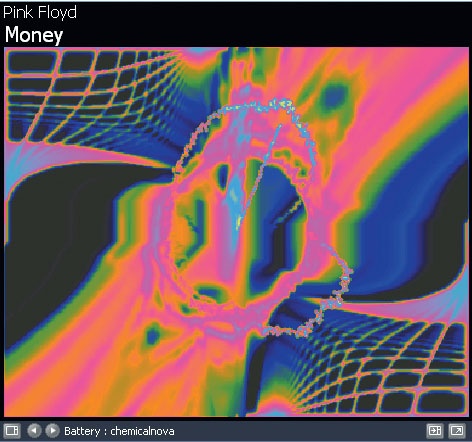
Are you in a funky mood? Then you need a funky visualization like 3D Alchemy Classic. Throwing a party? Put on some dance music and try any of the Ambience options. Do you need to relax? Pick a slow song and opt for Musical Colors, Electric Green. Want to be romantic? Try Battery, Smoke Or Water. If none of these does the trick, you’ll want to venture out onto the Internet to find one that does. The perfect visualization is out there, and one can be found to match almost any mood or any scene! If you can’t find what you want that’s included with Windows XP, here’s how to download some fresh ones:
There are always new visualizations to be found on the Internet. Here’s a list of some of my favorite sites:
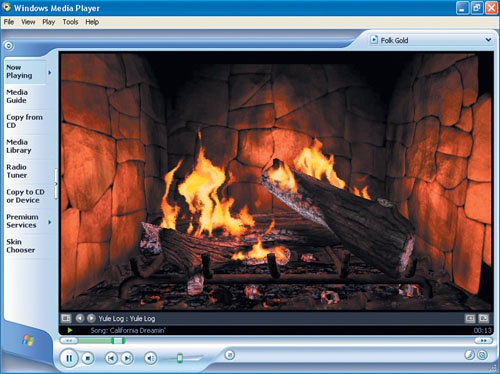
I’ve said it once, and I’ll say it again. Check out the Windows Media Bonus Pack for more fun stuff. The Bonus Pack, available at http://www.microsoft.com/windows/windowsmedia/download/bonuspack.aspx, has some really nice visualizations, including the following:
Yule Log. Use this visualization on a snowy day to warm you up, and enjoy the pops and flares of a traditional Yule log fire.
Trilogy. Choose from these visualizations when you are looking for something fresh and new. These visualizations are colorful, soothing, and quite different from the existing visualizations in Media Player.
Dungeon Siege. Use these visualizations if you’re into the game Dungeon Siege from Microsoft. You’ll view a female warrior, creatures, and flames moving to the music.
Null. Use this option to turn off visualizations and album art.

If the visualizations distract you, you can choose No Visualization or Album Art from the Visualizations options in the View menu.
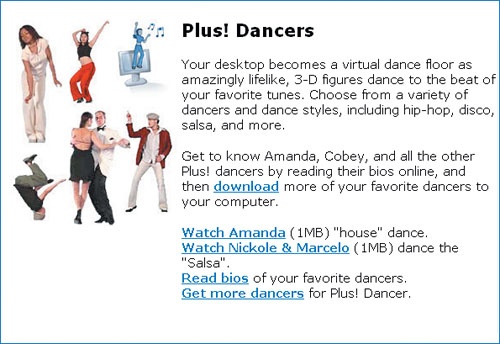
If visualizations aren’t enough for you, turn your desktop into a virtual dance floor! Using Microsoft Plus! Digital Media Edition, you can add 3-D figures to your screen and they’ll dance to whatever music you are playing. You can set them to dance all of the time, even if music isn’t playing, but that’s not as fun. There are lots of dance styles to choose from, including ballroom, modern, salsa, rap, and hip-hop, but if you’d like more, you can download new dancers in different styles and sizes. If you don’t already have Microsoft Plus! Digital Media Edition, turn to the Introduction at the beginning of this book to find out where to purchase and how to download and install it. Let’s get this dance party started!
Once you’ve installed Microsoft Plus!, follow these steps to start and configure the dancers:
Click Start, point to All Programs, point to Microsoft Plus! Digital Media Edition, and click Plus! Dancer. A dancer will appear on the left side of the screen, but it can be dragged to any location on the desktop.
If a dancer is already dancing, right-click the dancer. If there is no dancer dancing, click the Dancer icon in the taskbar notification area.
Click Start Dancing to start the dancer, Stop Dancing to stop the dancer, or Dance Only When Music Plays if that is your configuration choice.
Click Options to set options for the dancers (including which dancer should dance for which genre), to set random dancers, or to use a specific dancer. You can also change visibility, preview the dancer, and set similar program options.
Click Meet The Plus! Dancers to get more information about the people dancing. You’ll be taken to www.microsoft.com/windows/plus/dme/music.asp where you can get all kinds of cool information. Figure 3-9 shows an example of what you might see.
With Microsoft Plus! Digital Media Edition, you’ll never dance alone again.
You can change the size of Media Player, the visualization window, and even the size of some of the panes if you want to personalize the player even more. You can size it so that it takes up only half of the screen, or put it in a corner of the monitor. You can increase and decrease the width of many of the panes so that you can see complete titles, artist information, album information, and other categories, and you can even increase the width of some of the title bars. Here are several ways to resize the Media Player:
To change the size of the entire player, click and drag from the bottom right corner of the player or click the Restore Down button in the top right of the Media Player window and drag to the appropriate size.
From inside the Media Library, Now Playing, or Copy To CD Or Device sections of the player, maneuver the mouse over the pane dividers until a two-headed arrow is showing. Click and drag to resize the pane.
From inside the Copy From CD, Media Library, or Copy To CD Or Device sections of the player, position the mouse over the title bar dividers until it becomes a two-headed arrow, then click and drag to increase or decrease the size of the listings.
From Now Playing, change the size of the visualization by clicking the Maximize The Video And Visualization Pane or View Full Screen button.
Now that you can play a CD, personalize the Media Player, and view visualizations and dancers, it’s time to explore more advanced options. There’s quite a bit you can do with Windows Media Player, and one of those things is to acquire information about what’s currently playing. So, if you’d like a little more information about what’s in the changer, look no further than the two panes in the right section of the interface.
The top pane, which contains the album cover and title of the CD, is the Media Information pane, and the bottom pane, which contains the songs on the CD, is the Playlist pane. You can see both of these panes in Figure 3-8, shown earlier. If you aren’t seeing both of these panes, click View, point to Now Playing Options, and click any options that do not have a check mark by them.
In the Media Information pane, you can see the album art if it’s available, and if you don’t own the CD yet (perhaps you’ve previously downloaded it or are listening to a single track from a friend’s CD), you can choose to buy the CD or view the album information. You can also click the picture of the album cover to see more about the artist. In the Playlist pane, you can quickly jump to any other song in the list just by double-clicking it.
You can play songs at variable speeds (and even in reverse) if the media and file type support it. Playing a song faster than it is normally played can really liven up a party, and playing a song more slowly is a great way for an aspiring musician to learn to play it. You can also use this feature to set your favorite music to the perfect workout speed! Not all content can be played at variable speeds though, including CDs and some streaming or progressively downloaded media. Streaming (or progressive downloading) is a way to send data over the Internet in packets, and as the packets arrive, the media is played.
When you think about playing music slower or faster than it was originally intended, you probably think about spinning a record too slowly or too quickly on a record player—play it too slowly and the voices and music are low pitched and in the wrong key, play it too quickly and it sounds like the Chipmunks! With digital technology though, you can maintain the correct key and tone if you use one of a few specific file types and stay within the proper range of speeds. This feature is know as time expansion, and is supported for files with the following extensions: .wma, .wmv, .wm, .mp3, and .asf.
To play a file using variable speeds and experience time expansion, play one of the sample files in Windows Media Player, as described here:
Open Windows Media Player.
In the Quick Access Box, select Like Humans Do (Radio Edit).
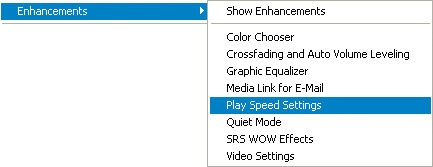
On the View menu, point to Enhancements, and click Play Speed Settings, as shown in Figure 3-10.
In the Enhancements pane, move the Play Speed slider to the right to increase the speed and to the left to decrease it. Notice that if you stay within the green boundary, there is no deterioration of the music; it is only played faster or slower. (As you look at the interface, notice that there are also buttons for playing media Slow, Normal, and Fast, if you prefer not to work with a slider.)
With Media Player playing your favorite songs, with the perfect skin and visualization selected, and with your dog at your heels, you head off to the kitchen to make a sandwich. Back at the computer moments later, you find that your hands are full and you’ve dripped mustard all over your shirt! Perhaps you aren’t that messy, but it’s still going to be a pain to put down that sandwich and switch to another song or artist, or even to do something as simple as changing the volume. There’s no need to drop everything—you can command Windows Media Player with your voice.
With Microsoft Plus! you can control the player by saying, out loud, "Media Player, play," or "Media Player, stop." You can also adjust the volume, skip to the next or a previous song, play a particular playlist, artist, or CD track, and show or hide visualizations, all just by speaking into a microphone or headset. If you still haven’t purchased, downloaded, and installed Microsoft Plus! after hearing about all of the amazing things you can do with it and Windows XP, turn to the Introduction at the beginning of this book to find out how. Welcome to a sneak peek at the future!
Before you can use the voice command options, you’ll have to work through the setup process, as described here:
Click Start, point to All Programs, and click Microsoft Plus!.
Click Digital Media (on the left side), and under Plus! Voice Command For Windows Media Player, click Start.
On the Welcome To Plus! Voice Command For Windows Media Player page, click I Want Plus! Voice Command To Run As The Only Speech Recognition Program or I Want Plus! Voice Command To Run With Other Speech Recognition Programs. The first option is the better choice. Click OK. If this page doesn’t open automatically, right-click the icon on the system tray, then click Getting Started, and move on to step 4.
On the second page of the Plus! Voice Command configuration setup, click Configure Microphone, and work through the Microphone Wizard.
On the same page, click Configure Language Bar to learn about the language bar feature. The language bar is used to turn your microphone on and off and is displayed on the taskbar.
On the same page, click Available Commands to learn about the commands you can use. There are commands for controlling playback and for controlling appearance, as well as other supported commands. These commands will be listed next. Close any open windows and then click OK.
If you purchased and installed Microsoft Plus! prior to updating to Windows Media Player, you will be prompted to let Windows look for updates. Click Yes if prompted. Close the Microsoft Plus! window.
Now that the Plus! Voice Command program has been installed and configured, you can begin using it. Imagine being able to simply speak into the microphone to start and stop music, switch tracks, and view visualizations—there’s no need to even stop dancing! If you configure your microphone just right, you might even be able to yell your commands from across the room and not even have to get out of your recliner! Follow these steps:
Click Start, point to All Programs, and click Microsoft Plus!.
Click Digital Media. Under Plus! Voice Command For Windows Media Player, click Start. Windows Media Player will open automatically and you’ll see the icon on the system tray. This icon is shown in Figure 3-11. If the player does not start automatically, you can start it from the Quick Launch area of the taskbar. If the program is already running on the taskbar, right-click, and choose Plus! Voice Command On from the choices.
On the language bar, if necessary, click the Voice Command icon to highlight it (do not choose Dictation).
Tip
If the language bar isn’t showing on the taskbar, open Control Panel, open Regional And Language Options, click the Languages tab, and under Text Services And Input Languages, click Details. On the Settings tab, under Preferences, click Language Bar, and select the Show The Language Bar On The Desktop check box.
On the language bar, click Microphone to turn it on. Your language bar should look something like the one shown in Figure 3-12.
With the microphone on and with Plus! Voice Command enabled, say clearly and slowly, "Media Player, start." If the command is received properly, the Voice Command area of the taskbar will change to Command Received. If the command was not interpreted correctly, it will display the question What Was That? Figure 3-13 shows an example.

There are other commands besides "Media Player, play," and "Media Player, stop." While you can access all of the commands from the Plus! Voice Command Help files, here are the ones you’ll probably use most often:
"Media Player, pause". Pauses the current song or video.
"Media Player, next". Advances to the next song or video.
"Media Player, previous". Plays the previous song or video.
"Mute". Turns off the sound but does not stop the playback.
"Mute off". Turns the sound back on after having been muted.
"Play artist ______". Plays songs by the artist you specify.
"Play genre ______". Plays songs in the genre you specify.
"Restart". Plays the current song or video from the beginning.
"Volume down" and "Volume up". Decreases and increases the volume.
There are also several commands that can be used to control appearance. Again, a complete list can be found in the Plus! Help files, but these are the ones you’ll probably use most:
Hide (Show) Captions
Hide (Show) Equalizer
Hide (Show) Lyrics
Hide (Show) Visualization
View Full Mode
View Skin Mode
You can also say, "What can I say?," "Show (or Hide) Help," and "Stop listening" (which turns off the microphone).
If you find that you are totally into being able to control Media Player with your voice (and if your friends are wowed by your new super powers), you’ll probably be looking for ways to improve the performance. The first time I configured my Plus! Voice Command program, the player would stop and start if I did so much as even type too loud, and would ask me, "What was that?" when I spoke into the microphone in my clearest voice. If this has happened to you, there are several ways to improve the performance of this speech recognition feature, including the following:
Use a high-quality, close-talk headset and a USB microphone with gain adjustment support.
Create a speech recognition profile. Open Control Panel, click Sounds, Speech, and Audio Devices, click Speech, and then click Train Profile. You can create different profiles for different users.
Talk at a consistent level, use a consistent rate of speech, and pause between words.
Click the Voice Command icon in the system tray and click Options. Experiment with the Confidence Level slider, which determines how the player will respond to your commands. A higher setting causes less command recognition but requires you to speak more clearly. You can also click Speech Settings to configure and test the microphone and train your speech profile.
MUSIC FOR LIFE

I just can’t go to sleep until Jay Leno does his monologue! And although it’s great that I can fall asleep with certainty if Jay is on, this has its drawbacks; waking up to an infomercial at 2 A.M. is certainly one of them. If this sounds familiar, or if you like to fall asleep with the radio on and that same radio is supposed to wake you up as well, have I got a deal for you. If you’ve purchased Microsoft Plus! Digital Media Edition, you can set Windows Media Player to turn itself off after you’ve fallen asleep, and turn itself back on to wake you at a specified time.
DON’T LET THE BEDBUGS BITE!
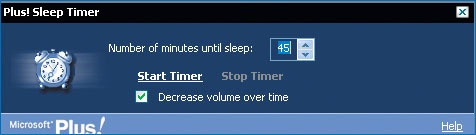
You might not believe it, but your computer can replace your stereo, your clock radio, and your alarm. You can use the Plus! Sleep Timer to automatically turn off the DVD, the radio, or the CD you’re playing at about the time you figure you’ll nod off. Of course, this is all achieved through the Media Player, which means that you can watch visualizations if you want to, and the perfect visualization can be quite an effective sleep aid. The Sleep Timer automatically turns off the music, the video, or whatever else you’ve got playing, after a specified number of minutes. It can even decrease the volume as you fall asleep. Here’s how to get started:
Choose the music to fall asleep with and begin playing it.
To enable the Sleep Timer plug-in, click Tools, click Options, and then click the Plug-Ins tab.
Under Category, click Background. Select Plus! Sleep Timer (Background) and click OK.
On the Tools menu, point to Plug-Ins, and select Plus! Sleep Timer.
In the Enhancements pane, in the Number of Minutes Until Sleep box, select an appropriate number, as shown here.
Click Start Timer.
WAKE UP WITH STYLE
After falling asleep so serenely, why not wake up that way too? Throw out that obnoxious LCD clock radio you’ve had since college and let your computer take over the job. Say good-bye to that loud beeping or those insufferable DJs, and hello to your favorite song or movie clip. Using the Plus! Alarm Clock, you can schedule an alarm that will wake you up with music or other media files stored in the Windows Media Player library. Just like any other alarm, it even comes with a snooze button. Here’s how to set it up:
Click Start, point to All Programs, point to Microsoft Plus! Digital Media Edition, and click Plus! Alarm Clock.
Click Alarm, click Create, and then work through the wizard to name the alarm, set how often the alarm should occur, configure the start times and dates, select the music to play, set the volume, and then preview the alarm.
Once the alarm is configured, use the Plus! Alarm Clock window to change the alarm, delete the alarm, or set advanced options. The figure here shows the available advanced options. (While you’re at it, if you spend a lot of time at your computer, consider setting an hourly alarm to remind you to get up and walk around a bit. Staring at the monitor for hours can be damaging to the eyes.)
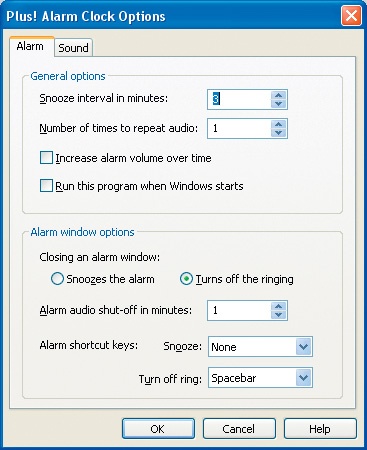
The Plus! Alarm Clock advanced options are shown here. These options are available by clicking Tools and clicking Options. On the Alarm tab there are options to set a snooze interval, repeat the audio, increase alarm volume over time, and configure how the alarm will respond to closing the alarm window. On the Sound tab, you can configure a default sound in case the media you’ve already chosen is unavailable, to configure a chime to sound each hour, and to change other alarm settings.
As an alternative to listening only to your own CDs, Windows Media Player can be used to listen to music or news from almost anywhere. If you have a job where access to the outside world is limited, or if you are at a computer that doesn’t have a CD player, you might find yourself feeling out of touch. Keeping in touch is easy if you have an Internet connection and Windows Media Player.
Using the Radio Tuner, you can access a vast number of streaming radio stations on the Internet. You can listen to stations that play your favorite music, or you can locate talk radio stations to listen to others’ opinions. You can get the latest sports and scores on The Ticket or ABC Radio. You can even complement your foreign language studies by finding a station from the appropriate country.
Finding a station is easy, but there are so many choices, it might be hard to pinpoint what it is you want to hear. You can use the Radio Tuner to search by genre, and the list is quite long. Some of my favorite categories include Editor’s Picks, Classic Rock, Holiday, Latin, and 80s.
WHAT’S ON THE HORIZON?
Connecting to the world through Internet radio is a not only a great way to locate new music or listen to your favorite oldies, it is also the perfect way to check on local traffic, weather, or events, as well as hear news from all over the world. Access your local stations to check the traffic before you leave work, check the weather before calling for a tee time, or find out where you are supposed to park before leaving for the concert. You can listen to the BBC and MSNBC to get world views on different subjects too, or practice a foreign language by listening to a news talk station in your desired language. You can listen to radio stations from almost every major city on the planet. I practice my Italian by listening to Radio13.net from Italy.
Here are some of my other favorites:
The Basement. Sydney, Australia
MSN Music—Reggae Planet. Microsoft
80s Moves and Grooves. Los Angeles, California
AccuRadio—Holiday Music. Net Only
World Radio Network. United Kingdom
Many of these radio stations also have a Web site, which gives the transmission specifics and information about the station itself. While the station plays, you can see information about buffering, reception, the station, whether plug-ins are running or not, and transmission speed from the Media Player’s status bar.
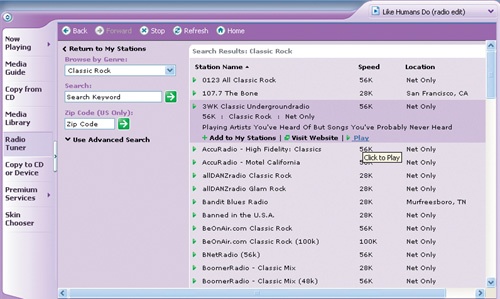
To locate a radio station you’d like to hear, open Windows Media Player, click Radio Tuner on the taskbar, and make a choice from the Browse By Genre box. In Figure 3-14, I’ve selected Classic Rock, and I’ve clicked the 3WK Classic Underground radio to see the details for that station. The mouse pointer is directly over the Play button. Click this button to play the station. I’ve changed the color of the player to purple.
As you might have noticed, you can also select and play stations based on keywords; type in words such as sports, news, gossip, hip-hop, or night music. If you want to hear local stations, search by zip code. You can also select Advanced Search if you don’t find exactly what you want with these three options.
Once you’ve found a station you like, you can add it to a preset list. Preset lists store your favorite stations like the buttons on your car radio do. Whenever you want to hear the station again, you just select it from a list. Here’s how:
Locate an Internet radio station.
Click it in the right pane as shown in Figure 3-14 earlier.
Click Add To My Stations. (Add To My Stations will change to Added To My Stations.)
You can now access your saved stations from the Media Library. Just click Media Library, expand the Radio category, and click My Favorites. In this same section you can also locate featured stations and recently played stations.
You can add stations to the Media Library in other ways too. While using the player to listen to a station, on the File menu, point to Add To Media Library, and then click Add Currently Playing Track.
- digital media
Music, movies, and videos that are transmitted and viewed digitally either over the Internet or using a computer. Digital media can also be used to represent hardware such as smart media cards, film readers, compact discs, and digital cameras.
- interface
The graphic display that allows a user to communicate with the application or the computer. Often referred to as a GUI (graphical user interface), it usually contains sliders, buttons, menus, and other options for commanding the program.
- playlist
The list of songs available on the computer, in a particular group, or on an album. A single album’s playlist contains the songs on that album.
- skins
Graphically diverse, interesting, and theme-related interfaces. The skin changes the appearance of the default interface, and (as far as Windows Media Player goes) generally offers less functionality than the original.
- streaming
A way to transmit digital media from the Internet to a user’s computer. Using this technology, the media file is broken up into parts, and as the parts arrive at the user’s computer, they are played. Using streaming technology, the user does not have to wait for the entire download to be complete before playing the file.
- system tray
The area of the Windows taskbar that contains the system clock and other options, including icons for virus-protection programs, network connections, sound and audio, and Windows Messenger. The system tray is located at the far right of the taskbar.
- time expansion
The ability to change the speed of a song by making it play faster or slower than originally recorded. If a song is of the correct file type and is stored on your computer, and if you stay within the proper range of speeds, you can maintain the correct key and tone of the song while increasing or decreasing the speed at which the file is played. This feature is supported in Windows Media Player for files with the following extensions: .wma, .wmv, .wm, .mp3, and .asf.
- VCD
Video compact discs (VCDs) can be played on a VCD player connected to a television set or computer, on some CD-ROM drives, and some DVD players. Each disc holds approximately 74 minutes of video.
- visualization
Graphics that move with the music. Windows Media Player comes with many visualizations, all of which are created digitally by Windows. These visualizations include graphics that look like equalization bars, warps, waves, bubbles, clouds, spikes, and more.