
Chapter 7 NetWare Printing Services
Instant Access
![]() Install iPrint as part of the server installation, or install it after the fact through iManager.
Install iPrint as part of the server installation, or install it after the fact through iManager.
![]() Configure the Broker, Print Manager, and Printer objects through iManager.
Configure the Broker, Print Manager, and Printer objects through iManager.
![]() After the Broker and Print Manager are created, load BROKER.NLM and NDPSM.NLM on your NetWare 6.5 server to enable NetWare print services.
After the Broker and Print Manager are created, load BROKER.NLM and NDPSM.NLM on your NetWare 6.5 server to enable NetWare print services.
![]() Use the Manage Printers page in iManager to configure printer objects.
Use the Manage Printers page in iManager to configure printer objects.
![]() Use the RPM Configuration page in iManager to configure automatic printer support for workstations.
Use the RPM Configuration page in iManager to configure automatic printer support for workstations.
![]() IPPSRVR.NLM will be loaded automatically on the NetWare server that hosts the Print Manager for that printer.
IPPSRVR.NLM will be loaded automatically on the NetWare server that hosts the Print Manager for that printer.
![]() The iPrint client is required to access and manage iPrint printers. Install the client by going to the iPrint home page on your NetWare 6.5 server at
The iPrint client is required to access and manage iPrint printers. Install the client by going to the iPrint home page on your NetWare 6.5 server at http://<server_IP_address or DNS_name>:631/ipp.
![]() To tell the printer how to print a job (the paper form to use, format, and so on), open iManager >> Manage Printer. Specify the printer and select the Configurations page to change printer configuration.
To tell the printer how to print a job (the paper form to use, format, and so on), open iManager >> Manage Printer. Specify the printer and select the Configurations page to change printer configuration.
![]() To print files from within an application, simply follow the application’s normal printing procedures (making sure the application is configured to print to a network printer).
To print files from within an application, simply follow the application’s normal printing procedures (making sure the application is configured to print to a network printer).
![]() To cancel or move a print job, open iManager >> Manage Printer. Specify the printer and select the Printer Control >> Jobs page.
To cancel or move a print job, open iManager >> Manage Printer. Specify the printer and select the Printer Control >> Jobs page.
Along with file sharing, printer sharing was one of the original value propositions of NetWare back in the early 1980s. NetWare 6.5 continues to deliver a powerful printing solution that allows users to print to any network printer to which they have been given rights—even if that printer is on the other side of the world! NetWare 6.5 uses iPrint as its default print environment. iPrint leverages the powerful foundation of Novell Distributed Print Services (NDPS), but puts a Web face to printing and removes the dependence on the Novell client for print services. With iPrint, mobile employees, business partners, and even customers can access your printers through existing Internet connections. iPrint uses the Internet Printing Protocol (IPP), an industry standard, to make it possible to seamlessly print over the Internet, thus making location-based printing a reality.
The benefits of IPP include the following:
![]() Enjoys broad vendor support
Enjoys broad vendor support
![]() Works over local networks as well as the Internet
Works over local networks as well as the Internet
![]() Provides encrypted print services via SSL or TLS
Provides encrypted print services via SSL or TLS
![]() Provides accessibility to print services from any platform (Windows, Macintosh, Linux, Unix, and so on)
Provides accessibility to print services from any platform (Windows, Macintosh, Linux, Unix, and so on)
However, because iPrint is implemented on the foundation of NDPS, you get all the advantages of robust network printing services coupled with the interoperability and ease-of-use of an Internet standard. So, through the combination of IPP and NDPS, you get the following capabilities:
![]() Global access to printers managed through eDirectory
Global access to printers managed through eDirectory
![]() Web-based printer location tool and driver installation
Web-based printer location tool and driver installation
![]() Capability to print from anywhere to anywhere
Capability to print from anywhere to anywhere
![]() Web-based user controls and printer status
Web-based user controls and printer status
![]() Printers don’t have to be IPP-aware to function with iPrint
Printers don’t have to be IPP-aware to function with iPrint
Practically, this means that once your iPrint environment is configured, you can enjoy powerful printing options suitable for the Web-based business world, such as:
![]() Printing across the Internet: Remote employees can actually print directly to a printer located at the office because iPrint resources are available as standard Web URLs. Simply enter the appropriate URL for a company’s print services, locate the printer to which you want to print, and iPrint takes care of the rest—including the installation of the iPrint client software, if necessary.
Printing across the Internet: Remote employees can actually print directly to a printer located at the office because iPrint resources are available as standard Web URLs. Simply enter the appropriate URL for a company’s print services, locate the printer to which you want to print, and iPrint takes care of the rest—including the installation of the iPrint client software, if necessary.
![]() Printing away from “home”: Setting up printing when visiting a different company location used to be an ordeal. No more. Now, simply access the company’s print services URL, browse to the office at which you are currently located, and use the office map to locate the printer closest to you. Selecting the printer will install the necessary driver software automatically.
Printing away from “home”: Setting up printing when visiting a different company location used to be an ordeal. No more. Now, simply access the company’s print services URL, browse to the office at which you are currently located, and use the office map to locate the printer closest to you. Selecting the printer will install the necessary driver software automatically.
![]() Printing instead of faxing: Because you can now print across the Internet, you can effectively print instead of FAXing. All you need is an iPrint printer to which you can connect. With the Web-based iPrint tools it is possible to monitor the print job remotely and then email the intended recipient when the print job has finished.
Printing instead of faxing: Because you can now print across the Internet, you can effectively print instead of FAXing. All you need is an iPrint printer to which you can connect. With the Web-based iPrint tools it is possible to monitor the print job remotely and then email the intended recipient when the print job has finished.
iPrint provides the robust printing environment you expect from NetWare while at the same time integrating with modern printing standards that extend NetWare printing capabilities to the Internet.
Because iPrint leverages NDPS, you might recognize several of the components that have been around since NetWare 5. In order to properly manage and route network print jobs from multiple users to multiple printers, NDPS uses the following software components:
![]() Printer Agent: A printer agent is simply software that manages a printer. Every printer must have a printer agent in the iPrint world. A printer’s printer agent does the following:
Printer Agent: A printer agent is simply software that manages a printer. Every printer must have a printer agent in the iPrint world. A printer’s printer agent does the following:
![]() Manages the printer’s print jobs
Manages the printer’s print jobs
![]() Responds to client queries about print jobs or printer capabilities
Responds to client queries about print jobs or printer capabilities
![]() Communicates with the printer and is notified when something goes wrong, or when some other monitored event occurs so it can be communicated to those interested in such things
Communicates with the printer and is notified when something goes wrong, or when some other monitored event occurs so it can be communicated to those interested in such things
![]() Gateways: The gateway handles communication between the Print Manager and the printer. Novell provides a default gateway that will work in most situations (NDPSGW.NLM), but some printer vendors have their own custom gateway software that provides proprietary printer-specific information. For information on using a vendor-specific gateway, consult the printer documentation.
Gateways: The gateway handles communication between the Print Manager and the printer. Novell provides a default gateway that will work in most situations (NDPSGW.NLM), but some printer vendors have their own custom gateway software that provides proprietary printer-specific information. For information on using a vendor-specific gateway, consult the printer documentation.
![]() Print Manager: The Print Manager controls all printer agents installed on a given server. Server-based printer agents are required for printers that are not NDPS-aware. NDPS-aware printers include their own printer agents, so one is not needed on the server.
Print Manager: The Print Manager controls all printer agents installed on a given server. Server-based printer agents are required for printers that are not NDPS-aware. NDPS-aware printers include their own printer agents, so one is not needed on the server.
![]() Broker: The NDPS broker provides centralized management of printing services for all the printers on the network. Because every server doesn’t need to be a broker, the network is analyzed to determine whether a broker needs to be installed. A new broker will not be installed if an existing broker is within three network “hops” of the server currently being installed. However, there might be situations where you want to create an additional broker anyway; for example, to provide fault tolerance and reliability to the printing environment. The broker provides three services:
Broker: The NDPS broker provides centralized management of printing services for all the printers on the network. Because every server doesn’t need to be a broker, the network is analyzed to determine whether a broker needs to be installed. A new broker will not be installed if an existing broker is within three network “hops” of the server currently being installed. However, there might be situations where you want to create an additional broker anyway; for example, to provide fault tolerance and reliability to the printing environment. The broker provides three services:
![]() Resource management service: This service allows resources such as printer drivers, fonts, print job banners, and so on to be installed in a central location and then downloaded to clients, printers, or any other entity on the network that needs them.
Resource management service: This service allows resources such as printer drivers, fonts, print job banners, and so on to be installed in a central location and then downloaded to clients, printers, or any other entity on the network that needs them.
![]() Event notification service: This service receives notifications from the printer agents and distributes them to users and network administrators via predetermined methods.
Event notification service: This service receives notifications from the printer agents and distributes them to users and network administrators via predetermined methods.
Notification methods might include NetWare pop-up messages, entries in log files, email messages, or any other custom delivery method that can be created.
![]() Service registry service: Printers advertise their availability and attributes, such as make, model, and address, through this service.
Service registry service: Printers advertise their availability and attributes, such as make, model, and address, through this service.
TIP
If you are managing printers at multiple sites, you should plan to have a broker at each geographical location to reduce printing-related traffic over your WAN links.
In addition to the previous NDPS components, iPrint adds the following components:
![]() IPPSRVR.NLM: This module provides the IPP compatibility for the iPrint environment, and generates a URL for the printer whereby it can be accessed through iPrint’s Web-based tools. It will be loaded on any server that hosts a Print Manager for printers configured to use the IPP protocol.
IPPSRVR.NLM: This module provides the IPP compatibility for the iPrint environment, and generates a URL for the printer whereby it can be accessed through iPrint’s Web-based tools. It will be loaded on any server that hosts a Print Manager for printers configured to use the IPP protocol.
![]() iPrint Web pages: These pages are used to install the iPrint client software and printers, and to view and manage print jobs. The look and feel of these pages is customizable with any HTML editor you might want to use.
iPrint Web pages: These pages are used to install the iPrint client software and printers, and to view and manage print jobs. The look and feel of these pages is customizable with any HTML editor you might want to use.
![]() Print provider and Web browser plug-ins: These are the only client-side pieces necessary to leverage the iPrint environment. As previously mentioned, the Novell client is not required.
Print provider and Web browser plug-ins: These are the only client-side pieces necessary to leverage the iPrint environment. As previously mentioned, the Novell client is not required.
With this introduction to iPrint components you are now ready to start working with the printing capabilities of NetWare 6.5.
If you didn’t select iPrint during the server installation, you can install it after the fact from iManager. To install iPrint from iManager, complete the following steps:
1. Launch iManager and open the Install and Upgrade link, and then select Install NetWare 6.5 Products.
2. Click Remote Product Install in the right frame.
3. Browse to the location of the NetWare 6.5 Operating System CD-ROM and click OK.
4. Browse to and select the server to which you want to install iPrint and click Next. Authenticate as an Admin user to the server you selected.
5. At the Components screen, select only iPrint, and click Next.
6. At the Summary screen, select Copy Files to install iPrint. You will need to insert, or specify the location of, the NetWare 6.5 Products CD-ROM.
7. When the iPrint installation is complete, click Close.
With iPrint installed on your NetWare 6.5 server, you are now ready to start configuring your iPrint environment.
There are a few general tasks involved in setting up an iPrint environment. All of them can be performed through iManager.
![]() Create a broker.
Create a broker.
![]() Create a Print Manager.
Create a Print Manager.
![]() (Optional) Set up DNS: Although not technically required, it will be a lot easier for your users to access Web-based iPrint tools if DNS is configured on your network. Otherwise, they will have to specify IP addresses to get to iPrint services. If the IP address changes for any reason, users will have to re-install their printers. For more information about configuring DNS, see Chapter 5, “Novell eDirectory Management.”
(Optional) Set up DNS: Although not technically required, it will be a lot easier for your users to access Web-based iPrint tools if DNS is configured on your network. Otherwise, they will have to specify IP addresses to get to iPrint services. If the IP address changes for any reason, users will have to re-install their printers. For more information about configuring DNS, see Chapter 5, “Novell eDirectory Management.”
![]() Create printer objects.
Create printer objects.
![]() Install iPrint support on workstations.
Install iPrint support on workstations.
The following sections take a look at each of these tasks and describe how you can accomplish each of them.
To create a new broker for your iPrint environment, complete the following steps:
1. Launch iManager and open the iPrint link.
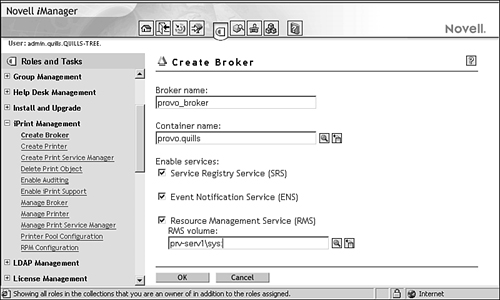
2. Select Create Broker. At the Create Broker page, provide the necessary information and click OK (see Figure 7.1).
![]() Broker name: Specify a name for the Broker object.
Broker name: Specify a name for the Broker object.
![]() Container name: Specify a location for the Broker object in the eDirectory tree.
Container name: Specify a location for the Broker object in the eDirectory tree.
![]() Enable services: Select the services that you want to load on this broker. Broker services have been described previously. If you enable the Resource Management Service (RMS), you need to specify the volume on which the RMS database is stored. The volume name must include server name and directory context. For example:
Enable services: Select the services that you want to load on this broker. Broker services have been described previously. If you enable the Resource Management Service (RMS), you need to specify the volume on which the RMS database is stored. The volume name must include server name and directory context. For example:
PRV-SERV1_PRV_DATA.PROVO.QUILLS
3. Click OK to complete the process.
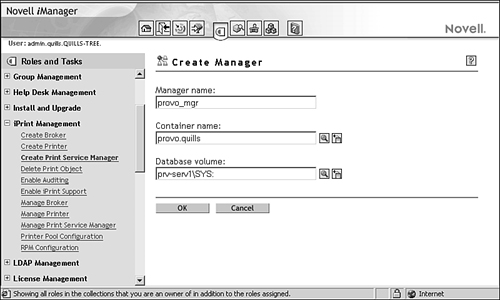
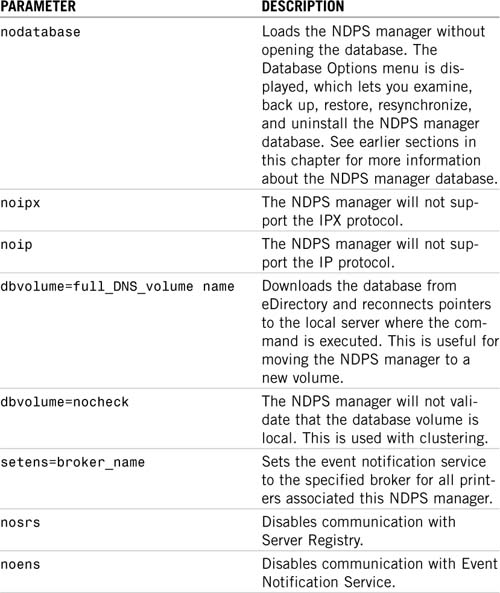
4. Load BROKER.NLM on the appropriate server using the following syntax. Table 7.1 lists the switches you can use when loading BROKER.NLM.
broker <broker name> /[startup parameter]
TIP
Modify the AUTOEXEC.NCF file and add the command to load BROKER.NLM, with all the appropriate information, if you want print services to load automatically whenever the server starts.
Once installed, the NDPS broker provides the foundation for your NetWare printing environment, including centralized management of printing services for all the printers on the network.
NetWare 6.5 ships with many printer drivers for common printers. However, as printer manufacturers release new printers and updated drivers, you might need to add a driver that is not included with the default set that shipped with NetWare 6.5.
You can also add new banner pages to the broker using the same procedure. To see the list of existing printer drivers and banners, and to add a new driver or banner to the broker, complete the following steps:
1. Launch iManager and open the iPrint link.
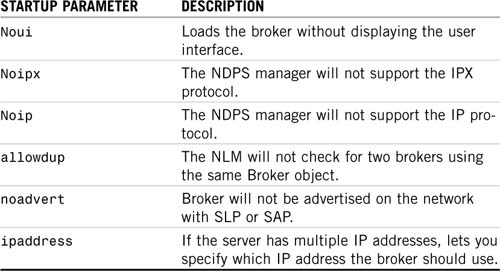
2. Click Manage Broker. Specify or browse to your NDPS Broker object and click OK.
3. Select the Resource Management Service tab to add a resource to your broker, as shown in Figure 7.2.
4. Select the subpage for the type of resource you want to add. A list appears, showing all resources of that type that are currently loaded.
5. Click Add from File or Add from System and specify the driver you want to add. Click OK and follow the prompts to add the driver or banner to your broker. Add from File means you have a separate driver available. Add from System means you want to extract the appropriate resource driver from a system .CAB file.
The new driver or banner will appear in the list of available resources in the Resource Management database.
By default, all three of the broker’s services are enabled when the broker is installed. If you want to disable (or re-enable) a service, you can do so from iManager by completing the following steps:
1. Launch iManager and open the iPrint link.
2. Click Manage Broker. Specify or browse to your NDPS Broker object and click OK.
3. Select the Broker Control tab and uncheck the service that you want to disable.
4. Click Apply to disable the specified service for the selected Broker.
WARNING
You should disable a broker service only if you’re sure you do not need that service on your network, or if another broker is available that is no more than three hops away.
The specified broker services will be unloaded from the NetWare 6.5 server.
Once you have created and loaded your NDPS broker, you are ready to create a Print Manager on your server. To do this, create a Print Manager object in the eDirectory tree and then load NDPSM.NLM on the server by completing the following steps:
1. Launch iManager and open the iPrint link.
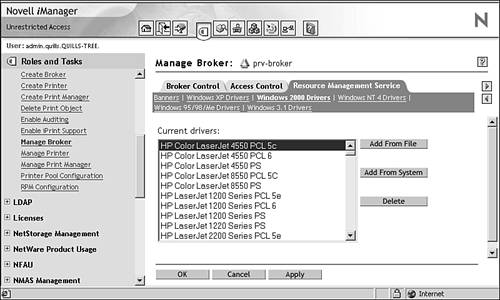
2. Select Create Print Manager. At the Create Manager page, provide the necessary information and click OK (see Figure 7.3).
![]() Manager name: Specify a name for the Print Manager object.
Manager name: Specify a name for the Print Manager object.
![]() Container name: Specify a location for the Print Manager object in the eDirectory tree.
Container name: Specify a location for the Print Manager object in the eDirectory tree.
![]() Database volume: Specify the location of the RMS database that you specified when creating the NDPS broker.
Database volume: Specify the location of the RMS database that you specified when creating the NDPS broker.
3. Click OK to return to the iManager home page.
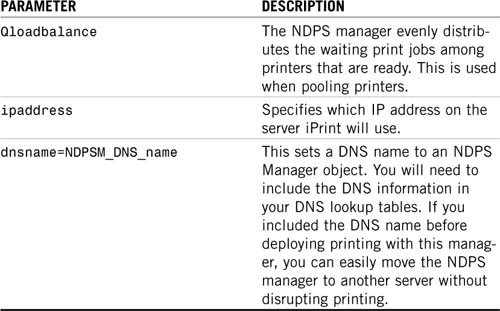
4. From the console of the appropriate server, load NDPSM.NLM using the following syntax (see Table 7.2 for the switches to use when loading NDPSM.NLM):
load ndpsm <Manager name> /[startup parameter]
The Print Manager will control all printer agents that you install on your NetWare 6.5 server. Server-based printer agents are required for printers that are not NDPS-aware.
Each server that is running the Print Manager loads IPPSRVR.NLM when iPrint is enabled for a printer associated with that manager. To provide additional stability to the printing environment, you should assign a DNS name for each Print Manager that will host IPP printers. That way, if the Print Manager is moved to a different server, the iPrint URLs for associated IPP printers will still work.
To enable DNS for each Print Manager, first load NDPSM.NLM with the /dnsname command-line switch using the following syntax:
NDPSM <NDPS_Manager> /dnsname=<DNS Name>
Once the Print Manager is loaded with a DNS name, add a new resource record (A Rec) to your DNS name server that links the new DNS name to the IP address of the NetWare 6.5 server hosting the Print Manager. For more information on configuring DNS, see Chapter 5.
To create an iPrint printer, you must first create a Printer object in the eDirectory tree, and you must have already created a Print Manager object. To create a Printer object using iManager, complete the following steps:
1. Launch iManager and open the iPrint link.
2. Select Create Printer. At the Create Printer page, specify the required information and click Next.
![]() Printer name: Specify a name for the Printer object.
Printer name: Specify a name for the Printer object.
![]() Container name: Specify a context where the Printer object will be located.
Container name: Specify a context where the Printer object will be located.
![]() Manager name: Specify the name of the Print Manager that will manage this printer.
Manager name: Specify the name of the Print Manager that will manage this printer.
![]() Gateway type: This specifies the printer gateway that will be used with this printer. Only the Novell LPR gateway is available through iManager. Third-party gateways from specific printer manufacturers must be installed from the server console. For more information on third-party gateways, see the NetWare 6.5 online documentation and the documentation that came with your printer.
Gateway type: This specifies the printer gateway that will be used with this printer. Only the Novell LPR gateway is available through iManager. Third-party gateways from specific printer manufacturers must be installed from the server console. For more information on third-party gateways, see the NetWare 6.5 online documentation and the documentation that came with your printer.
3. Specify the IP address or DNS name of your printer and click Next.
4. Select the appropriate printer driver(s) from the driver lists and click Next. You can select a driver for each type of Windows workstation platform: Windows XP/2000, Windows 95/98/Me, and Windows 3.1. These are the drivers that will be automatically downloaded to the client workstations when they install the printer.
5. Click OK to return to the iManager home page.
Once the printer is created, make sure spooling is configured properly by completing the following steps:
1. From iManager, select iPrint Configuration and click Manage Printer.
2. Specify the printer you just created and click OK.
3. At the Manage Printer page, select the Configuration tab and choose the Spooling page.
4. From the Spooling page you can set the location of the spooling area (it defaults to the same location as the Print Manager), restrict the amount of space available for spooling, and determine the print-scheduling algorithm (default is First In, First Out).
IPP support is now enabled automatically when a new printer object is created. However, you can disable/re-enable IPP support from the Client Support tab in the Manage Printers page.
If you need to service legacy print queues, select the Client Support tab from the Manage Printer page and click the QMS Support subpage. From there you can specify the print queues that you want this printer to service. iPrint offers PSERVER emulation through NDPS, so you don’t need to load PSERVER.NLM on the server.
Once your printers have been installed, managing them is relatively easy. Everything you need is located in iManager. The Printer Management links, shown in the left side of the navigation frame in Figure 7.3, are a one-stop shop for managing user access, printer configuration, and print service support.
iPrint lets you create a pool of printers to share print duties. Users install one of the printers associated with a pool. When a print job is sent, if the installed printer is busy, the Print Manager can automatically redirect that print job to an idle printer in the pool. Pool printers need to use the same print driver and be of a similar make and model to be sure that print jobs will print correctly. All printers in a pool must be assigned to the same Print Manager.
To create a printer pool, complete the following steps:
1. From iManager, select iPrint and then click Printer Pool Configuration.
2. Specify the Print Manager for which you are creating a printer pool. Select Create Pool from the drop-down list, and click OK.
3. Specify a name for the printer pool, and select the printers that should be included in the pool. Click Next.
4. Click OK to return to the iManager home page.
Once created, the printer pool will transparently share jobs among all printers in the pool when necessary.
After creating printers, iPrint allows you to designate specific printer drivers to be automatically downloaded and installed on workstations so that the users don’t have to worry about installing their own printer support. The printers you specify will appear automatically on the user’s installed printers list. This feature is known as Remote Printer Management (RPM). You can also use Remote Printer Management to designate a default printer and remove printers from workstations.
NOTE
You aren’t required to designate printers to download and install automatically. Users can also install printer support manually. However, depending on your network, it might save time to designate one or more automatic downloads.
With Remote Printer Management, you configure printer drivers and other information you want to be installed. When a user logs in, the workstation software checks the user’s container object for any new printer information. If new printer information (such as a new driver to be downloaded) exists, the workstation is automatically updated.
You can access Remote Printer Management from iManager by completing the following steps:
1. From iManager, select iPrint and click RPM Configuration.
2. Specify the object for which you want to configure Remote Printer Management and click OK. Valid object selections include Organization, Organizational Unit, Group, or User. Your choice will determine how broadly the RPM rules are applied.
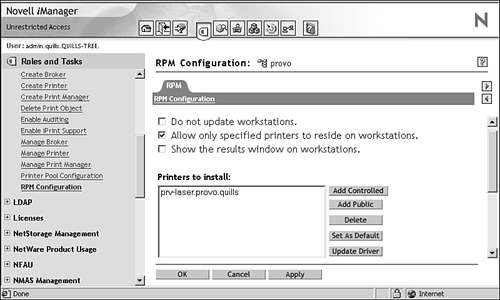
3. At the RPM Configuration page, as shown in Figure 7.4, specify your desired configuration and click OK. You can enable/disable RPM, specify printers to install automatically, select a default printer, and even specify printers that should be removed if currently installed.
Once configured, Remote Printer Management will automatically apply the printer configuration you have specified to any workstation logged into by a user within the scope at which the RPM configuration has been applied.
If a required printer driver isn’t automatically downloaded, users can still install the printer support on their workstations manually. This involves using the standard Windows printer installation tools to locate, specify, and install the appropriate print drivers.
This method requires knowledge about the printer they are trying to install and access to appropriate print drivers, which are often available from Windows printer libraries.
In order for users to use iPrint, they need two components:
![]() The Novell iPrint client
The Novell iPrint client
![]() A printer to which they can print
A printer to which they can print
When a user selects a printer to be installed by iPrint, iPrint determines whether the Novell iPrint client is installed. If it is not installed, iPrint will walk the user through the client installation. Following this, the printer driver is downloaded and the printer is installed in the user’s Printers folder.
iPrint client files and printers can be quickly and easily installed from a Web page.
TIP
The iPrint client and appropriate printer drivers can also be distributed using ZENworks for Desktops. If you have this additional Novell product, consult the Novell online documentation for more information on automating client delivery and installation with ZENworks for Desktops.
The iPrint client has the following requirements for installation:
![]() Windows 95/98/Me or Windows XP/2000/NT
Windows 95/98/Me or Windows XP/2000/NT
![]() Web browser with JavaScript enabled, such as Microsoft Internet Explorer 5.0 or later
Web browser with JavaScript enabled, such as Microsoft Internet Explorer 5.0 or later
From such a workstation, users browse to the iPrint URL, which, by default, is the following: http://<server_IP_address or DNS_name>/ipp. Figure 7.5 shows a sample iPrint printers home page.
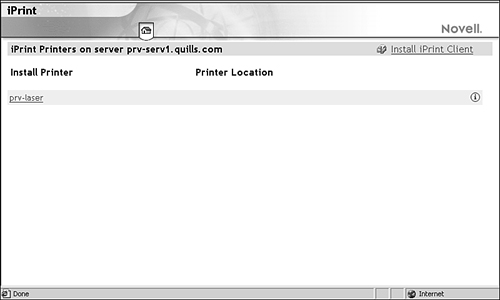
The iPrint printers home page displays a listing of available printers and a link to install the iPrint client. Users simply select Install iPrint Client and follow the prompts to complete the client installation. If they try to install a printer before installing the iPrint client, they will be prompted to install the client first.
NOTE
The iPrint client requires the workstation to reboot to complete the installation. The iPrint client can be removed through the standard Remove Programs option in the Windows Control Panel. There is also an Uninstall option under the Novell iPrint program group in the Start menu.
After the client is installed, users return to the same iPrint URL to install the necessary printer support. If you have associated a printer driver with each of your iPrint printers, it is automatically installed on the users’ workstations. If a printer driver already exists on the workstations, it will be overwritten.
When the printer driver installs, a Printer icon is added to the users’ Printers folder. From that point on, users access the printer through all the normal avenues.
You can control how printer driver options are set when the printer driver is installed on a workstation. Printer driver defaults are kept in the INST.HTM file, which is stored in SYS:APACHE2HTDOCSIPPDOCS on your iPrint server. Complete the following steps to change the printer driver default settings:
1. Open SYS:APACHE2HTDOCSIPPDOCSINST.HTM using any text editor.
2. Search for the section heading PARAM NAME=driver-options, as shown in Figure 7.6.
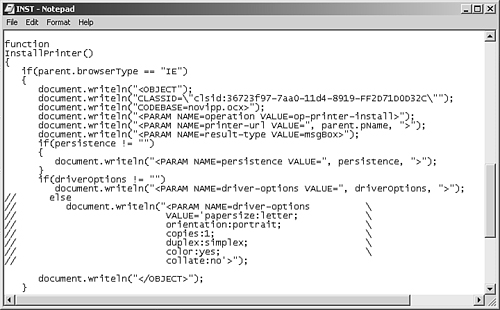
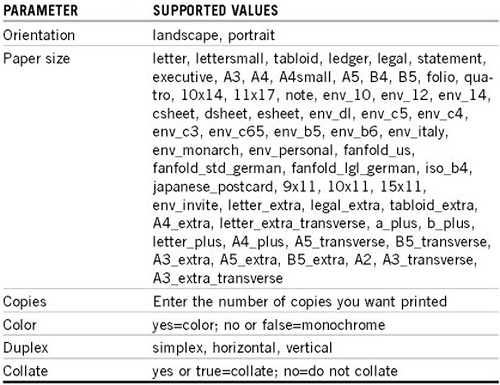
3. Replace the value after the colon (:) with the desired parameter for each option you want to change. Supported parameter values are listed in Table 7.3.
4. Save and close INST.HTM.
With your preferred settings defined in the INST.HTM file, workstations will receive your preferred configuration automatically.
Periodically, users will need to update their iPrint client. Each time a user starts his or her workstation, the iPrint client checks with the default printer to determine whether a newer version of the iPrint client exists. If necessary, a newer version of the client can be installed. You can control how this update takes place with the IPRINT.INI file.
IPRINT.INI is stored in SYS:APACHE2HTDOCSIPPDOCS on each server where iPrint is installed. It lets you specify whether the user should be prompted before a new client is installed, or if the update should be a “hands-free” process.
Descriptive text for each entry in IPRINT.INI is included in the file. You can view and edit the file using a text editor.
Location-based printing is one of the key values of iPrint. It lets users easily locate and install printers using one of two methods:
![]() Printer list views: With list views, you configure printer lists so that they make the most sense for your users, such as by building, by office location, or by eDirectory context.
Printer list views: With list views, you configure printer lists so that they make the most sense for your users, such as by building, by office location, or by eDirectory context.
![]() Printer maps: Using the iPrint Map Designer, you can create maps of printer locations by using drag-and-drop technology. Once created, the maps are posted on a Web server for users to access. By looking at the maps, they locate a printer close to their location and simply click the Printer icon. The printer driver and iPrint client, if necessary, are then installed on the users’ workstations.
Printer maps: Using the iPrint Map Designer, you can create maps of printer locations by using drag-and-drop technology. Once created, the maps are posted on a Web server for users to access. By looking at the maps, they locate a printer close to their location and simply click the Printer icon. The printer driver and iPrint client, if necessary, are then installed on the users’ workstations.
Each of these methods is discussed in the following sections.
iPrint provides a default list of printers organized by the Print Manager. In order to create a custom list, you can modify the HTML of the iPrint page and create links to individual printers’ IPP URLs. When you create an iPrint printer, a URL is listed in the accepted IPP URL list. This is the URL you will specify when creating a customized printer list.
Using the iPrint Map Designer tool, you can quickly create a map showing printer locations. The tool lets you import floor plans that can be used to drag and drop printers to actual locations. These maps are then published on a Web server so that users can install printers that are closest to their location.
Creating printer maps requires that you use Microsoft Internet Explorer 5.5 or later and have the iPrint client installed on the workstation from which you will be creating the maps.
The iPrint Map Designer lets you create maps showing the physical locations of printers in a building by using background images of the building’s floor plan. Once the map is created, use the iPrint Map Designer to modify or update your maps as necessary.
To create a printer map for your iPrint users, complete the following steps:
1. Get graphic images of your building floor plan(s). iPrint supports images in JPEG, GIF, and BMP formats. Copy all of the floor plan images to your iPrint servers and store them in SYS:APACHE2HTDOCSIPPDOCSIMAGESMAPS.
2. To access the iPrint Map tool, do one of the following:
![]() Map a drive to
Map a drive to SYS:APACHE2HTDOCSIPPDOCS and open MAPTOOL.HTM with Microsoft Internet Explorer.
![]() With Microsoft Internet Explorer, open the
With Microsoft Internet Explorer, open the http://<server_address>:631/login/ippdocs/maptool.htm iPrint URL, with <server_address> as the IP address or DNS name of the server where Print Manager is running.
3. Select Background from the navigation frame on the left. Select a floor plan image from those you have copied to SYS:APACHE2HTDOCSIPPDOCSIMAGESMAPS. Alternatively, you can retrieve and modify an existing map file by selecting Open and specifying (browsing to) the directory where the map is located.
4. To add a printer to the map, provide the following information:
![]() Printer icon: Select the type of printer icon you want to use.
Printer icon: Select the type of printer icon you want to use.
![]() Printer list: Click the Browse icon and enter the DNS name of the appropriate Print Manager. Click OK. You can also enter the IP address or DNS name of the NetWare 6.5 server where Print Manager is running. From the printer list, select the printer agent you want associated with this printer icon. If the printer is not listed, make sure you have IPP enabled for that printer.
Printer list: Click the Browse icon and enter the DNS name of the appropriate Print Manager. Click OK. You can also enter the IP address or DNS name of the NetWare 6.5 server where Print Manager is running. From the printer list, select the printer agent you want associated with this printer icon. If the printer is not listed, make sure you have IPP enabled for that printer.
NOTE
To add printers from different Print Managers to the same map, first add the printers from the first Print Manager, and then click the Browse icon and select a different manager.
![]() Printer URL: This field will be populated automatically by the URL created for the printer when IPP is enabled for the printer. You should not need to change the URL.
Printer URL: This field will be populated automatically by the URL created for the printer when IPP is enabled for the printer. You should not need to change the URL.
![]() Mouse over text: This field is populated automatically by the printer agent’s name. You can override this information and enter any descriptive text you want to display when a user moves the mouse over the Printer icon.
Mouse over text: This field is populated automatically by the printer agent’s name. You can override this information and enter any descriptive text you want to display when a user moves the mouse over the Printer icon.
![]() (Optional) Printer caption field: Enter the information to display, using Enter to parse the information onto multiple lines.
(Optional) Printer caption field: Enter the information to display, using Enter to parse the information onto multiple lines.
5. Click Save, and save the map to SYS:APACHE2HTDOCSIPPDOCS.
WARNING
If you click Refresh or exit Internet Explorer without saving the map, all changes since the last time the map was saved will be lost.
Repeat step 4 for each printer you want to place on your map. You can edit a printer’s information at any time by clicking the appropriate printer icon and changing the printer information fields as required. If you need to add or modify printers from a previously used Print Manager, click a printer icon from that manager and the printer list will be populated with printers from that manager.
After creating your maps, you need to post them on a Web server. Copy the contents of the IPPDOCS directory and its subdirectories to the Web server in order for your maps and iPrint to work properly. You can link to your maps from your company’s internal Web page or send the URL out to your users.
You might want printers to remove themselves automatically from a workstation. For example, you have a printer in your lobby for customers to use. When the customer leaves, you want the printer to be removed from the customer’s laptop. Setting the persistence of the printer allows you to automatically remove the printer when the customer reboots his or her laptop.
Complete the following to set the persistence of a printer:
1. Using a text editor, open SYS:APACHE2HTDOCSIPPDOCSINST.HTM.
2. Edit the file by searching for persistence=.
3. Replace the printer setting value—located after the comma (,)—with volatile-reboot.
4. Save the file.
Doing this will instruct an installed printer driver to automatically remove itself when the workstation is rebooted.
iPrint is designed to take full advantage of eDirectory security and ease of management. Setting up a secure printing environment can be done on three levels:
![]() Print access control: Create a secure printing management infrastructure by assigning users to User, Operator, or Manager roles. This restricts the list of those who can control printers, Print Managers, and brokers.
Print access control: Create a secure printing management infrastructure by assigning users to User, Operator, or Manager roles. This restricts the list of those who can control printers, Print Managers, and brokers.
![]() Printer security levels: Printer security levels control how access to printers is managed. By default, the client application will control print security, but this responsibility can be moved to the Print Manager to provide greater security.
Printer security levels: Printer security levels control how access to printers is managed. By default, the client application will control print security, but this responsibility can be moved to the Print Manager to provide greater security.
![]() Securing iPrint with SSL: This option not only encrypts print communications over the wire, but also requires users to authenticate before installing and printing to a printer.
Securing iPrint with SSL: This option not only encrypts print communications over the wire, but also requires users to authenticate before installing and printing to a printer.
Each of these levels is discussed in the following sections.
Printer security is ensured through the assignment of the Manager, Operator, and User Access Control roles, and by the strategic placement of printers and printer configurations. For more information on eDirectory access control in general, see Chapter 6, “Users and Network Security.”
The access controls for iPrint allow you to specify the access each User, Group, or Container object will have to your printing resources. It is important to remember that all iPrint print roles function independently. For example, assigning someone as a printer manager does not automatically grant said person the rights of a printer user.
In most cases, the default assignments will prevent any problems that this role independence might cause. For example, a printer manager is automatically assigned as a printer operator and user for that printer. Similarly, a printer operator is automatically assigned as a user of that printer as well. You cannot remove the user role from an operator, and you cannot remove the operator and user roles from a manager.
The creator of an iPrint object is automatically assigned to all supported roles for the type of object being created.
You can assign multiple Printer objects to a given printer agent, but simultaneously make different access control assignments to each Printer object. This means that users in different containers can be assigned different trustee rights to the same printer.
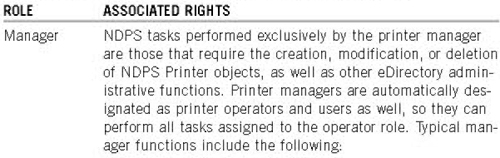
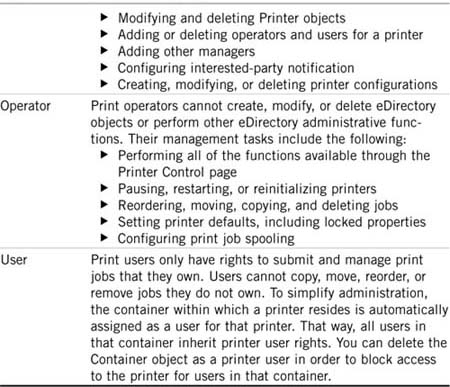
As previously alluded to, there are three roles associated with iPrint printing services: Manager, Operator, and User. Table 7.4 describes the rights granted to each role.
To define the role assignment for a printer, complete the following steps:
1. From iManager, select iPrint and click Manage Printer.
2. Specify the printer for which you want to configure access controls and click OK.
3. At the Manage Printer page, select the Access Control tab, as shown in Figure 7.7.
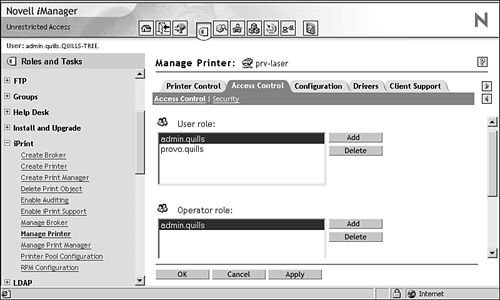
4. Make your desired changes by adding or deleting members from the User, Operator, and Manager roles for this printer. eDirectory objects that can be assigned in these roles include User, Group, or Container objects. Click OK to save your changes.
Following these changes, printer access will be granted according to the access controls you have defined.
Print Manager security is provided exclusively through the printer manager role in iManager. The printer manager role was discussed previously in the “Printer Roles” section. Refer to Table 7.4 for more information on iPrint administrative roles in iManager. For more information on role-based administration with iManager, see Chapter 3, “Novell Management Tools.” Common administrative tasks related to the print manager include the following:
![]() Creating printer agents and NDPS Manager objects
Creating printer agents and NDPS Manager objects
![]() Adding or deleting operators and users for a printer
Adding or deleting operators and users for a printer
![]() Adding other managers
Adding other managers
![]() Configuring interested-party notification
Configuring interested-party notification
![]() Creating, modifying, or deleting printer configurations
Creating, modifying, or deleting printer configurations
You should plan on assigning users who need to perform these types of tasks as occupants of the printer manager role.
There are two roles associated with the NDPS Broker object. The printer manager role was discussed previously in the “Printer Roles” section. Refer to Table 7.4 for more information on iPrint administrative roles in iManager:
![]() Manager: NDPS tasks performed exclusively by the broker manager require the creation, modification, or deletion of Broker objects, as well as those that involve other eDirectory administrative functions. Typical manager functions include the following:
Manager: NDPS tasks performed exclusively by the broker manager require the creation, modification, or deletion of Broker objects, as well as those that involve other eDirectory administrative functions. Typical manager functions include the following:
![]() Creating, modifying, and deleting Broker objects
Creating, modifying, and deleting Broker objects
![]() Adding other managers
Adding other managers
![]() Enabling or disabling brokered services
Enabling or disabling brokered services
![]() Adding resources to the Resource Management Service
Adding resources to the Resource Management Service
![]() Assigning or changing a broker password
Assigning or changing a broker password
![]() Public access user: A public access user is a role assigned to all individuals on the network who are users of printers receiving services and resources provided by the broker. This role is assigned by default and does not require specific administrative action by the broker manager.
Public access user: A public access user is a role assigned to all individuals on the network who are users of printers receiving services and resources provided by the broker. This role is assigned by default and does not require specific administrative action by the broker manager.
You can also assign a password to the broker interface for increased security. After the broker loads on your NetWare server, navigate to the Broker screen and press F4.
Printer security levels affect how rights to a printer are determined and enforced. There are three security levels:
![]() Low: Security is enforced by the client applications only.
Low: Security is enforced by the client applications only.
![]() Medium (default): Security is enforced by the NDPS manager if print data integrity is involved. If print data integrity is not involved, security is enforced by the client applications.
Medium (default): Security is enforced by the NDPS manager if print data integrity is involved. If print data integrity is not involved, security is enforced by the client applications.
![]() High: Security is enforced by the NDPS manager for all operations.
High: Security is enforced by the NDPS manager for all operations.
As noted, the default security level is Medium. For sensitive print data, you can set the security level to High, but there is a trade-off between print performance and print security. To set a printer’s security level, complete the following steps:
1. From iManager, select iPrint Management and click Manage Printer.
2. Specify the printer for which you want to change security levels and click OK.
3. At the Manage Printer page, select the Access Control tab and click the Security subpage.
4. In the Security Level field, set the level of security for this printer and click OK to save your changes.
The printer will now adhere to the security characteristics defined by the security level you have applied to that printer.
Secure printing takes advantage of SSL, which requires users to authenticate using their eDirectory usernames and passwords. Users must authenticate once per eDirectory tree per session. The print data is encrypted, and all print communications use port 443. Without secure printing, the printer is available to anyone on the local network and print communications are not encrypted. Secure printing works in conjunction with the security level set for the printer.
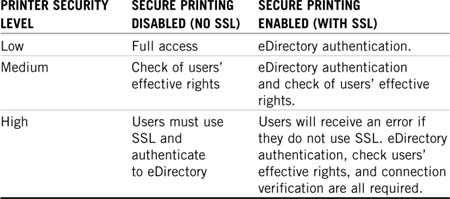
Table 7.5 shows how access is determined, depending on the level of printer security and if secure printing is enabled or disabled. Printer security levels were discussed in a previous section.
To enable SSL support for a given printer, or for all printers associated with a given print manager, complete the following steps:
1. From iManager, select iPrint and click Enable iPrint Support.
2. Specify the print service manager for which you want to enable IPP printing.
3. At the Enable iPrint Support page, check the box next to Enabled and click OK. This will enable IPP on all printers assigned to this print service manager. You can also select printers individually by checking the box from the Enabled column next to each printer you want iPrint enabled.
4. (Optional) Use the same check box procedure in the Secure column to enable secure printing as needed for printers associated with this print manager. More information on securing your printing services was provided earlier in this chapter.
5. Click OK to return to the iManager home page.
As you probably noted, this same routine can also be used to disable/enable iPrint support for a printer should that be necessary.