
If you are not familiar with using Wi-Fi networks, this chapter can help you a great deal. Along with other functions you need to know when using your hotspot or other wireless networks, this chapter discusses how to use the Windows XP Wireless Zero Configuration tool. This also helps prepare you for assisting your hotspot users.
Note
Recommended practice is to use at least the Windows XP operating system when using wireless networks because of the built-in networking tools. If you are currently using an older operating system, such as Windows 98 or Windows Me, upgrade to the latest version. This gives you a much better experience when using wireless networks. Therefore, this chapter gives instructions only for Windows XP.
Keep in mind that when using wireless or wired networks, you should always keep your operating system up-to-date with the latest service packs and updates. This helps plug any known security holes in the operating system and makes your experience safer. In addition, Windows XP users should download updates so that the Wireless Zero Configuration utility supports the current technologies.
Download Windows operating system updates online at http://windowsupdate.microsoft.com/.
You should disconnect or disable your network adapter when you are not using your network. For security reasons, this is especially true when you are using unsecured wireless networks such as hotspots. Doing so also helps save battery power when you are using laptops and other mobile devices. In addition, knowing how to disable and enable your network adapter might help when you are troubleshooting problems.
You can turn your network adapter on and off via the Start menu:
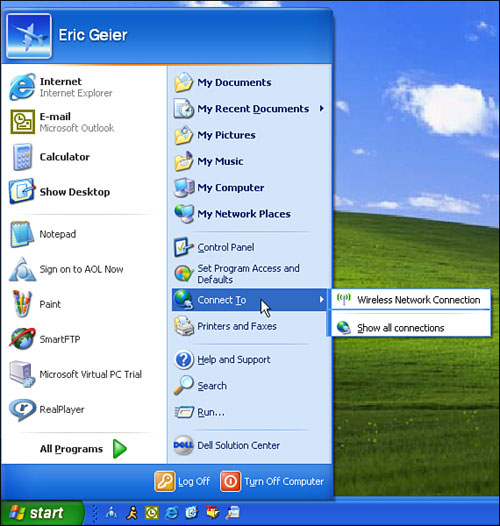
In the lower-left corner of Windows, click the Start button.
Hover the mouse pointer over the Connect To option, as shown in Figure 13-1.
If this option is not available, your Start menu is likely in Classic mode. In that case, hover over the Settings option, and then hover over the Network Connections option.
To enable a wireless connection, click it.
To disable a wireless connection, right-click it and click the Disable option.
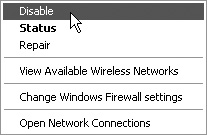
An easier and quicker way to disable your network adapter is via the system tray using the following steps:
Right-click the system tray icon of the wireless adapter.
Click the Disable option, as shown in Figure 13-2.
If you have not noticed yet, Windows XP has a built-in wireless configuration utility. In addition, most wireless adapters have a custom wireless configuration utility that you can use. Usually you can pick which utility you want to use.
Most wireless vendors automatically set up their utility to work. Therefore, if you want to use their utility, you should not have to make changes to get their utility working. However, if you disabled it earlier or if it is not working, try disabling the Windows XP utility and stopping the Wireless Zero Configuration Service, using the instructions in this section.
On the other hand, if you want to use the Windows XP configuration utility, called the Wireless Zero Configuration, instead of the vendor’s configuration utility, you probably need to do some things to enable it. First try enabling the Windows XP utility using the instructions described in the following sections.
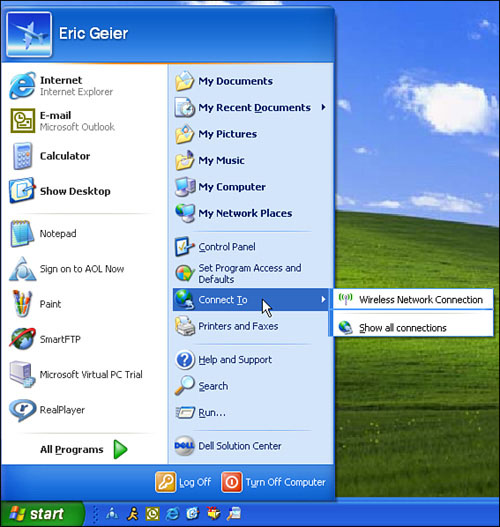
You can switch between the Windows XP and the manufacturer’s utility by following these steps:
In the lower-left corner of Windows, click the Start button.
Hover the mouse pointer over the Connect To option, as shown in Figure 13-3.
If the Connect To option is not available, your Start menu is likely in classic mode. In that case, hover over the Settings option, and then hover over the Network Connections option.
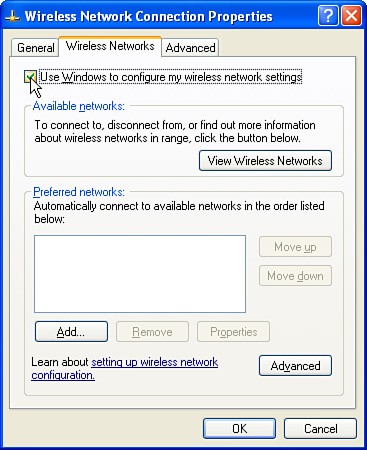
Right-click the wireless adapter, and click the Properties option.
Click the tab labeled Wireless Networks.
If you do not see the Wireless Networks tab, make sure that the wireless adapter is enabled. In addition, the Wireless Zero Configuration service might be disabled; therefore, you might want to follow the instructions in the next section and then continue with this step.
As needed, check or uncheck the option Use Windows to configure my wireless network settings, as shown in Figure 13-4.
Start and stop the Wireless Zero Configuration service that is used to run the Windows XP configuration utility by doing the following:
In the lower-left corner of Windows, click the Start button.
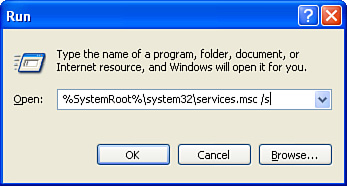
Click Run.
Enter %SystemRoot%system32services.msc /s, as shown in Figure 13-5, and then click OK.
Scroll down to the Wireless Zero Configuration listing, and double-click it.
To enable, click the Start button. In the Startup type drop-down list, select Automatic, and then click Apply.
To disable, click the Stop button. In the Startup type drop-down list, select Disabled, and then click Apply.
One of the first things you should know is how to connect to wireless networks because you must do so before you can access the Internet via your network. To connect to a wireless network using the Windows XP Configuration utility, do the following:
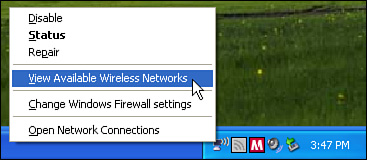
Right-click the wireless adapter system tray icon and click the View Available Wireless Networks option, as shown in Figure 13-6.
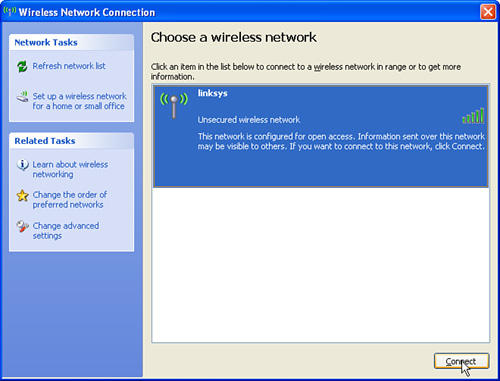
Click the desired wireless network.
Click the Connect button, as shown in Figure 13-7.
If the wireless network is not using an encryption method, you need to verify that you understand the consequences of connecting to an unsecured network, such as a hotspot, by clicking the Connect Anyway button in the popup window.
If the wireless network is using encryption, you need to input the network key in the popup window and click Connect.

You can easily check the connection status of your wireless adapter. This status information can help when you are troubleshooting connection problems.
To quickly see the status of your connection, follow these steps:
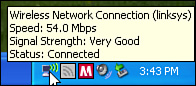
Hover over the wireless adapter system tray icon.
You should see the status information popup, as shown in Figure 13-8. If you are connected to a network, the popup shows the network name (Service Set Identifier, or SSID) you are connected to, the speed (or data rate), and the signal strength of the connection.
To view details of your connection, follow these steps:
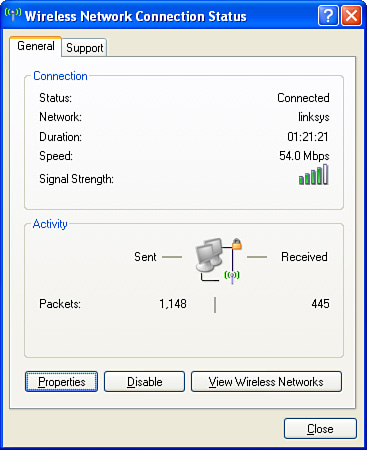
Double-click the wireless adapter system tray icon.
As shown in Figure 13-9, you should see the connection and activity status. This lets you know the network name (SSID) you are connected to, how long you have been connected, the speed (or data rate), and the signal strength of the connection. You can also see how many packets have been sent and received while you have been connected.
If both the wireless network adapter you are using and the wireless router or access point are 802.11g-compliant, the best possible data rate would be 54 Mbps. When you are using products with a speed-booster feature, the data rate might be higher. If the network devices, however, support only 802.11b, the highest data rate possible is 11 Mbps.
In addition, this window gives you another way to disable your network adapter, go to the properties of the adapter, and go to the View Available Wireless Networks window.
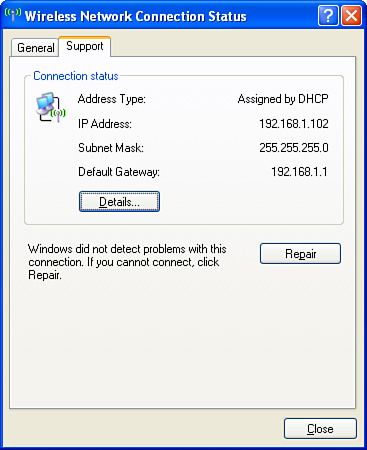
Click the Support tab.
As Figure 13-10 illustrates, you should see the current IP address information of your wireless adapter.
Clearly shown in Figure 13-10 is the address type, or the way the IP address was received, the IP address assigned to your computer, the subnet mask, and the default gateway, which is the IP address of the device you are connected through, such as a wireless router.
The preferred network list is a prioritized list of networks you would like to connect to. You can add networks to the list, which saves time, especially when you are using encrypted wireless networks. Your wireless adapter automatically connects to networks in the preferred list, which avoids the need to enter encryption keys on secure networks.
Follow these steps to get to the preferred network list:
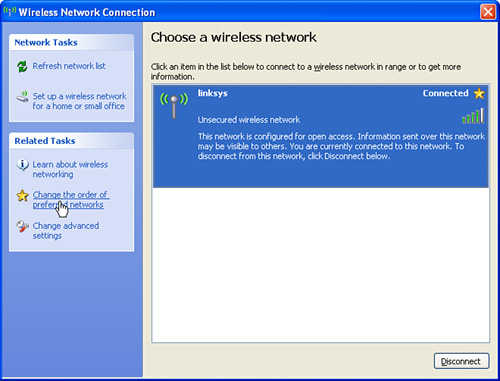
Right-click the wireless adapter system tray icon, and click the View Available Wireless Networks option, as shown in Figure 13-11.
Click the Change the order of preferred networks option, in the Related Tasks selection, as shown in Figure 13-12.
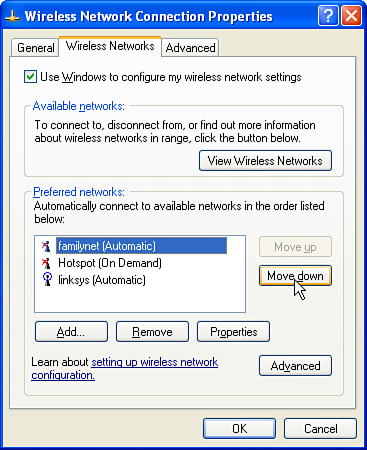
You can move the order of your wireless networks by selecting a network and clicking the Move up or Move down buttons, as shown in Figure 13-13.
If you need to add a network to the preferred list, do so by following these steps:
Click the Add button.
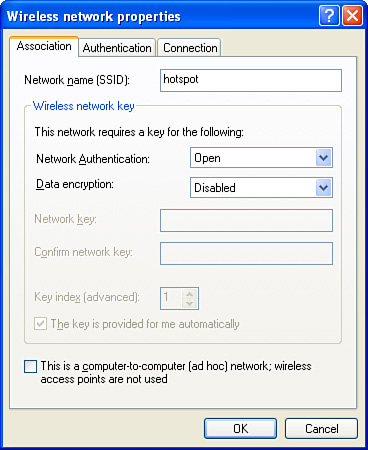
Enter the applicable information about the wireless network you want to add to your preferred list. See Figure 13-14 for an example.
If the network does not have encryption enabled, such as might be the case with public hotspots, select Open authentication, and set data encryption to Disabled.
If you are trying to add an ad-hoc or peer-to-peer network to your preferred list, mark the appropriate check box on the bottom of the window. With hotspots, you do not choose ad-hoc or peer-to-peer. These types of networks allow wireless computers to communicate directly with each other without a wireless router or access point.
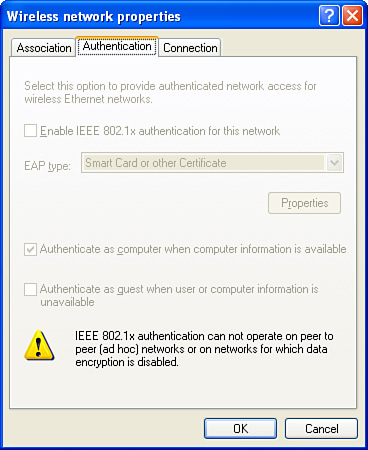
Select the Authentication tab, as shown in Figure 13-15, and make any necessary changes. Most likely you will not need to with a hotspot.
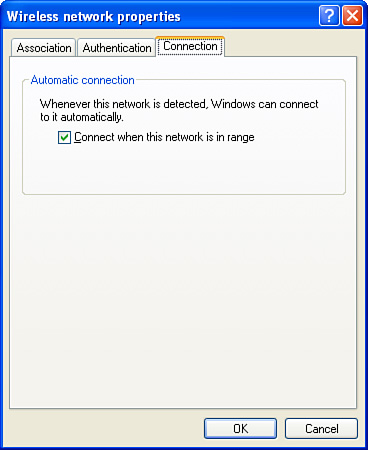
Select the Connection tab, as shown in Figure 13-16. If you want to automatically connect to the network when it is available, mark the check box. This is not always suggested. See the Caution and Note following Figure 13-16 for more information.
Click OK to apply the changes.
Note
If you add a preferred ad-hoc or peer-to-peer network to your preferred list, and either it is higher priority than other networks on the list or no other preferred networks are nearby, the wireless adapter automatically starts accepting other nearby ad-hoc clients based on the ad-hoc network information that you added to the preferred list. Therefore, others can freely connect to the ad-hoc network and view any shared files on your computer. If the peer-to-peer network you added has encryption enabled, other users need to know the network key to connect. However, for better security, you should not set the network to automatically connect when available. For more information, see Step 4 in the preceding list.
Caution
Remember that when you are setting a preferred network to automatically connect when available, it basically connects to any network with that same network name (or SSID). Therefore, you should not set to automatically connect to networks with common or default names, such as “default” and “linksys.”
Review and make any applicable changes to the Advanced options:
Click the Advanced button.
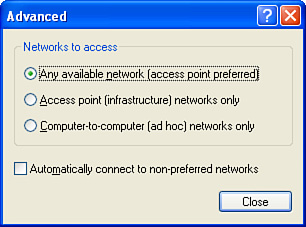
Make any desired changes. See Figure 13-17 for an example.
Remember that infrastructure networks are those with wireless routers or access points, such as hotspot networks.
The Any available network (access point preferred) option is usually recommended. It automatically connects only to access points and computer-to-computer networks that are listed in your preferred list.
If you want to automatically connect to any available wireless network when it becomes available, mark the appropriate check box. For security reasons, this is not recommended, because you will automatically be connected to networks even if they are not in your preferred list.
Click Close to apply the changes.
One of the benefits of using wireless or wired networks is the ability to share files among the network users. Enabling sharing on hotspots and other networks that are not secured by encryption is not suggested. However, on private networks, it comes in handy. First, you must enable sharing on certain folders, or move files to your Windows XP Shared Documents folder. Then you should be able to access the folders on other computers that are connected to the same network.
Windows XP, by default, has a folder called Shared Documents under My Computer, with sharing enabled. To quickly share files with other network users, you can copy or drag files into this folder. You can also enable sharing of other folders, as documented in the following steps:
Double-click My Computer on your desktop.
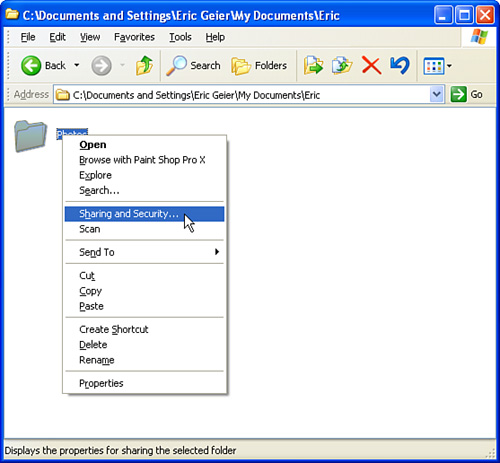
Browse to the folder you would like to share, right-click the folder, and click the Sharing and Security option, as shown in Figure 13-18.
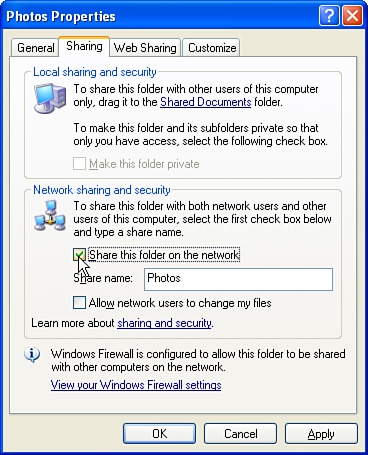
Check the Share this folder on the network option, as shown in Figure 13-19.
Specify a share name that describes the folder or files you are sharing.
Check the Allow network users to change my files option if you want to give other network users this privilege.
Click OK to apply the changes.
You can access the shared folders on your network using these steps:
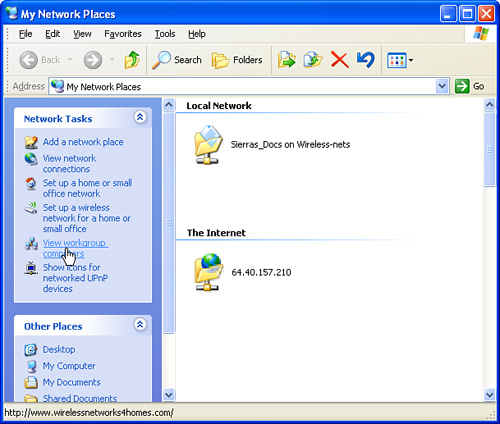
Double-click My Network Places on your desktop.
Click the View workgroup computers option under Network Tasks, as shown in Figure 13-20. To browse computers within other workgroups, click the Up button; then double-click the desired workgroup.
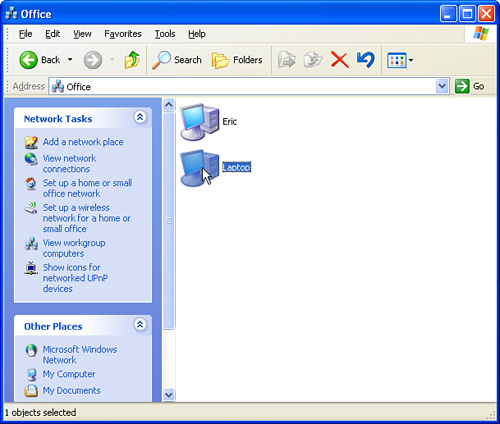
Double-click the computer you want to browse, as shown in Figure 13-21.
Double-click the desired shared folder.
One of the ways to share printers on a network is to connect a printer directly to a computer within the network and set it up to be shared in Windows. This is the method discussed in the following sections.
First you must enable the sharing of the printer among the network:
In the lower-left corner of Windows, click the Start button.
Click Printers and Faxes.
If this option is not available, your Start menu is likely in Classic mode. Therefore, hover over the Settings option and click Printers and Faxes.
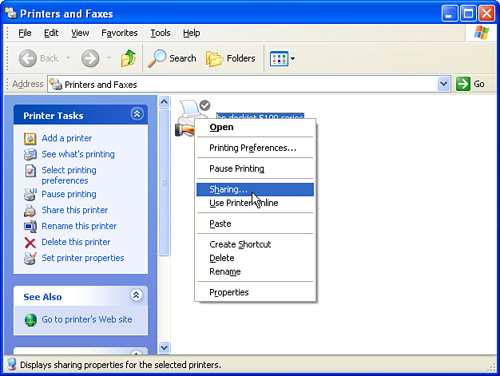
Right-click the printer you would like to share, and click Sharing, as shown in Figure 13-22.
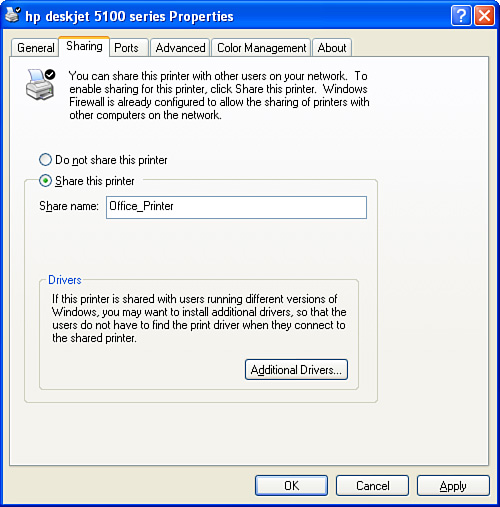
Mark the Share this printer option.
Specify a share name that describes the printer you are sharing. See Figure 13-23 for an example.
Now you can set up or add a shared network printer on a specific computer:
In the lower-left corner of Windows, click the Start button.
Click Printers and Faxes.
If this option is not available, your Start menu is likely in Classic mode. In that case, hover over the Settings option and click Printers and Faxes.
Under the File menu, click Add Printer. When the wizard starts, click Next.
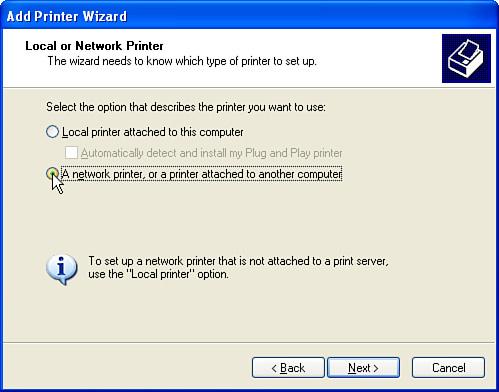
Click the A network printer, or a printer attached to another computer option, as shown in Figure 13-24, and click Next.
Mark the Browse for a printer option, and click Next.
Find the computer where the shared printer is attached, double-click it, and then click Next.
Click the shared printer you would like to set up, as shown in Figure 13-25, and click Next.
Specify whether you want to set this shared printer to the default printer, and then click Next.
Make sure the information is correct, and click Finish.

You have been introduced to the main tasks you need to know when using Wi-Fi networks. Now you are better equipped when using your new Wi-Fi hotspot or any other wireless network to which you might have access, such as in your home or office. Keep in mind a few main points, covered in this chapter:
Keep your operating system up-to-date.
Disable your network adapter(s) when you are not using it.
Indicate whether you want to use Windows XP to configure your wireless network settings when you are toggling between Windows XP and the manufacturer’s utility.
When you want to use the Windows XP configuration utility, you must have the Zero Configuration Service enabled.
Use the preferred wireless network list to streamline your Wi-Fi experiences.