Chapter 1
Introducing Visual Studio 2010
![]() Learn What Visual Studio 2010 Can Do for You
Learn What Visual Studio 2010 Can Do for You
![]() Install and Choose Among Installation Options
Install and Choose Among Installation Options
![]() Understand What Types of Applications You Can Build
Understand What Types of Applications You Can Build
Your first experience with Visual Studio (VS) 2010 is often installation. As with most software, VS is rather easy to install; this chapter describes the installation process and gives you tips to help understand available options. Once installation is complete, you’ll open VS for the first time and need to know how to navigate the VS environment; this chapter gives you a high-level view of how VS is organized, how to find the features you need, and how to work with windows. Finally, you’ll learn how to find the different application types that VS helps you build. At this point, you know that VS will help you build .NET applications, but let’s start off with a more detailed explanation of what VS will do for you.
What Is Visual Studio 2010 About?
Visual Studio 2010 (VS) is an integrated development environment (IDE); a set of tools in a single application that helps you write programs. Without VS, you would need to open a text editor, write all of the code, and then run a command-line compiler to create an executable application. The issue with the text editor and command-line compiler is that you would lose a lot of productivity through manual processes. Fortunately, you have VS to automate many of the mundane tasks that are required to develop applications. The following sections explain what VS will do for you and why VS is all about developer productivity.
Automatically Generated Code
VS includes a suite of project types that you can choose from. Whenever you start a new project, VS will automatically generate skeleton code that can compile and run immediately. Each project type has project items that you can add, and project items include skeleton code. In the next chapter, you’ll learn how to create projects, add project items, and view automatically generated code. VS offers many premade controls, which include skeleton code, saving you from having to write your own code for repetitive tasks. Many of the more complex controls contain wizards that help you customize the control’s behavior, generating code based on wizard options you choose.
Rapid Coding Experience
The VS editor optimizes your coding experience. Much of your code is colorized; you have Intellisense, tips that pop up as you type; and keyboard shortcuts for performing a multitude of tasks. There are a few refactorings, features that help you quickly improve the organization of your code while you’re coding. For example, the Rename refactoring allows you to change an identifier name where it is defined, which also changes every place in the program that references that identifier. VS introduces even more features, such as a call hierarchy, which lets you see the call paths in your code; snippets, which allow you to type an abbreviation that expands to a code template; and action lists for automatically generating new code.
Everything at Your Fingertips
You’ll really want to learn how to navigate the VS environment because a plethora of tools are available to aid you in your quest to rapidly create quality software. You have the Toolbox jam-packed with controls, a Server Explorer for working with operating system services and databases, a Solution Explorer for working with your projects, testing utilities, and visual designers. By the way, there are compilers too.
Customizability and Extensibility
You can customize many parts of the VS environment, including colors, editor options, and layout. The options are so extensive that you’ll need to know where to look to find them all. If the out-of-the-box VS development environment doesn’t offer a feature you need, you can write your own macros to automate a series of tasks you find yourself repeating. For more sophisticated customization, VS exposes an application programming interface (API) for creating add-ins and extensions. Several third-party companies have chosen to integrate their own applications with VS. For example, Embarcadero’s Delphi language and development environment is hosted in Visual Studio. The rich and customizable development environment in VS helps you work the way you want to.
As you move through this book, keep these important concepts in mind and look for all of the tips that will help you use VS to your advantage. Your first step in using VS will be installation, which is discussed in the next section.
Installing Visual Studio 2010
Hopefully the preceding discussion whets your appetite on what VS can do for you. If you haven’t already installed VS, this section walks you through the setup process. The guidance along the way will explain how to choose among available options to customize the installation to your needs. The following steps explain how to install VS:
1. When you first place the VS DVD into the drive, you’ll see the Microsoft Visual Studio 2010 window, shown in Figure 1-1. Available options are to Install Microsoft Visual Studio 2010 and Check For Service Releases. Click Install Microsoft Visual Studio 2010.
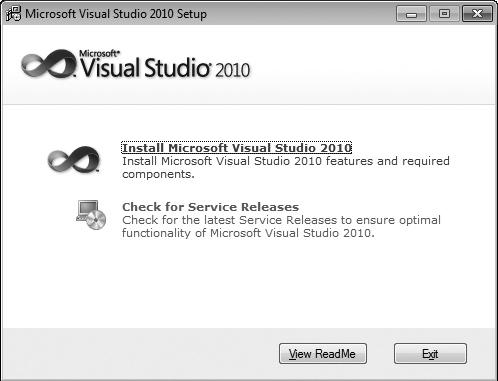
Figure 1-1 Microsoft Visual Studio 2010 Setup window
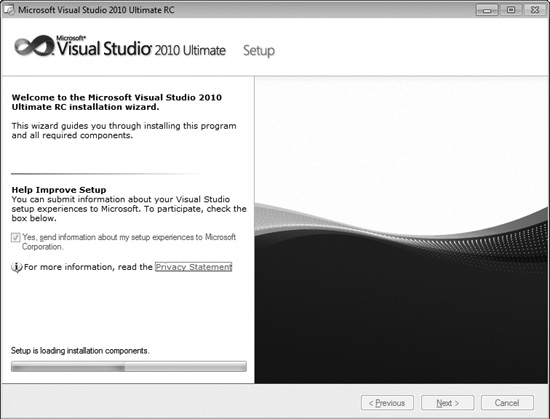
Figure 1-2 Setup Welcome window
2. The next window you’ll see, Figure 1-2, is the welcome window, titled Microsoft Visual Studio 2010. Figure 1-2 shows that I’m installing the Ultimate version. Installation for other versions is similar, but the number of features available to install varies.
If you check the box on this page in the Help Improve Setup section, the installer will gather logs produced during the setup process and send them across the Internet to Microsoft after the setup is complete. To help you make an informed choice as to whether to check this box, there is a Privacy Statement link under the check box to click and read if you would like more information about what Microsoft does with setup information. When you’re ready, click Next. After setup components are loaded, you’ll see the licensing screen in Figure 1-3.

Figure 1-3 Setup Licensing window
3. In Figure 1-3, you’ll see what components will be installed. You’ll need to read the VS license to ensure you understand what the terms are. The licensing terms can differ, depending on what type of package you acquired and your particular country or region. Once you’ve read the license, you’ll need to check “I have read and accept the license terms” to proceed. Next, enter the license key that comes with your software and enter your name. The installer will automatically fill in the product key if you downloaded VS via Microsoft Developer Network (MSDN). Click Next and you’ll see options for customizing product installation.
4. Figure 1-4 lets you choose between full and custom installation. If you click the Custom option, you’ll be able to choose precisely which components should be installed. This is a good opportunity to uncheck the items you won’t ever use. If this is your first installation and you have plenty of storage, you might want to go through the list and check everything to take a look at what is available. You can always return to this installation later and make adjustments.
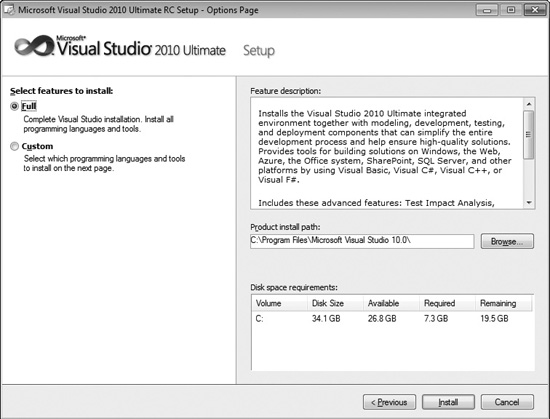
Figure 1-4 Setup Customization window
The configuration screen in Figure 1-4 shows that you can also change the location of where to install VS. Take note of the installation location because this is where you will go to find sample code, common assemblies, and more items affecting the development environment. Evaluate the disk space requirements to ensure you have enough available storage. You’ve now completed the configuration options for installation. Click Install to start the installation. You’ll see a screen similar to Figure 1-5 during the installation process where the small check marks indicate which VS components have successfully installed.

Figure 1-5 Setup Progress window
5. During the installation, the VS installer will need to reboot your computer, showing the restart message in Figure 1-6. Make sure you close any applications you currently have open so that you don’t lose your work, and then click Restart Now.
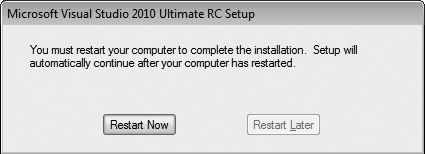
Figure 1-6 Setup Restart window
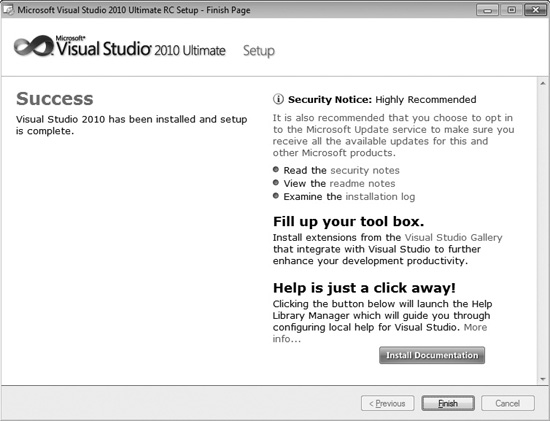
Figure 1-7 Setup Success window
6. When installation completes without error, you’ll see the Success window, shown in Figure 1-7. If you have errors during installation, this window will give you guidance on what to do to solve the problem.
Your installation is now almost complete. You can install product documentation by clicking the Install Documentation button, shown in Figure 1-7. The initial installation screen that appeared when beginning the installation will reappear, as shown in Figure 1-8. You should also check for service releases; not only for the updated functionality to VS, but also because service releases often include important security updates.
You are now ready to run VS for the first time. At that point, you’ll need to perform one more easy configuration step, where you will choose your default environment settings, as shown in Figure 1-9.

Figure 1-8 Checking for service releases

Figure 1-9 Default Environment Settings window
The choice you make for default environment settings depends a lot on what language or environment you’ll use to write software in. The environment settings choice isn’t locked in stone and can be reset if you decide you don’t like the settings. A later section of this chapter, “Modifying Environment Settings after Setup,” explains how to change environment settings. This book covers both VB and C#, so you would most likely want to choose the setting specific to the language you will use. The examples in this book will use either VB or C# settings, depending on the topic. The choice of settings determines how VS will lay out the windows and the default options that are set throughout the VS IDE.
NOTE
C# or VB, which Should I Choose? Both C# and VB are first-class languages on the .NET platform. The languages themselves are stripped down to bare syntax, with all additional services moved into the .NET Framework Class Library, which is common to all languages. There are a few small differences between the languages, but in reality, the choice really comes down to personal preference. In practice, knowing both languages is an advantage because much has been written in articles and books showing how to use .NET techniques that doesn’t depend on which language was used. You’ll not want to miss out on excellent content regardless of the language it is written in.
You should now have a good installation with the configuration and environment settings of your choosing. With VS open for the first time, the next section describes the high-level parts of the Start page.
Navigating the Visual Studio 2010 Environment
This section is a high-level view of VS, describing what is available when you first start Visual Studio 2010, also known as the Visual Studio integrated development environment, commonly known as the IDE, which is pronounced by saying the letters I-D-E. Seeing what is available will help you find features more quickly. Additionally, knowing what is available by default will help you differentiate between default functionality and the context-sensitive features of the software items you’re working on.
Figure 1-10 shows how VS appears when first started. It refers to portions of the screen, helping you see how the IDE is organized. The following description will associate each feature with a name so that you can understand where to look when discussing these features in more depth throughout the rest of this book.
The following sections describe portions of the Start screen shown in Figure 1-10.
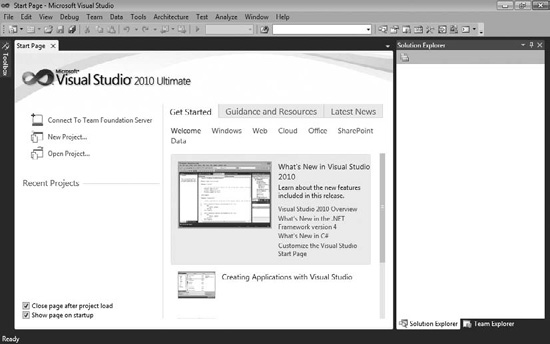
Figure 1-10 Visual Studio 2010 Start screen
The Menu
At the very top left of Figure 1-10, you’ll see the menu bar, which includes the words “File,” “Edit,” “View,” “Tools,” and so on. The menu bar is a standard part of most windows applications. Besides standard file management functionality, the File menu is where you visit to create new projects. The File menu also gives you access to recently opened files and projects.
The Edit menu has your standard cut, copy, and paste operations. It also gives you access to a bookmark feature for providing easy navigation through source code.
It would be worth your effort to explore the View menu to see what is available, but if you are just learning Visual Studio and how to write software, it’s best to not click these different views just yet; we’ll explore most of those views and what they’re used for later. The View menu gives you access to all of the tool windows in VS. The View menu also has a menu item named Other Windows that includes more application windows that will come in handy as you create new software.
The Tools menu contains a grab-bag of functionality; for instance, you can attach a debugger to see your other programs run, line by line; connect to a database for data; set add-ins, macros, and more. One very important menu item on the Tools menu is Options, which exposes hundreds of settings for customizing your VS environment.
You can use the Test menu to find all of the functionality for performing unit tests to test your new software one part at a time. This is also where other editions of VS include access to other types of testing tools.
The Analyze, Architecture, and Team menus have advanced functionality for improving the performance of an application, working with application architecture, and integrating with Microsoft’s Team Foundation Server.
The Windows and Help menus are similar to most other application types, where the Windows menu allows you to manipulate the VS windows and the Help menu is where you visit to find the technical documentation on VS.
TIP
Many menu items contain shortcut keys that perform the same action as selecting the menu item. If you are curious about what shortcut keys are associated with a particular action, you can often find them by opening the menu to see if there are shortcuts associated with that action. For example, to open the Solution Explorer window and visit the View menu, the shortcut keys are CTRL-W, S.
Toolbar
Beneath the menu in Figure 1-10, you’ll find a toolbar. The toolbar contains frequently accessed functionality that is a subset of what is available via menus. The toolbars are context-sensitive, showing and hiding depending on what you are doing in VS. You can display any toolbar by selecting View | Toolbars.
You can also customize toolbars by right-clicking the toolbar of your choice, scrolling to the bottom of the list, and selecting Customize. The toolbar customization window allows you to add any feature you would like to the current toolbar.
Work Area
In the center of Figure 1-10, you can see the Start page. This is the same area that you’ll use to write code and work with visual designers. The Start page is divided into two sections: project management and information. The project management side of the page, on the left, offers a quick way to start new projects or work with a list of recently opened projects. The information side of the page, on the right, contains resources to help you get started with VS, such as links to the Microsoft Web site, walkthroughs to help you learn new features, and a tab that updates with the latest developer news from Microsoft.
Toolbox
On the far left side of Figure 1-10 is a vertical tab, titled Toolbox, which contains a context-sensitive list of controls that can be dragged and dropped onto the current designer surface. The term “context-sensitive” means that certain items are visible or hidden, depending on where you’ve clicked last or what context you are working in, such as creating or editing a new Web page. If you’re following along, you don’t have a designer surface open right now, so the Toolbox is empty.
Solution Explorer
The Solution Explorer window, to the right of the Start page in Figure 1-10, is where your solutions, projects, and project items will appear. This is where you can find and organize all of the files and settings that belong to a project. In Figure 1-10, the Solution Explorer is blank because there isn’t an open solution. If you close this window and need to find it again, just remember the View menu discussed earlier.
Status Bar
At the very bottom of Figure 1-10 is the Status bar, which communicates what is happening with VS at the current time. In Figure 1-10, the Status bar displays the word “Ready” to indicate you can begin using VS at any time. As you work with VS, the Status bar changes in a context-sensitive way to give you information specific to the task you are working on. For example, the editor displays line, column, and other information pertaining to the status of the editor.
Managing VS Windows
Looking at the VS screen in Figure 1-10, you can see how the windows in the work area— Toolbox, Start, and Solution Explorer—are decorated with various title bars. Window title bars include a set of three icons: Window Position (down arrow), Maximize/Restore Down (window), and Close (cross). Figure 1-11 shows the Solution Explorer with these three icons on its title bar at the top-right corner.
The Window Position allows you to treat the window as Dock, Float, Dock As Tabbed Document, Auto Hide, and Hide. You can expand a window to fill the entire work area or allow the window to be resized and float freely around the work area with the Maximize/Restore Down icon. In the docked position, the Maximize/Restore Down icon becomes a pin that can be used to pin the window open or allow it to slide shut. The Close icon allows you to close a window. The following sections describe how use these title icons to manipulate these windows through expanding and collapsing, docking, floating, tabbing, and closing and opening.
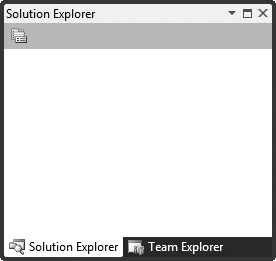
Figure 1-11 Window title bar icons
Expanding and Collapsing Windows
Hovering over the Toolbox tab will expand the Toolbox and display a set of three icons in the title bar of the Toolbox window: Window Position (down arrow), Hide (pin), and Close (cross). You can see what the Toolbox window looks like when expanded in Figure 1-12; the pin in the Hide icon is sideways and the vertical tab still appears in the left margin.

Figure 1-12 Expanded Toolbox
If you move the carat away from the Toolbox, the Toolbox will collapse and turn back into a tab on the left side of the screen.
For any collapsed window, such as the Toolbox, you can expand that collapsed window and click the Hide (pin) icon to pin the window, which will make the window layout similar to the Solution Explorer. Figure 1-13 shows the pinned window; the pin in the Hide icon (above the Auto Hide tooltip) is vertical and you no longer see the Toolbox tab in the left margin.
Clicking the Hide icon on any expanded window will cause the window to collapse and display as a tab, similar to the Toolbox. Another way to collapse a window is by selecting the Auto Hide option on the Window Position (down arrow) menu.
Docking Windows
The Dock option displays the window in an open docked position, similar to the Solution Explorer in Figure 1-10. You can move a docked window to any position in the work area. To move a docked window, select its title bar and drag the window out of its current position. Figure 1-14 shows VS when you’re dragging a window.

Figure 1-13 Pinned Toolbox

Figure 1-14 Dragging a window for docking
As shown in Figure 1-14, you’ll see a visual set of icons appear over the workspace, indicating the docking zones where you can move the window to. The shadow of the window will show what the new location will be whenever you drag a window into a docking zone. Dropping the window into the docking zone will move the window from its old docking zone into the new docking zone.
Floating Windows
The Float option allows windows to appear anywhere in the VS IDE, where you can move them at will. You move a floating window by selecting the floating window’s title bar and moving the carat to the new location where you want the window to be. Alternatively, you can double-click on the title bar. Figure 1-15 shows the Toolbox floating over other windows.

Figure 1-15 Floating a window
Tabbed Windows
An example of using the Dock As Tabbed Document option is the Start page. Any window set as Dock As Tabbed Document will appear as a new tab in the work area, along with all the other windows set as Dock As Tabbed Document. For example, if the Toolbox is set as Dock As Tabbed Document, it will become a tabbed document in the same group as the Start window, as shown in Figure 1-16.
TIP
Position windows in a way that makes you most productive. In practice, you probably don’t want your Toolbox to be a tabbed window. You’ll see examples in later chapters of this book that drag-and-drop items from the Toolbox to a designer page, which is also laid out as a tabbed document window. So, trying to drag-and-drop between two tabbed document windows can be cumbersome. There are several options for working with Windows in VS, and after working with VS for a while, you’ll want to pick the layout that works best for you.
To change a window from a tabbed document, select the tab and drag the window away from the other documents, making it a floating window.

Figure 1-16 Tabbed document windows
Closing and Opening Windows
Clicking the Close icon on a window title bar will close the window. Another way to close the window is by selecting the Hide option from the Window Position icon menu.
Reopening a window depends on what type of window it is: VS or Project Item. If the window is from VS, you can re-visit the View menu and select the window you need to open. Alternatively, you can use a keyboard shortcut key to open a window. These shortcut keys for the windows are displayed on the right side of the menu item in the View menu.
Other windows are for project items in the Solution Explorer. In most cases, you would re-open a project item by locating it in the appropriate project of Solution Explorer and double-clicking it. There are edge cases where you open project items by right-clicking the project item in Solution Explorer and selecting a menu item, but I’ll explain those cases when I discuss them specifically in the rest of this book.
You can now manipulate windows, customizing the layout of your VS environment as you need. Sometimes, though, you’ll want to reset your layout to the original default, as you’ll learn about in the next section.
Modifying Environment Settings after Setup
Reasons for modifying environment settings include wanting to reset everything back to a default, importing shared settings from another developer, or switching between settings for different projects. This section will explain how to modify your settings and achieve each of these goals.
With VS open, select Tools | Import And Export Settings, which will start the Import and Export Settings Wizard shown in Figure 1-17.
From Figure 1-17, you can see the options to Export, Import, and Reset settings. The following sections explain each of these options.
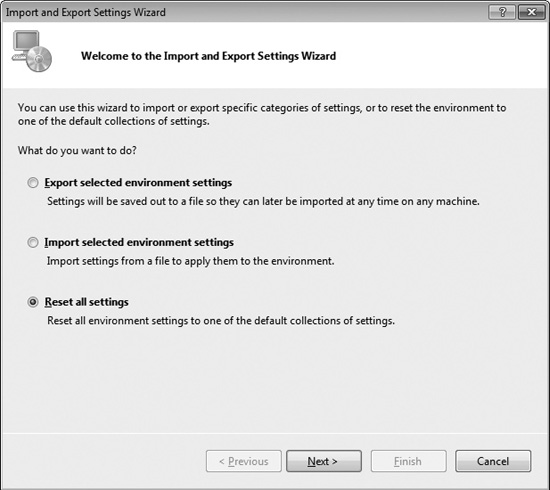
Figure 1-17 Import and Export Settings Wizard
Exporting Selected Environment Settings
We’ll start off with export, which you might use to share your settings with another developer. This could also be useful if you planned to make significant changes to your settings and wanted a backup in case you wanted to revert to previous settings. To perform the export, choose the “Export selected environment settings” option from Figure 1-17 and click Next to display the Choose Settings To Export window in Figure 1-18.
There is a tree of options you can choose from to determine what settings to export. The warning sign indicates settings that you might not want to export for personal or security reasons. The warning settings typically have something to do with system file paths or something outside of VS that you wouldn’t normally share with other people. After you’ve selected options, click Next to display the Name Your Settings File window in Figure 1-19.
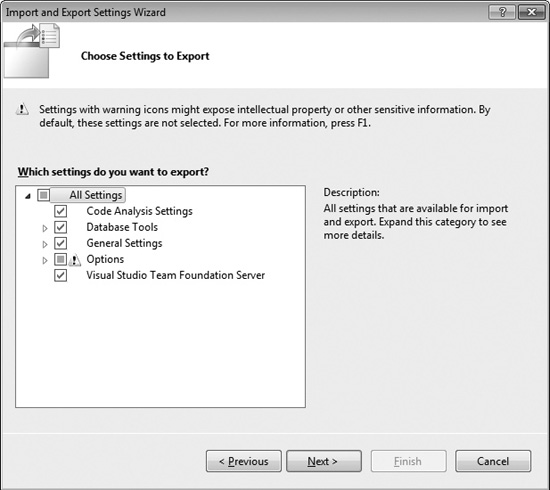
Figure 1-18 Choose Settings To Export window
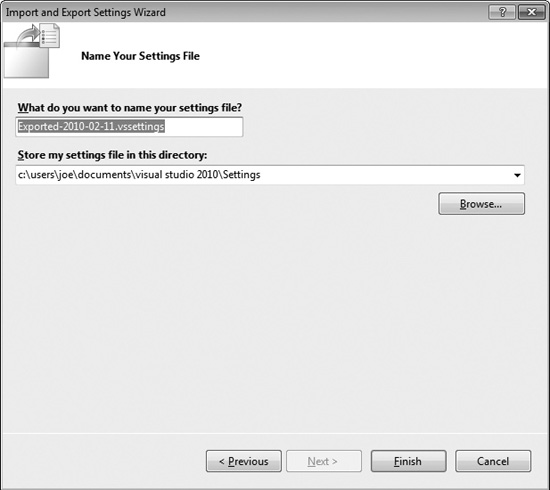
Figure 1-19 Name Your Settings File window
The two text boxes in Figure 1-19 are for a filename and path where the settings file will be saved. Notice that the default filename includes the date, which could be helpful if you ever need to restore settings. Click Finish, which will perform the export and show you the Complete window in Figure 1-20 after the export operation is done.
Click Close to close the window. With an exported settings file, you or another person can perform an import with that file, as described in the next section.
Importing Selected Environment Settings
You would perform a settings import to restore previous settings, import settings from another person, or change to specific settings for a project you’re working on. To perform an import, open VS and select Tools | Import and Export Settings, which opens the Import and Export Settings Wizard shown in Figure 1-17. Choose the “Import selected environment settings” option and click Next to view the Save Current Settings window shown in Figure 1-21.
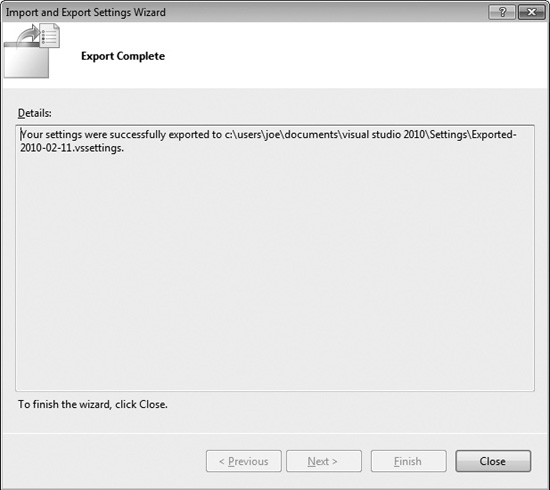
Figure 1-20 Export Complete window
TIP
You can search for various color schemes for Visual Studio on the Internet to download. One site, at the time of this writing, is http://winterdom.com/2007/11/vs2008colorschemes; it offers schemes made for Visual Studio 2008 but that also import into Visual Studio 2010.
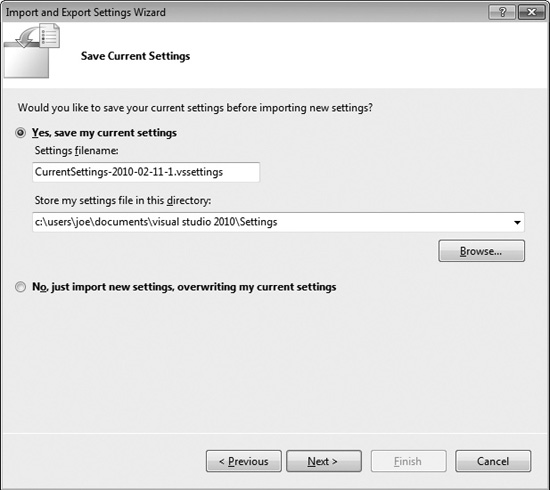
Figure 1-21 Save Current Settings window
The Save Current Settings window allows you to back up your current environment settings before changing them. If you do a backup, you will be able to restore later in case something doesn’t work out the way you intended with the import. You can choose not to back up also. Click Next to view the Choose A Collection Of Settings To Import window in Figure 1-22.
As shown in Figure 1-22, you can import some of the predefined settings that are part of VS under the Default Settings branch or import custom settings under the My Settings branch. Custom settings include the current settings and any other settings that you’ve saved to the default path, shown in Figures 1-19 and 1-21. Optionally, you can

Figure 1-22 Choose A Collection Of Settings To Import window
click Browse and navigate to the location where a settings file is located. After selecting a settings file, click Next, which brings you to the Choose Settings To Import window shown in Figure 1-23.
The Choose Settings To Import window allows you to specify only those settings that you want in your environment. It will only update the settings checked in Figure 1-23. All of your other current settings, those that are unchecked in Figure 1-23, will not be changed. Click Finish to begin the import operation. When import is done, you’ll see the Import Complete window, shown in Figure 1-24.

Figure 1-23 Choose Settings To Import window
Your import is now complete, and you can click the Close window. Another settings option is to reset your current settings to one of the VS default options, explained next.
Resetting All Settings
You could reset settings if you wanted to restore the default settings in VS or if you wanted to switch between default VS settings. For this book, I switched between default settings for VB and C# to ensure the environment settings were appropriate for whichever language I was discussing. To perform a reset, open VS and select Tools | Import And Export Settings, which will open the Import and Export Settings Wizard shown earlier in Figure 1-17.
Choose the Reset All Settings option and click Next. You’ll see the Save Current Settings window, which is exactly the same as Figure 1-21. Choose your save option and click Next to view the Default Collection Of Settings window shown in Figure 1-25.

Figure 1-24 Import Complete window
Figure 1-25 shows that you can select among a set of default settings for VS. Each of these default settings are the same as what you selected during installation, previously shown in Figure 1-9 and the Default Settings branch of Figure 1-22. Choose a setting and click Finish, which starts the reset operation. When the reset is done, you’ll see the Reset Complete window, shown in Figure 1-26. The reset is now complete, and you can click Close to close the window when you’re finished.
Earlier in the chapter, we discussed projects very lightly, but we will gradually dig deeper as this book progresses. The next section takes you a little bit further by describing what project types are available in VS.

Figure 1-25 Default Collection Of Settings window
Familiarization with Visual Studio Project Types
Visual Studio includes a plethora of project types, making it easy to build applications with premade templates. The following discussion will show how to find what project types are available and describe what those project types are.
To see what projects are available, select File | New | Project, as shown in Figure 1-27.
NOTE
If you’ve set your environment up for VB, you’ll notice right away that the option to select is File I New Project, which is only two menu choices, rather than 3 for C#. While the exact wording and placement of options won’t always match, you can rely on the functionality being the same, except for when I explain otherwise.
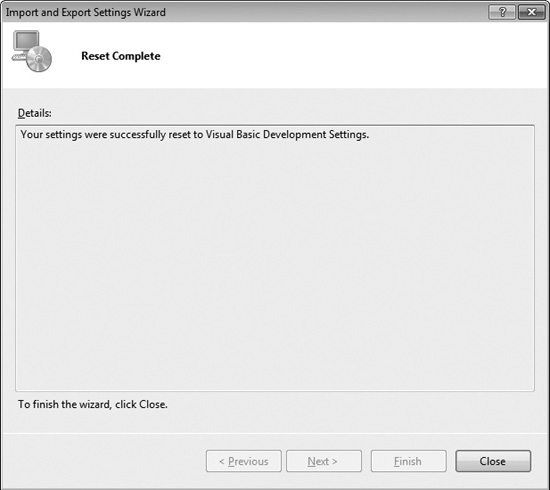
Figure 1-26 Reset Complete window
In addition to a new project, Figure 1-27 shows that you can create a new Web site, just open a file for editing, or open a wizard that creates a new project from existing files. We’ll look at many of these options later in the book, but let’s take a look at the New Project window, Figure 1-28, which opened as a result of selecting File | New | Project.
The New Project window in Figure 1-28 shows that there are many projects to select from, including Windows, Web, Office, SharePoint, Cloud, Reporting, Silverlight, Test, WCF, and Workflow. Some of these project types don’t appear in Figure 1-28, but if you scroll down the Templates list in the New Project window, you’ll see them. Figure 1-28 also shows the appearance for C# projects, but there are also similar projects for other programming languages that ship with VS; including VB, C++ (pronounced see-plus-plus), and F# (pronounced f-sharp). If you had selected VB settings during the setup process,
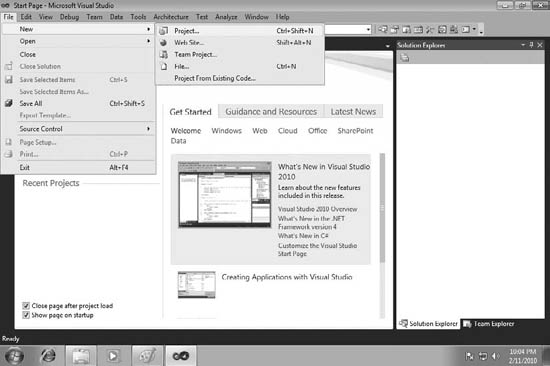
Figure 1-27 Selecting a New Project via the File menu
earlier in this chapter, the default set of project types would have been VB and C# projects would be listed in the Other Languages branch. The following sections describe the types of projects available, some of which you’ll learn how to create later in this book.
Windows Projects
Selecting Windows Projects will show you a list of project types that can be created for desktop applications, including Windows Presentation Foundation (WPF), Windows Forms, and Console. Console applications are for building applications that don’t need a graphical user interface (also known as GUI and pronounced “goo-ee”) and are generally for creating utilities that administrators can write scripts with or for writing a quick test for your program. You’ll be using Console applications when learning VB and C# languages later in this book because it is a simple way to concentrate on the language without any distractions. Windows Forms is an older desktop GUI technology. The new desktop GUI technology for .NET is called WPF, which is covered in a later chapter in this book.
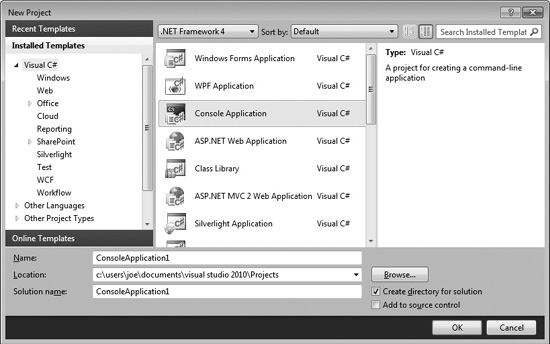
Figure 1-28 New Project window
Other windows projects include Windows Services, which are applications that are always on and run as a service in the background without a GUI, Class Libraries for holding reusable code often referred to as middleware, and Control Libraries for holding graphical controls that can be dragged-and-dropped from the Toolbox onto a visual designer within VS.
Web Projects
Web projects include ASP.NET, Server Controls, Web Services, and Dynamic Data. An ASP.NET project allows you to write an application that is hosted by a Web server, such as Internet Information Server (IIS), and runs in a Web browser. A Server Control project enables you to build a library of GUI controls that can be dragged-and-dropped onto the design surface of a Web page in VS. Web Services are reusable components that you can call from across the Internet. An important feature of Web Services is that they use ubiquitous protocols to enable code from any platform to call them, facilitating integration among heterogeneous computing systems. Dynamic Data projects offer a quick way to build a working Web site, based on an existing database schema.
Office Projects
For years, developers have been writing Visual Basic for Applications (VBA) programs to automate Microsoft Office applications. An Office project allows you to automate Office applications through .NET using languages such as VB and C#. Supported Office applications include Excel, Word, Project, PowerPoint, Outlook, Visio, and InfoPath.
SharePoint Projects
SharePoint is a technology for building portal-style Web applications. It is closely associated with Office applications and managing workgroup collaboration. In order to create and run SharePoint projects, the computer you use to run VS will need to be running one of Microsoft’s server platforms, such as Server 2008. SharePoint does not run on Windows 7, Vista, or Windows XP.
Database Projects
Database projects include a SQL Server project type, offering close integration with SQL Server for building .NET code that runs inside of SQL Server. For example, you can write stored procedures and functions in either C# or VB and have the benefit of the .NET Framework in your code. VS makes it easy to deploy your code to SQL Server with a single mouse click.
Summary
By knowing the benefits of VS, you have an appreciation for what VS can do for you, increasing your productivity through automatically generated code, rapid coding and visual design, and extensibility. You should be able to install VS, choosing the options that prepare the environment specifically for the work you want to do. Another set of skills you gained was the ability to manipulate the layout of your environment and manage environment settings, including how to get your environment back to the default settings if you’ve made too many changes. Having grown acquainted with each of the major features of the IDE, you can open VS and find the features that you need. With your knowledge of the advantages of VS, proper installation, and awareness of VS capabilities, you are now ready to start your first software development project, which you’ll learn about in the next chapter.