Chapter 2
Learning Just Enough C# or VB.NET: Basic Syntax
![]() Learn Basics of Starting a Project
Learn Basics of Starting a Project
![]() Use the VS Editor
Use the VS Editor
![]() Code Expressions and Statements
Code Expressions and Statements
The .NET platform supports several different programming languages. Since all of the languages run on the same platform and share the same class libraries, language choice becomes a personal choice of preference. In other words, you can accomplish the same tasks, regardless of what programming language you use. With .NET, you have a choice of language but retain the same benefits of having all of the features of .NET available to you.
Visual Studio (VS) 2010 ships with four programming languages: C#, C++, F#, and Visual Basic.NET (VB). The pronunciation of each of these languages, respectively, is See Sharp, See Plus Plus, Eff Sharp, and Vee Bee. C# and VB are the two most popular .NET programming languages and have the greatest support in VS. Therefore, this book uses both C# and VB in all examples. While you may choose one of these languages as your favorite, there is great benefit in knowing both. Most of what is written online, in magazines, and in books contains examples for either C# or VB, and sometimes, but not always, both. You might not want to miss great content because of a limited language choice.
Chapter 1 danced around projects and what is available. It was important to have that overview, but I’m sure you’re eager to see some code. This chapter will be satisfying in that you’ll learn how to create a project, see what code is generated, and learn how to add code yourself. This is the first chapter of three that covers language syntax, combining each language feature with tips on how VS helps you code. You’ll start off by creating a simple project and then learn about language types and statements.
Starting a Bare-Bones Project
Chapter 1 described the project types that you can create. This chapter takes you a step further; actually creating a project. Because the primary focus of this chapter is on learning C# and VB, the project type will be a Console application. A Console application is very simple, allowing you to read and write text from and to the Command Prompt window. Later chapters introduce you to the project types used most, such as WPF and ASP.NET.
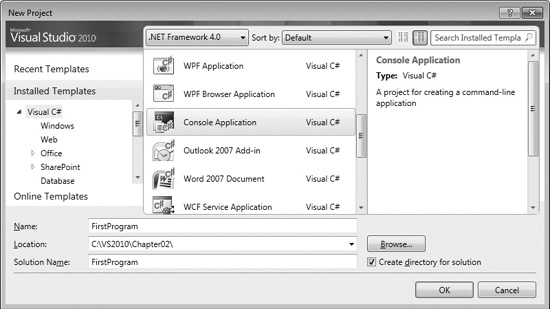
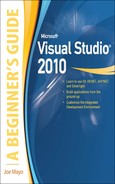
Figure 2-1 The New Project window
To get started, open VS and select File | New | Project. You’ll see the New Project window, shown in Figure 2-1. Your first task is to select Console Application as the program type. Then set the program name to FirstProgram and specify a location of your choice for where the project will be created. Other features of the New Project window include the ability to specify the .NET Framework version, sorting options, icon size options, and a search capability.
NOTE
It’s often useful to choose a project location other than the default. The default is your personal “My Documents” folder, which is long to type, cumbersome to navigate to, and error prone. Choosing a shorter path helps alleviate these problems. If you’re working on a team with other developers, it’s also helpful to use a common location for projects where everyone has their files in the same location.
NOTE
In the example code that accompanies this book, the projects are named FirstProgramCS (containing C# examples) and FirstProgramVB (containing VB examples). You’ll see this convention, specifying the language in the project name suffix, in all of the code examples accompanying this book.
Along the very top center of the dialog shown in Figure 2-1, the .NET Framework is the set of class libraries, runtime, and languages that is the development platform supported by VS. VS allows you to target multiple versions of the .NET Framework, including versions 2.0, 3.0, 3.5, and 4.0. VS will compile your code against the version you choose. Generally, you’ll want to begin all new projects with the latest version, 4.0, because you’ll want to be able to use the newest and most productive .NET features. The primary reason for using an earlier version is if you must perform work on code that is already written for an earlier version of .NET. The sorting and searching features to the right of this selection enable you to find project types in different ways, whichever is most comfortable for you.
Clicking OK will produce a Console application project in the programming language you chose, which you can see in the Solution Explorer, shown in Figure 2-2. The Solution Explorer in Figure 2-2 contains a solution, which is a container for multiple projects. Later, you’ll gain a stronger appreciation for the role of the solution when organizing projects to support a software application. Under the solution is the FirstProgram project. Within the FirstProgram project are project items, such as files and settings. Many different types of project items can go into a project, and the specific project items that go

Figure 2-2 A Console application in the Solution Explorer
into a project depend on the project type. For example, there are project items that are part of a WPF application but wouldn’t be part of a Console application. Of particular interest in the FirstProgram project is the file named Program.cs (or Modulel.vb if programming in VB), which is a code file, as we’ll discuss in the next section.
Examining the Code Skeleton
Having run the New Project Wizard for a Console application, you’ll see a file named Program.cs (or Module.vb) that contains skeleton code in the editor. VS will create skeleton code using built-in templates for most project types that you create. You’re free to add, remove, or modify this code as you see fit. Listing 2-1 contains the skeleton code, which I’ll explain next.
Listing 2-1 Console application skeleton code
C#:
using System;
using System.Collections.Generic;
using System.Linq;
using System.Text;

namespace FirstProgram
{
     class Program
     {
         static void Main(string[] args)
         {
         }
     }
}
VB:
Module Module1

    Sub Main()

    End Sub

End Module
The skeleton code in Listing 2-1 is what VS created when the new Console application was created. It is there to give you a head start on writing your program. What you now have is a whole computer program. This program doesn’t do much of anything at this point, but it will actually run and then end itself. Looking at the whole program, you can see that there are sets of nested curly braces in the C# code. The VB code has Module and Sub with corresponding End identifiers to indicate the boundaries of a block. The braces in C# code always come in pairs and define a block. The following explanation works from the inside out to help you understand what this code means.
The Main Method
The innermost block of the C# code is the static void Main(string[] args) definition, which is called a method. The method in VB is called Sub Main and is identical in purpose. You’ll learn later that methods are one way you can group code into logical chunks of functionality. You can think of methods as actions where you, as the method author, tell the computer what to do. The name of this particular method is Main, which is referred to as the entry point of the program, the place where a Console application first starts running. Another way of thinking about Main is that this is the place your computer first transfers control to your program. Therefore, you would want to put code inside of Main to make your program do what you want it to.
In C#, Main must be capitalized. It’s also important to remember that C# is case-sensitive, meaning that Main (capitalized) is not the same as main (lowercase). Although VS capitalizes your code for you if you forget to, VB is not case-sensitive. Capitalization is a common gotcha, especially for VB programmers learning C#.
In C#, methods can return values, such as numbers, text, or other types of values, and the type of thing they can return is specified by you right before the method name. In VB, a Sub (a shortened keyword derived from the term subroutine) does not return a value, but a Function does, and you’ll see examples soon. Since Main, in the C# example, does not return a value, the return type is replaced with the keyword void. Methods can specify parameters for holding arguments that callers pass to the method. In the case of Main, the parameter is an array of strings, with a variable name of args. The args parameter will hold all of the parameters passed to this program from the command line.
One more part of the C# Main method is the static keyword, which is a modifier that says there will only ever be a single instance of this method for the life of the program. To understand instances, consider that methods are members of object types where an object can be anything in the domain of the application you’re writing, such as a Customer, Account, or Vehicle. Think about a company that has multiple customers. Each customer is a separate instance, which also means that each Customer instance contains methods that belong to each instance. If an object such as Customer has methods that belong to each instance, those methods are not static. However, if the Customer object type has a method that is static, then there would only be a single copy of that method that is shared among all Customer objects. For example, what if you wanted to get a discount price for all customers, regardless of who the customer is; you would declare a static method named GetCustomerDiscount. However, if you wanted information that belonged to a specific customer, such as an address, you would create an instance method named GetAddress that would not be modified as static.
VB uses the term shared, which has the same meaning as static. Modules are inherently shared, and all module methods must be shared. Therefore, the VB Main method is shared.
In C#, the curly braces define the begin and end of the Main method. In VB, Main begins with Sub and is scoped to End Sub. Next, notice that the C# Main method is enclosed inside of a set of braces that belong to something called a class that has been given the name Program. The VB Main method is enclosed in something called a module. You’ll learn about the enclosing class and module next.
The Program Class
Methods always reside inside of a type declaration. A type could be a class or struct for C# or a class, module, or struct in VB. The term type might be a little foreign to you, but it might be easier if you thought of it as something that contains things. Methods are one of the things that types contain. The following snippet, from Listing 2-1, shows the type that contains the Main method, which is a class in C# and a module (in this example) in VB:
class Program
{
     // Main Method omitted for brevity
}
VB:
Module Module1
    ' Main omitted for brevity
End Module
Most object types you create will be a class, as shown in the previous C# example. In VB, you would replace Module with Class. Although VS uses Module as the default object type for a new project, it’s a holdover from earlier versions of VB. In practice, you shouldn’t use the VB Module but should prefer Class. The Program class contains the Main method. You could add other methods to the Program class or Module1 module, which you’ll see many times throughout this book. The Console application defined the skeleton code class to have the name Program. In reality you can name the class anything you want. Whatever names you choose should make sense for the purpose of the class. For example, it makes sense for a class that works with customers to be named Customer and only contain methods that help you work with customers. You wouldn’t add methods for working directly with invoices, products, or anything other than customers because that would make the code in your Customer class confusing. Classes are organized with namespaces, which are discussed next.
The FirstProgram Namespace
A namespace helps make your class names unique and therefore unambiguous. They are like adding a middle name and surname to your first name, which makes your whole name more unique. A namespace name, however, precedes the class name, whereas your middle name and surname follow your first or given name. A namespace also helps you organize code and helps you find things in other programmers’ code. This organization helps to build libraries of code where programmers have a better chance to find what they need. The .NET platform has a huge class library that is organized into namespaces and assemblies; this will become clearer the more you program. The main .NET namespace is System, which has multiple sub-namespaces. For example, guess where you can find .NET classes for working with data? Look in System.Data. Another quick test: Where are .NET classes for working with networking protocols like TCP/IP, FTP, or HTTP? Try System.Net.
Another benefit of namespaces is to differentiate between classes that have the same name in different libraries. For example, what if you bought a third-party library that has a Customer class? Think about what you would do to tell the difference between Customer classes. The solution is namespaces, because if each Customer has its own namespace, you can write code that specifies each Customer by its namespace. Always using namespaces is widely considered to be a best practice.
The Program class in Listing 2-1 belongs to the FirstProgram namespace, repeated here for your convenience (in C#):
namespace FirstProgram
{
    // Program class omitted for brevity
}
You can put many classes inside of a namespace, where inside means within the beginning and ending braces for a namespace.
The using directives at the top of the C# part of Listing 2-1 are really a shortcut that makes it easier for you to write code. For example, the System namespace contains the Console class. If the using System directive were not present, you would be required to write System.Console.WriteLine instead of just Console.WriteLine. This was a short example, but using directives can help clean up your code and make it more readable.
A VB module must be declared at the global level, meaning that it can’t be added to a namespace that you create. The following example demonstrates what a VB namespace looks like:
Namespace FirstProgram
    Public Class Customer

    End Class
End Namespace
In this example, you can see that the FirstProgram namespace contains a Customer class. The next task you’ll want to take on is writing code, but before doing so, let’s look at some of the features of the VS Code editor.
An Overview of the VS Code Editor
The VS Code editor is where you’ll be performing much of your coding work. This section will point out a few features you will be interested in and show you how to perform customizations. Figure 2-3 shows the editor with the Console application skeleton code from the C# part of Listing 2-1.

Figure 2-3 The VS Code editor
The following sections examine various elements of the Code editor, starting with class and member locators.
Class and Member Locators
The two drop-down lists, class locator and member locator, at the top of the editor are for navigating the code. If you have multiple classes in your file, you can use the class locator drop-down list on the left to select the class you want to find, and the editor will move you to the first line of that class declaration. In practice, I only put a single class within a single file, so the class locator doesn’t get much attention. However, you will have VS wizards that automatically generate code and put many classes in the same file, and the class locator is very useful if you want to find a particular class and learn about what the automatically generated code is doing. The member locator drop-down list on the top right contains a list of methods and other members for the class selected in the class locator. The only class member we’ve discussed so far is the method, but there are more, as you’ll learn in upcoming chapters. Selecting a member causes the editor to move you to the first line of that class member. Whenever you find yourself scrolling through a large file, remember that the member locator will help you find what you’re looking for quickly.
The vertical bar on the left side of the editor is called the indicator margin, where you’ll see icons for features such as bookmarks and debug breakpoints. The next section discusses bookmarks.
Bookmarks
Figure 2-3 shows a bookmark on the line for the program class. Bookmarks allow you to navigate code quickly without manual navigation when working with multiple documents or multiple locations within the same document. Table 2-1 shows a list of keyboard commands for bookmarks.

Table 2-1 Bookmark Shortcut Keys
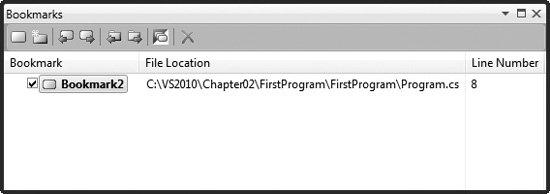
Figure 2-4 The Bookmarks window
One of the entries in Table 2-1, CTRL-W, B opens the Bookmarks window shown in Figure 2-4, allowing you to manage bookmarks throughout your application.
The bookmark has a toolbar, which is the same toolbar that appears in VS when the editor window is active. The actions on the toolbar include the items from Table 2-1, plus the ability to move between folders.
Within the Bookmark list, you can check to make a bookmark active or inactive. When the bookmark is inactive, previous and next navigation will not stop at the bookmark. You can change the name of the bookmark by clicking the name twice. The File Location and Line Number tell you where the bookmark is located.
Setting Editor Options
The editor is very configurable, and there are more options available than many people realize. You can view available options by selecting Tools | Options to show the Options window in Figure 2-5. As you can see from the figure, selecting Environment | Fonts And Colors allows you to change the appearance of VS. Regarding our current discussion of the editor, this is where you can customize the coloration of code elements that appear in the editor.
TIP
If you want to share your custom editor settings, you can use the Import and Export Settings Wizard that you learned about in Chapter 1. There is also an Import And Export Settings branch right below Fonts And Colors in the Options window.
Most editor customizations are in a language-specific branch of the Options window. Figure 2-6 shows the options available for C# programmers.

Figure 2-5 The Options window

Figure 2-6 C# code editor options
The Options window in Figure 2-6 is opened to Text Editor, C#, Formatting New Lines. As you can see, there are very detailed settings for even how the editor automatically formats new lines and where braces appear. If the code doesn’t format the way you want it to, visit this page to set the options to what you please.
Saving Time with Snippets
Snippets are important to learn because they will save you time. A snippet is a set of keystrokes that form a template for a piece of code. The code for a snippet is typically something that is common in normal programming. You’ll see many common statements and blocks of code in this chapter, many of which have associated snippets. This section shows you the mechanics of using snippets, and you’ll see more examples throughout the rest of this chapter.
To use a snippet, begin typing the snippet prefix until the snippet acronym appears in the Intellisense completion list, press the TAB key twice, and fill in the snippet form while tabbing through each field. Press ENTER when you’re done.
Since you’ve already learned about namespaces, I’ll show you the namespace snippet. To start, open any code file and click to start typing in a part of the file outside of all code blocks, such as directly below any using statements but above any existing namespace statements. Type the letter n and watch the completion list go straight to the namespace element. Type an a and you’ll see the namespace alone in the completion list, as shown in Figure 2-7.
NOTE
The CTRL-ALT-SPACE keystroke in Figure 2-7 switches between the Intellisense modes Consume First and Standard mode. In Standard mode, which shows CTRL-ALT-SPACE, typing characters automatically selects keywords. However, there are situations where you are trying to type a word that doesn’t exist yet and Intellisense is too aggressive by adding the selected completion list item, instead of what you typed. In those cases, you can press the CTRL-ALT-SPACE keys to go to Consume First mode and what you’ve typed will be selected. You can still use the DOWN ARROW key on your keyboard in Consume First mode to select the highlighted term in the completion list.
Figure 2-7 Using snippets
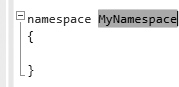
Figure 2-8 Filling in the Snippet template
You can identify snippets in the completion list by the torn paper icon. At this point, you can press the TAB key to complete the namespace keyword. Then press TAB again to produce a template where you can fill out the highlighted fields. Figure 2-8 shows the results of creating a namespace snippet by typing n and pressing TAB, TAB.
As shown in Figure 2-8, you would type in the Namespace name in the highlighted form field to replace MyNamespace, which is placeholder text. For templates with more fields, you would press the TAB key to move between fields. In the case of the namespace shown in Figure 2-8, there is only one field in the template to complete.
VB offers a couple of ways to add snippets: by typing prefixes or via a pick list. To see how VB snippets work, place your carat inside of the Module1 module, underneath End Main (not inside of the Main block). Type Su and press TAB, and notice that VS creates a Sub (method) along with a template containing a field for filling out the Sub snippet.
Another way to add VB snippets is to type a ? and press TAB. You’ll receive a pick list, as shown in Figure 2-9. You can navigate this pick list to find the snippet you need, as classified in one of the folders. VB ships with many more built-in snippets than for C#.
Now that you know how to use snippets, let’s move on to the different types of statements you can have in C# and VB and how snippets work with those statements.
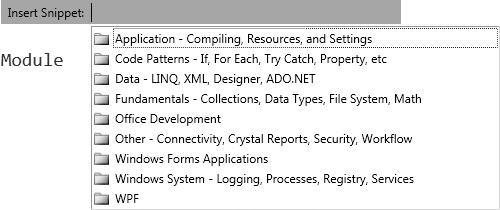
Figure 2-9 VB snippet pick list
Coding Expressions and Statements
There are various types of statements you can write with both C# and VB, including assignment, method invocations, branching, and loops. We’ll start off by looking at primitive types, such as integers and strings, and then I’ll show how to build expressions and set values by performing assignments. Then you’ll learn about branching statements, such as if and switch in C# or the case statement in VB. Finally, you’ll learn about various loops, such as for and while. I describe these language features in general terms because they differ between C# and VB, but you’ll learn that the concepts are essentially the same.
Before writing any code, you should know how Intellisense works; it is an important productivity tool that reduces keystrokes for common coding scenarios.
Making Intellisense Work for You
Previously, you saw how snippets work. Snippets use Intellisense to show a completion list. Intellisense is integrated into the VS editor, allowing you to complete statements with a minimum number of keystrokes. The following walkthrough shows you how to use Intellisense, as we add the following line to the Main method. Don’t type anything yet; just follow along to see how Intellisense works:
C#:
Console.WriteLine("Hello from Visual Studio 2010!");
VB:
Console.WriteLine("Hello from Visual Studio 2010!")
The following steps show you how VS helps you save keystrokes:
1. Inside the braces of the Main method, type c and notice how the Intellisense window appears, with a list of all available identifiers that start with c. This list is called a completion list.
2. Type o and notice that the completion list filters all but those identifiers that begin with co.
3. Type n and you’ll see that the only identifier available is Console. This is what we want, and you only needed to type three characters to get there.
4. At this point most people press the ENTER or TAB key to let VS finish typing Console, but that is effectively a waste of a keystroke.
You know that there is a dot operator between Console and WriteLine, so go ahead and type the period character, which causes VS to display “Console.” in the editor and show you a new completion list that contains members of the Console class that you can now choose from.
NOTE
So, I’ll admit that I spent a couple paragraphs trying to explain to you how to save a single keystroke, but that’s not the only thing you should get out of the explanation. The real value is in knowing that there are a lot of these detailed options available to increase your productivity. Every time you take advantage of a new VS option, you raise the notch of productivity just a little higher.
5. Now type write and notice that both Write and WriteLine appear in the completion list. Now type the letter l and notice that WriteLine is the only option left in the completion list.
NOTE
If you’ve typed WriteLine a few times, you’ll notice that the completion list goes straight to WriteLine after a few characters, rather than just Write. This is because Intellisense remembers your most frequently used identifiers and will select them from the list first. If you continue to type, Intellisense will then highlight those identifiers with exact matches. Notice the checked option in Figure 2-10; Intellisense preselects most recently used members, showing that this behavior is turned on by default.
6. Save another keystroke and press the (key to let VS finish the WriteLine method name.
7. At this point, you can finish typing the statement, resulting in a Main method that looks like this:
C#:
   static void Main(string[] args)
   {
       Console.WriteLine("Hello from Visual Studio 2010!");
   }
VB:
   Sub Main()
       Console.WriteLine("Hello from Visual Studio 2010!")
   End Sub
If you’re a C# developer and want to change Intellisense options, open Tools | Options and select Text Editor | C# | Intellisense, and you’ll see the Intellisense options in Figure 2-10. This option isn’t available for VB.
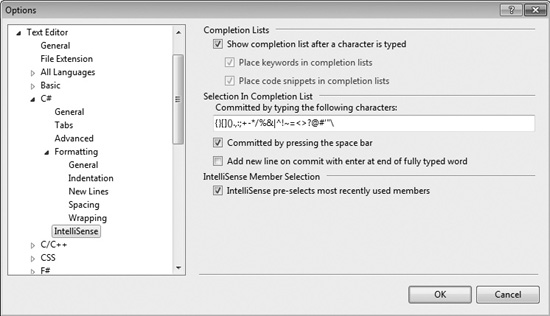
Figure 2-10 Intellisense options
Notice that there is a text box titled “Committed by typing the following characters,” which contains a set of characters that will cause VS to type the rest of the selected identifier in the completion list plus the character you typed. Referring back to Step 4, this is how you know that a period commits the current selection.
You now have a program that does something; it can print a message to the console. The next section will explain how you can run this program.
Running Programs
In VS, you can run a program either with or without debugging. Debugging is the process of finding errors in your code. If you run with debugging, you’ll be able to set break points and step through code, as will be described in Chapter 6. Running without debugging allows you to run the application, avoiding any breakpoints that might have been set.
To run without debugging, either select Debug | Start Without Debugging or press CTRL-F5. This will run the Command Prompt window, where you’ll see the words “Hello from Visual Studio 2010!” or whatever you asked the computer to write, on the screen. The Command Prompt window will stay open until you press ENTER or close the window.
To run with debugging, either select Debug | Start Debugging or press F5. Because of the way the application is coded so far, the Command Prompt window will quickly run and close; you might miss it if you blink your eyes. To prevent this, you can add a Console.ReadKey statement below Console.WriteLine, which will keep the window open until you press any key. Here’s the updated Main method:
C#:
static void Main(string[] args)
{
    Console.WriteLine("Hello from Visual Studio 2010!");
    Console.ReadKey();
}
VB:
Sub Main()
    Console.WriteLine("Hello from Visual Studio 2010!")
    Console.ReadKey()
End Sub
Pressing F5 will show “Hello from Visual Studio 2010!” on the Command Prompt window, just as when running without debugging.
To understand why there are two options, think about the difference between just running a program and debugging. If you run a program, you want it to stay open until you close it. However, if you are debugging a program, you have most likely set a breakpoint and will step through the code as you debug. When your debugging session is over, you want the program to close so that you can start coding again right away.
Now that you know how to add code to the Main method and run it, you can begin looking at the building blocks of algorithms, starting in the next section.
Primitive Types and Expressions
The basic elements of any code you write will include primitive types and expressions, as explained in the following sections.
Primitive Types
You can define variables in your programs whose type is one of the primitive types. Variables can hold values that you can read, manipulate, and write. There are different types of variables, and the type specifies what kind of data the variable can have. In .NET there are primitive types (aka built-in) and custom types. The custom types are types that you create yourself and are specific to the program you are writing. For example, if you are writing a program to manage the customers for your business, then you would create a type that could be used as the type of a variable for holding customer types. You’ll
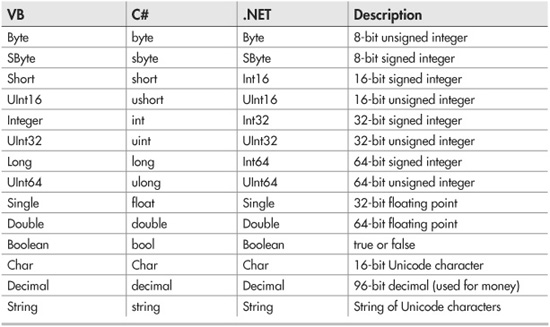
Table 2-2 Primitive Types
learn how to create custom types later. First, you need to learn about primitive types. The primitive types are part of the programming languages and built into .NET. A primitive type is the most basic type of data that you can work with in .NET, which can’t be broken into smaller pieces. In contrast, a custom type can be made up of one or more primitive types, such as a Customer type that would have a name, an address, and possibly more bits of data that are primitive types. Table 2-2 lists the primitive types and descriptions.
Looking at Table 2-2, remember that C# is case-sensitive and all of the primitive types are lowercase. You can also see a third column for .NET types. Occasionally, you’ll see code that uses the .NET type, which aliases the C# and VB language-specific types. The following example shows how to declare a 32-bit signed integer in both C# and VB, along with the .NET type:
C#:
int age1;
Int32 age2;
VB:
Dim age1 as Integer
Dim age2 as Int32
Consistent with Table 2-2, C# uses int and VB uses Integer as their native type definitions for a 32-bit signed integer. Additionally, you see age defined in both C# and VB using the .NET type, Int32. Notice that the .NET type is the same in both languages. In fact, the .NET type will always be the same for every language that runs in .NET. Each language has its own syntax for the .NET types, and each of the language-specific types is said to alias the .NET type.
Expressions
When performing computations in your code, you’ll do so through expressions, which are a combination of variables, operators (such as addition or multiplication), or referencing other class members. Here’s an expression that performs a mathematical calculation and assigns the result to an integer variable:
C#:
int result = 3 + 5 * 7;
VB:
Dim result As Int32 = 3 + 5 * 7
A variable that was named result in this example is a C# type int or a VB type Int32, as specified in Table 2-2. The variable could be named pretty much anything you want; I chose the word result for this example. The type of our new variable result in the VB example is Int32, which is a primitive .NET type. You could have used the VB keyword Integer, which is an alias for Int32 instead. The expression is 3 + 5 * 7, which contains the operators + (addition) and * (multiplication) and is calculated and assigned to result when the program runs. The value of result will be 38 because expressions use standard algebraic precedence. In the preceding example, 5 * 7 is calculated first, multiplication has precedence, and that result is added to 3.
You can modify the order of operations with parentheses. Here’s an example that adds 3 to 5 and then multiplies by 7:
C#:
int differentResult = (3 + 5) * 7;
VB:
Dim differentResult As Int32 = (3 + 5) * 7
Because of the grouping with parentheses, differentResult will have the value 56 after this statement executes.
The Ternary and Immediate If Operators
The C# ternary and VB immediate if operators allow you to test a condition and return a different value depending on whether that condition is true or false. Listing 2-2 shows how the ternary and immediate if operators work.
Listing 2-2 A ternary operator example
C#:
int bankAccount = 0;
string accountString = bankAccount == 0 ? "checking" : "savings";
VB:
Dim accountString As String =
    IIf(bankAccount = 0, "checking", "saving")
The conditional part of this operator evaluates if bankAccount is equal to 0 or not when the program runs (commonly known as “at runtime”). Whenever the condition is true, the first expression, the one following the question mark for C# or following the comma for VB, “checking” in this case, will be returned. Otherwise, if the condition evaluates to false, the second expression, following the colon for C# or after the second comma for VB, will be returned. That returned value, either the string “checking” or “savings” in this case, is assigned to the accountString variable that was declared.
NOTE
In earlier versions of the VB programming language, you were required to place an underline at the end of a statement that continued to the next line. In the latest version of VB, line continuations are optional. If you’ve programmed in VB before, the missing statement continuation underline might have caught your attention, but it is now perfectly legal.
Enums
An enum allows you to specify a set of values that are easy to read in code. The example I’ll use is to create an enum that lists types of bank accounts, such as checking, savings, and loan. To create an enum, open a new file by right-clicking the project, select Add | New Item | Code File, call the file BankAccounts.cs (or BankAccounts.vb), and you’ll have a blank file. Type the enum in Listing 2-3.
Listing 2-3 An example of an enum
C#:
public enum BankAccount
{
    Checking,
    Saving,
    Loan
}
VB:
Enum BankAccount
    Checking
    Saving
    Loan
End Enum
Listing 2-4 shows how you can use the BankAccount enum:
C#:
BankAccount accountType = BankAccount.Checking;

string message =
   accountType == BankAccount.Checking ?
       "Bank Account is Checking" :
       "Bank Account is Saving";
VB:
Dim accountType As BankAccount = BankAccount.Checking

Dim message =
    IIf(accountType = BankAccount.Checking,
        "Bank Account is Checking",
        "Bank Account is Saving")
The accountType enum variable is a BankAccount and is initialized to have the value of the Checking member of BankAccount. The next statement uses a ternary operator to check the value of accountType, evaluating whether it is Checking. If so, message is assigned with the first string. Otherwise, message is assigned with the second string. Of course, we know it’s the first string because the example is so simple that you can see it is coded that way.
Branching Statements
A branching statement allows you to take one path of many, depending on a condition. For example, consider the case for giving a customer a discount based on whether that customer is a preferred customer. The condition is whether the customer is preferred or not, and the paths are to give a discount or charge the entire price. Two primary types of branching statements are if and switch (Select Case in VB). The following sections show you how to branch your logic using if and switch statements.
Expressions
If statements allow you to perform an action only if the specified condition evaluates to true at runtime. Here’s an example that prints a statement to the console if the contents of variable result is greater than 48 using the > (greater than) operator:
C#:
if (result > 48)
{
   Console.WriteLine("result is > 48");
}
VB:
If result > 48 Then
    Console.WriteLine("Result is > 48")
End If
C# curly braces are optional if you only have one statement to run after the if when the condition evaluates to true, but the curly braces are required when you want two or more statements to run (also known as “to execute”) should the condition be true. The condition must evaluate to either a Boolean true or false. Additionally, you can have an else clause that executes when the if condition is false. A clause is just another way to say that an item is a part of another statement. The else keyword isn’t used as a statement

Figure 2-11 The C# if statement snippet template
itself, so we call it a clause because it can be part of an if statement. An example of an else clause is shown here:
C#:
if (result > 48)
{
    Console.WriteLine("result is > 48");
}
else
{
    Console.WriteLine("result is <= 48");
}
VB:
If result > 48 Then
    Console.WriteLine("Result is > 48")
Else
    Console.WriteLine("Result is <= 48")
End If
As the preceding example shows, if result is not greater than 48, then it must be less than or equal to 48.
if and else Snippets
The if snippet creates a template for you to build an if statement. To use the if snippet, type if and press TAB, TAB; you’ll see the template in Figure 2-11 for C# or Figure 2-12 for VB.

Figure 2-12 The VB if statement snippet template
As shown in Figure 2-11, the template brings you to a highlighted field for specifying the condition of the if statement. For C#, type the condition you want evaluated and press ENTER; the snippet completes by placing your carat within the if statement block. For VB, just place your cursor where you want to begin typing next.
In C#, the else statement snippet is similar to if. Type else and press TAB, TAB— the else template appears with the carat between the blocks of the else. There isn’t a VB else snippet; just type Else between the last statement of the If and the End If.
Switch/Select Statements
A switch statement (Select Case statement for VB) tells the computer to evaluate one or many conditions and branch appropriately. Here’s an example that will perform different actions depending on the value of a name variable:
C#:
var name = "Megan";

switch (name)
{
    case "Joe":
        Console.WriteLine("Name is Joe");
        break;
    case "Megan":
        Console.WriteLine("Name is Megan");
        break;
    default:
        Console.WriteLine("Unknown Name");
        break;
}
VB:
Dim name As String = "Megan"

Select Case name
    Case "Joe"
         Console.WriteLine("Name is Joe")
    Case "Megan"
         Console.WriteLine("Name is Megan")
    Case Else
         Console.WriteLine("Unknown name")
End Select
In the C# example, you can see the keyword switch with the value being evaluated in parentheses. The code to execute will be based on which case statement matches the switch value. The default case executes when there isn’t a match. The break keyword

Figure 2-13 A switch snippet template
is required. When the program executes a break statement, it stops executing the switch statement and begins executing the next statement after the last curly brace of the switch statement.
For the VB example, the Select Case statement uses name as the condition and executes code based on which case matches name. The Case Else code block will run if no other cases match.
Switch Statement Snippets
There are two scenarios for switch statement snippets: a minimal switch statement and an expanded switch with enum cases. First, try the minimal switch statement by typing sw and pressing TAB, TAB, resulting in the switch statement in Figure 2-13.
You would replace the switch_on in Figure 2-13 with a value you want to use in the switch statement. After pressing ENTER, you’ll see the snippet expand to a switch statement with a default case, as follows:
switch (name)
{
    default:
        break;
}
VB Select statements work similar to the C# switch; type Se and press TAB, TAB; you’ll see the VB template shown in Figure 2-14.
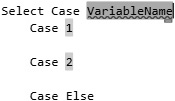
Figure 2-14 The Select Case snippet template
In C#, you normally just add the case statements you need. However, there is a special feature of the switch snippet that makes it even more efficient to use enums, creating a case for each enum value automatically. In the following example, we use the accountType variable of the enum type BankAccount from Listing 2-3. To see how the switch statement works with enums, type sw and press TAB, TAB; you’ll see the switch template with the condition field highlighted. Type accountType in the field and press ENTER. The switch snippet will automatically generate cases for each of the BankAccount enum members as follows:
switch (accountType)
{
    case BankAccount.Checking:
        break;
    case BankAccount.Saving:
        break;
    case BankAccount.Loan:
        break;
    default:
        break;
}
The enum comes through as a convenience that is easy to read and minimizes potential spelling mistakes when using strings. Now that you know how branching statements work, let’s move on to loops.
Loops
You can perform four different types of loops: for, for each, while, and do. The following sections explain how loops work.
For Loops
For loops allow you to specify the number of times to execute a block of statements. Here’s an example:
C#:
for (int i = 0; i < 3; i++)
{
    Console.WriteLine("i = " + i);
}
VB:
For i As Integer = 0 To 2
    Console.WriteLine("i = " & i)
Next
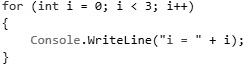
Figure 2-15 The C# for loop snippet template
In the preceding C# loop, i is a variable of type int, the loop will continue to execute as long as i is less than 3, and i will be incremented by one every time after the loop executes. The condition, i < 3, is evaluated before the loop executes, and the loop will not execute if the condition evaluates to false.
The VB For loop initializes i as an integer, iterating (repeating) three times from 0 to 2, inclusive.
The for Loop Snippet
To use the C# for loop snippet, type fo and press TAB, TAB; you’ll see the snippet template in Figure 2-15.
NOTE
The + and & operators from the preceding code example perform string concatenation. Although i is an integer, it will be converted to a string prior to concatenation.
The same key sequence (fo, TAB, TAB) works for VB For loop snippets too, except that you’ll see the snippet template in Figure 2-16.
The C# for loop snippet template is different from previous templates in that you have two fields to fill out. First, name your indexer, which defaults to i, and then press TAB, which moves the focus to the loop size field, containing Length as the placeholder. If you like the variable name i, which is an understood convention, just press the TAB key and set the length of the loop. You’ll end up with a for loop and the carat inside of the block.
For Each Loops
For each loops let you execute a block of code on every value of an array or collection. Arrays store objects in memory as a list. Collections are more sophisticated than arrays
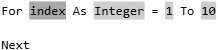
Figure 2-16 The VB For loop snippet template
and hold objects in memory in different forms, which could be Stack, List, Queue, and more. Here’s an example that loops on an array of strings:
C#:
string[] people = { "Megan", "Joe", "Silvia" };

foreach (var person in people)
{
   Console.WriteLine(person);
}
VB:
Dim people = {"Megan", "Joe", "Silvia"}

For Each person As String In people
    Console.WriteLine(person)
Next
In this example, people is an array of strings that contains three specific strings of text. The block of the loop will execute three times, once for each item in the array. Each iteration through the loop assigns the current name to person.
The For Each Loop Snippet
To add code using a for each snippet in C#, type fore and press TAB, TAB, which results in the snippet template shown in Figure 2-17.
The for each loop snippet gives you three fields to complete. The var is an implicit type specifier that allows you to avoid specifying the type of item; the compiler figures that out for you, saving you from some keystrokes. The item field will be a collection element type. You may leave var as is or provide an explicit type, which would be string in this case. You can tab through the fields to add meaningful identifiers for the item and collection you need to iterate through.
To execute the VB For Each snippet, type ?, TAB, C, ENTER, C, ENTER, f, ENTER and you’ll see the For Each loop template shown in Figure 2-18.
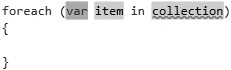
Figure 2-17 The C# for each loop snippet template

Figure 2-18 The VB For Each loop snippet template
While Loops
A while loop will allow a block of code to execute as long as a specified condition is true. Here’s an example that does a countdown of numbers:
C#:
int count = 3;

while (count > 0)
{
    Console.WriteLine("count: " + count);
    count--;
}
VB:
Dim count As Integer = 3

While count > 0
    Console.WriteLine("count: " & count)
    count -= 1
End While
The while loop executes as long as count is greater than 0. Since count is 3 and will decrement by one each time through the loop, the value will change from 3 to 2 to 1 and then the loop won’t execute anymore. Be careful not to create endless loops.
The while Loop Snippet
To create a while loop snippet, type wh and press TAB, TAB; and you’ll see the snippet template in Figure 2-19 (C#) or Figure 2-20 (VB).
For C#, filling in the condition and pressing ENTER places the carat inside the while loop block.

Figure 2-19 The C# while loop snippet template

Figure 2-20 The VB while loop snippet template
Do Loops
You can use a do loop if you want the code in the loop to execute at least one time. Here’s an example that demonstrates a simple menu that obtains user input:
C#:
string response = "";

do
{

    Console.Write("Press 'Q' and Enter to break: ");
    response = Console.ReadLine();
} while (response != "Q");
VB:
Do
   Console.Write("Press Q and Enter to break: ")
   response = Console.ReadLine()
Loop While response <> "Q"
In this example, you’ll always get the prompt for Press ‘Q’ and Enter to break:. The Console.ReadLine reads the user input, which is of type string. If the input is a string that contains only a capital Q, the loop will end.
VB has another variation of loops that use the Until keyword, as follows:
Do
   Console.Write("Press Q and Enter to break: ")
   response = Console.ReadLine()
Loop Until response = "Q"
In this code, you can see that the Until condition will continue looping while the condition is not true, which is opposite of the Do Loop While.
The Do Loop Snippet
To use the do loop snippet, type do and press TAB, TAB; you’ll see the do loop template shown in Figure 2-21.

Figure 2-21 The C# do loop snippet template
Figure 2-22 The VB do loop while snippet template
Fill in the condition on the do loop and press ENTER, placing the carat in the do loop block.
For a VB Do snippet type ?, TAB, C, ENTER, C, ENTER, and use an arrow key to select the variant of Do loop that you want. Figure 2-22 shows an example of the Do Loop While template.
Summary
Working with languages is a core skill when building .NET applications. Two of the most used languages in .NET are C# and VB, which is why this chapter is dedicated to those two languages. You learned about types, expressions, statements, code blocks, conditions, and branching. Additionally, you learned some of the essential features of VS for writing code, such as the code editor, bookmarks, Intellisense, and snippets.
Chapter 3 takes you to the next step in your language journey, teaching you about classes and the various members you can code as part of classes.