Chapter 7
Working with Data
![]() Work on SQL Server Databases with Visual Studio 2010
Work on SQL Server Databases with Visual Studio 2010
![]() Query Data with Language Integrated Query (LINQ)
Query Data with Language Integrated Query (LINQ)
![]() Use LINQ to SQL to Query and Manipulate SQL Server Data
Use LINQ to SQL to Query and Manipulate SQL Server Data
Most of the work we do each day involves data, and most of the data we work with comes from databases. Because of the importance of data in our applications, this chapter introduces how to work with data in VS. It’s very important to learn the concepts in this chapter because it will affect all of the work you do when programming. You’ll also see many examples of working with data throughout the rest of this book, underscoring the importance of data in software engineering.
While you’re free to work with any data source you want, Microsoft has several versions of SQL Server from free Express versions to Enterprise level. Since SQL Server Express ships with VS, we’ll use that for all of the examples in this chapter and the rest of the book. Don’t worry; the development experience for Express is similar to all other versions, so what you learn will be applicable to other versions of SQL Server.
Data operations are so important that you also have support in the programming languages for working with data called Language Integrated Query (LINQ). You can use LINQ to query many types of data sources, whether it is objects, XML, or relational data. This chapter will show you how to use LINQ for querying data from SQL Server.
Working with Databases
VS provides several tools for working directly with databases. The free Express versions of VS, such as Visual C# Express and Visual Basic Express, don’t have this built-in support. However, you can visit MSDN and download the free SQL Server Express for database work alongside the Express versions. What I’ll show you in this chapter will be available in VS Professional or later, which includes support for working with SQL Server directly in the VS IDE.
Introduction to Server Explorer
You don’t need to open a project to perform any database work. To start working with databases in VS, you need to start VS and then open Server Explorer by clicking

Figure 7-1 Server Explorer
View | Server Explorer or pressing CTRL-ALT-S. Server Explorer, shown in Figure 7-1, allows you to work with databases, servers, and SharePoint. Servers give you access to the various types of services for managing an operating system, such as Event Logs, Performance Counters, and Services. It is very convenient to be able to access these services in VS during development. For example, if you need to restart an operating system service, you can do it quickly. SharePoint is out of the scope of this book, but the relevant part of Server Explorer is the Data Connections section at the top, which you can see in Figure 7-1.
The Data Connections section will have a list of databases that you can select and work with. Initially, the list will be empty and you must add connections yourself, which you can do by right-clicking Data Connections and configuring the database settings. Since the process of connecting to an existing database is similar to the task for creating a database, I’ll show you how to create a brand new database instead, which is covered in the next section.
Creating a Database
All of the examples in this chapter will use a database that we will create in this section. Therefore, we need to create a database to work with. With VS Standard and higher, you don’t need external tools to create a simple database because there is built-in support for getting started. That said, there are advanced scenarios where a database administrator would want to use the SQL Server tools to create the database themselves, meaning that you would only want to connect to the database they created. For many cases, you can just create the database yourself to get started.

Figure 7-2 Create New SQL Server Database
To create a database, right-click Data Connections in Server Explorer, and select Create New SQL Server Database. This will show the Create New SQL Server Database window, shown in Figure 7-2.
In Figure 7-2, the server name is .sqlexpress. The dot before the backslash represents the current machine name, and the sqlexpress is the name for the SQL Server Express database. Server names will vary, depending on the location of the server and the name given to the database server instance. For example, if you were deploying an application to a shared Web hosting site, the server name would look something like sql02.somedomain.com, which is established by the hosting provider you are using.
Your authentication options include Windows and SQL Server. Here, I’m choosing Windows authentication because it’s the simplest option. The database created here is local, but you might have a database already created on a server at another location. The database on another server might have a SQL login, which is another method of authentication.
After adding the database name, click OK to create the database. As shown in Figure 7-2, we’ve called this database MyShop, representing an application that supports customers who order products from a store. You’ll see the new database under Data Connections in Server Explorer, similar to what you see in Figure 7-1. Now you’re ready to add tables.
Adding Tables
The database itself will hold data for customers, orders, and order details that we introduced in the preceding chapter. The data will be held in tables that we’ll create in this section. In later sections, I’ll show you how to perform Create, Read, Update, and Delete (CRUD) operations on this data. Right now, you’ll learn how to create the tables.
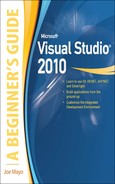
To create a table, right-click the Tables branch under the database in Server Explorer and select Add New Table; you’ll see a Table Designer similar to Figure 7-3. Yours won’t have the CustomerID or Name columns yet; that’s coming up next.
The Table Designer allows you to add columns and configure the data type (such as integer, date, float, or character) and other details of each column and the table. Figure 7-3 shows a table with two columns, CustomerID of data type int and Name of data type nvarchar(50). Ensure that Null is unchecked for each column to avoid errors in code that doesn’t check for null later in this chapter.
NOTE
Databases, such as SQL Server, have their own type system, which doesn’t always match the .NET type system perfectly. That said, there are types that match very well; for instance, a SQL int is the same as a C# int or VB Integer. A SQL nvarchar(50) can be matched with a C# string or VB String. However, the nvarchar is limited to 50 characters, or whatever length is specified in parentheses, but the C# string and VB String don’t have a specified size. A full discussion of SQL types is out of scope, but you should be aware that there are differences between SQL and .NET types.
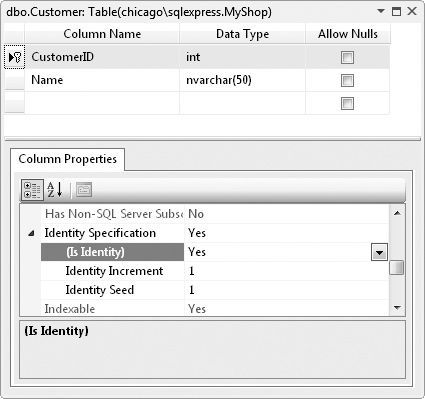
Figure 7-3 The Customer table
The CustomerID has a primary key symbol, which is created by right-clicking the column and selecting Set Primary Key. If you needed a composite key (multiple columns that define a key), which you don’t in this simple example, you would press CTRL and click each column that belongs to the key and then right-click and select Set Primary Key.
NOTE
When working with LINQ, which we discuss later in this chapter, it is absolutely essential that you give every table a primary key.
In addition to setting the primary key, it’s helpful to make the key number autoincrement so that it will have a unique value for every record you insert. In Figure 7-3, you can see that CustomerID is selected and Column Properties has scrolled down to the Identity Specification property. By default, Identity Specification is collapsed and set to No. You’ll need to expand the Identity Specification property by selecting the arrow on the left, and change the value to Yes by selecting the drop-down arrow on the right of the “(Is Identity)” setting, which by default is No. This will also enable Identity Increment, which specifies the number to add for each new record, and the Identity Seed, which specifies what the first number will be. The effect of setting Identity Increment is that the first record added to the table will have a CustomerID with the value 1 (Identity Seed) and subsequent records will have a CustomerID with the values 2, 3, 4, and so on (Identity Increment). The value for CustomerID in each record creates a unique value that identifies the record and makes it easy to program data applications.
When you’re done creating the table, click the Save button on the toolbar and name the table Customer when prompted.
You can add data to the Customer table by opening the database in Server Explorer, navigate to the Tables folder in the MyShop database, right-click Customer, and select Show Table Data. You’ll see a grid similar to Figure 7-4 where you can enter some

Figure 7-4 Adding data to a table

Figure 7-5 The Order table
customer data. Notice that you need only type a name in the Name column (replacing the word NULL) and do not need to enter a value for the CustomerID, since we’ve made the CustomerID column auto-increment.
In a database of any sophistication, you have multiple tables. In the MyShop database, a Customer has an Order. So, create a new table named Order, shown in Figure 7-5, that has Primary Key OrderID, a datetime field called OrderDate, and an int field called CustomerID.
The Description in the Column Properties for the CustomerID field says FK to Customer. FK is an abbreviation for foreign key, which is used to create a relationship between a parent table and a child table. The next section explains more about what a foreign key is and how to create one.
Relating Tables with Foreign Keys
Foreign keys allow you to establish a relationship between two tables. You can think of this relationship as being parent/child, master/detail, or one-to-many; each analogy being equal, I’ll use parent/child. The preceding section shows how to create Customer and Order tables. The relationship between these two tables is that Customer is the parent and Order is the child. One record in Customer can have many records in Order; customers can have zero or more orders. A foreign key can help manage the relationship between Customer and Order.
The mechanics of creating a foreign key relationship is that you put the foreign key column in the child table, Order, and have the foreign key column refer to the primary key of the parent table, Customer. In this case, the reference is made simply by matching the integer value; if the ID number is the same in both tables, then the records are related. As shown in Figure 7-5, Order does have a CustomerID column, of type int, and we will make this the foreign key that will refer to CustomerID primary key in Customer, shown in Figure 7-3.
To create this foreign key relationship in VS, right-click the CustomerID column in the Order table and select Relationships. We’re going to create the foreign key relationship that you see in Figure 7-6.
Next, click Add, select the Tables And Columns Specific property, and click the ellipses button that appears on the far right of your selection (the ellipses does not appear until you first click “Tables And Columns Specific” below “(General)” in the Foreign Key Relationships dialog window. This will open the Tables And Columns window shown in Figure 7-7.
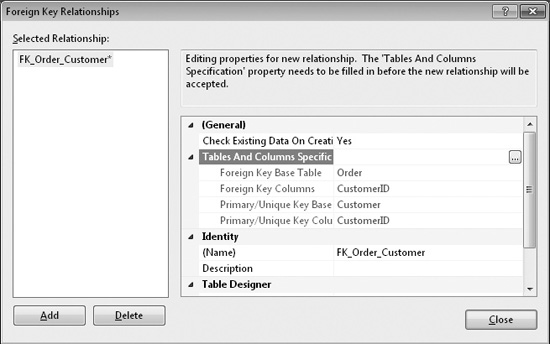
Figure 7-6 Managing a foreign key relationship
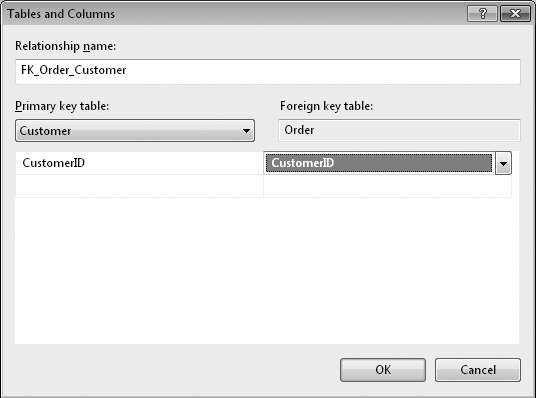
Figure 7-7 Configuring a foreign key relationship
In the primary key table drop-down, shown in Figure 7-7, select Customer, which automatically selects the primary key, CustomerID. (Note: If you don’t see this behavior, check to see that you’ve set your primary key columns and saved those table changes as described earlier.) In the list, under Foreign Key Table in Figure 7-7, you’ll initially see OrderID, which is the primary key of the order table. Select OrderID and change it to CustomerID as the foreign key column. Click OK to exit and click Close to finalize creation of the foreign key relationship. When you click Save to save the new foreign key relationship, you’ll see a warning message similar to Figure 7-8, listing the tables participating in the change. Select Yes to make your changes to the SQL Server tables. You can uncheck the Warn About Tables Affected box if you don’t want to see this message anymore, but the message does serve as a safety net to make sure you don’t accidentally save unintended changes to SQL Server, which is an external product to VS 2010.
Once the foreign key is in place, you can add a few records to the Order table, much as you did with the Customer table, but remember that the CustomerID must match an existing CustomerID in the Customer table because of the foreign key relationship. Forcing the child to refer to its parent is good because it maintains the integrity of the database, demonstrating the value of a foreign key.

Figure 7-8 Foreign key relationship Save warning message
TIP
Figure 7-7 shows an editable Relationship Name field. In many cases, you won’t care what this name is because it follows a standard convention of FK_Child_Parent. However, sometimes you have multiple relationships between the same tables, which means that VS appends an incremental number to the end of the name. Thus, for instance, the next foreign key relationship between the same two tables would be FK_Child_Parent1. In those cases, it would be smart to plan ahead and change the name to something meaningful so that you can later understand or quickly recall what relationship rules the foreign keys are enforcing. To see what I mean by enforcing rules, go ahead and enter a new record in the Order table, but enter an integer in the CustomerID column that does not exist already in the Customer table, like 9999. Try to save that record and then read the error message presented to you.
Working with multiple tables, you might want to have a better feel for the database structure and relationships. Database diagrams could be helpful in this case. To create a database diagram, right-click the Database Diagrams folder under the database in Server Explorer and click Add New Diagram. Click Yes when you receive an information message requesting the creation of objects for database diagramming. In the Add Table window, press the CTRL key so that you can select multiple rows, click to select each table, and click Add. You’ll see a new database diagram similar to Figure 7-9 (you may see Order appear above Customer in your diagram, which is fine; the position of
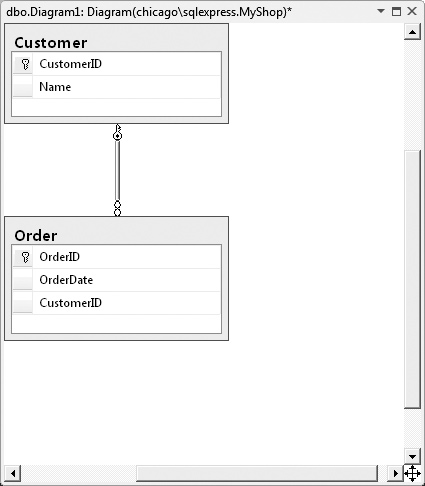
Figure 7-9 A database diagram
the symbols—the key and the infinity symbol at the end of the line connecting the two tables—is what is important).
As shown in Figure 7-9, the database diagram shows you tables, columns, and relationships. You can use this window to add new tables and relationships. When you want to create a new table, right-click the design surface, select Add Table, and use the Visual Designer to configure the table, as in previous examples. What is helpful with this designer is the ease in which foreign key relationships can be created as compared to the method we used earlier to accomplish the same thing. To create a foreign key relationship, click the foreign key column in the child table, drag the carat to the parent table, and drop the carat on the primary key of the parent table. When you’re finished with creating the database diagram, VS will prompt for the diagram name; you can reply with a name of your choice and click OK to save the diagram.
Other features of the database diagram include navigation, printing, and multiple diagrams. When you have a database diagram larger than the screen size, click the symbol with the four arrow heads at the lower right-hand corner of the database diagram, and move your mouse to quickly navigate through the document. If you want a permanent copy of the diagram, right-click and copy to clipboard or select File | Print. You can also add multiple diagrams to the Database Diagrams folder, allowing you to have multiple different views for your convenience.
In addition to tables and diagrams, you can add database views, stored procedures, functions, synonyms, types, and assemblies. Most of these database items are for advanced scenarios, but it’s important that you know about stored procedures, which are covered next.
Adding Stored Procedures
A stored procedure is code that is written in SQL and saved as part of a database. It is a method stored in the database itself, and not in your program code; hence the term stored procedure. In this section, I’ll show you how to create and execute a stored procedure. Later sections of this chapter will show you how to execute this stored procedure, which runs a data query, through LINQ to SQL.
To create a stored procedure, right-click the Stored Procedure folder for the database in Server Explorer and select Add New Stored Procedure. You’ll see an editor appear with skeleton code for a stored procedure. Modify the code so that it retrieves all of the data from the Customer table, as shown in Listing 7-1. After modifying the template code, click Save and you’ll see the stored procedure appear in the Stored Procedures folder of the database in Server Explorer.
Listing 7-1 Stored procedure example
CREATE PROCEDURE GetCustomers
AS
declare @cust_count int
select @cust_count = count(*) from Customer
if @cust_count > 0
begin
         select [Name] from Customer
end
return
Listing 7-1 declares a variable named @cust_count and runs a select statement to assign the number of customers, count(*), to @cust_count. If @cust_count is larger than 0, there are customers and the stored procedure queries for customer names. Teaching TSQL (Microsoft’s dialect of SQL) syntax is outside the scope of this book, but you can download SQL Server Books Online for free and purchase McGraw-Hill’s Microsoft SQL Server 2008: A Beginner’s Guide, Fourth Edition by Dusan Petkovic (McGraw-Hill/Professional, 2008) to get started.
To execute this stored procedure, right-click the stored procedure in the database in Server Explorer and click Execute. You’ll see output similar to the following if there are records in the customer table:
Running [dbo].[GetCustomers].

Name
-----------------------------------------------
Meg
Joe
May
No rows affected.
(3 row(s) returned)
@RETURN_VALUE = 0
Finished running [dbo].[GetCustomers].
In addition to execution, you can debug the stored procedure in VS. To debug, set a breakpoint on any line in the stored procedure, right-click the stored procedure in Server Explorer, and select Step Into Stored Procedure or click ALT-F5. If you need more help debugging, visit Chapter 6 for a refresher on VS debugging capabilities.
Configuring Database Options
VS has many database configuration settings that you can view via the Tools | Options menu and selecting Database Tools, as shown in Figure 7-10. For example, one of the
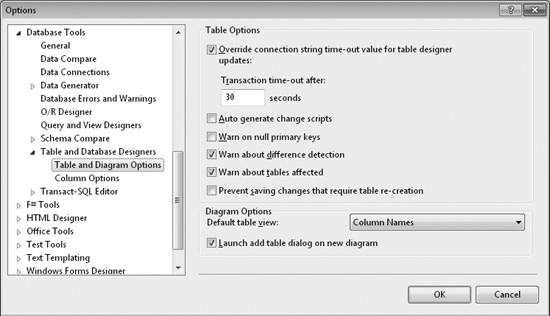
Figure 7-10 Database Tools options
options found after clicking the arrow button to expand Database Tools and then selecting Table And Database Designers is “Prevent saving changes that require table re-creation.” VS will not allow you to save a foreign key change to existing tables. However, by unchecking “Prevent saving changes that require table re-creation,” you’ll be able to save foreign key changes to an existing table.
As with so many other features of VS, there are literally dozens of database settings; most are intuitive if you already understand SQL Server. Other options differ, depending on the version of VS you have, and your Options screen might not look the same as Figure 7-10.
Now that you know how to create databases, tables, and stored procedures, you’ll need to know how to use your database from code. The rest of this chapter shows you how to use LINQ to work with data. First, we’ll look at the basic syntax of LINQ through LINQ to Objects and then follow with working with SQL Server through LINQ to SQL.
Learning Language Integrated Query (LINQ)
LINQ is a set of features built into programming languages, such as C# and VB, for working with data. It’s called Language Integrated Query because the LINQ syntax is part of the language, as opposed to being a separate library. This section will show you the essentials of LINQ with LINQ to Objects, a LINQ provider for querying in-memory collections of objects. The great news is that the syntax you learn here is not only applicable to LINQ to Objects, but to all other LINQ providers, such as LINQ to SQL and more, that you’ll encounter.
The examples in this chapter will use a Console project for simplicity. Later chapters will show you how to display data in desktop and Web applications. If you want to run the code in this chapter, you can create a Console application and type the examples into the Main method, as has been explained in each previous chapter of this book.
Querying Object Collections with LINQ
One way to use LINQ is via LINQ to Objects, which allows you to query collections of objects. You can use LINQ to query any collection that implements the IEnumerable interface. As you may recall, we discussed interfaces in Chapter 4; now you can see one more example of how important interfaces are to .NET development. Listing 7-2 shows a program that uses LINQ to query a collection. The object type is a custom class, named Customer. The Main method creates a generic list of Customer and uses a LINQ query to extract the Customer objects that have a first name that starts with the letter M.
Listing 7-2 A program demonstrating how to make a LINQ to objects query
C#:
using System;
using System.Collections.Generic;
using System.Linq;

class Customer
{
   public string FirstName { get; set; }
   public string LastName { get; set; }
}
class Program
{
   static void Main(string[] args)
   {
     List<Customer> custList = new List<Customer>
     {
        new Customer
        {
          FirstName = "Joe",
          LastName = "Zev"
        },
        new Customer
        {
          FirstName = "May",
          LastName = "Lee"
        },
        new Customer
        {
          FirstName = "Meg",
          LastName = "Han"
        }
     };
     var customers =
        from cust in custList
        where cust.FirstName.StartsWith("M")
        select cust;
     foreach (var cust in customers)
     {
        Console.WriteLine(cust.FirstName);
     }
     Console.ReadKey();
   }
}
VB:
Class Customer
     Property FirstName As String
     Property LastName As String
End Class

Module Module1
     Sub Main()
          Dim custList As New List(Of Customer) From
          {
               New Customer With
               {
                    .FirstName = "Joe",
                    .LastName = "Zev"
               },
               New Customer With
               {
                    .FirstName = "May",
                    .LastName = "Lee"
               },
               New Customer With
               {
                    .FirstName = "Meg",
                    .LastName = "Han"
               }
          }

          Dim customers =
               From cust In custList
               Where cust.FirstName.StartsWith("M")
               Select cust

          For Each cust In customers
               Console.WriteLine(cust.FirstName)
          Next

          Console.ReadKey()
     End Sub

End Module
Both the C# and VB examples from Listing 7-2 contain similar LINQ queries. To clarify, the following examples show both the C# LINQ query:
var customers =
     from cust in custList
     where cust.FirstName.StartsWith("M")
     select cust;
and the VB LINQ query:
Dim customers =
     From cust In custList
     Where cust.FirstName.StartsWith("M")
     Select cust
The customers variable in the LINQ queries references a new collection that holds the result of running the LINQ query, which contains all of the customers where the first letter of the FirstName property is the letter M. The from clause specifies the range variable that you name, cust is the name I chose, and the collection object to query, custList, was created and populated in the previous line of code. The range variable is what you use to specify parameters of the LINQ query. In the preceding example, we use the where clause to filter the results of the query. This where clause calls the StartsWith method on each FirstName property of the cust range variable to specify the filter.
The select clause specifies that each individual customer object is returned into our new customers collection, which we declared as type var (Dim in VB), which means our customers variable winds up being whatever collection type is returned from our LINQ query. This also means that the resulting customers collection will contain zero or more Customer type instances, depending on the filter we specified and whether our custList contained any Customer objects in the first place as a result of the Select cust portion of the LINQ statement. The select clause for C# queries is required, but the select clause for VB queries is optional and will return the range variable instance if omitted.
What our LINQ statement is essentially saying in English is “Create a new collection object and assign it to our variable customers (we don’t really care what type of object customers turns out to be as long as we can use it later), then go through every object in our previously defined and loaded custList collection, selecting only the ones that have for their FirstName property a string that begins with the letter M, and ignore all the rest, then take the ones that match this filter and stuff them into whatever collection you created for me earlier that you assigned to my variable customers.”
Creating a LINQ Projection with Anonymous Types
You can customize what is returned by the select clause by using what is called an anonymous type. This customization of return values is called a projection. Anonymous types facilitate custom projections, allowing you to return the results of a LINQ query in a form that you specify without needing to declare a new type ahead of time. Here’s an example of creating a query that declares a new anonymous type for combining the FirstName and LastName properties of Customer into a variable, FullName, that is created as a string-type property associated with the object returned into cust in the foreach statement:
C#:
var customers =
     from cust in custList
     where cust.FirstName.StartsWith("M")
     select new
     {
          FullName =
               cust.FirstName + " " +
               cust.LastName
};
foreach (var cust in customers)
{
     Console.WriteLine(cust.FullName);
}
VB:
Dim customers =
     From cust In custList
     Where cust.FirstName.StartsWith("M")
     Select New With
     {
          .FullName =
               cust.FirstName & "  " &
               cust.LastName
     }
For Each cust In customers
     Console.WriteLine(cust.FullName)
Next
In both the C# and VB select clauses you see a new statement (New With in VB) that defines the anonymous type. The new anonymous type has a single property, FullName, that is the combination of FirstName and LastName in Customer, but the new type will only have a FullName property. Notice how the foreach loop uses the FullName property, instead of the FirstName property from Listing 7-2. The beauty of this anonymous type is that we don’t really care what type of object is generated for us by the LINQ query, as long as that object has the new property associated with it that we specified, FullName in this case, which it does.
The variable, cust, in the preceding listing is used in two different scopes: the LINQ query and the foreach statement. Although the identifier, cust, is the same, the two usages are separate instances. Although you might not use the same practice in your own code, I wanted to demonstrate this so that you can see that range variables, such as cust, are scoped to the query they are defined in.
Another nuance of the preceding code is that cust, in the foreach loop, is not type Customer. Rather, it is an instance of the anonymous type created by the projection (select clause) of the LINQ query. Therefore, FullName is the only property each anonymous type instance, cust, contains.
Using LINQ to Sort Collection Results
Another common task you’ll want to perform with data is sorting so that you can put objects in a certain order. The following example modifies the example from Listing 7-2 to sort items from the customer List in descending order:
C#:
var customers =
     from cust in custList
     orderby cust.FirstName descending
     select cust;
VB:
Dim customers =
     From cust In custList
     Order By cust.FirstName Descending
     Select cust
The orderby (Order By in VB) clause specifies the properties to sort on. This example sorts the list by the FirstName property in descending order.
This was a quick taste of what you could do with LINQ, and there is much more. In fact, I wrote an entire book on the subject titled LINQ Programming (McGraw-Hill/Professional, 2008). The remaining section of this book takes what you’ve learned here and expands, showing you more samples of LINQ queries. The difference will be that you will be working with SQL Server data instead of in-memory objects.
Handling Data with LINQ to SQL
The LINQ to SQL provider allows you to communicate with SQL Server databases. There are many other types of providers, such as LINQ to Entities for generic databases (which includes SQL Server), LINQ to XML for XML data sources, and LINQ to Oracle for Oracle databases. The preceding section showed you how to use the in-memory provider, LINQ to Objects. However, LINQ to SQL is the easiest database provider to learn and ships with VS. Once you learn LINQ to SQL, the journey to other providers is easier. The following sections will show you how to set up LINQ to SQL, perform queries, and modify data.
Setting Up LINQ to SQL
Setting up LINQ to SQL involves running the LINQ to SQL Wizard and adding classes and methods. Behind the scenes, LINQ to SQL generates code, saving you a lot of work. The result of setting up LINQ to SQL is that you will have a data model, which is an environment with classes that you can use to query and modify database data and call methods for invoking stored procedures.
Before setting up LINQ to SQL, you’ll need to create a project (a Console project for the purposes of this chapter). See Chapter 5 if you need a refresher on how to set up a Console project. Select Add | New Item, select LINQ to SQL Classes, name the file MyShop.dbml, and click Add. This will show you the LINQ to SQL Designer, with two surfaces for classes and methods. Figure 7-11 shows the LINQ to SQL Designer with a couple of classes and a method.
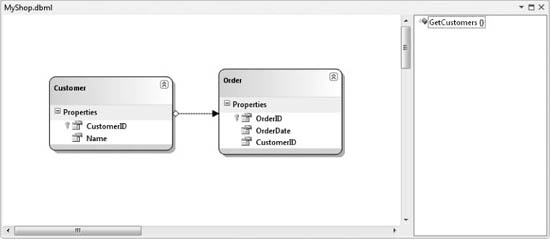
Figure 7-11 The LINQ to SQL Designer
To add entities to the LINQ to SQL Designer, open Server Explorer, select a database, and open the Tables folder. Then drag and drop the Customer and Order tables from Server Explorer to the left surface of the LINQ to SQL Designer. You can see the Customer and Order classes in Figure 7-11, along with properties corresponding to the fields of each table in the database.
The line between Customer and Order is called an association. As you might guess from reading the previous discussion on class relationships, the association defines the relationship between two classes. Although a relationship between tables is constrained by a foreign key in a child that refers to the primary key of that child’s parent, an association is the reverse direction; it is a property of a parent class that refers to all of the children of that class. When coding, you can use this association to navigate between parent and child objects.
NOTE
Features, such as the difference between foreign key relationships in relational databases and associations in object-oriented code, are often referred to as an impedance mismatch, a term taken from electrical engineering, between data and objects. LINQ is designed to reduce the impedance mismatch by allowing you to work with data from an object-oriented point of view, rather than doing all of the low-level work yourself such as copying data records into data transfer objects, DTOs, that you design and create.
On the right pane of Figure 7-11, you can see a GetCustomers method, which allows you to call the GetCustomers stored procedure. You can put stored procedures, such as GetCustomers, onto the design surface by opening the Stored Procedures folder of the database in Server Explorer and dragging and dropping that stored procedure onto the right pane of the LINQ to SQL Designer.
If your database has views and functions, you can add them the same way as you did for classes and functions previously. Before showing you how to use these new classes and views, I’ll show a little more about what you can do with the LINQ to SQL Designer.
Working with the LINQ to SQL Designer
While the most important part of the LINQ to SQL Designer is being able to add classes and methods, you should also know about some if its features such as the Methods pane hiding, zooming, and auto-layout. You’ll see these options through the design surface context menu (right-click).
Most of the time working with the Designer is with classes, and you want as much screen real estate as possible. You can achieve this goal by hiding the Methods pane. Just right-click the design surface and select Hide Methods Pane. Similarly, select Show Methods Pane to make the Methods pane reappear.
The default zoom level for the Designer is 100%, but you can change this by right-clicking, select Zoom, and select a zoom level percent. This might be useful if you wanted a higher-level view where you could fit more objects onto the screen at one time.
If you right-click and select Layout Diagram, VS will automatically lay out your diagram so that classes with relationships can physically reside in the same area with minimal overlapping of association lines, a feature I call auto-layout. After you’ve performed auto-layout, you will be able to manually change the location of classes by selecting and dragging each class to a new location, a feature I call manual layout.
TIP
Be careful of executing auto-layout after you have your layout the way you want. I tend to perform an auto-layout after the first time working with the LINQ to SQL Designer on a database. Then I follow up with manual layout to make working with classes even easier. Using auto-layout after manual layout will result in a lot of lost work.
It’s common in development to add new tables to a database that you also want in the Designer. In that case, drag and drop the tables from Server Explorer as you did for Customer and Order earlier. If a table changes, you can select its corresponding class in the Designer and delete that class and then drag and drop the new table onto the design surface. Any foreign key references will result in associations on the Designer if classes for both tables reside in the Designer too.
An important part of working with the Designer is properties. Right-click the Designer, select Properties, and you’ll see the Properties window, similar to Figure 7-12.
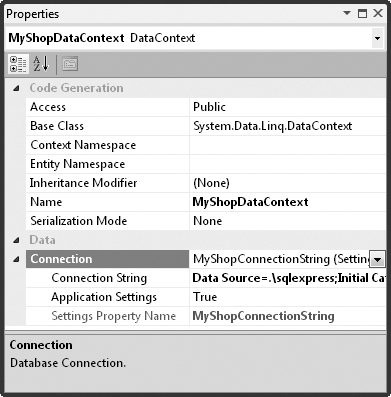
Figure 7-12 The LINQ to SQL Class Designer Properties window
LINQ to SQL generates a lot of code for you, and the Properties window allows you to modify parts of that code through the Code Generation section. To see this section, be sure your Properties window has the “Categorized” button selected near the top left side, and not the Alphabetical “AZ” button. You can also see the database connection string, which is created when you dragged and dropped from Server Explorer to the Designer and saved.
In addition to properties for the Designer itself, you view properties on objects such as classes, associations, and methods. Select the object you want to work with, right-click that object, and select Properties to show the Properties window for that object.
You now have a data model to work with. The following sections show you how to work with this data model to query, insert, update, and delete data.
Introduction to Querying LINQ to SQL
Previously, you learned how to use LINQ through the LINQ to Objects provider. All of what you learned with LINQ to Objects is applicable to other LINQ providers, including LINQ to SQL. This section combines the nuances of LINQ to SQL with what you’ve already learned to query database data. Listing 7-3 shows a LINQ query with LINQ to SQL that retrieves values from the Customer table of the MyShop database, which contains the tables added previously in this chapter.
Listing 7-3 Querying data with LINQ to SQL
C#:
using System;
using System.Linq;

namespace LinqToSqlDemoCS
{
     class Program
     {
          static void Main()
          {
               var myShop = new MyShopDataContext();

               var customers =
                    from cust in myShop.Customers
                    where cust.Name != "Joe"
                    select cust;

               foreach (var cust in customers)
               {
                    Console.WriteLine("Name: " + cust.Name);
}
               Console.ReadKey();
          }
     }
}
VB:
Module Module1

     Sub Main()
          Dim myShop As New MyShopDataContext

          Dim customers =
               From cust In myShop.Customers
               Where cust.Name IsNot "Joe"
               Select cust

          For Each cust In customers
               Console.WriteLine("Name: "& cust.Name)
          Next

          Console.ReadKey()
     End Sub
End Module
And here’s the output using my data:
Name: Meg
Name: May
Other than the obvious fact that we’re now getting our data from a real database, the difference between Listing 7-3 and the LINQ to Objects examples you saw earlier are that you have to use the System.Linq namespace (C# only), declare the MyShopDataContext data context, and query Customers from the data context. In C#, the using directive for the System.Linq namespace is required. If you left it out, the compiler will give you the following error message:
“Could not find an implementation of the query pattern for source type ‘System. Data.Linq.Table<LinqToSqlDemoCS.Customer>’. ‘Where’ not found. Are you missing a reference to ‘System.Core.dll’ or a using directive for ‘System.Linq’?”
Remember this message because any time you add a new file to a C# project where you are coding LINQ queries, this will be an indication you need to add a using directive for the System.Linq namespace.
A data context is the code that is generated by VS when you run the LINQ to SQL item wizard. The Main method instantiates MyShopDataContext, which is the data context. The name came from when the LINQ to SQL item wizard ran and your naming of the *.dbml file.
LINQ to SQL queries are made with the data context, which contains a property that holds a collection of the class type that the property is named after, myShop.Customers and myShop.Orders in this case. The LINQ query in the Main method uses the myShop data context instance to access the Customers collection in the from portion of the query.
NOTE
The LINQ to SQL provider uses pluralized data context properties. However, the results are not perfect; for example, Deer becomes Deers, which is incorrect in English. Additionally, pluralization is designed for English and will produce strange results in languages other than English. If the pluralization generated by the LINQ of a class is incorrect, you can either double-click the class name in the Designer or change the class name via the Properties window.
This section introduced you to what goes into creating a LINQ to SQL query, but your queries will likely need to work with multiple tables, as discussed in the next section.
Performing Queries on Multiple Tables
Until now, all queries have been from a single data source or table, like Customers in Listing 7-3. Often, you need to combine the results from multiple tables, which is where select many and join queries are useful. To demonstrate how joins work, we’ll define a scenario where you need to know the dates of all orders made and the name of the customer who made the order.
The select many lets you join tables based on associations in the LINQ to SQL Designer. From the parent object, you navigate to the child object and are able to access the properties of both parent and child. The following code shows how to perform a select many query that gets data from the Customer and Order tables and repackages it into a collection of data transfer objects:
C#:
var myShop = new MyShopDataContext();

var customers =
     from cust in myShop.Customers
     from ord in cust.Orders
     select new
     {
          Name = cust.Name,
          Date = ord.OrderDate
     };

foreach  (var custOrd in customers)
{
     Console.WriteLine(
               " Name: " + custOrd.Name +
               " Date: " + custOrd.Date);
}
VB:
Dim myShop As New MyShopDataContext

Dim customers =
     From cust In myShop.Customers
     From ord In cust.Orders
     Select New With
     {
          .Name = cust.Name,
          .Date = ord.OrderDate
     }
For Each custOrd In customers
     Console.WriteLine(
          " Name: " & custOrd.Name &
          " Date: " & custOrd.Date)
Next
And here’s the output:
Name: Joe Date: 1/5/2010 12:00:00 AM
Name: May Date: 10/5/2010 12:00:00 AM
Name: May Date: 10/23/2010 12:00:00 AM
Imagine that the preceding code is sitting in the Main method, like what you saw in Listing 7-3. The different part of this query that makes it a select many type of query is the second from clause. Consider the parent/child relationship between Customer and Order, which is represented by cust and ord in this query. The second from clause uses the cust instance to specify the orders to query, which will be all orders belonging to each customer. The ord instance will hold each order belonging to its associated cust. To make this data useful, the projection is on an anonymous type that pulls together the name of the customer and the date of that customer’s order.
In the database, I created two orders for May, one order for Joe, and zero orders for Meg. Since there wasn’t an order for Meg, you don’t see any items from Meg in the output. Later, I’ll show you how to add a parent record, even when that parent record has no child records.
The select many query is fine for simple queries but becomes harder to use in more complex queries. In this case, a join query emerges as an easier option. Like a select many query, a join query will combine two tables that have matching keys. Here’s an example of a join query that accomplishes the exact same task as the preceding select many query:
C#:
var myShop = new MyShopDataContext();

var customers =
     from cust in myShop.Customers
     join ord in myShop.Orders

          on cust.CustomerID equals ord.CustomerID
     select new
     {
          Name = cust.Name,
          Date = ord.OrderDate
     };
foreach  (var custOrd in customers)
{
     Console.WriteLine(
          " Name: " + custOrd.Name +
          " Date: " + custOrd.Date);
}
VB:
Dim myShop As New MyShopDataContext

Dim customers =
     From cust In myShop.Customers
     Join ord In myShop.Orders
          On cust.CustomerID Equals ord.CustomerID
     Select New With
     {
          .Name = cust.Name,
          .Date = ord.OrderDate
     }
For Each custOrd In customers
     Console.WriteLine(
          " Name: " & custOrd.Name &
          " Date: " & custOrd.Date)
Next
The difference between this query and the select many is that there is a join clause instead of a second from. The join identifies a range variable, ord, and operates on the Orders property of the data context. You also must specify which keys of the table join, mentioning the parent first, cust.CustomerID, and then the child, ord.CustomerID. Remember to use the equals keyword because the equality operator will not work.
The select many and join clauses are synonymous with SQL inner joins because there must be a foreign key in a child table that matches a parent in the parent table before any records for the parent will be returned. To address the issue of needing to get parents that don’t have children, you must perform a left outer join. To perform the equivalent of a SQL left outer join in LINQ, you must use a standard operator called DefaultIfEmpty. The following query gets a record for all customers, regardless of whether they have orders or not:
C#:
var myShop = new MyShopDataContext();

var customers =
     from cust in myShop.Customers
     join ord in myShop.Orders
          on cust.CustomerID equals ord.CustomerID
          into customerOrders
     from custOrd in customerOrders.DefaultIfEmpty()
     select new
     {
          Name = cust.Name,
          Date = custOrd == null ?
               new DateTime(1800, 1, 1) :
               custOrd.OrderDate
     };
foreach (var custOrd in customers)
{
     Console.WriteLine(
          " Name: " + custOrd.Name +
          " Date: " + custOrd.Date);
}
VB:
Dim myShop As New MyShopDataContext

Dim customers =
     From cust In myShop.Customers
     Group Join ord In myShop.Orders
          On cust.CustomerID Equals ord.CustomerID
          Into customersOrders = Group
     From custOrd In customersOrders.DefaultIfEmpty()
     Select New With
     {
               .Name = cust.Name,
               .Date = IIf(custOrd Is Nothing,
                    New DateTime(1800, 1, 1),
                    custOrd.OrderDate)
     }

For Each custOrd In customers
     Console.WriteLine(
               " Name: " & custOrd.Name &
               " Date: " & custOrd.Date)
     Next
And the output is
Name: Meg Date: 1/1/1800 12:00:00 AM
Name: Joe Date: 1/5/2010 12:00:00 AM
Name: May Date: 10/5/2010 12:00:00 AM
Name: May Date: 10/23/2010 12:00:00 AM
For C#, the left outer join is accomplished the same way as a join except for two additional lines: the into clause and the second from clause. For VB, the left outer join is the same as the join except for three lines: the Into clause, the second From clause, and the Group keyword. The into clause specifies an identifier that is used by the from clause. In the from clause, DefaultIfEmpty will return the default value for the continuation variable type. In the preceding example, the continuation variable is customerOrders whose type is Order. Since LINQ to SQL types are classes and Order is a class from the Orders entity collection, the default value is null (Nothing in VB). Notice how I enhanced the projection with a ternary (immediate if in VB) operator to control what value is returned when the parent doesn’t have a child. When performing a left outer join, make sure you compare the value against its default value to determine if the parent doesn’t have a child and ensure that valid values are set. Not only does the preceding example demonstrate how to check for a default value, but it also shows that you can use expressions in your projections.
In addition to LINQ queries, you can call stored procedures. As you may recall from the previous discussion on working with the LINQ to SQL Designer, I described how to drag and drop a stored procedure from Server Explorer to the design surface. Adding the stored procedure to the design surface also added a method to the data context. Here’s how to use that method:
C#:
var myShop = new MyShopDataContext();

var customers = myShop.GetCustomers();

foreach (var cust in customers)
{
      Console.WriteLine("Name: " + cust.Name);
}
VB:
Dim myShop As New MyShopDataContext

Dim customers As IEnumerable =
     = myShop.GetCustomers()

For Each custOrd In customers
     Console.WriteLine("Name:" & custOrd.Name)
Next
And here’s the output:
Name: Meg
Name: Joe
Name: May
Just call myShop.GetCustomers and you’ll receive a collection of Customer objects.
There are many more advanced scenarios that you can handle with LINQ, but this is just a beginner’s guide. However, you now have a solid base of query techniques that will get you started. In addition to querying a database, you’ll need to perform insert operations, which is next.
TIP
LINQ to SQL generates SQL (Structured Query Language) statements to send to the database for your queries. If you would like to see the generated SQL, set a breakpoint on the line after the query and run the program with debugging. When you hit the breakpoint, hover over the variable holding query results and you’ll see the SQL statement.
Inserting Data with LINQ to SQL
To insert a new record into a table, you’ll need to create an instance of the LINQ to SQL class for that table, call a method to insert, and then call another method to commit the changes. The following example shows how to add a new record to the Customer table:
C#:
private static int InsertCustomer()
{
     var cust = new Customer { Name = "Jim" };

     var myShop = new MyShopDataContext();

     myShop.Customers.InsertOnSubmit(cust);

     myShop.SubmitChanges();

     return cust.CustomerID;
}
Function InsertCustomer() As Integer
     Dim cust = New Customer With
     {
          .Name = "Jim"
     }
     Dim myShop As New MyShopDataContext

     myShop.Customers.InsertOnSubmit(cust)

     myShop.SubmitChanges()

     Return cust.CustomerID
End Function
As shown here, each collection property, such as Customers, has an InsertOnSubmit method that takes an object of the collection’s type, Customer in this case. Don’t forget to call SubmitChanges, or else you won’t see any changes to your data. The next section discusses updates. Once the insert executes, with SubmitChanges, the new object, cust, will be updated with the new CustomerID, which you read and return to calling code.
Updating Data with LINQ to SQL
To update data, you need to get an object for the record you want to update, change the object you received, and then save the changes back to the database. The following example shows how to update a record:
C#:
private static void UpdateCustomer(int custID)
{
     var myShop = new MyShopDataContext();

     var customers =
          from cust in myShop.Customers
          where cust.CustomerID == custID
          select cust;

     Customer firstCust = customers.SingleOrDefault();

     if (firstCust != null)
     {
          firstCust.Name = "James";
     }

     myShop.SubmitChanges();
}
Sub UpdateCustomer(ByVal custID As Integer)
     Dim myShop As New MyShopDataContext

     Dim customers =
          From cust In myShop.Customers
          Where cust.CustomerID = custID
          Select cust

     Dim firstCust As Customer =
          customers.SingleOrDefault()

     If (firstCust IsNot Nothing) Then
          firstCust.Name = "James"
     End If

     myShop.SubmitChanges()
End Sub
In the previous queries for the customer whose name was Jim, change the object to James and saves changes. The call to SingleOrDefault was necessary because the result of a LINQ to SQL query is a collection, but we only want the first or only record returned. There is also an operator method named Single, but using SingleOrDefault is favorable because it returns a default value if no records are returned, whereas Single will throw an exception. The code uses an if statement to protect against the possibility of an exception; otherwise, the code would throw a NullReferenceException when firstCust is null (Nothing in VB) and the code tries to access the Name property of a null object. Remember to call SubmitChanges; otherwise the updates won’t be made.
You can now query, insert, and update. Your final skill to learn is deleting data.
Deleting Data with LINQ to SQL
To delete a record from the database, you get a reference to the object for that record, call a method to delete that object, and save changes. Here’s an example that deletes a record:
C#:
private static void DeleteCustomer(int custID)
{
     var myShop = new MyShopDataContext();

     var customers =
          from cust in myShop.Customers
          where cust.CustomerID == custID
          select cust;
     Customer firstCust = customers.SingleOrDefault();

     if (firstCust != null)
     {
          myShop.Customers.DeleteOnSubmit(firstCust);
     }
     myShop.SubmitChanges();
}
VB:
Sub DeleteCustomer(ByVal custID As Integer)
     Dim myShop As New MyShopDataContext

     Dim customers =
         From cust In myShop.Customers
         Where cust.CustomerID = custID
         Select cust

     Dim firstCust As Customer =
         customers.SingleOrDefault()

     If (firstCust IsNot Nothing) Then
         myShop.Customers.DeleteOnSubmit(firstCust)
     End If

     myShop.SubmitChanges()
End Sub
This example is similar to the update example that did a query and then a call to SingleOrDefault to get a reference to the requested object. You then use the collection property, Customers in this case, to call the DeleteOnSubmit method. You need the check for null (Nothing in VB), or you’ll receive an ArgumentNullException when DeleteOnSubmit executes and the firstCust argument is null (Nothing in VB). Remember to call SubmitChanges; otherwise, you won’t delete the record.
A final note on the preceding three sections. The code runs in an insert, update, and delete sequence. Notice how the insert methods return an int, which is the CustomerID. Whenever you perform a query from a database, you’ll often want to get the ID field for the record at the same time. The reason is that the ID is unique to that one record and you can perform subsequent actions with the ID. Both the update and delete methods in preceding examples accepted an int parameter that was used to perform a database lookup of the record. Again, using the ID guarantees that we’ll only return one record, which is also why I was confident in calling SingleOrDefault. Since this chapter is about data, I purposely don’t show you how the program handles that ID. However, you’ll see IDs being used in multiple later chapters that show you how to build user interfaces. Pay attention to how the UI code holds on to IDs and then uses them when calling code that interacts with the database. You’ll see many different examples, but most of the examples that you see and then use in your own programs will be variations of what you’ve learned here.
Summary
This chapter showed you how to work with the VS database tools. You can create tables, relationships, and stored procedures. The section “Querying Object Collections with LINQ” helped you understand basic LINQ queries. You can now use LINQ to SQL, setting up a designer with classes and methods. Additionally, you can create, read, update, and delete data with LINQ to SQL.
This chapter used Console applications to show you how to work with data. This was to help you concentrate on data access exclusively, minimizing any other distractions. However, real applications require graphical user interfaces (GUIs). Remaining chapters of this book will show you how to create GUI applications that consume data, giving you many more examples of how LINQ to SQL works in an application. The next chapter gets you started in GUI development with WPF.