
Chapter 13
Extending Visual Studio 2010
![]() Create an Add-In with VS
Create an Add-In with VS
![]() Learn What Types of Add-Ins to Create
Learn What Types of Add-Ins to Create
![]() Deploy an Add-In
Deploy an Add-In
Previous chapters discussed many ways to use VS, and the preceding chapter showed you a few ways to create your own customizations. In particular, macros offer the ability to perform repeatable actions and give you access to much of what VS has to offer. Taking customization one step beyond macros, this chapter shows you how to extend VS functionality with a software component called an Add-In.
Essentially, an Add-In is a software component that allows you to add new capabilities to VS that haven’t existed before. The Add-In plugs into VS, and you can run it as if it were part of VS. This chapter shows you how the process of creating an Add-In works. You’ll see how to add functionality to make an Add-In perform any task you want. Besides creating an Add-In, this chapter points you in the right direction so that you can figure out how to access the different parts of VS. The specific example in this chapter is an AddIn that finds all of the shortcut keys in VS and prints them to the Output window. With knowledge of how to create an Add-In, you’ll learn how to deploy the Add-In so that it can be loaded into VS. We’ll begin with a walk-through of how VS helps you create an Add-In.
Creating a Visual Studio Add-In
As when creating other project types in VS, you can run a project wizard to create an AddIn for VS. The following discussion will show you how to start and run the Add-In Project Wizard and examine the results.
Running the Add-In Project Wizard
You would start the Add-In project the same way you would any other project. The difference is that an Add-In Project Wizard asks more questions than normal. The following steps take you through the process of the Add-In Project Wizard and explain the various screens and questions you’ll need to answer.
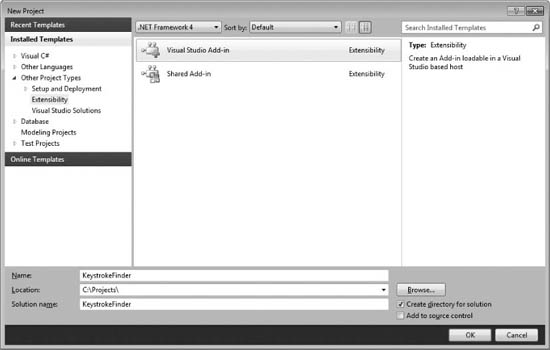
Figure 13-1 Selecting a Visual Studio Add-In in the New Project window
1. Open VS and press CTRL-SHIFT-N to open the New Project window. Select Other Project Types | Extensibility and observe that there are two types of Add-In project types: Visual Studio Add-In and Shared Add-In. The Shared Add-In is what you would use to create a Microsoft Office Add-In. The Visual Studio Add-In is appropriately named because it describes what we want to do.
2. Select Visual Studio Add-In. Name the project KeystrokeFinder, specify the location where you want the project to be, and click OK. Click Next to pass the Welcome screen and you’ll see the Select A Programming Language screen, shown in Figure 13-2.
3. Pick the language you would like to use. This book doesn’t discuss C++, but it would be safe to pick either C# or VB, which you can learn more about in Chapters 2 through 4. Click Next to reveal the Select An Application Host window, shown in Figure 13-3.
4. Your choices include Microsoft Visual Studio 2010 and Microsoft Visual Studio 2010 Macros. Checking Microsoft Visual Studio 2010 will allow the Add-In to work in the VS environment, which you’ve used for most of this book. Checking Microsoft Visual
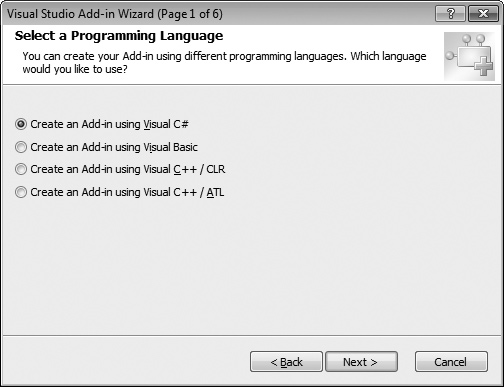
Figure 13-2 The Select A Programming Language window
Studio 2010 Macros will allow this Add-In to work with the Macro Editor, explained in the preceding chapter. We’re only interested in VS for the current Add-In, so check only Microsoft Visual Studio 2010 (not the Macros option). Click Next to display the Enter A Name And Description window, shown in Figure 13-4.
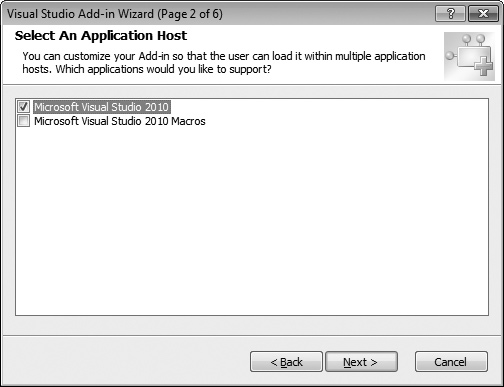
Figure 13-3 The Select An Application Host window
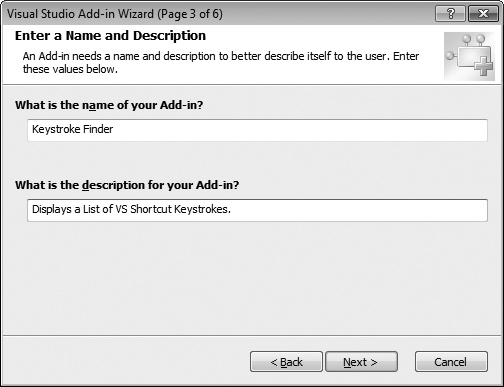
Figure 13-4 The Enter A Name And Description window
5. The Enter A Name And Description window starts by appending “ – No Name provided.” and “ – No Description provided.” to the name of the project in the name and description fields, respectively. Just delete the defaults and add the name and description you want the Add-In to have. The Add-In will be named after what you put here, and users will be able to read the description in the VS Add-In Manager, which I’ll discuss later in this chapter. Click Next to display the Choose Add-In Options window, shown in Figure 13-5.

Figure 13-5 The Choose Add-In Options window
6. The first choice in Figure 13-5, “Would you like to create command bar UI for your Add-In?” will add a menu item to the Tools menu with the name of your Add-In. Check the second box too, allowing the Add-In to load when VS loads; the alternative being that you can manually load the Add-In via the Add-In Manager, discussed later in this chapter. The third option comes into play when you want to allow the Add-In to work when someone runs VS via the command line. The preceding chapter shows an example of running VS on the command line when installing the global project templates by running devenv /installvstemplates. Popping up a modal window (one that requires you to click an OK button to make it go away) will stop a command-line operation from running because it is expecting acknowledgment of the modal window. If that command-line operation were running as a scheduled Windows background job, there would be no way to acknowledge the window and the job would not work. So, check the third box only if it’s safe to run via the command line. Check the first two boxes and leave the third box unchecked. Click Next to move to the Choosing ‘Help About’ Information window, shown in Figure 13-6.
7. You can optionally show an About window for your Add-In. Check the box and modify the text that you would like to show in the About box. Click Next and click Finish on the Summary window.
After a minute VS will create a new solution and project that contains items that help you create an Add-In. The next section discusses what those project items are.
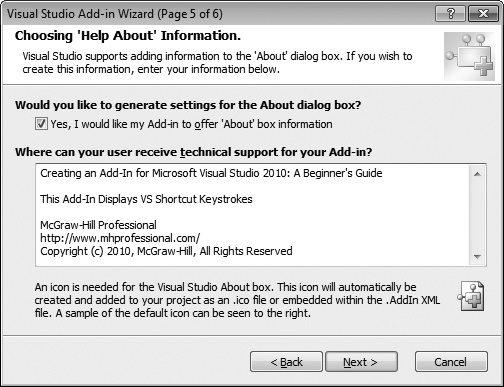
Figure 13-6 The Choosing ‘Help About’ window
Examining an Add-In Wizard Solution
After running the New Project Add-In Project Wizard, you’ll have a solution with a project that has skeleton code forming the basis of the application. Not only will you need to know what files are available, but you’ll also need to understand a couple of interfaces and how to implement the interface methods properly. If you’re a little rusty on interfaces, now might be a good time to visit Chapter 4 for a review. What you mostly need to know about this project is that there are new references, a Connect class, and a couple of *.AddIn files. Refer to Figure 13-7 as we discuss each of these Add-In project items.
Looking at assembly references (under the References folder), you might wonder what all the assemblies are with EnvDTE names. Pulling the name apart, Env is short for environment and DTE means Development Tools Extensibility. So, EnvDTE is an assembly containing code that allows you to extend the VS development environment. Each assembly represents functionality for a particular version of VS: EnvDTE is for VS.NET (the first version of VS that supported .NET development) and VS 2003, EnvDTE80 is for VS 2005, EnvDTE90 is for VS 2008, and EnvDTE100 is for VS 2010 (the subject of this book). The reason you need references to all of the EnvDTE versions is that each new version builds upon the previous with new functionality, rather than replacing the older version. Therefore, you’ll sometimes encounter classes, interfaces, or
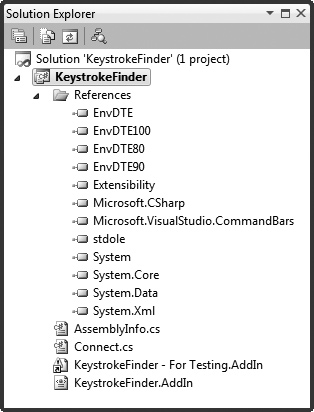
Figure 13-7 An Add-In project in Solution Explorer
methods that are numbered, such as the IDTExtensibility and IDTExtensibility2, where IDTExtensibility2 is a more recent version with additional members. I’ll explain what the IDTExtensibility2 interface does later, but what you should get out of this example is how each version of the EnvDTE assemblies manages newer versions of code. This scheme promotes the addition of new functionality for each version of VS without sacrificing backward compatibility.
The Connect class contains the code that interacts with VS to make an Add-In work. Remember, this is a VS project, just like all of the other projects you can create. You’re free to add classes containing your functionality and have code in Connect call your classes, organize code into folders, or add a class library to the solution and call code in the class library. The next section discusses internals of Connect in detail.
The other items of note in this project are the files with the *.AddIn extensions. These are the deployment files. There was a time when you were required to go into the Windows registry to configure an Add-In, but not anymore. The Add-In configuration is done in the *.AddIn files, which contains XML. In a later section of this chapter, you’ll see the internals of the *.AddIn file and learn how to manipulate this file for deployment.
Additionally, one of the *.AddIn files has a shortcut arrow, which is a special shortcut to a file used for debugging. If you look at the properties for this shortcut file, you’ll notice that it points at your DocumentsVisual Studio 2010Addinsfolder, which is a deployment location. Whenever you debug this application, VS uses the debugging *.AddIn file to load the Add-In in a new copy of VS. You would manipulate the Add-In in the new copy of VS, and your current copy of VS, in debugging mode, can hit breakpoints and debug the Add-In.
Now that you know the key elements of an Add-In project, the next section drills down into the Connect class and describes the members that interact with VS to run an Add-In.
Drilling into the Connect Class
The Connect class implements two interfaces, IDTExtensibility2 and IDTCommandTarget, and contains several members. Before examining the code, you’ll learn about the interfaces, their members, and purpose.
The purpose of the interfaces (IDTExtensibility2 and IDTCommandTarget) is to help manage the lifetime of the Add-In. VS understands these interfaces, but it doesn’t know anything about the code you write. Therefore, you have to bridge the gap between your code and what VS needs to make an Add-In work. To do this, you use a class (Connect) that implements the interfaces (IDTExtensibility2 and IDTCommandTarget). Then you place your code into methods, members of Connect, that implement (match) the interfaces. When VS communicates with the interfaces, your code (implementing the interface) executes.
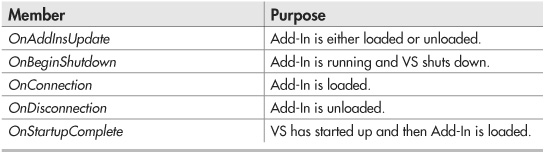
Table 13-1 The IDTExtensibility2 Interface
It’s like people from different countries trying to communicate, where they have a subject to discuss but need a common language to be able to understand each other; the common language would be the interface between the people.
The first interface to discuss is IDTExtensibility2, whose purpose is to let VS manage loading and unloading of the Add-In. Loading and unloading are important because VS loads Add-Ins when it starts and unloads Add-Ins when it shuts down. There are certain actions that you might want to take, depending on when the Add-In is loaded and what type of information you might need access to. For example, the very first time an Add-In is ever loaded, you might want to perform a special operation like configuration or asking the user if she would like to register your Add-In. Table 13-1 shows the members of IDTExtensibility2 and describes their purpose.
The second interface that Connect implements is IDTCommandTarget. When building an Add-In, you need a way for the VS IDE to execute the Add-In. For example, you will create a named command that exposes the Add-In as a menu item in the Tools menu. Whenever a user selects the menu item, the named command will execute and run your Add-In code. IDTCommandTarget is the interface VS uses to execute your Add-In. Table 13-2 shows the members of IDTCommandTarget and describes their purpose.
Each of the methods of both the IDTExtensibility2 and IDCommandTarget interfaces are implemented by the provided Connect class. Listing 13-1 shows each of these members with full documentation comments and skeleton code. The code in Listing 13-1 is in C#, but it is very informative to take the overview of the interfaces from the previous table and then

Table 13-2 The IDTCommandTarget Interface
take an even closer look at the comments in the code for a better understanding of what that code does. The code comments are exactly the same in VB. Some of the comments refer to the host application, where the host is either the VS IDE or the VS Macro Editor, as was selected while running the Add-In Project Wizard in the preceding section and shown in Figure 13-3. I’ve removed the contents of each method because subsequent sections of this chapter will explain important method implementations and how to make the Add-In perform useful operations.
Listing 13-1 Skeleton code for the Connect class
using System;
using Extensibility;
using EnvDTE;
using EnvDTE8 0;
using Microsoft.VisualStudio.CommandBars;
using System.Resources;
using System.Reflection;
using System.Globalization;

namespace KeystrokeFinder
{
    /// <summary>The object for implementing an Add-in.</summary>
    /// <seealso class='IDTExtensibility2' />
    public class Connect : IDTExtensibility2, IDTCommandTarget
    {
        /// <summary>
        /// Implements the constructor for the Add-in object.
        /// Place your initialization code within this method.
        /// </summary>
        public Connect()
        {
        }

        /// <summary>
        /// Implements the OnConnection method of the
        /// IDTExtensibility2 interface. Receives notification
        /// that the Add-in is being loaded.
        /// </summary>
        /// <param term='application'>
        /// Root object of the host application.
        /// </param>
        /// <param term='connectMode'>
        /// Describes how the Add-in is being loaded.
        /// </param>
        /// <param term='addInInst'>
        /// Object representing this Add-in.
        /// </param>
        /// <seealso class='IDTExtensibility2'/>
        public void OnConnection(
           object application, ext_ConnectMode connectMode,
           object addInInst, ref Array custom)
        {
        }

        /// <summary>
        /// Implements the OnDisconnection method of the
        /// IDTExtensibility2 interface. Receives notification
        /// that the Add-in is being unloaded.
        /// </summary>
        /// <param term='disconnectMode'>
        /// Describes how the Add-in is being unloaded.
        /// </param>
        /// <param term='custom'>
        /// Array of parameters that are host application specific.
        /// </param>
        /// <seealso class='IDTExtensibility2' />
        public void OnDisconnection(
            ext_DisconnectMode disconnectMode, ref Array custom)
        {
        }
        /// <summary>
        /// Implements the OnAddInsUpdate method of the
        /// IDTExtensibility2 interface. Receives notification
        /// when the collection of Add-ins has changed.
        /// </summary>
        /// <param term='custom'>
        /// Array of parameters that are host application specific.
        /// </param>
        /// <seealso class='IDTExtensibility2' />
        public void OnAddInsUpdate(ref Array custom)
        {
        }

        /// <summary>
        /// Implements the OnStartupComplete method of the
        /// IDTExtensibility2 interface. Receives notification
        /// that the host application has completed loading.
        /// </summary>
        /// <param term='custom'>
        /// Array of parameters that are host application specific.
        /// </param>
        /// <seealso class='IDTExtensibility2' />
        public void OnStartupComplete(ref Array custom)
        {
        }

        /// <summary>
        /// Implements the OnBeginShutdown method of the
        /// IDTExtensibility2 interface. Receives notification
        /// that the host application is being unloaded.
        /// </summary>
        /// <param term='custom'>
        /// Array of parameters that are host application specific.
        /// </param>
        /// <seealso class='IDTExtensibility2’ />
        public void OnBeginShutdown(ref Array custom)
        {
        }

        /// <summary>
        /// Implements the QueryStatus method of the
        /// IDTCommandTarget interface. This is called
        /// when the command’s availability is updated
        /// </summary>
        /// <param term='commandName'>
        /// The name of the command to determine state for.
        /// </param>
        /// <param term='neededText'>
        /// Text that is needed for the command.
        /// </param>
        /// <param term='status'>
        /// The state of the command in the user interface.
        /// </param>
        /// <param term='commandText'>
        /// Text requested by the neededText parameter.
        /// </param>
        /// <seealso class='Exec’ />
        public void QueryStatus(
            string commandName,
            vsCommandStatusTextWanted neededText,
            ref vsCommandStatus status,
            ref object commandText)
        {
        }
        /// <summary>
        /// Implements the Exec method of the IDTCommandTarget
        /// interface. This is called when the command is invoked.
        /// </summary>
        /// <param term='commandName'>
        /// The name of the command to execute.
        /// </param>
        /// <param term='executeOption'>
        /// Describes how the command should be run.
        /// </param>
        /// <param term='varIn'>
        /// Parameters passed from the caller to the command handler.
        /// </param>
        /// <param term='varOut'>
        /// Parameters passed from the command handler to the caller.
        /// </param>
        /// <param term='handled'>
        /// Informs the caller if the command was handled or not.
        /// </param>
        /// <seealso class='Exec’ />
        public void Exec(
          string commandName, vsCommandExecOption executeOption,
          ref object varIn, ref object varOut, ref bool handled)
        {
        }
        private DTE2 _applicationObject;
        private AddIn _addInInstance;
     }

   }
You’ve had an overview of what the IDTExtensibility2 and IDTCommandTarget interfaces do and reviewed the comments in Listing 13-1. In the next section, you’ll see how to add your own code to the interface methods to make the KeystrokeFinder Add-In perform some useful work.
Adding Functionality to an Add-In
When implementing the functionality of an Add-In, you’ll be most concerned with capturing the call to Exec, which VS calls whenever the user selects the Tools menu item for your Add-In. This section will also cover a couple of other methods: OnConnection, which contains a lot of initialization code, and QueryStatus, which is handy for managing the state of the Add-In menu item. We’ll look at OnConnection first so that you can see how the Add-In is initialized.
Reviewing the OnConnection Method
As you learned earlier, the Connect class implements various interface methods so that VS can call into those methods to run your Add-In. One of the primary methods is OnConnection, which is a member of the IDTExtensibility2 interface. VS calls OnConnection when the Add-In loads. When calling OnConnection, VS passes four parameters that you can use to initialize the Add-In. The Add-In Project Wizard, covered in a previous section of this chapter, generates much skeleton code that uses parameter values in OnConnection to initialize the Add-In. While the example in this chapter doesn’t modify the OnConnection method, understanding the code is helpful in learning how the Add-In initializes and how it does affect the code you will write later. We’ll first take another look at OnConnection parameters and then examine the generated code.
Understanding OnConnection Parameters
The OnConnection method has four parameters. Each of the parameters are passed to the OnConnection method by VS; these parameters provide all of the information necessary for initializing the Add-In. Table 13-3 lists each parameter and its purpose.
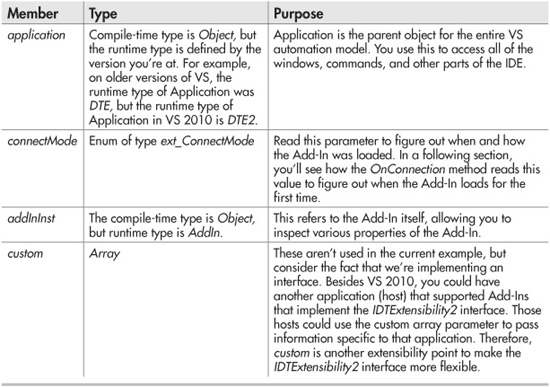
Table 13-3 OnConnection Method Parameters
Reviewing OnConnection Generated Code
You know that the purpose of the OnConnection method is to help initialize the Add-In, and you’ve seen the parameters populated by VS and what each parameter means. Listing 13-2 shows the code generated by VS after the Add-In Project Wizard completes. It reflects the result of choosing to have a command bar UI, shown in Figure 13-5. Code comments were omitted to place more focus on the code itself.
Listing 13-2 The OnConnection method
C#:
public void OnConnection(
    object application, ext_ConnectMode connectMode,
    object addInInst, ref Array custom)
{
    _applicationObject = (DTE2)application;
     _addInInstance = (AddIn)addInInst;
    if(connectMode == ext_ConnectMode.ext_cm_UISetup)
    {
        object []contextGUIDS = new object[] { };
        Commands2 commands =
         (Commands2)_applicationObject.Commands;
        string toolsMenuName = "Tools";

        Microsoft.VisualStudio.CommandBars.CommandBar
            menuBarCommandBar = ((
                Microsoft.VisualStudio.CommandBars.CommandBars)
                _applicationObject.CommandBars)["MenuBar"];
        CommandBarControl toolsControl =
            menuBarCommandBar.Controls[toolsMenuName];
        CommandBarPopup toolsPopup =
           (CommandBarPopup)toolsControl;

        try
        {
            Command command = commands.AddNamedCommand2(
            _addInInstance, "KeystrokeFinder",
            "KeystrokeFinder",
            "Executes the command for KeystrokeFinder",
             true, 59, ref contextGUIDS,
             (int)vsCommandStatus
                 .vsCommandStatusSupported+
             (int)vsCommandStatus.vsCommandStatusEnabled,
             (int)vsCommandStyle
                 .vsCommandStylePictAndText,
              vsCommandControlType
                 .vsCommandControlTypeButton);

          if((command != null) &&
              (toolsPopup != null))
          {
              command.AddControl(
                  toolsPopup.CommandBar, 1);
          }
    }
    catch(System.ArgumentException)
    {
    }

   }
 }
VB:
Public Sub OnConnection(
    ByVal application As Object,
    ByVal connectMode As ext_ConnectMode,
    ByVal addInInst As Object,
    ByRef custom As Array) Implements IDTExtensibility2.OnConnection
    _applicationObject = CType(application, DTE2)
    _addInInstance = CType(addInInst, AddIn)

    If connectMode = ext_ConnectMode.ext_cm_UISetup Then

        Dim commands As Commands2 =
            CType(_applicationObject.Commands, Commands2)
        Dim toolsMenuName As String = "Tools"

        Dim commandBars As CommandBars =
            CType(_applicationObject.CommandBars, CommandBars)
        Dim menuBarCommandBar As CommandBar =
            commandBars.Item("MenuBar")

        Dim toolsControl As CommandBarControl =
            menuBarCommandBar.Controls.Item(toolsMenuName)
        Dim toolsPopup As CommandBarPopup =
            CType(toolsControl, CommandBarPopup)

        Try
    Dim command As Command =
        commands.AddNamedCommand2(
            _addInInstance, "KeystrokeFinderVB",
            "KeystrokeFinderVB",
            "Executes the command for KeystrokeFinderVB",
            True, 59, Nothing,
            CType(vsCommandStatus.vsCommandStatusSupported,
                Integer) +
            CType(vsCommandStatus.vsCommandStatusEnabled,
                Integer),
              vsCommandStyle.vsCommandStylePictAndText,
              vsCommandControlType.vsCommandControlTypeButton)

          command.AddControl(toolsPopup.CommandBar, 1)
      Catch argumentException As System.ArgumentException
      End Try

   End If
End Sub
Dissecting Listing 13-2 into its constituent parts demonstrates the role OnConnection has and how it affects subsequent code. The first part of the method obtains references to a couple of important objects: application and addInInst. The following excerpt shows how to obtain a reference to these objects and convert them to DTE2 and AddIn, respectively. The references to _applicationObject and _addInInstance are fields of the Connect class, which is important because now other methods of the class will be able to access these objects.
C#:
 _applicationObject = (DTE2)application;
 _addInInstance = (AddIn)addInInst;
VB:
 _applicationObject = CType(application, DTE2)
 _addInInstance = CType(addInInst, AddIn)
The remaining code in OnConnection sets up the menu item under the Tools menu, as directed by choosing to build a command UI, shown in Figure 13-5. However, this only occurs one time—the first time the application runs. To make sure the menu item sets up one time, the code checks the connectMode parameter to see if it’s set to ext_ConnectMode.ext_cm_UISetup, as shown in the following code. The remaining code in the OnConnection method will only execute if the following condition is true:
C#:
if(connectMode == ext_ConnectMode.ext_cm_UISetup)
VB:
If connectMode = ext_ConnectMode.ext_cm_UISetup Then
The first time the code runs, the code within the preceding if statement will execute, creating a menu item for the KeystrokeFinder Add-In in the Tools menu. Code examples that follow in this section are all contained within the preceding if statement; this is good information to know because it shows you how to navigate the VS object model to find something.
The following code uses _applicationObject to get a list of commands, which is a list of all the actions you can take with VS. As discussed earlier, _applicationObject is type DTE2 and serves as the parent object for accessing all functionality in VS.
C#:
 Commands2 commands =
    (Commands2)_applicationObject.Commands;
VB:
 Dim commands As Commands2 =
     CType(_applicationObject.Commands, Commands2)
In the VS automation object model, a menu item is called a CommandBar. So, you get a reference to a CommandBars collection, again through _applicationObject, to reference the MenuBar, which is the main VS menu, assigned to menuBarCommandBar:
C#:
 Microsoft.VisualStudio.CommandBars.CommandBar
     menuBarCommandBar = ((
        Microsoft.VisualStudio.CommandBars.CommandBars)
        _applicationObject.CommandBars)["MenuBar"];
VB:
  Dim commandBars As CommandBars =
      CType(_applicationObject.CommandBars, CommandBars)
  Dim menuBarCommandBar As CommandBar =
      commandBars.Item("MenuBar")
Within the CommandBars collection, menuBarCommandBar, you then look into the Controls collection, which is a list of menus on the main menu to find the Tools menu, assigned to toolsControl as follows:
C#:
    string toolsMenuName = "Tools";
    CommandBarControl toolsControl =
        menuBarCommandBar.Controls[toolsMenuName];
VB:
  Dim toolsMenuName As String = "Tools"
  Dim toolsControl As CommandBarControl =
        menuBarCommandBar.Controls.Item(toolsMenuName)
In the VS automation object model, an individual menu is a CommandBarPopup, assigned to toolsPopup as follows:
C#:
 CommandBarPopup toolsPopup =
  (CommandBarPopup)toolsControl;
VB:
 Dim toolsPopup As CommandBarPopup =
      CType(toolsControl, CommandBarPopup)
Now you have a reference to the menu where the menu item for the Add-In must be added. You are ready to add the command, using the AddNamedCommand2 method of the commands collection. Remember that earlier code assigned these commands from the application object to the commands variable. A quick review of the arguments to AddNamedCommand2 gives you the gist of what’s happening: The code passes a reference to the Add-In; provides a menu item name and description; and indicates that the status of the command is supported and enabled, the menu item will have pictures and text, and the type of menu item is button (can be clicked). If you want all the details of this method call, now is a good time to refer to the documentation. While it’s important to understand the major interfaces, such as OnConnection for IDTExtensibility2, memorizing every API call might not be the most productive use of your time when you’re just starting out. The following code shows the call to AddNamedCommand2:
C#:
 Command command = commands.AddNamedCommand2(
     _addInInstance, "KeystrokeFinder",
    "KeystrokeFinder",
    "Executes the command for KeystrokeFinder",
    true, 59, ref contextGUIDS,
    (int)vsCommandStatus
        .vsCommandStatusSupported+
    (int)vsCommandStatus.vsCommandStatusEnabled,
    (int)vsCommandStyle
        .vsCommandStylePictAndText,
    vsCommandControlType
        .vsCommandControlTypeButton);
VB:
Dim command As Command =
    commands.AddNamedCommand2(
        _addInInstance, "KeystrokeFinderVB",
        "KeystrokeFinderVB",
        "Executes the command for KeystrokeFinderVB",
        True, 59, Nothing,
        CType(vsCommandStatus.vsCommandStatusSupported,
            Integer) +
        CType(vsCommandStatus.vsCommandStatusEnabled,
            Integer),
        vsCommandStyle.vsCommandStylePictAndText,
        vsCommandControlType.vsCommandControlTypeButton)
AddNamedCommand2 returned a Command object, command, which must be placed into VS somewhere so that a user can click it to invoke the Add-In. The next statement accomplishes this task by adding command to the Tools menu. As you may recall from previous examples, the code searched for and obtained a reference to the Tools menu. After ensuring that both the command and toolsPopup refer to valid objects (a best practice), the following code places command into the first position (at the top) of the Tools menu:
C#:
if((command != null) &&
    (toolsPopup != null))
{
    command.AddControl(
        toolsPopup.CommandBar, 1);
}
VB:
command.AddControl(toolsPopup.CommandBar, 1)
This completes the responsibilities of the OnConnection method. If you had your own code for initializing the Add-In, the OnConnection method would be a good place to put it. The preceding example was useful because now you know how to access VS menus and commands. The example also demonstrated the importance of the main application object and how it’s used as the starting point for getting to other part of VS.
As you may recall, the OnConnection method assigned the main application object to _applicationObject, a field of the Connect class. This is important because now you have access to the main application object, and you’ll see how it’s used in the next section, which shows you how to execute your Add-In via the Exec method.
Implementing the Exec Method
Whenever a user starts your Add-In, VS calls the Exec method of the IDTCommandTarget interface. The Exec method is important because that’s where you add your code to implement the behavior of your Add-In. The previous sections discussed code that is generated by VS, but Listing 13-3 contains code for the Exec method that you should enter yourself to make the KeystrokeFinder Add-In work. The purpose of the Add-In for this section is to list all VS commands and their associated shortcut keys. The list of commands and shortcuts will be displayed in the VS Output window. Listing 13-3 shows the Exec method for the KeystrokeFinder Add-In.
Listing 13-3 Implementing the Exec method
C#:
public void Exec(
    string commandName, vsCommandExecOption executeOption,
    ref object varIn, ref object varOut, ref bool handled)
{
    handled = false;
    if(executeOption ==
        vsCommandExecOption.vsCommandExecOptionDoDefault)
   {
        if (commandName ==
            "KeystrokeFinder.Connect.KeystrokeFinder")
        {

        OutputWindow outWin =
           _applicationObject.ToolWindows.OutputWindow;
        OutputWindowPane outPane =
           outWin.OutputWindowPanes.Add(
              "Keyboard Shortcuts");
        outPane.Activate();

        foreach (Command cmd in
           _applicationObject.Commands)
        {
            object[] cmdBindings =
               cmd.Bindings as object[];
        if (cmdBindings.Length > 0)
        {
           string bindingStr =
              string.Join(", ", cmdBindings);
           outPane.OutputString(
             "Command: " + cmd.Name +
             ", Shortcut: " + bindingStr +
             "
");
           }
        }

        handled = true;
        return;
      }
    }
  }
VB:
Public Sub Exec(
    ByVal commandName As String,
    ByVal executeOption As vsCommandExecOption,
    ByRef varIn As Object, ByRef varOut As Object,
    ByRef handled As Boolean) Implements IDTCommandTarget.Exec
    handled = False
    If executeOption =
        vsCommandExecOption.vsCommandExecOptionDoDefault Then
        If commandName =
          "KeystrokeFinderVB.Connect.KeystrokeFinderVB" Then

          Dim outWin As OutputWindow =
            _applicationObject.ToolWindows.OutputWindow

          Dim outPane As OutputWindowPane = outWin.
              OutputWindowPanes.Add(
                 "Keyboard Shortcuts")

          outPane.Activate()

          For Each cmd As Command In _applicationObject.Commands

              Dim cmdBindings As Object() =
                  CType(cmd.Bindings, Object())

              If cmdBindings.Length > 0 Then

                  Dim bindingStr As String =
                      String.Join(", ", cmdBindings)
              outPane.OutputString(
                   "Command:" & cmd.Name &
                   ", Shortcut:" & bindingStr &
                   Environment.NewLine)

             End If

            Next

            handled = True
            Exit Sub
        End If
    End If
End Sub
The executeOption parameter of Exec allows you to determine whether you want to prompt the user for input, perform the action, or show help, which are options of the vsCommandExecOption. All you need to do is check the option and perform the operation for the current value of executeOption. In the current Add-In, we only check for vsCommandExec OptionDoDefault, which means to just perform the operation:
C#:
if(executeOption ==
    vsCommandExecOption.vsCommandExecOptionDoDefault)
VB:
If executeOption =
    vsCommandExecOption.vsCommandExecOptionDoDefault Then
The example in this chapter only has one command, but you could potentially have multiple commands if you decided to add more commands in the OnConnection method. Add an if statement to ensure you’re executing code for the proper command, such as the following code:
C#:
if (commandName ==
    "KeystrokeFinder.Connect.KeystrokeFinder")
VB:
If commandName =
    "KeystrokeFinderVB.Connect.KeystrokeFinderVB" Then
As you learned earlier, the application object is the starting point for accessing all VS objects. Since we need to write to the Output window, the code accesses the ToolWindows property of the application object, which provides access to multiple VS windows. The following code obtains a reference to the OutputWindow, adds a new pane, and activates the pane:
C#:
OutputWindow outWin =
    _applicationObject.ToolWindows.OutputWindow;
OutputWindowPane outPane =
    outWin.OutputWindowPanes.Add(
        "Keyboard Shortcuts");
outPane.Activate();
VB:
Dim outWin As OutputWindow =
    _applicationObject.ToolWindows.OutputWindow

Dim outPane As OutputWindowPane =
    outWin.OutputWindowPanes.Add
      ("Keyboard Shortcuts")

outPane.Activate()
Going back to the application object, we need to access the Commands collection, using a foreach loop to access each Command object. Each command name is in the Name property. The Bindings property is a collection of shortcut keys for the command. Some commands have no shortcut keys, as indicated by an empty Bindings collection (its Length property will be set to 0), so we skip them. The following code shows how to iterate through all VS commands and print each command name and associated shortcut keys to the Output window:
C#:
foreach (Command cmd in
    _applicationObject.Commands)
{
    object[] cmdBindings =
      cmd.Bindings as object[];

    if (cmdBindings.Length > 0)
    {
      string bindingStr =
         string.Join(", ", cmdBindings);
    outPane.OutputString(
        "Command:" + cmd.Name +
    ", Shortcut: " + bindingStr +
    "
");
  }
}

handled = true;
VB:
For Each cmd As Command In _applicationObject.Commands

Dim cmdBindings As Object() =
    CType(cmd.Bindings, Object())

If cmdBindings.Length > 0 Then

    Dim bindingStr As String =
        String.Join(", ", cmdBindings)

    outPane.OutputString(
       "Command:" & cmd.Name &
      ", Shortcut: " & bindingStr &
      Environment.NewLine)

  End If

Next

handled = True
Notice how we set handled to true, letting VS know that the code recognized and acted on the command. Besides letting users execute the Add-In, you want to ensure their experience with the Add-In is logical and the command displays its status properly, as you’ll learn about in the next section.
Setting Status with QueryStatus
While VS is working with your Add-In, it will call the QueryStatus method of IDTCommandTarget to ensure it displays the command properly. Listing 13-4 shows the default implementation of QueryStatus.
Listing 13-4 The QueryStatus method
C#:
public void QueryStatus(
   string commandName,
  vsCommandStatusTextWanted neededText,
  ref vsCommandStatus status,
  ref object commandText)
{
    if(neededText ==
        vsCommandStatusTextWanted
           .vsCommandStatusTextWantedNone)
{
        if(commandName ==
            "KeystrokeFinder.Connect.KeystrokeFinder")
        {
            status =
               (vsCommandStatus)
               vsCommandStatus.vsCommandStatusSupported|
               vsCommandStatus.vsCommandStatusEnabled;
            return;
    }

   }

 }
VB:
Public Sub QueryStatus(
    ByVal commandName As String,
    ByVal neededText As vsCommandStatusTextWanted,
    ByRef status As vsCommandStatus,
    ByRef commandText As Object) Implements IDTCommandTarget.
QueryStatus

    If neededText =
        vsCommandStatusTextWanted.vsCommandStatusTextWantedNone Then

        If commandName =
          "KeystrokeFinderVB.Connect.KeystrokeFinderVB" Then
          status =
             CType(vsCommandStatus.vsCommandStatusEnabled +
                   vsCommandStatus.vsCommandStatusSupported,
                   vsCommandStatus)
Else

            status = vsCommandStatus.vsCommandStatusUnsupported

        End If
    End If
End Sub
The QueryStatus method in Listing 13-4 checks the commandName to ensure it’s working with the right Add-In. If so, it sets the status parameter to a combination of values from the vsCommandStatus enum. In Listing 13-4, the status is supported and enabled.
This demonstrated how to create an Add-In. Next, you’ll learn how to deploy the Add-In.
Deploying an Add-In
There are two files involved in deploying your Add-In: a *.AddIn file and *.dll. The *.AddIn file contains registration information for your Add-In, and *.dll is the class library output assembly that contains your Add-In.
You can deploy the *.AddIn file by copying it into a folder that VS recognizes. There is a specified set of folders that VS recognizes, but you can add your own folder location. To see what the VS settings are, select Tools | Options | Environment | Add-in/Macros Security. You’ll see a window similar to Figure 13-8. The Add-in/Macros Security window also has options that allow you to determine if macros can run, if any Add-Ins can load, or if Add-Ins are allowed to load over the Internet.

Figure 13-8 The Add-in/Macros Security window
In addition to the *.AddIn file, you’ll need to determine where the Add-In class library file (*.dll) will reside. By default, the Add-In Project Wizard assumes that the *.dll file is deployed in the same location as the *.AddIn file. Listing 13-5 shows the contents of the *.AddIn file. The location of the *.dll file is specified in the Assembly element, which can be either a file system path or a URL.
Listing 13-5 Contents of the *.AddIn file
<?xml version="1.0" encoding="UTF-16" standalone="no&"?>
<Extensibility xmlns=
“http://schemas.microsoft.com/AutomationExtensibility">
   <HostApplication>
       <Name>Microsoft Visual Studio</Name>
       <Version>10.0</Version>
   </HostApplication>
   <Addin>
       <FriendlyName>Keystroke Finder</FriendlyName>
       <Description>
Displays a List of VS Shortcut Keystrokes.
       </Description>
       <AboutBoxDetails>
Creating an Add-…
       </AboutBoxDetails>
       <AboutIconData>…</AboutIconData>
       <Assembly>KeystrokeFinder.dll</Assembly>
       <FullClassName>
KeystrokeFinder.Connect
       </FullClassName>
       <LoadBehavior>1</LoadBehavior>
       <CommandPreload>1</CommandPreload>
       <CommandLineSafe>0</CommandLineSafe>
  </Addin>
</Extensibility>
Another way to work with Add-Ins is via the Add-In Manager, which you can open by selecting Tools | Add-in Manager. Figure 13-9 shows the Add-In Manager with the KeystrokeFinder Add-In in the list. Checking Available Add-Ins immediately loads or unloads the Add-In, checking Startup indicates whether the Add-In will load when VS starts, and checking Command Line makes the Add-In load if a user runs VS (devenv.exe) via the command line.
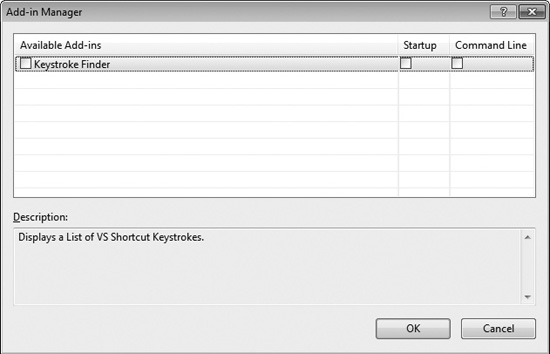
Figure 13-9 The Add-In Manager
Once the Add-In is deployed and loaded, a user can run the Add-In by selecting Tools | KeystrokeFinder. When the Add-In runs, the Output window will contain a listing of commands and shortcut keys. To see the results, you should open the Output window, CTRL-w-o, before running the Add-In.
Now you know how to create and deploy an Add-In, but you’ll also need some guidance in moving forward to help you create your own Add-Ins. The next section provides that guidance.
Where to Go Next
As you’ve seen in previous sections, the application object is central to getting started with Add-In development. Whenever you need to find something, use the application object reference, press the DOT on your keyboard, and Intellisense will show you properties such as commands and windows.
As you view the application object properties, have the VS documentation open, telling you what each property means and providing example code of how it works.
Sometimes there aren’t examples and the documentation isn’t as clear as it could be. In those cases, you might have to perform some investigation. The tools to perform this investigation include the debugger’s breakpoints and the Immediate window. Set a breakpoint in one of the Add-In methods and inspect the value of an object. To find out what is inside that object, open the Immediate window, type the object name, and press DOT to let Intellisense help you find properties you’re interested in.
On occasion, you’ll have properties that are collections. In that case, you can write code in the Add-In method you want the access the collection through, add a foreach (For Each in VB) loop, and print values of the collection to the Output window.
Summary
Each section of this chapter walked you through the steps necessary to write an Add-In. You learned how Add-In projects are started, similar to other projects, except that the wizard for creating Add-Ins is more extensive. Once you understood what project items were created, you learned about the contents of the Add-In itself, the interfaces that are implemented, and the skeleton code generated by the Add-In Project Wizard. This chapter showed you how to add code to the Add-In to make it perform a search of all VS commands and their related shortcut keys. This process demonstrated how you could access anything throughout VS via code. You learned how to deploy and manage an Add-In and then finished off with tips on moving forward to create your own Add-Ins.
This is the last chapter of this book, but only the beginning for your software development experience using Microsoft Visual Studio 2010. I sincerely appreciate your reading my book and hope that it propels you to greater skill and success.
—Joe Mayo