
CHAPTER
2
Principles of Good Software Design

Many of the scalability issues encountered in real-world projects can be boiled down to violations of core design principles. Software design principles are more abstract and more general than scalability itself, but they lay down a solid foundation for building scalable software.
Some of the principles presented in this chapter are related to object-oriented design and others related directly to scalability, but most of them are more abstract and universal, allowing you to apply them in different ways. A skilled software craftsperson should understand both good and bad software design practices, starting with what drives the reasoning behind design decisions. Let’s get started with understanding some of those decisions now.
Simplicity
“Make things as simple as possible, but no simpler.” –Albert Einstein
The most important principle is keeping things simple. Simplicity should be your northern star, your compass, and your long-term commitment. Keeping software simple is difficult because it is inherently relative. There is no standardized measurement of simplicity, so when you judge what is simpler, you need to first ask yourself for whom and when. For example, is it simpler for you or for your clients? Is it simpler for you to do now or maintain in the future?
Simplicity is not about using shortcuts and creating the quickest solution to the problem at hand. It is about what would be the easiest way for another software engineer to use your solution in the future. It is also about being able to comprehend the system as it grows larger and more complex. The lessons of simplicity often come from experience with different applications, using different frameworks and languages. Revisiting code you have written, identifying complexity, and looking for solutions to simplify is the first step to learn from your own mistakes. Over time you develop sensitivity and an ability to quickly judge which solution is simpler in the long run. If you have an opportunity to find a mentor or work closely with people who value simplicity, you will make much faster progress in this area. There are four basic steps to start promoting simplicity within your products. Let’s take a look at each in more detail.
Hide Complexity and Build Abstractions
Hiding complexity and building abstractions is one of the best ways to promote simplicity. As your system grows, you will not be able to build a mental picture of the entire system because it will have too many details. Human working memory has limited space—either you see the whole system without much detail or you see all the details of a very narrow part of the system. To make software simple is to allow this mental zoom in and zoom out. As your system grows, it cannot and will not all be simple, so you have to strive for local simplicity.
Local simplicity is achieved by ensuring that you can look at any single class, module, or application and quickly understand what its purpose is and how it works. When you look at a class, you should be able to quickly understand how it works without knowing all the details of how other remote parts of the system work. You should only have to comprehend the class at hand to fully understand its behavior. When you look at a module, you should be able to disregard the methods and think of the module as a set of classes. Zooming out even more, when you look at the application, you should be able to identify key modules and their higher-level functions, but without the need to know the classes’ details. Finally, when you look at the entire system, you should be able to see only your top-level applications and identify their responsibilities without having to care about how they fulfill them.
Let’s consider an abstract example as shown in Figure 2-1, where circles represent classes/interfaces. When you work on a class or an interface, you look at the circle and its contents. You may also need to look at its neighbors since each edge represents dependencies on another class or interface. In this way, complexity is not about how many nodes you have in your network, but how many edges you have between your nodes, with nodes being classes and edges being dependencies on one another. A good general rule is that no class should depend on more than a few other interfaces or classes.

Figure 2-1 Levels of abstraction
To build local simplicity, you also need to separate functionality into modules, so once you look at the higher level of abstraction, you need not be worried about how modules perform their duties, but how they interact. If you look at Figure 2-1 on the higher level, you can disregard details of each module and focus on its interactions. In this case, the interactions between Module A and Module B are reduced to a single public interface that is visible to both modules.
In large and complex systems you will need to add another layer of abstraction where you create separate services. Each service becomes responsible for a subset of functionality hiding its complexity and exposing an even higher level of abstraction.
Avoid Overengineering
The second practice promoting simplicity is to deliberately avoid the urge to overengineer. Engineers love challenges and puzzles, and they love the challenge of building complex software. When you try to predict every possible use case and every edge case, you lose focus on the most common use cases. In such a situation you can easily follow the urge of solving every problem imaginable and end up overengineering, which is building a solution that is much more complex than is really necessary.
Good design allows you to add more details and features later on, but does not require you to build a massive solution up front. Beginning with a reasonable level of abstraction and iterating over it gives better results than trying to predict the future and build everything that might be needed later on.
The Java community used to be notorious for their overengineering of the simplest things. Fortunately in recent years, frameworks like Spring and dynamic languages built on top of the Java Virtual Machine (e.g., Groovy) show the right vision. Engineers have to care about simplicity and the most common scenarios, not building imaginary systems that no one can ever use or understand.
HINT
If you like to solve puzzles, ask yourself this question each time you design a piece of software: “Can this be any simpler and still allow flexibility in the future?” Building software that is simple to understand and proves to be extensible can give a great deal of satisfaction.
Overengineering usually happens when people try to do the right thing, but choose the wrong perspective or assume too much about future needs. I encourage you to ask yourself “What tradeoffs am I making here?” or “Will I really need this?” and work closely with the business stakeholders to better understand the biggest risks and unknowns. Otherwise, you may spend a lot of time following dogmas and building solutions that no one will ever need. Most of the principles covered in this chapter come with some cost, and it is your responsibility to define the line between the right amount of complexity and overengineering. It is a difficult role and there is almost no black and white—it is a game of tradeoffs played entirely in shades of gray.
Try Test-Driven Development
Adopting a test-driven development (TDD) methodology will also promote simplicity. You do not have to follow it all the time—practicing TDD for just a few months should be long enough to give you a new perspective.
Test-driven development is a set of practices where engineers write tests first and then implement the actual functionality. It is a radical approach, but worth experiencing. The main benefits are that there is no code without unit tests and there is no “spare” code. Since developers write tests first, they would not add unnecessary functionality, as it would require them to write tests for it as well. In addition, tests can be used as a type of documentation, as they show you how the code was meant to be used and what the expected behavior was.
As a side effect of experiencing the test-first methodology, engineers go through an important mental shift. It forces them to assume the client’s point of view first, which helps them to create much cleaner and simpler interfaces. Since you have to write your test first, you have to imagine how would you use the component you are about to build. To write tests, you assume the viewpoint of the client code using your component, rather than focusing on the internal implementation of it. This slight difference in approach results in greatly improved code design and application programming interface (API) simplicity.
When you design code, whether using TDD or not, think about it from the perspective of your client. Put yourself in the shoes of a new developer who joined your team and started using your interface. What methods would they want to call, what parameters would they want to pass, and what response would they expect to be returned? When you think about it from this perspective, you ensure that clients can interact easily with your code.
Learn from Models of Simplicity in Software Design
Simplicity can sometimes go unnoticed or be misinterpreted as a lack of complexity. When things fall into place naturally, when there is no difficulty in adapting the system or understanding it, you have probably witnessed well-crafted simplicity. It is a great experience to realize that a system you are working on is well designed. Whenever you find this quality, analyze it and look for patterns. Grails, Hadoop, and the Google Maps API are a few models of simplicity and great places for further study. Try analyzing these frameworks:
![]() Grails Grails is a web framework for the Groovy language modeled on Rails (a Ruby web framework). Grails is a great example of how simplicity can become transparent. As you study the framework and begin using it, you realize that everything has been taken care of. You see how things work as expected and how extending functionality seems effortless. You also realize that you cannot imagine it being much simpler. Grails is a masterpiece of making a developer’s life easy. Read Grails in Action22 and Spring Recipes14 to learn more.
Grails Grails is a web framework for the Groovy language modeled on Rails (a Ruby web framework). Grails is a great example of how simplicity can become transparent. As you study the framework and begin using it, you realize that everything has been taken care of. You see how things work as expected and how extending functionality seems effortless. You also realize that you cannot imagine it being much simpler. Grails is a masterpiece of making a developer’s life easy. Read Grails in Action22 and Spring Recipes14 to learn more.
![]() Hadoop Get familiar with the MapReduce paradigm and the Hadoop platform. Hadoop is a great piece of open-source technology helping to process petabytes of data. It is a large and very complex platform, but it hides most of its complexity from developers. All that developers have to learn is an incredibly simple programming API. When you get to know Hadoop better, you realize how many difficult problems it solves and how simple it makes it for developers to process almost infinite amounts of data. To get a basic understanding of MapReduce and Hadoop, I recommend reading the original MapReduce white paperw1 and Hadoop in Action.23
Hadoop Get familiar with the MapReduce paradigm and the Hadoop platform. Hadoop is a great piece of open-source technology helping to process petabytes of data. It is a large and very complex platform, but it hides most of its complexity from developers. All that developers have to learn is an incredibly simple programming API. When you get to know Hadoop better, you realize how many difficult problems it solves and how simple it makes it for developers to process almost infinite amounts of data. To get a basic understanding of MapReduce and Hadoop, I recommend reading the original MapReduce white paperw1 and Hadoop in Action.23
![]() Google Maps API Explore the Google Maps API. There are few APIs that I admire as much as Google Maps. Over the years the API has changed, but it is still a great example of a flexible API that solves complex problems in extremely simple ways. If all you need is a map with a single marker, you can get it done in an hour, including the time for creating API keys. As you dig deeper you find more and more amazing features, like overlays, user interface (UI) customizations, and map styles, all fitting perfectly into place.
Google Maps API Explore the Google Maps API. There are few APIs that I admire as much as Google Maps. Over the years the API has changed, but it is still a great example of a flexible API that solves complex problems in extremely simple ways. If all you need is a map with a single marker, you can get it done in an hour, including the time for creating API keys. As you dig deeper you find more and more amazing features, like overlays, user interface (UI) customizations, and map styles, all fitting perfectly into place.
As you read through this chapter, you will see more design principles promoting simplicity. Simplicity is the underlying value that helps you scale your systems. Without simplicity, engineers will not be able to comprehend the code, and without understanding your software, you cannot sustain growth. Remember, especially at scale, it is always better to design something that is simple and works than something sophisticated and broken.
Loose Coupling
The second most important design principle is to keep coupling between parts of your system as low as necessary.
Coupling is a measure of how much two components know about and depend on one another. The higher the coupling, the stronger the dependency. Loose coupling refers to a situation where different components know as little as necessary about each other, whereas no coupling between components means that they are completely unaware of each other’s existence.
Keeping coupling low in your system is important for the health of the system and ability to scale, as well as your team morale. Let’s go through some of the effects of low and high coupling:
![]() High coupling means that changing a single piece of code requires you to inspect in detail multiple parts of the system. The higher the overall coupling, the more unexpected the dependencies and higher chance of introducing bugs. Suppose you introduce a change to the user authentication process and you realize that you need to refactor five different modules because they all depend on the internal implementation of the authentication process. Sound familiar? Low coupling would allow you to introduce these changes without the risk of breaking other parts of the system.
High coupling means that changing a single piece of code requires you to inspect in detail multiple parts of the system. The higher the overall coupling, the more unexpected the dependencies and higher chance of introducing bugs. Suppose you introduce a change to the user authentication process and you realize that you need to refactor five different modules because they all depend on the internal implementation of the authentication process. Sound familiar? Low coupling would allow you to introduce these changes without the risk of breaking other parts of the system.
![]() Low coupling promotes keeping complexity localized. By having parts of your system decoupled, multiple engineers can work on them independently. As a result, you will be able to scale your company by hiring more engineers, since no one has to know the entire system in full detail to make “local” changes.
Low coupling promotes keeping complexity localized. By having parts of your system decoupled, multiple engineers can work on them independently. As a result, you will be able to scale your company by hiring more engineers, since no one has to know the entire system in full detail to make “local” changes.
![]() Decoupling on a higher level can mean having multiple applications, with each one focused on a narrow functionality. You can then scale each application separately depending on its needs. Some applications need more central processing units (CPU), whereas others need input/output (I/O) throughput or memory. By decoupling parts of your system, you can provide them with more adequate hardware and better scalability.
Decoupling on a higher level can mean having multiple applications, with each one focused on a narrow functionality. You can then scale each application separately depending on its needs. Some applications need more central processing units (CPU), whereas others need input/output (I/O) throughput or memory. By decoupling parts of your system, you can provide them with more adequate hardware and better scalability.
Promoting Loose Coupling
The single most important practice promoting loose coupling is to carefully manage your dependencies. This general guideline applies to dependencies between classes, modules, and applications.
Figure 2-2 shows how classes, modules, and applications are laid out within a system. A system is the whole—it contains everything: all of the applications you develop and all the software you use in your environments. Applications are the highest level of abstraction within the system, and they serve highest-level functions. You might use an application for accounting, asset management, or file storage.
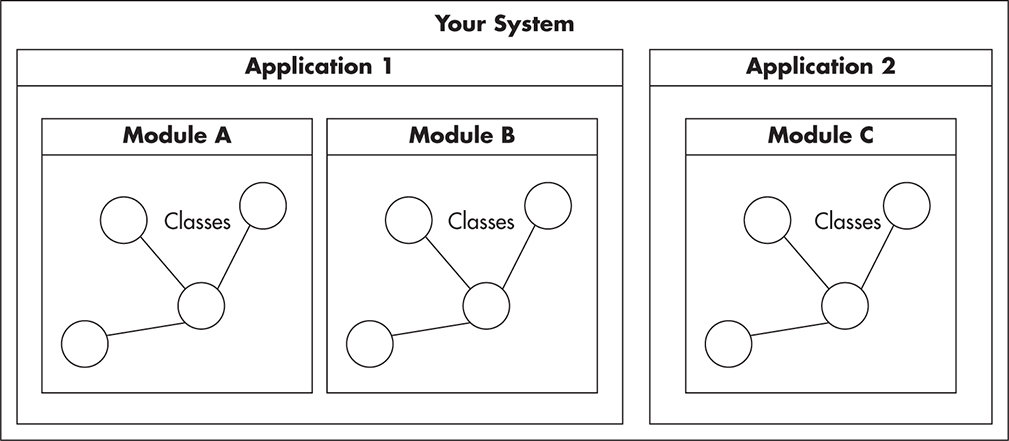
Figure 2-2 Parts of the system
Within an application you have one or more modules that implement finer, more granular features. Since applications are often developed and deployed by different teams, modules (like credit card processing, Portable Document File [PDF] rendering, or File Transfer Protocol [FTP] interfacing) should be independent enough for multiple teams to work on them in parallel. If you do not feel confident in another team taking ownership of a certain module, it is likely too tightly coupled with the rest of the application.
Finally, your modules consist of classes, which are the smallest units of abstraction. A class should have a single purpose and no more than a few screens of code. I will talk more about single responsibility later in this chapter.
In object-oriented languages like Java, C#, or PHP you can promote low coupling by correct use of public, protected, and private keywords. You want to declare as many methods as private/protected as possible. The reason for this approach is that the more methods you make private, the more logic remains hidden from the outside world. Hiding details is a great way to reduce coupling and promote simplicity. The less access other classes have to your class, the less aware they are of how the class does its job. Private methods can be refactored and modified easily, as you know that they can only be called by the same class. This way, the complexity is localized and you do not have to search far to find out what could potentially break. Exposing many public methods, on the other hand, increases a chance of external code using them. Once a method is public, you cannot assume that no one is using it anymore and you have to search carefully throughout the application.
HINT
When writing code, be stingy. Share only the absolute minimum of information and functionality that satisfies the requirements. Sharing too much too early increases coupling and makes changes more difficult in the future. This applies to every level of abstraction, whether class, module, or application.
To reduce coupling on the higher levels of abstraction, you want to reduce the contact surface area between parts of your system. Loose coupling should let you replace or refactor each element of the system without major work on the rest of the system. Finding the balance between decoupling and overengineering is a fine art, and engineers often disagree on the necessary level of abstraction. You can use diagrams to help you make these decisions (tradeoffs) more easily. When you draw a diagram of your application, the contact surface area is determined by the number of dependencies that cross boundaries of two elements of your diagram. Figure 2-3 shows two examples: a highly coupled application and a loosely coupled one.

Figure 2-3 Comparison of high and low coupling
As you can see in Figure 2-3, a highly coupled application can make it difficult to modify or refactor its parts without affecting remaining modules. In addition, modules know about each other’s structure and access their parts directly. The second example shows modules that have more privacy. To reduce the contact surface area, public functionality of module B was isolated to a small subset and explicitly made public. Another important thing to notice is that the second application does not have circular dependency between modules. Module A can be removed or refactored without affecting module B, as module B does not depend on module A at all.
Avoiding Unnecessary Coupling
On the other side of the spectrum, there are practices that increase coupling. A great example of unnecessary coupling is the practice of exposing all the private properties using public getters and setters. It is a trend that originated many years ago around Java Beans. The idea of providing getters and setters came from the need to build generic code manipulation tools and integrated development environments (IDEs). Unfortunately, this practice was completely misunderstood by the wider community. Something that was meant to allow IDE integration became a bad habit replicated across other platforms and languages.
When you work with object-oriented languages like Java or PHP, creating a new class should not begin by adding public getters and setters for all of your class members. This breaks encapsulation and invites coupling. It is a much better approach to start with private methods and make them protected or public only when really necessary. Different languages give you different ways of achieving the same goals—the point to remember is to hide as much as you can and expose as little as possible.
Another common example of unnecessary coupling is when clients of a module or class need to invoke methods in a particular order for the work to be done correctly. Sometimes there are valid reasons for it, but more often it is caused by bad API design, such as the existence of initialization functions. Clients of your class/module should not have to know how you expect them to use your code. They should be able to use the public interface in any way they want. If you force your clients to know how the API is supposed to be used, you are increasing the coupling, because now not only are the method signatures part of the contact surface area, but also the order in which they should be used.
Finally, allowing circular dependencies between layers of your application, modules, or classes is a bad coupling practice. It is quite easy to notice and relatively easy to avoid once you are aware of the danger of circular dependencies. Usually, drawing a diagram of your system is enough to expose circular dependencies, which is a key reason I recommend using diagrams in your design process. A diagram of a well-designed module should look more like a tree (directed acyclic graph) rather than a social network graph.
Models of Loose Coupling
Understanding loose coupling takes a lot of practice. Fortunately, as with simplicity, you can gain a lot of experience by reading code and analyzing systems built by other people.
A good example of loose coupling is the design of Unix command-line programs and their use of pipes. Whenever a process is created in a Unix system, it automatically gets three open files that it can read from and/or write to (called standard output, standard input, and standard error). The files are not necessarily actual files; they can be virtual file handlers pointing to a terminal, a network socket, a file on a hard drive, or a pipe connecting to another process. The Unix system exposes a very simple API to read from and write to files. All you get is just a few simple functions. The operating system hides from the program the real nature of the file handler. Whether it is a real file or a network socket, the program can read and write to it in the same way. That allows Unix command-line programs like grep, sed, awk, and sort to perform a specific function and be connected using pipes to perform much more complex tasks. I personally believe that Unix file handling is a genius solution and a great example of a “framework” promoting loose coupling between programs.
Another good example of loose coupling is Simple Logging Facade for Java (SLF4J). I strongly encourage you to have a look at its structure and compare it to Log4J and Java Logging API. SLF4J acts as a layer of indirection, isolating complexity of implementation from the users of the logging interface. It also exposes a much simpler and cleaner API that can be understood within minutes.
Loose coupling is one of the most fundamental principles of building flexible software. I highly encourage you to prioritize creating loosely coupled modules. I also encourage reading some of the books discussing coupling from different perspectives.1,2,5,10,12,14,22,27,31
Don’t Repeat Yourself (DRY)
“I think one of the most valuable rules is avoid duplication. Once and only once, is the Extreme Programming phrase.” –Martin Fowler
Repeating yourself implies that you are undertaking the same activity multiple times. There are many areas in your software engineering life where this can be applied, from the code you write in your applications, to repetitive testing before each code release, to your company operations as a whole.
HINT
If you are doing the same thing over and over again, chances are that you are wasting your life away. Instead of doing the same thing multiple times, you could be doing something cool like building new features or thinking of better solutions for your customers’ needs. Try to agree with your team and your boss on some basic rules to avoid repetitiveness—for example, that duplicated code fails code review and every new class needs to come with automated tests.
There are a number of reasons developers repeatedly waste time:
![]() Following an inefficient process This can occur in the release cycle, the way new features are designed, sign-offs, or meetings and it is where continuous improvement can bring you great benefits. Use feedback, introduce incremental change, and repeat. It is common for teams to be aware of wasted time but still fail to do anything about it. Whenever you hear, “This is just how we do it” or “We have always done it this way,” it is most likely an inefficient process and an opportunity for change.
Following an inefficient process This can occur in the release cycle, the way new features are designed, sign-offs, or meetings and it is where continuous improvement can bring you great benefits. Use feedback, introduce incremental change, and repeat. It is common for teams to be aware of wasted time but still fail to do anything about it. Whenever you hear, “This is just how we do it” or “We have always done it this way,” it is most likely an inefficient process and an opportunity for change.
![]() Lack of automation You waste time deploying manually, compiling, testing, building, configuring development machines, provisioning servers, and documenting APIs. At first it feels like a simple task, but with time it gets more and more complex and time consuming. Before you know it, your entire day is spent deploying code and testing releases, with virtually no time devoted to building new features. The burden of increased manual work is very easily missed, as it builds up in tiny increments. Try to automate your builds and deployments from day one, as they will only get more complicated as you go along.
Lack of automation You waste time deploying manually, compiling, testing, building, configuring development machines, provisioning servers, and documenting APIs. At first it feels like a simple task, but with time it gets more and more complex and time consuming. Before you know it, your entire day is spent deploying code and testing releases, with virtually no time devoted to building new features. The burden of increased manual work is very easily missed, as it builds up in tiny increments. Try to automate your builds and deployments from day one, as they will only get more complicated as you go along.
![]() Not invented here, also known as reinventing the wheel This is often a problem arising from writing code before considering the reuse of existing code. It is a pattern of behavior especially common among younger engineers, who enjoy implementing things that are easily available (in-house or in open-source world). Good examples are implementing hashing functions, sorting, b-trees, Model View Controller (MVC) frameworks, or database abstraction layers. Even though you are not literally repeating yourself, you are still wasting time because you could use tools and libraries that others have built before you. Any time I am about to write a generic library I search online first and usually there are a few good open-source alternatives available.
Not invented here, also known as reinventing the wheel This is often a problem arising from writing code before considering the reuse of existing code. It is a pattern of behavior especially common among younger engineers, who enjoy implementing things that are easily available (in-house or in open-source world). Good examples are implementing hashing functions, sorting, b-trees, Model View Controller (MVC) frameworks, or database abstraction layers. Even though you are not literally repeating yourself, you are still wasting time because you could use tools and libraries that others have built before you. Any time I am about to write a generic library I search online first and usually there are a few good open-source alternatives available.
![]() Copy/paste programming Imagine that you have existing code that does a similar thing to what you are about to develop. To save some time, you copy and paste a large chunk of code and then modify it just a little bit. Now you have two copies of similar code to maintain and apply changes to. After some time, you realize that every change you make has to be applied in multiple parts of the system and that bugs often recur as fixes are not applied to all copies of the affected code. Try to get your team to commit to some rules, such as “we never copy and paste code.” That should give everyone authority to point out duplication during code reviews and create some positive peer pressure.
Copy/paste programming Imagine that you have existing code that does a similar thing to what you are about to develop. To save some time, you copy and paste a large chunk of code and then modify it just a little bit. Now you have two copies of similar code to maintain and apply changes to. After some time, you realize that every change you make has to be applied in multiple parts of the system and that bugs often recur as fixes are not applied to all copies of the affected code. Try to get your team to commit to some rules, such as “we never copy and paste code.” That should give everyone authority to point out duplication during code reviews and create some positive peer pressure.
![]() “I won’t need it again so let’s just hack it quickly” solutions You will sometimes approach a problem that seems isolated in nature. You think, “I will never need this code again; I’ll just hack it.” In time, the problem occurs again and you have to work with the code that was hacked together as a one-off script. The problem now is that the code is not documented, unit tested, or properly designed. Even worse, other engineers can come along and copy/paste the hacked-together solution as a base for their own one-off scripts.
“I won’t need it again so let’s just hack it quickly” solutions You will sometimes approach a problem that seems isolated in nature. You think, “I will never need this code again; I’ll just hack it.” In time, the problem occurs again and you have to work with the code that was hacked together as a one-off script. The problem now is that the code is not documented, unit tested, or properly designed. Even worse, other engineers can come along and copy/paste the hacked-together solution as a base for their own one-off scripts.
Copy and Paste Programming
Copy and paste programming is such a common problem that I believe it needs a few more words. Applications face this issue because developers usually do not realize that the more code you write, the more expensive it becomes to support and maintain the application. Copying and pasting results in more code within your application. More code results in higher maintenance costs—an exponentially growing technical backlog. Changes to applications with code duplication require modifications to all copies, tracking differences between copies, and regression testing all of the copy-pasted code. Since complexity rises exponentially with the number of lines of code, copy and pasting is actually an expensive strategy. In fact, copy-paste programming is such a serious problem that people spend their careers researching ways to deal with it. White papersw2–w5 published by the National Aeronautics and Space Administration (NASA) show that 10 percent to 25 percent of large systems’ codebase is a result of copy-paste programming.
Dealing with code duplication can be frustrating, but there is nothing that patient refactoring can’t fix. A good first step is to search through the codebase and document every occurrence of the duplicated functionality. Once you have done this, you should have a better understanding of what components are affected and how to refactor them. Think about creating abstract classes or extracting repetitive pieces of code into separate, more generic components. Both composition and inheritance are your friends in battling repetitive code.
Another good way to deal with copy-paste programming is the use of design patterns and shared libraries. A design pattern is an abstract way of solving a common problem. Design patterns are solutions on a software design level. They can be applied to different systems and different subject matters. They are concerned with structuring object-oriented code, dependencies, and interactions, not with particular business problems. A design pattern could suggest how to structure objects in a module, but it would not dictate what algorithms to use or how business features should work. Design patterns are out of the scope of this book, but you can learn more through a number of books1,7,10,36,18 to get more familiar with most common patterns.
You can also employ web services to combat duplication on higher levels of abstraction. Instead of building the same functionality into each application you develop, it is often a good idea to create a service and reuse it across the company. I will talk more about benefits of web services in Chapter 4.
HINT
Prevent future repetition by making the most common use cases the easiest. For example, if your library provides 20 functions, only 5 of which will be used 80 percent of the time, keep these 5 operations as easy to use as possible. Things that are easy to use tend to be reused. If using your library is the easiest way to get things done, everyone will use your library. If using your library is difficult, you will end up with duplication or hacks.
Coding to Contract
Coding to contract, or coding to interface, is another great design principle. Coding to contract is primarily about decoupling clients from providers. By creating explicit contracts, you extract the things that clients are allowed to see and depend upon. Decoupling parts of your system and isolating changes is a key benefit discussed earlier in the chapter.
A contract is a set of rules that the provider of the functionality agrees to fulfill. It defines a set of things that clients of the code may assume and depend upon. It dictates how a piece of software can be used and what functionality is available, but does not require clients to know how this functionality is implemented.
The term “contract” means different things in different contexts. When I talk about methods in object-oriented programming, the contract is the signature of the method. It defines what the expected parameters are and what the expected result is. A contract does not specify how the result is produced, as this is an implementation detail that you should not worry about when you look at the contract. When I talk about classes, a contract is the public interface of the class. It consists of all the accessible methods and their signatures. Going further up the abstraction layers, the contract of a module includes all the publicly available classes/interfaces and their public method signatures. As you can see, the higher the level of abstraction, the more complex and broader a contract may get. Finally, in the context of an application, contract usually means some form of a web service API specification.
As I already mentioned, the contract helps in decoupling clients from providers. As long as you keep the contract intact, clients and providers can be modified independently. This in turn makes your code changes more isolated and thus simpler. When designing your code, create explicit contracts whenever possible. You should also depend on the contracts instead of implementations whenever you can.
Figure 2-4 shows how a contract separates clients from the providers. Provider 1 and Provider 2 could be two alternative implementations of the same contract. Each provider could be a separate module, and since they both fulfill the same contract, clients can use either without needing direct knowledge of which implementation is being used. Any code that fulfills the contract is equally good in the eyes of the client, making refactoring, unit testing, and changes to the implementation much simpler.
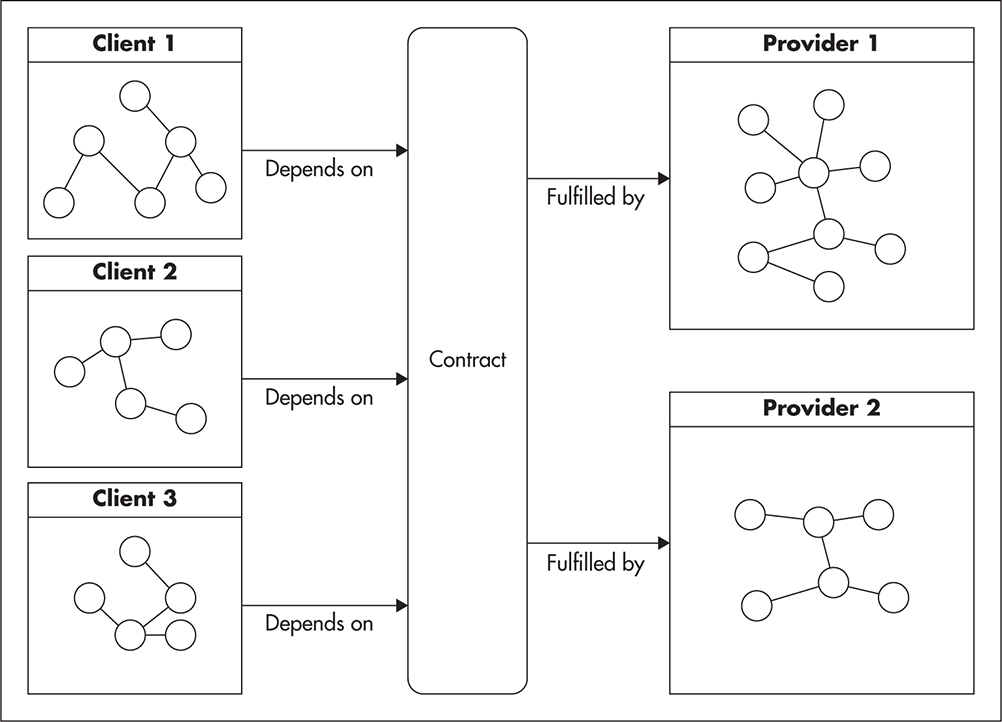
Figure 2-4 Clients decoupled from providers
HINT
To make coding to contract easier, think of the contract as an actual legal document. When people agree to do something in a legally binding document, they become much more sensitive to details, as they may be liable if specific stipulations are not met. A similar situation happens in software design. Every part of the contract that is loose increases future liability. As a provider, exposing more than necessary increases your future costs because any time you want to make a change, you will need to renegotiate the contract with all of your clients (propagating the change throughout the system).
When designing a class, first consider what functionality your clients really need and then define the minimal interface as the contract. Finally, implement the code fulfilling the contract. Deal with libraries and web services in the same way. Whenever you expose a web service API, be explicit and careful about what you expose to your clients. Make it easy to add features and publish more data when needed, but start with as simple a contract as possible.
To illustrate the power of coding to contract, let’s have a look at the Hypertext Transfer Protocol (HTTP) protocols. HTTP is implemented by different applications using different programming languages on different platforms, and yet, it is one of the most popular protocols ever developed. Some of the clients of the HTTP contract are web browsers like Firefox and Chrome. Their implementations vary and their updates are released on different schedules by different organizations. Providers, on the other hand, are mainly web servers like Apache, Internet Information Services (IIS), or Tomcat. Their code is also implemented in different technologies by different organizations and deployed independently all around the world. What is even more exciting is that there are other technologies implementing the HTTP contract that many people have never even heard of. For example, web cache servers like Varnish and Squid implement the HTTP protocol as both clients and providers. Figure 2-5 shows how clients and providers become decoupled by the HTTP contract.
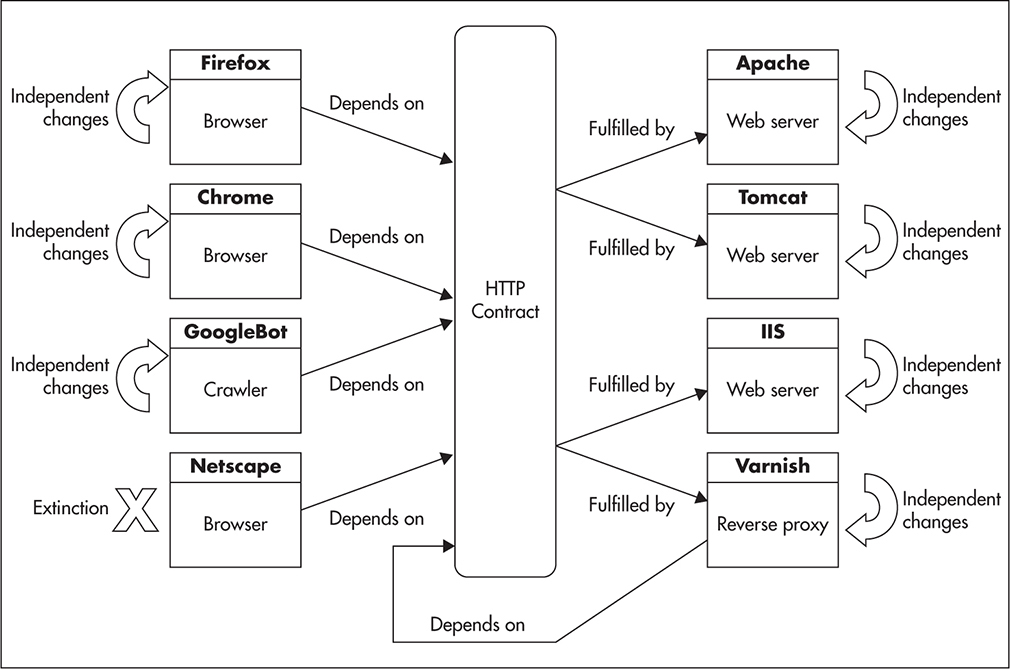
Figure 2-5 HTTP contract decouples implementations
Despite the complexity of the ecosystem and all the applications involved, HTTP provides flexibility of independent implementation changes and transparent provider replacement. HTTP is a beautiful example of decoupling by contract, as all that these applications have in common is that they implement or depend upon the same contract.
Draw Diagrams
“You know what architecture really is? It is an art of drawing lines. With an interesting rule that once you have drawn a line all the dependencies that cross that line point in the same direction.” –Robert C. Martin
Drawing diagrams is a must-have skill for every architect and technical leader. Diagrams summarize knowledge, and they truly are worth a thousand words. With diagrams, you document the system, share knowledge, and help yourself fully understand your own designs. Many engineers do not design their code up front and skip diagrams in favor of getting straight into the code. I have watched people do it, and I was doing the very same thing myself. Especially with the adoption of agile practices and lean startup methodologies, there is not much time for up-front designs, but that does not mean there should be none at all.
If you find it difficult to draw diagrams, you can start by drawing diagrams to document what you have already built. It is easier to draw diagrams of applications and features that you have already built and that you understand well. Once you get more comfortable with different diagram types, try to draw as you code. Flesh out class interfaces by looking at them from the client’s point of view, attempt to write high-level unit tests for these interfaces, and draw some simple diagram sketches. By assuming the client’s point of view and drawing simple diagrams at the same time, you will validate your own design and discover flaws before the code is even written. Once you’re more comfortable with diagrams, attempt to do more up-front design. Don’t get discouraged if you find it difficult to design up front. It is not an easy task to switch from code first to design first, so be prepared that it may take months or years before you get completely comfortable with the process.
Imagine you want to design a circuit breaker component. A circuit breaker is a design pattern that can be used to increase robustness of your system and protect it from failures of other components (or third-party systems). It allows your code to check if an external component is available before attempting to perform an action. Listings 2-1 and 2-2 and Figures 2-6 and 2-7 show how the component could be designed. You begin with a draft of the main interface (Listing 2-1) and then validate the interface by drafting some client code (Listing 2-2). This could be a unit test or just a draft of code that doesn’t have to compile. At this stage, just make sure that the interface you create is clear and easy to use. Once you flesh out the main use cases, support the design with a sequence diagram showing how clients interact with the circuit breaker, as seen in Figure 2-6. Finally, sketch out the class diagram, as in Figure 2-7, to ensure you did not break design principles and that the structure is sound.
Listing 2-1 Quick draft of the interface you are designing

Listing 2-2 Draft of the client code
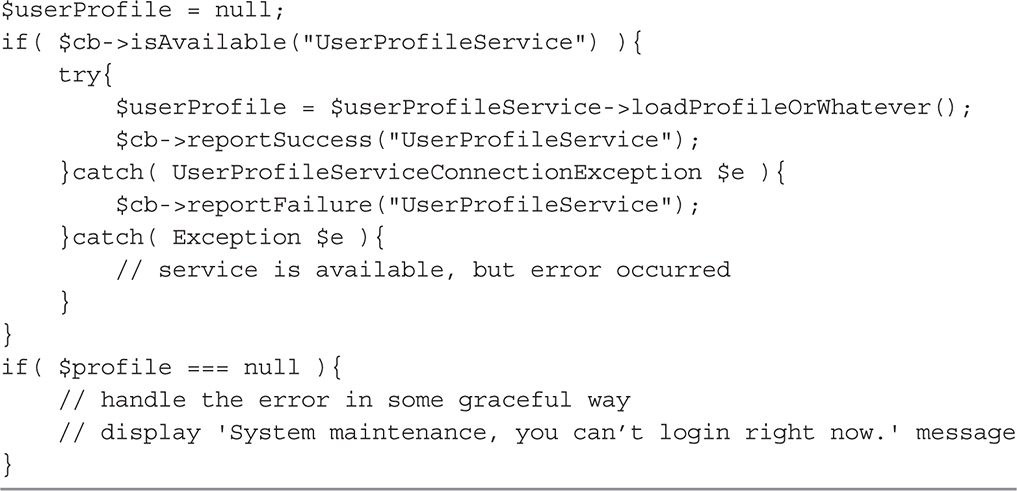
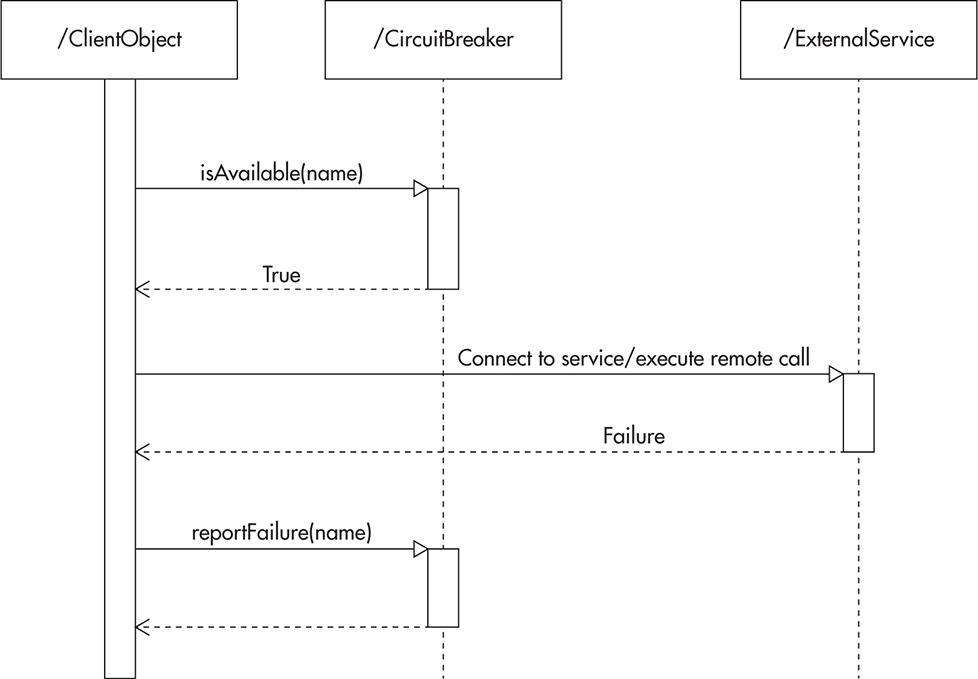
Figure 2-6 Draft of the sequence diagram drawn while designing the interface
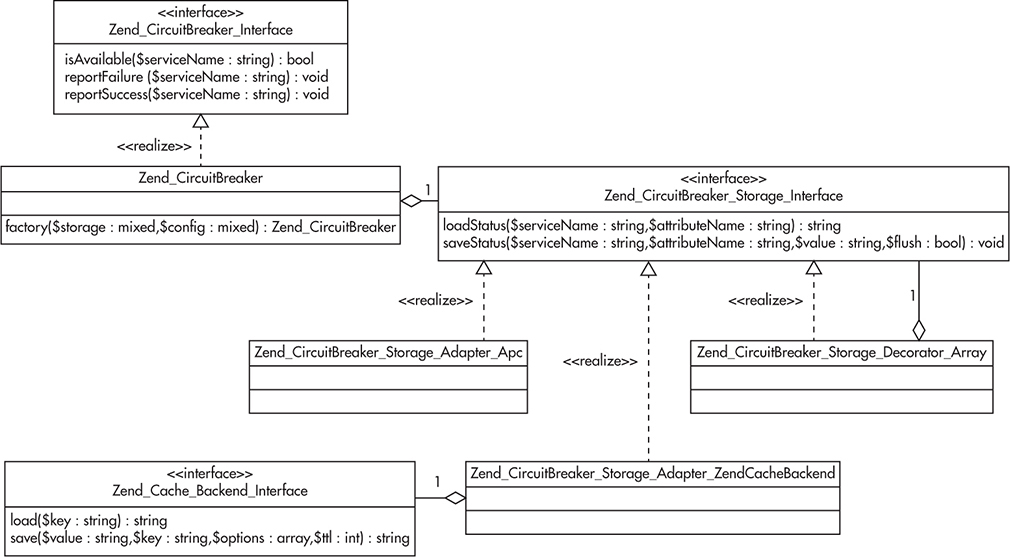
Figure 2-7 Draft of the class diagram drawn while designing the interface
I believe that following this simple design process is like taking the up-front design into the startup world. You benefit from the diagrams because you can see the design from different angles. At the same time, you reduce the risk of creating an unrealistic design and getting very far into it before having a chance to validate it.
Three types of diagrams are especially useful in documenting and understanding large-scale systems: use case, class, and module diagrams. The more your company scales up and the bigger your teams get, the more you benefit from having these diagrams. Let’s have a look at each diagram type in more detail.
Use Case Diagrams
A use case diagram is a simplified map defining who the users of the system are and what operations they need to perform. Use case diagrams are not concerned with technical solutions, but with business requirements and are a great way to distill key facts about both new features and those business requirements. When you document a new feature, support it with a simple use case diagram. Use case diagrams contain actors represented by humanoid icons, actions that actors perform, and a high-level structure of how different operations relate to each other. Use case diagrams may also show communication with external systems, such as a remote web service API or a task scheduler. Do not include too many details about requirements. Keep it simple so the diagram maintains readability and clarity. By leaving use case diagrams at a high level, you can distill key operations and business processes without drowning in an ocean of details.
Figure 2-8 shows an example of a simple use case diagram with a hypothetical automated teller machine (ATM) application. Even though an ATM machine involves many details related to authentication, security, and transaction processing, you focus only on what users of the ATM should be able to accomplish. From this perspective, it is not important to know the ordering of the buttons on the screen or what the ATM does to implement each feature. You only see a high-level overview of the requirements that will help to define the final contract and show the intent of the ATM system.
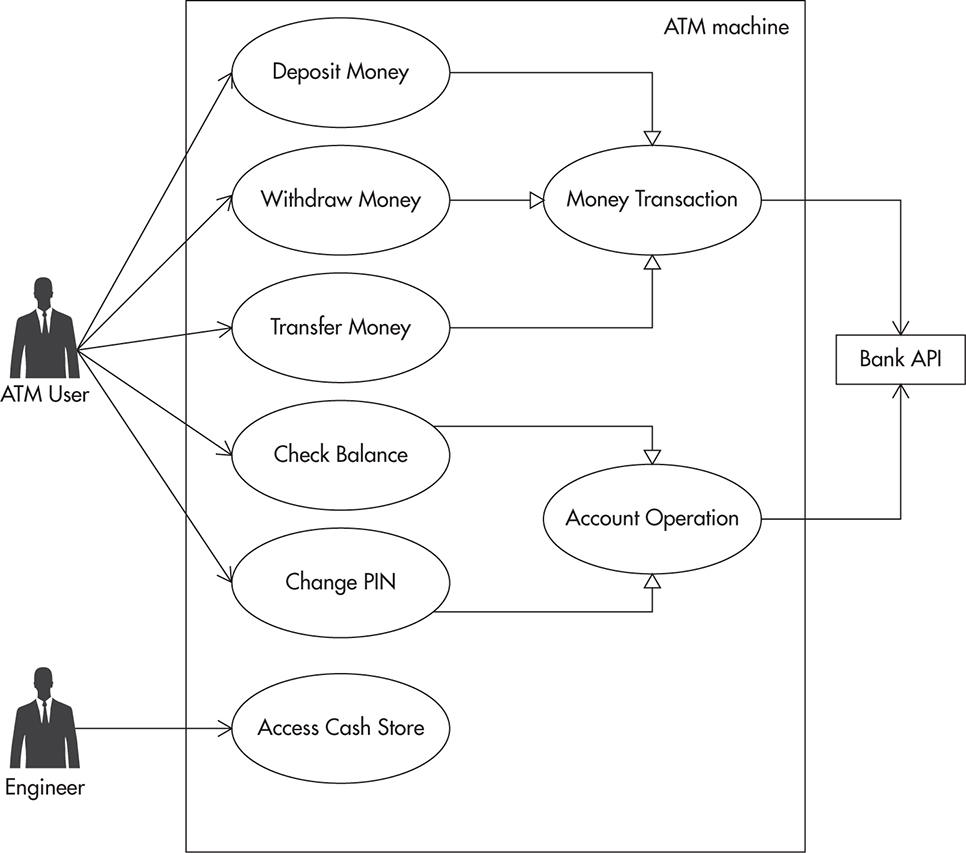
Figure 2-8 Simple ATM use case diagram
Class Diagrams
Class diagrams present the structure of individual modules. A class diagram typically includes interfaces, classes, key method names, and relationships between different elements. Class diagrams are good for visualizing coupling, as each class becomes a node of the diagram and each dependency becomes a line. By drawing a class diagram, you see immediately which classes are highly coupled with the rest of the module and which are more independent. Simply watch how many lines are connected to each node to judge how many dependencies the node includes. Class diagrams are the best tools to visualize a module’s structure with its classes, interfaces, and their interdependencies.
Figure 2-9 shows a simple example of a class diagram. The key elements here are interfaces and classes, with their most important methods and dependencies represented by different types of lines. In this case, you have two implementations of the EmailService. The first one delivers e-mails instantly, using a Simple Mail Transport Protocol (SMTP) protocol adapter, and the second one adds e-mails to an e-mail queue for delayed delivery.

Figure 2-9 Simple e-mail module class diagram
The EmailService interface is also a good example of the benefits of coding to contract. Whoever depends on the EmailService interface could send e-mails using either SMTP or queue-based implementations without having to know how the e-mails are actually delivered.
Interfaces should only depend on other interfaces and never on concrete classes. Classes, on the other hand, should depend on interfaces as much as possible.
Module Diagrams
The module diagram is similar to a class diagram because it displays structure and dependencies. The only difference between module and class diagrams is that module diagrams focus on the higher level of abstraction. Module diagrams represent the zoom-out view of the code, with less depth but more surface area. Instead of looking at classes and interfaces, module diagrams focus on relationships between larger parts of the system. You use module diagrams to show high-level dependencies and interactions between a module and its direct neighbors of the dependency graph. A module can be a package or any logical part of the application responsible for a certain functionality.
Figure 2-10 shows an example of a module diagram focusing on a hypothetical PaymentService with its relations to other parts of the application that may be relevant to the payment functionality. Module diagrams usually focus on parts of the application that are relevant to the functionality being documented while ignoring other irrelevant pieces. As your system grows larger, it is better to create a few module diagrams, each focusing around certain functionality, rather than including everything on a single diagram. Ideally, each diagram should be simple enough so you could remember and re-create it in your mind.
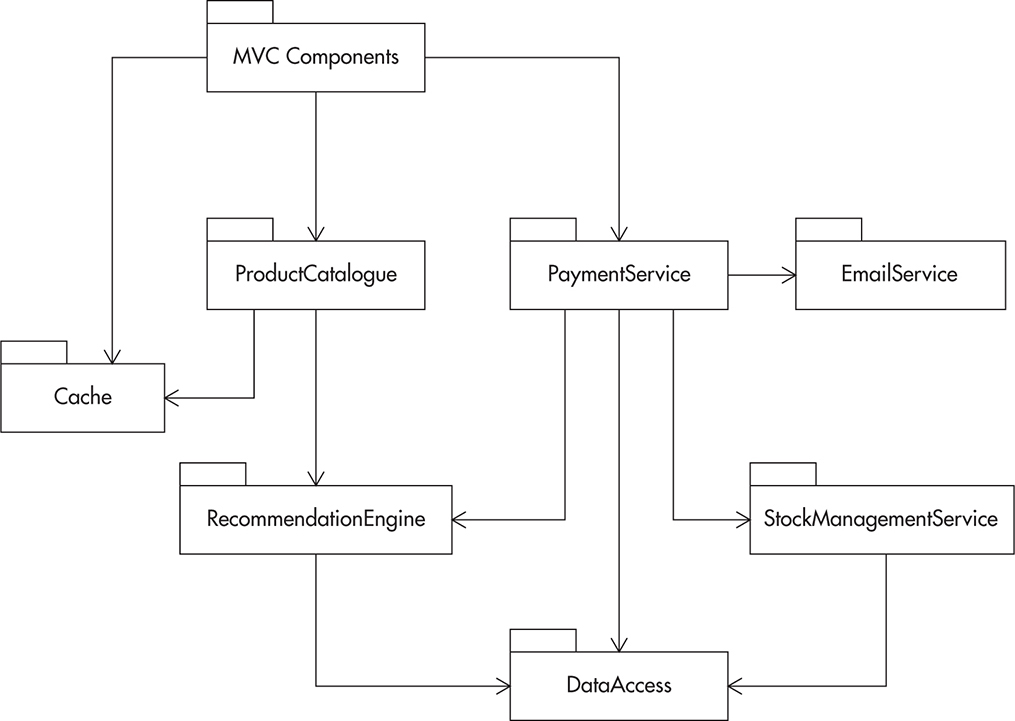
Figure 2-10 Module diagram focused on PaymentService
Be creative and don’t worry whether you “draw it correctly” or not. Practice in making your diagrams understandable is more important than perfection and following notation standards. Learn more about Unified Modeling Language (UML) and design patterns by consulting sources.1,7,10 I also recommend ArgoUML as a desktop UML diagram drawing tool. It is an open-source Java application that can be used across your company without uploading your software designs into the cloud. If you prefer cloud-based solutions and online collaboration, try draw.io, a free and easy-to-use online service integrated with Google Drive. Draw.io is my preferred tool, and almost all of the diagrams in this book were created using it.
Single Responsibility
Single responsibility is a powerful way to reduce the complexity of your code. At its core, the single-responsibility principle states that your classes should have one single responsibility and no more. Single responsibility reduces coupling; increases simplicity; and makes it easier to refactor, reuse, and unit test your code—all core principles discussed so far. Following this principle will result in producing small and simple classes that can be easily refactored and reused.
In the short term, it may be easier to simply keep adding methods to an existing class, regardless if the new functionality is within the responsibility of the class or not. However, after months of work, you will notice that your classes become large and closely coupled with each other. You will see them interacting with each other in unexpected ways and doing many unrelated things. At the same time, the size of each class will make it hard to fully understand its behavior and its role. This is when complexity rises sharply with every new line of code.
Promoting Single Responsibility
There are no hard-and-fast metrics that define whether your class is following the single-responsibility principle, but there are some guidelines that can help:
![]() Keep class length below two to four screens of code.
Keep class length below two to four screens of code.
![]() Ensure that a class depends on no more than five other interfaces/classes.
Ensure that a class depends on no more than five other interfaces/classes.
![]() Ensure that a class has a specific goal/purpose.
Ensure that a class has a specific goal/purpose.
![]() Summarize the responsibility of the class in a single sentence and put it in a comment on top of the class name. If you find it hard to summarize the class responsibility, it usually means that your class does more than one thing.
Summarize the responsibility of the class in a single sentence and put it in a comment on top of the class name. If you find it hard to summarize the class responsibility, it usually means that your class does more than one thing.
If your class breaks any of these guidelines, it is a good indicator that you may need to revisit and potentially refactor it.
On the higher level of abstraction, you should partition your functionality across modules to avoid overlaps. You would do it in a similar way as with classes—try to summarize responsibility of a module or an application in one or two sentences, just on a higher level. For example, you could say, “File Store is an application allowing clients to upload files and manage their metadata, and it also allows clients to find files based on complex searches.” This makes the application’s purpose clear. Limit its scope and isolate it from the rest of the system using an explicit interface (for example, a web service definition).
Examples of Single Responsibility
To keep things simple, let’s take validation of an e-mail address as an example. If you place your validation logic directly in the code that creates user accounts, you will not be able to reuse it in a different context. You will have to either copy-paste the validation code or create an awkward dependency between classes that should not know about each other, both of which break core principles of good software design. Having validation logic separated into a distinct class would let you reuse it in multiple places and have only a single implementation. If you need to modify the validation logic at a later date, you will only need to refactor a single class. For example, you may need to add support for UTF-8 encoded Unicode characters in domain names. Having a single class responsible for e-mail validation should make the change isolated and much simpler than if validation logic was spread across different classes. As a side effect of the single-responsibility principle, you will likely end up with much more testable code. Since classes have less logic and fewer dependencies, it will be easier to test them in isolation. A good way to explore single responsibility further is to research some of the design patterns such as strategy, iterator, proxy, and adapter.5,7 It can also help to read more about domain-driven design2 and good software design.1,37
Open-Closed Principle
“Good architecture maximizes the number of decisions not made.” –Robert C. Martin
The open-closed principle is about creating code that does not have to be modified when requirements change or when new use cases arise. Open-closed stands for “open for extension and closed for modification.” Any time we create code with the intent to extend it in the future without the need to modify it, we say we apply the open-closed principle. As Robert C. Martin advocates, the open-closed principle allows us to leave more options available and delay decisions about the details; it also reduces the need to change existing code. The prime objective of this principle is to increase flexibility of your software and make future changes cheaper.
This is best explained with an example. Consider a sorting algorithm where you need to sort an array of Employee objects based on employee names. In the most basic implementation, you could include the sorting algorithm itself and all necessary code in a single class, EmployeeArraySorter, as shown in Figure 2-11. You would expose just a single method, allowing the sort of an array of Employee objects, and announce that the feature is complete. Even though it solves the problem, it is not very flexible; it is actually a very fixed implementation. Since all of the code lives together in a single class, you have very little ability to extend it or add new features without changing the existing code. If you had a new requirement to sort an array of City objects based on their population, you may not be able to reuse the existing sorting class. You would be faced with a dilemma—do you extend the EmployeeArraySorter to do something completely unrelated to its original design, or do you copy-paste the class and add the necessary modifications? Luckily you have a third option, which is to refactor the solution and make it open-closed compliant.
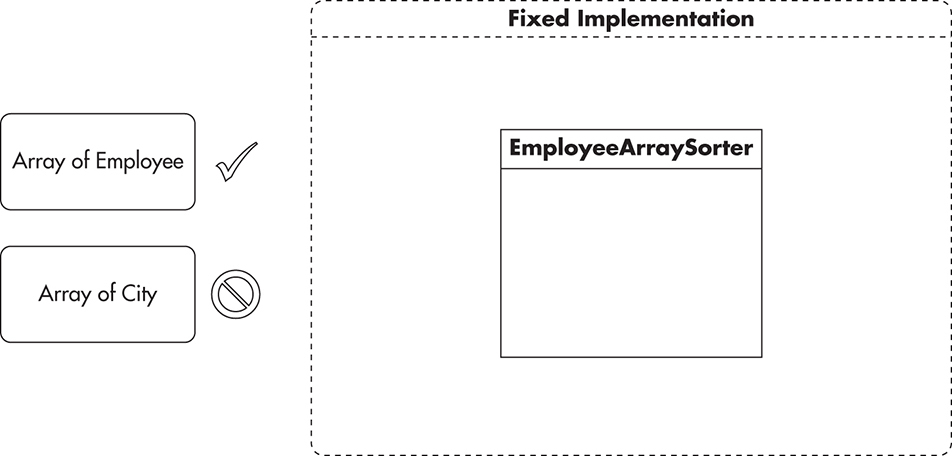
Figure 2-11 Fixed implementation
The open-closed solution requires you to break down the sorting problem into a set of smaller problems. Each of these tasks can then vary independently without affecting the reusability of remaining components. You can have a single interface that compares two objects called Comparator and another interface that performs a sorting algorithm called Sorter. Sorter would then use instances of Comparator and an array to do the actual sorting. Figure 2-12 shows how it might look. Note that this implementation is similar to the Java Comparator API.

Figure 2-12 Open-closed implementation
Using this approach makes reusing existing code easier. For example, to change sorting fields or types of sorted objects, you just add a new Comparator implementation that would have almost no code in it. You do not need to change any code that lives in “the dotted box” in Figure 2-12. If you wanted to change the sorting algorithm itself, you would not have to modify Comparators or other clients of the Sorter implementation. You would only need to create a new implementation of the Sorter interface. By allowing parts of the solution to change independently, you reduce the scope of changes necessary. You also allow extensions that do not require modification of the existing code.
Other good examples of the open-closed principle are MVC frameworks. These frameworks have dominated web development partially due to their simple and extensible nature. If you think about it, how often have you needed to modify the MVC component within a framework? If the framework is well architected, the answer should be “never.” However, you have the ability to extend the MVC components by adding new routes, intercepting requests, returning different responses, and overriding default behaviors. You do not have to modify the existing framework code to be able to extend its original functionality, and that is the open-closed principle in action.
As with other design principles, begin by familiarizing and exposing yourself to various frameworks that promote the open-closed principle. Experiencing different approaches is an effective way to get started and will help you see differences and recurring patterns. For example, open-closed is beautifully done in the Spring MVC framework for the Java language. Users have great flexibility to modify the default behavior without ever modifying the framework, yet the client code does not have to be coupled to the framework. By using annotations and conventions, most of your classes do not even have to know about the existence of the Spring framework at all!
Dependency Injection
We have already discussed dependencies in this chapter, as it is one of the most important topics when it comes to coupling and complexity. Dependency injection is a simple technique that reduces coupling and promotes the open-closed principle. Dependency injection provides references to objects that the class depends on, instead of allowing the class to gather the dependencies itself. At its core, dependency injection is about knowing as little as possible. It allows classes to “not know” how their dependencies are assembled, where they come from, or what actual implementations are fulfilling their contracts. It seems like a subtle change from pull to push, but it has a great impact on the flexibility of software design.
Let’s consider an analogy comparing a class implementing dependency injection to a CD player.L34 All that a CD player knows is the interface of a compact disc. It knows how to read the tracks, how music is encoded, and what optical parameters of the laser are necessary to read the contents of the CD. The compact disc inserted into the CD player is a dependency, and without it a CD player is unable to work correctly. By pushing the responsibility of finding dependencies onto its users, a CD player can remain “dumb.” At the same time, a CD player is more reusable, as it does not have to know every title ever burned on CD or every combination of songs in all the compilation albums ever made. Instead of knowing all possible CDs or assembling them magically itself, the CD player depends on you (the client) to provide a readable instance of a CD. As soon as you satisfy the dependency with an instance of a compact disc, the CD player can operate.
As an additional benefit, the CD player can be used with different nonstandard implementations of a compact disc. You can insert a cleaning disc or a testing disc with specially crafted malformed tracks, allowing you to test different failure scenarios.
Figure 2-13 shows how an overburdened CD player might look. It could have a hardcoded list of known CDs, and any time you wanted to play a new disc you would need to make changes to its code.
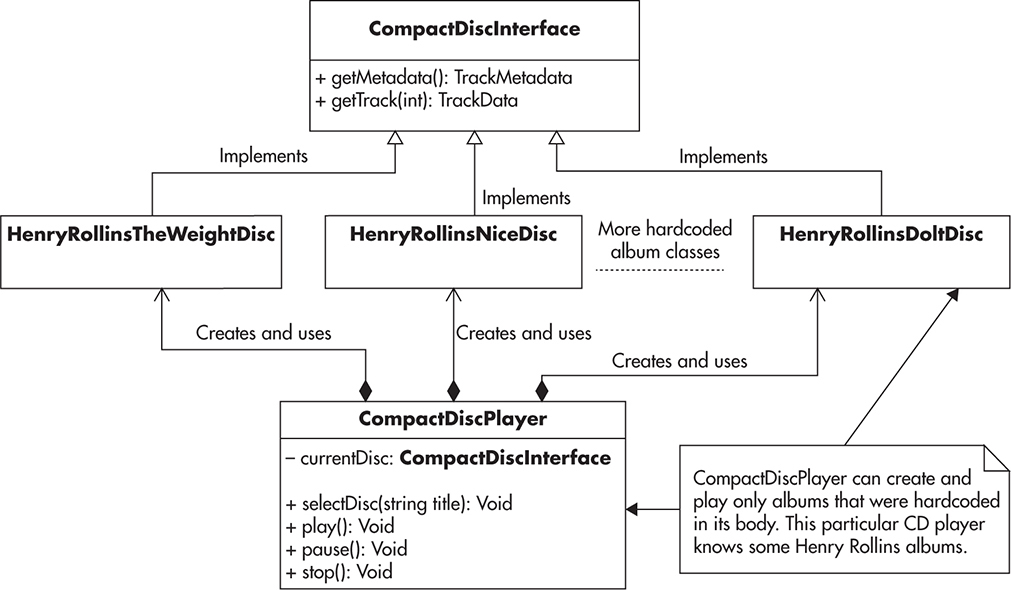
Figure 2-13 CD player without dependency injection
Now let’s look at the implementation of the same CD player using dependency injection. Figure 2-14 shows how a typical CD player operates. It does not know anything about discs themselves; it depends on its clients to provide it with a functional instance of a compact disc. This way, you keep the implementation opened for changes (allow new discs) but closed for modification (CD player never has to change).
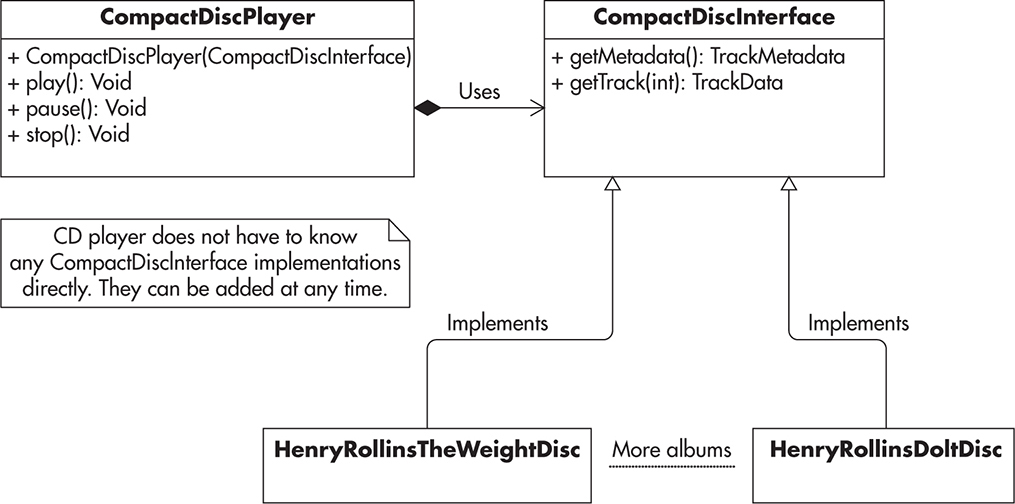
Figure 2-14 CD player using dependency injection
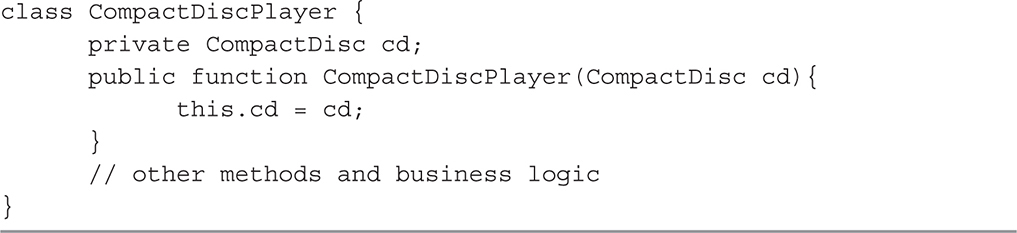
In practice, dependency injection can be summarized as not using the “new” keyword in your classes and demanding instances of your dependencies to be provided to your class by its clients. Listing 2-3 shows an example of a constructor-based dependency injection in Java. Using this approach, as soon as the instance is created, it is fully functional; there are no additional expectations on what has to happen for the CD player instance to work. The responsibility of gathering all the dependencies can be pushed out of the class itself, making it simpler, more reusable, and testable.
Listing 2-3 Example of constructor-based dependency injection
When used well, dependency injection reduces local complexity of the class and makes it dumber, which is a good thing. Without knowing who the provider of the contract is or how to get an instance of it, our class can focus on its single responsibility. The code of the class becomes simpler, and it requires less understanding of the rest of the system to modify and unit test the class. It may seem like you will end up with the same code, just in a different place, but this is exactly the purpose. By removing the assembly code from your classes, you make them more independent, reusable, and testable. Dependency injection is a practice that has been promoted for many years within the object-oriented programming (OOP) community. Given that dependency injection does not require use of any framework, I recommend getting familiar with the Spring framework or Grails framework as great examples of dependency injection in practice.w76,1,14,22,7
Inversion of Control (IOC)
Dependency injection is an important principle and a subclass of a broader principle called inversion of control. Dependency injection is limited to object creation and assembly of its dependencies. Inversion of control, on the other hand, is a more generic idea and can be applied to different problems on different levels of abstraction.
Inversion of control (IOC) is a method of removing responsibilities from a class to make it simpler and less coupled to the rest of the system. At its core, inversion of control is not having to know who will create and use your objects, how, or when. It is about being as dumb and oblivious as possible, as having to know less is a good thing for software design.
IOC is heavily used by several frameworks, including Spring, Symfony, Rails, and even Java EE containers. Instead of you being in control of creating instances of your objects and invoking methods, you become the creator of plugins or extensions to the framework. The IOC framework will look at the web request and figure out which classes should be instantiated and which components should be delegated to.
IOC is also referred to as “the Hollywood principle” because the subject of IOC is being told, “Don’t call us, we will call you.” In practice, this means your classes do not have to know when their instances are created, who is using them, or how their dependencies are put together. Your classes are plugins, and some external force will decide how and when they should be used.
Imagine you wanted to build an entire web application in pure Java without any web framework. No web server, no frameworks, no API. Just Java. To accomplish such a complex task, you would need to write a lot of code yourself. Even if you decided to use some third-party libraries, you need to control the entire application flow. By using a web framework, you reduce the complexity of your own code. Not only do you reduce the amount of code that has to be written, but you also reduce the amount of things that developers have to know. All you have to learn is how to hook into the framework, which will create instances of your classes. The framework will call your methods when requests arrive and handle default behavior and control the execution flow from extension point to extension point.
Figure 2-15 illustrates a web application written in pure Java (no frameworks). In this case, a large chunk of the application would focus on talking to the external world. The application would have to be responsible for things like opening network sockets, logging to files, connecting to external systems, managing threads, and parsing messages. Your application has to control almost everything, which implies that you will have to be aware of most of these things.
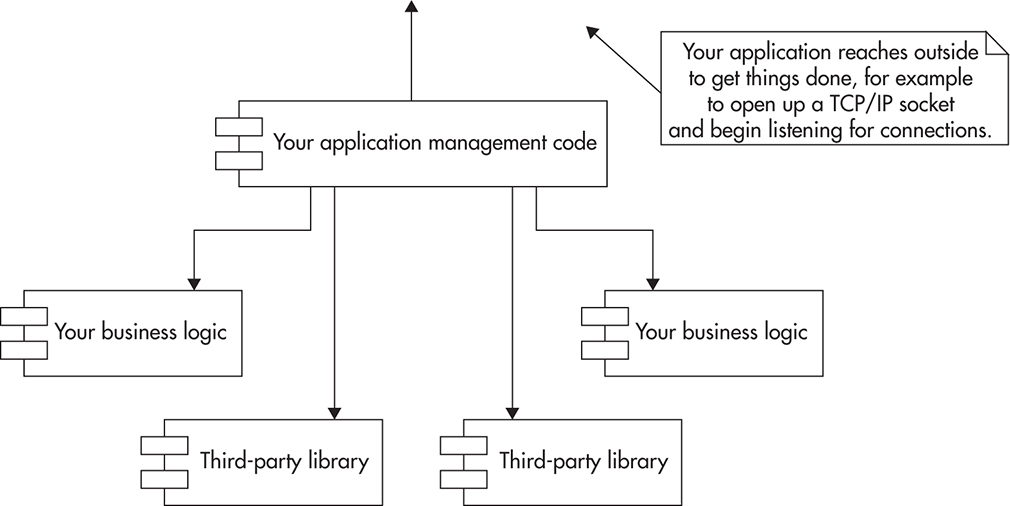
Figure 2-15 Web application written in pure Java, no IOC framework
If you used an IOC framework, your application might look more like Figure 2-16. Not only can the framework take away a lot of responsibilities, but now our application does not even have to know about most of these things that happen. Even though all the same things need to happen, they can happen outside of our application code. This does not change the overall complexity of the system, but it does reduce the local complexity of your application.

Figure 2-16 The same web application within an IOC container
Inversion of control is a universal concept. You can create an inversion of control framework for any type of application, and it does not have to be related to MVC or web requests. Components of a good IOC framework include the following:
![]() You can create plugins for your framework.
You can create plugins for your framework.
![]() Each plugin is independent and can be added or removed at any point in time.
Each plugin is independent and can be added or removed at any point in time.
![]() Your framework can auto-detect these plugins, or there is a way of configuring which plugin should be used and how.
Your framework can auto-detect these plugins, or there is a way of configuring which plugin should be used and how.
![]() Your framework defines the interface for each plugin type and it is not coupled to plugins themselves.
Your framework defines the interface for each plugin type and it is not coupled to plugins themselves.
Writing code for an IOC framework is like keeping fish in a fish tank. You can have many fish in a tank and they can have some autonomy, but they live in a larger world that is out of their control. You decide what the environment in the tank is and when fish get fed. You are the IOC framework, and your fish are your plugins, living in a protective bubble of not knowing.
Designing for Scale
Designing for scale is a difficult art, and each technique described in this section comes with some costs. As an engineer, you need to make careful tradeoffs between endless scalability and the practicality of each solution. To make sure you do not overengineer by preparing for scale that you will never need, you should first carefully estimate the most realistic scalability needs of your system and design accordingly.
HINT
To put it into perspective, many startups fail and thus never need to design for scale at all. (Depending on the source of statistics, you could say that up to 90 percent of all startups fail.) Most startups that succeed moderately have limited scalability needs (the following 9 percent of all startups). Only a very limited number of companies ever grow to the size that requires horizontal scalability (the remaining 1 percent).
In a similar way to the design principles discussed so far, tackling complexity and coupling, there are a few principles that help design scalable systems. As you learn more about scalability, you may realize that many of the scalability solutions can be boiled down to three basic design techniques:
![]() Adding more clones Adding indistinguishable components
Adding more clones Adding indistinguishable components
![]() Functional partitioning Dividing the system into smaller subsystems based on functionality
Functional partitioning Dividing the system into smaller subsystems based on functionality
![]() Data partitioning Keeping a subset of the data on each machine
Data partitioning Keeping a subset of the data on each machine
Each of these techniques offers different benefits and introduces different costs. It is worth becoming more familiar with each of them to be able to design scalable systems efficiently. Let’s discuss each of these techniques in more detail using an example. Imagine you are building a web application that would let people manage their eBay auction bids. Users would create accounts and allow your application to bid on their behalf. Nice and simple.
Adding More Clones
If you are building a system from scratch, the easiest and most common scaling strategy is to design it in a way that would allow you to scale it out by simply adding more clones. A clone here is an exact copy of a component or a server. Any time you look at two clones, they have to be interchangeable and each of them needs to be equally qualified to serve an incoming request. In other words, you should be able to send each request to a random clone and get a correct result.
Using our example of an eBay bidding application, as your application grows in popularity, you will need to scale all of the components of your application. As mentioned in Chapter 1, you can either upgrade your existing servers (scale vertically) or add more servers to your setup to distribute the load (scale horizontally). Scaling by adding clones works great in the case of web servers, so let’s consider it first. Figure 2-17 shows a single web server setup with the eBay bidding application deployed on it.
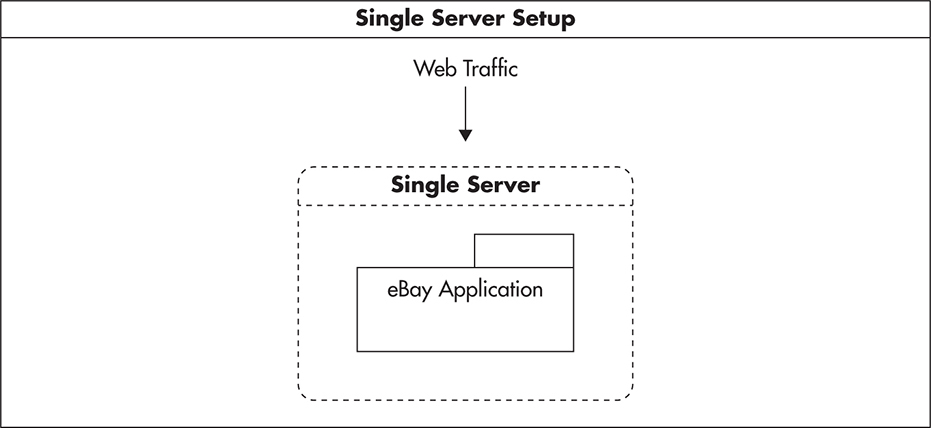
Figure 2-17 Single-server setup
To scale by adding clones, your goal is to have a set of perfectly interchangeable web servers and distribute the load equally among them all. In this setup, the load (web requests) is usually distributed among clones using a load balancer. Ideally, whenever the load balancer receives a request, it should be able to send it to any of the servers without needing to know where the previous request went. Figure 2-18 shows the same application scaled by adding clones.
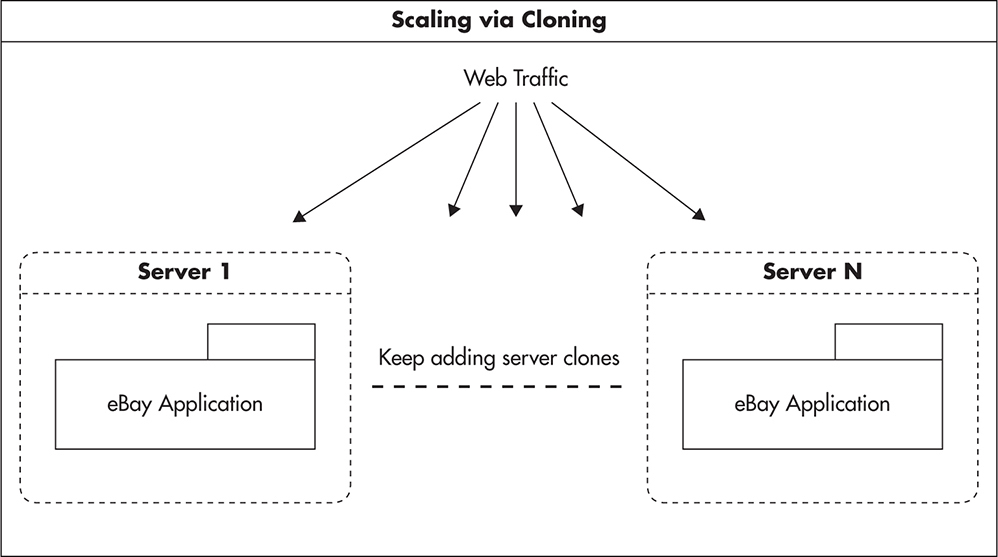
Figure 2-18 Scaling out by adding clones
To scale by adding clones, you need to pay close attention to where you keep the application state and how you propagate state changes among your clones. Scaling by adding clones works best for stateless services, as there is no state to synchronize. If your web services are stateless, then a brand-new server is exactly the same as a server that is already serving requests. In such a case, you can increase capacity by simply adding more servers to the load balancer pool. (Stateless service is a term used to indicate that a service does not depend on the local state, so processing requests does not affect the way the service behaves. No particular instance needs to be used to get the correct result. I will discuss stateless services in more detail in Chapter 3 and Chapter 4.) Note that scaling by adding clones of the same thing is not reserved for stateless services. In fact, databases have been scaling out using this technique for years through the use of replication. I will explain replication and scaling by adding clones in the context of databases in Chapter 5.
Scaling via adding clones is like a hospital’s emergency room unit. If you had the budget to hire numerous equally trained doctors and purchase more operating room space and equipment, you could easily increase the overall number of emergency patients processed. Equally skilled doctors are equally well suited for treating any patient who is unlucky enough to have an emergency.
Scaling by adding clones is the easiest and cheapest technique to implement in your web layer. If you follow front-end and web services layer best practices presented later in Chapters 3 and 4, you will be able to scale most of your stack using this technique. The main challenge with scaling by adding clones is that it is difficult to scale stateful servers this way, as you need to find ways to synchronize their state to make them interchangeable.
Functional Partitioning
The second primary scalability strategy is functional partitioning. It is fairly universal and applicable across different levels of abstraction. The main thought behind the functional partitioning technique is to look for parts of the system focused on a specific functionality and create independent subsystems out of them.
In the context of infrastructure, functional partitioning is the isolation of different server roles. You divide your data centers into different server types. You have your object cache servers, message queue servers, queue workers, web servers, data store engines, and load balancers. Each of these components could be built into the main application, but over the years, engineers realized that a better solution is to isolate different functions into independent subsystems. Think of functional partitioning as a different way to scale your hospital. Instead of hiring more and more generic doctors, you can start hiring specialists in each area and providing specialized equipment for different types of operating rooms. Emergencies of different types may require different tools, different techniques, and different experience on behalf of the doctor.
In a more advanced form, functional partitioning is dividing a system into self-sufficient applications. It is applied most often in the web services layer, and it is one of the key practices of service-oriented architecture (SOA). Going back to the example of the eBay bidding application, if you had a web services layer, you could create a set of highly decoupled web services handling different parts of functionality. These services could then have their logical resources like data stores, queues, and caches. Figure 2-19 shows such a scenario where functionality was split into a profile service and a scheduling service. Depending on specific needs, these services could share underlying infrastructure like data store servers or they could be hosted separately. By giving your services more autonomy, you promote coding to contract and allow each service to make independent decisions as to what components are required and what the best way to scale them out is.
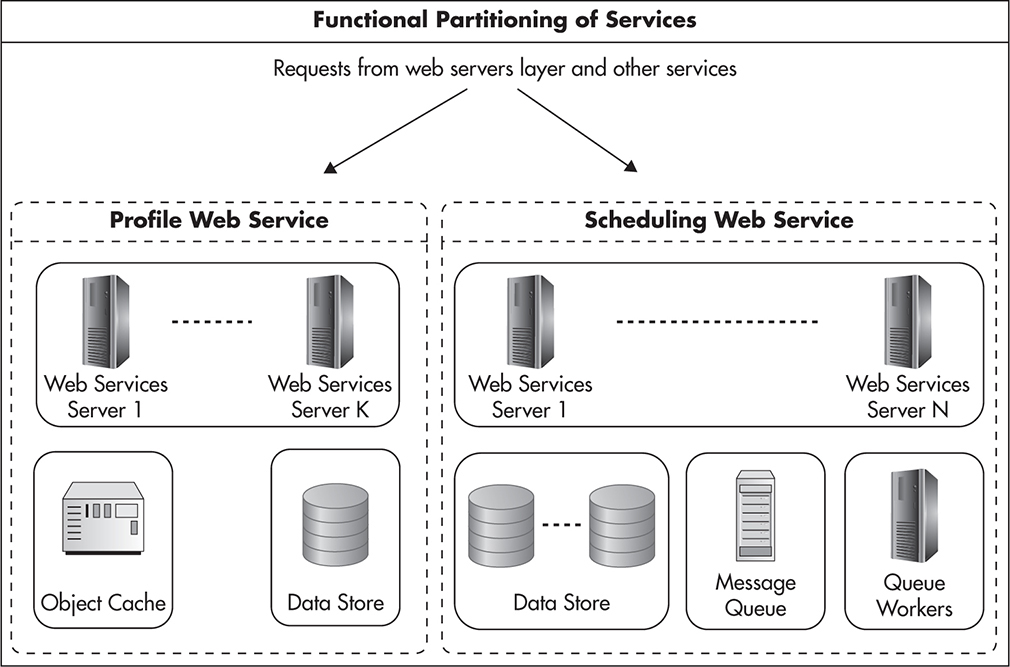
Figure 2-19 Functional partitioning
Functional partitioning is most often applied on a low level, where you break your application down into modules and deploy different types of software to different servers (for example, databases on different servers than web services). In larger companies, it is also common to use functional partitioning on a higher level of abstraction by creating independent services. In such cases, you can split your monolithic application into a set of smaller functional services. Additional benefits of such division is the ability to have multiple teams working in parallel on independent codebases and gaining more flexibility in scaling each service, as different services have different scalability needs.
There are numerous benefits of functional partitioning, but there are also a few drawbacks. Functional partitions are independent and usually require more management and effort to start with. There is also a limited number of functional partitions that you can come up with, limiting your ability to scale using this technique. After all, you can’t keep rewriting your application and keep dividing it into smaller and smaller web services to scale endlessly.
Data Partitioning
The third main scaling strategy is to partition the data to keep subsets of it on each machine instead of cloning the entire data set onto each machine. This is also a manifestation of the share-nothing principle, as each server has its own subset of data, which it can control independently. Share nothing is an architectural principle where each node is fully autonomous. As a result, each node can make its own decisions about its state without the need to propagate state changes to its peers. Not sharing state means there is no data synchronization, no need for locking, and that failures can be isolated because nodes do not depend on one another.
To illustrate further, let’s again look at the eBay bidding application. To recap, I scaled it in one way by adding more web servers (adding clones) and then I scaled it in a different way by splitting the web services layer into two independent services. This gave me two different types of scalability. But there is one more way I can scale it out: by distributing the load based on the data itself. A good example of such partitioning is splitting the data stored in the object cache of the profile web service from Figure 2-19.
To scale the object cache, I could add more clones, but then I would need to synchronize all of the state changes between all of my servers. Alternatively, I could look for further functional partitioning opportunities. I could try to cache web service responses on one cache server and database query results on another server. Neither of these approaches seems very attractive in this case, though, as they would not let me scale very far. A better way out would be to create a mapping between the cache key of the cached object and the cache server responsible for that key. Figure 2-20 shows how such mapping could be implemented.
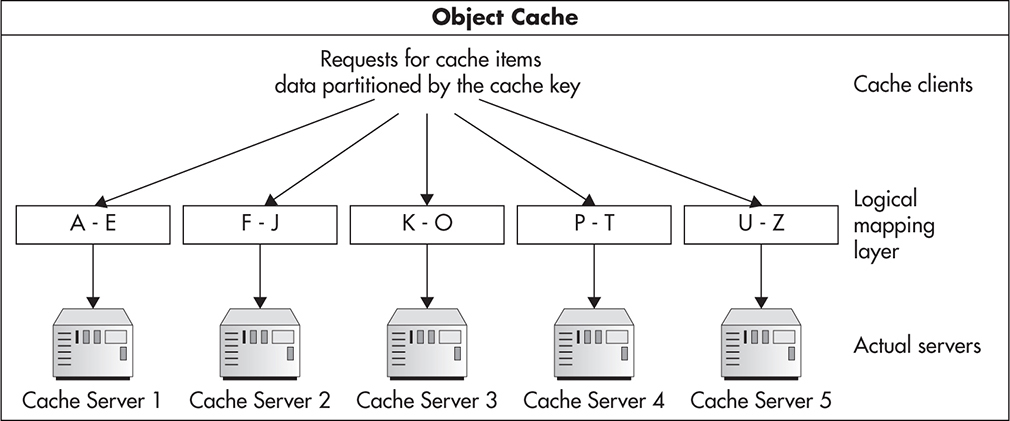
Figure 2-20 Data partitioning
Figure 2-20 shows a simplistic approach where I distribute cached objects among cache servers based on the first letter of the cache key. In practice, applications use more sophisticated ways of partitioning the data, but the concept remains the same. Each server gets a subset of the data for which it is solely responsible. By having less data on each server, I can process it faster and store more of it in memory. Finally, if I had to increase the capacity even further, I could add more servers and modify the mapping to redistribute the data.
Think back to the hospital analogy. If your hospital was providing scheduled visits to see your specialists, you would probably have to scale your specialists by using data partitioning. After all, you can’t have your patients see a different doctor every time they come for a visit. You could get around the problem by logging the doctor’s name on each patient’s card. By using a registry of which patient is treated by which doctor, your front desk staff could easily schedule appointments with the correct doctors.
Data partitioning, applied correctly with scaling by adding clones, effectively allows for endless scalability. If you partition your data correctly, you can always add more users, handle more parallel connections, collect more data, and deploy your system onto more servers. Unfortunately, data partitioning is also the most complex and expensive technique. The biggest challenge that data partitioning introduces is the fact that you need to be able to locate the partition on which the data lives before sending queries to the servers and that queries spanning multiple partitions may become very inefficient and difficult to implement.
I will discuss data partitioning in more detail in Chapter 5, as it is one of the key scaling techniques in modern data stores. You can also read more about adding clones, functional partitioning and data partitioning.27,41,w34,w35
Design for Self-Healing
“Any sufficiently large system is in a constant state of partial failure.” –Justin Sheehy
The final design principle in this chapter is designing software for high availability and self-healing. A system is considered to be available as long as it performs its functions as expected from the client’s perspective. It does not matter if the system is experiencing internal partial failure as long as it does not affect the behavior that clients depend on. In other words, you want to make your system appear as if all of its components were functioning perfectly even when things break and during maintenance times.
A highly available system is a system that is expected to be available to its clients most of the time. There is no absolute measurement of high availability, as different systems have different business requirements. Instead of defining an absolute measure of high availability, systems are measured in the “number of nines.” We say a system with 2 nines is available 99 percent of the time, translating to roughly 3.5 days of outage per year (365 days * 0.01 = 3.65 days). In comparison, a system with availability of 5 nines would be available 99.999 percent of the time, which makes it unavailable only five minutes per year.
As you can imagine, different business scenarios will have different outage tolerances. The main point to remember is that the larger your system gets, the higher the chance of failure. If you need to contact five web services and each of them connects to three data stores, you are depending on 15 components. Whenever any of these components fails, you may become unavailable, unless you can handle failures gracefully or fail over transparently.
As you scale out, failures become a much more frequent occurrence. Running 1,000 servers can easily give you a few failing servers every single day.w58 To make matters even worse, there are other reasons for failures, such as power outages, network failures, and human errors. Operating at scale magnifies these issues so that failure must be considered a norm, not a special condition. When designing for high availability, you need to hope for the best but prepare for the worst, always thinking about what else can fail and in what order.
One of the most exciting examples of such a high-availability mindset is a system developed at Netflix called Chaos Monkey. Netflix reliability engineers decided that the best way to prove that the system can handle failures is to actually cause them on an ongoing basis and observe how the system responds. Chaos Monkey is a service that runs during office hours and kills random components of the Netflix infrastructure. It may seem like a completely absurd idea that a company would risk outages this way, but what it really does is prove that their system is able to handle any type of failure.
Another similar example of the high-availability mindset is a concept called Crash-Only.w57 Advocates of the Crash-Only approach say that the system should always be ready to crash, and whenever it reboots, it should be able to continue to work without human interaction. This means that the system needs to be able to detect its failure, fix the broken data if necessary, and start work as normal, whether it is serving requests, processing queue messages, or doing any other type of work. Following this practice, CouchDB, a popular open-source data store, does not even provide any shutdown functionality. If you want to stop a CouchDB instance, you just have to terminate it.
What better way to prove that your system can handle failures than make it fail every day? I have witnessed many outages caused by the fact that there was some component that kept local server state or could not handle network timeouts properly. Continuously testing different failure scenarios is a great way to improve the resilience of your system and promote high availability. In practice, ensuring high availability is mainly about removing single points of failure and graceful failover.
Single point of failure is any piece of infrastructure that is necessary for the system to work properly. An example of a single point of failure can be a Domain Name System (DNS) server, if you have only one. It can also be a database master server or a file storage server.
A simple way to identify single points of failure is to draw your data center diagram with every single device (routers, servers, switches, etc.) and ask yourself what would happen if you shut them down one at a time. Once you identify your single points of failure, you need to decide with your business team whether it is a good investment to put redundancy in place. In some cases, it will be easy and cheap; in other cases, it may be very difficult or expensive. Especially if the system was not designed with high availability in mind, you may need to carefully consider your tradeoffs.
Redundancy is having more than one copy of each piece of data or each component of the infrastructure. Should one of the copies fail, your system can use the remaining clones to serve clients’ requests. Systems that are not redundant need special attention, and it is a best practice to prepare a disaster recovery plan (sometimes called a business continuity plan) with recovery procedures for all critical pieces of infrastructure.
Finally, if you had a system that was highly available and fully fault tolerant, you may want to implement self-healing. Self-healing is a property going beyond graceful failure handling; it is the ability to detect and fix problems automatically without human intervention. Self-healing systems are a holy grail of web operations, but they are much more difficult and expensive to build than it sounds. To give you an example of self-healing, consider failure handling in Cassandra, which is an open-source data store. In Cassandra, a data node failure is handled transparently by the system. Once the cluster recognizes node failure, it stops any new requests from being routed to the failed node. The only time when clients may be failing is during the failure recognition phase. Once the node is blacklisted as failed, clients can still read and write data as usual, as remaining nodes in the cluster provide redundancy for all of the data stored on the failed node. Whenever the failed node comes back online, it is brought up to speed with the data it missed and the system continues as if nothing happened.
In the same way, replacing a dead node with a brand-new, blank node does not require system administrators to reconstruct the data from backup, as is often necessary in relational database engines. Adding a new empty data node causes the Cassandra cluster to synchronize the data so that over time the newly added machine is fully up to date. When a system can detect its own partial failure, prevent unavailability, and fully fix itself as soon as possible, you have a self-healing system. Minimizing the mean time to recovery and automating the repair process is what self-healing is all about.
Mean time to recovery is one of the key components of the availability equation. The faster you can detect, react to, and repair, the higher your availability becomes. Availability is actually measured as mean time to failure / (mean time to failure + mean time to recovery). By reducing the time to recovery, you can increase your availability, even if the failure rate is out of your control. This may be the case when using cloud hosting services like Amazon Web Services (AWS), as cloud providers use cheaper hardware, trading low failure rates for low price. In such an environment, you need to focus on mean time to recovery, as mean time to failure is something you cannot control.
I highly recommend learning more about high availability, monitoring, and self-healing systems as your scalability experience advances. A number of great sources exist for further study.w35,w4,w7,w1,w15,w18,w27,w36,w39,w42 In Chapter 5, we’ll return to high availability to describe different storage engines and their properties.
Summary
Whether you are a software engineer, architect, team lead, or an engineering manager, it is important to understand design principles. Software engineering is all about making informed decisions, creating value for the business, and preparing for the future. Remember: design principles are your northern star, your compass. They give you direction and they increase your chances of being successful, but ultimately, you have to decide which approach is best for your system.
As a software engineer or architect, your job is to provide solutions that are the best fit for your business under constraints of limited money, time, and knowledge about the future. If you take your role seriously, you need to keep an open mind and try to consider different points of view. The “cleanest” solution is not always the best if it takes more time to develop or if it introduces unnecessary management costs. For example, the line between decoupling and overengineering is very fine. It is your job to watch out for these temptations and not become biased toward the coolest solution imaginable. Your business needs to make informed tradeoffs between scalability, flexibility, high availability, costs, and time to market. I will discuss tradeoffs that you need to learn to make more often in the last chapter of this book.
Remain pragmatic. Don’t be afraid to break the rules, if you really believe it is the best thing for your business or for your software. Every system is different and every company has different needs, and you may find yourself working in a very different context than other engineers. There is no single good way to build scalable software, but first learn your craft, learn your tools, and look for reasons to drive your decisions. The principles laid out in this chapter are a good start on your path to quality software design.