
AutoLISP Basics and Advanced Customization Tools
You may have heard of AutoLISP, Visual LISP, VBA, .NET Framework, Active X, and ObjectARX. What exactly are they? These are all programming languages, environments, and tools used, among other things, to customize and automate AutoCAD beyond what can be done by simpler methods like shortcuts, macros, and the CUI, all explored earlier in this book.
To properly discuss all these methods would take up quite a few volumes of text, and indeed much has been written concerning all of them. Our goal here is to introduce the very basics of AutoLISP and only gloss over the rest, so at least you have an idea of what they are. If advanced customization or software development work interests you, you can pursue it much further with other widely available publications.
Overview 1. Autolisp
This is really the very beginning of the discussion. AutoLISP is a built-in programming language that comes with AutoCAD and is itself a dialect of a family of historic programming languages, collectively referred to as LISP (list processing language). LISP was invented by an MIT student in 1958 and found wide acceptance in artificial intelligence among other research circles. The language and its developer, J. McCarthy, pioneered many expressions and concepts now found in modern programming.
AutoLISP is a somewhat scaled back version of LISP uniquely geared toward AutoCAD. It allows for interaction between the user and the software, and indeed one of the primary uses of AutoLISP is to automate routines or complex processes. Once the code is written, it is saved and recalled as needed. The code is then executed as a script (no compiling needed) and performs its operation.
One advantage of AutoLISP over other methods, discussed shortly, is that it requires no special training, except some familiarity with syntax, and is thus quite well suited for nonprogrammers. While it is not a compiled, object oriented language like C++or Java, and therefore not suitable for writing actual software applications, it also does not need to be for its intended use.
Overview 2. Visual Lisp
Over the years, AutoLISP has morphed into a significantly more enhanced version, called Visual LISP. More specifically, Visual LISP was purchased by Autodesk from another developer and became part of AutoCAD since release 2000. It is a major improvement and features a graphical interface and a debugger. Visual LISP also has Active X functionality (more on that later). However, Visual LISP still reads and uses regular AutoLISP, and that is still where a beginner needs to start before moving up. We briefly touch on Visual LISP and its interface (the vlide command) later on. The subject is an entire book all in itself.
Overview 3. Vba, .Net, Active X, and Objectarx
There is evidence to suggest Autodesk is moving away from using Visual LISP toward other, more advanced tools for customization and programming.
VBA (Visual Basic for Applications) is a language based on Visual BASIC, a proprietary Microsoft product. VBA allows you to write routines that can run in a host application (AutoCAD) but not as stand-alone programs. It has some additional power and functionality over Visual LISP.
.NET Framework is another Microsoft software technology that was intended as a replacement for VBA. It features precoded solutions to common programming problems and a virtual machine to execute the programs.
Active X, also developed by Microsoft, is used to create software components that perform particular functions, many of which are found in Windows applications. Active X controls are small program building blocks and are often used on the internet, such as for animations and unfortunately also for some viruses and spyware applications.
ObjectARX is the highest level of customization and programming you can do with AutoCAD, short of working on developing AutoCAD itself. Unlike the scripting-type languages and methods discussed so far, ObjectARX (ARX stands for AutoCAD runtime extension) is an application programming interface (API). Using C++, programmers can create Windows DLLs (Data Link Libraries) that interact directly with AutoCAD itself.
Everything needed to do this is part of the ObjectARX Software Development Kit, freely distributed by Autodesk. This is not easy to master, as you would expect from professional-level software coding tools. Typical users are third party developers who need a way to write complex software that interacts seamlessly with AutoCAD. ObjectARX is specific to each release of AutoCAD and even requires the use of the same compiler Autodesk uses for AutoCAD itself.
I hope this discussion gives you some insight into what is out there for AutoCAD customization. This is only a cursory overview, of course, and you can pursue these topics much further. Any journey to learn advanced AutoCAD customization, however, begins with AutoLISP; and this is where we go next to introduce some basics of this programming language.
Autolisp Fundamentals
As mentioned before, despite the proliferation of new tools, AutoLISP is still very much in use, thousands of chunks of code are still being written annually, and many are easily found online for just about any desired function. The main reason for AutoLISP’s past and present (to some extent) popularity remains the fact that AutoCAD designers are not programmers and AutoLISP is accessible enough for almost anyone to jump in and learn. The value it adds to your skill set is substantial. Let us cover some basics and get you writing some code.
AutoLISP code can be implemented in two distinct ways:
![]() You can type and execute a few lines of code right on the command line of AutoCAD. This is good for a simple routine that is useful only in that drawing.
You can type and execute a few lines of code right on the command line of AutoCAD. This is good for a simple routine that is useful only in that drawing.
![]() You can load saved AutoLISP code and execute it, usually the case with more complex and often-used routines.
You can load saved AutoLISP code and execute it, usually the case with more complex and often-used routines.
We generally use the second method of writing and saving our routines. At this stage, it is helpful to know how (and where) to save AutoLISP code and, by extension, how to load what is written.
All AutoLISP code is saved under the *.lsp extension. Once the code is written, it can theoretically be stored just about anywhere (AutoCAD Express folder contains a sizable number of built-in routines). To load the code, go to Tools→Load Application… or Tools→AutoLISP→Load Application… (or just type in appload) and the dialog box in Figure F.1 appears.
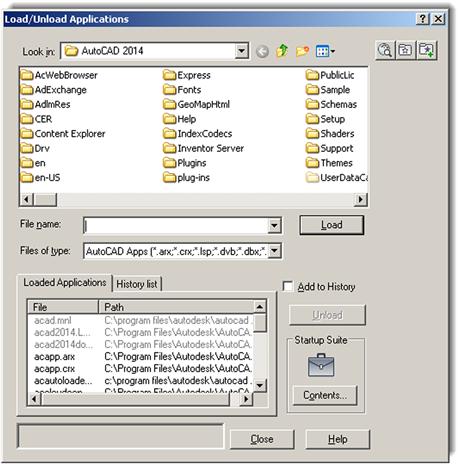
Then, you just browse around, find the AutoLISP code you are interested in, click on it, and press Load. Once loaded, you can close the dialog box; the code is ready to execute with a command input. There is a way to automatically load all existing code upon starting AutoCAD by adding it to the Startup Suite (lower right corner, the briefcase icon).
Now that you know how to save new code and where to find it, we should try writing a simple example that illustrates some AutoLISP basics. Here are two critical points that need to be understood before you begin:
![]() AutoLISP is closely tied to AutoCAD commands, so to write something useful, you need to know the commands well. If you do not know how to do it in AutoCAD manually, AutoLISP is of no use.
AutoLISP is closely tied to AutoCAD commands, so to write something useful, you need to know the commands well. If you do not know how to do it in AutoCAD manually, AutoLISP is of no use.
![]() Approach AutoLISP for an answer to a specific problem. State what you want to solve or automate, then write out the steps to do it manually. Only then, using proper syntax, write and test the AutoLISP code.
Approach AutoLISP for an answer to a specific problem. State what you want to solve or automate, then write out the steps to do it manually. Only then, using proper syntax, write and test the AutoLISP code.
Following this philosophy, let us state a problem we would like to solve. We would like to modify the zoom to extents command by having it zoom to only 90% of the screen, not 100%. That way we can see everything and nothing gets lost at the edges of the screen. How do we do this by hand, first of all?
You, of course, type in zoom, press Enter, select e for Extents, and press Enter again. The drawing is zoomed all the way. To bring it back a bit, you repeat the zoom command but type in .90x instead of e. The drawing then zooms in a bit to fill only 90% of the screen.
Let us now automate these steps so all you have to do is type in zz (a random choice for a command name; you could pick anything) instead of the two-step process just described.
We need to
1. Open up the Notepad editor (we use the built-in Visual LISP editor later).
2. Save the blank file as ZoomSample.lsp in any folder you wish.
3. Define the function zz by typing in exactly the following: (defun C:zz ().
4. List the relevant commands in order by typing in exactly the following: (command"zoom""e" "zoom" ".90x").
5. Finally add (princ) and close the expression with another ).
So, here is the final result:
(defun C:zz ()
(command "zoom" "e" "zoom" ".90x")
(princ))
Save the file again and let us run it. Open up any drawing, load the AutoLISP routine using appload or the drop-down menu and run it by typing in zz and pressing Enter. The drawing should zoom out to 90% as expected.
This simple routine has some essential ingredients of all AutoLISP code:
![]() It starts out with a parenthesis, indicating that a function follows.
It starts out with a parenthesis, indicating that a function follows.
![]() The defun or define function (an AutoLISP expression) is next followed by C, indicating it is an AutoCAD command, and finally the actual command, zz.
The defun or define function (an AutoLISP expression) is next followed by C, indicating it is an AutoCAD command, and finally the actual command, zz.
![]() The set of opening and closing parentheses can hold arguments or variables.
The set of opening and closing parentheses can hold arguments or variables.
![]() The next line features command, an AutoLISP expression meaning AutoCAD commands (in quotation marks, meaning it is a string) follow.
The next line features command, an AutoLISP expression meaning AutoCAD commands (in quotation marks, meaning it is a string) follow.
![]() The (princ) function is added so the routine does not constantly return a “nil” value.
The (princ) function is added so the routine does not constantly return a “nil” value.
![]() Finally, another, matching parenthesis closes out the program.
Finally, another, matching parenthesis closes out the program.
Here are two simple routines that I use often to rotate the UCS crosshairs to align them to some geometry (this general task was covered in Chapter 15).
The first routine does the rotation and is called perp:
(defun C:perp ()
(command "snap" "ro" "" "per" pause "snap" "off")
(princ))
The second one brings the crosshairs back to normal and is called flat:
(defun C:flat ()
(command "snap" "ro" "" "0" pause "snap" "off")
The perp and flat AutoLISP routines feature two new concepts. The first one is the pause function, which allows for user input. In this case, it is for the user to select the line to which the crosshairs are to be aligned. Then, the function resumes and turns off snap. The other concept is the two quotation marks back to back with nothing between them. They simply force an Enter.
Study these three examples closely. They are simple; many AutoLISP routines are, as that is all that is needed to get the job done. Here is what we learned so far:
Variables and Comments
Let us move on to other concepts. To take a step up in sophistication from what we did so far, we need to introduce program variables. Variables can be numbers, letters, or just about anything else that can change. The reason they are needed is because they allow for user interaction. Because user input is not known when the code is first written, a variable is used. When that information is acquired, the program proceeds accordingly. Variables are a fundamental concept in all programming.
Variables in AutoLISP can be global (defined once for the entire routine) or local (defined as needed for one-time use). Local is usually how variables get defined in AutoLISP. The function that creates variables is setq. To set a variable equal to whatever the user inputs (such as the radius of a circle), you write setq RadCircle. The next logical step with variables is to pick up on whatever the user inputs. For this we need the getstring function that returns anything the user types in.
Here is how these concepts look in practice, with the simply meaning that a new line is started.
(setq RadCircle (getstring " Circle Radius: "))
In addition to getstring are many other get functions, such as getfiled (asks user to select a file using a dialog box), getangle, and getdist.
As in any programming language, you are allowed to comment on your work, so you or someone else can understand your intent when examining the code at a later time. In AutoLISP, comments are preceded by a semicolon. You can add more than one semicolon to indicate sections or headers, of course:
;This is a comment
;;So is this
Advanced Features and the Vlide Command
We have only scratched the surface of AutoLISP, and if you enjoyed writing and running these simple routines, then consider taking a full class on this subject or reading specialized books. There is much more to learn. For example,
![]() The IF→THEN statements: This is a common feature in all of programming. If certain conditions are met, then the program does something; if not, it does something else.
The IF→THEN statements: This is a common feature in all of programming. If certain conditions are met, then the program does something; if not, it does something else.
![]() The WHILE function: Another important concept in programming. This function continues to do something until a condition is met.
The WHILE function: Another important concept in programming. This function continues to do something until a condition is met.
Finally, we come to the vlide command and the Visual LISP Editor, as shown in Figure F.2.
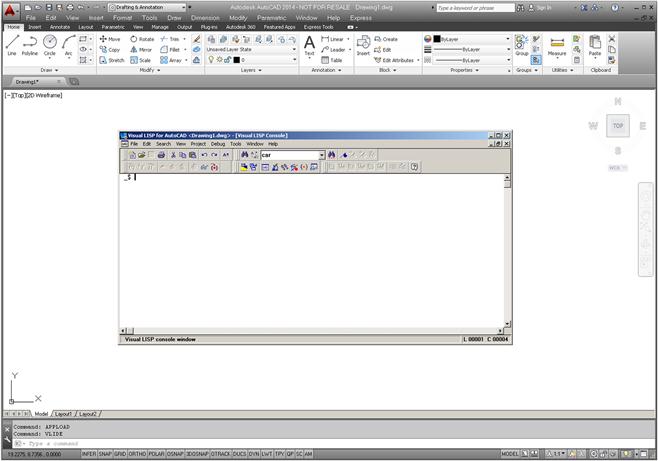
Everything you typed earlier into Notepad can be typed into the Visual LISP Editor, which has many additional useful features, such as debugging, error tracing, and checks for closed quotations and parentheses (formatting tools). Everything you type is also color coded for easy identification.
In-depth coverage of Visual LISP is beyond the scope of the book, but you are encouraged to pick up a specialized textbook and try to progress with this invaluable skill.