
Reputation-Based Detection
Abstract
The most basic form of intrusion detection is reputation-based detection. This type of detection is performed by attempting to identify communication between friendly hosts on the network you are protecting, and hosts on the Internet that are believed to be malicious based upon a reputation for malicious actions.
In this chapter, we will examine public reputation lists and several ways that reputation-based detection can be performed. This will include an overview of performing reputation-based detection with BASH Scripts, CIF, Snort, Suricata, and Bro.
Keywords
Network Security Monitoring; Detection; Intrusion Detection System; IDS; Snort; Suricata; IP; Domain; Reputation; CIF; Collective Intelligence Framework; BASH; Bro; Bro IDS; Public Reputation Lists; Malware Domain List; Zeus Tracker; SpyEye Tracker; Tor; Tor Exit Node; Spam
Chapter Contents
Common Public Reputation Lists
Abuse.ch ZeuS and SpyEye Trackers
Common Issues when Using Public Reputation Lists
Further Reducing of False Positives with Whitelists
Automating Reputation-Based Detection
Manual Retrieval and Detection with BASH Scripts
Detection of Malicious IP Addresses in Session Data
Detection of Malicious Domains in Full Packet Capture Data
The Collective Intelligence Framework (CIF)
Updating and Adding Indicator Lists
The most basic form of intrusion detection is reputation-based detection. This type of detection is performed by attempting to identify communication between friendly hosts on the network you are protecting, and hosts on the Internet that are believed to be malicious based upon a reputation for malicious actions.
By definition, reputation is a widespread belief that someone or something has a particular habit or characteristic. In the context of network defense, a host can have either a positive or negative reputation, or no reputation at all. Generally, hosts within your internal network have a positive reputation because they are trusted under the purview of your network security team. A host with a negative reputation is believed to be a potential threat to your trusted systems.
There can be several reasons that an organization will deem a host to have a negative reputation. The most common is that a publicly accessible system will be compromised and used to host malicious files, resulting in a negative reputation, as people who visit the site are often infected with some type of malware. In industries where corporate espionage is rampant, IP ranges associated with competitors may have a negative reputation because of the threat of intellectual property theft. In the realm of government and defense networks, hosts with negative reputations will often include those that are known to belong to unfriendly foreign governments, or devices that are known to have been compromised by the intelligence services of those governments.
In this chapter, we will examine public reputation lists and several ways that reputation-based detection can be performed. This will include an overview of performing reputation-based detection with BASH Scripts, CIF, Snort, Suricata, and Bro.
Public Reputation Lists
In reality, most organizations perform reputation-based detection by utilizing public lists of atomic indicators (most commonly IP addresses and domain names) with negative reputations. These blacklists are then fed into some type of detection mechanism so that analysts are alerted when a friendly hosts appears to communicate with an external device on one of these lists.
There are several benefits to using public reputation lists. First, most organizations simply don’t have the visibility to create sizable reputation lists on their own. Even with sensors spread throughout offices globally, there are limitations to the number of attacks you will see, as well as your ability to investigate them all fully. Leveraging a public list takes advantage of larger networks of sensors that report up to the groups that maintain the lists. Additionally, most lists are reasonable well maintained. A significant number of the hosts that wind up on these lists are legitimate servers that were only temporarily compromised, such as systems used in “Watering Hole” attacks where a legitimate site is compromised in order to target its users. Because of this, it is just as important that negative reputation hosts are removed from these lists once they have proven to be more reputable.
There are also some negative aspects to using public reputation lists. In a lot of cases, the maintainers of these lists don’t always provide context with the individual IP addresses or domains on the list. When an alert is generated based upon communication with a host on one of these lists, you don’t really know why the host has a negative reputation. It could be because the host was at one time referring visitors to another malicious website thanks to a temporary persistent XSS flaw, or it could be because the host is a primary node in a major botnet. Some type of context is helpful in pointing the investigation in the right direction.
Ultimately, I believe that the positives of public lists outweigh the negatives, and that the problems with them can be dealt with provided due diligence is taken in vetting the lists and controlling how the list items are utilized. You should ensure that the lists you choose to incorporate into your detection architecture are consistent with organizational goals, and that analysts are properly trained in how to assess and investigate alerts generated from this intelligence. If leveraged properly, reputation-based detection can be one of the few “easy wins” an NSM practitioner can have when it comes to finding malicious activity on the network.
Common Public Reputation Lists
There are many public reputation lists available. Here are a few of my favorites, along with some pros and cons of each, and how they can best be utilized.
Malware Domain List
Regardless of the global concerns related to targeted attacks by sophisticated adversaries, the majority of an analyst’s day will be spent investigating incidents related to malware infections on their systems. Because of this, it becomes pertinent to be able to detect malware at both the host and network level. One of the easiest ways to detect malware at the network level is to use public reputation lists that contain IP addresses and domain names that are known to be associated with malware-related communication.
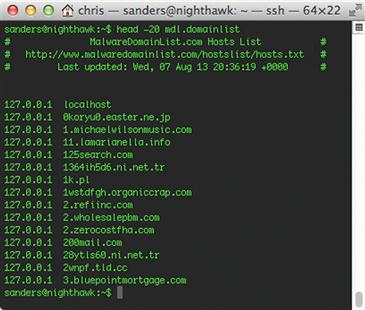
Malware Domain List (MDL) is a non-commercial community project that maintains lists of malicious domains and IP addresses. The project is supported by an open community of volunteers, and relies upon those volunteers to both populate the list, and vet it to ensure that items are added and removed from the list as necessary.
MDL allows you to query its list on an individual basis, or download the list in a variety of formats. This includes CSV format, an RSS feed, and a hosts.txt formatted list. They also provide lists that include only new daily list entries, and lists of sites that were once on the list but have now been cleaned or taken offline. MDL is one of the largest and most used reputation lists available.
I’ve seen many organizations that have had a great deal of success detecting malware infections and botnet command and control (C2) by using MDL as an input for reputation-based detection. The vastness of MDL can sometimes result in false positives, so an alert generated from a friendly host visiting an entry found on MDL isn’t enough by itself to automatically declare an incident. When one of these alerts is generated, you should investigate other data sources and a wider range of communication from the friendly host to attempt to determine if there are other signs of an infection or compromise.
You can learn more about MDL at http://www.malwaredomainlist.com.
Abuse.ch ZeuS and SpyEye Trackers
ZeuS and SpyEye are incredibly popular crimeware kits that are used by attackers to infect systems and perform a variety of malicious tasks (Figure 8.1). The kits themselves provide the ability to create malware that infects machines via drive-by download, eventually joining them to a botnet that the kit can be used to control. At one time, ZeuS was the largest botnet in the world, with SpyEye being one of its biggest competitors. Even though the creator of ZeuS announced in 2010 that he was retiring the source code, its public release has ensured that ZeuS infections remain prevalent today. SpyEye infections are also still very common, even though the creator of the software was allegedly caught and jailed in 2013.
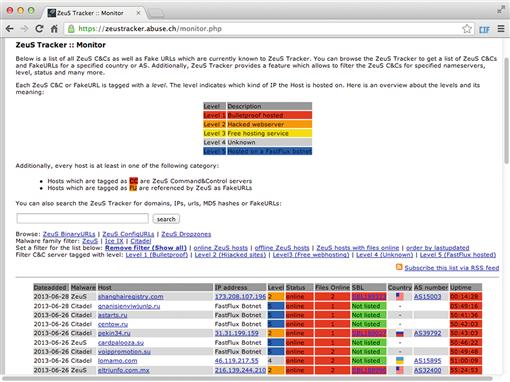
ZeuS Tracker and SpyEye Tracker are projects that track command and control servers on the Internet that are used to control Zeus and SpyEye infected machines. In addition to this, these services also track hosts that are infected with Zeus and SpyEye files, including those hosting drive-by download exploits. These lists allow for user submission, and list contents can be queried individually, or downloaded as a single list. These lists can be downloaded in a variety of formats, including by domain or IP only, or in the form of Squid, iptables, or host file block lists. They also maintain a list of recently removed entries.
I’ve found that both of these lists tend to be high quality with a minimal number of false positives when utilized for reputation-based detection. The way you handle the investigation of an alert generated by communication with a host on one of these lists depends upon the nature of the communication, and whether the friendly host appears to actually be infected with one of these types of malware.
You can learn more about the ZeuS Tracker at https://zeustracker.abuse.ch/, and SpyEye tracker at https://spyeyetracker.abuse.ch/.
PhishTank
A great number of targeted attacks begin with some type of phishing as the initial attack vector. Most organizations have more success detecting these types of compromises after this initial stage, however, the ability to know when users are being redirected to known phishing websites can be useful for early detection of an incident that is currently happening, or for a retrospective investigation of an incident that has already occurred.
PhishTank, operated by OpenDNS, is a free community-driven website that allows for the sharing of phishing related data. Once registered, users can submit links they’ve found that appear to be associated with phishing attempts. PhishTank is unique because it relies on community verification in addition to community submission. In order for any URL to appear on its list, it must be verified by a certain number of registered PhishTank users. Users who have successfully verified more URLs have more weight to their verifications, so it takes a smaller number of verifications from these more trusted users.
One especially useful feature is their web-based search that allows you to search based upon the “Targeted Brand”, or company name, that is being used for the phishing attack. If you happen to work for an organization that is frequently targeted for use in phishing schemes (such as a bank), then you can utilize the PhishTank list to derive adversaries who may be looking to prey on your customers.
PhishTank provides their list in a variety of formats, along with an API for integration with custom applications. While PhishTank doesn’t have a web-based forum, it does have open mailing lists for users and developers.
If you deploy PhishTank listings into a detection mechanism on your network, then you should pay special attention to everything that occurs immediately following a device’s initial visit to a known phishing site. Particularly, you will want to look for any additional redirections, the download of any executable content, or a user inputting their credentials into the site.
You can learn more about PhishTank at http://www.phishtank.com/.
Tor Exit Node List
Normally, when you communicate with a device on the Internet, such as a web server, your client browses directly to that device. For the web server owner, this results in the web server generating a log of the communication containing the client’s IP address. Additionally, if the web server is monitored by an NSM sensor, the client’s IP address will appear in other data sources such as packet capture data or session data.
One method commonly used to prevent a client’s true source IP address from showing up in these logs is a service like Tor. Tor is an open network that allows a user to mask their IP address so they can remain anonymous while accessing devices on the Internet.
When you browse to a web server utilizing a Tor client, your outbound traffic is routed to the Tor network instead of the destination web server. When this traffic is routed into the Tor network, it is eventually redirected to an exit node. It is the exit node that will actually initiate communication with the web server. This means that the logs generated by the web server and any NSM infrastructure will show the IP address associated with the Tor exit node rather than the actual client that initiated the communication. This process is illustrated in Figure 8.2.

If someone attempts to anonymize his or her activities while communicating with a device on your network, then this would constitute a suspicious action and might be worth investigating. With that said, plenty of individuals utilize Tor for legitimate anonymization. Traffic originating from a Tor exit node might warrant some suspicion, but this factor alone is not enough on its own to draw any sort of conclusion during an investigation.
The detection of traffic sourced from the Tor network can be accomplished by implementing a listing of Tor exit nodes into a detection mechanism. One such list exists at blutmagie.de, and can be queried from the browser or downloaded in a CSV file.
You can learn more about the Tor Exit Node list at http://torstatus.blutmagie.de/.
Spamhaus Block Lists
Spamhaus is an international nonprofit organization that is devoted to tracking spam operations and sources on the Internet. They host multiple lists, including:
• Spamhaus Block List (SBL) – A database of IP addresses from which Spamhaus does not recommend accepting e-mail.
• Exploits Block List (XBL) – A database of IP addresses of hijacked systems infected by third party exploits, including open proxies, worms/viruses with built-in spam engines, and other types of exploits.
• Policy Block List (PBL) – A database of end-user IP address ranges that should not be delivering unauthenticated SMTP e-mail to any Internet mail server except those provided for specifically by an ISP for that customer’s use. This essentially prevents hosts that shouldn’t be sending mail from doing so. This is primarily used to help networks enforce their acceptable use policies.
• Domain Block List (DBL) – A database of domains found in spam messages.
• Don’t Route or Peer (DROP) – A listing of hijacked network blocks of IP space that are directly allocated to spam hosting operations. These are blocks of IP addresses that are typically forgotten about by network owners that get reclaimed by spammers through a variety of techniques including the registration of abandoned domain names to accept point-of-contact e-mails, or by document forgery or social engineering tactics. Spamhaus also provides an Extended DROP (EDROP) list, which contains everything in the DROP list, as well as IP addresses that it believes to be more generally associated with cyber crime, but not directly allocated to spam distributors.
The SBL, XBL, PBL, and DBL lists are available for free for non-commercial use. If you don’t meet these criteria, then you are required to purchase a subscription to these services. The DROP and EDROP lists, however, are free for use, which makes them good candidates for inclusion in reputation-based detection systems. The DROP/EDROP lists are well maintained as well, so they can be useful for detection of internal hosts who are communicating with known spam hosting systems.
Of particular interest is the DROP list’s integration with the Emerging Threats (ET) signature repository. ET maintains a set of Spamhaus DROP list detection signatures for use with either the Snort or Suricata intrusion detection systems. This really simplifies the implementation of this list.
While it isn’t entirely fruitful to utilize these lists to detect incoming spam, it might be worth knowing if a friendly host (other than a mail server) is communicating with systems that fall into the ranges typically used by spammers.
You can learn more about the Spamhaus lists at http://www.spamhaus.org/drop/.
Other Lists
A plethora of other IP and Domain reputation lists are available. In fact, there are far too many to cover in this book. Others public lists you might want to look into include:
• AlientVault Labs IP Reputation Database: http://labs.alienvault.com/labs/index.php/projects/open-source-ip-reputation-portal/
• MalC0de Database
http://malc0de.com/database/
• SRI Malware Threat Center
http://www.mtc.sri.com/live_data/attackers/
• Project Honeypot
https://www.projecthoneypot.org/list_of_ips.php
• Emerging Threats Rules
http://www.emergingthreats.net/open-source/etopen-ruleset/
Common Issues when Using Public Reputation Lists
While reputation-based detection can often be considered an “easy win,” a few common pitfalls are associated with detecting malicious activity based upon communication with systems that have negative reputations.
Automatic Blocking
It is generally never a good idea to utilize public blacklists in conjunction with automated blocking or intrusion prevention software without some form of manual vetting. This can lead to unintentional blocking of legitimate sites, or even potentially causing a denial of service condition on your network.
In one famous case, the US Navy enabled automatic blocking of hosts based upon a third-party reputation list that wasn’t fully vetted. When this was turned on, the entire Navy found itself blocked from accessing a number of legitimate websites, including Google.
In another example, an organization was ingesting a public reputation list directly into its internal DNS servers in order to attempt to block access to malicious domains by redirecting name queries for them. This worked fine, until one day the list they were ingesting was populated with the company’s own mail server. The result was that no users were able to send and receive mail, and it took the network administrators quite a while to figure out what was causing the problem.
There is nothing more embarrassing than causing a scenario like one of these in your own organization. Because of this, you should stick to using public reputation lists with detection-only mechanisms.
Pruning of Lists
It is very common for Internet-facing servers to become compromised and temporarily used for the distribution of malware or other malicious content, ultimately resulting in the server’s IP address or domain name being added to a blacklist. When this happens, usually the owners of these systems will eventually find out they have been compromised, and they will clean up the system. When this happens, the server isn’t always removed from the blacklist in a timely manner. As a result, false positive alerts are generated for communication to this server.
These types of false positives are common, and are something you can never truly get away from when performing reputation-based detection. However, you should do your best to minimize these types of false positives so that you don’t waste analysis time. The best way to do this is to ensure that the lists you are ingesting are as judicious about removing hosts from their lists as they are about adding them. Additionally, you should ensure that you pull updated lists from their sources on a frequent basis. I’d recommend doing this at least daily. There are a number of ways to automate this process, which we will look at later in this chapter.
Shared Servers
It is incredibly common for IP addresses of shared servers to end up on public blacklists. In this scenario, a domain associated with a single user of a shared server, often one provided by an ISP or hosting provider, has become compromised and is hosting some type of malicious logic. The problem is that rather than the individual domain ending up on a blacklist, the IP address of the server is added. This means that whenever users visit another website hosted on this shared IP address, they will generate an alert when no malicious activity is actually occurring. This can be responsible for a large number of false positives.
With that said, if one website on a shared web server is compromised, it greatly increases the probability that other websites on that server are also compromised. With no additional context, you should still investigate every alert. If you start to find shared servers that appear on these lists because of issues that wouldn’t affect all of the hosts on the server, such as cross-site scripting (XSS), then you might consider removing the IP address entry from the blacklist, and replacing it with an entry specific to the domain that is actually exhibiting malicious logic.
Advertising Networks
Advertising networks allow their customers to submit ad code that is automatically placed onto the websites of the network subscribers. This is a huge industry, and it is how a lot of websites generate revenue. This appeals to attackers because it allows them to attempt to place malicious code into advertisements and have the ads distributed to popular websites automatically by the ad network. While most ad networks perform a review process that eliminates this practice, not all of them do, and sometimes attackers are able to subvert or slip through these processes.
This practice can result in domains associated with advertising networks being placed onto public blacklists. When this occurs and you are performing detection based upon a public blacklist, it will result in an alert being generated every time a user is presented with an advertisement from the ad network, whether it is malicious or not. This can be responsible for a massive number of false positives. If you don’t believe me, try checking your organization’s web logs for requests to the akamai.com or scorecardresearch.com domains, which both belong to major advertising networks. You will find that they are utilized by a large number of popular websites.
The most practical way to eliminate the excessive number of false positives generated by advertising networks is to remove any reference to these networks from the blacklists you are ingesting. These ads generally don’t contain any malicious code, but rather, contain code that redirects the user somewhere else that contains the real malicious logic. It’s better to rely on other detection mechanisms at this point, rather than having to deal with all of the false positives that could be generated otherwise.
Further Reducing of False Positives with Whitelists
We’ve only talked about lists containing indicators with negative reputations (blacklists) to this point. However, there is merit to incorporating lists of indicators with positive reputations (whitelists) into your network as well. While blacklists can yield very positive results when paired with a detection mechanism, they are prone to false positives, especially when the lists aren’t vetted well.
One tactic that can effectively minimize the amount of false positives associated with reputation-based detection is use of the Alexa Top Sites list as a whitelist. Their Top Sites list contains the top 1,000,000 visited sites on the Internet. This list can be pruned down to the top 100-500 sites, and then those results can be used in conjunction with blacklists to ensure that none of these whitelisted websites will trigger an alert if they are found on the blacklists. It is possible that one of these sites could become infected with some type of malware, but the chance of that occurring is small, and if it does occur, it is likely that the companies supporting the sites will quickly mitigate the infection.
Automating Reputation-Based Detection
To perform reputation-based detection, you need two components. First, you need at least one list of IPs or domains with negative reputations. We’ve already covered several of the publicly available blacklists, but this can also be supplemented with private, industry-specific, and internal lists. Once you have at least one list, you must feed the contents of that list into some type of mechanism for performing detection based upon the entries in the list. There are several options for automating and accomplishing these tasks.
Manual Retrieval and Detection with BASH Scripts
The rest of this chapter will be devoted to using various free and open source tools for reputation-based detection. All of these tools can be effectively used in most organizations, but with that said, this provides the perfect opportunity to demonstrate just how simple reputation-based detection can be. It is so simple, in fact, that you can utilize basic Linux BASH scripting to interact with collected data to accomplish the entire process. In these next few examples, we will use BASH scripts to download and parse a public reputation list, and then use that list to detect malicious domains and IP addresses in network traffic.
Download and Parsing a List
As I stated above, the first thing you need to begin performing reputation-based detection is a list of things that are reputed to be bad. In this case, we will take one of the more popular public lists, Malware Domain List. MDL maintains both a domain and IP list, and we want to get both of them. Ultimately, we want each list to reside as a text file with entries delimited by new lines.
The IP address list can be downloaded using curl with the following command:
curl http://www.malwaredomainlist.com/hostslist/ip.txt > mdl.iplist
The greater than symbol (>) is used to redirect the output of the command to the file named mdl.iplist. If you examine this file, everything will look as you might expect. However, in order for us to parse the list properly later, we have to address one discrepancy.
If you run the command “file mdl.iplist,” the tool will tell you that the file we’ve just created is of the type “ASCII text, with CRLF line terminators.” Windows-based operating systems represent a new line with both the line feed ( in ASCII or 0x10 in hex) and carriage return ( in ASCII or 0x0D in hex) characters. Unix-based operating systems represent a new line with only the line feed character. If we attempt to parse this file using Unix-based tools, the addition of the CR character at the end of every line will result in unexpected output.
There are several ways that the CR character can be stripped from each line in the file, but the easiest is to use the dos2unix utility. If dos2unix is not natively installed on the distribution you are using, it can be installed easily from most standard repositories (apt-get install dos2unix, yum install dos2unix, etc). We can pipe the output of the curl command directly to this utility before writing the output to a file. Our modified command looks like this:
curl http://www.malwaredomainlist.com/hostslist/ip.txt | dos2unix > mdl.iplist
Now we need to accomplish the same task with the list of malicious domains from MDL. This command will initially look very similar (Figure 8.3):
curl http://www.malwaredomainlist.com/hostslist/hosts.txt | dos2unix > mdl.domainlist
If you run this command and then open the mdl.domainlist file, you will notice a few problems. At the top of the file, there are some extra lines of text, along with some blank lines that need to be removed. If we attempt to parse the file in its current state, those lines will generate errors. We can get rid of them by using sed, and instructing it to remove the first six lines of the file:
curl http://www.malwaredomainlist.com/hostslist/hosts.txt | sed ‘1,6d’ | dos2unix > mdl.domainlist
Next, notice that each line has two values, with the first column containing the loopback IP address 127.0.0.1, and the second column containing the actual domain. This list is presented in this format so that the list can be easily copied and pasted into a host’s file for redirection of requests to these hosts. This isn’t something we are using the list for right now. This can be done by using awk to select only the data in the second column.
curl http://www.malwaredomainlist.com/hostslist/hosts.txt | sed ‘1,6d’ | awk ‘{print $2}’ | dos2unix > mdl.domainlist
The resulting output of this file is shown in Figure 8.4.

We should now have two properly formatted files containing IP addresses and domains that we can use for detection. These lines can be placed into a single script, which can be run at a regular interval in order to ensure the lists are kept up to date. I’d recommend using a CRON job to schedule a new download of this data at least once per day. The following entry into /etc/crontab will run the update script once per day at 6:30 AM.
30 6 * * * /home/sanders/GatherMDL.sh
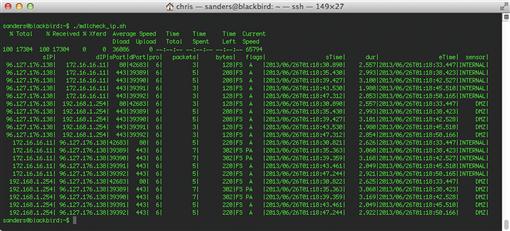
Detection of Malicious IP Addresses in Session Data
With lists in hand, now we want to attempt to detect any communication between hosts on our network and hosts in the list of IP addresses from MDL. One of the most efficient ways to do this is to leverage session data. We will write a short script to perform detection leveraging SiLK.
First, we need to establish the time frame to examine. In this case, we will examine all traffic occurring within the past hour. We can use the date command to get the current date and time, as well as the date and time an hour ago. These will be set to variables.
start = $(date -ud '-60 minutes' + %Y/%m/%d:%T)
endd = $(date -ud + %Y/%m/%d:%T)
Next, we must take the line delimited list of IP addresses we generated earlier, and convert that into an IP set that can be iterated by SiLK’s rwfilter tool. This is done with the rwsetbuild command. Here, we provide rwsetbuild with the name of the input file, and the name of the output file, which is mdl.domainlist.set:
rwsetbuild mdl.iplist mdl.iplist.set
Finally, we can use rwfilter to perform a query for any records matching the IP addresses in the list within the past hour. The command is:
rwfilter –start-date = $start –end-date = $end --anyset = mdl.iplist.set --proto = 0-255 --type = all --pass = stdout | rwcut
This command utilizes several of the same rwfilter options we examined in Chapter 4, along with the variable names created earlier as the value for that the --start-date and --end-date options. The --anyset option is where the input file is specified.
These elements combined will result in the following completed script:
#!/bin/bash
start = $(date -ud '-60 minutes' + %Y/%m/%d:%T)
end = $(date -ud + %Y/%m/%d:%T)
rwsetbuild mdl.iplist mdl.iplist.set
rwfilter --active-time = $start-$end --anyset = mdl.iplist.set --proto = 0-255 --type = all --pass = stdout | rwcut
This output of this script is shown in Figure 8.5.
Detection of Malicious Domains in Full Packet Capture Data
Our next task is to attempt to detect any communication that is occurring between friendly hosts and potentially malicious domains found in the list that was pulled down from MDL. This data won’t be found in session data, so instead, we will look to packet capture data.
This process will be a bit more involved than examining IP address with rwfilter, so we will be relying on BASH functions to organize each process. Before writing the first function, we need to tell the script that we will provide the PCAP file to parse as an argument within the command line when the script is executed. This is done with the statement:
pcapfile = $(echo $1)
The first function we will build utilizes Justniffer (discussed in Chapter 6) to parse the supplied PCAP file and extract all of the domain names found within HTTP communication occurring over TCP port 80 to a separate file called temp.domains:
ParsePCAP() {
justniffer -p “tcp port 80” -f $pcapfile -u -l “%request.timestamp - %source.ip - > %dest.ip - %request.header.host - %request.line” > temp.domains
}
Next, we can write the function that will actually examine the contents of the temp.domains file for matches from the MDL domain list using grep in a while loop. The output will display the portion of the HTTP request containing the match. The sed statement is used to add text to the end of the request that states what domain generated the match. In addition to outputting matches to the console, the tee command is used to output matches to a file called alert.txt.
DetectMDL() {
while read blacklistterm; do
grep -i $blacklistterm temp.domains | sed “s,$, - Match:$blacklistterm,g"| tee -a alert.txt
done < “mdl.domainlist”
}
We can combine these functions into a single script, along with an additional function that cleans up the temporary file generated while parsing the PCAP:
#!/bin/bash
pcapfile = $(echo $1)
ParsePCAP() {
justniffer -p “tcp port 80” -f $pcapfile -u -l “%request.timestamp - %source.ip - > %dest.ip - %request.header.host - %request.line” > temp.domains
}
DetectMDL() {
while read blacklistterm; do
grep -i $blacklistterm temp.domains | sed “s,$, - Match:$blacklistterm,g"| tee -a alert.txt
done < “mdl.domainlist”
}
CleanUp() {
rm -rf temp.domains
}
ParsePCAP
DetectMDL
CleanUp
Exit
The final output of this script is shown in Figure 8.6.

The scripts shown here are very basic, and could be improved in a lot of ways. This includes:
• The ability to parse an entire directory instead of just a single PCAP file
• The ability to perform both strict and loose match checking
We’ve provided a more full featured version of these scripts in a tool called Scruff, which can be found at http://www.appliednsm.com/scruff.
The Collective Intelligence Framework (CIF)
The Collective Intelligence Framework (CIF) is a cyber threat intelligence management system developed by Wes Young at REN-ISAC. CIF allows analysts to define lists to ingest, and then automatically pulls in those lists on a regular basis. This data is then normalized and stored in the CIF database. Once this data is stored, it can be queried with CIF, or used in conjunction with a post process script to be deployed to a detection mechanism.
CIF comes with the ability to ingest several lists out of the box, including the Zeus/SpyEye tracker, the Spamhaus DROP list, and many more. Beyond that, it also provides the ability to write extensions so that you can parse lists that aren’t preconfigured with the software. Once you’ve ingested these lists, you can utilize output plugins to send these indicators to whatever detection mechanisms you have in place.
CIF is not included by default in Security Onion. If you’d like to follow along with the examples in this chapter then you can install it by following the instructions at https://code.google.com/p/collective-intelligence-framework/wiki/ServerInstall_v1.
Updating and Adding Indicator Lists
When you’ve installed CIF, the first thing you should do is issue commands that will force CIF to populate its database with entries from the lists it is already configured to parse. These are broken into two groups, hourly and daily. The lists in the hourly grouping are updated once every hour, and the lists in the daily grouping are updated once every day. First, you should update the hourly list with the command:
cif_crontool -d -p hourly
Next, you should update the daily lists, which are much larger. This could take quite some time depending upon your available bandwidth and the performance of the system you have CIF installed on. The command for the daily update is:
cif_crontool -d -p daily
Once completed, the CIF database should be populated with results from all of its preconfigured reputation lists.
CIF also provides a framework for ingesting and parsing additional lists, which comes in handy if you would like to utilize a reputation list that isn’t already included with CIF. This is especially useful if you utilize a private reputation list that isn’t publicly available, or isn’t hosted on the Internet. CIF allows for parsing data in delimited or non-delimited text files, XML files, JSON files, and more.
The existing feed configuration files can be examined for examples of how to pull custom feeds into CIF. Figure 8.7 shows the configuration file used to ingest the list from malwaredomains.com, which are in a delimited text file.

The configuration for this type of feed is fairly minimal. The first section of the configuration file identifies the location of the feed and sets several default values such as a confidence rating for the list (65) and an assessment value for classifying the indicators (malware). The second section of the configuration identifies how the values in the delimited text map to columns in the CIF database, how the text file is delimited, and how often the list should be updated. In this case, the text file is delimited by a tab and a form feed character ( |f), and the list is update daily.
You can read more about creating custom feed configuration files for varying data types on the CIF website.
Querying Indicators
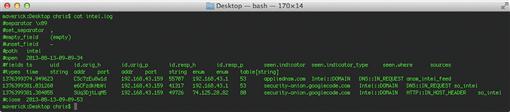
With CIF intelligence at our fingertips, we need the ability to query this data. There are two ways that data can be queried; the CIF Perl client and the web interface. The Perl client is the default mechanism for interacting with CIF data and the most stable. Using the CIF command, we can query for any indicator type that might be found within the CIF database. For example, if we wanted to perform a query for an IP address that we suspect to be associated with malicious activity, the following command will accomplish this:
cif –q 112.125.124.165
The –q command specifies a basic query of all CIF data available. CIF also allows you to search for IP address ranges using CIDR notation, such as 112.125.124.0/24. The results of this command are shown in Figure 8.8.
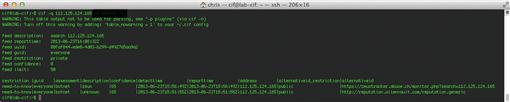
In this output, we can see that the IP address in question appears in both the Zeus Tracker and Alientvault Reputation lists, classified as being part of a botnet. The output provides a URL for both of these reputation lists so that you can get more context from the indicator. The output also provides information on restrictions and confidence associated with the indicator. These values are all configurable within the CIF configuration, as some lists are given a default restriction and confidence value.
If you run this command a second time, you will notice that an additional entry appears in the list with “search” listed under the assessment heading. Whenever someone searches for a particular indicator with CIF, it logs the search and will output this data in the search results. This is useful for knowing if other analysts are searching for the same indicator. In some cases, you may find that a particular indicator you are concerned about doesn’t show up in any public reputation lists, but that multiple analysts within your group are searching repetitively for the same indicator. This probably means that activity associated with this indicator warrants further investigation if so many people suspect mischief. In the case of Figure 8.9, the output of the CIF query shows an indicator that has been searched for multiple times.

If you’d like to suppress the output of entries that are generated from user queries, you can use the –e flag. This flag will allow you to specify any assessment type you do not want included in the query results. In this case, you could suppress search entries by appending “-e search” to the query.
Deploying Indicators
One of my favorite features of CIF is the ability to create and utilize custom output plugins. These plugins allow you to output indicators contained within the CIF database to a format that is useful for deployment with various detection mechanisms. Currently, CIF supports the ability to output data to a variety of formats, including CSV files, ASCII tables, HTML tables, Iptables firewall rules, PCAP filters, Snort rules, and Bro input.
Be default, CIF will output results to a table format so that they can be read easily from a terminal window. If you’d like to use one of these other formats, you can the –p flag. If we wanted to output the results of our previous query to a Snort rule for detection, we would use the command:
cif –q 112.125.124.165 –p Snort
This command will output a Snort rule for each entry in the search output, which is shown in Figure 8.10.

When utilizing CIF output to generate items like Snort rules, you should always double check the rules before deploying them to make sure they are optimized for performance and configured in a manner consistent with the standard you are using for deploying other IDS signatures within your organization. For instance, by default, CIF-generated Snort rules are only configured to detect traffic going to the listed IP addresses. In a lot of cases, you may want to reconfigure these rules to detect traffic to or from these addresses. Making this adjustment is pretty easy, and is addressed in the discussion of Snort Rules in the next chapter.
CIF is still in its infancy and isn’t without a few quirks, but it represents a great deal of potential. The community support for the project has grown tremendously, with a great deal of users contributing configurations for a variety of list feeds and output plugins. I’ve also seen several use cases where organizations are using CIF to successfully manage their reputation-based detection capabilities. If you’d like to learn more about CIF, you can do so at the project website here: https://code.google.com/p/collective-intelligence-framework/.
Snort IP Reputation Detection
Snort is one of the world’s most popular signature-based IDS. We will talk about Snort in great detail in the next chapter, but for now we are going to look at its reputation-based detection capabilities by using its reputation preprocessor for detection of communication with potentially malicious IP addresses.
In the past, reputation-based detection for IP addresses with Snort was done with standard rules. In order to address performance concerns with that method, the reputation preprocessor was developed. This preprocessor runs before all of the other preprocessors, and does so in an efficient manner so that large lists of IP addresses can be managed.
The reputation preprocessor is enabled in Snort on Security Onion, but alerting for it is not. Before adding entries to the reputation preprocessor blacklist, we should enable alerting. In order to do this, you should first create a file called preprocessor_rules in the /etc/nsm/rules directory of your SO sensor. This rule should contain the following rule to allow for alerting of reputation preprocessor events:
alert ( msg: “REPUTATION_EVENT_BLACKLIST"; sid: 1; gid: 136; rev: 1; metadata: rule-type preproc ; classtype:bad-unknown; )
Next, the Snort configuration must be modified to enable parsing of the preprocessor rule file that we just created. This is done by editing /etc/nsm/sensor_name/snort.conf, and uncommenting this line:
include $PREPROC_RULE_PATH/preprocessor.rules
Now, the only thing remaining is adding IP addresses to the reputation preprocessor blacklist. This file can be found at /etc/nsm/rules/black_list.rules. The file accepts both individual IP addresses, and IP address ranges in CIDR notation. You can also specify inline comments by appending the comment after the pound sign (#) following the IP entry. In order to test the preprocessor, you can add the following entry:
192.0.2.75 # Test Address
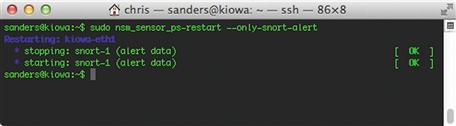
In order for these changes to take effect, you should restart Snort on the sensor, as shown in Figure 8.11.
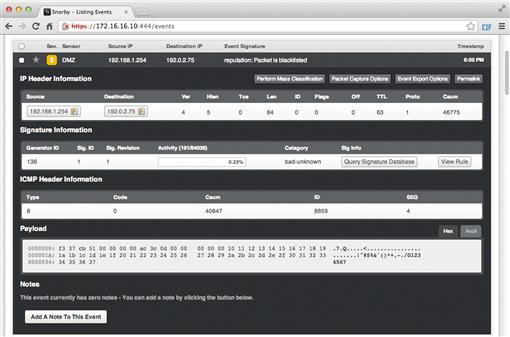
In order to test the newly created rule, you can simply ping the address 192.0.2.75 from Security Onion itself, or from another device being monitored by it. Figure 8.12 shows an example of this rule generating an alert.
You can add a large number of IP addresses to the black_list.rules file without negatively affecting sensor performance. Since the alerts generated from this preprocessor aren’t too verbose, you should make it a habit to add contextual comments regarding the indicators in the black list file so that analysts can reference this when an alert is generated.
Snort’s reputation preprocessor doesn’t have a lot of bells and whistles, but if you are already using Snort in your environment it makes it incredibly easy to implement reputation-based detection of IP addresses with only a few small changes. Unfortunately, this processor only handles IP addresses. If you would like to perform detection of communication with malicious domains using Snort, then you can use standard Snort rules, which are discussed in Chapter 9. Unfortunately, using standard rules for detection of a large number of malicious domains doesn’t scale entirely well. You can read more about Snort’s reputation preprocessor and its various configuration options at http://manual.snort.org/node175.html.
Suricata IP Reputation Detection
Suricata is rapidly gaining popularity as an alternative to Snort for signature-based detection. This is primarily because of its ability to inspect traffic in a multithreaded manner, which makes it preferable for monitoring high throughput connections. It also utilizes the same rule syntax as Snort, so rules are portable between the two. We will examine Suricata in depth in Chapter 9, but for now we will look at Suricata’s version of an IP reputation detection engine. It may help you to read that chapter first in order to gain a better understanding of how Suricata functions, and then come back to read this section.
Suricata’s IP reputation capability functions in a manner that is designed to optimize the processing of a large number of entries. This works by utilizing the same API that is used for tagging and thresholding. To enable this functionality, you must first modify the Suricata.yaml configuration file. The following section is used to enable IP Reputation capabilities:
# IP Reputation
reputation-categories-file: /etc/nsm/sensor-name/iprep/categories.txt
default-reputation-path: /etc/nsm/rules
The first item defined in this configuration is the reputation categories file. Categories allow you to organize lists and their alerts into manageable units. The categories file requires that you specify a unique id number for the category, a category name, and a description. Typically, categories will be organized by list source. These must take the format:
< id >,<short name >,<description >
An example category file might look like this:
1,ZeusTracker,Zeustracker IP Addresses
2,SpyEyeTracker,SpyEye Tracker IP Addresses
3,MDL,Malware Domain List IP Addresses
4,Watchlist,Internal Watch List IP Addresses
Next, you must define the default-reputation-path, which is the directory that contains reputation list files. In the case of the example above, we’ve chosen to place these files in the same directory that Security Onion stores Suricata/Snort IDS rules.
The last configuration item that is required is to define the actual list files to be parsed by Suricata. These files must exist within the default reputation path. The entries within these files must match the format:
< IP >,<category >,<confidence >
This format requires the IP address be in standard dotted-quad notation. In addition to this, the category number specified must exist in the category file mentioned earlier. Finally, you must include a numerical confidence value. An example reputation list file could look like this:
192.0.2.1,1,65
192.0.2.2,1,50
192.0.2.3,2,95
With IP reputation configured, all that remains is to create alerts so that analysts can be notified whenever communication with one of these IP addresses is detected. This is accomplished by adding a rule that utilizes the iprep directive. The iprep directive itself takes four options:
• Traffic Direction (any/src/dst/both): Used to specify the direction of the traffic to/from the IP.
• Category (Short Name): The short name of the category that you are attempting to match. The short name must match exactly what is listed in the categories file.
• Operator (>,<,=): The operator used in conjunction with the reputation value specified.
• Confidence Value (1-127): Will restrict matches to only those with confidence matching the operator and value specified.
This directive can be combined with any other features that might normally be used in a Suricata rule, allowing for a great deal of flexibility. However, the addition of any additional features such as content matching will decrease the speed in which IP reputation rules operate. A rule that only uses the iprep directive is an IP-only rule, and is the fastest way to implement a large number of IP reputation rules.
An example of a very basic IP-only rule is:
alert ip any any - > any any (msg:"IPREP Malware Domain List – High Confidence"; iprep:dst,MDL,>,75; sid:1; rev:1;)
This rule will generate an alert whenever outbound communication is detected to an IP address listed on the MDL list, whose confidence value is greater than 75. An example alert generated by this rule is shown in Figure 8.13.

Suricata has the ability to parse a large number of IP addresses using this method. I’ve heard of organizations testing this capability with up to a million addresses in lists being used with IP-only rules. Suricata is a very solid and efficient choice for reputation-based detection of IP addresses.
Reputation Detection with Bro
The Bro IDS is easily one of the most powerful and flexible NSM detection tools available. We will talk about harnessing this power in depth in Chapter 10, but for now let’s have a quick tour of Bro’s reputation-based detection capabilities.
Bro is extremely well suited for the detection of several types of indicators, such as IP addresses, domains, email addresses and SSL certificates, using its built-in intelligence processing features collectively known as the intel framework. Table 8.1 lists the data types supported by the intel framework and what Bro calls them in its scripting language. We will confine ourselves the IP addresses, domains and email addresses for the purposes of this example.
Table 8.1
Data Types Supported by the Bro Intel Framework
| Data Type | Bro Name | Description |
| IP Address | Intel::ADDR | An IPv4 or IPv6 address or CIDR block |
| URL | Intel::URL | The complete URL, with the “http://” or “https://” prefix removed |
| Software Name | Intel::Software | The name of a specific piece of software |
| Email Address | Intel::EMAIL | An email address |
| Domain Name | Intel::DOMAIN | A full domain name, including any subdomains |
| User Name | Intel::USER | A user name |
| MD5, SHA-1 or SHA-256 File Hash | Intel::HASH | The hash of a file object (depends on the Bro File Analysis Framework) |
| SSL Certificate Hash | Intel::CERT_HASH | The SHA-1 hash of a specific SSL certificate |
The intel framework integrates closely with Bro’s extensive library of protocol parsers. Loading an indicator into the intel framework is “fire-and-forget.” If Bro ever sees that indicator while processing any of the protocols it knows how to decode, it will log it, no matter how many layers of tunnels or encodings it has to roll back. This makes the intel framework one of the most powerful and flexible indicator detection solutions available. It is also incredibly extensible, so with a little Brogramming (yes, that’s a word now!) you can add your own indicator types and have Bro look for them as well.
In order to configure the intel framework, first you must create an input file that lists all your indicators, which is a simple tab-delimited text file. The first line is mandatory (even though it looks like a comment) and describes the fields in the lines that follow. Figure 8.14 shows the format of a sample input file. Bro is very picky about the format of this file, so be sure you separate the fields with one and exactly one tab, and that there are no blank lines.

Each line of data starts with the actual indicator value and its data type (according to Table 8.1 above). Although all of the remaining fields must be present in each line of data, their values are optional. If you don’t wish to specify a value, just use a dash (“-”) for that field.
The “meta.source” field is a place for you to name the intel feed that this indicator came from. The name can include spaces and punctuation, but no tabs. Depending on your intel management infrastructure, this could also be a database key or a URL into a web-based intel application. If the indicator shows up in traffic, Bro will log that data, and include the value of the source field in the log for a bit of context.
The “meta.do_notice” field is a Boolean, which can be either “T” (True) or “F” (False). It controls whether you want to also output any matches for that indicator to the Bro notice.log file. Notices are Bro’s way of drawing extra attention to an event, even though it may already be logged somewhere else. We’ll discuss notices and why you may want to do this in more detail in Chapter 10.
The “meta.if_in” field allows you to restrict notice logging to only certain contexts (e.g., “only if it appears in the HTTP Host: header”). No matter what you put here, the intel framework still logs all matches, it just doesn’t create notices unless this condition matches. This may be useful, for example, when your intel says that the indicator is specifically related to HTTP traffic. If you see the indicator in DNS and Email traffic, Bro will still create entries for that activity in intel.log, but no notices will be created, since you’re less concerned with activity in those contexts.
There are several ways to populate this list. If you are using CIF, then there is an option to output data in a format that is digestible by the Bro intel framework, so this is typically the easiest route. Alternatively, you could write your own script that will output list entries in this format. In order to test this functionality, we can just create entries by hand.
Now that we have a data file with our reputation data in it, we must deploy this file and a Bro script to load it up into the intelligence framework. The default installation of Bro keeps its configuration and script files in /usr/local/bro/share/bro, but the version of Bro included with Security Onion keeps its data files in /opt/bro/share/bro/site, so we’ll use that. You can begin by creating a subdirectory there called Reputation, so that you can copy your data file there as /opt/bro/share/bro/site/Reputation/reputation.dat.
Next, you will need to add a few lines of code to Bro’s default startup file, /opt/bro/share/bro/site/local.bro. Edit that file to include the following:
Chapter 10 will provide a lot more background that will be helpful for understanding Bro scripting in detail, but the code above should be reasonably decipherable as it is written. This code loads two Bro script modules from the intel framework (seen and do_notice), then adds your new intel data file to the (initially empty) list of data files it will read in when Bro starts. The framework handles everything else automatically. In fact, should you ever need to add or remove entries from your reputation list, you can just edit the reputation.dat file appropriately. Bro is smart enough to automatically notice the changes and update its internal state.
Finally, we need to let the running Bro know that we’ve changed its configuration by doing the following:
1. Execute broctl check – This will check the code for any errors.
2. Execute broctl install – This will install the new script
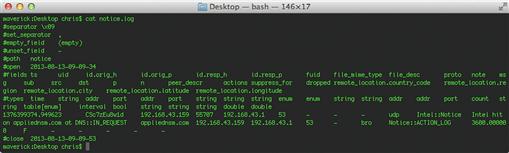
With these changes made, you should be up and running. Whenever Bro observes any of the indicators listed in your data file, it will log this output to /usr/local/bro/logs/current/intel.log (default Bro installation) or /etc/nsm/bro/logs/current/intel.log (Security Onion). In addition, if you set the meta.do_notice on any of those indicators, those hits will also generate entries in the notice.log file in the same directory. An example intel.log file is shown in Figure 8.15.
We’ll explain Bro’s logging in more detail in Chapter 10, but for now, it’s easy to see in the Intel log that someone did a DNS look up for appliednsm.com and visited the Security Onion web site on Google Code. Since the reputation data file specifies that indicator hits for appliednsm.com should also result in notices, the DNS activity for that domain also shows up in notice.log, as shown in Figure 8.16.
For demonstration purposes, we’re reading all this log output in raw format directly from the files, but in a production environment, they would probably be exported to some log management utility for alerting, like ELSA or Log Stash. Regardless of how you choose to view this data, Bro is an incredibly effective way to perform reputation-based detection.
Conclusion
Reputation-based detection is one of the “easy wins” in NSM because it is so simple to accomplish effectively, and it always yields positive results. If you are just starting to build your NSM capability, then reputation-based detection is the easiest way to get the most bang for your buck right out of the gate.
In this chapter we discussed the importance of reputation-based detection, along with multiple sources for public reputation lists. We also looked at several methods for automating reputation-based detection, including the use of basic BASH scripting and the use of the Collective Intelligence Framework. We also looked at how Snort, Suricata, and Bro could be used for effective detection of potentially malicious communication with suspect IP addresses and domains. In the next few chapters we will take a much harder look at Snort, Suricata, and Bro, which will help extend your knowledge of these platforms.