
The Bro Platform
Abstract
NSM is all about bringing network data together to provide context for detection and analysis. Most NSM systems already integrate the “big three” sources (IDS alerts, session data, full packet capture data), but as we’ve already seen in this book, these are not the only data sources you can use. One particularly rich source of this data is Bro. This chapter will provide a review of the Bro architecture, the Bro language, and several practical cases that demonstrate the truly awesome power of Bro as an IDS and network logging engine.
Keywords
Network Security Monitoring; Bro; IDS; Darknet; Log; Notice; File Carving
Chapter Contents
Creating Custom Detection Tools with Bro
Extracting Files in Live Network Traffic
Using Bro to Monitor the “Dark” Side
Overriding Default Notice Processing
Generating E-mail Notices from Darknet Events
Suppressing, E-mailing, and Alarming - the Easy Way
NSM is all about bringing network data together to provide context for detection and analysis. Most NSM systems already integrate the “big three” sources (IDS alerts, session data, full packet capture data), but as we’ve already seen in this book, these are not the only data sources you can use. One particularly rich source of this data is Bro.
Bro is often described as an IDS, though as we’ll see in this chapter, that description hardly does it justice. Think of it, rather, as a development platform for network monitoring applications. It provides substantial “out-of-the-box” functionality for decoding and logging network traffic and provides an event-driven development model to allow you to watch for certain types of transactions and provide your own custom scripts to run when they happen.
In this chapter, we will see how to work with Bro’s built-in logs to identify activity of interest on our network. We’ll also see several examples of Bro programming that showcases some of its more important and useful features.
Basic Bro Concepts
Contrary to popular belief, Bro itself is not an IDS, even though you’ll sometimes see it called “the Bro IDS”. Bro is really a scripting platform that is designed for working with network traffic. As you will see in the examples in this chapter, Bro’s scripting language (which, somewhat confusingly, is also called “Bro”) offers features that are extremely useful for protocol analysis (IP addresses and ports are native data types, for example). It also offers a lot of out-of-the-box functionality for basic analysis tasks, such as robust protocol decoding, transaction logging and notifications for some common security events.
That said, Bro does actually make an excellent IDS platform, which is why it is included in this book. Bro is different than, and complimentary to, a signature-based IDS such as Snort or Suricata. The Snort rule language is well adapted to finding bytes in a network flow (and there are a lot of tasks that really just come down to that!), but Bro is often the best option for more complex tasks, such as those that require higher-level protocol knowledge, working across multiple network flows, or using a custom algorithm to compute something about the traffic in question.
One of Bro’s strengths is that it inherently knows about all of the common Internet protocols, and even a number of the not-so-common ones. It can identify these protocols in network traffic even if they are running on non-standard ports, using a feature called Dynamic Protocol Detection (DPD). Just a few of the application and tunneling protocols that Bro supports include:
By default, when Bro sees network traffic using an application protocol it knows about, it will log the details of those transactions to a file. Of course, the logging is fully customizable, but Bro doesn’t stop there. While it’s parsing and decoding the protocol, Bro actually gives you a mechanism to create custom logic for processing the transactions in the traffic it is examining. It treats the actions taken by a protocol as a series of events, for which you can register event handlers written in Bro code. When you write and register a new event handler for a certain event, and when that event occurs in the network traffic, Bro will automatically call your code based upon the event handler you’ve written. You can do pretty much whatever you like in your handlers, and you can have as many as you like. You can even have multiple handlers for the same event. This might occur when you are inspecting the same protocol to find different types of behavior.
As an example, the Bro code below represents a very simple event handler for the http_request event. Bro generates this event whenever an HTTP client makes a request from a server. This code prints the original URL path requested by the client to the console (standard output). Of course, this isn’t very useful in a production situation, but we’ll see more real-world examples later in this chapter. For now, just know that simply adding this code to any script that is loaded into your running Bro (a process that will be explained later) is enough to register the event handler and have Bro call it when it sees an HTTP request.
#
# This is a sample event handler for HTTP requests.
#
event http_request(c: connection, method: string, orig_uri: string, unescaped_uri: string, version: string) {
print fmt(“HTTP request found for %s”, orig_uri);
}
Running Bro
The easiest way to run Bro is to execute it from the command line and have it process a PCAP file according to Bro’s default configuration. This can be done with a command like:
bro -C -r file.pcap
The –r file.pcap argument tells Bro to read packets from the file specified, which in this case is file.pcap. The -C option is used to disable Bro’s internal checksum verification. Every IP packet has a built-in checksum that allows the destination to determine if it was received correctly. This is absolutely critical to proper network transmission, and every host checks this by default. Increasingly, however, many network cards implement a feature called TCP checksum offloading, which implements this check in the NIC hardware, freeing the system’s CPU from expending needless cycles. This can make a big difference at gigabit speeds or above, but often means that the checksum values are missing or incorrect when the packets make it to the operating system where libpcap (or another packet capture driver) can read them. By default, Bro simply ignores packets with invalid checksums, but the -C option forces Bro to skip the checksum validation and process all packets. You almost always want to use this, especially when processing PCAP files from systems where you don’t know if checksum offloading is enabled or not. If you used Security Onion’s setup script to automatically configure the network interfaces on your lab system, then it will disable offloading by default on your monitor interface, but most other systems have it on by default.
Bro Logs
A default Bro installation is configured to be very verbose in respect to logging. At this stage, Bro is not so much looking for bad things (a la IDS), but it does creates very detailed logs about the things it sees. Figure 10.1 shows a simple example of using Bro to process a single PCAP file. Notice that we started out with an empty directory, but Bro created several log files and a new directory as a result of parsing this file.

You can see by the names of the log files that Bro detected DNS, FTP, HTTP and SSL traffic in this capture file. We also have a few other files, whose contents may be a little less obvious. The conn.log file is a record of network connections (flows), and the files.log file is a record of all the files that were transferred (in this case, via HTTP or FTP, including all the HTML, images, and other embedded media that comprise the web traffic). Packet_filter.log simply contains the BPF filter Bro is using (the default is “ip or not ip”, which is a roundabout way of saying “all packets”). Weird.log is where Bro logs unusual events from any of the protocols, though Bro’s idea of what qualifies as “unusual” may or may not match your own. Finally, the extract_files directory is empty right now, but there will be more on this later.
If you open up one of these log files, you’ll see that it is a tab-delimited text file. The first several lines are internal Bro metadata that describe the fields and their data types, when the log file was created, and other less useful information. Reading the lines marked fields and types is a great way to orient yourself when you need to familiarize yourself with the contents of a new type of Bro log file that you haven’t dealt with before. The actual logs begin after the metadata. Each log is a single line of text.
Figure 10.2 shows a portion of the http.log file, and describes some of the HTTP transactions Bro saw in the PCAP file.
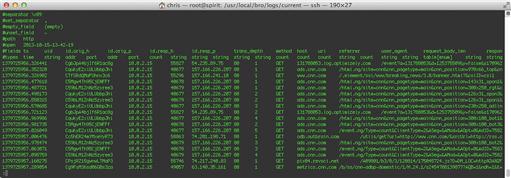
This is only a partial log file, for two reasons. First, there are too many records to fit in one window, so we’re only seeing the top of the file. More importantly, though, the records are very long, and extend past the right side of the window. They’re so long that it is hard to show a sample log file in print format. Table 10.1 summarizes some of the more important fields you will usually find in http.log. Note that it’s possible, and even common, to extend standard Bro log files with extra fields, depending on the scripts you are running in your Bro instance.
Table 10.1
| Field Name | Description |
| ts | The event timestamp |
| uid | A unique ID for the flow containing this transaction |
| id.orig_h | Source host |
| id.orig_p | Source port |
| id.resp_h | Destination host |
| id.resp_p | Destination port |
| trans_depth | Position of transaction inside HTTP pipeline |
| method | HTTP verb for this transaction |
| host | HTTP Host header value |
| uri | The path of the request |
| referrer | HTTP Referrer header value |
| user_agent | HTTP User-Agent header value |
| request_body_len | Length of the body of the request |
| response_body_len | Length of the body of the response |
| status-code | Numeric HTTP response status |
| status_msg | Human-readable HTTP status message |
| filename | Downloaded filename, as specified by the server |
| username | HTTP Basic Authentication user name |
| password | HTTP Basic Authentication password |
| orig_fuids | List of unique file IDs in the request (cf. files.log) |
| orig_mime_types | MIME types for request objects |
| resp_fuids | List of unique file IDs in the response |
| resp_mime_types | MIME types for response objects |
If all this seems like an awful lot of info to stuff into a log file, you’re right. And to be honest, most of the time you don’t actually need all 25 + fields when you’re just trying to find the answer to a specific question. Sometimes, it’s far more convenient to just extract the fields you are interested in. Fortunately, there’s a handy Bro command for this, bro-cut.
The simplest way to run bro-cut is to use the terminal to cat a log file into it with the pipe symbol. When you do this to pass this data to bro-cut, you can specify which fields you want to extract, as shown in Figure 10.3.
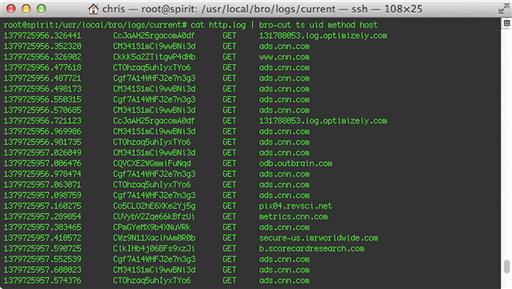
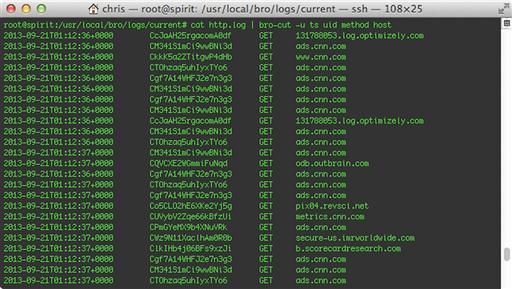
Here, we’ve specified that we only want to see the ts, uid, method, and host fields. In most cases, you will get more user-friendly output by using the -C (include all the log file metadata) and -u (decode timestamps into human-readable UTC time) options, as shown in Figure 10.4.
So far, we’ve been working with just one of the log files, but there are many others, and they are all related. For example, each of the HTTP transactions in http.log are tied to specific network flows in the conn.log file, and through that, many flows are also tied to DNS lookups for the destination hosts in the dns.log file. If you examine the last several screenshots closely, you’ll see that the uid field is included. Bro uses these unique identifiers in several places to tie related log entries together, even though they may be in different files. Because of this, it is usually a good idea to include the uid field when reviewing Bro logs so that you can quickly pivot between log files.
As an example, let’s say that we want to know more about the specific HTTP transaction listed on the first line in Figure 10.4. The second column lists the unique ID for the network flow containing this HTTP transaction. If you search for this string in all the log files, as shown in Figure 10.5, you will see that Bro found a number of different types of log entries. The http.log file shows that there were two HTTP transactions tied to this single flow record. This is a normal behavior for HTTP, which will often send multiple transactions through a single network connection to avoid having to take the time to set up and tear down quite so many TCP sessions. According to the files.log file, these transactions fetched a text file and a GIF image. The original network session itself is shown in conn.log as well, should you need to refer to it.

Many Bro logs contain more than one ID field. For example, the HTTP logs contain not only the first uid field, which ties them back to a specific connection, but also a resp_fuids field, which references a list of the IDs of the files that were downloaded in each transaction. Using these IDs allows you to associate transactions with each other, and to pivot between different types of transactions as you drill down through the logs.
Creating Custom Detection Tools with Bro
We started this chapter by drawing comparisons between Bro and scripting languages like Python or Perl, but so far, all we’ve been doing is looking at log files. Bro is more than just a logging platform, though. It’s really a general purpose programming language that was consciously focused on reading and processing network traffic. All of its logging so far has just been a by-product of the extensive parsing and normalizing it performs in preparation for any programs you might write. So let’s make things a bit more interesting, and write a tool with Bro that can aid in NSM collection, detection, and analysis.
We’re going to spend the rest of the chapter talking about how wonderful Bro is, but this is probably a good time to talk about something that isn’t so wonderful: Bro’s documentation.
Although there has been somewhat of an improvement in the past year or so, the Bro team has traditionally spent almost all of its time on the platform itself, and not so much on documenting how to use it, except by example. This is especially true of the Bro programming language itself. While some basic reference documentation exists (an explanation of the built-in Bro data types, for example, or brief summaries of the events and functions that Bro ships with), there’s really no comprehensive tutorial to aid the beginning Brogrammer.
Most people learn Bro scripting by examining existing code, either the large collection of scripts that ship with Bro’s distribution (found in /opt/bro/share/bro and subdirectories in Security Onion) or by downloading them from mailing lists or code sharing sites like GitHub.
To try to prepare you for doing this yourself, the examples in this chapter take the same approach. Rather than an A-Z list of all the things you can do with Bro, we’ll examine and dissect the code for a few useful scripts, covering some important Bro concepts as they show up in the code. You will find it helpful to refer to the online Bro documentation at http://www.bro.org/documentation/index.html as you go through the chapter. This closely mirrors the process you’ll go through as you find new interesting pieces of Bro code and learn by figuring out what they do.
File Carving
In an NSM environment, it is common to want to extract any files that were transferred from a session. If you have a PCAP file, there are tools that can do this (e.g., tcpxtract), but they usually operate on a byte level, without a lot of protocol knowledge. Once they recognize, say, the beginning of a PDF file, they can usually carve the next few thousand bytes and save them to disk, but this is only an approximation of the actual file that was transferred. This method may also require some manual carving after the fact to end up with the file you are looking for.
Bro, on the other hand, knows a lot about the protocols it decodes, and this knowledge makes all the difference. For our first example, we’ll look at a method to extract files out of packet captures with Bro. We’ll start by developing it as a tool we can call from the command line with a PCAP file, and then show how to integrate this into the Bro instance that runs with Security Onion so that it just runs all the time on our live network traffic.
First, let’s create a quick prototype. Bro has a built-in mechanism for performing on-the-fly analysis of files it sees going over the wire, called the File Analysis Framework. One of the possible “analysis” types it knows how to perform is to write the file to disk. You just have to ask Bro to do this for each file you’re interested in.
Fortunately, this is far easier to do than it probably sounds. Create a file called extract-files.bro that contains the following code:
# When Bro finds a file being transferred (via any protocol it knows about),
# write a basic message to stdout and then tell Bro to save the file to disk.
event file_new(f: fa_file)
{
local fuid = f$id;
local fsource = f$source;
local ftype = f$mime_type;
local fname = fmt(“extract-%s-%s”, fsource, fuid);
print fmt(“*** Found %s in %s. Saved as %s. File ID is %s”, ftype, fsource, fname, fuid);
Files::add_analyzer(f, Files::ANALYZER_EXTRACT, [$extract_filename = fname]);
}
This Bro script creates a new event handler for the file_new event that Bro creates whenever it sees a new file transfer begin, regardless of the protocol. The single parameter Bro passes to this is called f and is of type fa_file, a record type defined by the framework. Notice Bro’s use of the dollar sign character as the operator that refers to the fields in the record. The script references the id, source, and mime_type fields and uses those to construct and then print a short message about each file it finds. It then attaches the file extraction analyzer to that stream, which is the piece that actually tells Bro to save the file to disk. That’s it! Now that the ANALYZER_EXTRACT analyzer is attached to the file, Bro will take care of the rest.
All that’s left now is to actually run this against a PCAP file. Running a specific Bro script is very similar to the way we ran Bro before, but this time we just name the script file at the end of the command line. In fact, you can run multiple Bro scripts by just naming multiple scripts on the same command line, but we don’t really need to do that here. The command we will run is:
bro –C –r ../pcaps/bro-sample-traffic.pcap ../scripts/extract-files.bro
Figure 10.6 shows what our script looks like when it runs. Notice that each line contains the File ID, so you can find the corresponding log entry in files.log for more information if you need to.

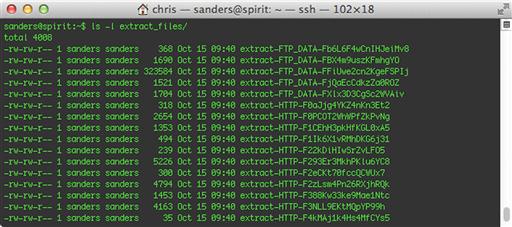
After running the script, notice that you have all of the same log files that Bro generated in the previous examples. In fact, everything looks pretty much the same as before. But this time, there are files inside the extract_files subdirectory, as shown in Figure 10.7.
Selective file extraction
Looking at the output above, you can see there are a lot of GIF files in the PCAP I used for this example, and also some HTML text. These are all from web traffic, and not what most people think of when they think about “file downloads”. What if you’re not at all interested in those file types, and just want to extract only Windows executables? No problem! Notice from our earlier code sample that Bro actually knows the MIME type of each file. It figures that out by examining the file, rather than just trusting whatever the file transfer protocol said it was.
We can modify our script to check the MIME type for each file before we attach the extraction analyzer.
#!/usr/bin/env bro
# When Bro finds an executable file being transferred (via any protocol it
# knows about), write a basic message to stdout and then tell Bro to save
# the file to disk.
event file_new(f: fa_file)
{
# Check that we have a MIME type value in this record
if (f?$mime_type) {
# See if the type is one we care about
if(f$mime_type == “application/x-dosexec” ||
f$mime_type == “application/x-executable”) {
local ftype = f$mime_type;
local fuid = f$id;
local fsource = f$source;
local fname = fmt(“extract-%s-%s”, fsource, fuid);
print fmt(“*** Found %s in %s. Saved as %s. File ID is %s”, ftype, fsource, fname, fuid);
Files::add_analyzer(f,Files::ANALYZER_EXTRACT, [$extract_filename = fname]);
}
}
}
This version is very similar to the first, but it adds an if statement to check whether the mime_type value exists in the file record (the f?$mime_type piece), and if so, checks the MIME type value before adding the extraction analyzer. Figure 10.8 shows the new output, skipping all the images and HTML content, and only processing executables.

In order to demonstrate another way in which Bro code can be run, let’s see a cool trick. So far, we’ve been explicitly running the Bro command and then naming the script we want to run. Notice the first line of the revised script starts with the typical Unix “shebang” (#!). As you might guess, this means that a standalone tool written in Bro can run from the command line just like any other scripting language. To do this, you must first change the permissions of the script to make it executable:
chmod 755 extract-exe-files.bro
Now, you can call the script like any other command, as shown in Figure 10.9. It still behaves the same way as before; creating log files and writing the extracted files to disk. It may be a more convenient way to run your code, though, especially if you’re providing this tool to other team members who may not be familiar with Bro itself.

Extracting Files in Live Network Traffic
Now that we’ve enhanced our script as a standalone tool, let’s take a look at what we can do to run it continually as part of Security Onion’s Bro instance. This would be useful if you wanted to extract every occurrence of certain file types in near-real time as they came across the network, rather than interacting with individual PCAP files retrospectively.
Typically, once you have a working Bro script, getting it to run all the time isn’t very difficult. When Security Onion runs Bro in sensor mode, Bro reads its configuration from /opt/bro/share/bro/site/local.bro by default. Of course, the term “configuration” is used pretty loosely here. Like everything else, local.bro is really just a script that Bro knows to load and run when it starts. The default version that ships with Security Onion really just loads other Bro scripts that perform some useful functions like detecting scans, logging applications in use on the network, adding GeoIP lookups to certain protocol logs, etc. Of course, local.bro really is just a “local” Bro configuration, and this is where you’ll add all your own customizations, too. The easiest way to get our file extraction code into Bro is to just paste it verbatim into the bottom of the local.bro file, as shown in Figure 10.10.

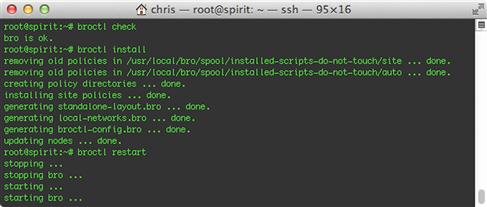
Whenever you make changes to local.bro, you need to run through a simple three-step process to make the running Bro instance aware of them. Each of the steps involves using the Bro control program broctl to perform a task. The commands for these steps are:
1. broctl check
Do quick syntax and sanity check of the entire configuration to make sure you haven’t accidentally broken anything.
2. broctl install
Make the configuration changes active, also known as “installing” them.
3. broctl restart
Restart Bro to make it re-read the new changes.
These commands and their output are shown in Figure 10.11.
After your new code has been running for a while, have a look in the Bro log directory /nsm/bro/logs/current. You can examine files.log to see what files were extracted. If any have been, you can look at the content of the “analyzers” field to see which files had the EXTRACT analyzer applied to them, as shown in Figure 10.12.
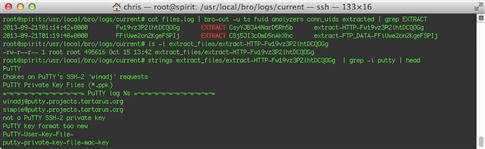
As you can see from the string’s output on the extracted binary, this file appears to be a copy of the Windows SSH client PuTTY.
This is probably a good time to mention that restarting Bro also forces it to archive any logs currently in /nsm/bro/logs/current and create a fresh new set. This also happens automatically each night (at 00:00 GMT for Security Onion’s configuration). If you’re working through these examples, don’t be surprised if some of your old logs disappear after you restart Bro, reboot the SO system, or even if you just leave things one day and come back the next. The logs are still there. Bro just moved them to a new date-coded subdirectory of /nsm/bro/logs.
Packaging Bro Code
Right now, Bro is configured to extract executable files from the live network stream, which is incredibly useful. These files can be further analyzed for signs of malicious logic, compiled for statistical analysis, or even have information about them fed back into Bro for further analysis. With that said, everything is working, but we could do a little more to package up our code into its own separate file.
If you think about it, continually adding new code directly to local.bro will probably become unmanageable after a while. Not only that, but if you ever want to share your scripts with other Bro users, you’ll have to comb through lots of unrelated modifications and make sure you get only the lines you need to share. This is likely to become a management pain after a while.
If you read the rest of local.bro (the parts we didn’t edit), you’ll see it really does nothing but load up other scripts, which are each stored in their own separate files. Let’s do this with our code!
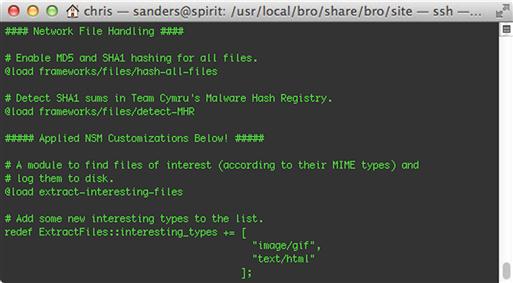
As it turns out, this is extremely simple. First, cut all of our custom code from local.bro and paste it into a new file called extract-interesting-files.bro, and copy that file into the /opt/bro/share/bro/site directory. This is in Bro’s default load path, so we can just insert a statement like the following into local.bro to make our script run just like before:
@load extract-interesting-files
If you use broctl to check, install and restart the Bro instance, you’ll see everything is working just like before, but now our code is easier to find, manage, and share.
Adding Configuration Options
While our code is stored in a much cleaner way, the only problem now is that if we ever want to extract different types of files for some reason, we would have to edit the script, possibly introducing new bugs and certainly making it more difficult to track changes to functionality.
For the final revision of our script, we’re going to add a configuration parameter called interesting_types, which will be a set of MIME type strings we care about. Whenever Bro sees a file with one of those MIME types, it will extract it to disk. We will set up this parameter so that other scripts can modify its contents without actually editing the script file itself.
Here’s the updated version of our extract-interesting-files.bro file:
#
# A module to find files of interest (according to their MIME types) and
# log them to disk.
#
module ExtractFiles;
export {
const interesting_types: set[string] = [
“application/x-dosexec”,
“application/x-executable”
] &redef;
}
event file_new(f: fa_file)
{
# Check that we have a MIME type value in this record
if (f?$mime_type) {
# See if the type is one we care about
if(f$mime_type in interesting_types) {
local ftype = f$mime_type;
local fuid = f$id;
local fsource = f$source;
local fname = fmt(“extract-%s-%s”, fsource, fuid);
print fmt(“*** Found %s in %s. Saved as %s. File ID is %s”, ftype, fsource, fname, fuid);
Files::add_analyzer(f,Files::ANALYZER_EXTRACT, [$extract_filename = fname]);
}
}
}
Right away, notice that we’ve declared this as a Bro “module” called ExtractFiles. Bro’s modules are much like modules in other languages; they provide a new namespace for functions and variables, separate from the main namespace to avoid collisions. By default, these names are private to the module, so you see that we have to use the export directive around those variables and constants we want to make available to other namespaces.
We’re only exporting one name here, the constant interesting_types, which is defined as a set of strings. A Bro set is an unordered collection of items of whatever type you specify. You can add and remove items, as well as check to see whether an item is a member of the set. There’s only one real tricky part here. Even though this is a “constant”, it has the &redef tag at the end of the declaration. That means you can actually explicitly change the contents of the constant, though you will have to use the special redef statement to do it. This is Bro’s way of keeping you from accidentally modifying an important configuration parameter due to a bug in your code or any other type of mistake. We’ll see how to do this intentionally in a short while.
The last change we made to our code was to replace the conditional that checks whether this is a MIME type we care about. Before, we had the types hard coded, like this:
if(f$mime_type == “application/x-dosexec” ||
f$mime_type == “application/x-executable”) {
Now we’ve simplified it to just check to see if the MIME type is part of our “interesting” set:
if(f$mime_type in interesting_types) {
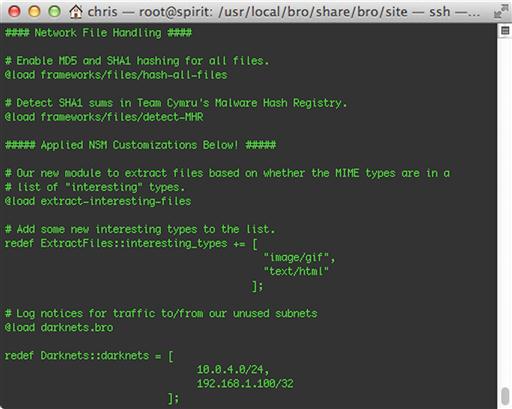
Now, since we’ve already added the appropriate @load statement to local.bro, we should be nearly ready to go. Before we do that, though, let’s see how you can add new file types to extract. In Security Onion, Bro’s database of known MIME types can be found in the text files in the /opt/bro/share/bro/magic directory. Figure 10.13 shows how to modify local.bro to add new MIME types (GIF and HTML) to our “interesting types”. Notice that we’ve used the redef keyword to add two new values to the “constant” set (which, from the main name space, we refer to as ExtractFiles::interesting_types).
If you use broctl to check, install and restart the Bro instance, you should start to see a lot of files being extracted very quickly if you are monitoring HTTP traffic at all, as is shown in Figure 10.14.

Using Bro to Monitor the “Dark” Side
Extracting files is a very useful task for a variety of purposes, but the question you will probably be asking yourself at this point is, “But how can I get Bro to let me know when something interesting happens?” Let’s look at an example that asks Bro to look for a certain type of event and let us know when it finds one.
For this example, we’ll use Bro to implement a darknet detector. A darknet is any subnet (or individual IP, technically) that is unused in your organization and that no other hosts should have any legitimate reason to interact with. For example, if your organization is allocated a /16 network, you may have several /24 networks that are unused. If you grab a few of those and guarantee they won’t be allocated in the future, you just created a darknet.
Darknets are useful things to have, and are helpful for identifying internal scanning and reconnaissance operations, as might occur when you have a worm or an unauthorized individual running around inside your network. They are not entirely reliable, as it’s easy for legitimate users to typo an IP address or for legitimate services to be misconfigured to point to your darknets, but they provide valuable early warning and are worth the time to set up and monitor.
To begin, create the file /opt/bro/share/bro/site/darknets.bro and place the following code into it:
#
# This module allows you to specify a set of unused netblocks or addresses
# that are part of your internal network but are not used. When Bro sees
# traffic to/from these netblocks, it will generate a notice.
#
@load base/frameworks/notice
module Darknets;
export {
# Create a notice type for logging
redef enum Notice::Type + = { Darknet_Traffic };
# Your darknets. This is empty by default, so add some network blocks
# in local.bro. NOTE: You can add specific hosts here by specifying
# them as /32 subnets.
const darknets: set[subnet] = {} &redef;
}
# Check each new potential connection (successful or not, TCP/UDP/IP)
# against our darknet set
event new_connection(c:connection) {
local darknet_conn = cat(c$id$orig_h, c$id$resp_h, c$id$resp_p);
if(c$id$orig_h in darknets) {
NOTICE([$note = Darknet_Traffic,
$msg = “Traffic detected FROM darknet",
$conn = c,
$identifier = darknet_conn]);
}
if(c$id$resp_h in darknets) {
NOTICE([$note = Darknet_Traffic,
$msg = “Traffic detected TO darknet",
$conn = c,
$identifier = darknet_conn]);
}
}
There are a few new things in here, so before we go on, let’s examine this code more closely.
First, notice that the code starts by loading the base/frameworks/notice module. This module is the implementation of Bro’s Notice Framework, a set of hooks that make it easy to create your own types of notices and to manage the notices of other modules. Before you can reference anything having to do with the Notice Framework, you have to make sure you’ve loaded it into your running Bro.
Next, you’ll see that we created a new set, called darknets. This set contains members of type subnet, which is a built-in Bro data type to store CIDR blocks, specified as literal values in the code, with the format x.x.x.x/y. By default, this set is empty, so just enabling this script won’t really do anything. We don’t know the allocated darknet subnet(s) in advance, of course, so this makes sense. We’ll configure this later, in local.bro.
Next, you’ll see that we provided an event handler for the new_connection event. Bro generates this event whenever it starts to track a new connection. The fact that this event was called doesn’t imply that the connection attempt was successful, as this event is called too early in the process to know that; only that a new connection was attempted.
The single parameter to the new_connection event is c, a record of type connection. Connection records are the kitchen sink of data that Bro tracks for connections. In addition to storing basic info like the source and destination addresses and ports, the connection state and Bro’s connection IDs, it’s common to find that other non-default or user-written scripts have stored additional data there, such as geotagging information, file hashes, etc.
Some of the most common pieces of data you will read from these records are the source and destination IPs and ports for the connection. Bro stores these as part of the id record, which is of type conn_id and a component of the connection type. Conn_id records have the following structure (Table 10.2):
Table 10.2
The Structure of the conn_id Record Type
| Field Name | Description |
| orig_h | The IP address of the originator of the connection (the client) |
| orig_p | The originator’s port number and protocol |
| resp_h | The IP address of the responder for the connection (the server) |
| resp_p | The responder’s port number and protocol |
Although we don’t need it for this example, it’s worthwhile to note that ports in Bro are native data types, and include both a numeric and a protocol piece. For example, you could use the following piece of code to assign the normal SMTP port to a variable:
smtp_port = 25/tcp;
For our example, though, we only care about the source and destination IP and the destination port, which we access through their nested data structures as c$id$orig_h, c$id$resp_h and c$id$resp_p respectively.
Our event handler starts by calling the cat() function, which simply takes the individual string representations of all of its arguments and returns them as a single string. Here, we’re building a string that consists of the source and destination IPs and the destination port. This is an easy way of creating an identifier for this connection. We’ll discuss why we need this shortly, but for now just know that we’re assigning this value to the variable darknet_conn.
Next, we examine the source IP (and later, in a nearly identical piece of code, the destination IP) to see if it’s in one of our darknets, like this:
if(c$id$orig_h in darknets) {
NOTICE([$note = Darknet_Traffic,
$msg = “Traffic detected FROM darknet”,
$conn = c,
$identifier = darknet_conn]);
}
This code says “if the source IP is in the set called darknets, generate a notice.” A notice is simply an entry in the notices.log file and is the most common way Bro draws extra attention to something. Bro also has the concept of alarms, which are like notices, except they go to the alarms.log file and are emailed out on a regular schedule. Notices can also be immediately emailed or paged for quick attention, but we won’t do that in this example.
In our code, we’re calling the NOTICE function, which takes exactly one argument: a record containing all the information about the notice. Although you can create a separate variable to hold the notice record, you will usually see code construct an implicit record using the [$field1 = value1,$field2 = value2,…,$fieldN = valueN] construct, which is the method we use here.
Each notice has a type, which is one of a set of enumerated values defined by the various modules loaded into Bro. The values themselves are not really important; they’re just used to differentiate one type of notice from another. You just need to know their names so you can pass them as the value of the $note field in the notice record. Each module that creates its own notices defines its own new types. Our code defines one type called Darknet_Traffic, like this:
# Create a notice type for logging
redef enum Notice::Type + = { Darknet_Traffic };
Each notice also includes a human-readable message in the $msg field. We’ve defined one notice type with two different possible messages, according to whether the traffic is detected going into or coming out of the darknet.
Next, we add the information about the current network connection to the notice record as the $conn field. Because Bro now knows which connection this notice is associated with, it can properly log the connection ID into the notice.log file, which builds the pivot linkages into the conn.log file that we saw earlier in the chapter.
Finally, our code adds the identifier we created earlier as $identifier. The identifier is important for generating notices with this script.
Notice Suppression
Consider what would happen if a system on your network were misconfigured, such that it tried to access the printer service on a host it thought was a print server, but was really an unused address in one of your darknets. Print jobs submitted by the faulty host would never print, but the system would keep submitting them, checking printer status, submitting them again, etc. It could do this for quite a long time until someone noticed and manually removed the jobs. You’d probably like to know about this activity, but you don’t necessarily want to see a separate notice for every single network connection involved in this faulty printer communication.
Bro solves this problem by using notice suppression. In other words, it’s smart enough to know that it’s already sent a notice about a particular event, and if so, to hold off sending another one for a while. To do this, it examines each notice’s type (Darknet_Traffic) and the unique identifier your code should supply. That’s why we had to create that darknet_conn value.
Darknet_conn uses the source and destination IPs, plus the destination port, to create a “unique” identifier for that connection. In fact, this is not at all unique, because it leaves out the source port, but this is by design. Repeated connections to the same service would normally come from different source port numbers, so including this would make the identifier too specific and generate more notices. Instead, we’re making the implicit assumption that once we know 10.0.2.15 talked to 192.168.1.1 on port 80 once, we can ignore the fact that it may have communicated several more times in the next few minutes. Once we have the original notice, we can always find the full list of connections in the conn.log file if we need to.
The default suppression interval is one hour, so for most things you should only get a max of 24 notices per day for the same event. You can adjust this up or down as you see fit, however. If you just want to change the default interval for all notices, you can add the following to local.bro:
# Change the default notice suppression interval for all notice types
redef Notice::default_suppression_interval = 30 min;
Bro has a built-in data type called interval that can be set to any number of usec, msec, sec, min, hr, or day values. This makes setting time intervals easier for this type of work.
You can also set the value differently for each type of notice. For example, if you want the keep the shorter value above for most notice types, but you want to set a longer value for our Darknet_Traffic types, you could add something like the following to local.bro:
Notice::type_suppression_intervals[Darknet_Traffic] = 2 hour;
As you become more familiar with Bro and how it works in your environment, you will almost certainly want to try your hand at tuning one or both of these types of suppression values.
Using and Testing the Script
Now that we have our code installed as darknets.bro in the correct directory, all we need to do is to load it from local.bro and give it a real list of dark subnets. Figure 10.15 demonstrates how to do this.
For this example, I’ve specified the entire 10.0.4.0 – 10.0.4.255 range as a darknet, and also the individual IP address 192.168.1.100. Neither of those ranges are in use on my lab network, but in a real world scenario you should modify this list to fit your own environment.
After a quick round of broctl check/install/restart, the darknet code should be loaded into our running Bro instance. Ideally, since these are supposed to be “dark” nets, we shouldn’t see any network traffic involving them. Since Bro doesn’t create log files until it has something to write to them, this also means you may not see a notice.log file immediately. That’s normal.
The next step is to create some test traffic to one of the configured darknets. For the first test, we’ll try some simple ICMP traffic to a “dark” host. Here, I chose an arbitrary IP address in the 10.0.4.0/24 range I configured as a darknet above, then just used the ping command to send a few packets, as shown in Figure 10.16. This host doesn’t exist on my network, so I didn’t get any replies, but Bro doesn’t care.
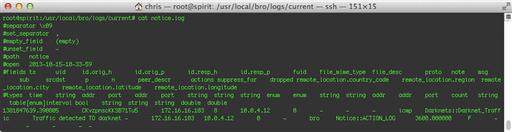
If you examine Figure 10.16, you’ll see that Bro logged our notice as type Darknets::Darknet_Traffic, which makes it easy to find with grep or whatever other reporting tool you like. It also reported that it found “Traffic detected TO darknet” so we know that the connection was inbound to the dark subnet.
For another test, let’s try a couple of TCP connections to the 192.168.1.100 address, which I previously configured as an individual dark host. I chose to try to connect on ports 80/tcp (HTTP) and 515/tcp (the Unix print spooler). The notices generated from this activity are shown in Figure 10.17.

Reading Figure 10.17 closely, you can see that Bro logged a number of Darknet_Traffic notices for connection attempts to 192.168.1.100 on port 80, and one notice each for traffic to and from port 515. From this, we can deduce that the host did not respond at all to HTTP requests, but it is listening on the print spooler port. This might lead us to believe that someone may have misconfigured his or her printer.
Extending the Darknet Script
With a little effort, the darknet module could be adapted to other uses as well. For example, if your security policy states that Active Directory servers should be on their own special subnet, and that the hosts on the network should not have access to the Internet, you could modify this code such that the list of “darknets” is replaced with a list of server subnets. In this case you would still expect to see a lot of traffic between your AD subnet and the rest of your internal network, so you can’t simply just alert on everything you see. With this in mind, you could either run this on a Bro instance that sees only traffic as it passes to and from the Internet (and thus should never see AD traffic anyway) or modify the logic of the new_connection handler a bit to make sure that the other side of the connection is not a valid local subnet (perhaps using a set of subnet types).
You could also use a similar approach to detect unauthorized connections between your DMZ and sensitive parts of your internal network (e.g. “why is the DMZ talking to the CEO’s computer?!”) or even replace the list of subnets with a list of allowed ports and audit connections using unusual or out-of-policy services. The possibilities for customizing and adapting this simple example to your own network are nearly endless, and really demonstrate some of the power and flexibility of Bro as a framework for detecting bad things on the network.
Overriding default notice processing
We’ve configured Bro to alert us whenever something tries to communicate with one of our darknets, but as written, our script isn’t very particular about exactly what is communicating with the darknets. I said before that there should be no legitimate reason for any other host on our network to try to talk to a darknet, but there are a few exceptions to this rule., such as, internal network mapping.
An organization sometimes wants to know what’s on its network, whether the purpose is to discover new devices that need to be managed or just to audit against unauthorized hosts being connected. Network engineers may do this on a regular basis, and it’s also a normal feature of many vulnerability management packages. So clearly there are some hosts that try to talk to our darknets, even if just to verify that they still really are dark. We don’t want to be alerted to all this legitimate activity, but as written, our script is likely to generate notices for an awful lot of this activity. Let’s see if we can fix that.
There are a couple of ways we could address this problem. Using only techniques we’ve already seen, we could modify the darknets module to define another set of the addresses of our authorized network scanners, then include some logic in the new_connection handler to check for set membership before generating a notice. That would work just fine, and would probably be a useful addition to the script. In fact, it’s probably the best way since we wrote the original darknets code ourselves. However, we’ve already seen all those techniques, so let’s try something new.
Let’s pretend that we originally got the darknet code from another Bro user. In that case, it might not make sense to directly modify the code, since we’d have to maintain a local patch, and apply and test it again with every new version of the module. That’s a pain, and fortunately, there’s another way. We can intercept Bro’s notices before they are written to the disk, inspect them, and decide whether we want to log the notice, discard it, or potentially take some other action.
We could put our new code into its own file, as we have been doing for the other examples However, by loading our code directly into local.bro, we keep the code that loads the darknets module and the code that modifies its logging together, which probably makes it clearer and easier to maintain for the purposes of this example. Here’s what the end of local.bro should look like, with both the previous darknets code and our new additions loaded in:
# Log notices for traffic to/from our unused subnets
@load darknets.bro
redef Darknets::darknets = [
10.0.4.0/24,
192.168.1.100/32
];
# These are our legitimate network scanners, which are allowed to talk to
# our darknets without logging notices.
const allowed_darknet_talkers: set[addr] = {
10.0.2.15
};
# Process all notices at high priority, looking for Darknets::Darknet_Traffic
# types. When we find them and either the src or dst IP is an
# allowed_darknet_talker, remove all actions from the notice, which causes
# Bro not to log, alarm, email or page it.
hook Notice::policy(n: Notice::Info) &priority = 5 {
if(n$note == Darknets::Darknet_Traffic &&
(n$conn$id$orig_h in allowed_darknet_talkers ||
n$conn$id$resp_h in allowed_darknet_talkers)) {
# Remove all actions and assign it the empty set
n$actions = set();
}
}
The code starts by declaring a new constant, allowed_darknet_talkers, as a set of IP addresses (you could easily make this into a set of subnets if you have a particularly large number of network scanners or otherwise whitelisted IP addresses). I’ve added my scanning system’s IP (10.0.2.15) as the only member of the set.
Next, I’ve declared a new type of function, called a hook. Hooks are similar to event handlers, in that Bro calls these hooks as it’s processing traffic and doing work. The main difference is that events correspond to things Bro finds happening in network traffic, where hooks are called when Bro is performing its own internal processes.
In this case, when Bro generates a new notice, it calls the Notice::policy hook to allow you to perform local processing and modify how Bro will handle the notice (in other words, how it implements its notice policy for this notice). The single argument to this hook is n, a record of type Notice::Info that contains all the information Bro has about this notice.
One interesting thing about the hook declaration is that it uses the &priority keyword to assign a priority value of 5 to this hook function’s execution. Because you can have multiple event handlers for each event and multiple hook functions for each hook, Bro allows you to set the order in which they are called. Valid priorities are any integer between 0 (default) and 5. Hooks and event handlers are called in priority order, with larger numbers being called before smaller numbers. In this case, &priority = 5 helps ensure that Bro calls our hook function before it does any other notice policy processing, to give us a chance to bail out on processing this notice early.
The first thing our hook has to do is to decide if it should process this notice or not. There are many types of notices that Bro can generate, but we only want to concern ourselves with Darknets::Darknet_Traffic here, and only if one of the two IPs is in our allowed_darknet_talkers set. In our original Darknets module code, we already saw how we could use the Conn_id record type to access the source and destination IP addresses of the connection in question. The Notice::Info type also stores a Conn_id record that refers to the original connection which generated the notice, which we can access as n$conn. Therefore, n$conn$id$orig_h would be the client’s IP, and n$conn$id$resp_h would be the server’s IP. All this processing goes into a simple if statement at the beginning of the hook to make sure we meet all the requirements. If not, we simply don’t do anything, and Bro continues to log the notice as it normally would.
If, however, our conditional evaluates to true, Bro processes the body of the hook, a single line that assigns an empty set to the n$actions variable:
# Remove all actions and assign it the empty set
n$actions = set();
This requires some explanation. Bro decides what to do with a notice by examining the list of “actions” which have been assigned to it. Actions are just enumerated type values, and there are four to choose from. Table 10.3 lists these and explains what they do.
Table 10.3
| Action | Description |
| Notice::ACTION_LOG | Writes the notice to the notice.log file. |
| Notice::ACTION_ALARM | Writes the notice to the alarm.log file. This file is emailed hourly to the address specified in the Notice::mail_dest variable. |
| Notice::ACTION_EMAIL | Immediately emails the notice to the address specified in the Notice::mail_dest variable. |
| Notice::ACTION_PAGE | Immediately sends the notice to the address specified in the Notice::mail_page_dest variable. This is normally an email-to-SMS gateway of some sort, but could be any email address. |
The underlying purpose of the Notice::policy hook is to allow you to change the set of default actions to be applied to the notice before Bro starts to implement those actions. In our code, since we removed all of the actions by assigning the empty set, we’re effectively telling Bro “do nothing with this notice.”
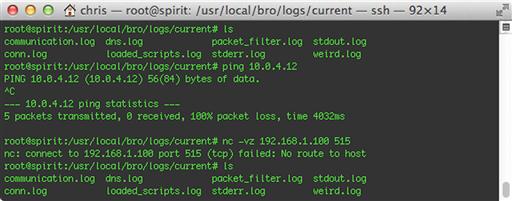
Now it’s time to try our new code. Recall that after restarting Bro, our log directory starts fresh and clean, so there are no notices. From our scanning host, we then ping one of the darknets (unsuccessfully) and connect to the printer port of the dark host we defined (successfully). But if we look at the log files, there are still no more notices (Figure 10.18). This indicates that our hook is working successfully, and will help us to avoid generating notices from traffic sources from approved internal scanning devices.
Generating E-Mail Notices from Darknet Events
As with the other examples in this chapter, you could easily repurpose the code that disables logging of Darknets::Darknet_Traffic notices for other useful purposes. For example, if there are no authorized network scanners in your organization, maybe you really want to know about darknet notices immediately. It would be quite simple to modify this code to elevate the processing such that the notice is logged and also emailed. Just take the checks for n$conn$id$orig_h and n$conn$id$dest_h out of the if statement, and replace these lines:
# Remove all actions and assign it the empty set
n$actions = set();
With these:
# In addition to the default Notice::ACTION_LOG which is already assigned
# to this event, add the Notice::ACTION_EMAIL action, so the notice will be
# emailed immediately.
add n$actions[Notice::ACTION_EMAIL];
You’ll need to also supply the email address as the value of Notice::mail_dest in your local.bro file like so:
redef Notice::mail_dest = “[email protected]”;
After restarting Bro, you should start receiving email alerts any time a system tries to communicate with one of your defined darknets.
Suppressing, E-Mailing, and Alarming - The Easy Way
In the last section, we saw how to hook into Bro’s notice processing to provide detailed, granular customizations that allowed you to make decisions about how to process each individual notice. This surgical precision is nice, but sometimes all you need is a big hammer.
Bro provides a number of convenient shortcuts for changing the notice processing policy. These shortcuts take the form of constants you can modify to change the policy for all events of a certain type.
For example, suppose you have only a single SSH server on your network, and it’s exposed to the Internet. It has a legitimate business use (secure remote file transfers for your business partners), but the fact that it’s directly accessible from the Internet and needs to use the default SSH port means it’s going to be the constant target of password guessing attacks. Bro’s support for the SSH protocol logs the SSH::Password_Guessing notice each time it sees this type of activity, but you could get hundreds of these notices each day. This can be annoying since there’s nothing you can do to prevent these attacks. You won’t want to turn off Bro’s SSH protocol support entirely, but there is another option.
The answer is to add the SSH::Password_Guessing notice type to the list of notices which should just never be logged. Bro still tracks them (other notice types still depend on knowing when password guessing attacks are going on) but you’ll never see them. You can do this by adding the following to local.bro:
# Don’t generate any notices for SSH password guessing attempts.
redef Notice::ignored_types + = { SSH::Password_Guessing };
After you restart Bro, the password guessing notices will no longer show up in the logs. This affects all such notices from any host, so if you want to see notices from some hosts and not others, this mechanism is not for you. In our example, though, we have only a single SSH server anyway, so this is perfect.
The opposite example would be to escalate the processing of certain types of notices to alarms (alert data), or to email alerts. Assume you have at least one Internet-facing web server and are especially concerned with SQL injection attacks. Bro can detect SQL injection if you load the detect-sqli script (which is likely on by default), and will generate HTTP::SQL_Injection_Attacker notices whenever it sees a host performing such an attack against one of your servers (it also generates an HTTP::SQL_Injection_Victim notice for the target server, but we can ignore that for now).
The problem is, by default, these just go into the notice.log file with everything else, but you’d like them to go into alerts.log so you’ll get an automatic email summary every hour. You can accomplish this with the following code in local.bro:
# Alarm on any SQLi attempts
redef Notice::alarmed_types + = { HTTP::SQL_Injection_Attacker };
Alternatively, you can escalate even further, and turn these into immediate email alerts, like this:
# Send email immediately for any SQLi attempts
redef Notice::emailed_types + = { HTTP::SQL_Injection_Attacker };
Of course, for either of these last two to work, you’ll have to make sure you have defined the Notice::mail_dest variable discussed earlier. Otherwise Bro won’t know where to send the messages.
Adding New Fields to Bro’s Logs
For our final example, let’s circle back to the beginning of the chapter and talk a little more about logs. We’ve already seen that Bro does an excellent job of logging different types of transactions, but sometimes even Bro’s logging falls short. Perhaps you need to track an additional piece of information for certain transactions, or you maybe you just want to provide extra context around some events. Adding new fields to existing Bro logs is quite easy, and is a common thing to do.
Suppose you work for an organization that is concerned about where its Internet traffic is coming from or going to. One simple thing you can do to track this is have Bro look up the country codes for all network connections it sees (both sources and destinations) and add them to the conn.log file as new fields.
To start, paste the following code into a file called conn-geoip.bro:
redef record Conn::Info + = {
orig_cc: string &optional &log;
resp_cc: string &optional &log;
};
event connection_state_remove (c: connection)
{
local client_geo_data = lookup_location(c$id$orig_h);
local server_geo_data = lookup_location(c$id$resp_h);
if(client_geo_data?$country_code) {
c$conn$orig_cc = client_geo_data$country_code;
}
if(server_geo_data?$country_code) {
c$conn$resp_cc = server_geo_data$country_code;
}
}
The script begins by adding two fields to the Conn::Info record type. This is the data type Bro uses to store information about each connection it sees. It typically records things like the connection timestamp, uid, endpoints, application-layer protocol, and so on. In our case, we’re adding two new fields to store country codes for the endpoints, orig_cc and resp_cc.
Notice that each of the new fields is tagged with a couple of options. These tags are not part of the record itself, but rather, they tell Bro how to treat these fields in various circumstances. The &log option tells Bro to make sure to write the value of this field to the log file when it creates the conn.log entry. If you leave this out, Bro will track the data but you’ll never see it in the log file. The &optional tag specifies that it’s OK for this field to have no value (for example, if one of the endpoints is an RFC 1918 address and thus has no specific geographic ties). In this case, Bro will just log a “-“ in that field, which is the default behavior for any field in any log if there is no value to record. Technically, you could replace &optional with &default=“None” (or some other string) if you wanted to log a different value in that case, but “-“ is the standard everywhere else, so we’ll stick with that for consistency.
Next, we set up a simple event handler for the connection_state_remove event, which Bro generates just before it’s ready to remove an active connection from its state table and write the log to disk. We’re using the lookup_location() function, which is built in to Bro. It takes an IP address as its argument, and returns a geo_location record, which Bro defines like so:
type geo_location: record {
country_code: string;
region: string;
city: string;
latitude: double;
longitude: double;
}
Our script generates two lookup requests, one for each side of the connection, with the IPs stored in the connection record:
local client_geo_data = lookup_location(c$id$orig_h);
local server_geo_data = lookup_location(c$id$resp_h);
Next, it checks each return value to see if the resulting record includes country code information. If so, it assigns the country code to the appropriate field in the newly redefined connection info record. Otherwise it does nothing.
if(client_geo_data?$country_code) {
c$conn$orig_cc = client_geo_data$country_code;
}
That’s it! Once we added the two new fields to the Conn::Info record and set the &log parameter, we guaranteed that those values would be logged to the conn.log file. All the connection_state_remove handler had to do was to look them up and insert them into the connection info record. Bro handled all the rest.
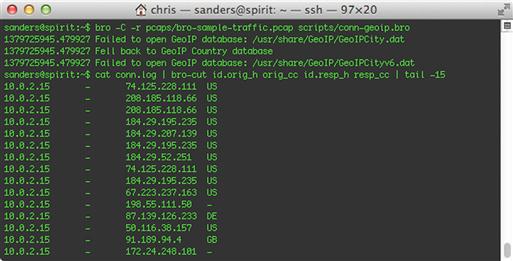
Now it’s time to run our script. For demonstration purposes, we’re going to go back to testing it from the command line with a PCAP file, though you now know enough to permanently add this to your running Bro instance, if you wish. Figure 10.19 shows the tail end of our connection log now, extracting IP address and geographic data for each endpoint.
Conclusion
We started this chapter with a quick overview of some essential Bro concepts and a tour through the log files, but quickly got down to a very hands-on, incremental primer on coding for Bro. So far, we’ve done some simple but very useful things, like extracting files and monitoring darknets. We’ve also seen several techniques you can use over and over again in your Bro journey, such as notice handling, alarming, tweaking configuration and logging settings, and creating your own modules.
Despite all we’ve just covered, we’ve barely scratched the surface. Even though we tried our best, it’s impossible to do justice to Bro in a single chapter. Bro really deserves its own book, but until we get that, keep a close eye on the web site at http://bro.org, especially their email lists. There is a lively and rapidly growing community of other Bro users out there answering questions, publishing scripts, and pushing the envelope of what you can do with it as a platform. For more real-time help, you can also tune into Freenode IRC’s #bro channel, where there is often someone around to help answer your questions or just to chat about cool things they are doing with Bro. It is the opinion of the authors of this book, and a lot of individuals in the NSM community, that Bro is the future of efficient NSM detection.