
HOUR 10
Learning About Authentication and Access Rights
What You’ll Learn in This Hour
![]() How anonymous users and authenticated users can be allowed access to our sites
How anonymous users and authenticated users can be allowed access to our sites
![]() Getting familiar with the built-in authorization levels (SharePoint groups)
Getting familiar with the built-in authorization levels (SharePoint groups)
![]() User levels and the rights associated with them
User levels and the rights associated with them
This hour expands on Hour 3, “Adding Users and Giving Them Rights,” by looking at how you can give anonymous users or all authenticated users access to a site. It also looks at how to change the logged on user when accessing the site and the differences logging in with a different level of user makes to what can be seen and what can be done.
Learning About Anonymous Access and All Authenticated Users
This section looks at a few special cases of groups of users: anonymous users and all authenticated users.
Anonymous Access
It is possible to have anonymous access to a site. As installed, SPF 2010 does not enable anonymous access, so the ability to access anonymously needs first to be specified, and then it is possible to say what anonymous-access users are enabled to do.
Anonymous access is a two-step process set at the Web Application level:
1. Specify that anonymous access is possible by selecting the web application in Central Administration and then choosing Authentication Providers in the ribbon. Then select an Authentication provider (typically Default is the only one) and for that provider specify that Anonymous Access is enabled.
2. You need to specify what anonymous users are allowed to do.
When anonymous access is possible, select Anonymous Policy in the same (Web Application) ribbon; then specify what anonymous users can access from a choice of Entire Web site, Lists and Libraries, and Nothing.
As this is set at the web application level, it applies for all site collections (and all sites in them) in the web application, something that might be forgotten later when creating a site. So be careful.
Allowing anonymous access isn’t a sensible choice for many sites. You may decide that you don’t want anonymous users to access even a restricted amount of your site’s information. If that’s the case, you can restrict access to the site to only users who have specifically been given rights to the site, or you can consider giving all the users who are logged in to your domain such rights. In the latter case, you should, instead of specifying anonymous access, give authenticated users access rights to your site.
Authenticated Users
The Authenticated Users group is a special set of users available when an SPF 2010 server is in a domain. In WSS 3.0 and MOSS 2007 there was a simple link on the left side of the screen, “Add All Authenticated Users,” which gave this group access to a site quickly and easily. In SPF 2010 this link has been removed (pity, because I thought it was useful), and now you have to give a user access rights in the normal way and then specify that you want to add this group (write Authenticated Users and then Ctrl-K to get the name checked).
The good thing about adding this group is that it includes everyone who is logged in to the domain rather than anyone who can access the site, so it’s an easy way to restrict access to company insiders.
Understanding the Rights of Different Kinds of Users
So far, even though we’ve created different users and assigned them to one of the existing SharePoint groups or to a new specially created SharePoint group, we’ve always been logged in as administrator. I use this access right throughout this book unless otherwise stated.
The rest of this hour describes how we can log in as someone else and the effect of doing so on what we can do in the site and what we can see of the site.
Logging In to a Site as Someone Else
In SPF 2010, logging in as someone else is simple. Just as with Windows 7 (or Vista), you can use the authority of a normal user most of the day and “run as an administrator” when you do something “special.”
When accessing SPF 2010, you can switch users as follows:
1. Go to the Home page. Look at the upper-right corner of the screen. You see text similar to SPF1administrator, with a small arrow to the right of the text. Click the arrow (see Figure 10.1).
FIGURE 10.1 Signing in as a different user

2. Click Sign in as Different User. The standard login box displays, as shown in Figure 10.2.
FIGURE 10.2 Starting to log in as MyReader
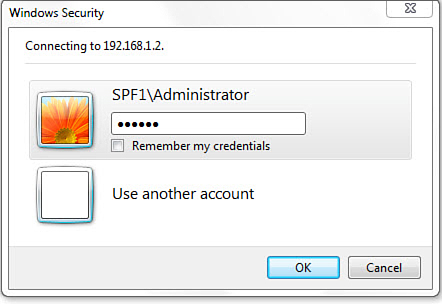
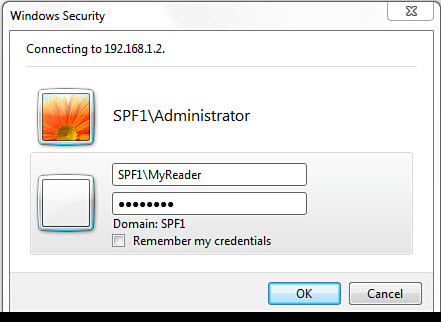
3. Click Use Another Account. The standard login box displays, as shown in Figure 10.3.
FIGURE 10.3 Logging in as MyReader
Notice that SPF1administrator is replaced by SPF1myreader at the top-right part of the screen. Otherwise, everything seems to be the same. Or is it?
Effect on the Default Site When Logging in as Somebody Else
The screen shows little difference compared to before, and you have to look closely to see what is now missing:
![]() Near the upper-left corner when logged in as administrator, there was an Edit button (before the Link to Browse). Now there isn’t.
Near the upper-left corner when logged in as administrator, there was an Edit button (before the Link to Browse). Now there isn’t.
![]() Before, there was a Recycle Bin at the bottom of the left column just above All Site Content. Now there isn’t.
Before, there was a Recycle Bin at the bottom of the left column just above All Site Content. Now there isn’t.
It’s clear why these two items have gone:
![]() The user MyReader has Read rights, and a reader can’t edit pages.
The user MyReader has Read rights, and a reader can’t edit pages.
![]() The user MyReader has Read rights, and readers can’t delete anything or add anything, so there is no need for a Recycle Bin for them.
The user MyReader has Read rights, and readers can’t delete anything or add anything, so there is no need for a Recycle Bin for them.
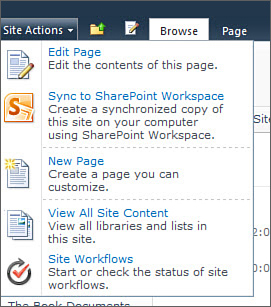
The main difference, however, is behind the scenes. If you now (as MyReader) click Site Actions you see two options only (Figure 10.4). If you remember, Site Actions for the administrator had approximately ten options.
FIGURE 10.4 The reduced Site Actions list when logged in as MyReader

Here, too, the reason there is a difference is clear. All the other functions are not valid for a person with only Read rights.
Now log in as MyContrib. Before you do and before you look at Figure 10.5, however, think about whether any of the two previously mentioned items will then be present or whether they will both still be missing—and whether Site Actions will offer any more alternatives and if so, what.
FIGURE 10.5 The Site Actions list when logged in as MyContrib
The Recycle Bin is back (in its usual place) because a contributor does have Delete and Add rights. The Edit button is back, as shown in Figure 10.5, and Site Actions now has three extra functions, one of which (Edit Page) is just a repeat of the Edit icon just above it; the second is Adding a Page that is also clear; and the third is about workflows, discussed in Hour 21, “Creating Workflows in SPF 2010,” and Hour 22, “Using SharePoint Designer 2010 to Create Workflows.”
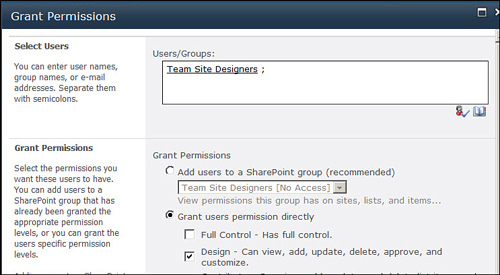
What is the situation if you give someone Design rights? We look at this next.
FIGURE 10.6 Granting permission to Team Site Designers
Effect on Site Settings When Logging In as Somebody Else
Let’s closely look at what happens to the Site Settings screen and compare the situation when logged in as administrator or when logged in as designer. Select the same menu item (Site Actions) and select the same item from the drop-down list (Site Settings):
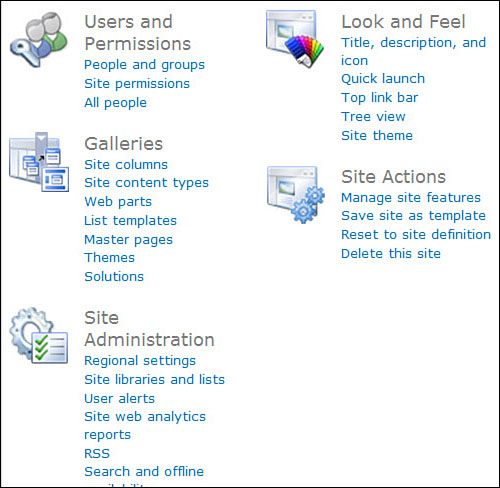
![]() Logging in as the administrator displays the screen shown in Figure 10.7. It’s a long list.
Logging in as the administrator displays the screen shown in Figure 10.7. It’s a long list.
FIGURE 10.7 Site Settings when logged in as administrator

![]() Logging in as a person with Design rights displays Figure 10.8. It’s a short list.
Logging in as a person with Design rights displays Figure 10.8. It’s a short list.
FIGURE 10.8 Site Settings when logged in as MyDesign

Not much left of all those options in Figure 10.8, is there? Again, the screen is changed to reflect just what that particular user (within or not within a SharePoint group) has rights to do.
If the user doesn’t have rights to do something, then (almost without exception) the user will not see it.
Remember that Administrator was the name of the administrator of the server (or VM) on which we installed SPF 2010. Also recall that SPF1Administrator is also the site collection administrator for the main site. So what happens if we have someone with Administration rights who isn’t a site collection administrator, for instance, if we are signed in as MyAdmin?
Sign in as MyAdmin and have another look at Site Settings.
Figure 10.9 shows more possibilities than Figure 10.8 (Site Administration has been cut off at the same point as Figure 10.7 when creating the image), but the entire Site Collection Administration section is missing compared to Figure 10.7, as is the Site Collection Administrators link in the User and Permissions section.
FIGURE 10.9 Site Settings when logged in as a mere site admin
Both of these omissions are fairly obvious, but it’s interesting that a site administrator isn’t even allowed to see who the site collection administrators are.
Many readers probably have just one name and password combination to access Share-Point sites. For those readers, were the preceding sections a complete waste of time?
Not necessarily. You might be wondering why your friend Joe, who works just down the corridor, can see more on his screen than you can. You might also be trying to follow another SharePoint book and are wondering why you don’t see the options it describes. This is actually a tricky one. One of the usual reasons for this is that the book you are reading is describing something in SPS 2010 that doesn’t even exist in SPF 2010. In that case, even Joe (if he is using SPF 2010) won’t see it.
I believe it’s better to be open about these things rather than to hide them. So, no, you didn’t waste your time reading the preceding sections. Now if you discover that you are missing access to something you need in your work, you know (if Joe has that access) that you just need to be moved to a different SharePoint group, which has the same rights that Joe already has (or which Joe is a member of). I’m not saying that will happen if you ask, but if you don’t ask, you certainly won’t be moved.
General Security Principles Apply
Of all the users we created together in Hour 3, one has so far not been used: MyDocLib. We haven’t used it because I want to use MyDocLib as an example when showing you how to restrict access to a list within a site to a particular group.
First, however, there’s one thing about SharePoint security that you need to know: SharePoint security does not break any standard security rules. Therefore, when restricting access to a document library, you can allow someone to access only the document library in question who also has the rights to access the site (or subsite) in which the document library is located. If you want someone to be allowed to access a document library but not be allowed to access the site containing it, the only solution is to create a special site that the person can access and put the document library there.
Specifying Special Access Rights for a Document Library
Now that you know the general principles, check again that MyDocLib has been given rights to the main site. Go back to being the administrator and access People and Groups / Team Site Members. You should see mydoclib listed along with mycontrib. If mydoclib is not listed there, add it (as MyDocLib).
Now that we know that MyDocLib has access rights to the main site, there is nothing stopping us from giving MyDocLib access rights to a document library in the site. To do this, follow these steps:
1. We have two libraries, so let’s open Shared Documents from the link in Quick Launch. It already has one document in it, so using this Document Library is a reasonable test.
2. Access Library Tools > Library (tab) and Library Settings (ribbon). Figure 10.10 displays the top part of what you’ll see.
FIGURE 10.10 Customizing a document library
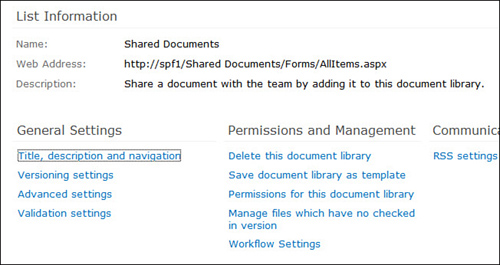
3. In the center column (Permissions and Management), select Permissions for This Document Library item. You see Figure 10.11, which is warning you that at the moment the Document Library is inheriting its permissions from the site it is in.
FIGURE 10.11 Standard permissions for a document library
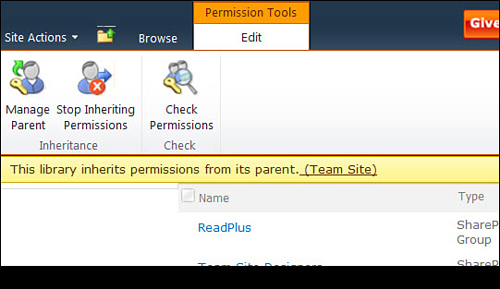
Clearly the first step needed is for this document library to stop inheriting permissions.
4. Click Stop Inheriting Permissions. You receive a warning that you are going to specify permissions for this document library. Click OK.
As Figure 10.12 shows, this is the same list of SharePoint groups and users shown in Figure 10.11. Now, however, there are several different ribbon items and a clearly visible check box next to each SharePoint Group.
FIGURE 10.12 Starting to amend the standard permissions for a document library
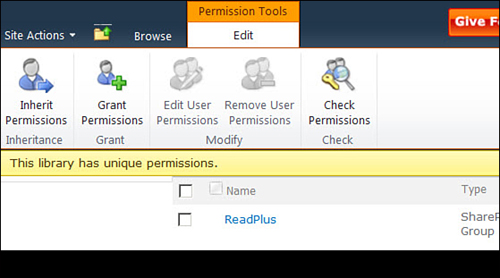
In this case, we intend to end up with a document library that can be accessed by all the administrators (members of the Team Site Owners SharePoint group) and MyDocLib.
5. Select all the rows except Team Site Owners and select Remove User Permissions (see Figure 10.13).
FIGURE 10.13 Removing some user permissions

6. Click OK when the warning message appears.
7. The list now shows only Team Site Owners. The final step is to add MyDocLib, so select Grant Permissions.
Figure 10.14 shows the situation before checking the username you’ve typed in (always a good idea). Figure 10.15 shows an extract of the same screen after the user-name has been checked.
FIGURE 10.14 Adding a user to Shared Documents
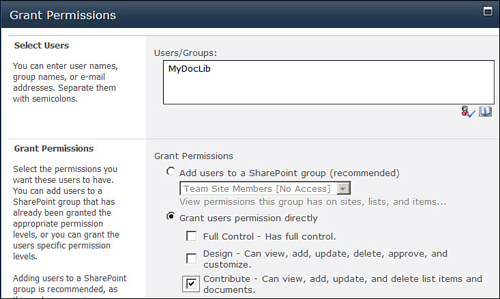
FIGURE 10.15 Adding a user after having checked the username
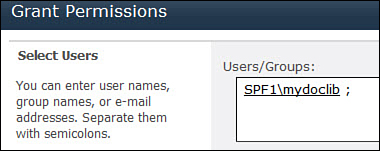
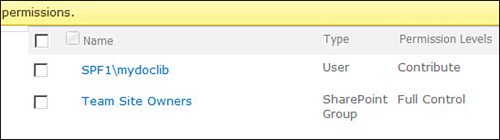
FIGURE 10.16 Only the administrators and one user have access rights
Note that I have given this user direct permissions.
We have achieved our goal, and both the administrators and this single user can access the content in this document library (see Figure 10.16). No one else apart from Site Owners can, though!
Summary
The different types of users who can access SPF 2010 sites were discussed. After briefly covering anonymous access and the All Authenticated Users group (all the users logged in to the domain), we examined the effect different permissions have on the look of SPF 2010 sites and the different options available.
Finally, we looked at how SPF 2010 applies general security principles, using an example of what happens when access rights to a document library are restricted to administrators and one particular user only.
Q&A
Q. Anonymous access is specified at the web application level. What is a web application, and how do I create one?
A. A web application is a bunch of sites accessible via the same port.
The basic installation created one web application (http://spf1) at port 80 (that is, the default site). All the sites we have added so far have been subsites to that site and are thus included in that same web application.
Even if we were to add a new “top-level” site to start off a new site collection (which, remember was a top-level site with its subsites and sub-subsites), that top-level site would still be in the same spf1 web application.
Here we look at creating a web application because it is good practice to separate anonymous access content from the normal content. As anonymous access is set at the web application level (see previous text), you can either allow anonymous access for all the sites below the default site (probably not a good idea) or create a new set of sites containing data that is suitable for anonymous access. This “new site of sites” must be contained in a site application.
Here are the basic instructions for creating a new web application where you specify that anonymous access is allowed, followed by the instructions for creating a new top-level site (site collection):
1. Open Central Administration > Manage web applications (in the Application Management section).
2. New (In the ribbon, upper left).
3. A long way down the page you need to Register New Managed Account. Do this (using SPF1Administrator) and return to the Create New Web Application screen.
4. Note the port number and accept the defaults until halfway down the page.
5. Change Allow Anonymous (in the Security Configuration section) to Yes.
6. Near the bottom of the page, specify SPF1 (the only selection in the dropdown) as the location of the Search server.
7. Turn the Customer Experience Improvement Program off. (Check back to see that Require Use Remote Interfaces Permission is turned off).
8. Click OK.
After a long wait, sometimes so long on a slow machine that it times-out, in which case just redo the creation, we now have a web application and anonymous access has been specified for it. The next steps create a top-level site:
1. From the Central Administration main page (or the Applications Management page), in the center of it, is a Create Site Collections link. Click it.
2. Make sure the web application listed at the top of the page is the one you want to use; otherwise change it. Give the top-level site a name (I used Anonymous Website and specified AnonWebSite for the URL).
3. Select Team Site.
4. Specify Administrator as the Primary Site Collection administrator. (Note that the site collection administrator could be anyone. For a site created for the Personnel department, it would be useful if it were someone within the department and not you. In this case of a site for anonymous access, however, the administrator of the server is fine.)
5. Note in passing that each site collection has its own set of (different) quotas but only if you have already created a separate quota template. Here we have only one listed.
6. Click OK.
7. The site is created and can be accessed via http://spf1:<portnumber>. (Mine is 42641, so http://spf1:42641 is what I can see.)
Q. I already have a web application, and I didn’t specify anonymous access when I created it. How can I do so now?
A. Complete the following steps:
1. Go to Central Administration > Manage web applications (in the Application Management section).
2. Select the web application that you want anonymous access to be allowed for.
3. Select Authentication Providers in the ribbon.
4. Select (usually) Default, and the Anonymous Access section should be visible on the page. (Then refer to the beginning of this hour for how to say what anonymous users an do).
Workshop
Quiz
1. Name the couple of “special” sets of users discussed in this hour.
2. Do all users always see the same things when they access the same page?
3. Why when we grant a specific user rights to a document library (or list) should we specify the user permissions directly rather than assign the user to a Share-Point group?
Answers
1. Anonymous access and the Authenticated Users group.
2. No, what they see depends on which rights they have.
3. Yes, you should specify user permissions directly. If the user is assigned to a group, that group will have access rights to the document library (or list). That is not what we want in this case.