
HOUR 11
Using What We’ve Learned So Far in a Site
What You’ll Learn in This Hour
![]() Collecting data to create a site
Collecting data to create a site
![]() Assigning data to appropriate SharePoint lists and libraries, and accepting when data isn’t suitable
Assigning data to appropriate SharePoint lists and libraries, and accepting when data isn’t suitable
![]() Deciding what to place on the default site page
Deciding what to place on the default site page
![]() How a user accesses information
How a user accesses information
This hour works through the actions needed when creating a website for a particular work scenario.
Brainstorming What Information a Site Could Contain
Now that we learned the concepts of building a website using SPF 2010, let’s put them into practice by setting up a site for a particular purpose.
Let’s build a site that can be used as a model for large teams investigating a serious crime. The first thing is to brainstorm what kinds of information the team is likely to have and need. So, just at random, a few things come to mind:
![]() Eyewitness reports
Eyewitness reports
![]() Interviews with suspects
Interviews with suspects
![]() Interviews with relatives
Interviews with relatives
![]() Photographs of suspects
Photographs of suspects
![]() Soundtracks of interviews
Soundtracks of interviews
![]() Videos of interviews
Videos of interviews
![]() Videos of the crime scene
Videos of the crime scene
![]() Photographs of the crime scene
Photographs of the crime scene
![]() Fingerprints
Fingerprints
![]() DNA samples
DNA samples
![]() Links to other computer systems
Links to other computer systems
![]() General information to the team members
General information to the team members
![]() Restaurant and hotel information for out-of-area members of the team
Restaurant and hotel information for out-of-area members of the team
![]() Images of menus
Images of menus
![]() Recommendations from local members of the team
Recommendations from local members of the team
![]() Dates of press briefings
Dates of press briefings
![]() Dates of internal meetings
Dates of internal meetings
![]() Method for the boss of the team to report to his superiors
Method for the boss of the team to report to his superiors
This gives you the general idea. Include anything and everything connected with issues related to the site, even if it later ends up being rejected.
Making Sense of the Mass of Data
Brainstorming should lead to a mass of hodge-podge ideas. The next step to starting a website is to collate this date and assign it to SharePoint “things.” We start with the documents previously listed (but we could start anywhere).
Thinking About Documents
Here’s our first attempt at a list of the documents:
![]() Eyewitness reports
Eyewitness reports
![]() Interviews with suspects
Interviews with suspects
![]() Interviews with relatives
Interviews with relatives
At this point (and this is normal), we discover that we forgot that the team will produce various reports, so we add them to the list:
![]() Weekly summaries
Weekly summaries
![]() Progress reports
Progress reports
![]() Text of press releases
Text of press releases
![]() Transcript of press briefing
Transcript of press briefing
![]() Reports from the team boss to higher management
Reports from the team boss to higher management
It’s fairly clear that all these documents will go into SharePoint document libraries. What is not clear is how many document libraries, because we might think of some more documents later in the process.
We need to think about whether we need a document library that includes all these documents, some (fewer than eight) document libraries to contain them, or eight different document libraries (one document library listed item).
In other words, think about consolidation. To do that, consider the names of the previously listed categories. Interviews with eyewitnesses, interviews with suspects, and interviews with relatives should go in the same document library because
![]() They are all interviews.
They are all interviews.
![]() There is a floating line between a suspect and an eyewitness (or relative): Being one doesn’t exclude being the other.
There is a floating line between a suspect and an eyewitness (or relative): Being one doesn’t exclude being the other.
We can put all three categories in an Interviews document library. Then we need something that makes it possible for us to mark someone as both an eyewitness and a suspect, for example.
I often do this by having three Yes/No fields:
![]() Suspect: Yes/No
Suspect: Yes/No
![]() Eyewitness: Yes/No
Eyewitness: Yes/No
![]() Relative: Yes/No
Relative: Yes/No
This makes it possible to easily create views, such as Suspect (condition is Suspect = Yes) or even a combined view, such as Suspect and Eyewitness (first condition is Suspect = Yes; second condition is Eyewitness = Yes).
Another option is to have a Choice type field with three choices (Suspect, Eyewitness, and Relative) and make this Choice type field (unlike the one we used in Hour 8, “Creating and Using Views and Folders”) have multiple choices.
The Interviews document library reduces the list by three items. Five items are left! We can immediately cross another one off: reports from the team boss to higher management. This won’t be available to team members other than the boss, so it can’t be located in the same document library as anything else. So we create a document library called Reports to Senior Management. We can decide later what to do to keep it secure. Four items left.
Because two of the four items relate to the press, both of them can be in a document library called Press Documents. To keep the two kinds of documents apart but still within the same document library, we can use the same technique as in Hour 8 and use a Choice field called, perhaps, Type of Document. In this, we have two alternatives: Press Releases and Press Briefing Transcripts. Of course, we’ll pre-prepare views for each of those two values (just as we did in Hour 8 for HP, IBM, and so on). Two left.
Both the two left, despite the completely different names in the list, are reports made on a regular basis. We can put them in the same document library using a Choice field (and views) to keep them apart.
Finally, we discover that we completely missed one set of documents. Regular team meetings will no doubt be written up. Because of the size of the team, there will probably be team meetings of subteams and team meetings of the entire squad. So we need one document library for team meetings with an extra field, Team Name, to categorize them and ease the use of views.
The end result (at least for now) are the following document libraries:
![]() Interviews
Interviews
![]() Press Documents
Press Documents
![]() Summaries and Progress Reports
Summaries and Progress Reports
![]() Team Meetings
Team Meetings
![]() Reports to Senior Management
Reports to Senior Management
The Reports to Senior Management document library needs to be separate.
Pictures
In the original list, we have four sets of pictures:
![]() Photographs of suspects
Photographs of suspects
![]() Photographs of witnesses
Photographs of witnesses
![]() Photographs of the crime scene
Photographs of the crime scene
![]() Images of menus
Images of menus
The first three involve solving the crime; the fourth does not.
The first two—following the ideas previously stated—can go into a single picture library. In this picture library, there must be a way (as previously, with the Yes/No fields) to decide whether someone is a witness or a suspect or both.
In fact, we now realize that we will have photographs of relatives, too, so this picture library will include them and be the equivalent of a document library.
The images of menus need their own picture library. For the moment, we can’t think of any other social usage for a picture library. Also it might prove useful if the out-of-town members of the squad (that is, those for whom the images of menus were conceived) can recognize the other members of the squad. In other words, we need a third picture library (with photographs of squad members). Let’s also add descriptions to the photographs in the picture library.
The end result is that we have four picture libraries:
![]() Suspects, Eyewitnesses, and Relatives
Suspects, Eyewitnesses, and Relatives
![]() Menu Images (and other social bric-a-brac)
Menu Images (and other social bric-a-brac)
![]() Squad Member Pictures (with brief descriptions)
Squad Member Pictures (with brief descriptions)
Now let’s look at some of the easier items to categorize.
Announcements
One item obviously goes in an Announcements list: general information to the team members. This can be used both for general information about how the investigation is proceeding and for information for out-of-town squad members about interesting things about to happen in the town. Given the seriousness of the investigation, it’s best to keep them apart.
We’ll have two Announcements lists:
![]() General investigation information announcements
General investigation information announcements
![]() Announcements about interesting local events
Announcements about interesting local events
Dates
Two date items were previously listed: dates of press briefings and dates of internal meetings. These are obvious candidates for different Calendar lists.
At this point, there could be a third calendar—one giving the local events for the out-of-towners’ free time.
Now, we have three different Calendar lists:
![]() Press Briefings
Press Briefings
![]() Internal Meetings
Internal Meetings
![]() Local Events
Local Events
Unformatted Information
A few items listed in our original list are both in the social category and haven’t been covered:
![]() Restaurant and hotel information for out-of-area members of the team
Restaurant and hotel information for out-of-area members of the team
![]() Recommendations from local members of the team
Recommendations from local members of the team
Both items are likely to be free format, with a title and a brief description from the local squad member, so they are suitable for the Custom list format with a title such as Bob’s Café and a description.
I see no reason why we can’t combine these items if they are strictly free-formatted information. If the restaurant/hotel information is official (and so probably laid out within a certain number of set fields) and the recommendations are strictly off-the-cuff ones, however, there should be two Custom lists (with different fields). Again, it’s a decision for the site designer based on the designer’s sense of how this information is going to be provided.
So we have two different Custom lists:
![]() Local Hotel and Restaurant Details
Local Hotel and Restaurant Details
![]() Local Tips
Local Tips
Other Information
Here’s what’s left from the original list:
![]() Soundtracks of interviews
Soundtracks of interviews
![]() Videos of interviews
Videos of interviews
![]() Videos of the crime scene
Videos of the crime scene
![]() Fingerprints
Fingerprints
![]() DNA samples
DNA samples
![]() Links to other computer systems
Links to other computer systems
Links
Links to other computer systems may seem to be the only obvious Links library required; however, fingerprints might be stored in a national (perhaps) fingerprint system rather than in our SharePoint site. Therefore, there ought to be a link to the fingerprint system.
I obviously don’t watch television enough, because I have no idea where DNA information is stored and accessed. Let’s assume that the information is similar to fingerprints and thus requires us to access another system.
From this, we can calculate that we will have one Links library, which contains several entries, such as the following:
![]() Links to Various Police-Related Organizations
Links to Various Police-Related Organizations
![]() Link to the Fingerprint System
Link to the Fingerprint System
![]() Link to the DNA System
Link to the DNA System
Just because we have listed something (about what the site should provide) in our brainstorming, we need to remain flexible and remind ourselves constantly that not everything needs to be stored in our own system. What is important is that our team can access the information, not that it is stored in our system. Links lists are often the solution to this “problem.”
Audio and Video
We’re left with audio and video. There is no list or library specifically for audio and video as there was for pictures. So the logical place to put these files is in a document library (or libraries)—that is, if we put them in a library at all. Whereas MP3 audio files are small and are not going to be a problem for a document library, video files are large and are a potential problem for (for instance) backups. One option, therefore, is to keep video files in the file system.
The other thing is that the SharePoint v4 systems do not as delivered provide any functionality for playing back video files in a window within the browser. Typically, either software additions are required (if third-party additions to the basic SharePoint software are available), or a video file will open a completely separate copy of software capable of playing back the video format we use.
In addition, it might first be necessary to check which file formats can be uploaded to a document library. The first question in the “Q&A” section shows how to check the file formats enabled in document libraries and how to amend that list.
Otherwise, if MP3 (for instance) is on the list of file types that are “banned,” any attempt to upload a single MP3 file (or a batch of files containing at least one MP3 file) will fail.
For the purpose of this site-creation exercise, let’s just assume that we’ve covered all the bases and that both audio and video files will be added to document libraries.
To be as logical as possible, let’s have three separate document libraries:
![]() Soundtracks of Interviews
Soundtracks of Interviews
![]() Videos of Interviews
Videos of Interviews
![]() Videos of the Scene of the Crime
Videos of the Scene of the Crime
Summary of Lists/Libraries
So far, our final tally of lists and libraries is as follows:
![]() Document libraries (8)
Document libraries (8)
![]() Picture libraries (4)
Picture libraries (4)
![]() Announcements lists (2)
Announcements lists (2)
![]() Calendar lists (3)
Calendar lists (3)
![]() Custom lists (2)
Custom lists (2)
![]() Links lists (1)
Links lists (1)
Placing the Lists/Libraries into the Web Pages
We’ve brainstormed our lists and libraries, so now we must create them and add fields (as appropriate) for each list. Then we must decide which lists/libraries should appear in the Quick Launch section and which lists/libraries need to appear in web part form in the main section of the page.
Deciding on One Site or Several Sites
First, consider whether one site is enough for your needs. If you look at our list, it is because the only thing we have that is of restricted access is one single document library; we can assume that there is nothing to stop the top management having rights to access the rest of the site. Therefore, we can also give them rights to that one Reports to Senior Management document library (following the rules outlined in Hour 10, “Learning About Authentication and Access Rights”).
However, although that approach is possible, we can always expect to have missed something when doing the brainstorming and follow-up design sessions. This means that we could have missed some other piece of information needed for contact between the senior management and the squad leader.
In fact, we probably missed that they need to communicate. These days, many senior managers communicate via a computer. Therefore, a Discussions list open only to senior management and the squad leader is certainly a possibility we should add to our design.
So now we have both a Discussions list and a document library that have restricted access. The obvious solution is to put them in a subsite that does not inherit permissions.
In that subsite, we have so few lists/libraries that we might as well put both web parts in the main section of the screen. We can place the Discussions list on the left, and on the right the document library, the web part for which should, perhaps, use a view that specifies something between 10 and 20 items.
Allocating Lists/Web Parts to the Default Page
What about the main site? It’s obvious that we have so many lists and libraries that we are not going to fit the web parts for all of them in the center section. So what we look for there are the lists/libraries that need to be “in your face.”
This knocks out most of the document libraries because we expect people to regularly look through them without prompting. For instance, the meeting reports and so on will automatically be read by people who were away at the time (or missed most of the meeting because they were daydreaming). Therefore, they don’t need to be in the main section. And, in any case, there’s a technique called alerts (discussed a bit later in this hour). With alerts, you can tell people when something has been changed in a document library (or list).
For both these reasons, we’ll use what little space we have in the main section of the screen for some other lists. The first obvious candidates are one of the two Announcements lists and two of the three Calendar lists.
Of the rest, only one list/library should be included in the main section of the page: the Links list. That is there because people will be using it often as a way to go directly to other systems, and they won’t want to first open it from Quick Launch.
Specifying What Will Be Listed in the Quick
Launch Section
As for the question of which items to list in Quick Launch, it depends on how many lists/libraries you have. At a minimum, you should have a link there for every list/library that you have not included as a web part in the main section of the screen. If you have the space, however, there’s nothing wrong with having even the list/libraries behind those web parts present in the main section of the page (or some of them) listed in the Quick Launch section.
To some extent, in a company environment this can be decided by the size of the monitors in use and the standard screen resolution. Just as an overfull screen looks a mess, so does a nearly empty one.
Positioning the Web Parts in the Web Page
So far, there’s been no discussion about how to position those web parts that we selected for the main section of the page. A good start is to get rid of the standard picture (if you are using a site template that includes it)! It does nothing useful and just fills up otherwise useful space. Follow that, if you have two Announcements lists, by placing (one each!) at the top of the two columns.
For some reason, it’s a good standard to have the Links list on the rightmost side of the screen. (Because we want all the links in the list to be visible here, that should be the rightmost section completed.)
That leaves the two calendars, which can then be placed only in the leftmost screen section (with the more important one first).
Here the view called Calendar does look nice, I agree, but it takes up a lot of space. So you should at least consider making one or both of your web parts use another more boring view. Figures 11.1 and 11.2 illustrate this point.
FIGURE 11.1 Using small-size calendars
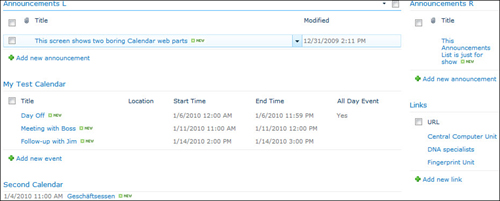
FIGURE 11.2 Using at least one “real” calendar
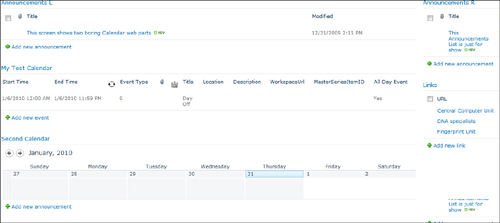
In Figure 11.2 (and only a small part of the second calendar is actually on screen), the second calendar dominates the entire screen (even though it contains no more information than the first calendar). So use full calendars with care. If you want them to dominate, fine. But if you don’t, use more minimal versions.
That’s enough for setting up the site. Now let’s look at the needs of the people who require access to a site’s information.
Additional Functions for the Users of the Site
People tend to use a site in three different ways:
![]() They access the site regularly and check what’s new there.
They access the site regularly and check what’s new there.
![]() They want to be told when things are new.
They want to be told when things are new.
![]() They want to search for things from the site.
They want to search for things from the site.
Of course, people might also want to do a combination of any of the things previously listed. Let’s look at these briefly.
People Who Access the Site Regularly
People who access the site regularly want to see at-a-glance information. The information they see directly is what the site designer decides they are likely to be most interested in.
People Who Want to Be Prompted for Updates
In the earlier releases users could specify alerts at List or Library level, and they would then receive email whenever anything happened in the List or Library. This restriction (which is still valid, although alerts are now possible on Views) on having Alerts only at List or Library level was something that caused a lot of queries to SharePoint administrators.
Often, therefore, site administrators didn’t tell their users that alerts were possible because, from the point-of-view of the administrator, alerts did nothing but cause him work. Another reason was that the administration of alerts was a mess because the only person who could create an alert was the user and the administrator had no picture of how many alerts were in place and for what. That has now been improved but users complaining about getting too many alerts (or not getting any) remains.
For alerts to function, the SharePoint system needs to send emails. This is something that our system hasn’t been set to do, so instead of going through how to create an alert, we go through how to create an RSS feed because this doesn’t require the administrator to do anything. (Sneaky perhaps, but these days I tend to rely more on RSS feeds than on emails, so I’m helping you to do what I do.)
(Very brief information on how an administrator can specify outgoing email, which is what is required for alerts to work, is in the “Q&A” section.)
Here are the steps for creating an RSS feed for The Books Documents document library:
1. Open The Book Documents library.
2. Select Library (menu line).
As you can see in Figure 11.3, the RSS feed is in the Share & Track section. (If your administrator has already specified support for outgoing email, this section would be the place where an icon for Alert creation would appear.) It doesn’t appear in Figure 11.3 because outgoing email hasn’t been specified; it wouldn’t be possible to use even if it were there, so SharePoint, as usual, doesn’t show it.
FIGURE 11.3 Choosing
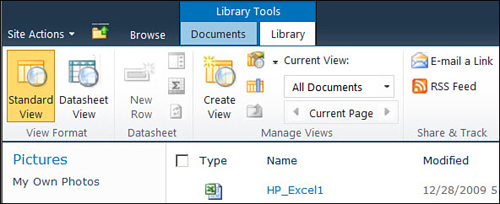
3. Click RSS Feed. Figure 11.4 shows the top section of the page.
FIGURE 11.4 The RSS feed
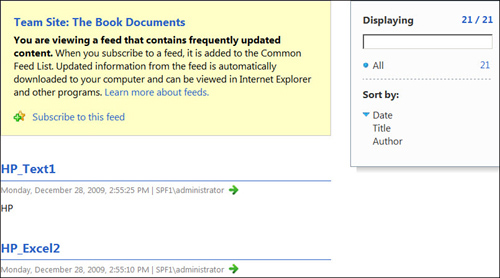
4. There are now two alternatives:
![]() You can copy the URL and then go to your RSS Reader; create a new feed; and specify the URL you just copied. (This is what I do.)
You can copy the URL and then go to your RSS Reader; create a new feed; and specify the URL you just copied. (This is what I do.)
![]() You can click Subscribe to This Feed.
You can click Subscribe to This Feed.
This option is a big disappointment. What you expect, based on your experience of creating RSS feeds from many non-SharePoint sites, is a selection of different RSS readers so that you can directly add this feed to your RSS Reader. Instead all this function does is add the feed to a folder in the copy of IE on the PC you are using at the time. So you need to add it to your own RSS Reader by hand anyway.
People Who Want to Search the Site
The final category of typical users consists of those who neither want to visit a site regularly nor want to receive email about changes to it. These people typically access a site only when they want something specific; therefore, they tend to use the Search function.
Searching a SPF 2010 site is covered in both in Hour 13, “Using SF 2010 Search and Installing Search Server 2010 Express,” (for simple out-of-the-box searches) and Hour 14, “Improving Searches,” (for more complicated searches after Search Server 2010 Express has been added).
Summary
This hour covered basic site design. It started with brainstorming data and then assigned this data to suitable kinds of SharePoint lists and libraries. The hour then examined where to place the data in the site and how typical users might access the data.
Q&A
Q. How do I find out which file formats are on the banned list (and how do I add new formats)?
A. Go to Central Administration > Security > Define Blocked File Types. You see a screen similar to Figure 11.5.
FIGURE 11.5 List of Blocked File Types
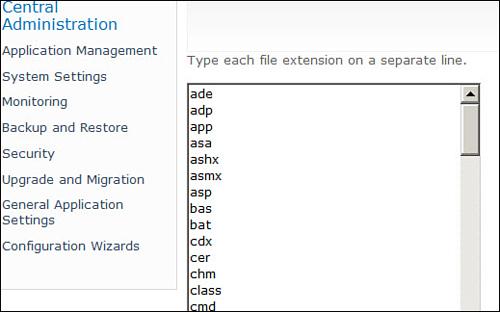
Scroll down the list to see whether MP3 files are blocked. They are not, and neither are such files such as AVI, MP4, and WMV file types that many administrators of business sites might well want to ban. However (and to my mind, oddly), Microsoft help files (.chm) are banned.
(Before you do anything else, check that you can’t upload .chm files.) So delete CHM from the list of file types in Figure 11.5 and click OK. Now you can upload Microsoft help files.
Adding file types such as MP4 to the list of file types is equally trivial. Just insert a line feed at the correct alphabetical location (for ease of use); add MP4 and click OK.
Q. How can administrators make alerts possible?
A. To create alerts, the administrator needs to allow the SharePoint system to send email; otherwise, there is no link available in the Share and Track group in the ribbon. This is done in Central Administration > System Settings > Configure Outgoing e-Mail Settings.
The main requirement is the need to have an SMTP server available. Typically, this is Exchange Server, but it could be any SMTP server (even a small, free one installed on the same server as your SPF 2010).
Getting the name of that SMTP server correct is the usual stumbling block in what otherwise is a relatively simple process (unlike setting incoming email settings).
Workshop
Quiz
1. Is the data we have gathered in the brainstorming phase the totality of data for the site?
2. If I have only a single document library that is of restricted access, should I locate it in the standard site and specify special access rights for it?
3. Can I specify that I get an email alert when a single item in a list or document in a document library changes?
Answers
1. It’s not likely to be. The subsequent processes (of assigning the data to lists and libraries and of then deciding what to include on the default page) all tends to throw up new data that was previously overlooked.
2. It is one option you have. Unless you are 100 percent sure that you will not have any more lists or libraries with restricted access, however, it might be a better option to create a special site (with restricted access) for it.
3. Not as such. If the item in question is the only one in a view and you have specified alerts for a particular view, then yes, you can. But typically, the standard options, views, lists, and such mean that an alert can act on several items or documents, not just on one.