
HOUR 16
Using Outlook 2010 with SPF 2010
What You’ll Learn in This Hour
![]() Linking SPF 2010 document libraries to Outlook 2010
Linking SPF 2010 document libraries to Outlook 2010
![]() Linking SPF 2010 Calendars to Outlook 2010
Linking SPF 2010 Calendars to Outlook 2010
![]() Linking SPF 2010 Contacts to Outlook 2010
Linking SPF 2010 Contacts to Outlook 2010
![]() Using Outlook 2007 instead of Outlook 2010
Using Outlook 2007 instead of Outlook 2010
![]() Using Outlook 2003 instead of Outlook 2010
Using Outlook 2003 instead of Outlook 2010
Having in the previous hour, looked at something (attachment storage) that is no longer possible when the user is running Outlook 2010, this hour looks at what is possible when using Outlook 2010 with SPF 2010.
The hour focuses on how document libraries, calendar lists, and contact lists from SPF 2010 sites appear and function in Outlook 2010. It concludes (in the “Q&A” section) by briefly looking at a situation when the user is using Outlook 2007 or 2003 rather than 2010.
Linking Document Libraries to Outlook 2010
With Outlook 2010, you can link a SPF 2010 document library to Outlook. There are a couple of reasons for doing this:
![]() It enables you to take the files offline to work with them (using standard Outlook 2010 functionality).
It enables you to take the files offline to work with them (using standard Outlook 2010 functionality).
![]() It enables you to use Outlook 2010’s built-in Viewer to see inside your documents (only for formats supported by the Outlook 2010 Viewer).
It enables you to use Outlook 2010’s built-in Viewer to see inside your documents (only for formats supported by the Outlook 2010 Viewer).
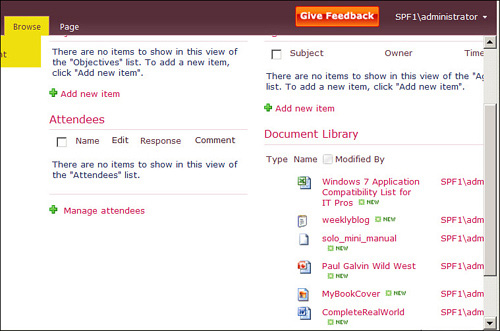
To have some documents in a document library that we can use to demonstrate this, I’ll copy some files into the document library of BookSite2 using the techniques used earlier in Hour 7, “Creating and Using Libraries.”
Following that, Figure 16.1 shows what we have on the default page of that site.
FIGURE 16.1 The document library in Book-Site2 after uploads
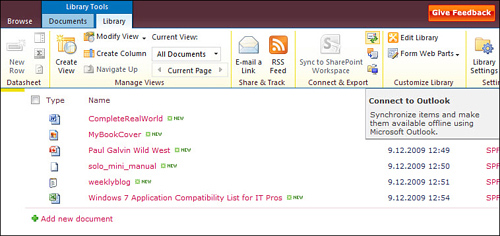
Follow these steps to link that document library to Outlook 2010:
1. Open the document library by clicking the Document Library heading in Figure 16.1.
2. Change the ribbon to Library (in the Library Tools section).
3. Move across to the right to the Connect and Export section.
Figure 16.2 shows what you see if you move the cursor over the top icon in this section.
FIGURE 16.2 Finding Connect to Outlook
4. Click the Connect to Outlook icon.
5. Control is likely to be transferred to a pop-up IE window asking you to confirm that you want the website to open the Outlook program (see Figure 16.3).
FIGURE 16.3 Outlook requires permission.
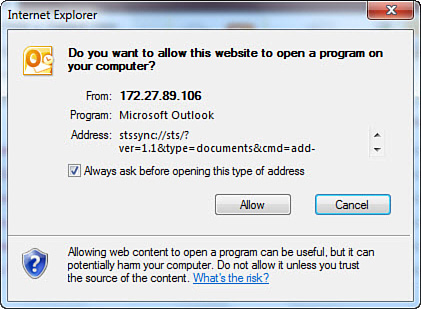
6. Click Allow.
7. A similar second pop-up box might appear; click Allow there, too. (This second pop-up is to allow the transfer of content.)
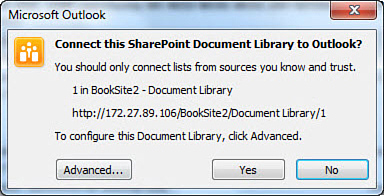
After this second Allow with the background of the website, Outlook 2010 opens, and on top of that there is a new pop-up window that again asks if we actually want to do this (see Figure 16.4).
FIGURE 16.4 Approving the connection of the document library to Outlook
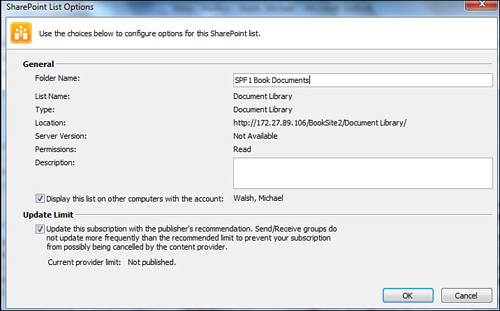
8. Click Advanced and change the default name to SPF1 Book Documents (see Figure 16.5).
FIGURE 16.5 Specifying the name in Outlook 2010 of the document library
9. Click OK.
10. This takes us back to Figure 16.4. Click Yes.
11. Now you need to Log In (again) to the website (see Figure 16.6).
FIGURE 16.6 Authorizing access to the website

12. Enter User name in the form SPF1Administrator. (Otherwise WIN7 would be taken as the “domain.”)
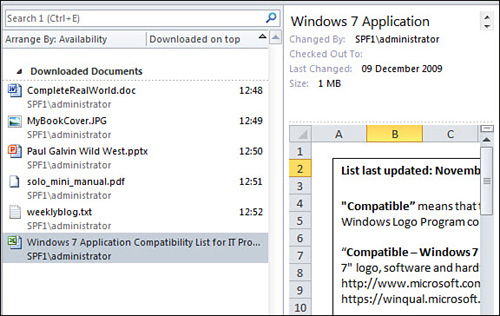
What now happens is that the pop-up disappears, and one-by-one the files from the document library are (slowly) copied across and listed on the page. When all the six files that were in the BookSite2 document library are copied, you see something like Figure 16.7 (which is the center section of the page).
FIGURE 16.7 The document library as shown in Outlook 2010

Here, in addition to the list of documents, you can see a new pane containing the content of the first document in the list. Figure 16.8, for instance, shows what the previewer for Excel files makes of the last item in the Document Library.
FIGURE 16.8 Another preview example
Deleting Connections to Old Servers
At some stage, you should remove from Outlook 2010 some of your connections to old (or test) Lists because they are no longer needed and, by still being there, take up useful screen space. To do this, follow these steps:
1. With Outlook 2010 open, scroll down in the left column to the SharePoint Lists section.
2. Select the name of the link you want to remove; here this link is to an old test document library called Team Site—Shared Documents (see Figure 16.9).
3. Right-click and then select Delete Folder, which gives you Figure 16.10.
4. Click OK, and the Link is removed.
Linking Calendars to Outlook 2010
Another useful way to combine Outlook 2010 with SPF 2010 is to link calendars between the two. This section goes into the details of how to set that up.
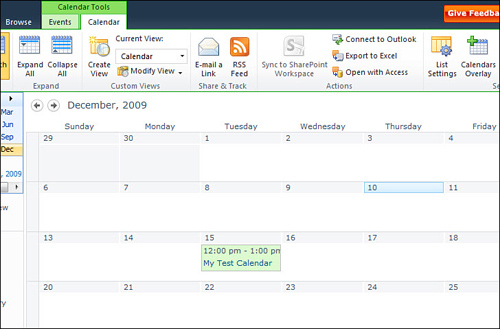
1. Open a Calendar List in SPF 2010 and select Calendar in the Calendar Tools section. As shown in Figure 16.11, I have selected the Calendar entry from the (default) Team Site because there is already an entry there.
FIGURE 16.9 Selecting a List to be disconnected
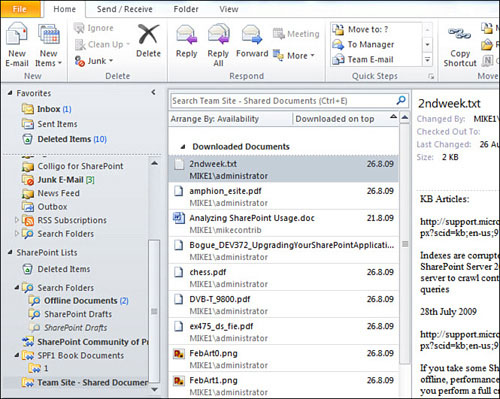
FIGURE 16.10 A scary warning
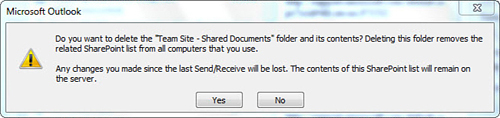
FIGURE 16.11 The Calendar List in SPF 2010
3. The same warning about allowing a website to open a program on your computer is present as a pop-up (refer to Figure 16.3). Just click Allow.
4. The same follow-up warning about allowing the website to open web content comes here, too. Click Allow.
5. Finally Outlook 2010 opens, and there is the same warning as in Figure 16.4, only now for SharePoint Calendar. Click Advanced, change the name to SPF1–Calendar, write Calendar from the SPF1 Team Site in the description field, click OK, and then select Yes (see Figure 16.4).
6. Again you need to connect to the site with SPF1Administrator and password.
7. You now have a Listing for SPF1—Calendar in a new Other Calendars section. SPF1—Calendar has been automatically selected for display, so your Outlook now displays both the Outlook Calendar and the SPF 2010 Calendar (see Figure 16.12).
FIGURE 16.12 Outlook 2010 Calendars
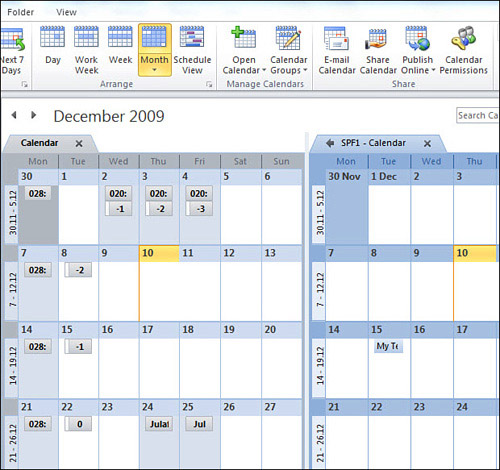
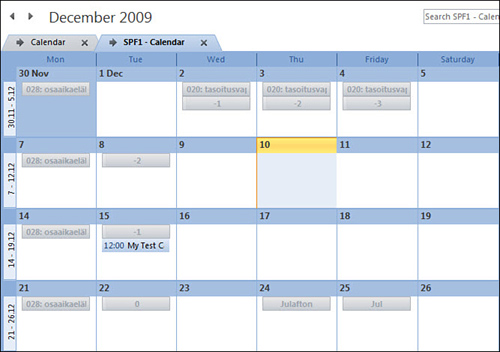
FIGURE 16.13 Overlay View of the Outlook 2010 and the SPF 2010 Calendars
Synchronization between SPF 2010 and Outlook 2010 for SPF 2010 calendars that are stored in Outlook 2010 is two-way. So it is possible to add a new item to a calendar in the Outlook 2010 copy of a SPF 2010 calendar and then have it synchronized automatically to the SPF 2010 site. (Changes made to the SPF 2010 calendar naturally also synchronize to the Outlook 2010 version of the Calendar.)
To see this in action, we need to take the following steps:
1. Access the Outlook 2010 copy of the SharePoint Calendar (SPF1—Calendar). Do this by removing Calendar from the Overlay View, as shown in Figure 16.13.
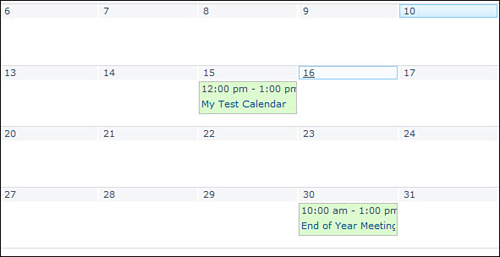
2. Add a new entry. Here I’m adding a meeting for the December 30, 2009 (called End of Year Meeting).
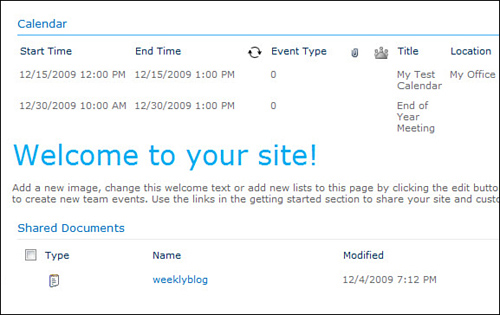
3. Now open the calendar in SPF 2010. Here I’m going directly to http://172.27.89.106/Lists/Calendar/calendar.aspx. Your TCP/IP address will be different of course. Figure 16.14 displays a small section of the page.
FIGURE 16.14 A calendar in SPF 2010 that includes an entry made in Outlook 2010
4. Click Team Site in the breadcrumbs near the top left of the Calendar page, a part of which was shown in Figure 16.14. Figure 16.15 shows a revised section of the default page of the (default) Team Site.
FIGURE 16.15 The List View web part of the SPF 2010 calendar also contains the new entry.
Linking Contacts to Outlook 2010 (and Learning How to Delete a List)
At the moment, we don’t have a Contacts List in our site, but we need one to check functionality with Outlook 2010, so follow these steps to create one. We create one in the (default) Team Site, but it could be created in one of the other sites if preferred; just amend the steps for using it.
1. Go to the Team Site if you aren’t already there.
FIGURE 16.16 The More Options page in a system with Silverlight
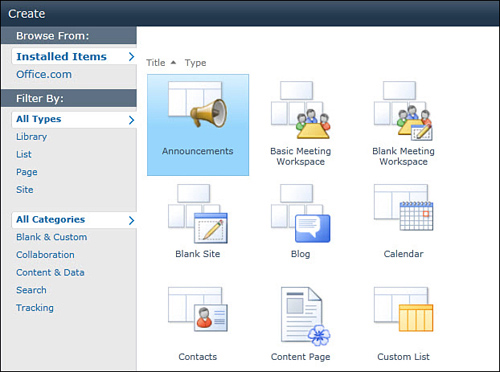
2. Select Site Actions and then More Options from the drop-down (see Figure 16.16).
3. Going through this All list of things that can be created would take forever, so click List in the left column to make the list of options more manageable (see Figure 16.17).
FIGURE 16.17 All the different List types
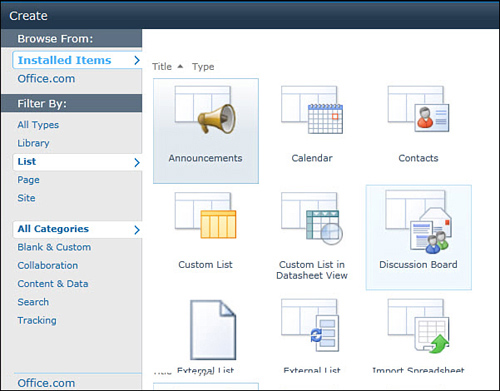
4. This is just a list of all the items from the Communications; Tracking and Custom Lists columns are in the non-Silverlight version in Figure 6.2. (The second copy of External List will probably be gone in your copy of SPF 2010.) Click Calendar.
5. Specify BookCalendar1 as the name of the Calendar in the right section of the screen. Create now becomes an available option.
6. Click Create.
7. After the BookCalendar1 list has been created, you have only the horizontal menu selection, but nothing has been selected, and therefore there is no thread visible. Select Calendar in the Calendar Tools section. (Refer to Figure 16.11—again, no misprint!)
8. Select List Settings to the right of the screen (see Figure 16.18).
9. Click Delete this List.
10. Click OK to approve that the List is sent to the Recycle Bin.
11. After that small detour, go back to the screenshot shown in Figure 16.16, and this time select Contacts.
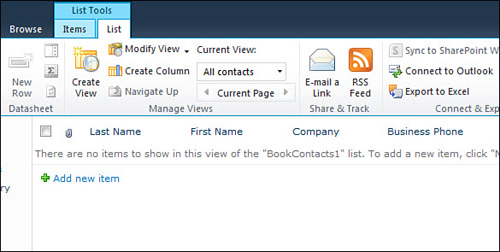
12. This time specify BookContacts1 as the name and again select Create. To use it, add some new names using Add New Item, as shown in Figure 16.19.
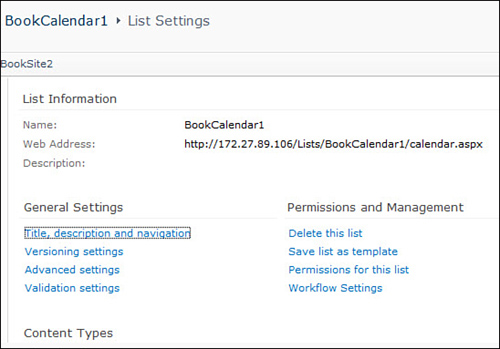
FIGURE 16.19 A new Contacts List
13. Then in Figure 16.20, select Connect to Outlook.
FIGURE 16.20 The populated Contacts List in SPF 2010

The same three “do you want to” screens come that we’ve already seen when connecting a document library and a calendar. Proceed through those screens as before.
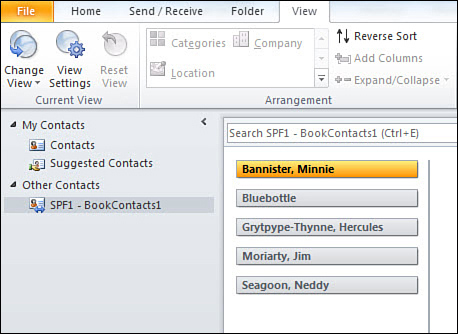
14. Again select Advanced in the third screen to change the name to SPF1—BookContacts1 before finally seeing the BookContacts1 List in your copy of Outlook 2010.
You see the Business Card view that takes up a lot of space for no good reason, so go to View on the menu line and then select Change Views at the far left of the ribbon. I’ve amended this to “Address Card,” as shown in Figure 16.21.
FIGURE 16.21 The populated Contacts List in Outlook 2010
Just as with calendars, the link between the listing in the Other Contacts group in Outlook 2010 and the SharePoint Contacts List is synchronized in both directions.
Unlike with calendars, however, you cannot overlay the SPF 2010 Contacts List you copied to Outlook 2010 with the Outlook 2010 Contacts List. Instead, you can select only one of the Contact lists listed in the left column to be displayed in the center of the screen.
Summary
In this hour, we looked at document libraries, calendars, and contacts and how you can use them in connection with Outlook 2010.
Q&A
Q. I have Outlook 2007—can I still get this functionality?
A. Connecting these lists to Outlook 2007 is almost identical with copying them to Outlook 2010. Also the options available when the lists have been copied to Outlook 2007 are similar. With Outlook 2007, synchronization is two-way, and with Outlook 2007, too, you have preview software for files in document libraries that can overlay calendars but cannot overlay contacts.
Q. I have Outlook 2003—can I still get this functionality?
A. With Outlook 2003 on the client PC, functionality is cut down severely:
![]() There is no longer a Connect to Outlook option for document libraries if Outlook 2003 is used.
There is no longer a Connect to Outlook option for document libraries if Outlook 2003 is used.
![]() You can no longer overlay a SharePoint calendar with an Outlook calendar if Outlook 2003 is used.
You can no longer overlay a SharePoint calendar with an Outlook calendar if Outlook 2003 is used.
There is only one-way synchronization between a SharePoint calendar in Outlook 2003 and the same calendar in the SharePoint site. One-way here means that changes made in the SharePoint site are reflected in the Outlook 2003 copy of the calendar but not vice versa.
![]() There is only one-way synchronization between a SharePoint Contact List in Outlook 2003 and the same contacts list in the SharePoint site. One-way here means that changes made in the SharePoint site are reflected in the Outlook 2003 copy of the contacts list but not vice versa.
There is only one-way synchronization between a SharePoint Contact List in Outlook 2003 and the same contacts list in the SharePoint site. One-way here means that changes made in the SharePoint site are reflected in the Outlook 2003 copy of the contacts list but not vice versa.
Q. I have some file types in my Document Library that are not shown in the Preview screen in Outlook 2010. Why not?
A. Microsoft provides in Outlook 2010 preview software for most common file types. If there isn’t preview software included for a particular file type, the contents of files of that file type will not be displayed in the Preview pane.
Workshop
Quiz
1. How can you use Outlook 2007/2010 to view the contents of a document stored in an SPF 2010 document library?
2. What is the main difference between using SPF 2010 calendars and contacts lists with Outlook 2003 and Outlook 2007/2010?
Answers
1. Both these Outlook products have a viewing frame with built-in Viewers for many standard file types. If an SPF 2010 document library is also listed in Outlook 2007/2010, this viewing frame can be used to view the contents of most of the documents in that document library.
2. Outlook 2003 has only one-way synchronization for these lists. Outlook 2007/2010 has two-way synchronization.