
HOUR 23
Using SharePoint Designer 2010 to Solve Common User Requests
What You’ll Learn in This Hour
![]() How to make a List appear in two different sites
How to make a List appear in two different sites
![]() How to create Data View web parts of Lists from the current site
How to create Data View web parts of Lists from the current site
![]() How to use Data View web parts to get data from outside the present site
How to use Data View web parts to get data from outside the present site
![]() How to customize Data View web parts
How to customize Data View web parts
You can do a great deal with SharePoint Designer 2010—enough to fill an entire book. So here we look in detail at something that is especially useful for SPF 2010 users because there is no easy alternative solution for non-SharePoint Server 2010 users.
This hour is about how to solve the common request of wanting to have the same data visible in two places. For SPF 2010 users the solution is to use the Data View Web Part (DVWP)—also called in some earlier SharePoint versions the Data Forms Web Part (DFWP). After we solve the main problem of showing SharePoint Lists in two places, we follow up by looking at what other kinds of data we can show in our SPF 2010 sites courtesy of DVWPs (and SPD 2010).
Avoiding Uploading the Same Document to Two Document Libraries
Some of the most common questions in the SharePoint newsgroups and forums are questions about how to upload documents to two different document libraries at the same time.
Another common question (and which is similar) is how to show the same list content in two (or more) different sites.
Uploading documents to two different document libraries at the same time could be done with a mass of special coding. When one of the standard methods for upgrading a document is used, a set of code could grab the request and ask you to specify additional destinations for the document (other than just the document library where the user was located in the browser when the upload document function was accessed).
Apart from the fact that this special coding would require quality SharePoint programming skills, it also leads to two (or more) physical copies of the same document being stored in the SharePoint database. So it requires more storage. Of course, the content of these two (or more) documents, when uploaded, could change independently over time (unless your special coding is extremely clever). So unless you actually want this, you need to look for another solution.
Creating and Using a Custom Web Part
In the previous version of SPD (SPD 2007), this problem was solved by using a Data View Web Part where you could click in a menu on a site in the same site collection and then on the List from that site that you wanted to appear in the site where you were located.
In that case there was only one copy of the List or Library (so there was no problem with duplicate sets of data), and the “list” that was created in the Data View Web Part (DVWP) was a read-only copy of that “master” List.
When you accessed (or refreshed) the page containing the DVWP, that copy always contained the latest version of the data from that list. We look at DVWPs in SPD 2010 later in this hour, but Microsoft said there were “issues” with the function described and removed it, so we need to find a new solution, which is to create a Custom Web Part of a List in one site and then use that Custom Web Part in another list. (Creating a DVWP from Lists in the same site is covered later but doesn’t solve this first problem.)
Creating a Custom Web Part from a Library
The first set of steps here detail creating a custom web part of a Library located in the default website. The steps would be identical for a List apart from the List name:
1. Open the default site (http://spf1) in SPD 2010.
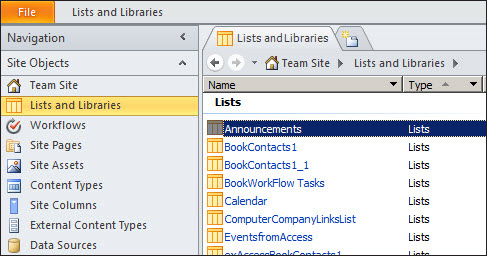
2. Go to the main page of the Team Site and select List and Libraries in the left column (see Figure 23.1).
FIGURE 23.1 Selecting Lists and Libraries
3. Click The Book Documents at the end of the list. It’s the final item in the Document Libraries section (see Figure 23.2).
FIGURE 23.2 Selecting The Book Documents Document Library
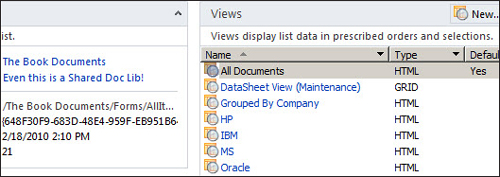
As you can see, there is a list of all the Views available for this List. When creating a custom web part, you can specify any one of these; however, for the purposes of this test later, it would be useful if we have a View that includes all the items in the List, except for those that include Company=HP. Before we create this custom web part, we use the New link in Figure 23.2 to create a View like that.
4. Click New.
5. In the Create New List View that follows, specify the name All But HP.
6. Click OK.
Now in Figure 23.2 there will be a new item at the top of the Views section, All But HP.
It’s tempting to think that we are finished with the creation of this view, but how did SPD 2010 know that All But HP as the name for a view meant that Company=HP records should be excluded? Of course it didn’t, and this New function here isn’t useful because all it creates is a View that isn’t sorted that includes all records and many columns.
Not what we want for our test case, so it’s a good idea to correct that before we move on in SPD 2010. We created Views in a browser before, so the following few action items are in shorthand with no images.
7. Open the site in a browser.
8. Open The Book Documents.
9. Click Library (ribbon menu).
10. Click Library Settings (ribbon).
11. Select the All But HP View.
12. Amend the All But HP View by doing the following:
![]() Unselect Modified, Modified By, and SPD Workflow1.
Unselect Modified, Modified By, and SPD Workflow1.
![]() Sort first by Company and then by Name (linked to Document).
Sort first by Company and then by Name (linked to Document).
![]() Set the Filter to Company “Is Not Equal To” HP.
Set the Filter to Company “Is Not Equal To” HP.
![]() Change the number of items to display from 3 to 5.
Change the number of items to display from 3 to 5.
13. Click OK. (In the browser the list appears again now without the HP rows). Now back to SPD 2010.
14. (In SPD 2010 at the latest version of Figure 23.2) Click All But HP (see Figure 23.3).
FIGURE 23.3 Opening the All But HP View in SPD 2010

Note that here, too, the list starts with the IBM items and not with the HP ones (and that there are five of them listed).
The next step is to save this as a web part.
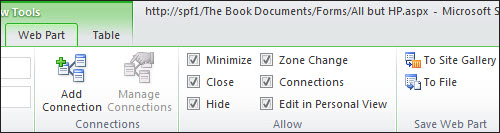
15. Click Web Part in the List View Tools section of the ribbon (see Figure 23.4).
16. Click To Site Gallery in the Save Web Part section to the right.
FIGURE 23.4 The List View Tools/Web Part ribbon
17. Click in the Save Web Part to Site Gallery window that appears. The next window is a bit trickier (see Figure 23.5).
FIGURE 23.5 Selecting data from the current website

18. Because we want to always (no matter where we are) see data from this Document Library located in the default site http://spf1, we need to click Yes.
Creating a New Page to Contain the Custom Web Part
Now that The Book Documents Library has been stored as a custom web part, it’s time to use that web part in the subsite.
There are two parts to this. First we create a new web part page that contains several zones. Then we populate one of these zones with the custom web parts we just created.
The first set of steps creates the new web part page:
1. Access http://spf1 in SPD 2010 and select Subsites from the column at the left (see Figure 23.6).
2. Click BookSite1 (see Figure 23.7).
3. Click Web Part Page (in the ribbon at the left side), and you get a selection of layouts of possible web pages (see Figure 23.8).
FIGURE 23.6 Listing subsites in SPD 2010
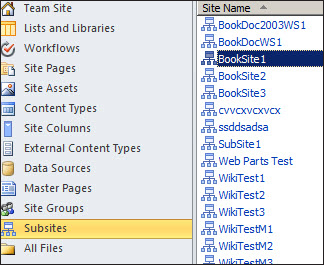
FIGURE 23.7 BookSite1 in SPD 2010
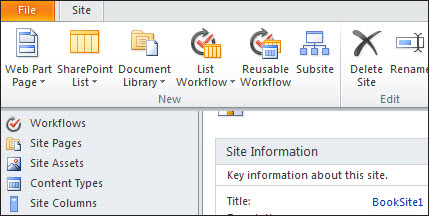
FIGURE 23.8 Possible web page layouts
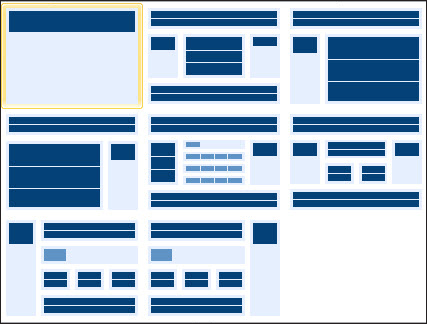
Each dark blue section and the rectangular light blue shapes are web part zones. Because we are testing, it’s wise to choose a version that already has lots of zones specified. (As we see later, we put web parts into different zones.)
4. Select the version in the center of the top row. (This is Header, Footer, 3 Columns as you see if you move the cursor over it.)
5. Name the page Page for Custom Web Parts.
6. Click OK.
Adding the Custom Web Part to the New Page
Now that we have a suitable web part page, we can populate it with the custom web part we previously created. Here are the steps for that (final) phase:
1. (You are still in the Subsite BookSite1 shown in Figure 23.7.) Click Site Pages (see Figure 23.9).
FIGURE 23.9 Site Pages list only 1

2. Double-click the 1. as shown in Figure 23.9. (A single-click enables you to edit the name, but there’s not much point in doing that—just leave it as 1.)
Figure 23.10 shows the contents of 1 that are in my site. There are two web pages because I created one earlier.
FIGURE 23.10 The real list of Site Pages
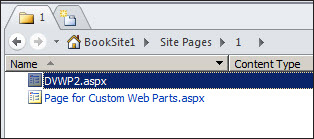
3. Click Page for Custom Web Parts.aspx.
4. Click File (see Figure 23.11).
FIGURE 23.11 Options for a Site Page
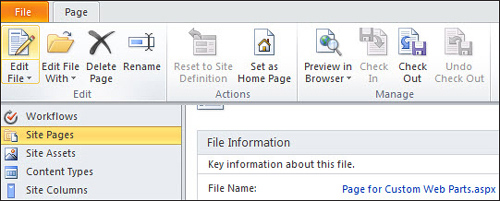
5. Click Edit File.
What you now see is the page that was just created with Headings for the site that it was created in. We can tell that it is the page we just created because we can clearly see (in Figure 23.12) the five different zones.
FIGURE 23.12 Starting to edit a web part page
6. Click the top-most zone (the large rectangle below Search This Site) to select it.
7. Click Insert. This displays a ribbon, part of which is shown in Figure 23.13.
FIGURE 23.13 The Insert Ribbon

8. Select the drop-down arrow next to Web Part (see Figure 23.14).
FIGURE 23.14 Selecting a web part to insert
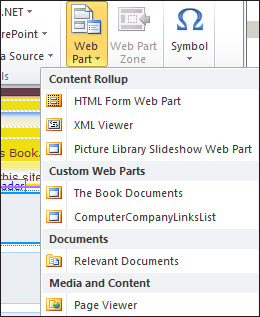
9. Click The Book Documents.
Again you see the same version of the Book Documents document library (from the top-level site, you’ll remember), only now it is located in the subsite to that top-level default site.
10. Click File > Save and then the right “x” at the top-right part of the window. (Alternatively, click the right “x” and you will be asked if you want to save the page, which you do.)
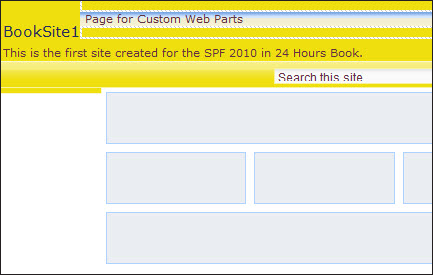
At this point it would be a good idea to go in the browser to http://spf1/BookSite1/ SitePages/1/Page for Custom Web Parts.aspx to see what the page looks like. As you can see it contains the document library from the default website.
Another useful test (which I’ll leave to you) would be to open a second tab of the browser at the default site, amend The Book Documents List in some way, and then go again to the Page for Custom Web Parts in the first tab. Refresh it to see if the changes you have just made in the main site appear.
Hint: They appear only if the company is not HP. (Because as you remember, the View we used in the subsite was All but HP.)
In the next section, you create a DVWP that obtains its data from a list in the same site.
Creating a Data View Web Part from a List in the Same Site
To start the process of creating a DVWP from a list, follow these steps:
1. In SPD 2010, go to the Page for Custom Webparts.aspx page previously created earlier in this hour. If you follow this hour without closing your server, this page should still be open for editing. If not, follow previous steps in this hour to open it for editing.
2. This time go to the zone at the bottom and select it.
3. Click Insert in the ribbon. You now see the same ribbon that was shown in Figure 23.13.
4. Select the down arrow to the right of Data View. Figure 23.15 displays both the previously added The Book Documents copy and the selected bottom zone.
This drop-down shows the Lists and Libraries in use in that site at which we are now located (BookSite1).
FIGURE 23.15 The Lists and more available for use in a DVWP
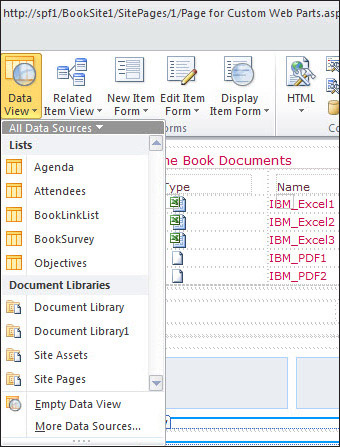
Clicking More Data Sources here would give us the same list shown in Figure 23.14 but with a slightly different look. We’ll see in the section after this one how to create more data sources and thus have more options available when selecting More Data Sources.
5. Select BookLinkList. If you don’t have this, select Document Library or any other List/Lib that has content. If none do, just add some content to a document library and use that.
For quite a long time, you see that the data view web part is being added (see Figure 23.16).
FIGURE 23.16 A long delay while the DVWP is added

Finally the DVWP has been added, and you see something like the screen shown in Figure 23.17.
FIGURE 23.17 The DVWP has been added.

7. Go to the browser and look at the page there. (If necessary, Refresh the page.) You should see a screen where the main section contains two sets of information. You see the first five items from The Book Documents list and the first five items from the BookLinkList List.
A question that will be looked at later in this hour is: Why do we use a DVWP to display a List from the same site? Why not just add the List itself? The answer as we see later lies in the enhanced formatting possibilities that can be done in a DVWP.
The next section deals with the creation of additional Data Sources that can be used in future DVWPs.
Creating and Using Data Sources
In this section, we create and use additional data sources.
Creating New Data Sources
In the first section of this hour, to add a top-level site’s List to a subsite, we needed in SPD 2010 to first create a web part of that top-level site’s List. Only when this had been done could the List be added to a subsite. The same kind of thing is necessary when creating an additional data source for a DVWP to use. Whereas SPD 2007 allowed this to be done within the DVWP creation routine, in SPD 2010 this is a completely separate action that at first seems to have nothing to do with a DVWP.
The following steps cover the creation of a new Data Source. The following section then deals with using that new Data Source in a DVWP.
1. You should still be located at the Page for Custom Web Parts.aspx; now click Data Sources in the left column.
2. Click Data Sources in the ribbon menu. The ribbon now looks like Figure 23.18.
FIGURE 23.18 The Data Sources ribbon
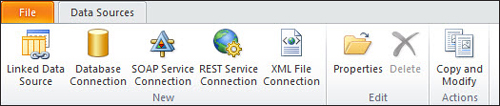
There are quite a few alternatives (in the New section). The most common perhaps in production use is the Database connection option, which enables you to grab data from a database and display it in a SharePoint page. The problem with that option is that accessing a particular database requires a database connection string that works only for connections to that particular database. This typically isn’t straightforward, and because I don’t want to spend time in this SharePoint Beginner/Intermediate guide on how to connect to databases, I’m going to take an easier example, creating an XML file connection.
3. Click XML File Connection.
I have already created an XML file called greeting.xml and stored it in the C drive on the server. Here is the simple text of that file:
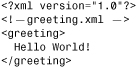
4. The XML File Connection routines ask you to specify the location of the file. Use Browse to find greeting.xml and click OK.
As previously stated, this file is stored in C: in the server. Because I am using an SPD 2010 copy installed on the server, that is an easy place to find it. In production you would have dedicated folders for such files, and they would probably be accessible from your client PC.
Figure 23.19 shows the warning window that appears in the case of a simple XML file like this.
FIGURE 23.19 The warning when adding an XML file

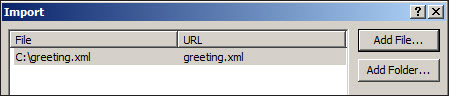
5. Click OK. This displays a screen that needs to be approved, this time for the import (see Figure 23.20).
FIGURE 23.20 Importing an XML file
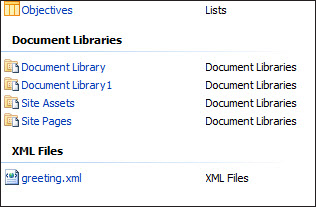
This section is XML Files (see Figure 23.21).
FIGURE 23.21 The revised Data Sources page
Using the New Data Sources
Most of this section is a repeat of the “Creating a DVWP from a List on the Same Site” section. Follow the steps there in general but select one of the free zones in the center of the page until Figure 23.15 displays. Then do the following:
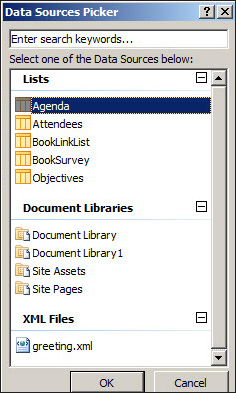
1. Click More Data Sources and you’ll get the screen in Figure 23.22.
Probably greeting.xml was visible in the previous screen too (just), but we’ve already had an image of that.
2. Click greeting.xml to select it.
3. Click OK.
4. Click File > Save to save the newest version of the page.
5. Open the page in your browser to see what it looks like. It’s a heading, which can be removed by modifying the web part of greeting.xml, and a text of greeting: Hello World! (Not fantastic, but then this isn’t an XML book either.)
FIGURE 23.22 The More Data Sources page
Now that we’ve added two completely different kinds of data view web parts, it is time for the final section of this hour, which looks briefly at the formatting and other options that a Data View Web Part (the list we added in the first section of this hour) enables us to apply to the List and so on we added as a DVWP.
Customizing the Look of a DVWP
The idea is just to indicate what options are available and to apply a couple of them.
Follow these steps to customize the look:
1. Open in SPD 2010 the Page for Custom Web Parts.aspx in Edit mode.
2. Select the BookLinkList section of the page (see Figure 23.23).
FIGURE 23.23 Selecting Book-LinkList DVWP
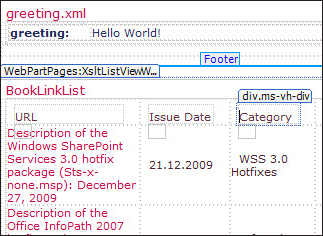
I made the image slightly longer, so you can see greeting.xml on the page as well. Figure 23.24 shows what the left section of the ribbon looks like when BookLinkList has been selected.
FIGURE 23.24 The ribbon when a DVWP has been selected
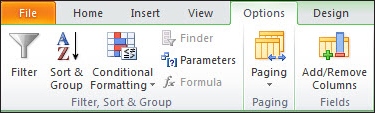
3. Click Sort & Group in the ribbon.
4. Make the changes (add Category and Sort and Group by it) that are shown in Figure 23.25.
FIGURE 23.25 Sort and Group customization

5. Click OK. The DataView is updated, and you see that the DVWP is now grouped and the first group is Alerts. That screenshot will appear, but first let’s use Conditional Formatting from the same ribbon (see Figure 23.24).
6. Click Conditional Formatting in the ribbon. The only valid option is Show Taskpane.
7. Click Show Taskpane.
Figure 23.26 shows a Conditional Formatting panel on the right where nothing is operable.
FIGURE 23.26 A Conditional Formatting pane with no valid options
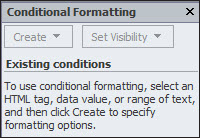
8. Do what it says, which means click the Category column in the main section of the page. Click the word Category. Now Create is selectable in the Conditional Formatting pane.
9. Click Create.
10. Click Apply Formatting in the drop-down.
11. Complete the Condition Criteria box, as shown in Figure 23.27.
FIGURE 23.27 The Condition Criteria box
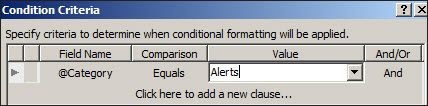
12. Click Set Style (at the bottom of the Condition Criteria box).
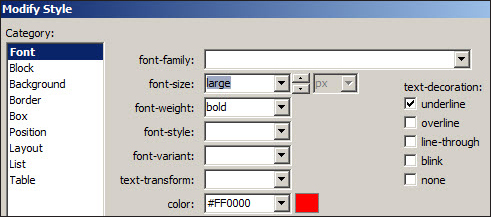
13. Set the Font to bold, large red, and underline (see Figure 23.28).
FIGURE 23.28 Setting the Style (Font)
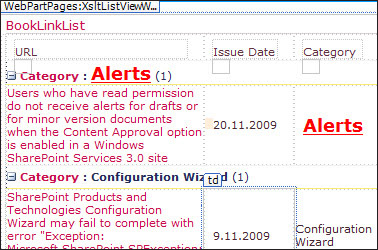
14. Click OK; you see Figure 23.29. Note the large font, bold, and the underline.
FIGURE 23.29 The customized BookLinkList
15. Complete by selecting File Save.
Again check the page in the browser.
Summary
In this hour, we added content to a site from other sites, the present site, or other locations using SPD 2010. The hour also briefly looked at customizing a DVWP.
There is an alternative to the use of the ribbon for customizing a DVWP. There are extra credits for right-clicking something in the DVWP and customizing that way.
Note too that if all you want to do is the make a column head bold (or underline), select it, as shown in Figure 23.29, and press Ctrl-B (or Ctrl-U).
Q&A
Q. Can I use a web part connection between a standard web part and a Data View web part?
A. Yes, provided they have a suitable matching field. You can also use the web part connection technique between two different Data View web parts based on Lists (see the first section of this hour).
Workshop
Quiz
1. Are you restricted to creating DVWPs from lists and libraries?
2. Can I customize a Data view solely by means of selection boxes?
3. Should SPD 2010 be installed on a client machine or on the server?
Answers
1. It is easier to create DVWPs from Lists or Libraries than creating them from most other things (provided the lists or libraries are in the same site). However, there are many other sources of information for DVWPs, such as databases (where it’s best if these are SQL Server databases), which often are more powerful implementations and something you can’t easily obtain any other way.
2. Yes, but some customization will require code.
3. In production you should install SPD 2010 on a client machine. (As stated in Hour 22, “Using SharePoint Designer 2010 to Create Workflows,” if you also maintain WSS 3.0 or MOSS 2007 sites, you should install SPD 2007 in a different client). In testing, it is sometimes useful to install SPD 2010 on the server. Testing is often done in virtual machines that have less memory and are generally slower than production servers; because SPD 2010 is not always quick to open pages, you may have annoying timeouts if using SPD 2010 on your (testing) host machine.
3. This hour was entirely written using SPD 2010 installed on the server; the previous two hours were written using a copy of SPD 2010 installed on a (Windows 7) client.