12: Customizing the Way You Work
What You’ll Do
Set General PowerPoint Options
Set Advanced PowerPoint Options
Customize the Way You Create Objects
Access Commands Not in the Ribbon
Introduction
Once you’ve become familiar with Microsoft PowerPoint and all the features it contains, you might want to customize the way you work with PowerPoint. You can change your view settings so that your PowerPoint window looks the way you want it to. PowerPoint comes with set defaults, such as opening all documents using a certain view, showing the vertical ruler, or how many files you’ve recently opened, which you can change to a new default.
Some of the other PowerPoint customization features allow you to set a default font and related attributes to use when you are typing text in text boxes. Other defaults might be the color or line style of a shape object that you create. You can change the location of the Ribbon, and the configuration of the Quick Access Toolbar to include commands not available on the Ribbon.
When you need to manage all the pictures on your computer, Microsoft Office Picture gives you a flexible way to organize, edit, and share your pictures. With Picture Manager, you can view all the pictures on your computer no matter where you store them. If you need to edit a picture, you can use Picture Manager to remove red eye and to change brightness, contrast, and color. You can also crop, rotate and flip, resize, and compress a picture. After you edit your pictures, you can add them along with any other media to Microsoft Clip Organizer. Clip Organizer is a program that comes with all Office Programs that allows you to add and organize clips and other media for use in Office documents using the Clip Art task pane.
Setting General PowerPoint Options
Each person uses PowerPoint in a different way. The General section of PowerPoint Options allows you to change popular options to personalize what appears in the PowerPoint window. For example, you can set options to show the Mini toolbar on selection, enable live preview, change the PowerPoint window color scheme, and show ScreenTips. In the Advanced section, you can set general options to provide error indicators and show customer submitted Office.com content (New!) in PowerPoint. When you change these options, PowerPoint uses them for all subsequent PowerPoint sessions until you change them again.
Change General Options
![]() Click the File tab, and then click Options.
Click the File tab, and then click Options.
![]() In the left pane, click General.
In the left pane, click General.
![]() Select the options for working with PowerPoint you want:
Select the options for working with PowerPoint you want:
![]() Show Mini Toolbar on Selection. Select to show a miniature semi-transparent toolbar that helps you work with selected text.
Show Mini Toolbar on Selection. Select to show a miniature semi-transparent toolbar that helps you work with selected text.
![]() Enable Live Preview. Select to show preview changes in a presentation.
Enable Live Preview. Select to show preview changes in a presentation.
![]() Color Scheme. Click the list arrow to select a Windows related color scheme.
Color Scheme. Click the list arrow to select a Windows related color scheme.
![]() ScreenTip style. Click the list arrow to select a ScreenTip option: Show enhanced ScreenTips, Don’t show enhanced ScreenTips, or Don’t show ScreenTips.
ScreenTip style. Click the list arrow to select a ScreenTip option: Show enhanced ScreenTips, Don’t show enhanced ScreenTips, or Don’t show ScreenTips.
![]() Type your name and initials as you want them to appear in Properties, and review comments.
Type your name and initials as you want them to appear in Properties, and review comments.
![]() Click OK.
Click OK.

![]() Click the File tab, and then click Options.
Click the File tab, and then click Options.
![]() In the left pane, click Advanced.
In the left pane, click Advanced.
![]() Select the general options you want:
Select the general options you want:
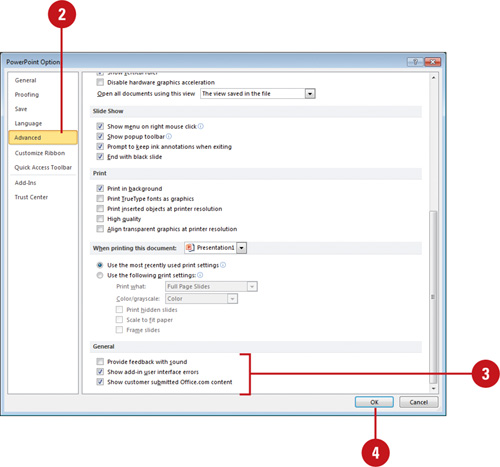
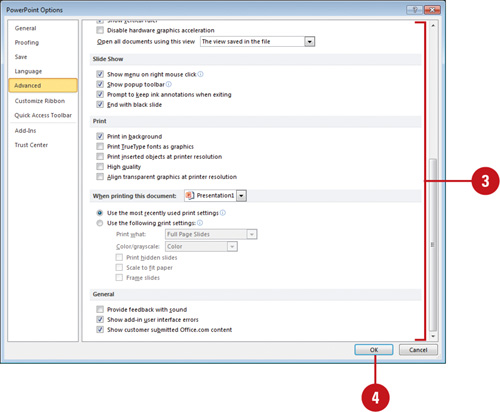
![]() Provide feedback with sound. Select to make a sound when an error occurs.
Provide feedback with sound. Select to make a sound when an error occurs.
![]() Show add-in user interface errors. Select to show errors with an user interface add-in.
Show add-in user interface errors. Select to show errors with an user interface add-in.
![]() Show customer submitted Office.com content (New!). Select to show customer submitted Office.com content where Office.com material is used in PowerPoint, such as the Clip Art task pane and themes.
Show customer submitted Office.com content (New!). Select to show customer submitted Office.com content where Office.com material is used in PowerPoint, such as the Clip Art task pane and themes.
![]() Click OK.
Click OK.
Did You Know?
You can change the appearance of Office programs in Windows. The appearance of the ribbon, toolbars, menus, and dialog boxes in Microsoft Office programs follows the theme or color scheme you set up in the Windows control panel.
Setting Advanced PowerPoint Options
You can customize the performance of many PowerPoint features including its editing, saving, spelling, viewing, printing and security procedures. The Advanced section of PowerPoint Options allows you to change options to specify how you want to open presentations, edit text, display content, deliver a slide show, and print presentations. When you change these options, PowerPoint uses them for all subsequent PowerPoint sessions until you change them again.
Change Advanced Options
![]() Click the File tab, and then click Options.
Click the File tab, and then click Options.
![]() In the left pane, click Advanced.
In the left pane, click Advanced.
![]() Select the options for working with PowerPoint you want:
Select the options for working with PowerPoint you want:
![]() When selecting, automatically select entire word (default on). Select to have PowerPoint select the entire word when you click a word.
When selecting, automatically select entire word (default on). Select to have PowerPoint select the entire word when you click a word.
![]() Allow text to be dragged and dropped (default on). Select to move or copy text by dragging.
Allow text to be dragged and dropped (default on). Select to move or copy text by dragging.
![]() Automatically switch keyboard to match language of surrounding text (default off). Select to have PowerPoint switch keyboard to match the language (only available with multiple keyboard languages).
Automatically switch keyboard to match language of surrounding text (default off). Select to have PowerPoint switch keyboard to match the language (only available with multiple keyboard languages).
![]() Maximum number of undos (default 20). Enter the number of changes you want to track.
Maximum number of undos (default 20). Enter the number of changes you want to track.
![]() Use smart cut and paste (default on). Select to have PowerPoint adjust the spacing of words and objects.
Use smart cut and paste (default on). Select to have PowerPoint adjust the spacing of words and objects.
![]() Show Paste Options buttons (default on). Select to show the Paste Options button alongside text that you paste.
Show Paste Options buttons (default on). Select to show the Paste Options button alongside text that you paste.
![]() Number of documents in the Recent Documents list. Enter the number of documents you want available on the File tab. Set to 0 to turn off.
Number of documents in the Recent Documents list. Enter the number of documents you want available on the File tab. Set to 0 to turn off.
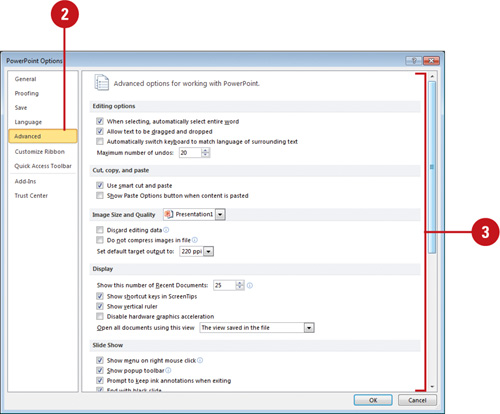
![]() Show shortcut keys in ScreenTips. Select to show shortcut keys in ScreenTips.
Show shortcut keys in ScreenTips. Select to show shortcut keys in ScreenTips.
![]() Show vertical ruler. Select to show the vertical ruler along with the horizontal ruler.
Show vertical ruler. Select to show the vertical ruler along with the horizontal ruler.
![]() Disable hardware graphics acceleration. Select to avoid display problem with media.
Disable hardware graphics acceleration. Select to avoid display problem with media.
![]() Open all documents using this view. Click the list arrow to select a default view when you open a presentation.
Open all documents using this view. Click the list arrow to select a default view when you open a presentation.
![]() Show menu on right mouse click. Select to show a shortcut menu when you right-click a slide during a slide show.
Show menu on right mouse click. Select to show a shortcut menu when you right-click a slide during a slide show.
![]() Show popup toolbar. Select to show the popup toolbar in a slide show.
Show popup toolbar. Select to show the popup toolbar in a slide show.
![]() Prompt to keep ink annotations when exiting. Select to save your changes when you write on slides during a slide show.
Prompt to keep ink annotations when exiting. Select to save your changes when you write on slides during a slide show.
![]() End with black slide. Select to insert a black slide at the end of the presentation.
End with black slide. Select to insert a black slide at the end of the presentation.
![]() Print in background. Select to print as you continue to work.
Print in background. Select to print as you continue to work.
![]() Print TrueType fonts as graphics. Select to print fonts as vector graphic for better print quality.
Print TrueType fonts as graphics. Select to print fonts as vector graphic for better print quality.
![]() Print inserted objects at printer resolution. Select to print charts and tables with the best print quality.
Print inserted objects at printer resolution. Select to print charts and tables with the best print quality.
![]() High Quality. Select to print with the highest color and resolution settings available.
High Quality. Select to print with the highest color and resolution settings available.
![]() Align transparent graphics at printer resolution. Select to print transparent graphics at the printer set resolution.
Align transparent graphics at printer resolution. Select to print transparent graphics at the printer set resolution.
![]() Click OK.
Click OK.
Accessing Commands Not in the Ribbon
If you don’t see a command in the Ribbon that was available in an earlier version of PowerPoint, you might think Microsoft removed it from the product. To see if a command is available, check out the Customize Ribbon or Quick Access Toolbar section (New!) in PowerPoint Options. The Quick Access Toolbar and Custom Ribbon give access to commands not in the Ribbon, which you can add to the toolbar or ribbon. For example, you can add the following commands: Create Microsoft Outlook Task, Replace Fonts, Send to Microsoft Word, and Web Page Preview.
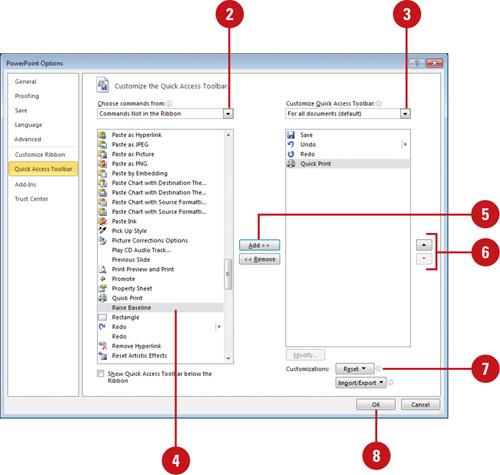
Add Commands Not in the Ribbon to the Quick Access Toolbar or Ribbon
![]() Click the File tab, click Options, and then click Quick Access Toolbar or Customize Ribbon.
Click the File tab, click Options, and then click Quick Access Toolbar or Customize Ribbon.
![]() Click the Choose commands from list arrow, and then click Commands Not in the Ribbon.
Click the Choose commands from list arrow, and then click Commands Not in the Ribbon.
![]() Click the Customize Quick Access Toolbar and then click For all documents (default), or click the Customize the Ribbon list arrow, and then click For All Tabs.
Click the Customize Quick Access Toolbar and then click For all documents (default), or click the Customize the Ribbon list arrow, and then click For All Tabs.
![]() Click the command you want to add (left column).
Click the command you want to add (left column).
TIMESAVER For the Quick Access Toolbar, click <Separator>, and then click Add to insert a separator line between buttons.
![]() Click Add.
Click Add.
![]() Click the Move Up and Move Down arrow buttons to arrange the commands in the order you want them to appear.
Click the Move Up and Move Down arrow buttons to arrange the commands in the order you want them to appear.
![]() To reset the Quick Access Toolbar to its original state, click Reset, click Reset only Quick Access Toolbar or Reset only selected Ribbon tab, and then click Yes.
To reset the Quick Access Toolbar to its original state, click Reset, click Reset only Quick Access Toolbar or Reset only selected Ribbon tab, and then click Yes.
![]() Click OK.
Click OK.
Customizing the Way You Create Objects
When you create a text box, PowerPoint applies a set of default text attributes. Some examples of PowerPoint’s font default settings include font style, size, and formatting options, such as bold, italic, and underline. When you draw an object, PowerPoint applies a set of default object attributes. Examples of object default settings include fill color, shadow, and line style. To find out the current default settings for your presentation, you can draw an object, or create a text object and check the object’s attributes. If you change a default setting, PowerPoint will use the new setting for all subsequent PowerPoint sessions until you change the setting again.
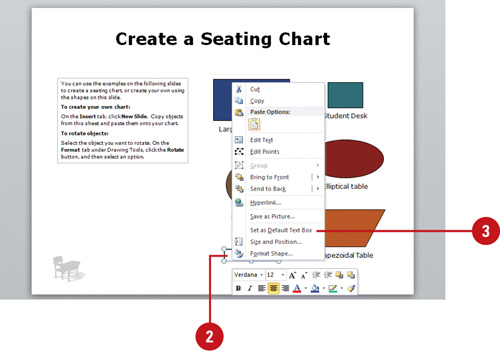
Customize the Way You Create Text Objects
![]() Create a text box.
Create a text box.
![]() Change the text attributes, including font type, style, and size.
Change the text attributes, including font type, style, and size.
![]() Right-click the shape, and then click Set as Default Text Box.
Right-click the shape, and then click Set as Default Text Box.
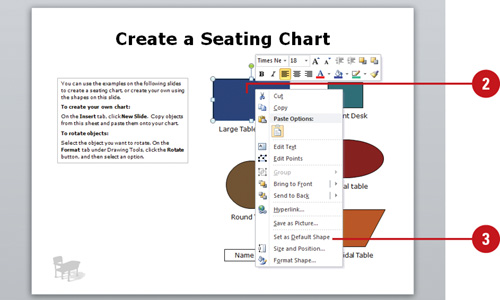
Customize the Way You Create Shape Objects
![]() Create a shape.
Create a shape.
![]() Change the shape attributes, including fill color or effect, text color, outline color and style; and font type, style, and size.
Change the shape attributes, including fill color or effect, text color, outline color and style; and font type, style, and size.
![]() Right-click the shape, and then click Set as Default Shape.
Right-click the shape, and then click Set as Default Shape.
Managing Pictures
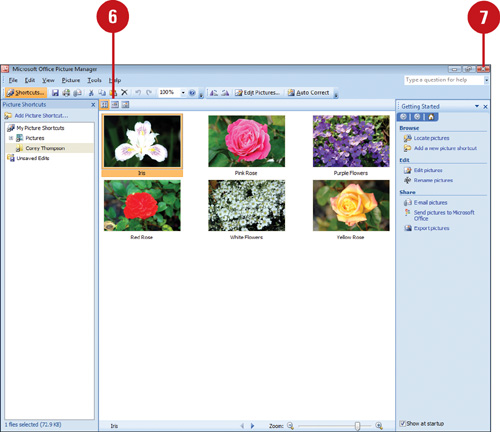
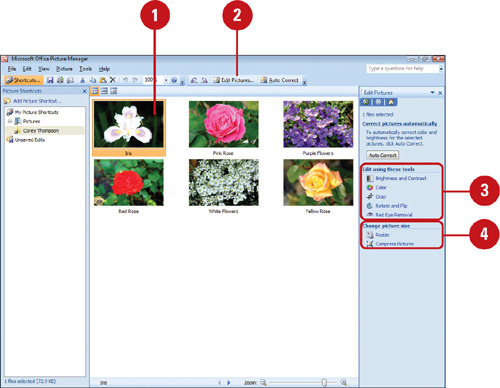
With Microsoft Office Picture Manager, you can manage, edit, and share your pictures. You can view all the pictures on your computer and specify which file type you want to open with Picture Manager. If you need to edit a picture, you can use Picture Manager to change brightness, contrast, and color, and to remove red eye. You can also crop, rotate and flip, resize, and compress a picture.
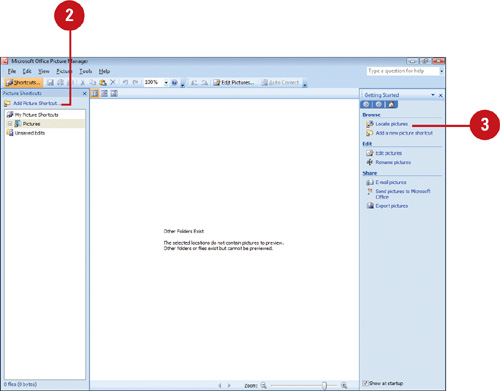
Open Picture Manager and Locate Pictures
![]() Click the Start button, point to All Programs, click Microsoft Office, click Microsoft Office Tools, and then click Microsoft Office Picture Manager.
Click the Start button, point to All Programs, click Microsoft Office, click Microsoft Office Tools, and then click Microsoft Office Picture Manager.
The first time you start the program, it asks you to select the file types you want to open with Picture Manager. Select the check boxes with the formats you want, and then click OK.
![]() If necessary, click Add Picture Shortcut.
If necessary, click Add Picture Shortcut.
![]() Click Locate Pictures.
Click Locate Pictures.
![]() Click the Look in list arrow, and then click a drive location.
Click the Look in list arrow, and then click a drive location.
![]() Click OK.
Click OK.
![]() Use the View buttons to view your pictures.
Use the View buttons to view your pictures.
![]() When you’re done, click the Close button.
When you’re done, click the Close button.
Did You Know?
You can export a folder of files with a new format or size. In Picture Manager, click the File menu, click Export, specify the folder with the pictures you want to change, select an export file format or select a size, and then click OK.
![]() In Picture Manager, select the picture you want to edit.
In Picture Manager, select the picture you want to edit.
![]() Click the Edit Pictures button on the Standard toolbar.
Click the Edit Pictures button on the Standard toolbar.
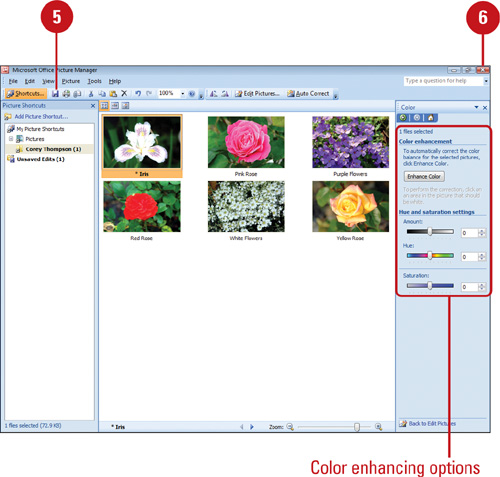
![]() Use the editing tools on the Edit Pictures task pane to modify the picture.
Use the editing tools on the Edit Pictures task pane to modify the picture.
![]() Brightness and Contrast
Brightness and Contrast
![]() Color
Color
![]() Crop
Crop
![]() Rotate and Flip
Rotate and Flip
![]() Red Eye Removal
Red Eye Removal
![]() Use the sizing tools on the Edit Pictures task pane to change the picture size.
Use the sizing tools on the Edit Pictures task pane to change the picture size.
![]() Resize
Resize
![]() Compress Pictures
Compress Pictures
![]() Click the Save button on the Standard toolbar.
Click the Save button on the Standard toolbar.
![]() When you’re done, click the Close button.
When you’re done, click the Close button.
Did You Know?
You can discard changes to a picture. If you don’t like the changes you make to a picture, click the Edit menu, and then click Discard Changes to restore the picture.
Organizing Clips
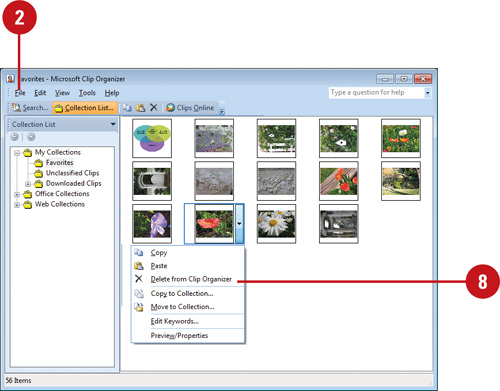
Microsoft Clip Organizer is a program that comes with all Office Programs that allows you to add and organize clips and other media for use in Office documents using the Clip Art task pane. The clips that come with Office are already organized, but if you’ve added clips without organizing them, it’s probably hard to find what you need in a hurry. To help you quickly locate a clip, you can place it in one or more categories. You can also assign one or more keywords to a clip and modify the description of a clip. When you add media files, Clip Organizer automatically creates new sub-collections under My Collections. These files are named after the corresponding folders on your hard disk. To help you find clips later on, Clip Organizer also creates search keywords based on the file’s extension and folder name. If you no longer need a picture in the Clip Organizer, you can remove it, which also saves space on your computer.
Add and Categorize Clips
![]() Click the Start button, point to All Programs, click Microsoft Office, click Microsoft Office 2010 Tools, and then click Microsoft Clip Organizer.
Click the Start button, point to All Programs, click Microsoft Office, click Microsoft Office 2010 Tools, and then click Microsoft Clip Organizer.
![]() In Clip Organizer, click the File menu, point to Add Clips to Organizer, and then click On My Own.
In Clip Organizer, click the File menu, point to Add Clips to Organizer, and then click On My Own.
![]() Locate the folder that contains the clip you want to add, and then select the clip.
Locate the folder that contains the clip you want to add, and then select the clip.
![]() Click the Add To button.
Click the Add To button.
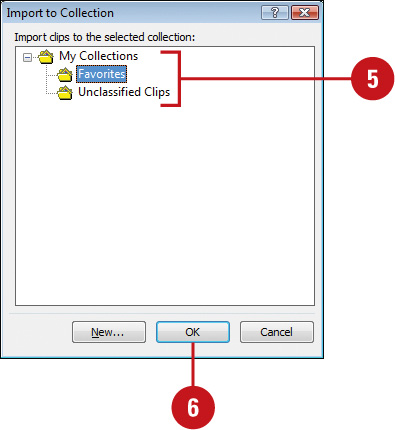
![]() Click the collection to which you want to add the clip, or click New to create a new folder.
Click the collection to which you want to add the clip, or click New to create a new folder.
![]() Click OK.
Click OK.
![]() Click Add.
Click Add.
![]() To delete a clip from all Clip Organizer categories, point to the clip, click the list arrow, and then click Delete from Clip Organizer.
To delete a clip from all Clip Organizer categories, point to the clip, click the list arrow, and then click Delete from Clip Organizer.
![]() Click the Start button, point to All Programs, click Microsoft Office, click Microsoft Office 2010 Tools, and then click Microsoft Clip Organizer.
Click the Start button, point to All Programs, click Microsoft Office, click Microsoft Office 2010 Tools, and then click Microsoft Clip Organizer.
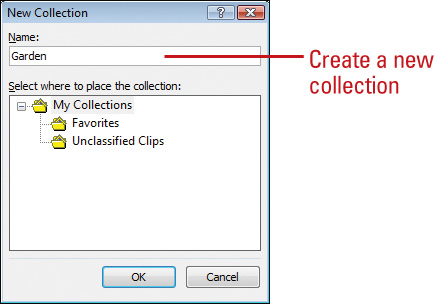
![]() To create a new collection folder, click the File menu, click New Collection, type a name, select a location, and then click OK.
To create a new collection folder, click the File menu, click New Collection, type a name, select a location, and then click OK.
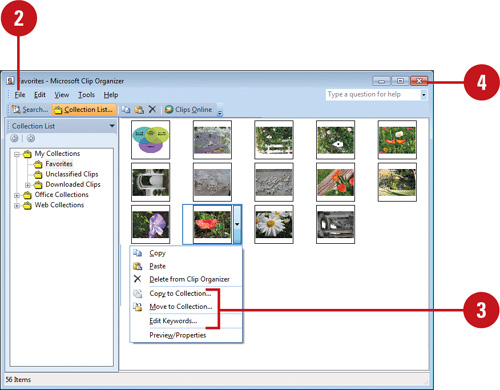
![]() In the Clip Organizer, find and point to the clip you want to categorize or change the properties of, click the list arrow, and then click one of the following:
In the Clip Organizer, find and point to the clip you want to categorize or change the properties of, click the list arrow, and then click one of the following:
![]() Click Copy to Collection to place a copy of the clip in another category.
Click Copy to Collection to place a copy of the clip in another category.
![]() Click Move to Collection to move the clip to another category.
Click Move to Collection to move the clip to another category.
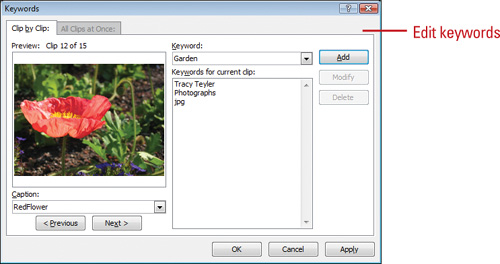
![]() Click Edit Keywords to edit the caption of the clip and to edit keywords used to find the clip.
Click Edit Keywords to edit the caption of the clip and to edit keywords used to find the clip.
![]() Click the Close button to close the Clip Organizer dialog box.
Click the Close button to close the Clip Organizer dialog box.
Did You Know?
You can change clip properties in the Clip Art task pane. In the Clip Art task pane, point to a clip, click the list arrow next to the clip, and then click Copy To Collection, Move To Collection, Edit Keywords, and Delete From Clip Organizer.
Changing Research Options
When you want to research a topic and use the material in a document, you can use the Research button on the Review tab to find the information you want directly from PowerPoint. Once you find it, you can copy and paste it into your document. If you have a hard time finding research information on a specific topic, you can use the Research Options command to enable and update additional reference books and research Web sites from which to search.
Change Research Options
![]() Click the Review tab.
Click the Review tab.
![]() Click the Research button.
Click the Research button.
![]() In the task pane, click Research options.
In the task pane, click Research options.
![]() Do one or more of the following:
Do one or more of the following:
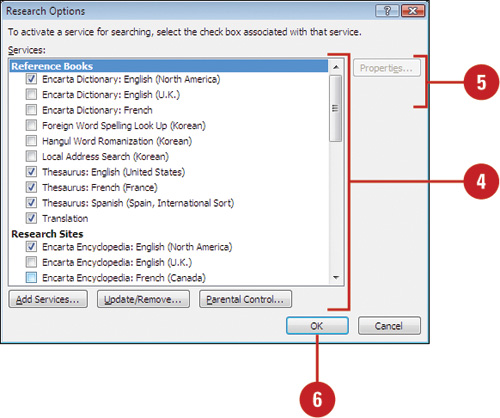
![]() Services. To activate or remove research services.
Services. To activate or remove research services.
![]() Add Services. To add research services.
Add Services. To add research services.
![]() Update/Remove. To update or remove a service provider.
Update/Remove. To update or remove a service provider.
![]() Parental Control. To turn on parental controls.
Parental Control. To turn on parental controls.
![]() Do one or more of the following:
Do one or more of the following:
![]() Properties. To display properties for the selected service.
Properties. To display properties for the selected service.
![]() Favorite. To make the selected service your favorite (New!).
Favorite. To make the selected service your favorite (New!).
![]() Click OK.
Click OK.
![]() When you’re done, click the Close button on the task pane.
When you’re done, click the Close button on the task pane.