
Workshops
Introduction
The Workshops are all about being creative and thinking outside of the box. These workshops will help your right-brain soar, while making your left-brain happy; by explaining why things work the way they do. Exploring possibilities is great fun; however, always stay grounded with knowledge of how things work.
Getting and Using the Project Files
Each project in the Workshop includes a start file to help you get started with the project, and a final file to provide you with the results of the project so you can see how well you accomplished the project.
Before you can use the project files, you need to download them from the Web. You can access the files at www.perspection.com in the software downloads area. After you download the files from the Web, uncompress the files into a folder on your hard drive where you’ll have easy access from Microsoft PowerPoint.
Project 1: Optimizing Presentations
Skills and Tools: PowerPoint options
PowerPoint comes with a varied set of features that allow you to create different kinds of presentations. However, not all features are created equal. Some features, such as hardware graphics acceleration, give you a little extra speed when you have the right hardware on your computer, but it also causes some movies not to display properly on the screen. Other features, like AutoFormat, are great when you want PowerPoint to automatically resize title or body text, but can be frustrating when you don’t want text size to automatically change. If you take your presentations on the road, not having the right fonts installed on the presentation computer, missing linked movies and sounds, or showing a slow presentation can create big problems.
The Project
In this project, you’ll learn how to set options to optimize PowerPoint and presentations for typical usage on any computer.
The Process
![]() Open PowerPoint 2010, open Optimize_start.potx, and then save it as Optimize_pres.pptx.
Open PowerPoint 2010, open Optimize_start.potx, and then save it as Optimize_pres.pptx.
![]() Turn off or slow down hardware graphics acceleration. To avoid movie display problems, either turn off or slow down hardware graphics acceleration.
Turn off or slow down hardware graphics acceleration. To avoid movie display problems, either turn off or slow down hardware graphics acceleration.
![]() Click the File tab, and then click Options.
Click the File tab, and then click Options.
![]() In the left pane, click Advanced.
In the left pane, click Advanced.
![]() Select the Disable hardware graphics acceleration check box.
Select the Disable hardware graphics acceleration check box.
![]() Click OK.
Click OK.
![]() To slow down hardware acceleration in Windows, open the Display Settings window in the Control Panel, click Advanced Settings, click the Troubleshoot tab, drag the Hardware acceleration slider one or two marks toward the None side (if available).
To slow down hardware acceleration in Windows, open the Display Settings window in the Control Panel, click Advanced Settings, click the Troubleshoot tab, drag the Hardware acceleration slider one or two marks toward the None side (if available).
To open the Display Settings windows in the Control Panel, do the following:

![]() Windows 7: Right-click the desktop, click Screen resolution.
Windows 7: Right-click the desktop, click Screen resolution.
![]() Windows Vista: Right-click the desktop, click Personalize, and then click the Display settings. link.
Windows Vista: Right-click the desktop, click Personalize, and then click the Display settings. link.
![]() A Embed fonts. To avoid fonts not showing up in a presentation on another computer, either use standard fonts, or embed the nonstandard fonts in the presentation. Embed only the fonts you need. When you embed a font in your presentation, the presentation may grow by as much as the size of the font file. Before you decide to embed, check the size of the font file. Some of the new Unicode fonts are enormous!
A Embed fonts. To avoid fonts not showing up in a presentation on another computer, either use standard fonts, or embed the nonstandard fonts in the presentation. Embed only the fonts you need. When you embed a font in your presentation, the presentation may grow by as much as the size of the font file. Before you decide to embed, check the size of the font file. Some of the new Unicode fonts are enormous!
![]() Click the File tab, and then click Options.
Click the File tab, and then click Options.
![]() In the left pane, click Save.
In the left pane, click Save.
![]() Click the list arrow next to Preserve fidelity when sharing this presentation, and then select the presentation you want to embed fonts.
Click the list arrow next to Preserve fidelity when sharing this presentation, and then select the presentation you want to embed fonts.
![]() Select the Embed fonts in the file check box.
Select the Embed fonts in the file check box.
![]() Click the option you want.
Click the option you want.
![]() Embed only the characters used in the presentation (best for reducing file size).
Embed only the characters used in the presentation (best for reducing file size).
![]() Embed all characters (best for editing by other people).
Embed all characters (best for editing by other people).
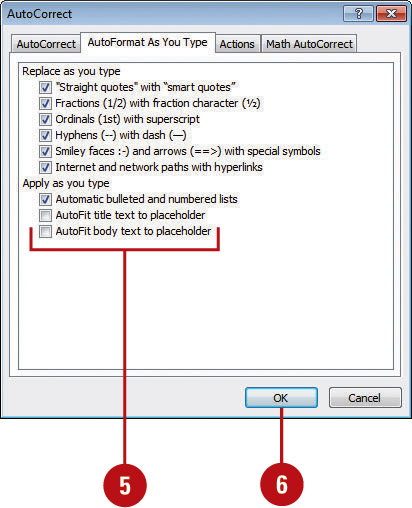
![]() Turn off AutoFormat. To avoid PowerPoint automatically changing text size when you type or paste, turn off the two parts of AutoFormat: AutoFit title text in placeholder, and AutoFit body text to placeholder.
Turn off AutoFormat. To avoid PowerPoint automatically changing text size when you type or paste, turn off the two parts of AutoFormat: AutoFit title text in placeholder, and AutoFit body text to placeholder.
![]() Click the File tab, and then click Options.
Click the File tab, and then click Options.
![]() In the left pane, click Proofing.
In the left pane, click Proofing.
![]() Click AutoCorrect Options.
Click AutoCorrect Options.
![]() Click the AutoFormat As You Type tab.
Click the AutoFormat As You Type tab.
![]() Clear the AutoFit title text to placeholder check box, and then clear the AutoFit body text to placeholder check box.
Clear the AutoFit title text to placeholder check box, and then clear the AutoFit body text to placeholder check box.
![]() Click OK.
Click OK.
![]() Click OK.
Click OK.
![]() Printing and showing a presentation. To avoid problems printing a color presentation on a back and white printer, where the background, diagrams, or shapes might not look good, take the time to test your presentation in grayscale as you’re working on it, instead of waiting until the end.
Printing and showing a presentation. To avoid problems printing a color presentation on a back and white printer, where the background, diagrams, or shapes might not look good, take the time to test your presentation in grayscale as you’re working on it, instead of waiting until the end.
![]() Click the View tab.
Click the View tab.
![]() Click the Pure Black and White or Grayscale button.
Click the Pure Black and White or Grayscale button.
![]() On the Black and White or Grayscale tab, click the button with the specific color method you want to use.
On the Black and White or Grayscale tab, click the button with the specific color method you want to use.
![]() When you’re done, click the Back To Color View button.
When you’re done, click the Back To Color View button.
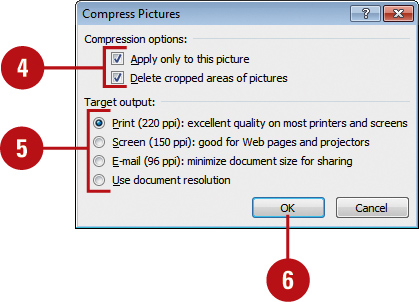
![]() To avoid large presentation file sizes and increase performance, it’s a good idea to compress and reduce image sizes in a presentation. In most cases, images don’t need to be much larger than 1024 × 768 pixels. If your images are larger than this, your PowerPoint files are probably bigger than they need to be. It’s actually alright to copy and paste images from one slide to another within PowerPoint. PowerPoint stores only one copy of the image no matter how many times you use it, so reusing an image can actually help keep your file sizes down.
To avoid large presentation file sizes and increase performance, it’s a good idea to compress and reduce image sizes in a presentation. In most cases, images don’t need to be much larger than 1024 × 768 pixels. If your images are larger than this, your PowerPoint files are probably bigger than they need to be. It’s actually alright to copy and paste images from one slide to another within PowerPoint. PowerPoint stores only one copy of the image no matter how many times you use it, so reusing an image can actually help keep your file sizes down.
![]() Click to select the pictures you want to compress.
Click to select the pictures you want to compress.
![]() Click the Format tab under Picture Tools.
Click the Format tab under Picture Tools.
![]() Click the Compress Pictures button.
Click the Compress Pictures button.
![]() Select the Apply only to this picture check box to apply compression setting to only the selected picture. If you want to delete cropped parts of a picture, select the Delete cropped areas of pictures check box.
Select the Apply only to this picture check box to apply compression setting to only the selected picture. If you want to delete cropped parts of a picture, select the Delete cropped areas of pictures check box.
![]() Click the Print, Screen, E-mail, or Use document resolution option to specify a target output.
Click the Print, Screen, E-mail, or Use document resolution option to specify a target output.
![]() Click OK to close the Compress Picture dialog box.
Click OK to close the Compress Picture dialog box.
![]() Click the Save button on the Quick Access Toolbar.
Click the Save button on the Quick Access Toolbar.
![]() In addition to compressing pictures, you can also compress audio and video media. Since audio and video is embedded (New!) in the presentation instead of being linked, the file size can increase greatly. To reduce the file size, you can use the Compress Media button on the Info screen. The Compress Media button is available only when audio or video are present in a presentation.
In addition to compressing pictures, you can also compress audio and video media. Since audio and video is embedded (New!) in the presentation instead of being linked, the file size can increase greatly. To reduce the file size, you can use the Compress Media button on the Info screen. The Compress Media button is available only when audio or video are present in a presentation.
![]() Click the File tab, and then click Info.
Click the File tab, and then click Info.
![]() Click the Compress Media button.
Click the Compress Media button.
![]() Click the quality option you want: Presentation Quality, Internet Quality, or Low Quality.
Click the quality option you want: Presentation Quality, Internet Quality, or Low Quality.
![]() Click Close.
Click Close.
![]() To undo the compression, click the Compress Media button, and then click Undo.
To undo the compression, click the Compress Media button, and then click Undo.
![]() Click the Save button on the Quick Access Toolbar.
Click the Save button on the Quick Access Toolbar.
The Results
Finish: Compare your completed project file with the presentation Optimize_results.pptx.
Project 2: Creating Better Presentations
Skills and Tools: Designing a presentation
PowerPoint makes it easy to create consistent professional slides, but you need to come up with the content and determine the layout of the material. Here are 10 important techniques to help you create and deliver better presentations.
The Project
In this project, you’ll learn how to create a better presentation without spending more time and effort.
The Process
![]() Be a presenter, not a reader.
Be a presenter, not a reader.
The audience has come to hear you give a presentation, share ideas, and communicate a message, not to look at you read information on a slide. PowerPoint can help you create slides, but it doesn’t deliver the presentation. In many ways, you become a story teller. Create a presentation with a compelling introduction to catch the audiences attention, a powerful body of content to draw them in, and a unique ending the audience will remember.
Keep slides simple and to the point. If slides contain too much information, the audience can get confused and turn off. Remember less is more. Experts suggest no more than five words per line and no more than five lines per slide. Instead of putting more information on a slide, put it in speaker’s notes for you to share. Don’t crowd your slides, and only include elements that contribute to the points you want to make.
![]() In PowerPoint, add slides with specific layouts to avoid slide over crowding.
In PowerPoint, add slides with specific layouts to avoid slide over crowding.
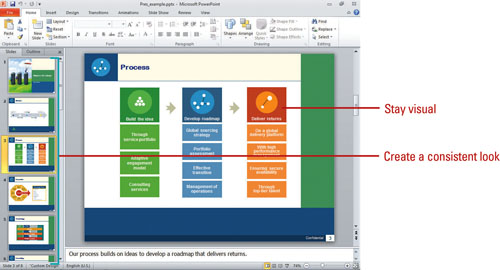
![]() Stay visual.
Stay visual.
A picture is worth a thousand words, or so they say. I think they are right. The world revolves around visuals, including billboards, traffic signs, and television to name a few. Insert an image, diagram, chart, or other visual to help get your point across to the audience. If you need to share statistics or other data, use a chart to convey the information. Visuals can promote an emotional response and interaction, instead of just information.
![]() In PowerPoint, use the Insert tab to add images, diagrams, charts, and other visuals.
In PowerPoint, use the Insert tab to add images, diagrams, charts, and other visuals.
![]() Insert other sounds and movies.
Insert other sounds and movies.
Use other sounds and movies for variety and visual appeal. Adding other media into a presentation re-enforces and supports your message. It provides validity to your message when someone else conveys the same thing.
![]() In PowerPoint, use the Insert tab to add sounds and movies.
In PowerPoint, use the Insert tab to add sounds and movies.
![]() Create a consistent look.
Create a consistent look.
A colorful background and unique look can make your presentation stand out. However, it may also be a distraction to the audience from hearing your message. Know your audience and create a consistent look for your presentation that complements your message.
![]() In PowerPoint, use slide masters to create a consistent look.
In PowerPoint, use slide masters to create a consistent look.
When you want to make a strong point during a presentation, a unique slide or a blank screen can help you get your point across to the audience. It’s useful when you want your audience to remember a certain point or concept.
![]() In PowerPoint, use Slide Master view to create another slide master with a different look, or use slide controls in Slide Show view to display a white or black screen.
In PowerPoint, use Slide Master view to create another slide master with a different look, or use slide controls in Slide Show view to display a white or black screen.
![]() Review, Review, Review.
Review, Review, Review.
Review your slides for correctness, accuracy, and content. Use the spell checking and proofing tools to avoid spelling errors and accidental mistakes, which can make you look bad. Check the accuracy of your content to make sure it’s correct. Make sure your slide content contributes to your main point. If some content doesn’t add to your message, then take it out.
![]() In PowerPoint, use the Review tab to access spell checker, thesaurus, and other text-related proofing tools.
In PowerPoint, use the Review tab to access spell checker, thesaurus, and other text-related proofing tools.
![]() Practice, Practice, Practice.
Practice, Practice, Practice.
Practice your presentation over and over again. The more comfortable you are delivering the material, the easier it will be to focus on the message instead of the mechanics of the presentation. Your PowerPoint presentation slides are here to add to your message. Let your message take center stage and use your PowerPoint slides, speaker’s notes, and handouts to support your cause.
![]() In PowerPoint, use the Slide Show tab to practice your presentation in Slide Show view with slide timings.
In PowerPoint, use the Slide Show tab to practice your presentation in Slide Show view with slide timings.
![]() Keep time.
Keep time.
![]() I don’t think anyone ever minded if a presentation ended early. However, going long can detract from your message. Determine how long you want your presentation to take and stay on time. The best way to stay on time is to rehearse with slide timings. Seems like everything takes longer than you think, so practicing your delivery from start to finish will keep you on time.
I don’t think anyone ever minded if a presentation ended early. However, going long can detract from your message. Determine how long you want your presentation to take and stay on time. The best way to stay on time is to rehearse with slide timings. Seems like everything takes longer than you think, so practicing your delivery from start to finish will keep you on time.
![]() In PowerPoint, use the Slide Show tab to practice your presentation in Slide Show view with rehearse slide timings.
In PowerPoint, use the Slide Show tab to practice your presentation in Slide Show view with rehearse slide timings.
![]() Distribute minimal handouts.
Distribute minimal handouts.
In many situations, the audience may need to take notes during your presentation. I believe it’s better to provide minimal handouts with only slide content to avoid distraction during the presentation. You want the audience to focus on you and your message instead of the handout. If you need to provide more detailed information for the audience, distribute it at the end of the presentation, where they can take it with them for later review.
![]() In PowerPoint, use the Handouts Master view to create supplemental handouts for the audience.
In PowerPoint, use the Handouts Master view to create supplemental handouts for the audience.
The Results
Finish: Open the example project file with the presentation Pres_example.pptx.
Project 3: Creating a Self Running Presentation with Narration
Skills and Tools: Record narration and create a self running presentation
Self-running slide shows are a great way to communicate information without needing someone to run the show. You might want to set up a presentation to run unattended in a kiosk at a trade show or place it on your company’s Intranet to run at the user’s convenience. The slides will advance automatically, or a user can advance the slides or activate hyperlinks. Instead of creating a silent presentation, you can record a narration to convey your message.
The Project
In this project, you’ll learn how to add sound narration to a presentation, and make the presentation self running.
The Process
![]() Open PowerPoint 2010, open SelfRun_start.potx, and then save it as SelfRun_pres.pptx.
Open PowerPoint 2010, open SelfRun_start.potx, and then save it as SelfRun_pres.pptx.
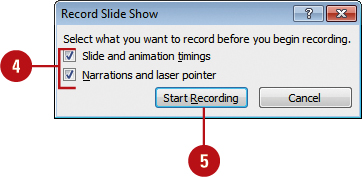
![]() Add sound narration.
Add sound narration.
![]() Click the Slide Show tab.
Click the Slide Show tab.
![]() Click the Record Slide Show button.
Click the Record Slide Show button.
![]() Select the Slide and animation timings check box and the Narrations and laser pointer check box.
Select the Slide and animation timings check box and the Narrations and laser pointer check box.
![]() Click Start Recording.
Click Start Recording.
As you record narration, you can pause and resume it at any time. To pause narration, click the Pause button on the Recording toolbar or right-click on the screen, and then click Pause Recording. To resume it, click Resume Recording.
![]() Speak clearly into the microphone attached to your computer and record your narration for each slide.
Speak clearly into the microphone attached to your computer and record your narration for each slide.
![]() When you’re done, right-click on the screen, and then click End Show.
When you’re done, right-click on the screen, and then click End Show.
![]() Rerun the slide show and verify that your narration has been recorded along with the automatic timings.
Rerun the slide show and verify that your narration has been recorded along with the automatic timings.
![]() Click the Save button on the Quick Access Toolbar.
Click the Save button on the Quick Access Toolbar.
![]() Create and start a self running presentation.
Create and start a self running presentation.
![]() Click the Slide Show tab.
Click the Slide Show tab.
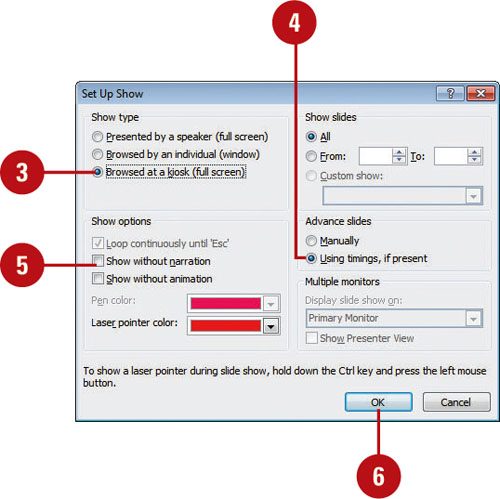
![]() Click the Set Up Show button. 2
Click the Set Up Show button. 2
![]() Click the Browsed at a kiosk (full screen) option.
Click the Browsed at a kiosk (full screen) option.
The Loop continuously until ‘Esc’ option is selected and grayed out.
![]() Select the Using timings, if present option, where you can advance the slides automatically.
Select the Using timings, if present option, where you can advance the slides automatically.
![]() To show a presentation with narration on a computer without sound hardware installed, select the Show without narration check box to avoid problems running the presentation.
To show a presentation with narration on a computer without sound hardware installed, select the Show without narration check box to avoid problems running the presentation.
![]() Click OK.
Click OK.
![]() Click the Resolution list arrow, and then select the display resolution you want, such as 640x480, 1024x768, or User Current Resolution.
Click the Resolution list arrow, and then select the display resolution you want, such as 640x480, 1024x768, or User Current Resolution.
![]() Click the From Beginning button to start the self running slide show. Press Esc to stop it.
Click the From Beginning button to start the self running slide show. Press Esc to stop it.
![]() Click the Save button on the Quick Access Toolbar.
Click the Save button on the Quick Access Toolbar.
The Results
Finish: Compare your completed project file with the presentation SelfRun_results.pptx.
Project 5: Creating a VBA Form in a Presentation
Skills and Tools: ActiveX controls and Visual Basic for Applications (VBA) form
An ActiveX control is a software component that adds functionality to an existing program. An ActiveX control supports a customizable, programmatic interface using VBA, which you can use to create your own functionality, such as a form. Excel includes several pre-built ActiveX controls—including a label, text box, command button, and check box—to help you create a user interface.
The Project
In this project, you’ll learn how to create a form using VBA that allows users to apply a template to the active presentation. You’ll also learn how to insert a picture from a selected folder, and show the active presentation in Slide Show view.
The Process
![]() Open PowerPoint 2010, open VBA_Form_start.potm, and then save it as VBA_Form_pres.pptm (macro-enabled presentation).
Open PowerPoint 2010, open VBA_Form_start.potm, and then save it as VBA_Form_pres.pptm (macro-enabled presentation).
![]() Create a form.
Create a form.
![]() Click the Developer tab. 2
Click the Developer tab. 2
![]() Click the Visual Basic button.
Click the Visual Basic button.
![]() Click the Insert menu, and then click UserForm.
Click the Insert menu, and then click UserForm.
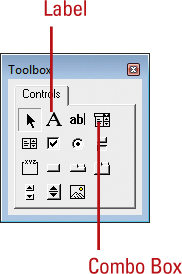
A new form, UserForm1, opens and the Toolbox appears, displaying controls.
![]() Click the Label button in the Toolbox.
Click the Label button in the Toolbox.
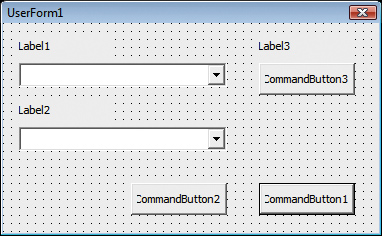
![]() Position the mouse pointer in the upper-left corner of the form, and then click the mouse button.
Position the mouse pointer in the upper-left corner of the form, and then click the mouse button.
A label appears selected on the form with the default caption, Label1.
![]() Click the ComboBox button in the Toolbox.
Click the ComboBox button in the Toolbox.
![]() Position the mouse pointer below the Label1 control, and then click the mouse button.
Position the mouse pointer below the Label1 control, and then click the mouse button.
The ComboBox button appears selected on the form.
![]() Repeat steps 5 through 8 to add Label2 control, and second ComboBox control to the form, and then repeat steps 5 through 6 to add Label3 control to the form.
Repeat steps 5 through 8 to add Label2 control, and second ComboBox control to the form, and then repeat steps 5 through 6 to add Label3 control to the form.
![]() Click the CommandButton button in the Toolbox.
Click the CommandButton button in the Toolbox.
![]() Position the mouse pointer below the second ComboBox, and then click the mouse.
Position the mouse pointer below the second ComboBox, and then click the mouse.
The CommandButton1 button appears selected on the form.
![]() Repeat steps 10 through 11 to add CommandButton2 and CommandButton3 to the form.
Repeat steps 10 through 11 to add CommandButton2 and CommandButton3 to the form.
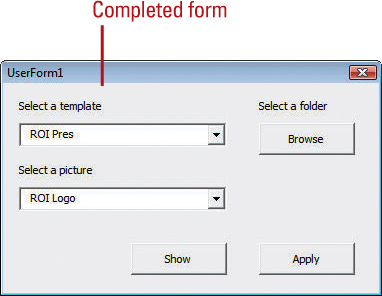
![]() Resize the form and any of the controls to match the illustration to the right.
Resize the form and any of the controls to match the illustration to the right.
![]() Set control properties.
Set control properties.
![]() Click the Label1 control on the form.
Click the Label1 control on the form.
![]() Click the View menu, and then click Properties Window, if necessary, to display the Properties window.
Click the View menu, and then click Properties Window, if necessary, to display the Properties window.
![]() In the Properties window, click Caption on the Alphabetic tab.
In the Properties window, click Caption on the Alphabetic tab.
![]() Double-click the Label1 caption, type Select a template, and then press Enter.
Double-click the Label1 caption, type Select a template, and then press Enter.
![]() Change the caption of Label2 to Select a picture, change the caption of Label3 to Select a folder, change the caption of CommandButton1 to Apply, change the caption of CommandButton2 to Show, and change the caption of CommandButton3 to Browse.
Change the caption of Label2 to Select a picture, change the caption of Label3 to Select a folder, change the caption of CommandButton1 to Apply, change the caption of CommandButton2 to Show, and change the caption of CommandButton3 to Browse.
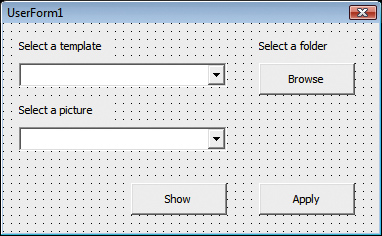
![]() Resize the width of the two ComboBoxes to stretch across the form. The height remains the same.
Resize the width of the two ComboBoxes to stretch across the form. The height remains the same.
![]() Add VBA functionality to the form.
Add VBA functionality to the form.
![]() Click the Insert UserForm button arrow on the Standard toolbar, and then click Module.
Click the Insert UserForm button arrow on the Standard toolbar, and then click Module.
A new module, Module1, opens.
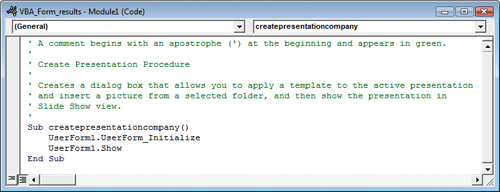
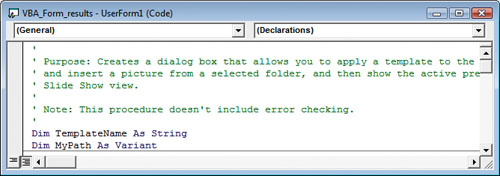
![]() Type the VBA code that appears in the following illustration:
Type the VBA code that appears in the following illustration:
![]() Select UserForm1 in the Project Window, and then click the View Code button.
Select UserForm1 in the Project Window, and then click the View Code button.
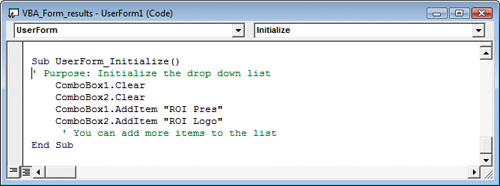
![]() Type the initialize form procedure VBA code that appears in the following illustration:
Type the initialize form procedure VBA code that appears in the following illustration:
![]() Click the Object box arrow at the top of the Code Window, and then click CommandButton1.
Click the Object box arrow at the top of the Code Window, and then click CommandButton1.
![]() In the Procedure box, type the VBA code that appears in the following illustration:
In the Procedure box, type the VBA code that appears in the following illustration:

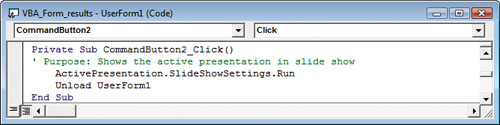
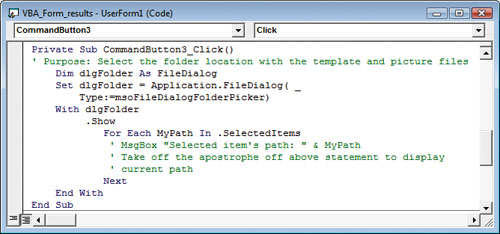
![]() Repeat steps 5 through 6 to add VBA code for CommandButton2 and CommandButton3 to the form that appears in the following illustration:
Repeat steps 5 through 6 to add VBA code for CommandButton2 and CommandButton3 to the form that appears in the following illustration:
![]() Click the Object box arrow at the top of the Code Window, and then click (General).
Click the Object box arrow at the top of the Code Window, and then click (General).
![]() Type Dim TemplateName As String, press Enter, type Dim MyPath As Variant, and then press Enter.
Type Dim TemplateName As String, press Enter, type Dim MyPath As Variant, and then press Enter.
Compare your screen to the following illustration:
![]() Click the Save button on the Standard toolbar.
Click the Save button on the Standard toolbar.
![]() Click the Close button on the Visual Basic Editor window to return to PowerPoint.
Click the Close button on the Visual Basic Editor window to return to PowerPoint.
![]() Click the Save button on the Quick Access Toolbar.
Click the Save button on the Quick Access Toolbar.
![]() Add a button on the Quick Access Toolbar to run the form.
Add a button on the Quick Access Toolbar to run the form.
![]() Click the the Customize Quick Access Toolbar list arrow, and then click Customize Quick Access Toolbar.
Click the the Customize Quick Access Toolbar list arrow, and then click Customize Quick Access Toolbar.
![]() Click the Choose command from list arrow, and then click Macros.
Click the Choose command from list arrow, and then click Macros.
![]() Click the Customize Quick Access Toolbar list arrow, and then click For all documents (default).
Click the Customize Quick Access Toolbar list arrow, and then click For all documents (default).
![]() Click the VBA form macro (left column).
Click the VBA form macro (left column).
![]() Click Add.
Click Add.
![]() Click the Move Up and Move Down arrow buttons to arrange the commands in the order you want them to appear.
Click the Move Up and Move Down arrow buttons to arrange the commands in the order you want them to appear.
![]() Click Modify.
Click Modify.
![]() In the Display name box, type CompanyPres.
In the Display name box, type CompanyPres.
![]() Click an icon from the symbol list.
Click an icon from the symbol list.
![]() Click OK.
Click OK.
![]() Click OK.
Click OK.
![]() Click the Save button on the Quick Access Toolbar.
Click the Save button on the Quick Access Toolbar.
![]() Click the CompanyPres button on the Quick Access Toolbar, and then test out the form.
Click the CompanyPres button on the Quick Access Toolbar, and then test out the form.
![]() When you’re done, click the Close button on the form.
When you’re done, click the Close button on the form.

The Results
Finish: Compare your completed project file with the presentation VBA_Form_results.pptx.
Want More Projects
You can access and download more workshop projects and related files at www.perspection.com in the software downloads area. After you download the files from the Web, uncompress the files into a folder on your hard drive where you’ll have easy access from your Microsoft Office program.
Get Everything on CD
Instead of downloading everything from the Web, which can take a while depending on your Internet connection speed, you can get all the files used in this book and much more on the Microsoft Office 2010 On Demand CD. The CD contains task and workshop files, tips and tricks, keyboard shortcuts, transition helpers from 2003 or 2007 to 2010, and other goodies from the author.
To get the Microsoft Office 2010 On Demand CD, go to www.perspection.com.