
2: Developing Presentation Content
What You’ll Do
Create New and Consistent Slides
Correct and Resize Text While Typing
Insert Information the Smart Way
Change Text Alignment and Spacing
Change Character Spacing and Direction
Modify a Bulleted and Numbered List
Use Slides from Other Presentations
Introduction
When creating a new presentation, there are things to consider as you develop your content. Microsoft PowerPoint can help you with this process. There are various elements to a presentation that make looking at your slides interesting: bulleted lists, clip art, charts and diagrams, organization charts and tables, and media clips or pictures. All of these items are considered graphic objects, and are separate from the text objects that you enter. Objects can be moved from one part of a presentation to another. You can also resize, move, and delete them.
As you develop your presentation, there are a few things to keep in mind—keep the text easy to read and straight to the point, make sure it isn’t too wordy, and have a balance of text and graphics. Too much text can lose your audience while too many graphics can distract their focus.
PowerPoint offers many tools to help develop your text. Using the AutoCorrect feature, text is corrected as you type. A built-in Thesaurus is always a few keystrokes away, as is a research option that allows you to look for information is available in PowerPoint or has links to the Web.
Once you’ve begun to enter your text, you can adjust the spacing, change the alignment, set tabs, and change indents. You can also format your text by changing the font style or its attributes such as adding color to your text. If you decide to enter text in outline form, PowerPoint offers you the Outline pane to jot down your thoughts and notes. If bulleted or numbered lists are your preference, you can enter your ideas in this format. Should you need to rearrange your slides, you can do this in various PowerPoint views.
Creating New and Consistent Slides
Creating consistent looking slides makes it easier for your audience to follow and understand your presentation. PowerPoint provides a gallery of slide layouts to help you position and format slides in a consistent manner. A slide layout contains placeholders, such as text, chart, table, or SmartArt graphic, where you can enter text or insert elements. When you create a new slide, you can apply a standard layout or a custom layout of your own design. You can also apply a layout to an existing slide at any time. When you change a slide’s layout, PowerPoint keeps the existing information and applies the new look.
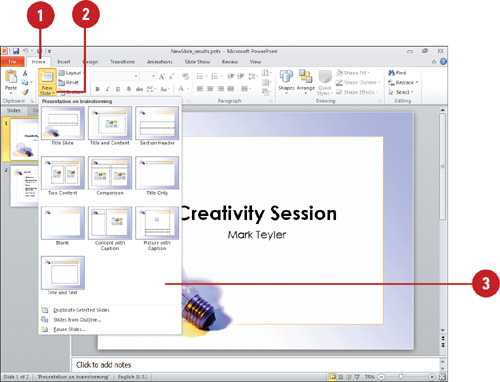
Insert a New Slide
![]() Click the Home tab.
Click the Home tab.
![]() Click the New Slide button arrow.
Click the New Slide button arrow.
TIMESAVER To insert a slide quickly without using the gallery, click the Add Slide button (icon).
![]() In the Slide Layout gallery, click the slide layout you want to use.
In the Slide Layout gallery, click the slide layout you want to use.
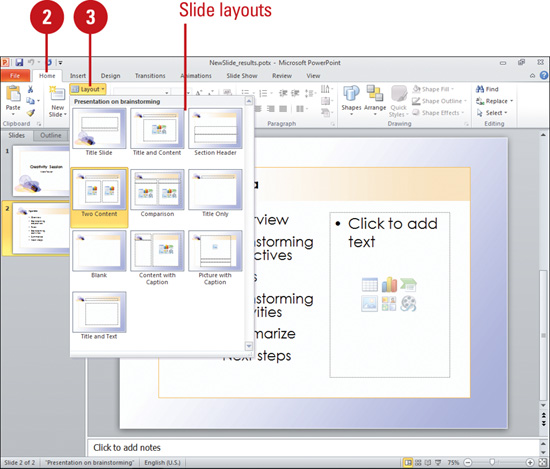
Apply a Layout to an Existing Slide
![]() In Normal view, display the slide you want to change.
In Normal view, display the slide you want to change.
![]() Click the Home tab.
Click the Home tab.
![]() Click the Layout button, and then click the slide layout you want.
Click the Layout button, and then click the slide layout you want.
See Also
See “Using Slides from Other Presentations” on page 78 for information on adding slides from other presentations.
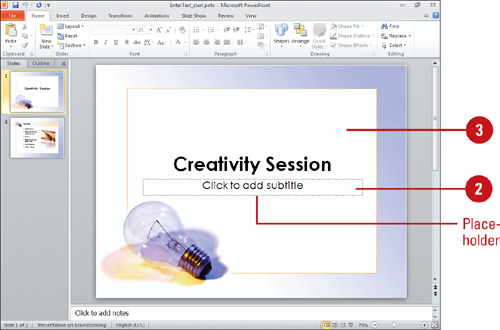
Enter Information in a Placeholder
![]() For text placeholders, click the placeholder, and then type the text.
For text placeholders, click the placeholder, and then type the text.
![]() For other objects, click the icon in the placeholder, and then work with the accessory that PowerPoint starts.
For other objects, click the icon in the placeholder, and then work with the accessory that PowerPoint starts.
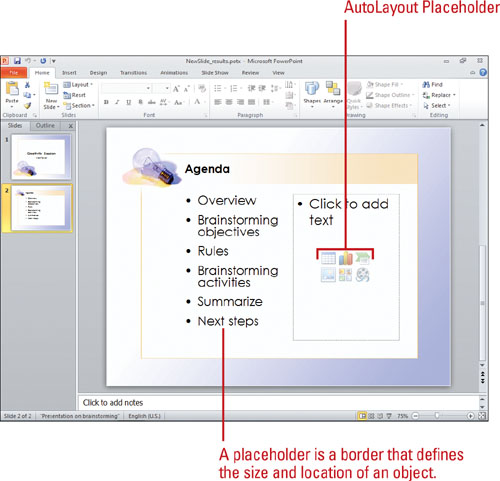
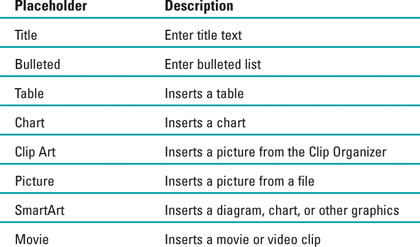
Slide Layout Placeholders
Did You Know?
You can duplicate a slide. In Outline or Slides pane or Slide Sorter view, select the slide you want to duplicate, click the Home tab, click the Add Slide button arrow in the Slides group, and then click Duplicate Selected Slides.
You can quickly delete a slide. In Outline or Slides pane or Slide Sorter view, select the slide you want to delete, and then press Delete or click the Delete button in the Slides group on the Home tab.
You can reset a placeholder position back to the default location. In Outline or Slides pane or Slide Sorter view, select the slide you want to reset, click the Home tab, and then click the Reset button in the Slides group.
Working with Objects
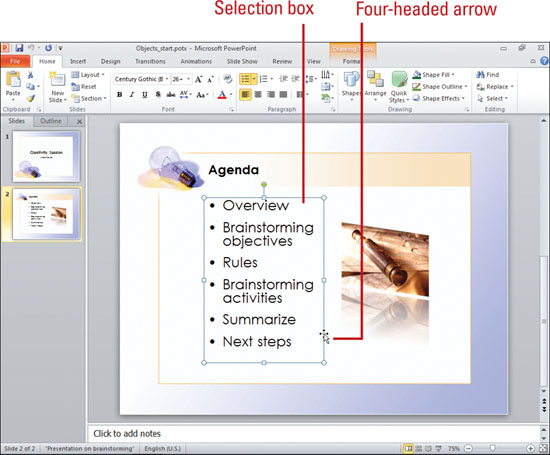
Once you create a slide, you can modify any of its objects, even those added by a slide layout. To manipulate objects, use Normal view. To perform any action on an object, you first need to select it. When you select an object, such as text or graphic, the object is surrounded by a solid-lined rectangle, called a selection box, with sizing handles (small white circles at the corners and small white squares on the sides) around it. You can resize, move, delete, and format selected objects.
Select and Deselect an Object
![]() To select an object, move the pointer (which changes to a four-headed arrow) over the object or edge, and then click to select.
To select an object, move the pointer (which changes to a four-headed arrow) over the object or edge, and then click to select.
![]() To select multiple objects, press and hold Shift as you click each object or drag to enclose the objects you want to select in the selection box. Press Ctrl+A to select all objects on a slide.
To select multiple objects, press and hold Shift as you click each object or drag to enclose the objects you want to select in the selection box. Press Ctrl+A to select all objects on a slide.
![]() To deselect an object, click outside its border.
To deselect an object, click outside its border.
![]() To deselect one of a group of objects, press and hold Shift, and then click the object.
To deselect one of a group of objects, press and hold Shift, and then click the object.
Resize an Object
![]() Move the pointer over a sizing handle.
Move the pointer over a sizing handle.
![]() Drag the sizing handle until the object is the size you want.
Drag the sizing handle until the object is the size you want.

TIMESAVER Use the Shift and Ctrl keys while you drag. The Shift key constrains an edge; the Ctrl key maintains a proportional edge; and the Shift and Ctrl keys together maintains a proportional object.
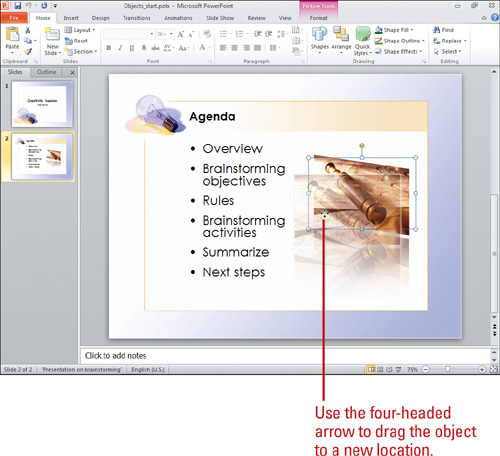
![]() Using the mouse. Move the pointer (which changes to a four-headed arrow) over the object, and then drag it to the new location. To move unfilled objects, drag the border. You can move an object in a straight line by pressing Shift as you drag the object.
Using the mouse. Move the pointer (which changes to a four-headed arrow) over the object, and then drag it to the new location. To move unfilled objects, drag the border. You can move an object in a straight line by pressing Shift as you drag the object.
![]() Using the keyboard. Click the object, and then press the arrow keys to move the object in the direction you want.
Using the keyboard. Click the object, and then press the arrow keys to move the object in the direction you want.
Did You Know?
You can use keyboard shortcuts to cut, copy, and paste objects. To cut an object from a slide, select the object and then press Ctrl+X. To copy an object, select the object, and then press Ctrl+C. To paste an object on a slide, press Ctrl+V.
Delete an Object
![]() Click the object you want to delete.
Click the object you want to delete.
![]() Press Delete.
Press Delete.
Did You Know?
You can use the Tab key to select hard-to-click objects. If you are having trouble selecting an object that is close to other objects, click a different object and then press Tab until you select the object you want. See “Selecting Objects Using the Selection Pane” on page 142 for more information on selecting hard-to-click objects.
Developing Text
Your presentation’s text lays the foundation for the presentation. Keep these basic presentation rules in mind when developing your text.
![]() Keep it simple.
Keep it simple.
![]() If you plan to present your slides to a large group, think about the people at the back of the room and what they can see.
If you plan to present your slides to a large group, think about the people at the back of the room and what they can see.
![]() Keep the text to a minimum with no more than five bullets per slide and no more than five words per bullet.
Keep the text to a minimum with no more than five bullets per slide and no more than five words per bullet.
![]() If you find a graphic that illustrates your point in a memorable way, use it instead of a lot of text.
If you find a graphic that illustrates your point in a memorable way, use it instead of a lot of text.
PowerPoint provides several views that can help you organize your text. You can work with text and other objects one slide at a time in Normal view or, by clicking the Outline tab, you can work with all the presentation text on all slides at once.
PowerPoint also offers many text formatting features traditionally associated with word processing software. You can apply fonts and text attributes to create the look you want. You can set tabs, indents, and alignment. Finally, you can edit and correct your text using several handy tools, including style, grammar, and spelling checkers.
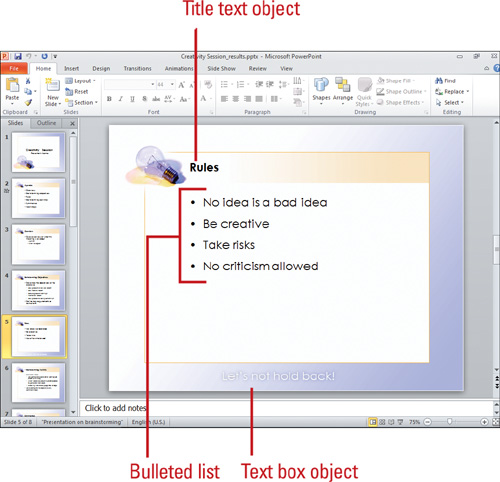
PowerPoint includes three types of text objects.
![]() Title text objects. Presized rectangular boxes that appear at the top of each slide—used for slide titles and, if appropriate, subtitles.
Title text objects. Presized rectangular boxes that appear at the top of each slide—used for slide titles and, if appropriate, subtitles.
![]() Bulleted list objects. Boxes that accommodate bulleted or numbered lists.
Bulleted list objects. Boxes that accommodate bulleted or numbered lists.
![]() Text box objects. Boxes that contain non-title text that you don’t want to format in bulleted or numbered lists—often used for captions.
Text box objects. Boxes that contain non-title text that you don’t want to format in bulleted or numbered lists—often used for captions.
The first slide in a presentation typically contains title and text and a subtitle. Other slides often start with a title and then list major points in a bulleted list. Use text boxes only occasionally—when you need to include annotations or minor points that don’t belong in a list.
Use the Slides pane of Normal view to enter text when you are focusing on the text or objects of one slide at a time.
When to Enter Text in an Outline
If you are concentrating on developing presentation content, but not on how the text looks or interacts with other objects on the slide, use the Outline tab in Normal view. This view lets you see the titles, subtitles, and bulleted text on all your slides at a single glance.
The Outline tab in Normal view is particularly useful for reorganizing the content of your presentation and ensuring that topics flow well from one to the next. You can easily move presentation topics up and down the outline.
Entering Text
In Normal view, you can type text directly into the text placeholders. A text placeholder is an empty text box. If you type more text than fits in the placeholder, the text is automatically resized to fit on the slide. You can also manually increase or decrease the line spacing or font size of the text. The insertion point (the blinking vertical line) indicates where text will appear when you type. To place the insertion point into your text, move the pointer over the text. The pointer changes to an I-beam to indicate that you can click and then type. When a selection box of dashed lines appears, your changes affect only the selected text. When a solid-lined selection box appears, changes apply to the entire text object.
Enter Text into a Placeholder
![]() In Normal view, click the text placeholder if it isn’t already selected.
In Normal view, click the text placeholder if it isn’t already selected.
![]() Type the text you want to enter.
Type the text you want to enter.
![]() Click outside the text object to deselect it.
Click outside the text object to deselect it.
Insert Text
![]() Click to place the insertion point where you want to insert the text.
Click to place the insertion point where you want to insert the text.
![]() Type the text.
Type the text.

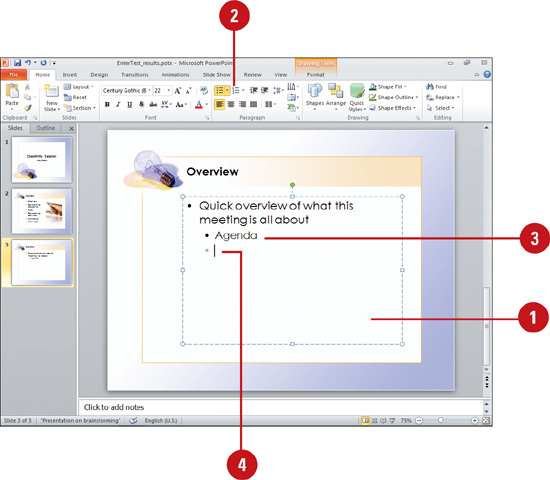
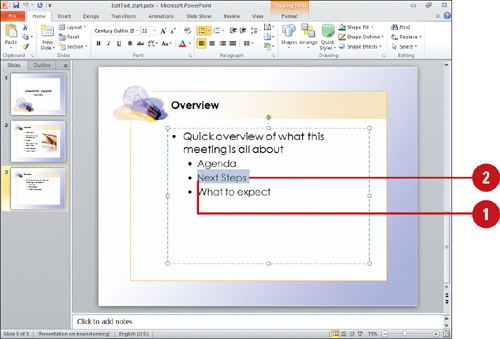
Enter Text in a Bulleted or Numbered List
![]() In Normal view, click the bulleted text placeholder.
In Normal view, click the bulleted text placeholder.
![]() To switch to a numbered list, click the Home tab, if necessary, and then click the Numbering button.
To switch to a numbered list, click the Home tab, if necessary, and then click the Numbering button.
![]() Type the first item.
Type the first item.
![]() Press Enter.
Press Enter.
![]() To increase the list level, press Tab or click the Increase List Level button on the Home tab.
To increase the list level, press Tab or click the Increase List Level button on the Home tab.
![]() To decrease the list level, press Shift+Tab, or click the Decrease List Level button on the Home tab.
To decrease the list level, press Shift+Tab, or click the Decrease List Level button on the Home tab.
![]() Type the next item.
Type the next item.
![]() Repeat steps 4 and 5 until you complete the list.
Repeat steps 4 and 5 until you complete the list.
See Also
See “Moving and Indenting Text” on page 54 or “Modifying a Bulleted and Numbered List” on page 64 for information on changing text in a bulleted list.
Editing Text
If you are familiar with word processing programs, you probably already know how to perform most text editing tasks in PowerPoint. You can move, copy, or delete existing text; replace it with new text; and undo any changes you just made. Some of the editing methods require that you select the text first. When you select text, the text is surrounded by a rectangle of gray dashed lines, indicating you can now edit the text.
Select and Modify Text
![]() Position the mouse pointer to the left of the text you want to highlight.
Position the mouse pointer to the left of the text you want to highlight.
![]() Drag the pointer over the text—just a few words, a few lines, or entire paragraphs, and then release the mouse button.
Drag the pointer over the text—just a few words, a few lines, or entire paragraphs, and then release the mouse button.
![]() To select discontinuous text, press Ctrl, and then drag the pointer over text.
To select discontinuous text, press Ctrl, and then drag the pointer over text.
![]() Modify the text the way you want.
Modify the text the way you want.
![]() To delete text, press Delete.
To delete text, press Delete.
![]() To replace text, type your new text.
To replace text, type your new text.
Move or Copy Text
![]() Select the text you want to move or copy.
Select the text you want to move or copy.
![]() Move or copy the text the way you want.
Move or copy the text the way you want.
![]() To move text short distances in the Outline tab or on a slide, drag the text to the new location. To copy text, press and hold the Ctrl key as you drag the text.
To move text short distances in the Outline tab or on a slide, drag the text to the new location. To copy text, press and hold the Ctrl key as you drag the text.
![]() To move or copy text between slides, click the Cut or Copy button on the Home tab, click where you want to insert the text, and then click the Paste button.
To move or copy text between slides, click the Cut or Copy button on the Home tab, click where you want to insert the text, and then click the Paste button.

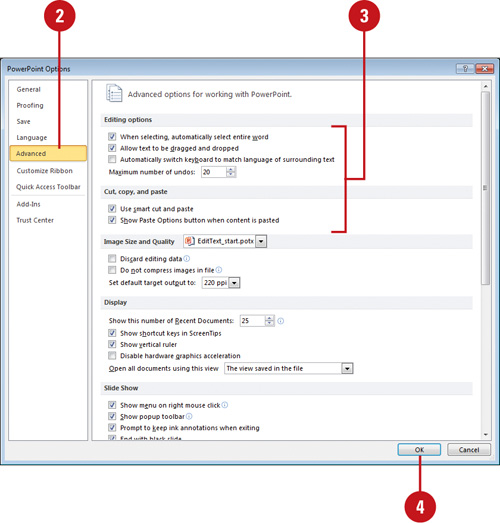
Setting Editing Options
PowerPoint provides advanced options that make editing text and working with objects easier. For example, PowerPoint can help you automatically select an entire word and allow text to be dragged and dropped. When you cut, copy, and paste text and objects, PowerPoint provides options that automatically adjust word spacing when you paste text with Smart Cut and Paste and Show Paste Options buttons when they are needed. When you use the Cut or Copy and Paste commands to move a slide to a new location, Paste Options button appears, allowing you to control how your slide appears after you paste it.
Set Editing Options
![]() Click the File tab, and then click Options.
Click the File tab, and then click Options.
![]() In the left pane, click Advanced.
In the left pane, click Advanced.
![]() Select or deselect the check box options you want turned on or off:
Select or deselect the check box options you want turned on or off:
![]() When selecting, automatically select entire word (default on). Select to have PowerPoint select the entire word when you click a word.
When selecting, automatically select entire word (default on). Select to have PowerPoint select the entire word when you click a word.
![]() Allow text to be dragged and dropped (default on). Select to move or copy text by dragging the text.
Allow text to be dragged and dropped (default on). Select to move or copy text by dragging the text.
![]() Automatically switch keyboard to match language of surrounding text (default off). Select to have PowerPoint switch keyboard to match the language (only available with multiple keyboard languages).
Automatically switch keyboard to match language of surrounding text (default off). Select to have PowerPoint switch keyboard to match the language (only available with multiple keyboard languages).
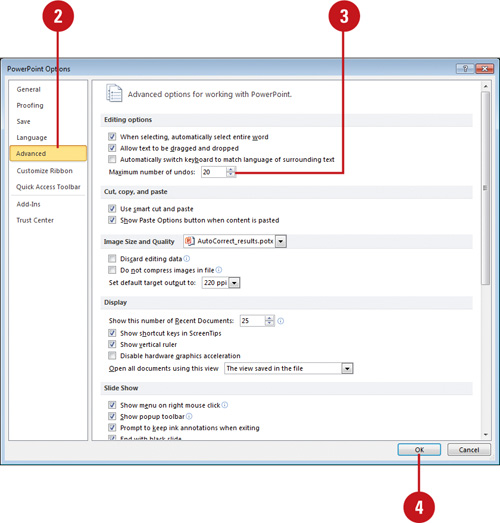
![]() Maximum number of undos (default 20). Enter the number of recent changes you want PowerPoint to track.
Maximum number of undos (default 20). Enter the number of recent changes you want PowerPoint to track.
![]() Use smart cut and paste (default on). Select to have PowerPoint adjust the spacing of words and objects.
Use smart cut and paste (default on). Select to have PowerPoint adjust the spacing of words and objects.
![]() Show Paste Options buttons (default on). Select to show the Paste Options button alongside text that you paste.
Show Paste Options buttons (default on). Select to show the Paste Options button alongside text that you paste.
![]() Click OK.
Click OK.
Correcting Text While Typing
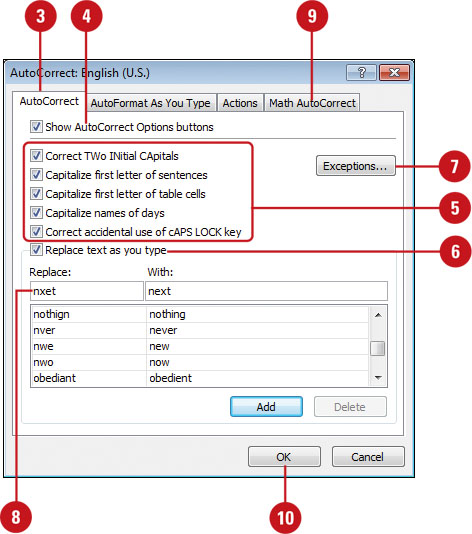
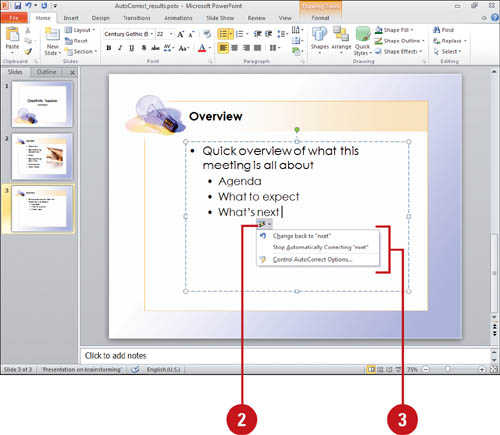
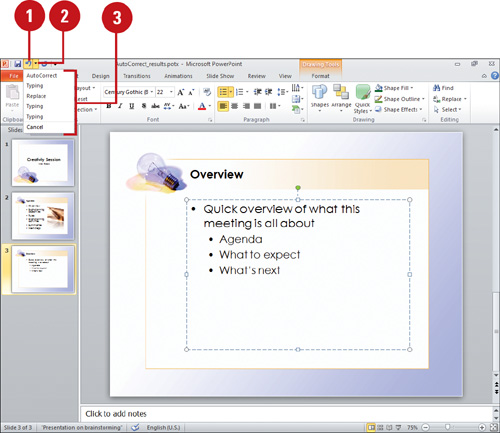
With AutoCorrect, PowerPoint corrects common capitalization and spelling errors as you type. For example, if you accidentally type two capital letters or forget to capitalize the first letter of a sentence or table cell, AutoCorrect will fix it for you. You can customize AutoCorrect to recognize or ignore routine misspellings you make or to ignore specific text that you do not want AutoCorrect to change. If you use math symbols in your work, you can use Math AutoCorrect (New!) to make it easier to insert them. It works just like AutoCorrect. When you point to a word that AutoCorrect changed, a small blue box appears under the first letter. When you point to the small blue box, the AutoCorrect Options button appears, which gives you control over whether you want to correct the text. You can change text back to its original spelling, stop AutoCorrect from correcting text, or change AutoCorrect settings.
Set AutoCorrect Options
![]() Click the File tab, and then click Options.
Click the File tab, and then click Options.
![]() Click Proofing, and then click AutoCorrect Options.
Click Proofing, and then click AutoCorrect Options.
![]() Click the AutoCorrect tab.
Click the AutoCorrect tab.
![]() Select the Show AutoCorrect Options buttons check box to display the button to change AutoCorrect options.
Select the Show AutoCorrect Options buttons check box to display the button to change AutoCorrect options.
![]() Select the capitalization and correction check boxes you want.
Select the capitalization and correction check boxes you want.
![]() Select the Replace text as you type check box.
Select the Replace text as you type check box.
![]() To change AutoCorrect exceptions, click Exceptions, click the First Letter or INitial CAps tab, make the changes you want, and then click OK.
To change AutoCorrect exceptions, click Exceptions, click the First Letter or INitial CAps tab, make the changes you want, and then click OK.
![]() To add an AutoCorrect entry, type Replace text, type the With text, and then click Add.
To add an AutoCorrect entry, type Replace text, type the With text, and then click Add.
![]() To use Math AutoCorrect, click the Math AutoCorrect tab, and then select the Use Math AutoCorrect rules outside of math regions check box.
To use Math AutoCorrect, click the Math AutoCorrect tab, and then select the Use Math AutoCorrect rules outside of math regions check box.
![]() Click OK, and then click OK again.
Click OK, and then click OK again.
![]() If you misspell a word that PowerPoint recognizes, it will correct it and the AutoCorrect button will appear.
If you misspell a word that PowerPoint recognizes, it will correct it and the AutoCorrect button will appear.
![]() Point to the small blue box under the corrected word, and then click the AutoCorrect Options button list arrow to view your options.
Point to the small blue box under the corrected word, and then click the AutoCorrect Options button list arrow to view your options.
![]() Click an option, or click a blank area of the slide to deselect the AutoCorrect Options menu.
Click an option, or click a blank area of the slide to deselect the AutoCorrect Options menu.
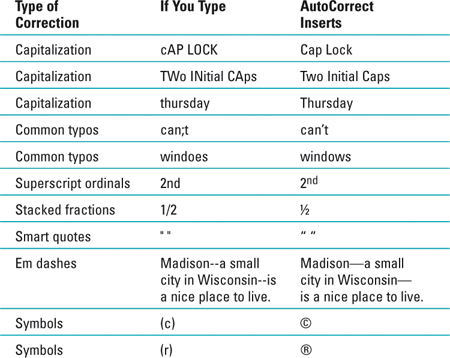
Examples of AutoCorrect Changes
Undoing and Redoing an Action
You may realize you’ve made a mistake shortly after completing an action. The Undo feature lets you “take back” one or more previous actions, including text you typed, edits you made, or commands you selected. For example, if you were to enter a title in a document, and then decide you don’t like it, you could undo it instead of selecting the text and deleting it. A few moments later, if you decide the text you deleted was alright, you could use the Redo feature to restore it.
Undo an Action
![]() Click the Undo button on the Quick Access Toolbar to undo the last action you completed.
Click the Undo button on the Quick Access Toolbar to undo the last action you completed.
TIMESAVER Press Ctrl+Z.
![]() Click the Undo button arrow on the Quick Access Toolbar to see recent actions that can be undone.
Click the Undo button arrow on the Quick Access Toolbar to see recent actions that can be undone.
![]() Click an action. Word reverses the selected action and all actions above it.
Click an action. Word reverses the selected action and all actions above it.
Click the Redo button on the Quick Access Toolbar to restore your last undone action.
TIMESAVER Press Ctrl+Y.
TROUBLE? If the Redo button is not available on the Quick Access Toolbar, click the Customize Quick Access Toolbar list arrow, and then click Redo.
Set Undo Options
![]() Click the File tab, and then click Options.
Click the File tab, and then click Options.
![]() In the left pane, click Advanced.
In the left pane, click Advanced.
![]() Enter the maximum number of undos you want PowerPoint to track (default 20).
Enter the maximum number of undos you want PowerPoint to track (default 20).
![]() Click OK.
Click OK.
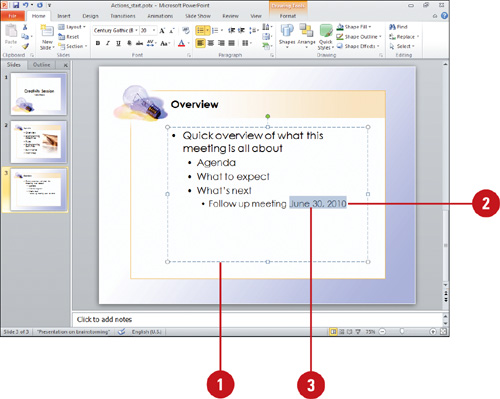
Resizing Text While Typing
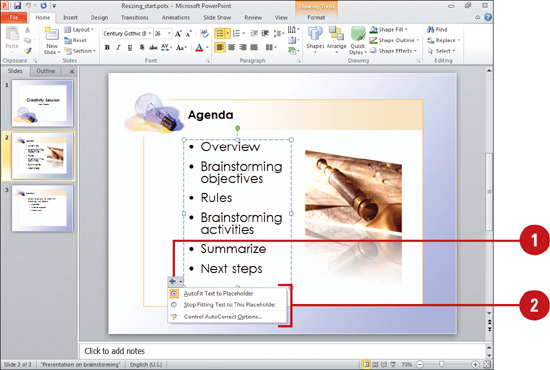
If you type text in a placeholder, PowerPoint uses AutoFit to resize the text, if necessary, to fit into the placeholder. The AutoFit Text feature changes the line spacing—or paragraph spacing—between lines of text and then changes the font size to make the text fit. The AutoFit Options button, which appears near your text the first time that it is resized, gives you control over whether you want the text to be resized. The AutoFit Options button displays a menu with options for controlling how the option works. You can also display the AutoCorrect dialog box and change the AutoFit settings so that text doesn’t resize automatically.
Resize Text as You Type
![]() If the AutoFit Options box appears while you type, click the AutoFit Options button to select an option, or continue typing and PowerPoint will automatically adjust your text to fit.
If the AutoFit Options box appears while you type, click the AutoFit Options button to select an option, or continue typing and PowerPoint will automatically adjust your text to fit.
![]() If you click the AutoFit Options button, click the option you want to fit the text on the slide.
If you click the AutoFit Options button, click the option you want to fit the text on the slide.
Turn Off AutoFit
![]() Click the File tab, and then click Options.
Click the File tab, and then click Options.
![]() In the left pane, click Proofing, and then click AutoCorrect Options.
In the left pane, click Proofing, and then click AutoCorrect Options.
![]() Click the AutoFormat As You Type tab.
Click the AutoFormat As You Type tab.
![]() Clear the AutoFit Title Text To Placeholder and AutoFit Body Text To Placeholder check boxes.
Clear the AutoFit Title Text To Placeholder and AutoFit Body Text To Placeholder check boxes.
![]() Click OK.
Click OK.
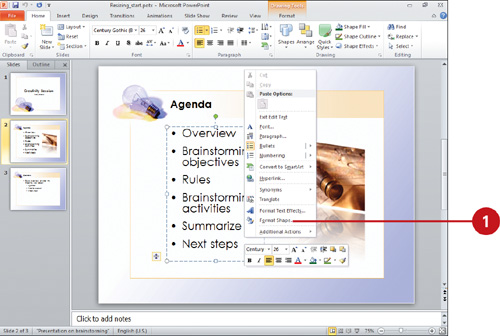
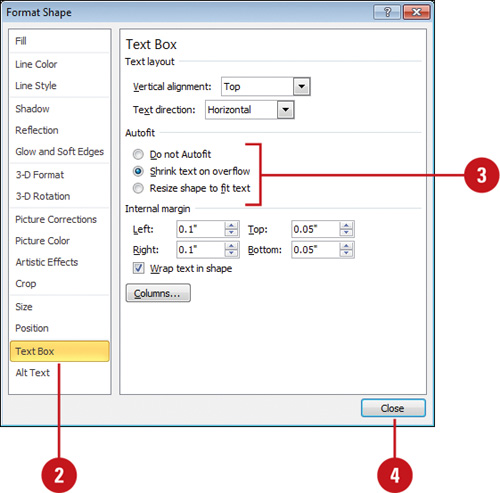
Change AutoFit Options for a Specific Object
![]() Right-click the object with text you want to change, and then click Format Shape.
Right-click the object with text you want to change, and then click Format Shape.
![]() In the left pane, click Text Box.
In the left pane, click Text Box.
![]() Click the Autofit option you want.
Click the Autofit option you want.
![]() Do not AutoFit. To turn off AutoFit for the selected object.
Do not AutoFit. To turn off AutoFit for the selected object.
![]() Shrink text on overflow. To resize text to fit in the selected object (default).
Shrink text on overflow. To resize text to fit in the selected object (default).
![]() Resize shape to fit text. To change the size of the shape to fit the text.
Resize shape to fit text. To change the size of the shape to fit the text.
![]() Click Close.
Click Close.
Inserting Information the Smart Way
Actions(New!), a replacement for smart tags, help you integrate actions typically performed in other programs directly in PowerPoint. For example, you can insert a financial symbol to get a stock quote, add a person’s name and address in a presentation to the contacts list in Microsoft Outlook, or copy and paste information with added control. PowerPoint analyzes the data you type and recognizes certain types that it marks with actions. The types of actions you can take depend on the type of data with the action. To use an action, you right-click an item to view any custom actions associated with it.
Change Options for Actions
![]() Click the File tab, and then click Options.
Click the File tab, and then click Options.
![]() In the left pane, click Proofing, and then click AutoCorrect Options.
In the left pane, click Proofing, and then click AutoCorrect Options.
![]() Click the Actions tab.
Click the Actions tab.
![]() Select the Enable additional actions in the right-click menu check box.
Select the Enable additional actions in the right-click menu check box.
![]() Select the check boxes with the actions you want.
Select the check boxes with the actions you want.
![]() To get properties about an action, select the action, and then click Properties.
To get properties about an action, select the action, and then click Properties.
![]() To add more actions, click More Actions, and then follow the online instructions.
To add more actions, click More Actions, and then follow the online instructions.
![]() Click OK.
Click OK.
![]() Click OK again.
Click OK again.

Insert Information Using an Action
![]() Click an item, such as a cell, where you want to insert an action.
Click an item, such as a cell, where you want to insert an action.
![]() Type the information needed for the action, such as the date, a recognized financial symbol in capital letters, or a person’s name from your contacts list, and then press Spacebar.
Type the information needed for the action, such as the date, a recognized financial symbol in capital letters, or a person’s name from your contacts list, and then press Spacebar.
![]() Right-click the item, and then point to Additional Actions(name varies depending on item).
Right-click the item, and then point to Additional Actions(name varies depending on item).
![]() Click the action option you want; options vary depending on the action. For example, click Show my Calendar or Schedule a Meeting.
Click the action option you want; options vary depending on the action. For example, click Show my Calendar or Schedule a Meeting.

Did You Know?
You can remove an action from text or item. Select text or item, and then press Delete to remove it.
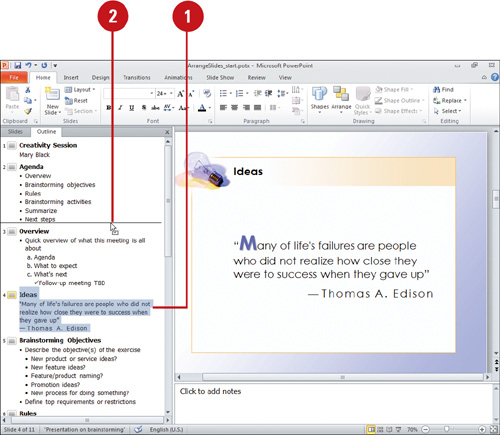
Inserting and Developing an Outline
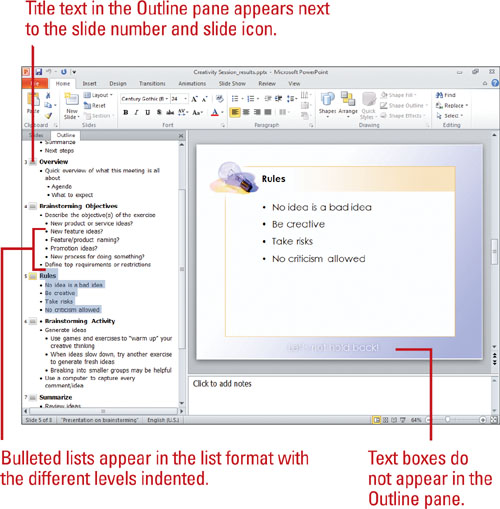
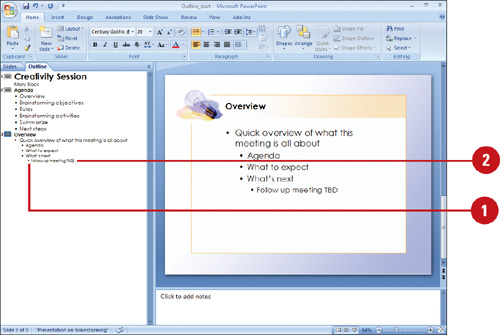
Outlining your content is a great way to create a presentation. You can outline and organize your thoughts right in PowerPoint or insert an outline you created in another program, such as Microsoft Word. If you prefer to develop your own outline, you can create a blank presentation, and then type your outline in the Outline pane of Normal view. As you develop an outline, you can add new slides and duplicate existing slides in your presentation. If you already have an outline, make sure the document containing the outline is set up using outline heading styles. When you insert the outline in PowerPoint, it creates slide titles, subtitles, and bulleted lists based on those styles.
Enter Text in the Outline Pane
![]() In the Outline pane of Normal view, click to place the insertion point where you want the text to appear.
In the Outline pane of Normal view, click to place the insertion point where you want the text to appear.
![]() Type the title text you want, pressing Enter after each line.
Type the title text you want, pressing Enter after each line.
To indent right a level for bullet text, press Tab before you type. Press Shift+Tab to indent left a level.
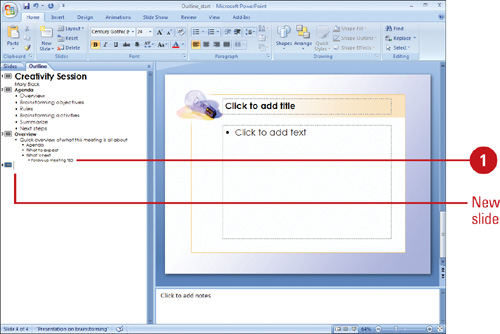
Add a Slide in the Outline Pane
![]() In the Outline pane of Normal view, click at the end of the slide text where you want to insert a new slide.
In the Outline pane of Normal view, click at the end of the slide text where you want to insert a new slide.
![]() Press Ctrl+Enter, or click the Home tab, click the New Slide button arrow, and then click a layout.
Press Ctrl+Enter, or click the Home tab, click the New Slide button arrow, and then click a layout.
Did You Know?
You can delete a slide. In the Outline or Slides pane or in Slide Sorter view, select the slide you want to delete, and then press Delete.
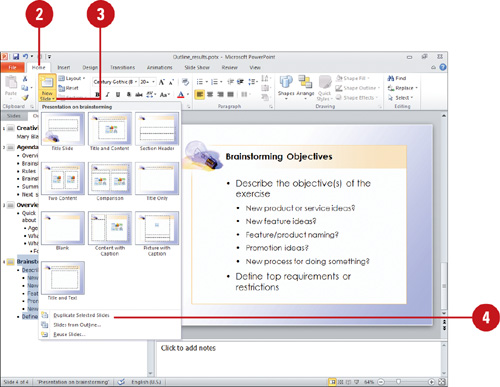
![]() In the Outline pane of Normal view, click the slide you want to duplicate.
In the Outline pane of Normal view, click the slide you want to duplicate.
TIMESAVER To select slides in a sequence, click the first slide, hold down the Shift key, and then click the last slide. To select multiple slides, use the Ctrl key.
![]() Click the Home tab.
Click the Home tab.
![]() Click the New Slide button arrow.
Click the New Slide button arrow.
![]() Click Duplicate Selected Slides.
Click Duplicate Selected Slides.
The new slide appears directly after the slide duplicated.
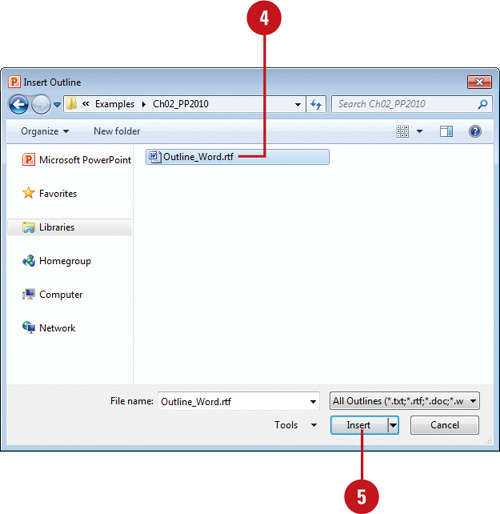
Insert an Outline from Another Program
![]() In the Outline pane of Normal view, click the slide after which you want to insert an outline.
In the Outline pane of Normal view, click the slide after which you want to insert an outline.
![]() Click the Home tab.
Click the Home tab.
![]() Click the New Slide button arrow, and then click Slides from Outline.
Click the New Slide button arrow, and then click Slides from Outline.
![]() Locate and select the file containing the outline you want to insert.
Locate and select the file containing the outline you want to insert.
![]() Click Insert.
Click Insert.
Did You Know?
You can open an outline from another program in PowerPoint. Click the File tab, click Open, click the Files Of Type list arrow, click All Outlines, and then double-click the outline file you want to open.
Moving and Indenting Text
Body text on a slide typically contains bulleted text, which you can indent to create levels. You can indent paragraphs of body text up to five levels using the Increase List Level and Decrease List Level buttons. In an outline, these tools let you demote text from a title, for example, to bulleted text. You can view and change the locations of the indent markers within an object with text using the ruler. In PowerPoint, pressing Enter within an object with text creates a paragraph. You can set different indent markers for each paragraph in an object.
Change the Indent Level
![]() In Normal view (Outline pane or slide), click the paragraph text or select the lines of text you want to indent.
In Normal view (Outline pane or slide), click the paragraph text or select the lines of text you want to indent.
![]() Click the Home tab.
Click the Home tab.
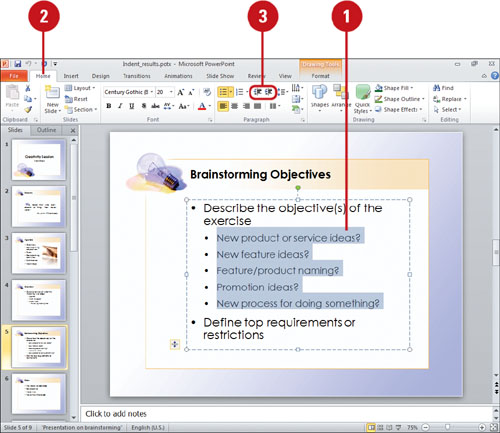
![]() Click the indent level option you want:
Click the indent level option you want:
![]() Click the Increase List Level button to move the line up one level (to the left).
Click the Increase List Level button to move the line up one level (to the left).
![]() Click the Decrease List Level button to move the line down one level (to the right).
Click the Decrease List Level button to move the line down one level (to the right).
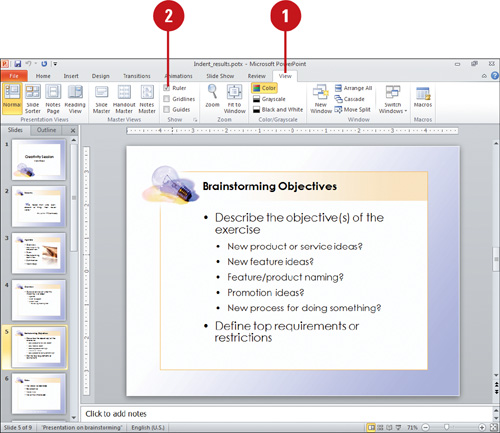
Display or Hide the Ruler
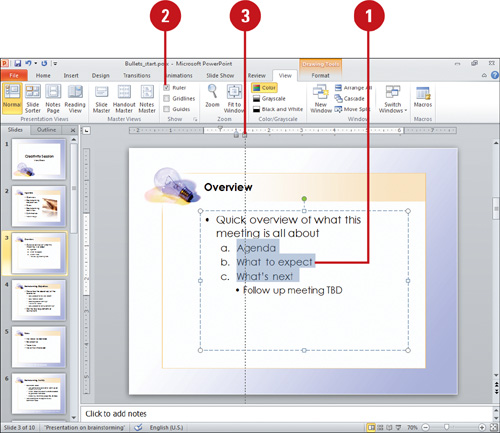
![]() In Normal view, click the View tab.
In Normal view, click the View tab.
![]() Select the Ruler check box to display it, or clear the Ruler check box to hide it.
Select the Ruler check box to display it, or clear the Ruler check box to hide it.
Did You Know?
You can use the Ruler with shape text.
When you select a text object and then view the ruler, the ruler runs the length of just that text object, and the origin (zero point) of the ruler is at the box borders, starting with the upper left.
![]() Display the ruler.
Display the ruler.
![]() Select the text for which you want to change the indentation.
Select the text for which you want to change the indentation.
![]() Change the indent level the way you want.
Change the indent level the way you want.
![]() To change the indent for the first line of a paragraph, drag the first-line indent marker.
To change the indent for the first line of a paragraph, drag the first-line indent marker.
![]() To change the indent for the rest of the paragraph, drag the left indent marker.
To change the indent for the rest of the paragraph, drag the left indent marker.
![]() To change the distance between the indents and the left margin, but maintain the relative distance between the first-line and left indent markers, drag the rectangle below the left indent marker.
To change the distance between the indents and the left margin, but maintain the relative distance between the first-line and left indent markers, drag the rectangle below the left indent marker.
Did You Know?
You can use the mouse to increase or decrease list level text. Move the mouse pointer over the bullet you want to increase or decrease, and then when it changes to a four-headed arrow, drag the text to the left to increase the level or to the right to decrease the level.
You can show or hide formatting in Outline pane. In Outline pane, right-click a slide icon, and then click Show Text Formatting. Turning off formatting is useful for viewing more slides.
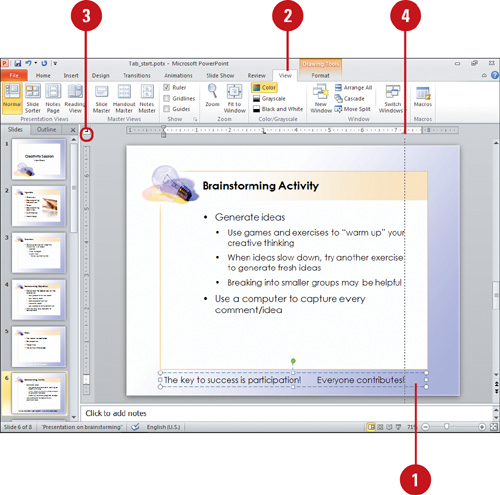
Setting Tabs
PowerPoint includes default tab stops at every inch; when you press the Tab key, the text moves to the next tab stop. You can control the location of the tab stops using the ruler. When you set a tab, tab markers appear on the ruler. Tabs apply to an entire paragraph, not a single line within that paragraph. You can also clear a tab by removing it from the ruler.
Set a Tab
![]() Click the paragraph or select the paragraphs whose tabs you want to modify. You can also select a text object to change the tabs for all paragraphs in that object.
Click the paragraph or select the paragraphs whose tabs you want to modify. You can also select a text object to change the tabs for all paragraphs in that object.
![]() If necessary, click the View tab, and then select the Ruler check box to display the ruler.
If necessary, click the View tab, and then select the Ruler check box to display the ruler.
![]() Click the Tab button at the left of the horizontal ruler until you see the type of tab you want.
Click the Tab button at the left of the horizontal ruler until you see the type of tab you want.
![]() Click the ruler where you want to set the tab.
Click the ruler where you want to set the tab.
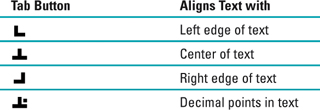
Tab Button Alignments
Did You Know?
You can use the Tabs dialog box to make multiple changes at one time. On the Home tab, click the Paragraph Dialog Box Launcher, click Tabs, select the tab stop you want to change, click Clear or make a change and click Set, and then click OK.
You must use caution when you change a default tab. When you drag a default tab marker to a new location, the spaces between all the tab markers change proportionally.
Change the Distance Between Default Tab Stops
![]() Select the text object in which you want to change the default tab stops.
Select the text object in which you want to change the default tab stops.
![]() If necessary, click the View tab, and then select the Ruler check box to display the ruler.
If necessary, click the View tab, and then select the Ruler check box to display the ruler.
![]() Drag any default tab stop marker to a new position.
Drag any default tab stop marker to a new position.
Clear a Tab
![]() Select the text object in which you want to clear tab stops.
Select the text object in which you want to clear tab stops.
![]() If necessary, click the View tab, and then select the Ruler check box to display the ruler.
If necessary, click the View tab, and then select the Ruler check box to display the ruler.
![]() Drag the tab marker off the ruler.
Drag the tab marker off the ruler.
Changing Text Alignment and Spacing
PowerPoint enables you to control the way text lines up on the slide. You can align text horizontally to the left or right, to the center, or to both left and right (justify) in a text object. You can also align text vertically to the top, middle, or bottom within a text object. In addition to vertical text alignment in a text object, you can also adjust the vertical space between selected lines and the space before and after paragraphs. You set specific line spacing settings before and after paragraphs in points. A point is equal to about 1/72 of an inch (or .0138 inches) and is used to measure the height of characters. Points are typically used in graphics and desktop publishing programs.
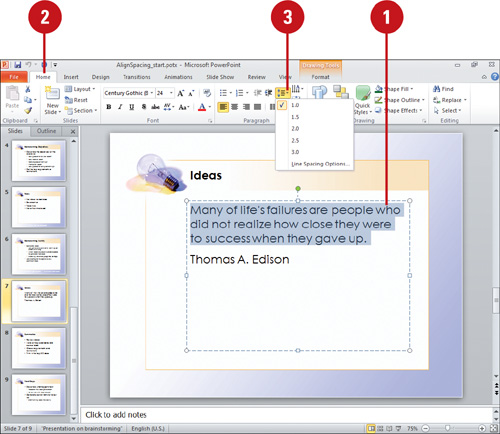
Adjust Line Spacing Quickly
![]() Select the text box.
Select the text box.
![]() Click the Home tab.
Click the Home tab.
![]() Click the Line Spacing button, and then click 1.0- 3.0.
Click the Line Spacing button, and then click 1.0- 3.0.
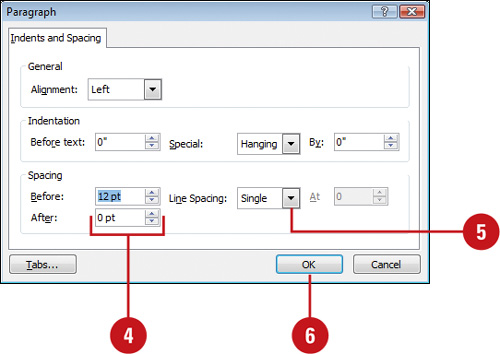
Adjust Line Spacing Exactly
![]() Select the text box.
Select the text box.
![]() Click the Home tab.
Click the Home tab.
![]() Click the Line Spacing button, and then click Line Spacing Options.
Click the Line Spacing button, and then click Line Spacing Options.
![]() Click the Before Spacing or After Spacing up or down arrows to specify a setting.
Click the Before Spacing or After Spacing up or down arrows to specify a setting.
![]() Click the Line Spacing list arrow, and then select a setting.
Click the Line Spacing list arrow, and then select a setting.
If you select Exactly or Multiple, specify at what spacing you want.
![]() Click OK.
Click OK.
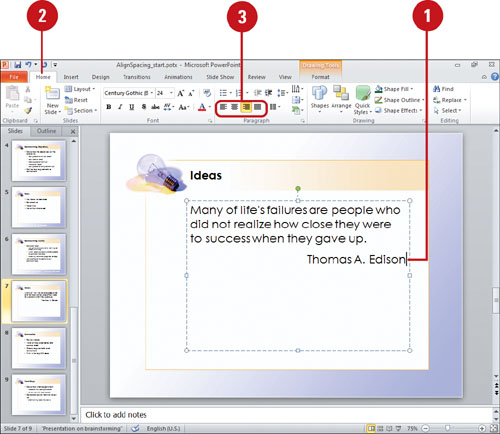
Change Text Alignment Horizontally
![]() Select the text box.
Select the text box.
![]() Click the Home tab.
Click the Home tab.
![]() Click an alignment button:
Click an alignment button:
![]() Align Left to align text evenly along the left edge and is useful for paragraph text.
Align Left to align text evenly along the left edge and is useful for paragraph text.
![]() Center to align text in the middle and is useful for titles and headings.
Center to align text in the middle and is useful for titles and headings.
![]() Align Right to align text evenly along the right edge and is useful for text labels.
Align Right to align text evenly along the right edge and is useful for text labels.
![]() Justify to align both left and right and is useful for column text.
Justify to align both left and right and is useful for column text.
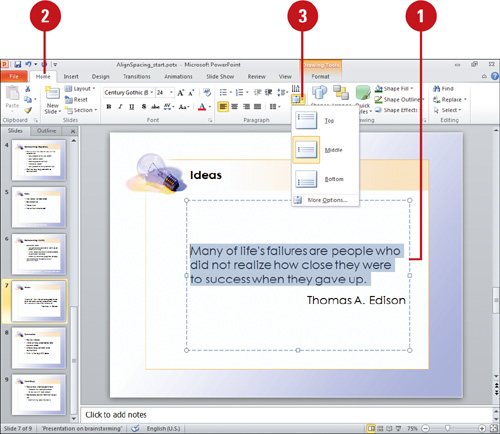
Change Text Alignment Vertically
![]() Select the text box.
Select the text box.
![]() Click the Home tab.
Click the Home tab.
![]() Click the Align Text button, and then click one of the following:
Click the Align Text button, and then click one of the following:
![]() Top, Middle, or Bottom to quickly align text within a text box.
Top, Middle, or Bottom to quickly align text within a text box.
![]() More Options to select from additional alignment options, including Top Centered, Middle Centered, and Bottom Centered.
More Options to select from additional alignment options, including Top Centered, Middle Centered, and Bottom Centered.
![]() If you selected More Options, click the Vertical Alignment list arrow, and then select an align option.
If you selected More Options, click the Vertical Alignment list arrow, and then select an align option.
![]() If you selected More Options, click Close.
If you selected More Options, click Close.
Changing Character Spacing
Kerning is the amount of space between each individual character that you type. Sometimes the space between two characters is larger than others, which makes the word look uneven. Kerning works only with TrueType or Adobe Type Manager fonts. You can expand or condense the character spacing to create a special effect for a title, or realign the position of characters to the bottom edge of the text—this is helpful for positioning the copyright or trademark symbols.
Change Character Spacing Quickly
![]() Select the text you want to format.
Select the text you want to format.
![]() Click the Home tab.
Click the Home tab.
![]() Click the Character Spacing button, and then click Very Tight, Tight, Normal, Loose, or Very Loose.
Click the Character Spacing button, and then click Very Tight, Tight, Normal, Loose, or Very Loose.

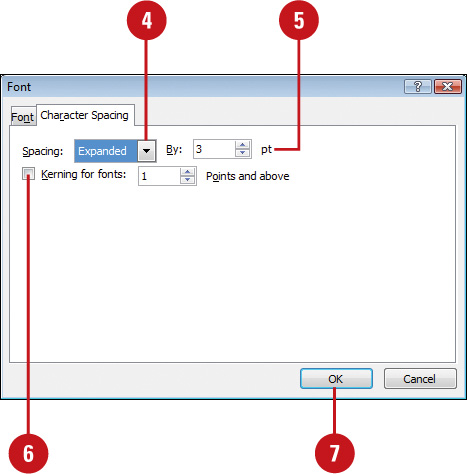
Change Character Spacing Exactly
![]() Select the text you want to format.
Select the text you want to format.
![]() Click the Home tab.
Click the Home tab.
![]() Click the Character Spacing button, and then click More Spacing.
Click the Character Spacing button, and then click More Spacing.
![]() Click the Spacing list arrow, and then select Normal, Expanded, or Condensed.
Click the Spacing list arrow, and then select Normal, Expanded, or Condensed.
![]() If you want, click the By up and down arrows to set the spacing distance (in points).
If you want, click the By up and down arrows to set the spacing distance (in points).
![]() To apply conditional kerning, select the Kerning for fonts check box, and then specify a font point size.
To apply conditional kerning, select the Kerning for fonts check box, and then specify a font point size.
![]() Click OK.
Click OK.
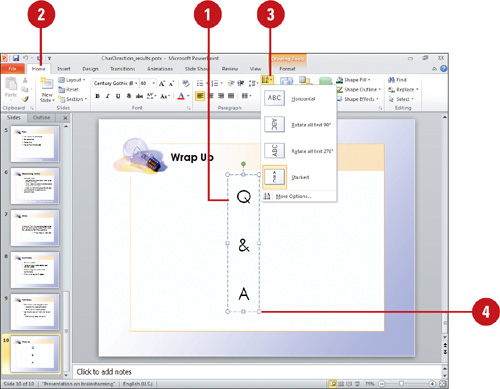
Changing Character Direction
Sometimes changing the direction of text on a slide creates a unique or special effect that causes the audience to remember it. In PowerPoint, you can rotate all text in an object 90 and 270 degrees or stack letters on top of one another to create the look you want. For a more exact rotation, which you cannot achieve in 90 or 270 degree increments, you can drag the green rotate lever at the top of an object to rotate it to any position. This is useful when you want to change the orientation of an object, such as the direction of an arrow.
Change Character Direction Quickly
![]() Select the text you want to format.
Select the text you want to format.
![]() Click the Home tab.
Click the Home tab.
![]() Click the Character Direction button, and then click one of the following:
Click the Character Direction button, and then click one of the following:
![]() Horizontal to align text normally across the slide from left to right.
Horizontal to align text normally across the slide from left to right.
![]() Rotate all text 90° to align text vertically down the slide from top to bottom.
Rotate all text 90° to align text vertically down the slide from top to bottom.
![]() Rotate all text 270° to align text vertically down the slide from bottom to top.
Rotate all text 270° to align text vertically down the slide from bottom to top.
![]() Stacked to align text vertically down the slide one letter on top of another.
Stacked to align text vertically down the slide one letter on top of another.
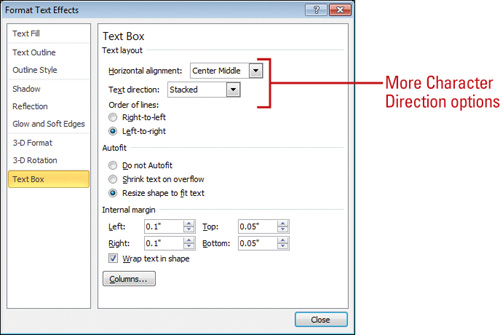
![]() More Options to select additional options, such as alignment, direction or resize shape to fit text.
More Options to select additional options, such as alignment, direction or resize shape to fit text.
![]() If necessary, resize text box.
If necessary, resize text box.
See Also
See “Rotating and Flipping a Shape” on page 150 for information on rotating an object using the green rotate lever.
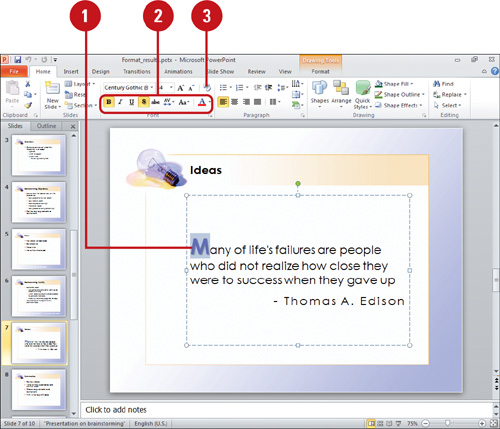
Formatting Text
Although PowerPoint’s layouts and themes provide preformatted styles for text, you can change the formatting or add extra emphasis to a word or text object. You can format a single letter, a word, a phrase, or all the text in a text object. The basic formats you apply to text are available on the Home tab in the Font group or in the Font dialog box. Some of the formats include strikethrough or double strike-through, all caps or small caps, and double or color underline. If you no longer like your text formatting, you can quickly remove it.
Change the Font Using the Ribbon
![]() Select the text or text object whose font you want to change.
Select the text or text object whose font you want to change.
![]() Click the Home tab, click the Font list arrow, and then point for a live preview, or click the font you want, either a theme font or any available fonts.
Click the Home tab, click the Font list arrow, and then point for a live preview, or click the font you want, either a theme font or any available fonts.
![]() Click one to change the font size:
Click one to change the font size:
![]() Click the Font Size list arrow on the Home tab, and then click the font size you want.
Click the Font Size list arrow on the Home tab, and then click the font size you want.
![]() Click the Increase Font Size button or Decrease Font Size button on the Home tab.
Click the Increase Font Size button or Decrease Font Size button on the Home tab.
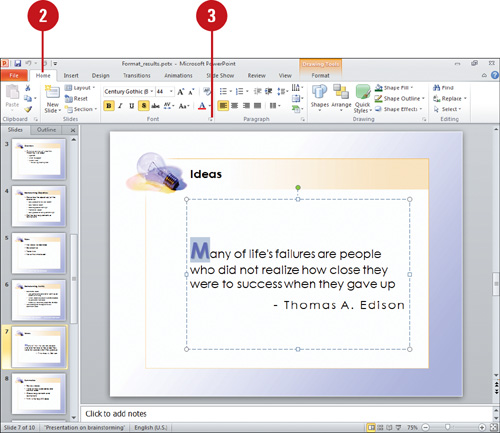
Format or Unformat Text Using the Ribbon
![]() Select the text you want to format, or click the selection box of a text object to format all the text in the box.
Select the text you want to format, or click the selection box of a text object to format all the text in the box.
![]() Click one or more of the formatting buttons on the Home tab in the Font group: Bold, Italic, Underline, Shadow, Strikethrough, or Font Color.
Click one or more of the formatting buttons on the Home tab in the Font group: Bold, Italic, Underline, Shadow, Strikethrough, or Font Color.
![]() To clear all formatting and return to default text style, click the Clear All Formatting button on the Home tab.
To clear all formatting and return to default text style, click the Clear All Formatting button on the Home tab.
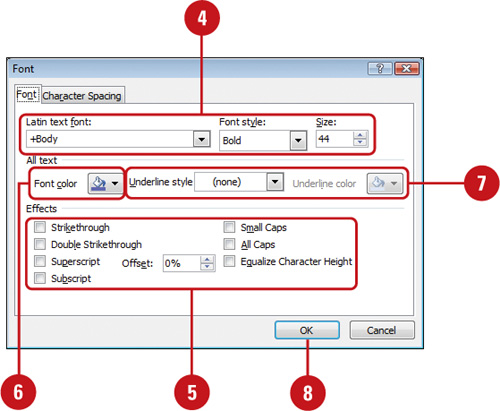
![]() Select the text you want to format, or click the selection box of a text object to format all the text in the box.
Select the text you want to format, or click the selection box of a text object to format all the text in the box.
![]() Click the Home tab.
Click the Home tab.
![]() Click the Font Dialog Box Launcher.
Click the Font Dialog Box Launcher.
![]() Make any changes you want to the Font, Font Style, and Size.
Make any changes you want to the Font, Font Style, and Size.
![]() Select or clear the effects you want or don’t want: Strikethrough, Double Strikethrough, Superscript, Subscript, Small Caps, All Caps, and Equalize Character Height.
Select or clear the effects you want or don’t want: Strikethrough, Double Strikethrough, Superscript, Subscript, Small Caps, All Caps, and Equalize Character Height.
![]() If you want, click Font Color, and then click a color.
If you want, click Font Color, and then click a color.
![]() If you want, click Underline Style list arrow, and then click a style. If you want to add an underline style, click Underline Color, and then click a color.
If you want, click Underline Style list arrow, and then click a style. If you want to add an underline style, click Underline Color, and then click a color.
![]() Click OK.
Click OK.
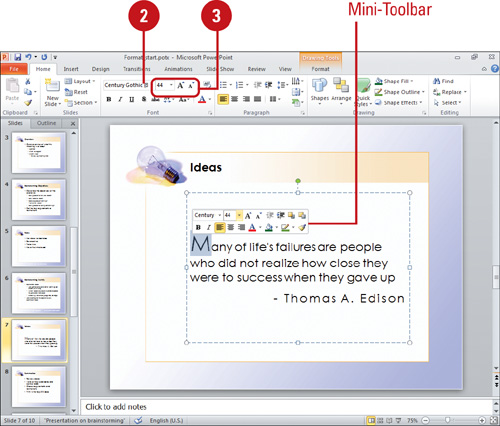
For Your Information
Quick Formatting with the Mini-Toolbar
When you point to selected text, PowerPoint displays the Mini-Toolbar above it. The Mini-Toolbar provides easy access to common formatting toolbar buttons, such as font, font size, increase and decrease font size, format painter, bold, italic, left align, center, right align, font color, increase and decrease list level, and bullets. If you don’t want to display the Mini-Toolbar, you can use PowerPoint Options to turn it off.
Did You Know?
You can replace fonts for an entire presentation. Click the Home tab, click the Replace button arrow, and then click Replace Fonts. Click the Replace list arrow, select the font in which you want to replace, click the With list arrow, select the font in which you want to replace it with, and then click Replace.
Modifying a Bulleted and Numbered List
When you create a new slide, you can choose the bulleted list slide layout to include a bulleted list placeholder. You can customize the appearance of your bulleted list in several ways, including symbols or numbering. You also have control over the appearance of your bullets, including size and color. You can change the bullets to numbers or pictures. You can also adjust the distance between a bullet and its text using the PowerPoint ruler.
Add and Remove Bullets or Numbering from Text
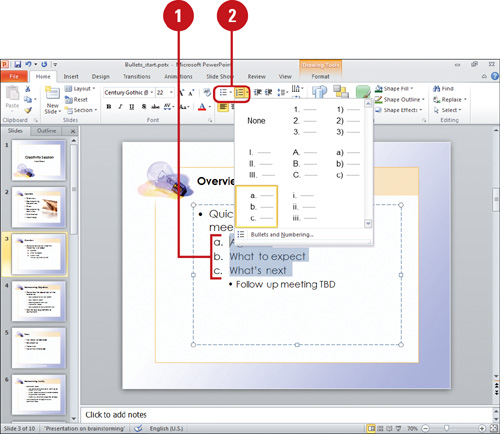
![]() Select the text in the paragraphs in which you want to add a bullet.
Select the text in the paragraphs in which you want to add a bullet.
![]() Click the Bullets or Numbering button arrow on the Home tab, and then select the style you want.
Click the Bullets or Numbering button arrow on the Home tab, and then select the style you want.
TIMESAVER Click the Bullets or Numbering button (not the arrow) on the Home tab to turn it on with the default setting.
![]() To remove the bullet or numbering, select the text, and then click the Bullets or Numbering button on the Home tab.
To remove the bullet or numbering, select the text, and then click the Bullets or Numbering button on the Home tab.
Change the Distance Between Bullets and Text
![]() Select the text you want to indent.
Select the text you want to indent.
![]() If the ruler isn’t visible, click the View tab, and then select the Ruler check box.
If the ruler isn’t visible, click the View tab, and then select the Ruler check box.
![]() Drag the indent markers on the ruler.
Drag the indent markers on the ruler.
![]() First-line Indent. The top upside down triangle marker indents the first line.
First-line Indent. The top upside down triangle marker indents the first line.
![]() Hanging Indent. The middle triangle marker indent second line and later.
Hanging Indent. The middle triangle marker indent second line and later.
![]() Left Indent. The bottom square marker indent entire line.
Left Indent. The bottom square marker indent entire line.
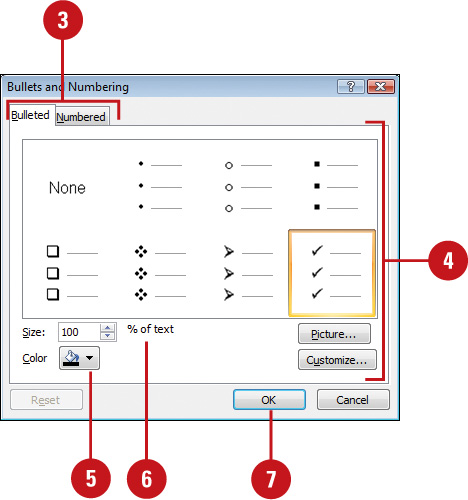
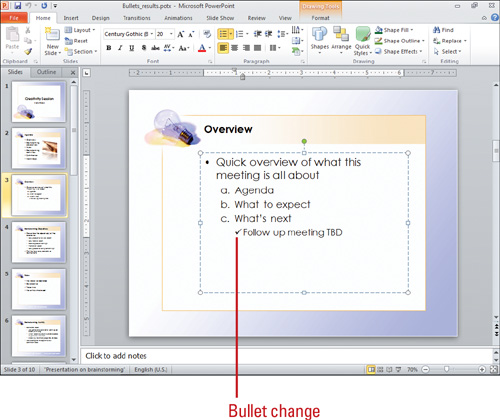
Change the Bullet or Number Character
![]() Select the text or text object whose bullet character you want to change.
Select the text or text object whose bullet character you want to change.
![]() Click the Bullets or Numbering button arrow on the Home tab, and then click Bullets and Numbering.
Click the Bullets or Numbering button arrow on the Home tab, and then click Bullets and Numbering.
![]() Click the Bulleted or Numbered tab.
Click the Bulleted or Numbered tab.
![]() Click one of the predefined styles or do one of the following:
Click one of the predefined styles or do one of the following:
![]() Click Customize, and then click the character you want to use for your bullet character.
Click Customize, and then click the character you want to use for your bullet character.
![]() Click Picture, and then click the picture you want to use for your bullet character.
Click Picture, and then click the picture you want to use for your bullet character.
![]() To change the bullet or number’s color, click the Color arrow, and then select the color you want.
To change the bullet or number’s color, click the Color arrow, and then select the color you want.
![]() To change the bullet or number’s size, enter a percentage in the Size box.
To change the bullet or number’s size, enter a percentage in the Size box.
![]() Click OK.
Click OK.
Did You Know?
You can select bulleted or numbered text. Position the mouse pointer over the bullet or number next to the text you want to select; when the pointer changes to the four-headed arrow, click the bullet.
AutoFormatting Text While Typing
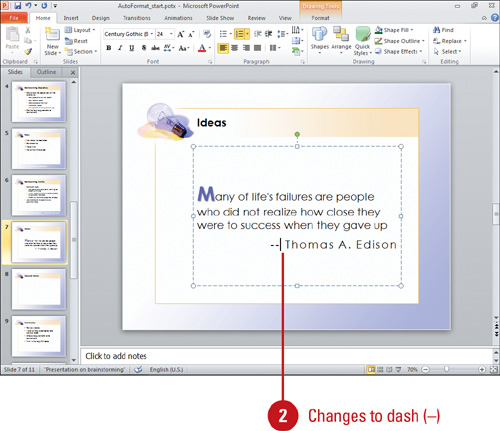
PowerPoint recognizes ordinals, fractions, em-dashes and en-dashes, formatted AutoCorrect entries and smart quotes followed by a number, and formats them as you type. For example, if you type 1/2, PowerPoint replaces it with ½. You can also automatically number a list. PowerPoint recognizes your intent; when you enter a number followed by a period and a space, PowerPoint will format the entry and the subsequent entries as a numbered list. If you insert a new line in the middle of the numbered list, PowerPoint automatically adjusts the numbers.
AutoFormat Text as You Type
![]() In Normal view, click to place the insertion point in the text where you want to type.
In Normal view, click to place the insertion point in the text where you want to type.
![]() Type text you can AutoFormat, such as 1/2, and then press the Spacebar or Enter.
Type text you can AutoFormat, such as 1/2, and then press the Spacebar or Enter.
PowerPoint recognizes this as a fraction and changes it to ½.
You can also type and replace any of the following:
![]() Straight quotes with “smart quotes”.
Straight quotes with “smart quotes”.
![]() Ordinals (1st) with superscript.
Ordinals (1st) with superscript.
![]() Hyphens (--) with dash (—).
Hyphens (--) with dash (—).
![]() Smiley faces :-) and arrows (==>) with special symbols.
Smiley faces :-) and arrows (==>) with special symbols.
![]() Internet and network paths with hyperlinks.
Internet and network paths with hyperlinks.
Did You Know?
You can use the AutoCorrect Options button to undo automatic numbering or fractions. Click the AutoCorrect Options button that appears when AutoCorrect makes a change, and then click the Undo Automatic x command. If you want to stop AutoCorrect from making a change, click Stop Automatically x command.
![]() In Normal view, click to place the insertion point in the text at the beginning of a blank line where you want to begin a numbered list.
In Normal view, click to place the insertion point in the text at the beginning of a blank line where you want to begin a numbered list.
![]() Type 1., press the Spacebar, type text, and then press Enter.
Type 1., press the Spacebar, type text, and then press Enter.
PowerPoint recognizes this as a numbered list and displays the next number in the list in gray.
![]() Type text, and continue until you complete the list.
Type text, and continue until you complete the list.
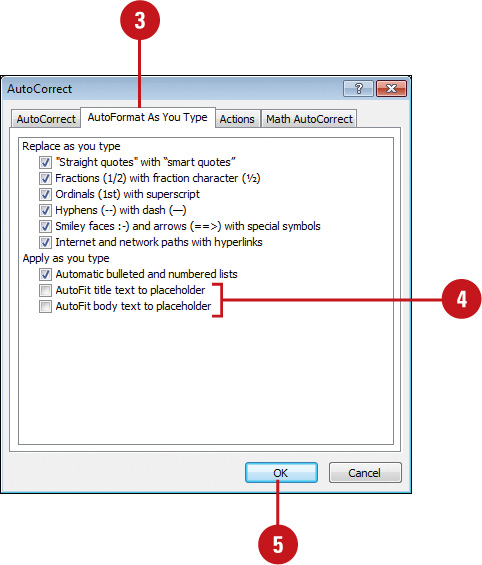
Change AutoFormat Options
![]() Click the File tab, and then click Options.
Click the File tab, and then click Options.
![]() Click Proofing, and then click AutoCorrect Options.
Click Proofing, and then click AutoCorrect Options.
![]() Click the AutoFormat As You Type tab.
Click the AutoFormat As You Type tab.
![]() Select or clear any of the following check boxes:
Select or clear any of the following check boxes:
![]() Straight quotes with “smart quotes”.
Straight quotes with “smart quotes”.
![]() Fractions (1/2) with fraction character (½).
Fractions (1/2) with fraction character (½).
![]() Ordinals (1st) with superscript.
Ordinals (1st) with superscript.
![]() Hyphens (--) with dash (—).
Hyphens (--) with dash (—).
![]() Smiley faces :-) and arrows (==>) with special symbols.
Smiley faces :-) and arrows (==>) with special symbols.
![]() Internet and network paths with hyperlinks.
Internet and network paths with hyperlinks.
![]() Click OK.
Click OK.
![]()
Applying a Format Style
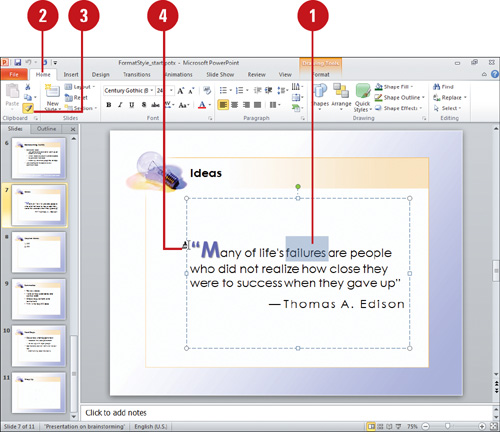
The Format Painter lets you “pick up” the style of one section of text or object and apply, or “paint,” it to another. The Format Painter is useful for quickly applying formatting styles to one or more text or shape objects. To apply a text or shape style to more than one item, double-click the Format Painter button on the Home tab instead of a single-click. The double-click keeps the Format Painter active until you want to press Esc to disable it, so you can apply formatting styles to any text or object you want in your presentation.
Apply a Format Style Using the Format Painter
![]() Select the word or object whose format you want to pick up.
Select the word or object whose format you want to pick up.
![]() Click the Home tab.
Click the Home tab.
![]() Click the Format Painter button.
Click the Format Painter button.
If you want to apply the format to more than one item, double-click the Format Painter button.
![]() Drag to select the text or click the object to which you want to apply the format.
Drag to select the text or click the object to which you want to apply the format.
![]() If you double-clicked the Format Painter button, drag to select the text or click the object to which you want to apply the format, and then press Esc when you’re done.
If you double-clicked the Format Painter button, drag to select the text or click the object to which you want to apply the format, and then press Esc when you’re done.
See Also
See Chapter 4, “Drawing and Modifying Shapes,” on page 111 for information on formatting text boxes by applying Quick Styles, fills, outline borders, and effects.
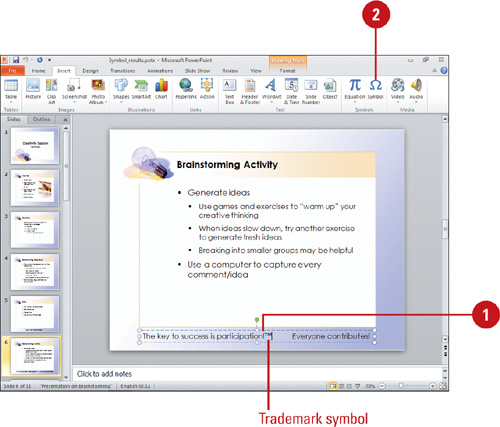
Inserting Symbols
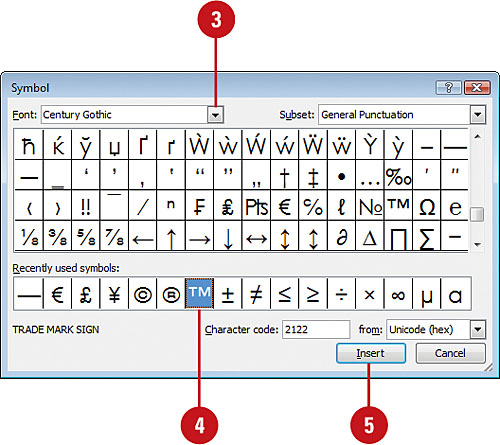
PowerPoint comes with a host of symbols for every need. Insert just the right one to keep from compromising a presentation’s professional appearance with a hand-drawn arrow («) or missing mathematical symbol (å). In the Symbol dialog box, you use the Recently used symbols list to quickly insert a symbol that you want to insert again. If you don’t see the symbol you want, use the Font list to look at the available symbols for other fonts installed on your computer.
Insert Symbols and Special Characters
![]() Click the document where you want to insert a symbol or character.
Click the document where you want to insert a symbol or character.
![]() Click the Insert tab, and then click the Symbol button.
Click the Insert tab, and then click the Symbol button.
![]() To see other symbols, click the Font list arrow, and then click a new font.
To see other symbols, click the Font list arrow, and then click a new font.
![]() Click a symbol or character.
Click a symbol or character.
You can use the Recently used symbols list to use a symbol you’ve already used.
![]() Click Insert.
Click Insert.
Did You Know?
You can insert a symbol using a character code. When the From box displays ASCII (decimal), you can use the number shown in the Character Code box to insert a character or symbol. Place your insertion point where you want the character on the slide, make sure Num Lock is on, hold down the Alt key, and then use the numeric keypad to type 0 (zero) followed by the character code. Then release the Alt key. The code applies to the current code page only, so some characters may not be available this way.
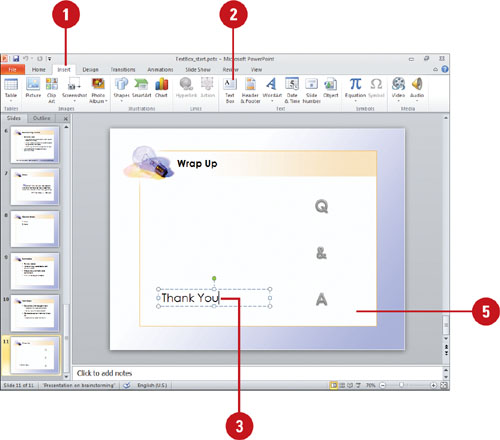
Creating a Text Box
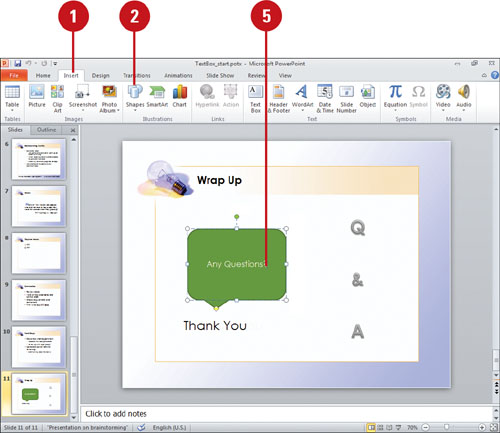
Usually you use the title, subtitle, and bulleted list placeholders to place text on a slide. However, when you want to add text outside one of the standard placeholders, such as for an annotation to a slide or shape text, you can create a text box. Text boxes appear in all views and panes. In Outline pane, PowerPoint labels slides with multiple text boxes in numbered order. Your text box doesn’t have to be rectangular—you can also use one of PowerPoint’s shapes, a collection of shapes that range from rectangles and circles to arrows and stars. When you place text in a shape, the text becomes part of object. You can format and change the object using Font options, as well as Shape and WordArt styles. You can also adjust the text margins with a text box or a shape to create the look you want.
Create a Text Box
![]() In Normal view, click the Insert tab.
In Normal view, click the Insert tab.
![]() Click the Text Box button.
Click the Text Box button.
![]() Perform one of the following:
Perform one of the following:
![]() To add text that wraps, drag to create a box, and then start typing.
To add text that wraps, drag to create a box, and then start typing.
![]() To add text that doesn’t wrap, click and then start typing.
To add text that doesn’t wrap, click and then start typing.
![]() To delete a text box, select it, and then press Delete.
To delete a text box, select it, and then press Delete.
![]() Click outside the selection box to deselect the text box.
Click outside the selection box to deselect the text box.
Did You Know?
You can use the sizing handles to adjust text boxes. If you create a text box without word wrapping and then find that the text spills over the edge of your slide, use the sizing handles to resize the text box so it fits on your slide. The text then wraps to the size of the box.
You can edit a text box. Click the text box, and then select the text you want to edit. Edit the text, and then click outside the text box to deselect it.
![]() Click the Home or Insert tab.
Click the Home or Insert tab.
![]() Click the Shapes button to display a complete list of shapes.
Click the Shapes button to display a complete list of shapes.
![]() Click the shape you want.
Click the shape you want.
![]() Drag to draw the shape on your slide.
Drag to draw the shape on your slide.
![]() Type your text.
Type your text.
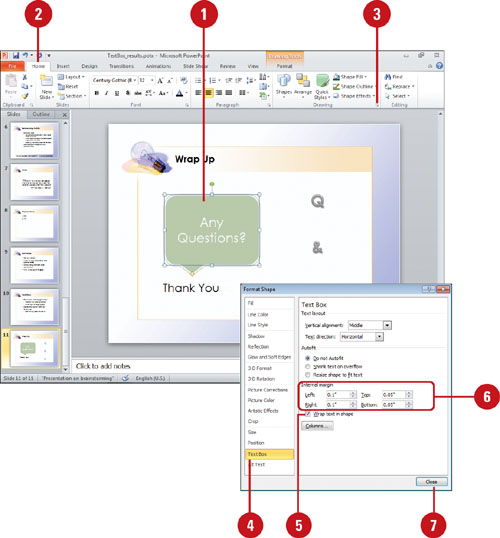
Wrap and Adjust Text Margins
![]() Select an object with text.
Select an object with text.
![]() Click the Home tab.
Click the Home tab.
![]() Click the Drawing Dialog Box Launcher.
Click the Drawing Dialog Box Launcher.
![]() In the left pane, click Text Box.
In the left pane, click Text Box.
![]() Select the Wrap text in shape check box.
Select the Wrap text in shape check box.
![]() Use the Internal margin up and down arrows to change the left, right, top, and bottom slides of the shape.
Use the Internal margin up and down arrows to change the left, right, top, and bottom slides of the shape.
![]() Click Close.
Click Close.
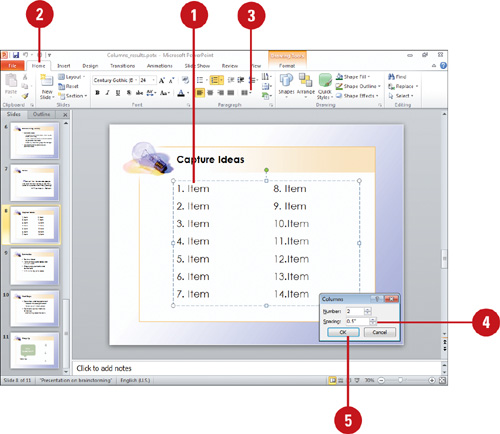
Creating Text Columns
Like Microsoft Word, PowerPoint can now create text columns within a text box. You can quickly transform a long list of text into a two, three, or more columns. After you create text columns, you can change the spacing between them to create the exact look you want. If you want to return columns back to a single column, simply change a text box to one column.
Create Text Columns
![]() Select the text box.
Select the text box.
![]() Click the Home tab.
Click the Home tab.
![]() Click the Columns button, and then click one of the following:
Click the Columns button, and then click one of the following:
![]() One, Two, or Three to quickly create text columns.
One, Two, or Three to quickly create text columns.
![]() More Columns to create larger text columns and change columns spacing.
More Columns to create larger text columns and change columns spacing.

Adjust Column Spacing
![]() Select the text box with the columns.
Select the text box with the columns.
![]() Click the Home tab.
Click the Home tab.
![]() Click the Columns button, and then click More Columns.
Click the Columns button, and then click More Columns.
![]() Click the Spacing up and down arrows, or enter a specific size.
Click the Spacing up and down arrows, or enter a specific size.
![]() Click OK.
Click OK.
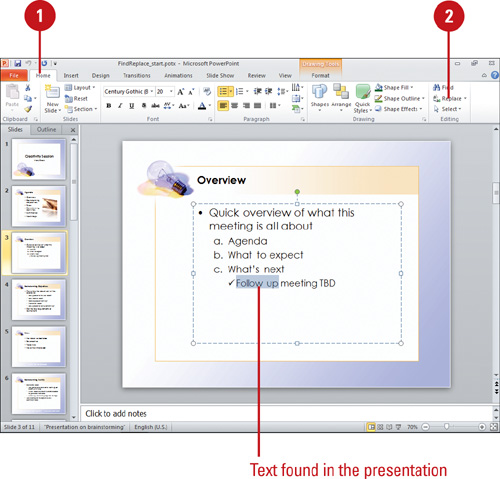
Finding and Replacing Text
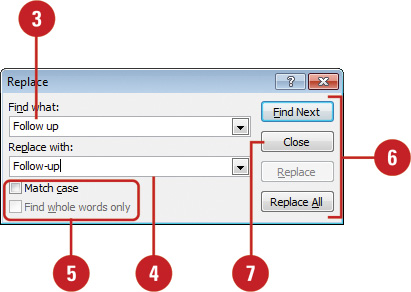
The Find and Replace commands on the Home tab allow you to locate and change specific text in a presentation. Find helps you locate each occurrence of a specific word or set of characters, while Replace locates every occurrence of a specific word or set of characters and replaces it with a different one. You can change every occurrence of specific text all at once, or you can individually accept or reject each change.
Find and Replace Text
![]() Click the Home tab.
Click the Home tab.
![]() Click the Replace button.
Click the Replace button.
![]() Click the Find What box, and then type the text you want to replace.
Click the Find What box, and then type the text you want to replace.
![]() Click in the Replace With box, and then type the replacement text.
Click in the Replace With box, and then type the replacement text.
![]() Click one of the following buttons.
Click one of the following buttons.
![]() Match Case. Select to find text with the same upper and lower case.
Match Case. Select to find text with the same upper and lower case.
![]() Find whole words only. Select to find entire text as a word.
Find whole words only. Select to find entire text as a word.
![]() Click one of the following buttons.
Click one of the following buttons.
![]() Find Next. Click to find the next occurrence of the text.
Find Next. Click to find the next occurrence of the text.
![]() Replace. Click to find and replace this occurrence of the text.
Replace. Click to find and replace this occurrence of the text.
![]() Replace All. Click to find and replace all occurrences of the text.
Replace All. Click to find and replace all occurrences of the text.
![]() Click OK when you reach the end of the presentation, and then click Close.
Click OK when you reach the end of the presentation, and then click Close.
Did You Know?
You can use the Find command to search for text. To find text in your presentation, click the Home tab, click the Find button, type what you want to find, and then click Find Next.
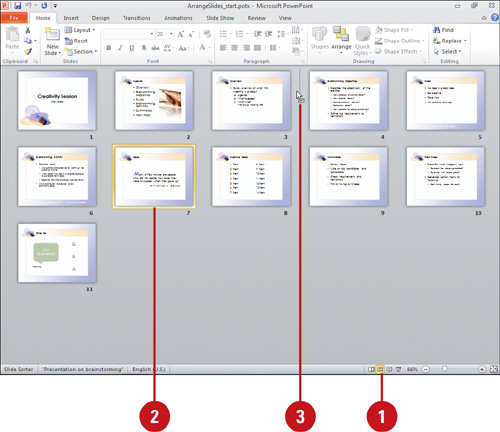
Rearranging Slides
You can instantly rearrange slides in Outline or Slides pane in Normal view or in Slide Sorter view. You can use the drag-and-drop method or the Cut and Paste buttons to move slides to a new location. In the Outline pane, you can also collapse the outline to its major points (titles) so you can more easily see its structure and rearrange slides, and then expand it back.
Rearrange a Slide in Slides Pane or Slide Sorter View
![]() Click Slides pane in Normal view or click the Slide Sorter View button.
Click Slides pane in Normal view or click the Slide Sorter View button.
![]() Select the slide(s) you want to move.
Select the slide(s) you want to move.
![]() Drag the selected slide to a new location.
Drag the selected slide to a new location.
A vertical bar appears where the slide(s) will be moved when you release the mouse button.
Move a Slide Using Cut and Paste
![]() In the Outline or Slides pane or in Slide Sorter view, select the slide(s) you want to move.
In the Outline or Slides pane or in Slide Sorter view, select the slide(s) you want to move.
![]() Click the Cut button on the Home tab.
Click the Cut button on the Home tab.
The Clipboard task pane might open, displaying items you have cut or copied.
![]() Click the new location.
Click the new location.
![]() Click the Paste button on the Home tab.
Click the Paste button on the Home tab.
Rearrange a Slide in the Outline Pane
![]() In the Outline pane in Normal view, select the slide(s) icons you want to move.
In the Outline pane in Normal view, select the slide(s) icons you want to move.
TIMESAVER To select slides in a sequence, click the first slide, hold down the Shift key, and then click the last slide. To select multiple slides, use the Ctrl key.
![]() Drag the selected slide up or down to move it in Outline pane to a new location.
Drag the selected slide up or down to move it in Outline pane to a new location.
A vertical bar appears where the slide(s) will be moved when you release the mouse button.
Collapse and Expand Slides in the Outline Pane
![]() In the Outline pane in Normal view, select the slide text you want to work with, and then:
In the Outline pane in Normal view, select the slide text you want to work with, and then:
![]() To collapse selected or all slides, right-click the slides, point to Collapse, and then click Collapse, or Collapse All.
To collapse selected or all slides, right-click the slides, point to Collapse, and then click Collapse, or Collapse All.
A horizontal line appears below a collapsed slide in Outline view.
![]() To expand selected or all slides, right-click the slides, point to Expand, and then click Expand, or Expand All.
To expand selected or all slides, right-click the slides, point to Expand, and then click Expand, or Expand All.
TIMESAVER Double-click a slide icon in the Outline pane to collapse or expand it.

Organizing Slides into Sections
When you’re working on large presentations or collaborating on a presentation with others, organizing slides into sections (New!) can make the workflow process easier. After you create a section of slides in a presentation, you can rename the untitled section. When you rename a section, you can include a name assignment to make it easier for others working the presentation to know which slides to modify. When you no longer need a section, you can remove individual sections, or quickly remove them all.
Organize Slides into Sections
![]() Click the Home tab.
Click the Home tab.
![]() Click Slides pane in Normal view or click the Slide Sorter View button.
Click Slides pane in Normal view or click the Slide Sorter View button.
![]() Click to place the insertion point where you want to insert a new selection or select the slide(s) you want to place into a section.
Click to place the insertion point where you want to insert a new selection or select the slide(s) you want to place into a section.
![]() Click the Section button, and then click Add Section.
Click the Section button, and then click Add Section.

Did You Know?
You can print sections. Click the File tab, click Print, click the Print Range list arrow, select the section name, and then click Print.
![]() Click the Home tab.
Click the Home tab.
![]() Click Slides pane in Normal view or click the Slide Sorter View button.
Click Slides pane in Normal view or click the Slide Sorter View button.
![]() Select the section you want to change.
Select the section you want to change.
![]() To collapse or expand a section, click the Collapse or Expand arrow in the section name.
To collapse or expand a section, click the Collapse or Expand arrow in the section name.
![]() To rename a section, click the Section button, click Rename Section, type a name, and then click OK.
To rename a section, click the Section button, click Rename Section, type a name, and then click OK.
![]() To assign a name to a section, type it in when you rename a section.
To assign a name to a section, type it in when you rename a section.
![]() To remove a section, click the Section button, click Remove Section or Remove All Sections.
To remove a section, click the Section button, click Remove Section or Remove All Sections.
![]() To move slides in a section, drag them to another location.
To move slides in a section, drag them to another location.

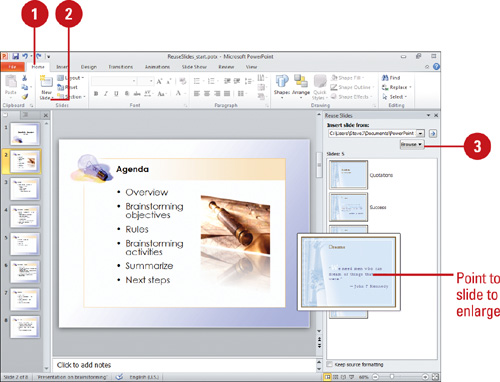
Using Slides from Other Presentations
To insert slides from other presentations, you can open the presentation and copy and paste the slides you want, or you can use the Reuse Slides task pane. With the Reuse Slides task pane, you don’t have to open the presentation first; instead, you can view a miniature of each slide in a presentation and then insert only the ones you select. If you only want to reuse the theme from another presentation, the Reuse Slides task pane can do that too.
Insert Slides from Another Presentation
![]() Click the Home tab.
Click the Home tab.
![]() Click the New Slide button arrow, and then click Reuse Slides.
Click the New Slide button arrow, and then click Reuse Slides.
![]() If the presentation you want is not available, click Browse, click Browse File, locate and select the file you want, and then click Open.
If the presentation you want is not available, click Browse, click Browse File, locate and select the file you want, and then click Open.
![]() Select the slides you want to insert.
Select the slides you want to insert.
![]() To display a larger preview, point to the slide.
To display a larger preview, point to the slide.
![]() To insert a slide, click the slide.
To insert a slide, click the slide.
![]() To insert all slides, right-click a slide, and then click Insert All Slides.
To insert all slides, right-click a slide, and then click Insert All Slides.
![]() To insert only the theme for all slides, right-click a slide, and then click Apply Theme to All Slides.
To insert only the theme for all slides, right-click a slide, and then click Apply Theme to All Slides.
![]() To insert only the theme for the selected slides, right-click a slide, and then click Apply Theme to Selected Slides.
To insert only the theme for the selected slides, right-click a slide, and then click Apply Theme to Selected Slides.
![]() When you’re done, click the Close button on the task pane.
When you’re done, click the Close button on the task pane.

See Also
See “Publishing Slides to a SharePoint Library” on page 452 for information on using SharePoint.