3: Designing A Look
What You’ll Do
Make Your Presentation Look Consistent
Control Slide Appearance with Masters
Control a Slide Layout with Masters
Control a Slide Background with Masters
Understand and Create Color Themes
Add and Modify a Background Style
Introduction
As you develop your presentation, an important element needs to be considered: the look of your slides. The design of your presentation is just as important as the information that it contains. A poorly designed presentation without the eye-catching design elements will lose your audience, and then what your presentation has to say won’t really matter.
Microsoft PowerPoint comes with professionally designed templates to help you create a consistent presentation look. A template is a presentation file that consists of one or more slide masters. A slide master is the part of a template that contains all of the properties of your PowerPoint presentation—slide layouts, themes, effects, animation, backgrounds, text font style and color, date and time, and graphic placement. Each slide master contains one or more slide layouts, which defines the positioning and formatting of content on a slide. Layouts contain placeholders, which hold and format future text and other slide content, such as slide numbers, date, time, and headers and footers.
Besides the text and graphics that you place on your slides, another important part of a presentation is the use of color. Not everyone has an eye for color, and pulling it all together can be daunting, so PowerPoint provides you with professionally designed color themes, which you can apply to any slide master. A theme is a set of unified design elements that provides a consistent look for a presentation by using color themes, fonts, and effects, such as shadows, shading, and animations.
Once you’ve set up your masters and themes to be exactly the way you want them, you can save it as a design template. Company specific styles, logos, colors themes and other elements, can now become a new template to be used with other presentations in the future.
Making Your Presentation Look Consistent
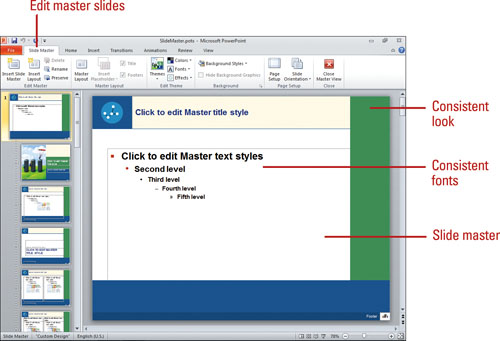
Each PowerPoint presentation comes with a set of masters: slide, notes, and handout. A master controls the properties of each corresponding slide or page in a presentation. For example, when you make a change on a slide master, the change affects every slide. If you place your company logo, other artwork, the date and time, or slide number on the slide master, the element will appear on every slide.
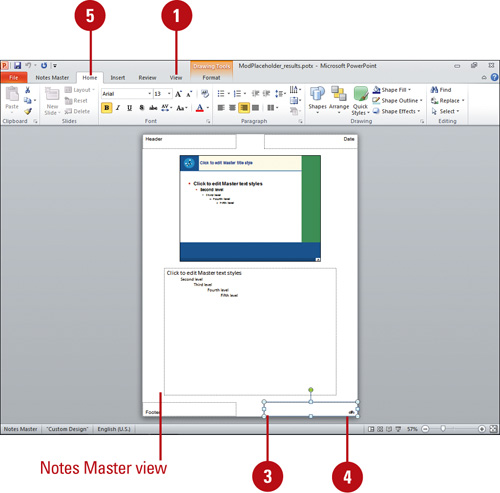
Each master contains placeholders and a theme to help you create a consistent looking presentation. A placeholder provides a consistent place on a slide or page to store text and information. A theme provides a consistent look, which incorporates a color theme, effects, fonts, and slide background style. Placeholders appear on the layouts associated with the master. The notes and handout masters use one layout while the slide master uses multiple layouts. Each master includes a different set of placeholders, which you can show or hide at any time. For example, the slide master includes master title and text placeholders, which control the text format for every slide in a presentation, while the handout master includes header, footer, date, page number, and body placeholders. You can modify and arrange placeholders on all of the master views to include the information and design you want.
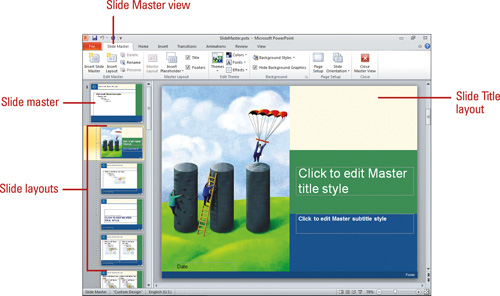
You can also view and make changes to a master—either slide, notes, or handout—in one of the master views, which you can access using the View tab. When you view a master, the Ribbon adds a Program tab that correspond to the master. For example, when you switch to Slide Master view, the Slide Master tab appears. The Ribbon on each master view also includes a Close Master View button, which returns you to the view you were in before you opened the master.
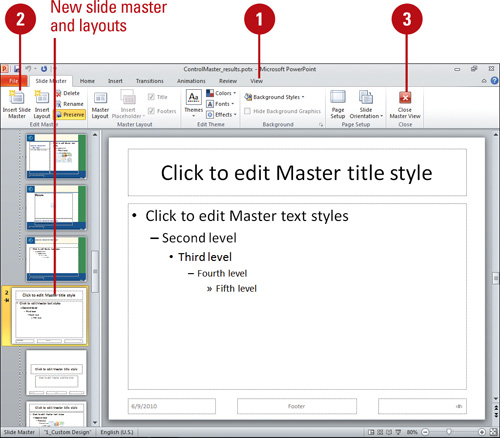
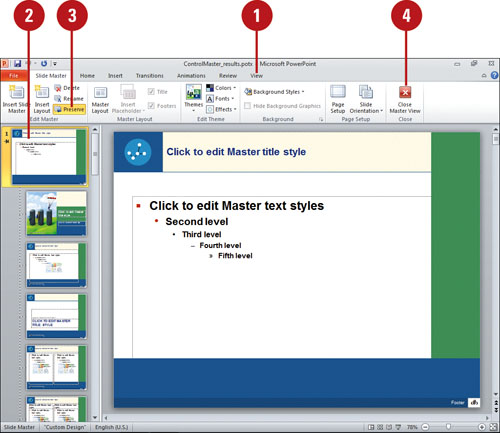
The Ribbon for each master view also includes commands specific to the type of master. For example, the Slide Master tab contains several buttons to insert, delete, rename, duplicate, and preserve slide masters. You can insert one or more slide masters into a presentation, which is useful for creating separate sections within the same presentation. When you preserve a slide master, you protect it from being deleted. As you work with slide masters in Slide Master view, you can create custom slide layouts and insert placeholders.
Viewing Masters
If you want to change the appearance of each instance of a slide element, like all the title fonts or all the bullet characters, you don’t have to change every slide individually. Instead, you can change them all at once using a slide master. PowerPoint updates the existing slides, and then applies your settings to any slides you add. Each PowerPoint presentation contains three masters: slide, notes, and handout. Which master you open depends on what part of your presentation you want to change. The slide master controls all the presentation slides, while the notes master and handout master controls the appearance of all speaker notes pages, and handout pages, respectively.
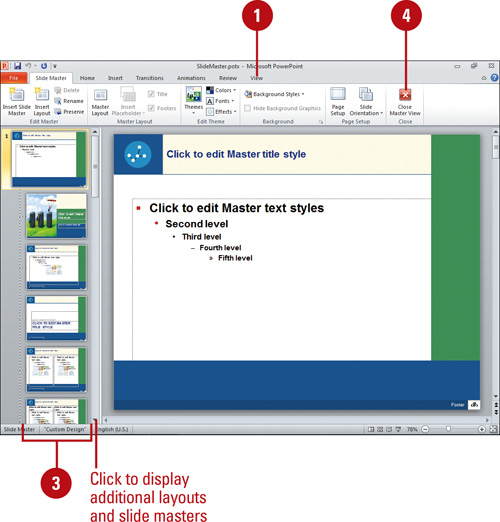
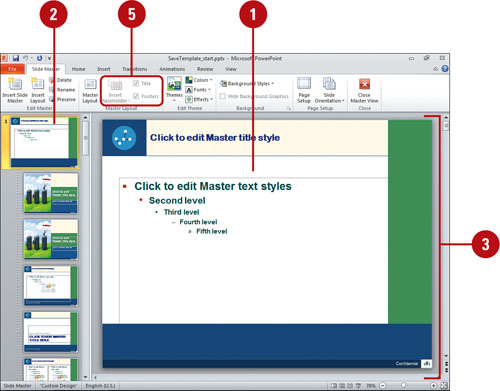
View the Slide Master
![]() Click the View tab.
Click the View tab.
![]() Click the Slide Master button.
Click the Slide Master button.
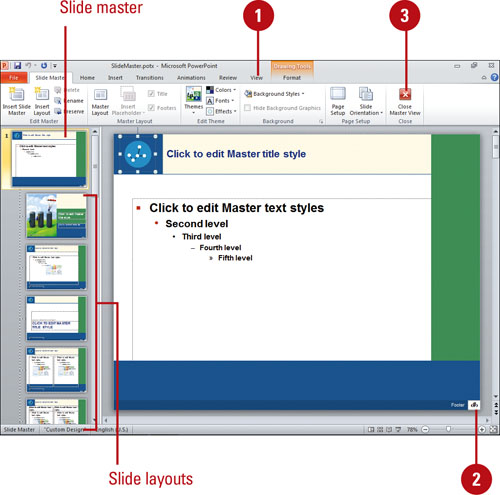
The slide master appears in the left pane as a larger slide miniature with a number next to it and the slides layouts associated with it appear below it.
TIMESAVER You can view the slide master quickly. Press and hold the Shift key, and then click the Normal view button.
![]() Click the slide master or slide layout to display it in the slide master view.
Click the slide master or slide layout to display it in the slide master view.
Use the scroll bar in the left pane to display additional slide masters and slide layouts.
![]() Click the Close Master View button on the Ribbon.
Click the Close Master View button on the Ribbon.
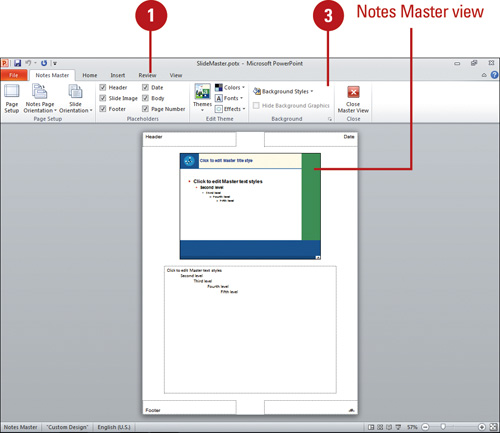
![]() Click the View tab.
Click the View tab.
![]() Click the Notes Master button.
Click the Notes Master button.
![]() Click the Close Master View button on the Ribbon.
Click the Close Master View button on the Ribbon.
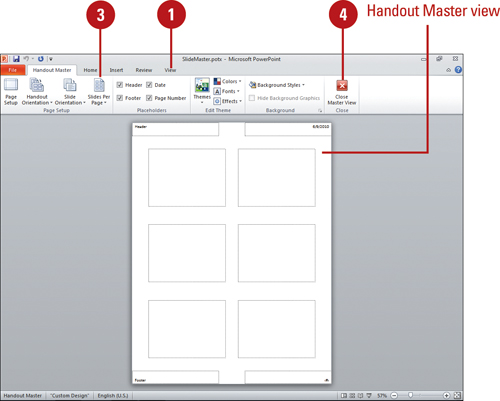
View the Handout Master
![]() Click the View tab.
Click the View tab.
![]() Click the Handout Master button.
Click the Handout Master button.
TIMESAVER You can view the handout master quickly. Press and hold the Shift key, and then click the Slide Sorter view button.
The Handout Master controls the look of your handouts.
![]() Click the Slides-per-page button, and then use one of the following:
Click the Slides-per-page button, and then use one of the following:
![]() Click the number of slides you want on your handout pages: 1, 2, 3, 4, 6, or 9.
Click the number of slides you want on your handout pages: 1, 2, 3, 4, 6, or 9.
![]() Click Show Slide Outline to show the slide outline, click the Slides-per-page button.
Click Show Slide Outline to show the slide outline, click the Slides-per-page button.
The item you select in steps 2 or 3
![]() Click the Close Master View button on the Ribbon.
Click the Close Master View button on the Ribbon.
Controlling Slide Appearance with Masters
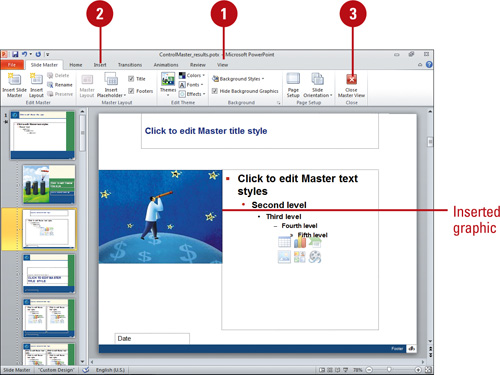
If you want an object, such as a company logo or clip art, to appear on every slide in your presentation, place it on the Slide Master. All of the characteristics of the Slide Master (background color, text color, font, and font size) appear on every slide. However, if you want an object to appear on a certain slide type, place it on a slide layout in Slide Master view. The Slide Master tab contains several buttons to insert, delete, rename, duplicate, and preserve masters. You can create unique slides that don’t follow the format of the masters. When you preserve a master, you protect (lock) it from being deleted. You can also arrange the placeholders the way you want them.
Include an Object on Every Slide or Only Specific Slides
![]() Click the View tab, and then click the Slide Master button.
Click the View tab, and then click the Slide Master button.
![]() Add the objects you want to a slide master or slide layout, and then modify its size and placement.
Add the objects you want to a slide master or slide layout, and then modify its size and placement.
![]() Slide master. Includes object on every slide.
Slide master. Includes object on every slide.
Slide master is the top slide miniature in the left column.
![]() Slide layout. Includes object only on the specific layout.
Slide layout. Includes object only on the specific layout.
![]() Click the Close Master View button on the Ribbon.
Click the Close Master View button on the Ribbon.
Did You Know?
You can delete a slide master. Click the View tab, click the Slide Master button, select the slide master you want to delete in the left pane, click the Delete button in the Edit Master group, and then click the Close Master View button.
You can rename a slide master. Click the View tab, click the Slide Master button, select the slide master you want to rename, click the Rename button in the Edit Master group, type a new name, click Rename, and then click the Close Master View button.
![]() Click the View tab, and then click the Slide Master button.
Click the View tab, and then click the Slide Master button.
![]() Click the Insert Slide Master button.
Click the Insert Slide Master button.
The new slide master appears at the bottom of the left pane with a push pin indicating the new master is preserved.
![]() Click the Close Master View button on the Ribbon.
Click the Close Master View button on the Ribbon.
The new slide master and associated layouts appears in the Add Slide and Layout galleries at the bottom (scroll down if necessary).
Preserve or Not Preserve a Slide Master
![]() Click the View tab, and then click the Slide Master button.
Click the View tab, and then click the Slide Master button.
![]() Click the master that you want to preserve or not preserve.
Click the master that you want to preserve or not preserve.
A push pin appears under the slide master number to indicate the master is currently preserved.
![]() Use the Preserve button to toggle it on (highlighted) and off (not highlighted).
Use the Preserve button to toggle it on (highlighted) and off (not highlighted).
![]() Preserve. Click the Preserve button to lock the master (highlighted).
Preserve. Click the Preserve button to lock the master (highlighted).
![]() Not preserve. Click the Preserve button to unlock the master (not highlighted), and then click Yes or No to delete the master (if not used).
Not preserve. Click the Preserve button to unlock the master (not highlighted), and then click Yes or No to delete the master (if not used).
![]() Click the Close Master View button on the Ribbon.
Click the Close Master View button on the Ribbon.
Controlling a Slide Layout with Masters
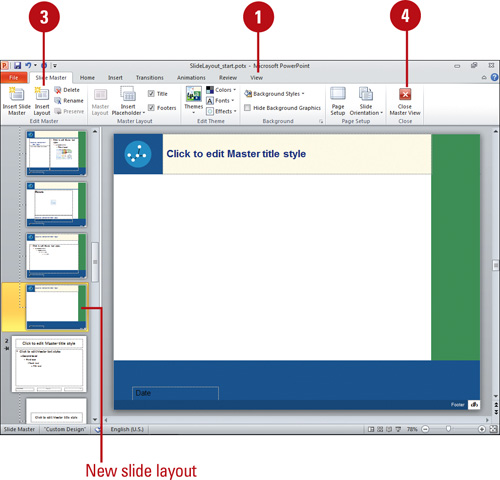
Each slide master includes a standard set of slide layouts. If the standard layouts don’t meet your specific needs, you can modify one to create a new custom slide layout, or insert and create a new custom slide layout from scratch. You can use the Ribbon in Slide Master view to help you create a custom slide layout. In the Master Layout group, you can show and hide available placeholders or insert different types of placeholders, such as Content, Text, Picture, Chart, Table, Diagram, Media, and Clip Art.
Insert a New Slide Layout
![]() Click the View tab, and then click the Slide Master button.
Click the View tab, and then click the Slide Master button.
![]() Select the slide master in the left pane in which you want to associate a new layout.
Select the slide master in the left pane in which you want to associate a new layout.
![]() Click the Insert Layout button.
Click the Insert Layout button.
The new slide layout appears at the end of the current slide layouts for the slide master.
![]() Click the Close Master View button on the Ribbon.
Click the Close Master View button on the Ribbon.
See Also
See “Modifying Placeholders” on page 88 for information on showing, hiding, and formatting placeholders.
Create a New Slide Layout from an Existing One
![]() Click the View tab, and then click the Slide Master button.
Click the View tab, and then click the Slide Master button.
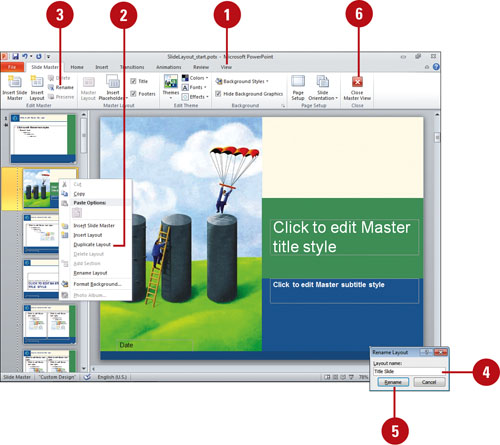
![]() Right-click the slide layout you want to use, and then click Duplicate Layout.
Right-click the slide layout you want to use, and then click Duplicate Layout.
The duplicate layout appears below the original one.
![]() Click the Rename button.
Click the Rename button.
![]() Type a new layout name.
Type a new layout name.
![]() Click Rename.
Click Rename.
![]() Click the Close Master View button on the Ribbon.
Click the Close Master View button on the Ribbon.
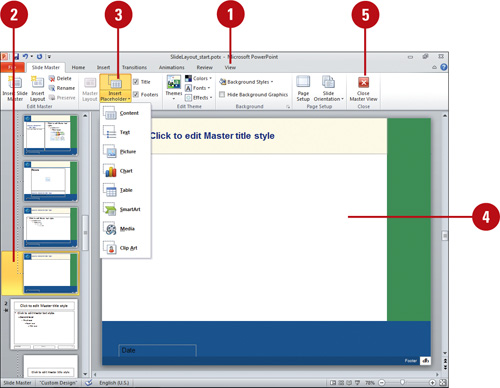
Insert a Placeholder
![]() Click the View tab, and then click the Slide Master button.
Click the View tab, and then click the Slide Master button.
![]() Select the slide layout to which you want to insert a placeholder.
Select the slide layout to which you want to insert a placeholder.
![]() Click the Insert Placeholder button arrow, and then click the placeholder you want to insert.
Click the Insert Placeholder button arrow, and then click the placeholder you want to insert.
TIMESAVER Click the Insert Placeholder button to insert a placeholder used to hold any kind of content.
![]() On the slide, drag to create a placeholder the size you want on the slide layout.
On the slide, drag to create a placeholder the size you want on the slide layout.
![]() Click the Close Master View button on the Ribbon.
Click the Close Master View button on the Ribbon.
Modifying Placeholders
Each PowerPoint master comes with a different set of standard placeholders. The slide master comes with Title and Footer placeholder, while the handouts master comes with Header, Footer, Date, and Page Number placeholders. If a master doesn’t contain the information you need, you can modify it by showing or hiding placeholders. After you display the placeholders you want, you can insert content—such as header or footer text—and format it like any other text box with the look you want. For example, you can format placeholder text using WordArt styles and Font and Paragraphs tools on the Home tab.
Show or Hide a Placeholder
![]() Click the View tab, and then click the master view (Slide Master, Handout Master, or Notes Master) button with the master you want to change.
Click the View tab, and then click the master view (Slide Master, Handout Master, or Notes Master) button with the master you want to change.
![]() If you’re in Slide Master view, select the slide master or slide layout you want to change.
If you’re in Slide Master view, select the slide master or slide layout you want to change.
![]() Select or clear the check box for the placeholder you want to show or hide.
Select or clear the check box for the placeholder you want to show or hide.
![]() Slide Master. Select or clear the Title or Footers check boxes.
Slide Master. Select or clear the Title or Footers check boxes.
![]() Handout Master. Select or clear the Header, Footer, Date, or Page Number check boxes.
Handout Master. Select or clear the Header, Footer, Date, or Page Number check boxes.
![]() Notes Master. Select or clear the Header, Slide Image, Footer, Date, Body, or Page Number check boxes.
Notes Master. Select or clear the Header, Slide Image, Footer, Date, Body, or Page Number check boxes.
![]() Click the Close Master View button on the Ribbon.
Click the Close Master View button on the Ribbon.
See Also
See “Controlling a Slide Layout with Masters” on page 86 for information on inserting placeholders on a slide master or slide layout.
Modify and Format Placeholders
![]() Click the View tab, and then click the master view (Slide Master, Handout Master, or Notes Master) button with the master you want to change.
Click the View tab, and then click the master view (Slide Master, Handout Master, or Notes Master) button with the master you want to change.
![]() If you’re in Slide Master view, select the slide master or slide layout you want to change.
If you’re in Slide Master view, select the slide master or slide layout you want to change.
![]() Select the placeholder you want to change.
Select the placeholder you want to change.
![]() To add information to a placeholder, such as a header or footer, click the text box to insert the I-beam, and then type the text you want.
To add information to a placeholder, such as a header or footer, click the text box to insert the I-beam, and then type the text you want.
![]() To format the placeholder, click the Home and Format (under Drawing Tools) tabs, and then use the formatting tools on the Ribbon.
To format the placeholder, click the Home and Format (under Drawing Tools) tabs, and then use the formatting tools on the Ribbon.
![]() Use the WordArt Styles to apply Quick Styles from the Style gallery.
Use the WordArt Styles to apply Quick Styles from the Style gallery.
![]() Use tools in the Font and Paragraph groups to modify the placeholder.
Use tools in the Font and Paragraph groups to modify the placeholder.
![]() To delete the placeholder, press the Delete key.
To delete the placeholder, press the Delete key.
![]() Click the Close Master View button on the Ribbon.
Click the Close Master View button on the Ribbon.
Did You Know?
You can change the slide master layout. If you delete an item from the slide master, you can reshow it again. Select the slide master in Slide Master view, click the Slide Layout button, select the placeholder check boxes you want, and then click OK.
Controlling a Slide Background with Masters
You may want to place an object onto most slides, but not every slide. Placing the object on the slide master saves you time. Use the Insert tab to help you insert objects. Once an object is placed on the slide master, you can hide the object in any slide you want. You can even choose to hide the object on every slide or only on specific ones. If you select the slide master in Slide Master view, you can hide background graphics on all slides. If you select a slide layout, you can hide them on the selected layout.
Hide Master Background Objects on a Slide
![]() Click the View tab, click the Slide Master button, and then select the slide master (for all slides) or slide layout (for specific slides) you want to hide background objects.
Click the View tab, click the Slide Master button, and then select the slide master (for all slides) or slide layout (for specific slides) you want to hide background objects.
![]() Select the Hide Background Graphics check box.
Select the Hide Background Graphics check box.
![]() To hide a background object on a single slide, display the slide in Normal view, click the Design tab, and then select the Hide Background Graphics check box.
To hide a background object on a single slide, display the slide in Normal view, click the Design tab, and then select the Hide Background Graphics check box.
![]() Click the Close Master View button on the Ribbon.
Click the Close Master View button on the Ribbon.
Add Background Graphics
![]() Click the View tab, and then click the master view (Slide Master, Handout Master, or Notes Master) button with the master you want to change.
Click the View tab, and then click the master view (Slide Master, Handout Master, or Notes Master) button with the master you want to change.
![]() Click the Insert tab, click the Insert Picture button, locate and select the picture you want, and then click Insert.
Click the Insert tab, click the Insert Picture button, locate and select the picture you want, and then click Insert.
![]() Click the Close Master View button on the Ribbon.
Click the Close Master View button on the Ribbon.
Adding a Header and Footer
Headers and footers appear on every slide. You can choose to not have them appear on the title slide. They often include information such as the presentation title, slide number, date, and name of the presenter. Use the masters to place header and footer information on your slides, handouts, or notes pages. Make sure your header and footer don’t make your presentation look cluttered. The default font size is usually small enough to minimize distraction, but you can experiment by changing their font size and placement to make sure.
Add a Header and Footer
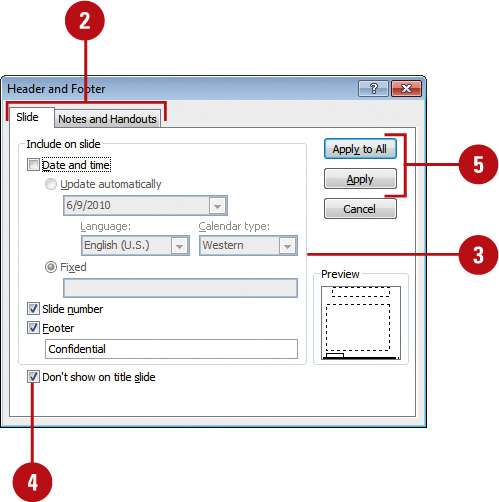
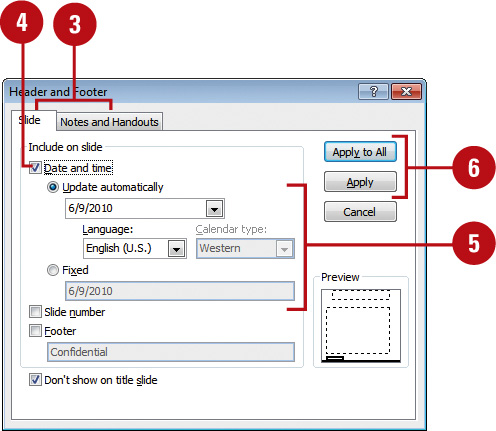
![]() Click the Insert tab, and then click the Header & Footer button.
Click the Insert tab, and then click the Header & Footer button.
![]() Click the Slide or Notes and Handouts tab.
Click the Slide or Notes and Handouts tab.
![]() Enter or select the information you want to include on your slide or your notes and handouts.
Enter or select the information you want to include on your slide or your notes and handouts.
![]() To not include a header and footer on the title slide, select the Don’t show on title slide check box.
To not include a header and footer on the title slide, select the Don’t show on title slide check box.
![]() Click Apply to apply your selections to the current slide (if available), or click Apply to All to apply the selections to all slides.
Click Apply to apply your selections to the current slide (if available), or click Apply to All to apply the selections to all slides.
Change the Look of a Header or Footer
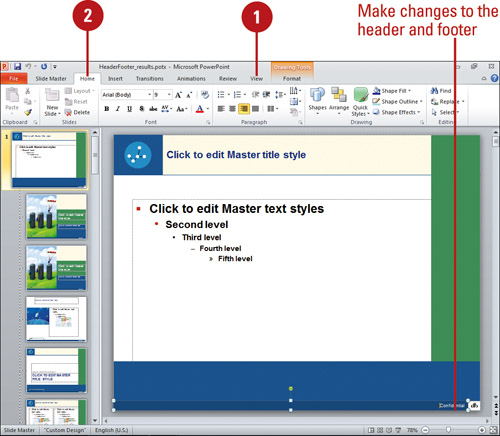
![]() Click the View tab, and then click the master view (Slide Master, Handout Master, or Notes Master) button with the master you want to change.
Click the View tab, and then click the master view (Slide Master, Handout Master, or Notes Master) button with the master you want to change.
![]() Make the necessary changes to the header and footer like any other text box. You can move or resize them or change their text attributes using the Home tab.
Make the necessary changes to the header and footer like any other text box. You can move or resize them or change their text attributes using the Home tab.
![]() Click the Close Master View button on the Ribbon.
Click the Close Master View button on the Ribbon.
Inserting Slide Numbers
You can insert slide numbers into the text of your presentation. When you insert slide numbers, PowerPoint keeps track of your slide numbers for you. You can insert slide numbers on every slide or only on a specific slide. To insert a slide number on every page, you place it in a placeholder on the slide master. In the Slide Master view, PowerPoint inserts a code <#> for the slide number. When you view slides in other views, the slide number is shown. To insert a slide number only on a specific page, you insert it in a text box on the slide you want. You can even start numbering with a page number other than one. This is useful when your slides are a part of a larger presentation.
Insert Slide Numbering on Slides, Notes, and Handouts
![]() Click the View tab, and then click the Slide Master button.
Click the View tab, and then click the Slide Master button.
![]() Select the slide master or slide layout in the left pane in which you want to insert a slide number.
Select the slide master or slide layout in the left pane in which you want to insert a slide number.
If the slide already contains a placeholder with the <#> symbol, which indicates slide numbering, you don’t need to continue.
![]() Click to place the insertion point in the text object where you want to insert the current slide number.
Click to place the insertion point in the text object where you want to insert the current slide number.
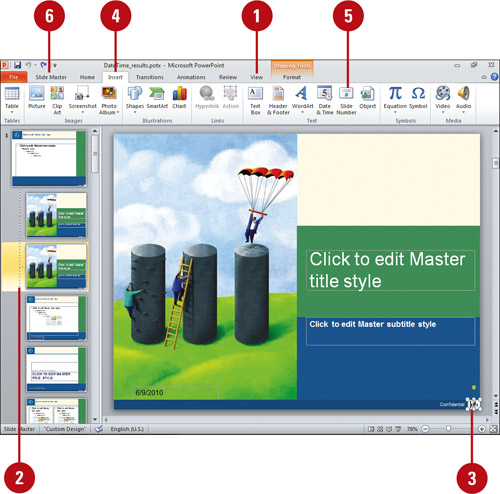
![]() Click the Insert tab.
Click the Insert tab.
![]() Click the Insert Slide Number button.
Click the Insert Slide Number button.
The <#> symbol appears in the text.
![]() Click the Slide Master tab, and then click the Close Master View button on the Ribbon.
Click the Slide Master tab, and then click the Close Master View button on the Ribbon.
Did You Know?
Insert slide numbers on slides, notes, and handout using the default placeholder. Click the Insert tab, click the Slide or Notes And Handouts tab, click the Date & Time button, select the Slide Number check box, and then click Apply or Apply To All.
Insert Slide Numbering on a Specific Slide
![]() Click to place the insertion point in the text object where you want to insert the current slide number.
Click to place the insertion point in the text object where you want to insert the current slide number.
![]() Click the Insert tab.
Click the Insert tab.
![]() Click the Insert Slide Number button.
Click the Insert Slide Number button.
The current slide number is inserted into the text box.
TROUBLE? If you don’t place the insertion point, the Header and Footer dialog opens.
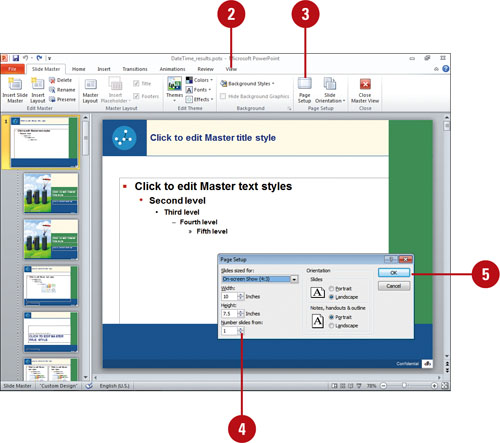
Start Numbering with a Different Number
![]() Insert the slide number if you need one on the slide or slide master.
Insert the slide number if you need one on the slide or slide master.
![]() Click the View tab, and then click the master view (Slide Master, Handout Master, or Notes Master) button with the master you want to change.
Click the View tab, and then click the master view (Slide Master, Handout Master, or Notes Master) button with the master you want to change.
![]() Click the Page Setup button.
Click the Page Setup button.
![]() Click the Number Slides From up or down arrow to set the number you want.
Click the Number Slides From up or down arrow to set the number you want.
![]() Click OK.
Click OK.
Inserting the Date and Time
You can insert the date and time into your presentation. For example, you might want today’s date to appear in a stock market quote. You can insert the date and time on every slide, notes page or handout, or only on a specific slide. To insert the date and time on every page, you place it in a placeholder on the slide master. To insert the date and time only on a specific page, you insert it in a text box on the slide you want. You can set the date and time to automatically update to your computer’s clock or stay fixed until you change it.
Insert the Date and Time on a Specific Slide
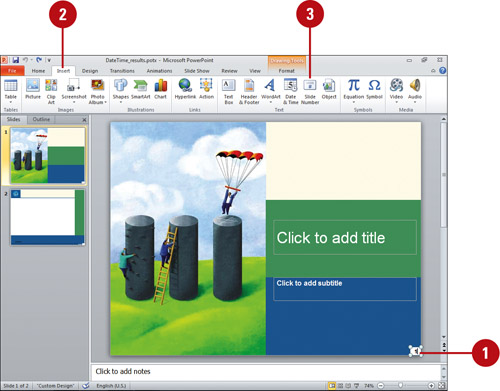
![]() Click to place the insertion point in the text object where you want to insert the date and time.
Click to place the insertion point in the text object where you want to insert the date and time.
![]() Click the Insert tab.
Click the Insert tab.
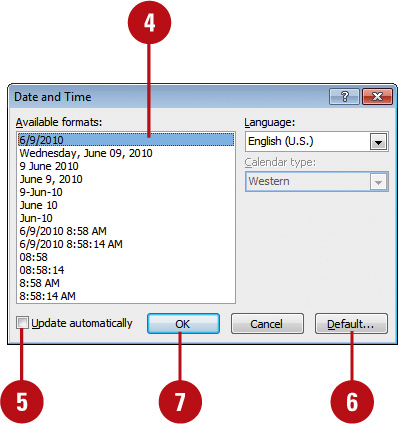
![]() Click the Date & Time button.
Click the Date & Time button.
![]() Click the date or time format you want.
Click the date or time format you want.
![]() To have the date and time automatically update, select the Update automatically check box.
To have the date and time automatically update, select the Update automatically check box.
![]() To change the default date and time format, click Default, and then click Yes to confirm.
To change the default date and time format, click Default, and then click Yes to confirm.
![]() Click OK.
Click OK.
Insert the Date and Time on Slides, Notes, and Handouts
![]() Click the Insert tab.
Click the Insert tab.
![]() Click the Date & Time button.
Click the Date & Time button.
![]() Click the Slide or Notes and Handouts tab.
Click the Slide or Notes and Handouts tab.
![]() Click the Date and time check box.
Click the Date and time check box.
![]() Click the Update automatically or Fixed option, and then specify or select the format you want.
Click the Update automatically or Fixed option, and then specify or select the format you want.
![]() Click Apply to apply your selections to the current slide, or click Apply to All to apply the selections to all slides.
Click Apply to apply your selections to the current slide, or click Apply to All to apply the selections to all slides.
Understanding Color Themes
Every presentation has at least one color theme. A presentation with more than one set of slide masters can have more than one color theme. A color theme helps you create professional-looking presentations that use an appropriate balance of color for your presentation content. You can use a default color theme or create a custom one.
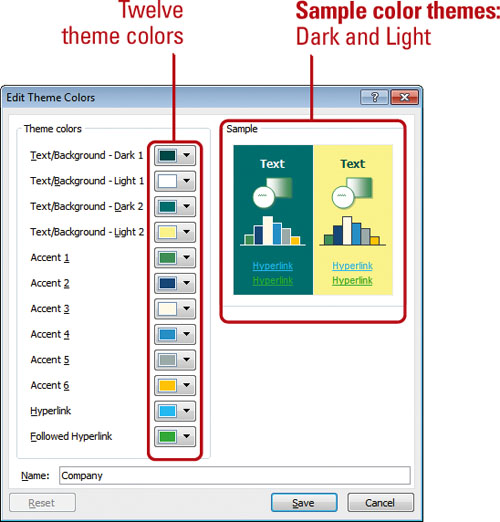
Color themes in PowerPoint are made up of a palette of twelve colors. These colors appear on color palettes when you click the Shape Fill and Outline Color or Font Color button arrow on the Home and Format tabs.
These twelve colors correspond to the following elements in a presentation:
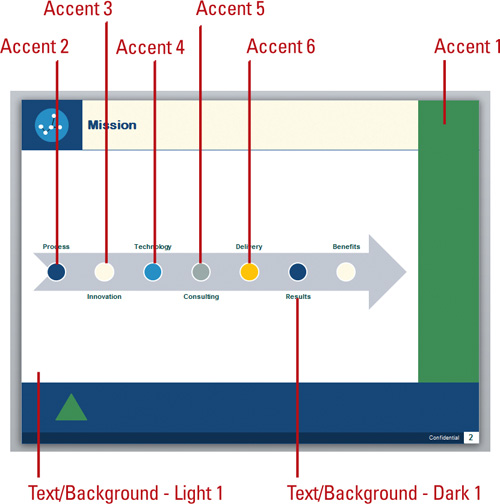
Four Text and Background. The two background colors (light and dark combinations) are the canvas, or drawing area, color of the slide. The two text colors (light and dark combinations) are for typing text and drawing lines, and contrast with the background colors.
Six Accent. These colors are designed to work as a complementary color palette for objects, such as shadows and fills. These colors contrast with both the background and text colors.
One hyperlink. This color is designed to work as a complementary color for objects and hyperlinks.
One followed hyperlink. This color is designed to work as a complementary color for objects and visited hyperlinks.
The first four colors in the Theme Colors list represent the presentation text and background colors (light and dark for each). The remaining colors represent the six accent and two hyperlink colors for the theme. When you apply another theme or change any of these colors to create a new theme, the colors shown in the Theme Colors dialog box and color palettes change to match the current colors.
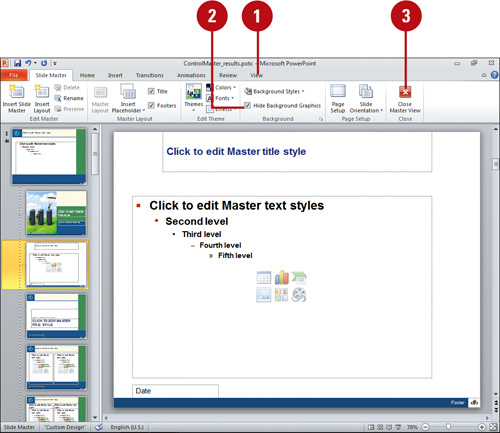
Viewing and Applying a Theme
A presentation theme consists of theme colors, fonts, and effects. You can quickly format an entire presentation with a professional look by applying a theme. Office comes with more themes and styles (New!). To quickly see if you like a theme, point to one on the Design tab to display a ScreenTip with name and information about it, and a live preview of it in the current slide. If you like it, you can apply it. When you apply a theme, the background, text, graphics, charts, and tables all change to reflect the theme. You can apply a theme to a matching slide, selected slides or all slides in a presentation. You can choose from one or more standard themes. When you add new content, the slide elements change to match the theme ensuring all of your material will look consistent. You can even use the same theme in other Microsoft Office programs, such as Word and Excel, so all your work matches. Can’t find a theme you like? Search Microsoft Office.com on the Web.
View and Apply a Theme
![]() Select the slide with the slide master you want to change.
Select the slide with the slide master you want to change.
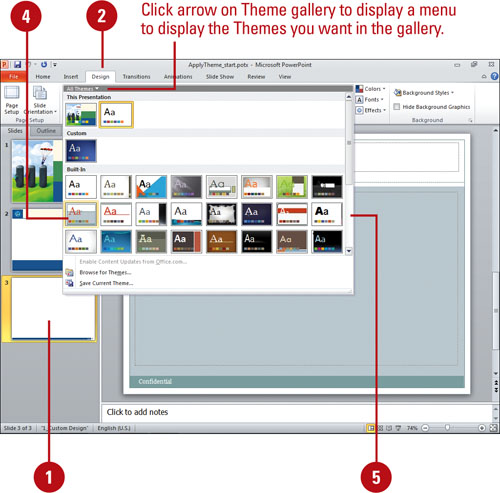
![]() Click the Design tab.
Click the Design tab.
![]() Click the scroll up or down arrow, or click the More list arrow in the Themes gallery to see additional themes.
Click the scroll up or down arrow, or click the More list arrow in the Themes gallery to see additional themes.
The current theme appears highlighted in the gallery.
![]() Point to a theme.
Point to a theme.
A live preview of the theme appears in the current slide, and a ScreenTip with the theme name and how many slides use it.
![]() Click the theme you want from the gallery to apply it to the selected slide master (and all its slides).
Click the theme you want from the gallery to apply it to the selected slide master (and all its slides).
![]() To apply the theme to matching slides, all slides, or selected slides, right-click the theme from the gallery, and then click the option you want.
To apply the theme to matching slides, all slides, or selected slides, right-click the theme from the gallery, and then click the option you want.
![]() To set a theme as default, right-click the theme you want from the gallery, and then click Set as Default Theme.
To set a theme as default, right-click the theme you want from the gallery, and then click Set as Default Theme.
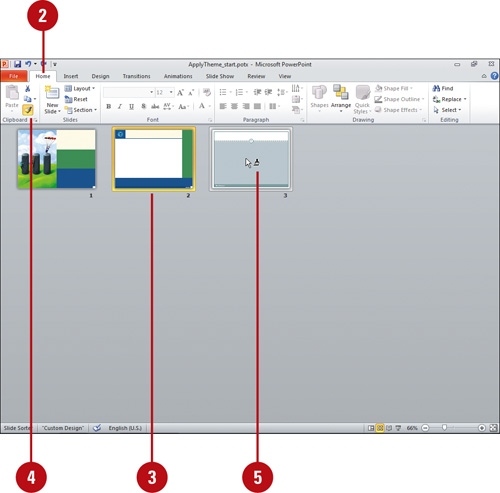
Apply the Theme of One Slide to Another
![]() Click the Normal View or Slide Sorter View button.
Click the Normal View or Slide Sorter View button.
![]() Click the Home tab.
Click the Home tab.
![]() Click the slide with the color theme you want to apply.
Click the slide with the color theme you want to apply.
![]() Click the Format Painter button on the Home tab to apply the color theme to one slide, or double-click the button to apply the color theme to multiple slides.
Click the Format Painter button on the Home tab to apply the color theme to one slide, or double-click the button to apply the color theme to multiple slides.
![]() Click the slides to which you want to apply the color theme. The slides can be in the current presentation or in another open presentation.
Click the slides to which you want to apply the color theme. The slides can be in the current presentation or in another open presentation.
![]() If you are applying the theme to more than one slide, press Esc to cancel the Format Painter. If you are applying the theme to only one slide, the Format Painter is canceled automatically.
If you are applying the theme to more than one slide, press Esc to cancel the Format Painter. If you are applying the theme to only one slide, the Format Painter is canceled automatically.
Did You Know?
You can get updates from Microsoft Office.com. Select the slide with the slide master you want to change, click the Design tab, click the More list arrow in the Themes gallery, and then click Enable Content Updates From Office.com.
You can create a new presentation based on a theme. Click the File tab, click New, click Themes, click the theme you want, and then click Create.
Creating a Color Theme
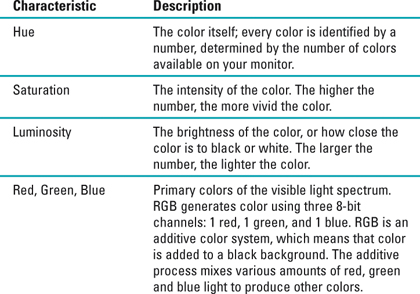
You may like a certain color theme except for one or two colors. You can change an existing color theme and apply your changes to the entire presentation or to just a few slides. You can add other custom colors to your theme by using RGB (Red, Green, and Blue) or HSL (Hues, Saturation, and Luminosity) color modes. The RGB color mode is probably the most widely used of all the color modes. You can accomplish this by using sliders, dragging on a color-space, or entering a numeric value that corresponds to a specific color. Once you create this new color theme, you can add it to your collection of color themes so that you can make it available to any slide in the presentation.
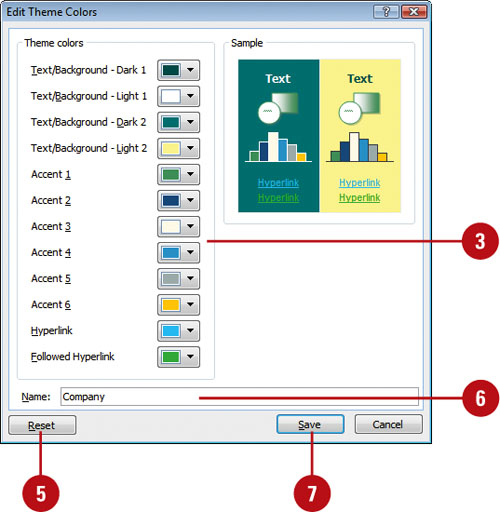
Change a Color in a Standard Color Theme
![]() Click the Design tab.
Click the Design tab.
![]() Click the Theme Colors button, and then click Create New Theme Colors.
Click the Theme Colors button, and then click Create New Theme Colors.
![]() Click the Theme Colors buttons (Text/Background, Accent, or Hyperlink, etc.) for the colors you want to change.
Click the Theme Colors buttons (Text/Background, Accent, or Hyperlink, etc.) for the colors you want to change.
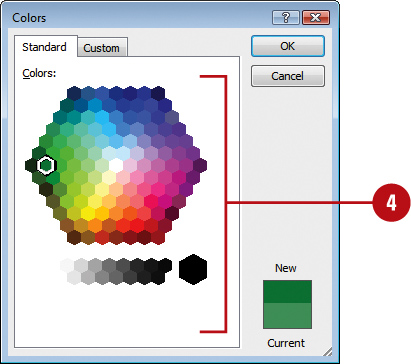
![]() Click a new color, or click More Colors to select a color from the Standard or Custom tab, and then click OK.
Click a new color, or click More Colors to select a color from the Standard or Custom tab, and then click OK.
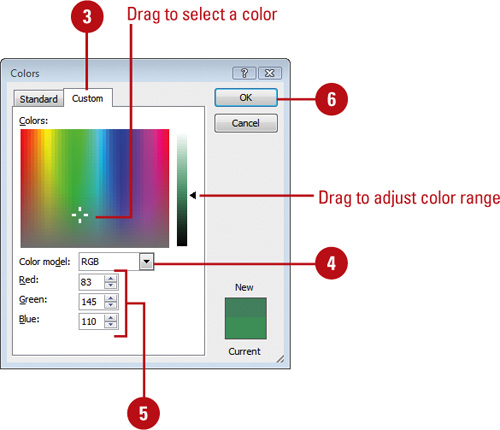
![]() To select a custom color, drag across the palette until the pointer is over the color you want, or choose a Color Model, and then enter the Hue, Sat, Lum, or Red, Green, and Blue values.
To select a custom color, drag across the palette until the pointer is over the color you want, or choose a Color Model, and then enter the Hue, Sat, Lum, or Red, Green, and Blue values.
![]() If you don’t like your color choices, click the Reset button to return all color changes to their original colors.
If you don’t like your color choices, click the Reset button to return all color changes to their original colors.
![]() Type a new name for the color theme.
Type a new name for the color theme.
![]() Click Save.
Click Save.
![]() To apply theme colors to a presentation, click the Theme Colors button, and then click a color theme.
To apply theme colors to a presentation, click the Theme Colors button, and then click a color theme.
![]() Select a text box.
Select a text box.
![]() Click the Font Color button on the Home tab, and then click More Colors.
Click the Font Color button on the Home tab, and then click More Colors.
This is one method. You can also use other color menus to access the Colors dialog box.
![]() Click the Custom tab.
Click the Custom tab.
![]() Click the Color model list arrow, and then click RGB or HSL.
Click the Color model list arrow, and then click RGB or HSL.
![]() Select a custom color using one of the following methods:
Select a custom color using one of the following methods:
![]() If you know the color values, enter them, either Hue, Sat, Lum, or Red, Green, and Blue.
If you know the color values, enter them, either Hue, Sat, Lum, or Red, Green, and Blue.
![]() Drag across the palette until the pointer is over the color you want. Drag the black arrow to adjust the amount of black and white in the color.
Drag across the palette until the pointer is over the color you want. Drag the black arrow to adjust the amount of black and white in the color.
The new color appears above the current color at the bottom right.
![]() Click OK.
Click OK.
Did You Know?
You can edit a custom color theme.
On the Design tab, click the Theme Colors button, right-click the custom color theme you want to edit, click Edit, make changes, and then click Save.
You can delete a custom color theme.
On the Design tab, click the Theme Colors button, right-click the custom color theme you want to delete, click Delete, and then click Yes.
Choosing Theme Fonts
A presentation theme consists of theme colors, fonts, and effects. Theme fonts include heading and body text fonts. Each presentation uses a set of theme fonts. When you click the Theme Fonts button on the Design tab, the name of the current heading and body text font appear highlighted in the gallery menu. You can apply a set of theme fonts to another theme or create your own set of theme fonts.
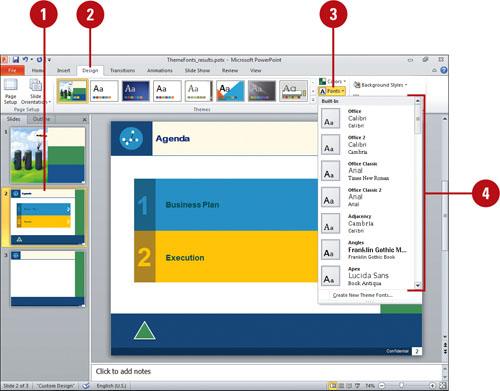
View and Apply Theme Fonts
![]() Select the slide with the slide master you want to change.
Select the slide with the slide master you want to change.
![]() Click the Design tab.
Click the Design tab.
![]() Click the Theme Fonts button.
Click the Theme Fonts button.
The current theme fonts appear highlighted in the menu.
TIMESAVER Point to the Fonts button to display a ScreenTip with the current theme fonts.
![]() Click the theme fonts you want from the gallery menu.
Click the theme fonts you want from the gallery menu.
![]() To apply the theme fonts to matching slides or all slides, right-click the theme fonts name on the menu, and then click the option you want.
To apply the theme fonts to matching slides or all slides, right-click the theme fonts name on the menu, and then click the option you want.
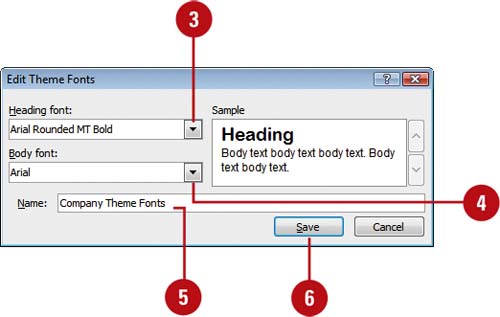
Create Theme Fonts
![]() Click the Design tab.
Click the Design tab.
![]() Click the Theme Fonts button, and then click Create New Theme Fonts.
Click the Theme Fonts button, and then click Create New Theme Fonts.
![]() Click the Heading font list arrow, and then select a font.
Click the Heading font list arrow, and then select a font.
![]() Click the Body font list arrow, and then select a font.
Click the Body font list arrow, and then select a font.
![]() Type a name for the custom theme fonts.
Type a name for the custom theme fonts.
![]() Click Save.
Click Save.
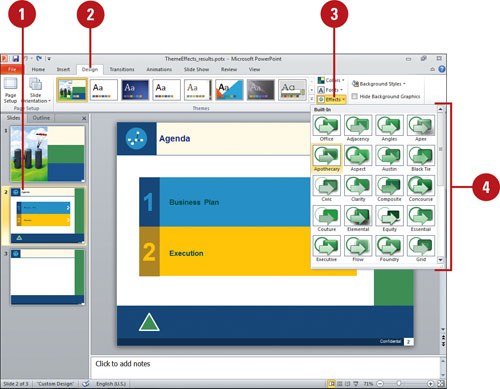
Choosing Theme Effects
A presentation theme consists of theme colors, fonts, and effects. Theme effects are sets of lines, fills, and special effects styles for shapes, graphics, charts, SmartArt, and other design elements. By combining the lines, fills, and special effects styles with different formatting levels (subtle, moderate, and intense), PowerPoint provides a variety of visual theme effects. Each presentation uses a set of theme effects. Some are more basic while others are more elaborate. When you click the Theme Effects button on the Design tab, the name of the current theme effects appears highlighted in the gallery menu. While you can apply a set of theme effects to another theme, you cannot create your own set of theme effects at this time.
View and Apply Theme Effects
![]() Select the slide with the slide master you want to change.
Select the slide with the slide master you want to change.
![]() Click the Design tab.
Click the Design tab.
![]() Click the Theme Effects button.
Click the Theme Effects button.
The current theme effects appear highlighted in the menu.
TIMESAVER Point to the Effects button to display a ScreenTip with the current theme effects name.
![]() Click the theme effects you want from the menu.
Click the theme effects you want from the menu.
![]() To apply the theme effects to matching slides or all slides, right-click the theme effects name on the menu, and then click the option you want.
To apply the theme effects to matching slides or all slides, right-click the theme effects name on the menu, and then click the option you want.
Did You Know?
You can edit or delete a custom theme fonts. On the Design tab, click the Theme Fonts button, and then right-click the theme you want to edit or delete. To edit it, click Edit, change it, and then click Save. To delete it, click Delete, and then click Yes.
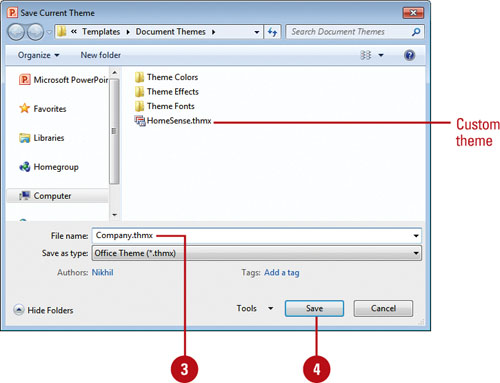
Creating a Custom Theme
If you have special needs for specific colors, fonts, and effects, such as a company sales or marketing presentation, you can create your own theme by customizing theme colors, theme fonts, and theme effects, and saving them as a theme file (.thmx), which you can reuse. You can apply the saved theme to other presentations and slides. When you save a custom theme, the file is automatically saved in the Document Themes folder and added to the list of custom themes used by PowerPoint and other Office programs. When you no longer need a custom theme, you can delete it.
Create a Custom Theme
![]() Click the Design tab, and then create a theme by customizing theme colors, theme fonts, and theme effects.
Click the Design tab, and then create a theme by customizing theme colors, theme fonts, and theme effects.
![]() Click the More list arrow in the Themes gallery, and then click Save Current Theme.
Click the More list arrow in the Themes gallery, and then click Save Current Theme.
The Save Current Theme dialog box opens, displaying the Document Themes folder, which is the default for Office programs.
![]() Type a name for the theme file.
Type a name for the theme file.
![]() Click Save.
Click Save.
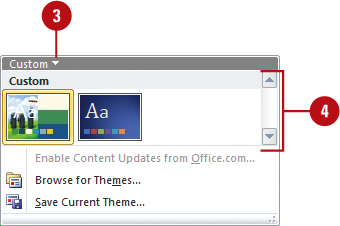
Choose a Custom Theme
![]() Click the Design tab.
Click the Design tab.
![]() Click the scroll up or down arrow, or click the More list arrow in the Themes gallery to see additional themes.
Click the scroll up or down arrow, or click the More list arrow in the Themes gallery to see additional themes.
![]() To display only the custom themes on the gallery, click the title bar for the gallery, and then click Custom.
To display only the custom themes on the gallery, click the title bar for the gallery, and then click Custom.
![]() Point to the gallery you want to display the theme name, and then click the one you want.
Point to the gallery you want to display the theme name, and then click the one you want.
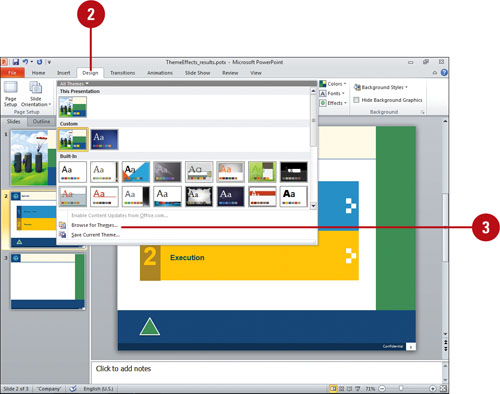
Apply a Custom Theme From a File
![]() Select the slide with the slide master you want to change.
Select the slide with the slide master you want to change.
![]() Click the Design tab.
Click the Design tab.
![]() Click the More list arrow in the Themes gallery, and then click Browse for Themes.
Click the More list arrow in the Themes gallery, and then click Browse for Themes.
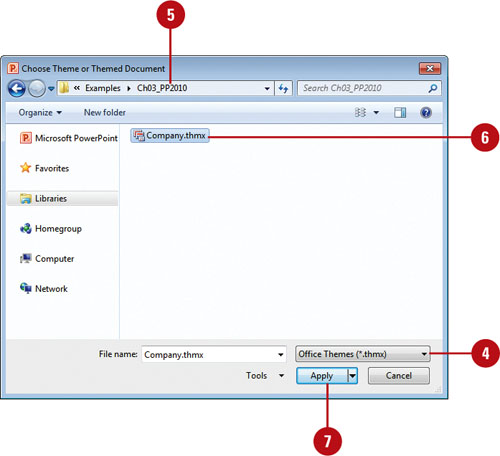
![]() If you want to open a specific file type, click the Files of type list arrow, and then click a file type.
If you want to open a specific file type, click the Files of type list arrow, and then click a file type.
![]() Office Themes and Themed Documents.
Office Themes and Themed Documents.
![]() Office Themes.
Office Themes.
![]() Office Themes and PowerPoint Templates.
Office Themes and PowerPoint Templates.
![]() If the file is located in another folder, click the Look in list arrow, and then navigate to the file.
If the file is located in another folder, click the Look in list arrow, and then navigate to the file.
![]() Click the theme file you want.
Click the theme file you want.
![]() Click Apply.
Click Apply.
Did You Know?
You can remove a custom theme from the gallery menu. Simply move the theme file from the Document Themes folder into another folder.
See Also
See “Viewing and Applying a Theme” on page 96 for information on applying a theme from the Themes gallery.
Adding Colors to a Presentation
In addition to the twelve color theme colors, PowerPoint allows you to add more colors to your presentation. These additional colors are available on each color button palette on the Ribbon or in a dialog box, such as the Font Color button. These colors are useful when you want to change the color of an object to a specific color, but the presentation color theme does not have that color. Colors that you add to a presentation appear in all color palettes and remain in the palette even if the color theme changes. PowerPoint “remembers” up to ten colors that you’ve added. If you add an eleventh, it appears first on the palette, replacing the oldest.
Add a Color to the Menus
![]() Click the object whose color you want to change, and then click the Format tab under Drawing Tools.
Click the object whose color you want to change, and then click the Format tab under Drawing Tools.
![]() Click the Shape Fill Color, Shape Outline Color, or Font Color button arrow on the Home or Format tabs to change an object’s color.
Click the Shape Fill Color, Shape Outline Color, or Font Color button arrow on the Home or Format tabs to change an object’s color.
![]() Click More Fill Colors, More Outline Colors, or More Colors, and then select a color from the Standard or Custom tab.
Click More Fill Colors, More Outline Colors, or More Colors, and then select a color from the Standard or Custom tab.
![]() To select a custom color, drag across the palette until the pointer is over the color you want, or choose a Color Model, and then enter the Hue, Sat, Lum, or Red, Green, and Blue values.
To select a custom color, drag across the palette until the pointer is over the color you want, or choose a Color Model, and then enter the Hue, Sat, Lum, or Red, Green, and Blue values.
![]() Click OK.
Click OK.
The current selection is changed to the new color, plus the new color is added to the Recent Colors section of the menu and is now available to use throughout the presentation.

Adding a Background Style
In PowerPoint, you can add a background style to your presentation. A background style is a background fill made up of different combinations of theme colors. When you change a presentation theme, the background styles change to reflect the new theme colors and backgrounds. To quickly see if you like a background style, you can point to one in the Background Styles gallery to display a live preview of it with the current slide. If you like it, you can apply it.
Add a Background Style
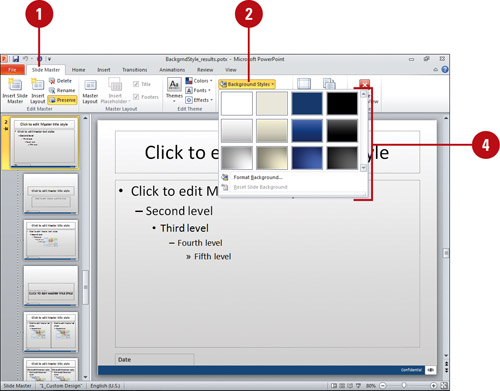
![]() Click the Design tab to change the background of the selected slide, or click the View tab, and then click the Slide Master View tab to change the background of the selected slide master or slide layout.
Click the Design tab to change the background of the selected slide, or click the View tab, and then click the Slide Master View tab to change the background of the selected slide master or slide layout.
![]() Click the Background Styles button.
Click the Background Styles button.
The current style appears highlighted in the gallery.
![]() Point to a style.
Point to a style.
A live preview of the style appears in the current slide, and a ScreenTip with the style name.
![]() Click the style you want from the gallery to apply it to the selected slide, slide master (and all its slides), or slide layout.
Click the style you want from the gallery to apply it to the selected slide, slide master (and all its slides), or slide layout.
![]() To apply the style to matching slides, all slides, selected slides, or slide master, right-click the style from the gallery, and then click the option you want.
To apply the style to matching slides, all slides, selected slides, or slide master, right-click the style from the gallery, and then click the option you want.
Did You Know?
You can reset the slide background.
Click the Design tab, click the Background Styles button, and then click Reset Slide Background.
Modifying a Background Style
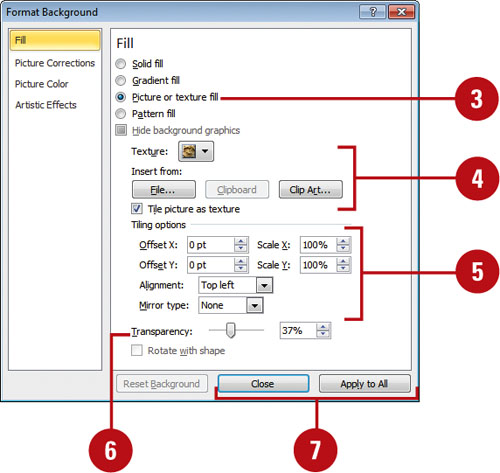
In PowerPoint, you can create a background style by adding a solid, a gradient, a texture, a pattern, or even a picture. A gradient background is a visual effect in which a solid color gradually changes from light to dark or dark to light. PowerPoint offers one-color and two-color gradient backgrounds with six styles: horizontal, vertical, diagonal up, diagonal down, from corner, and from title. For a one-color gradient background, the shading color can be adjusted lighter or darker, depending on your needs. You can also choose one of 24 professionally designed backgrounds in which the color gradient changes direction according to the shading style selected. In addition to a shaded background, you can also have a background with a texture, a pattern, or a picture. PowerPoint has several different textures, patterns, and pictures that you can apply to a presentation.
Create a Picture or Texture Background Style
![]() Click the Design tab to change the selected slide background, or click the View tab, and then click the Slide Master View tab to change the selected slide master or slide layout background.
Click the Design tab to change the selected slide background, or click the View tab, and then click the Slide Master View tab to change the selected slide master or slide layout background.
![]() Click the Background Styles button, and then click Format Background.
Click the Background Styles button, and then click Format Background.
![]() Click the Picture or texture fill option to display the available fill effects.
Click the Picture or texture fill option to display the available fill effects.
![]() Click the Texture button, and select a texture, or click File, Clipboard, or ClipArt, and select a picture.
Click the Texture button, and select a texture, or click File, Clipboard, or ClipArt, and select a picture.
![]() To tile the background, select the Tile picture as texture check box, and then specify the offset x and y, scale x and y, alignment, and mirror type you want. If you clear the check box, specify the stretch background options you want.
To tile the background, select the Tile picture as texture check box, and then specify the offset x and y, scale x and y, alignment, and mirror type you want. If you clear the check box, specify the stretch background options you want.
![]() Drag the Transparency slider to specify a percentage.
Drag the Transparency slider to specify a percentage.
![]() Click Apply to All to apply the fill effect to all slides, or click Close to apply only to the selected slide or slide master.
Click Apply to All to apply the fill effect to all slides, or click Close to apply only to the selected slide or slide master.
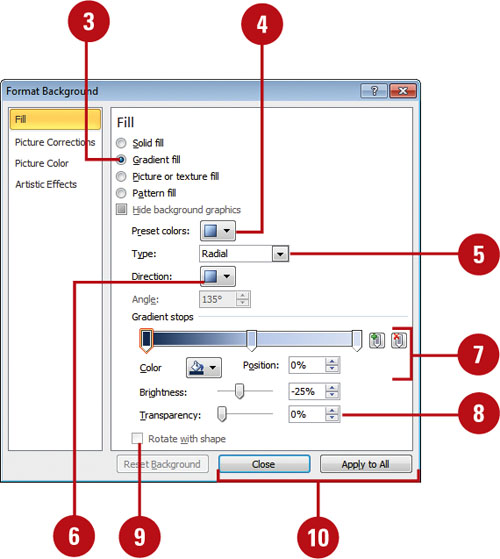
Create a Gradient Background Style
![]() Click the Design tab to change the selected slide background, or click the View tab, and then click the Slide Master View tab to change the selected slide master or slide layout background.
Click the Design tab to change the selected slide background, or click the View tab, and then click the Slide Master View tab to change the selected slide master or slide layout background.
![]() Click the Background Styles button, and then click Format Background.
Click the Background Styles button, and then click Format Background.
![]() Click the Gradient fill option to display the available fill effects.
Click the Gradient fill option to display the available fill effects.
![]() Click the Preset Colors button, and then select a color style.
Click the Preset Colors button, and then select a color style.
![]() Click the Type list arrow, and then click a type: Linear, Radial, Rectangle, or Path.
Click the Type list arrow, and then click a type: Linear, Radial, Rectangle, or Path.
![]() Click the Direction list arrow, select a direction, and then specify an angle.
Click the Direction list arrow, select a direction, and then specify an angle.
![]() Add or remove gradient stops, select a color, and then drag the Stop position slider to specify a percentage.
Add or remove gradient stops, select a color, and then drag the Stop position slider to specify a percentage.
![]() Drag the Transparency slider to specify a percentage.
Drag the Transparency slider to specify a percentage.
![]() Select or clear the Rotate with shape check boxes as desired.
Select or clear the Rotate with shape check boxes as desired.
![]() Click Apply to All to apply the fill effect to all slides, or click Close to apply only to the selected slide or slide master.
Click Apply to All to apply the fill effect to all slides, or click Close to apply only to the selected slide or slide master.
Did You Know?
You can create a solid fill background style. Click the Design tab, click the Background Styles button, click Format Background, click the Solid fill option, select a color, specify a color transparency, and then click Apply to All.
Saving a Template
A template file (.potx) saves all the customizations you made to slide masters, slide layouts, and themes to reuse in other presentations. You can save any presentation as a template file and use it to form the basis of your next presentation, which is useful for standard company presentations. Although you can store your template anywhere you want, you may find it handy to store it in the Templates folder that PowerPoint and Microsoft Office uses to store its templates. If you store your design templates in the Templates folder, those templates appear as options when you choose the New command on the File tab, and then click My Templates.
Create a Custom Template
![]() Open any presentation.
Open any presentation.
![]() If you want, create and customize one or more slide masters or slide layouts.
If you want, create and customize one or more slide masters or slide layouts.
![]() Format the placeholders on the slide masters and slide layouts.
Format the placeholders on the slide masters and slide layouts.
![]() Place objects or insert pictures on the slide masters and slide layouts.
Place objects or insert pictures on the slide masters and slide layouts.
![]() Add the footer and header information you want to include.
Add the footer and header information you want to include.
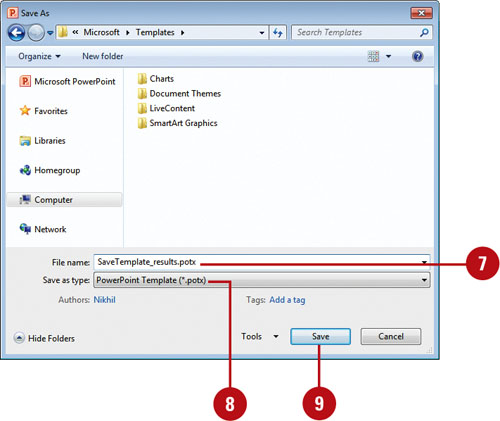
![]() Click the File tab, and then click Save As.
Click the File tab, and then click Save As.
![]() Enter a name for your template.
Enter a name for your template.
![]() Click the Save as type list arrow, and then click PowerPoint Template.
Click the Save as type list arrow, and then click PowerPoint Template.
Microsoft Office templates are typically stored in the following location:
Windows 7 or Vista. C:/Users/your name/AppData/Roaming/Microsoft/Templates
Windows XP. C:/Documents and Settings/your name/Application Data/Microsoft/Templates
![]() Click Save.
Click Save.
Change an Existing Design Template
![]() Click the File tab, and then click Open.
Click the File tab, and then click Open.
![]() Click the Files of type list arrow, and then click PowerPoint Template.
Click the Files of type list arrow, and then click PowerPoint Template.
![]() If necessary, click the Look in list arrow, and then select the folder containing the template you want to open.
If necessary, click the Look in list arrow, and then select the folder containing the template you want to open.
Microsoft Office templates are typically stored in the following location:
Windows 7 or Vista. C:/Users/your name/AppData/Roaming/Microsoft/Templates
Windows XP. C:/Documents and Settings/your name/Application Data/Microsoft/Templates
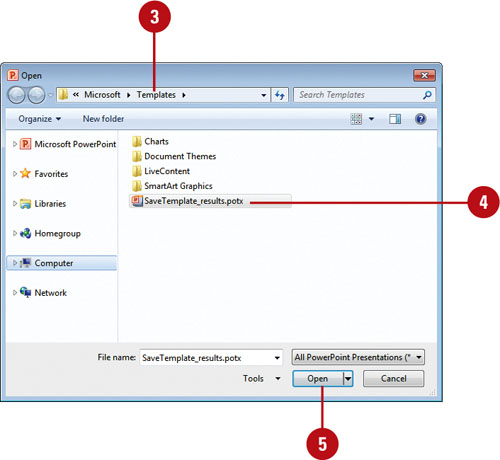
![]() Click the template you want to change.
Click the template you want to change.
![]() Click Open.
Click Open.
![]() Make your changes to the template.
Make your changes to the template.
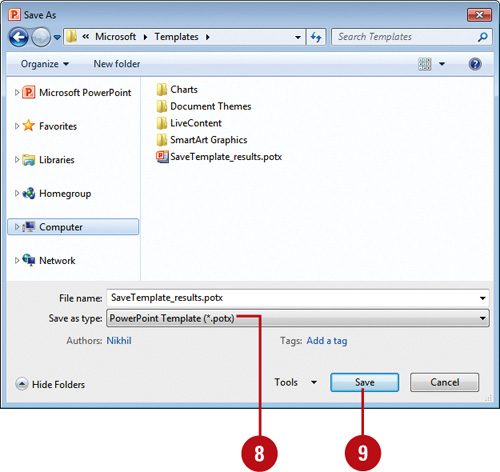
![]() Click the File tab, and then click Save As.
Click the File tab, and then click Save As.
![]() Click the Save as type list arrow, and then click PowerPoint Template.
Click the Save as type list arrow, and then click PowerPoint Template.
![]() Click Save.
Click Save.
![]() Click Yes to replace the existing file.
Click Yes to replace the existing file.