Chapter Three. More Tips on Using Your Studio Like a Pro: In Volume 3, We Took It Up a Notch. Now, Let’s Do It Again!
SHUTTER SPEED: 1/1600 SEC F-STOP: F/2.8 ISO: 500 FOCAL LENGTH: 70MM PHOTOGRAPHER: SCOTT KELBY

If anybody had told me that, in this series of books, I would have three chapters dedicated to studio lighting, I would have told them that they needed to see a physicist. Now, you probably just read the last part of that line as “they needed to see a psychiatrist” (rather than a physicist, which is what I actually wrote) and that’s probably because the human brain is pre-programmed to mentally insert words into sentences that reveal what we think we really need (a psychiatrist), rather than what I think you need (which is a really large softbox). For example, on some subliminal level, you must have repressed feelings of triggering inadequacies, but that’s only because you have an unconscious desire to buy multiple wireless flash transmitters, which most likely stems from the fact that when you were a child your parents obviously denied you the right to assign your strobes to different groups and channels. This is surprisingly common these days, so I don’t want you to think on any level that (a) you understand what all this is about, or (b) that I have any idea what this is all about, because clearly I don’t know you well enough to be your therapist. But, I do know this: if you’re still reading this chapter intro, you definitely need the professional help of a physicist. See, you did it again, you thought I said “psychiatrist.” Maybe we should move straight to a word association exercise, which I think may reveal a lot about your inner psyche. When I say a word, you say the first word that pops into your head. Ready? Pizza. “20° round grid.” Salad bowl. “Beauty dish.” Wide-screen TV. “Strip bank!” Savings & Loan. “Octabank!” Hmmmm...I dunno, these seem pretty normal to me. But let’s try one more just to be sure. Declaration of Independence. “Seamless paper.” Yup, you’re fine. Now tell me about your mother....
The Pro Trick for Creating Falloff
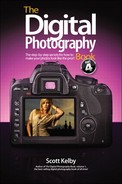
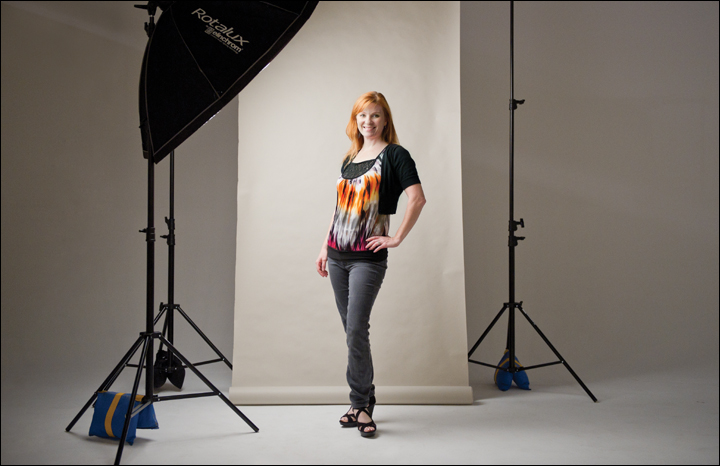
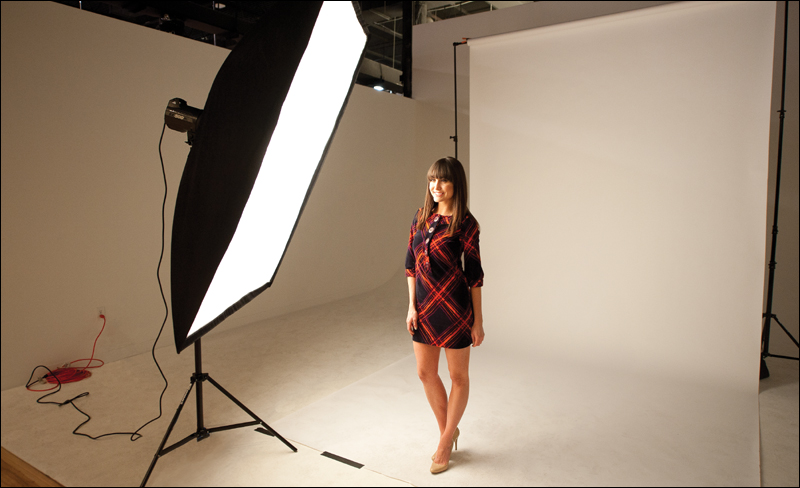
As you probably learned in one of the other books in this series, the human eye is drawn to the brightest thing in the image, and in portraits of people, the brightest thing should generally be their face, right? The problem is that your softbox doesn’t know that, and it will light their face, shoulders, chest, stomach, and so on, all with pretty much the same brightness. So, what we need to create is falloff, where the light literally falls off in brightness, so their face is the brightest thing in the image, then their shoulders are a little less bright, then it gets darker and darker as it moves down their body (unless you’re shooting fashion, where the clothes they’re wearing are equally as important, and maybe more so, as the person’s face). An easy way to create this falloff is to block the bottom ¼ to ⅓ of the soft box. You can do this with anything from a large black piece of posterboard you buy at any craft store to a photographic flag (I use the ones from Matthews, which can easily mount on a boom stand). You just put it in front of the bottom of the light (as shown here) to cut the spread of the light and create that falloff. (Note: You’ll also hear a photographic flag referred to as a “gobo,” which is a Hollywood movie lighting term that is short for “go between,” as in you’ve put something between the light and your subject.) By the way, one of the biggest mistakes people new to studio lighting make is to light everything evenly or to over-light the subject, so by creating this simple falloff, your shots will already look more professional.
Getting a Different Look Without Moving the Lights

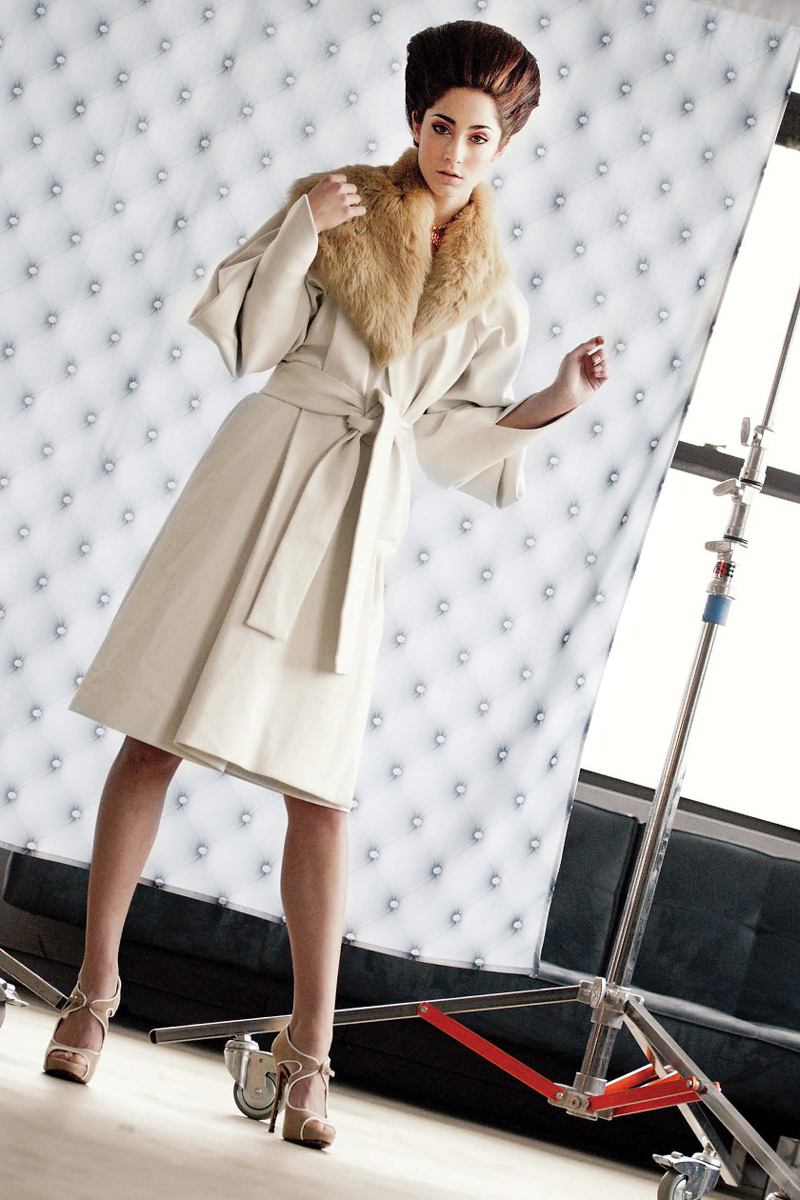
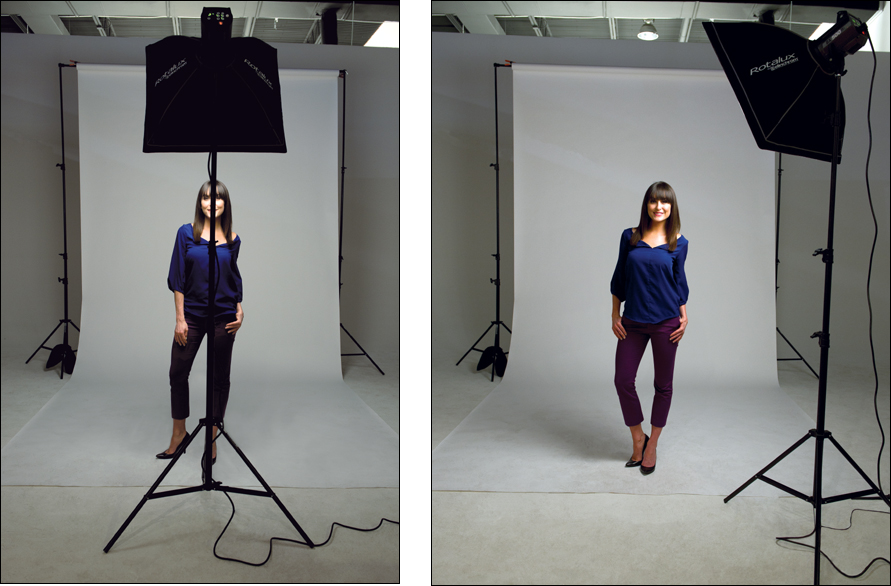
Once you’ve got your lights in place and you’ve got that first shot in the bag, try this: Don’t move the lights. Don’t move your subject. Instead, leave everything as is and move the photographer (kudos to Jeremy Cowart for this tip). If you were standing right in front of the subject, just move way over to one side or the other and take the shot again. You’ll be amazed at how moving two or three feet in either direction can completely change the look of the lighting, even if you haven’t touched a single light. Give this a try and you’ll wind up with two or three lighting looks out of just one lighting setup.
Using Lens Flare as an Effect in the Studio
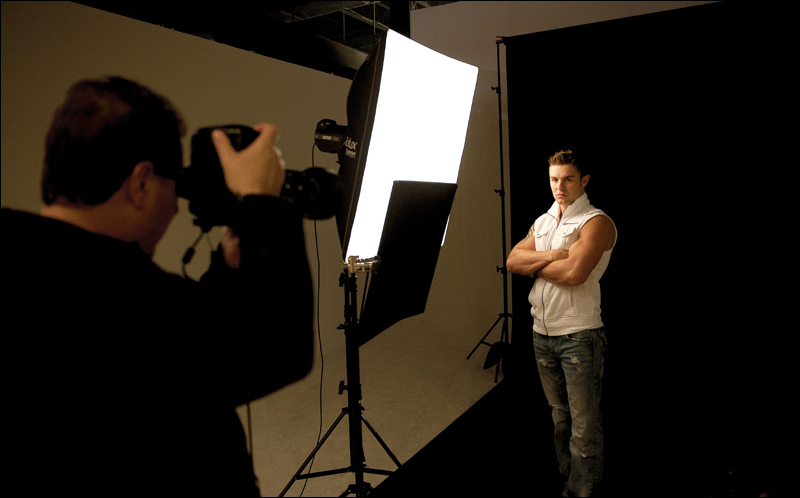
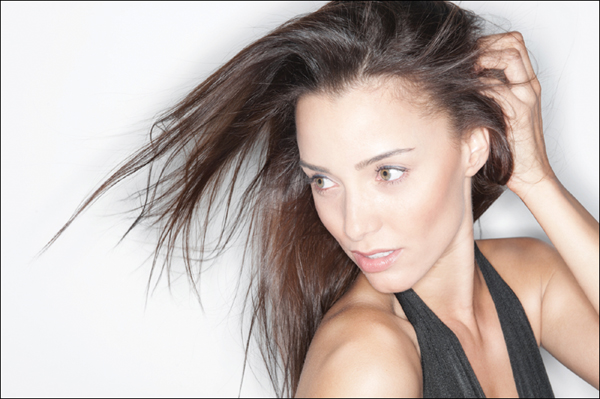
The blown-out, lens-flare look is really hot right now (it’s that look where your image is intentionally overexposed and has a large lens flare visible in the shot). Luckily for us, it’s fairly easy to nail this look—there are just a couple of tricks you need to know. The first is to take your lens hood off your camera. One of the reasons why we have a lens hood on in the first place is to eliminate lens flare, so we surely don’t want that on our camera, eliminating the thing we actually want. Secondly, you’re going to need a light behind your subject, and then you’ll need to shoot from an angle that allows the beam from that back light to hit the face of your lens to some extent. (Note: If you have a fabric egg-crate grid on your softbox, or a metal grid on your strobe, make sure you take it off, because besides just focusing the beam, those grids actually help eliminate lens flare, so in this one case, they’re working against you.) The key is finding the right position for your camera to maximize the effect coming from your strobe in the back, so it might take a few tries to get it to look right. By the way, today’s higher-end lenses often have a special nano-coating on them designed to eliminate lens flare, so if you’re struggling to get this look, try using one of your older lenses and that should do the trick.
How Far Should Your Subject Be from the Background?

As a general rule, I try to put my subject about 8 to 10 feet from the background (unless I’m using my main light to light the background). Here’s why: by keeping them far away from the background, you avoid your front light spilling onto the background. That spillover generally looks pretty bad, and a lot of times it’s not real obvious what the problem is—your photo just doesn’t look right—so it’s best to avoid that problem altogether. Another advantage of keeping that distance between your subject and the background is this: if you do want to use a separate background light, the two lights will be very distinct in the final image (it won’t all mush together), which will help create the separation and depth you want by lighting the background separately. One last advantage is you won’t have to worry about your subject’s shadow falling onto the background, and if your subject is far enough away from the background like this, you can have your white seamless paper turn black (if no light is hitting it at all, it’ll go just about solid black, because it’s that far away from the front light). Now, what if you’re shooting in a tight space and you can’t get your subject 8 to 10 feet from the background? In that case, move your main light in really close to your subject. As you move it in closer, the main light gets brighter (and the light falls off to black much faster), and you’ll have to change your aperture, so your subject doesn’t look like you just tossed a lighting grenade in their face. So, if you were at f/8, change it to maybe f/11 or f/14, and the front light won’t affect your background very much, if at all.
Let Your Main Light Do Double Duty
I always talk about how much you can get out of one light, and if you only have one light, you can have it pull double duty by having it light your background, as well. The trick is to move your main light close enough to the background so that it actually lights it for you. I do this a lot when I’m shooting on a white seamless paper background. If you don’t put a lot of light on the white paper, it looks dark gray in your photo. If I’m shooting fashion, I generally like a light gray, so to get that dark gray to turn to light gray, I just move my main light closer to the background and the spill from it winds up lighting the background quite a bit. Just be sure to position your light up high and have it aim down at your subject. That way, your subject’s shadow will appear near the floor, instead of casting on the background. It’s a handy tip to keep in mind when you’re using just one light.
Rim-Light Profile Silhouettes Made Easy
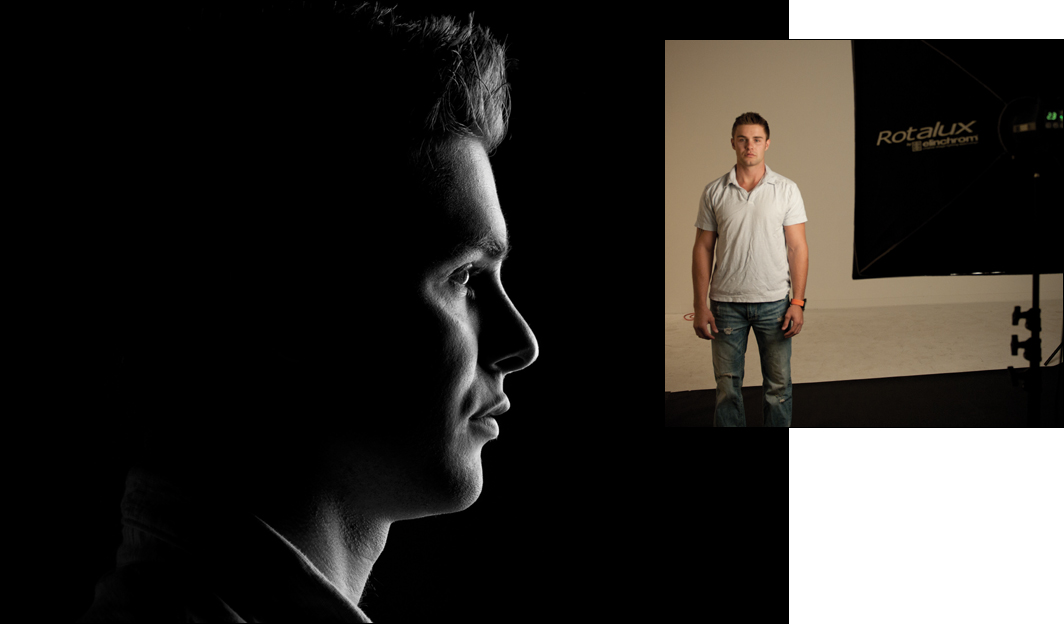
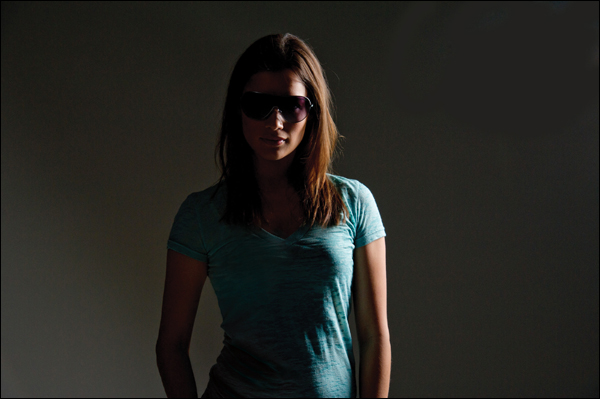
This is one of those super-quick, 30-second tricks that have a big impact. First, aim your softbox sideways and have your subject stand directly in front of the center of it (facing your camera). Now, have them turn sideways toward the softbox, so they’re facing it directly. Next, have your subject take a step or two sideways, closer to you (while you’re at your camera position). Have them step sideways toward you until they have actually moved past the edge of the softbox (so there’s no softbox in front of them at all. It’s actually a foot or so behind them, from your vantage point at the camera). Now take your shot. What you’ll get is a strong rim light all the way around the profile of your subject, and the rest will appear as a black silhouette. If you want a little light to appear on the cheek facing the camera, have them move just a few inches back toward the light until you see that cheek lit just a tiny bit (this is where the modeling light comes in handy, because you can see a preview of how the light will fall).
Using a Ring Flash
Part of the ring flash look is that you clearly see the black halo shadow it creates around your subject, but if you don’t have your subject really close to your background (which breaks all of our other background rules), you won’t see that halo. So, when you’re shooting with a ring flash, the trick is to get your subject just a few inches from the background and that black halo shadow will appear (as seen above).
Use Almost Any Softbox You Want with Your Brand of Strobe
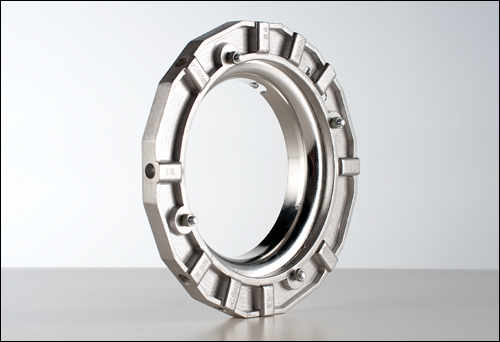
A lot of folks may not realize that if you have a particular brand of strobes, you don’t have to buy the same brand of softboxes. That’s because you can often buy an adapter that lets you use a different brand of softbox with your strobes. For example, F.J. Westcott sells adapters, so you can use Westcott softboxes with just about any strobe brand out there, and they’re in the $30 range. If you have Profoto strobes, but want to use softboxes made by Elinchrom, you can buy an adapter ring from Elinchrom that lets you do just that. So, in short, you can probably use just about any softbox brand you want, with just about any strobe you want—you’re just an adapter away.
When It Comes to Softboxes, Bigger Really Is Better
If I could give you just one tip about getting really beautiful light, it would be this: use the biggest softbox you can. Really big softboxes have gotten so popular lately because the bigger the softbox, the better the light, and today’s lighting manufacturers have embraced this big time, so we have lots of choices. So, how big is big enough? My most-used softbox is an Elinchrom Rotalux 53" Midi Octa, because it’s pretty big, but not so big that it dominates the room if I have to take it on location (which I often do). If you have a really high ceiling, you might look at something like the Elinchrom 74" Octa Light Bank (which is amazing!), but you don’t have to spend a fortune to have a huge softbox these days. F.J. Westcott just introduced a series of huge 7’ parabolic umbrellas—you can either fire a strobe into them (and the light gets huge and travels back toward your subject) or you can buy their shoot-through parabolic, where your flash fires through the umbrella (rather than reflecting off it). These are pretty darn affordable (well, in the context of lighting, anyway) at right around $100. If you want a more traditional softbox (the light is easier to control with softboxes versus umbrellas, so I tend to use them more often), then check out Westcott’s 54×72" shallow softbox (it’s huge and totally gorgeous and costs around $329). Are you seeing a pattern here? Yup. Big softboxes rule, and it makes getting beautiful portraits that much easier, and anything that makes getting great shots easier gets my vote.
What to Do When You Can’t Turn Your Strobe Power Down Any Further
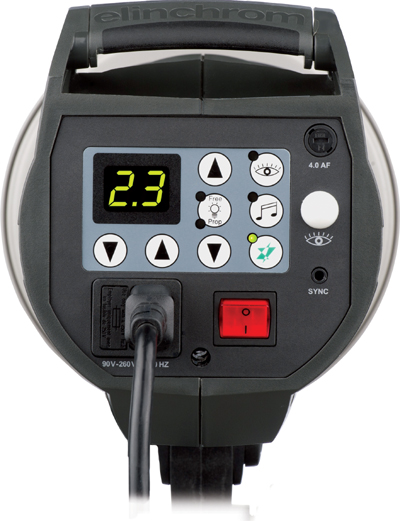
I mentioned on the previous page that the bigger the softbox, the softer and more beautiful the light. But what if you want even softer light? Well, the trick is to move that light as close as possible to your subject (without it actually appearing in the frame), because the closer the light, the bigger it becomes, which makes it even softer and more beautiful. One other thing happens when you move a light in this close: it gets much brighter (which makes sense, right? You move a light closer to something, and it gets brighter). So, as you move the light closer to your subject, you’ll need to lower the power of your strobe so it’s not so bright, right? Right. Now, what happens when you’ve lowered the power of your strobe as low as it can go (which is 2.3 on the BXRi 500 shown above), and it’s still too bright (this happens to me quite often, because I usually position my softboxes very close to my subject)? When this happens to you, here’s exactly what to do: raise your f-stop. That’s right. If you were at f/8, raise it to f/11. If you started at f/11, raise it to f/14. This cuts the amount of light falling on your subject, so you get the best of both worlds—you’re still getting super-soft light by moving it close to your subject, but you’re not blowing them out with too much light because it’s so close. You might even need to increase your f-stop by two stops or more, but if that’s the case, don’t sweat it—just do it.
How to Light a Couple or Small Group
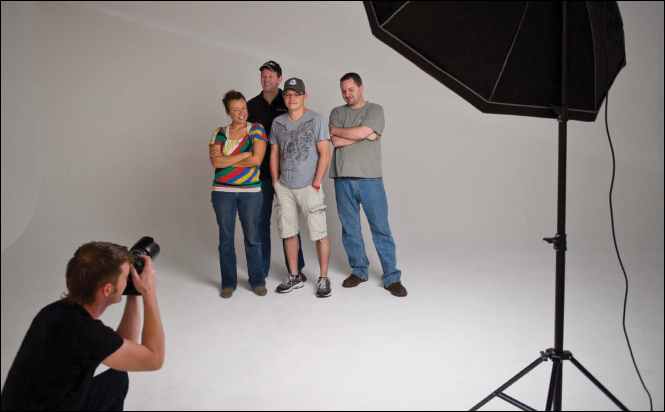
Lighting a couple or a small group is surprisingly easy, and you can do it with just one light and a large softbox, as long as you follow one simple rule: pull the light back fairly far from your subjects. If the light is too close, the person closest to the light will be brighter than the person standing next to them, and so on. Your goal is to have consistent, balanced light throughout the group, and the trick to that is to move your light way back. That way, the light pretty much hits the group at the same intensity, and the light looks balanced (just remember that moving the light farther away from your subjects makes the light darker, so you’ll have to crank up the power on your strobe to make up for that). Another helpful tip is to position the light fairly near the camera position (not way off to the side) or you’ll have shadows casting across people in the group. You will want the light off to the side a bit, just not way off to the side. You can even position the softbox directly behind you as you shoot (if your head sticks up a little in front of it, don’t sweat it), and that will do the trick, too. (Note: If you’re thinking, “Hey, won’t moving the softbox back farther make the subjects smaller in relation to the size of the softbox, so the light won’t be as soft?” you’re right, which is why you want to use a very large softbox for shooting groups. That way, when you move it far away, it’s still big, so the light is still soft.)
The Trick to Staying Out of Trouble
When I see photographers who are new to studio lighting really struggling, it’s generally when they’re using multiple lights and something looks wrong, but they don’t know exactly what’s wrong—but it’s definitely something. No matter where they move the lights, it just gets worse. This is generally because they put the lights in position and turn them all on. This is a recipe for disaster. The trick to staying out of trouble is this: only turn on one light at a time. Get the brightness right (the power setting), get the light properly aimed, and get the position right. Once that one light looks right (here’s the secret) turn off that light. Now, turn on another light (maybe a back light). Get just that one looking right (while no other lights are turned on), then once it looks good, turn that one off. If you’re using a third light, turn only it on, and get it right. Now, turn them back on, one by one, starting with the back light. As you add a light, pause and take a look at how things look. Take a test shot with just the back light on, or just a hair light, or both, and see how it looks. If it doesn’t look good by itself, turning on a bunch of other lights surely won’t help. The secret to success with multiple lights is to get each individual light looking good by itself. That way, when you finally turn them all on, they will complement each other and work together, rather than just throwing a bunch of random lights everywhere. It takes a few more seconds up front to set each light and position it individually, but it will save you loads of frustration and aggravation along the way, plus you’ll wind up with better lit photos, guaranteed.
Where to Put Your Softbox Demystified, Part I
When I was on the road with my Light It. Shoot It. Retouch It. LIVE! seminar tour, one of the most-asked questions was “Where do I put my main light?” People were really confused and apprehensive about it, and if you’ve ever felt like this, I’ve got good news for you (and it’s something you’ve probably never heard before). First, you already know that your strobe will be up high on a light stand, aiming down at an angle (kind of like the sun aims down on us). With that in mind, the secret is that there are basically two places your front main light goes: either (a) directly in front of your subject, or (b) at around a 45° angle to them. Are there other places you can put it? Absolutely. Where do most pros wind up putting it, no matter whether they are in the studio or on location? In front or at around a 45° angle (by the way, more often than not, it’s at around a 45° angle). Pick up any book on lighting, check out all the diagrams, and see for yourself—diagram after diagram will bear this out. No matter how intricate the set they’re shooting on, no matter how many lights they have in the back or how they’re lighting the background, their front light is almost always in one of these two places. Now, if they have a light behind their subject, guess where it winds up most of the time. (Wait for it...wait for it....) Either directly behind their subject, or behind them at a 45° angle. I know you were hoping it was more complicated than that, but it is what it is. So, the next time you’re sweating about where to put your main light, if you put your light either directly in front of your subject, or at a 45° angle to them, just know—everybody else is pretty much doing the same thing.
Where to Put Your Softbox Demystified, Part II
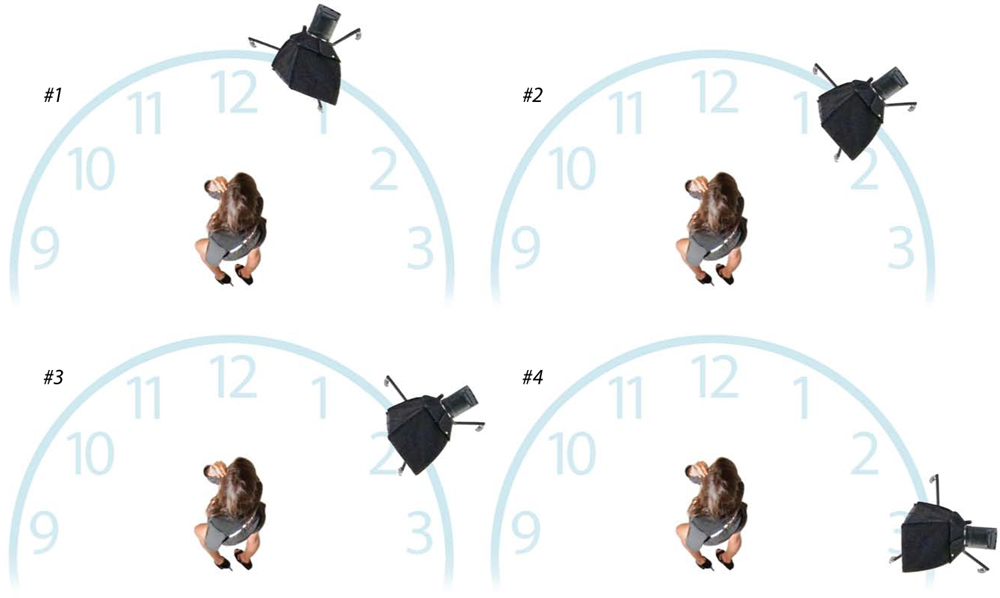
Okay, let’s say you chose the 45°-angle-to-your-subject lighting setup. Now what? Well, while that 45° angle is the right basic position, as you move your light even just a few inches in either direction, your lighting will change, so this is where you really massage your light to make it exactly what you want it to be. Picture an overhead view of your lighting setup and that the setup is the face of a clock, where your subject is in the center of the clock. The standard 45° angle is #2 above, but if you want more or fewer shadows on the opposite side of your subject’s face, then you just rotate the light “around the clock.” For example, the #1 position is more in front, and will light more of the face, so your subject will have fewer shadows on the far side of their face; #3 is more to the side, and they’ll have lots of shadows on the other side of their face; and #4 is literally lighting their side, and the other side of the face will be totally in shadow. Now, which of one these lighting setups is correct? The one you choose, because they’re all correct—they just have different amounts of shadows. When shooting a man, I tend to like #3 and #4. For a woman, I tend to like #1 and #2. But, I’ve used all four on both men and women, so it’s really up to you. Just remember this: in all four of my examples, the subject is facing forward. If you want more light to fall on their face for any of these positions, just have them angle toward the light (called “playing to the light”).
Let Lightroom Fix Your Color as You Shoot
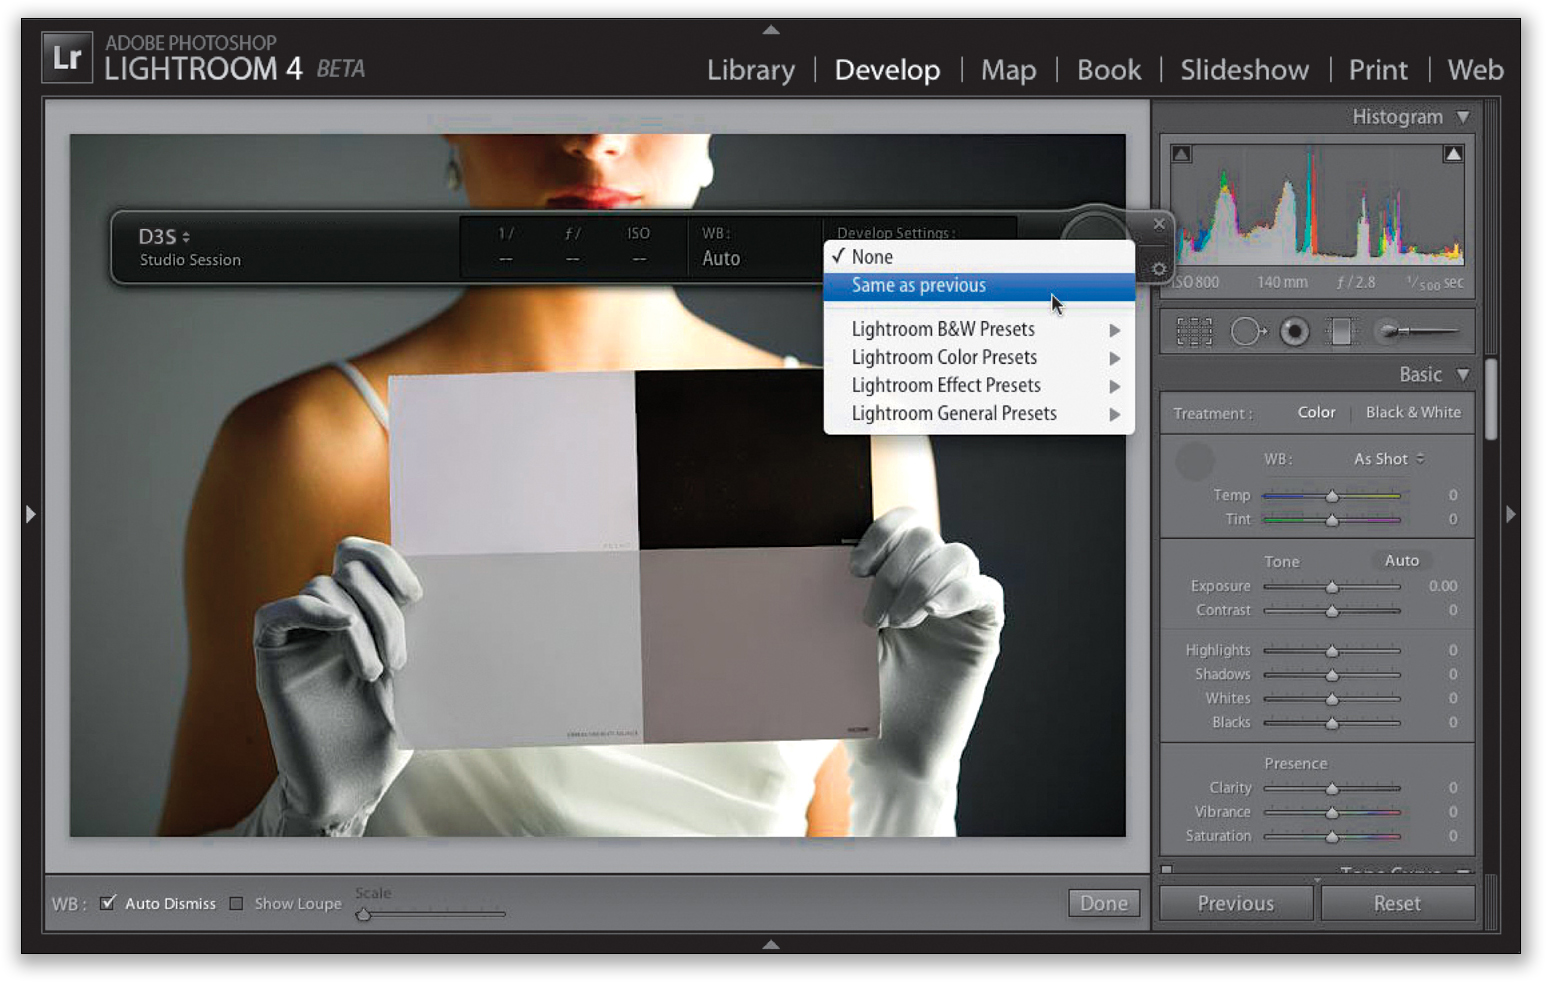
If you shoot tethered in Adobe’s Lightroom application (going straight from the camera, directly into your computer, so you can see the images appear at full-screen size on your monitor as you shoot), then you’ll love this trick, which lets you color correct one photo and has Lightroom’s tethering feature do the rest for you automatically. Start by handing your subject a gray card and ask them to hold it up near their face (you can buy a gray card at any photography store, or if you have my The Adobe Photoshop Lightroom Book for Digital Photographers or my The Adobe Photoshop Book for Digital Photographers, look in the back of the book—I’ve included a perforated gray card for you, so just tear it out and you’re ready to go). Once your subject is holding the card clearly in the frame, take a shot. Now, go to Lightroom’s Develop module, get the White Balance tool (it’s in the top-left corner of the Basic panel), and click it on the gray card. That sets the white balance for this one particular image (you’re almost there). Next, go to Lightroom’s Tethered Capture window (shown above), and from the Develop Settings pop-up menu, choose Same as Previous (also shown above). Now, when you take the next shot, it will automatically apply whatever you did to the previous photo. Well, you fixed the color (white balance) of the previous photo, so it will automatically do the same thing—it will fix the white balance for every photo as it appears. How handy is that? You only have to do this gray card trick again if you change the lighting pretty significantly.
How to Set a Custom White Balance In-Camera
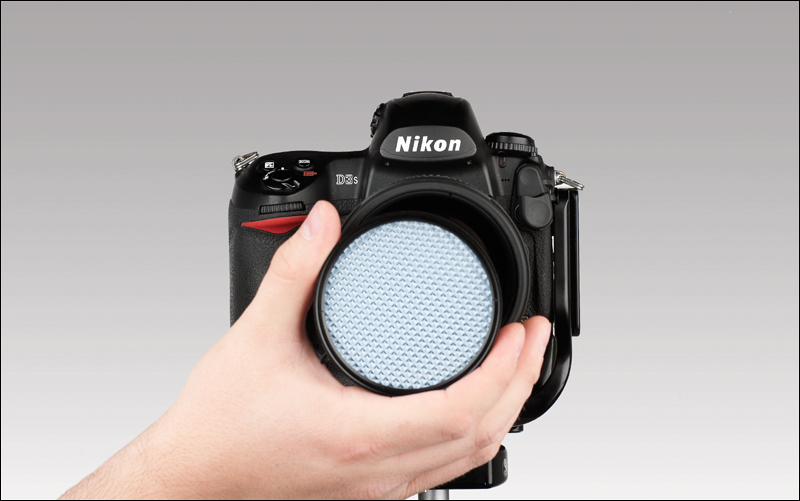
If you’d prefer to set a custom white balance in-camera (rather than having Lightroom correct your white balance for you, as shown on the previous page), I would recommend using something like an ExpoDisc, which is a white balance tool used by a lot of pro photographers. Here’s how it works: You start by putting the ExpoDisc over the end of your lens (it looks like a thick lens filter) and switching your lens to Manual focus (if you don’t, your camera might not let you actually take a shot). Then, aim it at the light source (not at your subject—aim it directly at the main softbox you’re using) and take a shot. Now, in your camera, you’re going to assign that image you just took as your white balance reference image. Here’s how: On Nikon DSLRs, before you take the shot, hold the WB button, then turn the dial until your White Balance is set to PRE, then release the WB button, and press it again until the letters “PRE” start blinking in your LCD panel on the top of your camera. That’s your cue to take your shot (you have 10 seconds to take it), so aim your camera at your softbox and fire off a shot. You should now see GOOD appear in the LCD panel. That’s it—your custom white balance is set (don’t forget to turn your lens back to Auto focus, though). On Canon DSLRs, put the ExpoDisc over the front of your lens, aim at your softbox, and take a shot. Now, press the Menu button on the back of your camera, scroll down to Custom WB, and press the Set button to bring up the next screen, then press Set again to choose that shot you just took as the white balance reference photo. Lastly, press the White Balance Selection button on top of your camera, then rotate the Main dial until you see Custom WB appear in the LCD panel (don’t forget to turn your lens back to Auto focus).
Taking Your Existing Strobes On Location
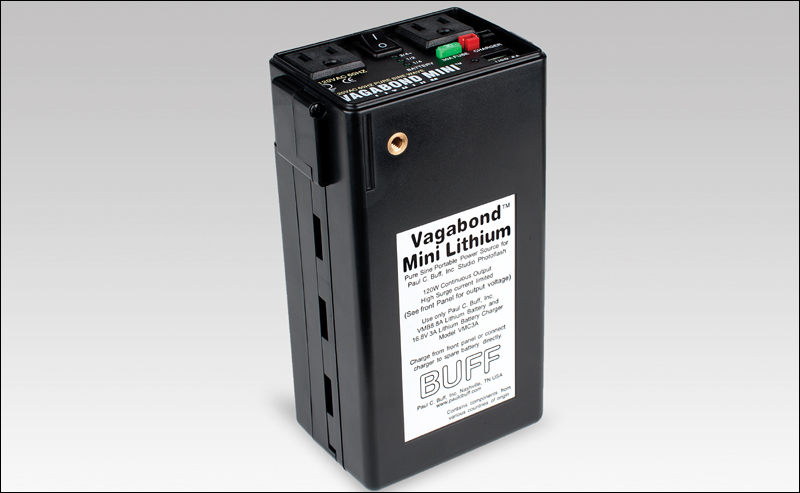
If you want to use your studio strobes on location, all you need is a way to power them by battery, since you probably won’t be able to just plug them into a wall socket. You used to have to buy specialized strobe heads that only worked with a proprietary battery pack, but in the past couple of years, we’ve seen battery packs appear where you can just plug a standard 120v household-style plug right in, which means that now you can take your existing studio strobes just about anywhere. I’ve been using a very small, very convenient, very lightweight pack called the Paul C. Buff Vagabond Mini Lithium, and it works pretty darn well (it’s reasonably inexpensive in the context of studio lighting, where nothing is actually reasonably inexpensive). You can pick one up for around $239 (direct from www.paulcbuff.com). It has two 120v outlets and a rechargeable battery that charges in about 3 hours—you get around 200 full-power flashes per charge. Now, the important phrase there is “full-power” because, unless you’re shooting out in direct sunlight, you probably won’t need to be firing these strobes at full power (more likely, half power or less), so if you fire at a lower power, you’ll get a lot more flashes out of each battery charge. A lot more!