Chapter Seven. Pro Tips for Shooting Travel Photos: How to Come Back with Images You’re Really Proud Of
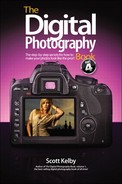
SHUTTER SPEED: 1/800 SEC F-STOP: F/4.2 ISO: 200 FOCAL LENGTH: 48MM PHOTOGRAPHER: SCOTT KELBY

It doesn’t matter what kind of photographer you classify yourself as (a wedding photographer, portrait photographer, landscape photographer, and so on), at some point, you’re going to go on vacation, and because you’re a photographer, you’re going to take a camera, and because people know you’re a photographer, they’re going to expect you to come back with some amazing travel photos from your trip. This, of course, puts a tremendous amount of stress on you at a time when you took a vacation to relieve stress in the first place, so what you’re really doing is trading one type of stress for another type of stress, and that is really stressful. So, I’m going to give you an absolutely can’t-miss solution that will let you return from your vacation with some fantastic, iconic travel photos, no matter how short your stay in a particular city might be, and knowing you can pull this off in a minimum amount of time (30 minutes tops) will remove the stress and let you actually enjoy your vacation. Here’s what you’ll need to get started: a telephoto zoom lens, unobstructed access to your hotel room window, a chair, an inexpensive tripod, and about $10 cash per city. Start by going to a local gift shop and buying a set of postcards. Be picky here—don’t just choose any set—choose a set that has the type of photos you’d like to call your own (don’t worry, we’re not going to hand these out and call them our own—they’re obviously preprinted postcards). Take these back to your hotel, separate each card (they’re usually perforated), and sit the first one on the chair, facing the window. Position your camera, on the tripod, with the soft light from the window at your back. Now, zoom in tight on the photo, so you don’t see any white border around it (make it fill the frame) and take a photo of that postcard. Repeat this for the rest of the set, and then enjoy a day of stress-free vacationing, knowing that you nailed some shots for the folks back home. Hey, I never said this was the least bit ethical. I just said it would remove your stress.
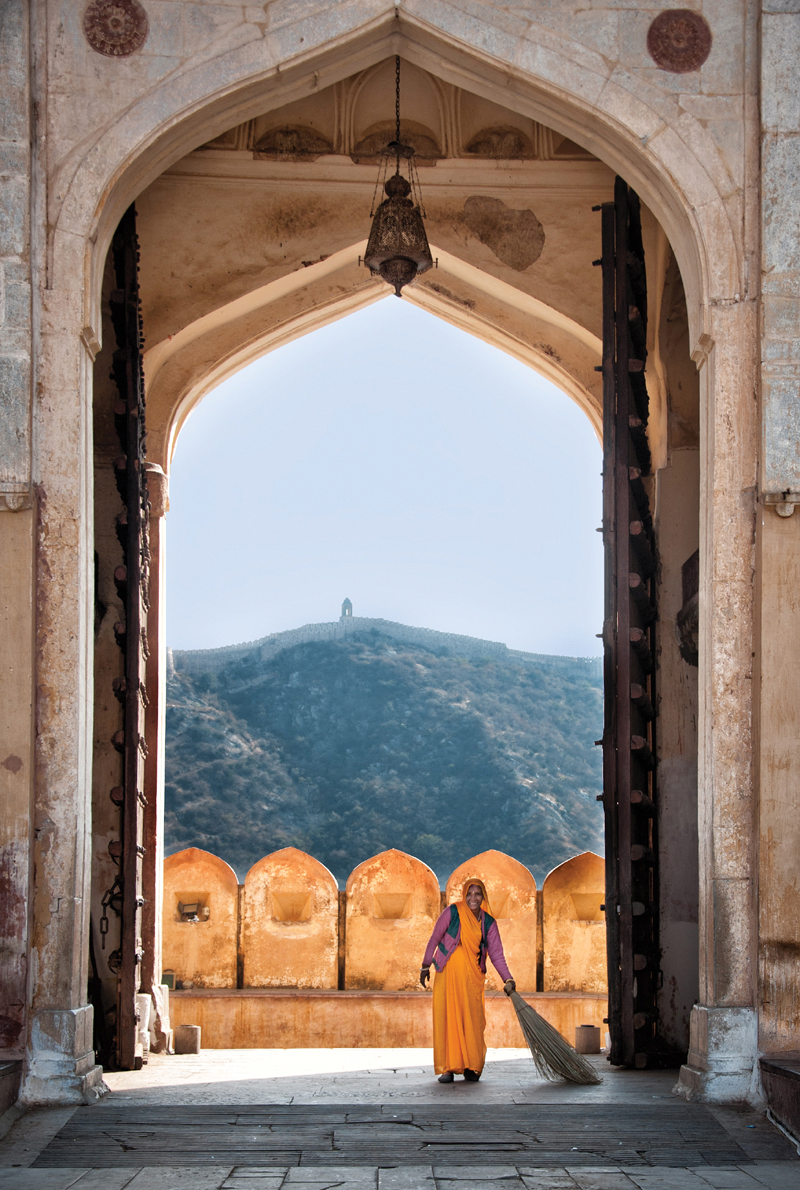
Wait for the Actors to Walk Onto Your Stage
This is a wonderful travel photo technique and one I picked up from city life photographer Jay Maisel (I’ve tried it countless times now, and it works like a charm). When you find a really colorful wall in the city where you’re shooting, walk across the street from it and just wait with your camera at the ready. A parade of people should pass by that wall in the next few minutes and, invariably, one or more of those people will have something colorful on that really stands out, or contrasts beautifully against that colorful wall, and you’ll wind up with a captivating and colorful travel shot. If it’s a rainy day, not only will your colors be nice and saturated, but there’s a reasonable chance somebody will walk by with a red umbrella (against your yellow wall, or vice versa). All it takes is a little patience and some luck.
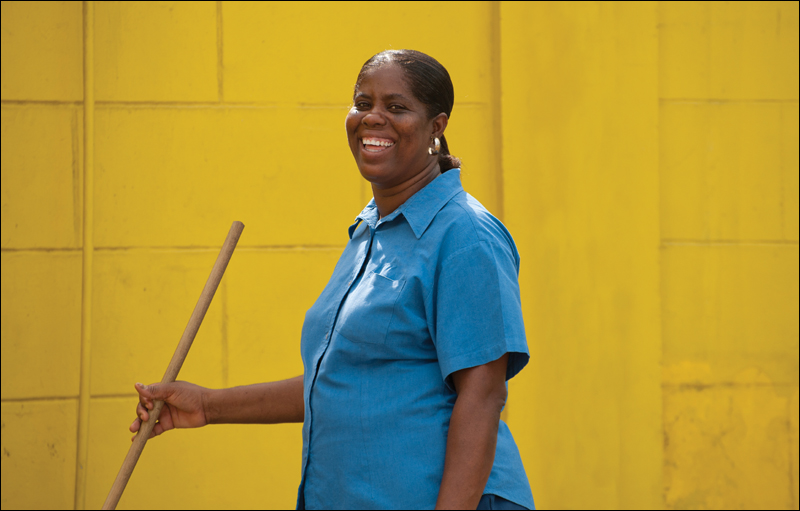
Look for That Classic “Lone Tree” Shot
When you head to the outskirts of a city, keep an eye out for a shot that’s always a pleaser—the “lone tree” shot. It can be in a field, or a meadow, or on the top of a hill, but if you keep your eye out for one, more often than not, you’ll find one, and they make for really interesting photographs. Of course, you might find a row of three or four trees, so in that case, just frame the photo so it looks like there’s only one tree (crop the other trees out while you’re framing the shot, and leave a lot of empty space to the left, or right, of the one tree that you leave in the frame, and it will have that “lone tree” effect). Two more quickies: (1) your lone tree doesn’t have to have leaves on it (I saw exactly that on the cover of a digital photography magazine this month), and (2) if it’s a foggy day, you get extra points for including that nice foggy atmospheric effect (try that one as a black and white. Could be really sweet!).
Camera Bags That Won’t Attract the Wrong Kind of Attention
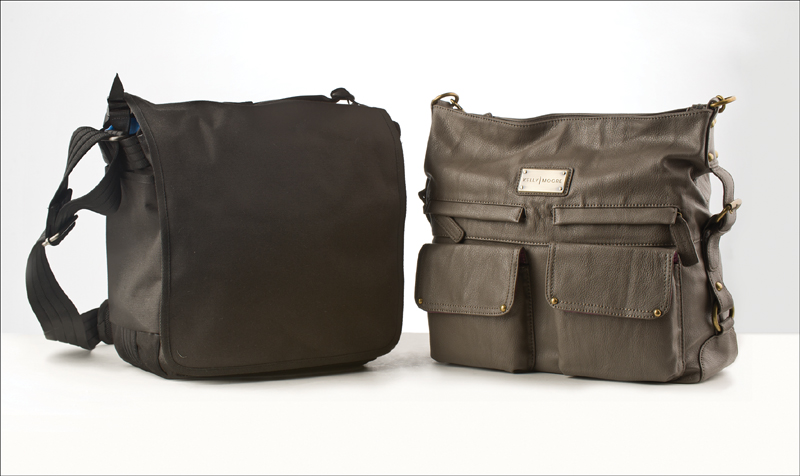
If you’re traveling in some exotic locations (or even some places here in the U.S.), it’s very possible that your camera rig costs more than the people passing by you on the street make in a year (if you have high-end gear, maybe two years). That’s why you don’t want to go around advertising, “Hey, I’ve got a camera bag here full of expensive equipment!” Believe me, thieves know what an expensive camera bag looks like, which is precisely why camera bags that don’t look like camera bags are getting so popular (almost every big bag manufacturer makes at least one “in disguise” camera bag these days). For example, Think Tank Photo makes the Urban Disguise line of camera bags that don’t look like camera bags. Kelly Moore (http://kellymoorebag.com) makes beautifully designed camera bags for women that look nothing like camera bags—you’d swear they were purses or totes. Lowepro makes one called the Exchange Messenger bag that looks...well...like a messenger bag. There are more out there, but the important thing is this: if you want to carry your gear safely and not raise the attention of thieves on the lookout for expensive camera gear, at least you’ve got some options.
How to Avoid Blurry Travel Shots
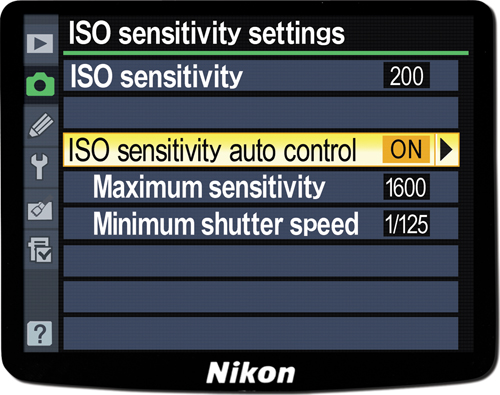
There are touching, hilarious, outrageous, beautiful, and totally unexpected things happening every day in the city you’re visiting, and you don’t want to miss one of those “moments.” When you do capture one of those moments, there’s a decent chance that the shot will wind up being blurry (it happens to travel photographers every day). If it’s blurry, it’s probably because your shutter speed fell below ![]() of a second (unless that moment you caught happened directly out in the midday sun). That’s why this tip (which I picked up from my buddy, Scott Diussa) is so important—it keeps you from “missing the shot” due to slow shutter speed by turning on your camera’s Auto ISO feature. This tells your camera to automatically raise your ISO if it sees your shutter speed get too slow. In fact, when it’s turned on, it won’t let any of your shots get below a minimum shutter speed that you choose (I choose
of a second (unless that moment you caught happened directly out in the midday sun). That’s why this tip (which I picked up from my buddy, Scott Diussa) is so important—it keeps you from “missing the shot” due to slow shutter speed by turning on your camera’s Auto ISO feature. This tells your camera to automatically raise your ISO if it sees your shutter speed get too slow. In fact, when it’s turned on, it won’t let any of your shots get below a minimum shutter speed that you choose (I choose ![]() of a second, because almost anybody can hand-hold a shot at that speed and it’ll be in focus). To turn Auto ISO on, on a Nikon, go under the Shooting menu, under ISO Sensitivity Settings, go to ISO Sensitivity Auto Control, choose On, then choose
of a second, because almost anybody can hand-hold a shot at that speed and it’ll be in focus). To turn Auto ISO on, on a Nikon, go under the Shooting menu, under ISO Sensitivity Settings, go to ISO Sensitivity Auto Control, choose On, then choose ![]() of a second as your Minimum Shutter Speed, and click OK (whew!). On a Canon, press-and-hold the ISO +/– button, then use the main dial until you see A (Auto) appear in the LCD on the top, then choose
of a second as your Minimum Shutter Speed, and click OK (whew!). On a Canon, press-and-hold the ISO +/– button, then use the main dial until you see A (Auto) appear in the LCD on the top, then choose ![]() as your minimum shutter speed. One last thing (for both Nikons and Canons) and that is “How high can you let the maximum ISO get?” Most DSLRs today can shoot at 800 ISO and it looks pretty decent, but I would still set your maximum at 1,600 ISO, because a photo with a little noise (which usually only other photographers will notice) beats the heck out of one that’s even a little bit blurry (which everybody will notice).
as your minimum shutter speed. One last thing (for both Nikons and Canons) and that is “How high can you let the maximum ISO get?” Most DSLRs today can shoot at 800 ISO and it looks pretty decent, but I would still set your maximum at 1,600 ISO, because a photo with a little noise (which usually only other photographers will notice) beats the heck out of one that’s even a little bit blurry (which everybody will notice).
My Favorite Travel Lenses
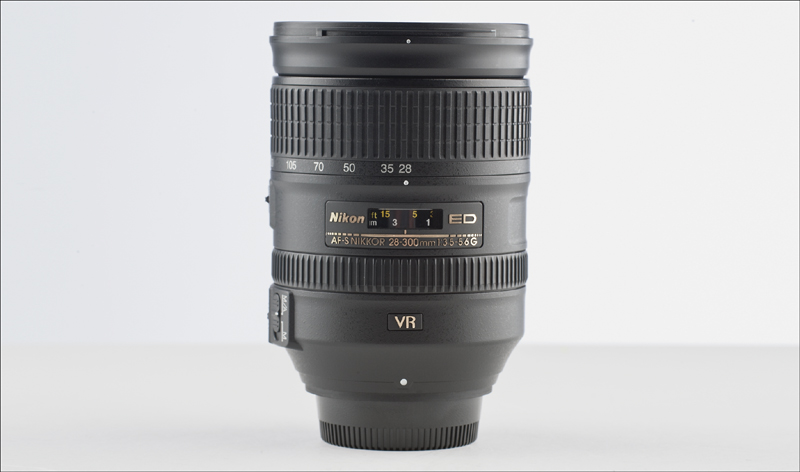
Back in volume 2 of this series, I mentioned that I like to keep my camera rig really light and simple when I’m on vacation, because after all, I’m on vacation (not on assignment). So, I usually go with just one lens that “does it all.” With a cropped sensor camera like a Nikon D300S or a Canon 60D, I take my 18–200mm lens (both Nikon and Canon make an 18–200mm f/3.5–f/5.6 lens), so I can cover everything from wide-angle to tight zoom without ever changing lenses. For a full-frame camera, like a Nikon D700 or D3S, Nikon makes a 28–300mm f/3.5–5.6 (which is pretty close to the equivalent of the 18–200mm on a cropped sensor). This has become my “go-to” lens for travel, because once again, it covers it all (from wide-angle to tight zoom). For a Canon full-frame camera, like the 5D Mark II or 1D X, Tamron makes an affordable 28–300mm lens. If it’s an important trip to somewhere really exotic, then you might want to consider taking a super-wide-angle (like a 12–24mm for cropped sensor bodies or a 14–24mm for full-frame bodies) for wide cityscapes or big sweeping scenes at a temple.
The Trick to Capturing Real Lives
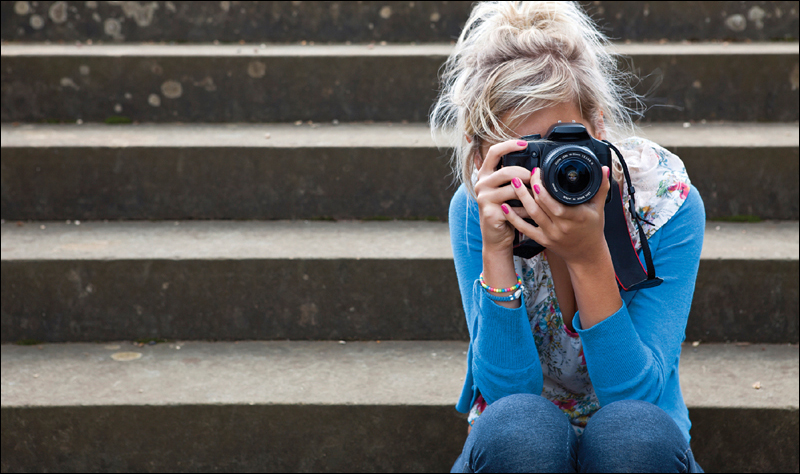
©ISTOCKPHOTO/CHRIS PRICE
When you walk into a foreign city with a big camera and a long lens, you stick out like a sore thumb and draw lots of attention. At first. But the longer you hang around a particular area, the more people realize you’re harmless, and after a while, nobody’s really paying much attention to you. That’s the goal. To get to the point that nobody’s really paying much attention to you (the opposite of the rest of our lives, right?). When they’re not focused on you and what you’re doing, they go back about their business, and when that happens, some real opportunities to capture memorable photos appear. The trick really is to camp out somewhere and just be patient. You can sit down at a sidewalk cafe, or perch yourself on a short wall, or even sit down on some steps, or on the ground and lean against a wall—just pick an area that’s near the middle of everything, but not directly in it. Remember, your job isn’t to be in the middle of everything, it’s to have a good view of the middle of everything. So, from across the street, or from above on a bridge, or on a staircase, or anywhere just outside the middle is where you want to be. You’re just “chillin’.” You’re not making a fuss, you’re not messing with your gear, and you’re not drawing attention to yourself. Just give everybody some time to get comfortable with you being there, and then you can capture real life as it unfolds in front of you. I promise you—your patience will pay off.
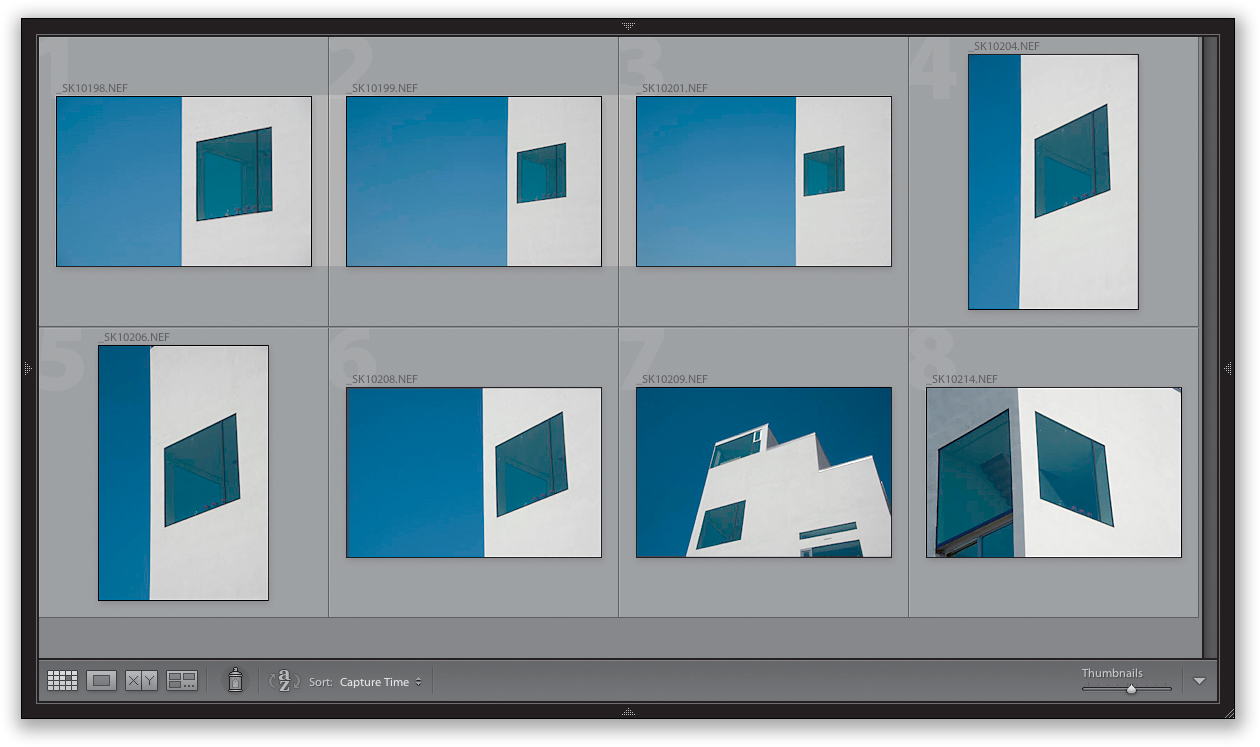
Tourist Removal Shooting Techniques
Tourists can make or break a scene. Sometimes, groups of people around a temple, church, or monument tell a story, but sometimes they just ruin what would otherwise be a really tranquil scene. That’s why you need a strategy for “removing tourists” from your shot. First, I’ve found that patience alone can pay off big time in these situations, because if you just stand there and wait, you could luck out and, if only for a brief moment, have no tourists visible in the frame (that doesn’t mean there are no tourists—it just means there aren’t any in the particular spot you’re aiming at). If that doesn’t work, then your strategy changes to the “moving tourist” strategy, which is based on the fact that tourists don’t stay in one place very long, and since that’s the case, you’re going to shoot a series of shots over a few minutes (not a few seconds—it usually takes at least three minutes). This trick works best if you’re on a tripod, but you can hand-hold if you’re the really patient type (don’t leave the exact spot where you took the first shot). Once you’re ready to shoot, take one shot, then wait until the main group of tourists has moved away from the area. Now, take another shot (I know, more tourists will be wandering around—that’s okay, just take the shot). Wait a minute, and take another shot. This all takes place while tourists are wandering around what you’re shooting. When you’re done, you should have five or six shots of the exact same view. Now, go watch the video (on the book’s companion website) to see how to use Photoshop or Photoshop Elements to make those tourists quickly and seamlessly disappear. You’ll be amazed at how easy this is and how well it works.
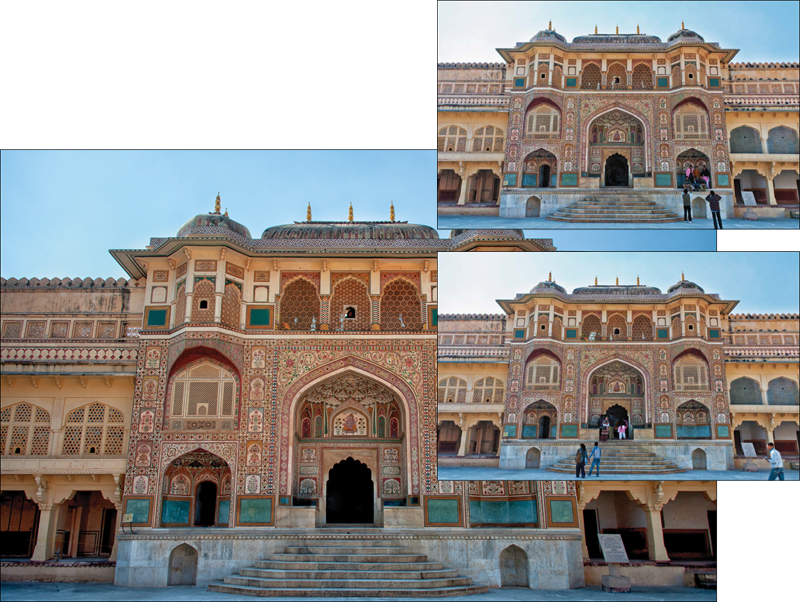
Learn How to Work the Scene
If you’re walking around a city or village and you stop to take a photo, that means something caught your eye (enough to make you stop and photograph it, right?). Don’t just take one shot, shrug your shoulders, and move on. Remember, something made you stop, so there’s probably something there, and taking one quick snapshot probably won’t uncover it. Your job as a photographer is to “work that scene” and find out what it was that captured your attention. The first step is simply to slow down—stop, look around for a moment, and see what it was that drew your eye in the first place. Was it the color, was it a doorway, an archway, was it some little feature, or something big? If you can figure it out, then you’ll know what to shoot, but more often than not, we can’t exactly describe what it was that made us stop and shoot, but it definitely was something. Your job is to find it, and to work that scene by trying these techniques: (1) Shoot the area with different focal lengths—shoot a few shots in really wide angle, then try 100mm, then zoom in tight, and see what you find. Stop and look at your LCD to see if you’re getting close. If you see something that looks like it has possibilities, then (2) try changing your viewpoint. Shoot it from a very low angle (get down on one knee) or try shooting it from above (look for stairs you can shoot from or a rooftop angle). This can make the shot come alive. If that looks really good and you’re getting close to nailing the shot, then (3) try varying your white balance (try changing it to Cloudy and see if having the shot look warmer looks better, or try Shade for a warmer look yet). Try all these things (work the scene) and my guess is one of those shots will bring a big smile to your face.
Finding Which Travel Photos You Like Best
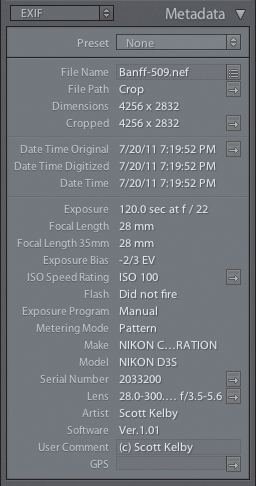
If you want to take better photos on your next vacation, start by looking at the photos from your last vacation. In particular, look at the metadata (the information embedded into your camera at the moment you took the shot, which includes which lens you used, your f-stop, shutter speed, ISO, and so on). But don’t look at all the shots from your last trip, just the “keepers”—the ones that wound up in your photo album or slide show, or as prints on your wall. In that metadata, look for a pattern. Are a lot of those shots taken with the same lens? If they are, you now know which of your lenses is your “go-to” lens for travel photography. Now, dig a little deeper. Is there a particular focal length you’re using (in other words, are you mostly zoomed in tight on these shots, like to 170mm or 200mm, or are they all mostly wide-angle shots, like 18mm or 24mm)? Once you pick up a pattern there (let’s say most of your favorites were shot at 24mm), you know that for travel you seem to prefer wide-angle shots. So, to increase your chances of coming back with shots you really like, shoot more wide-angle shots with your go-to lens for travel. You can dig even deeper if you like. Are a lot of your favorites taken with a slow shutter speed, which shows motion, or are they mostly high shutter speeds where you’re freezing motion? This helps you, once again, find your travel photography shooting style, and if you shoot more shots with that lens, focal length, and shutter speed you seem to like best, you’re more likely to come away with more shots that you love.
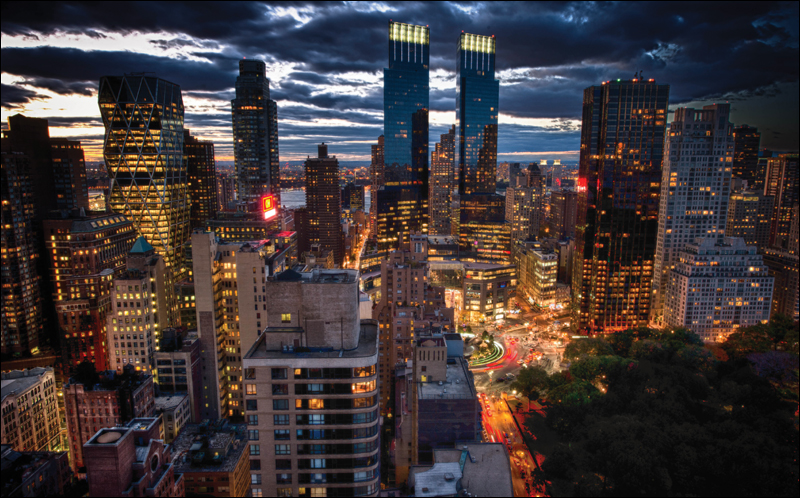
Shooting from the Roof of Your Hotel
RAFAEL “RC” CONCEPCION
If you spot a high-rise hotel in the city you’re visiting and you’d like to shoot a sweeping cityscape from their roof, it’s pretty unlikely that they’ll give you permission to shoot up there. Well, that is unless you’re a guest in the hotel. I’ve found that if you’re a paying guest in the hotel, and you contact the hotel concierge (or a friendly front desk staffer), you’re fairly likely to get a few minutes to shoot on the roof (they will usually send you up there with a maintenance man or other hotel staffer). Also, if they have a rooftop lounge, and you want to shoot there in the off-hours when it’s closed, they’re usually more than happy to accommodate you—tripod and all. All you have to do is ask.