Chapter Nine. Shooting HDR Like a Pro: How to Shoot and Process HDR Images
SHUTTER SPEED: VARIES F-STOP: F/4.5 ISO: 200 FOCAL LENGTH: 14MM PHOTOGRAPHER: SCOTT KELBY

Anytime you mention HDR, it starts an argument, because there are both people who dearly love HDR and those who hate it with a passion that knows no bounds. Personally, I like HDR and I shoot them myself whenever I get a chance. However, I’ve found when I post HDR images online, I don’t know what it is, but it brings out the worst in some people and they just have to post snarky comments like, “I’m sorry, but I hate HDR images” and other comments along those lines. After posting dozens of HDR images, I realized that people have an idea in their mind of what a “bad HDR” image looks like, and they apply that to any image a photographer notes is an HDR, so it’s really not about the image any more—it’s about the acronym HDR (which stands for High Dynamic Range). That’s why I propose that we no longer use the acronym HDR and instead use the acronym “KMA” to describe our images. But, to appreciate this new acronym, we need to break it down to its basic form. Once you understand the nuances of the acronym, I think the entire HDR community will seriously consider adopting it. We’ll start with the second letter, “M.” When I post an image online, I’m posting one of “my” photos, so I think M is appropriate to represent the photographer that posted it. Then, I thought it would be cool to embed another popular acronym within our new acronym (kind of a Trojan horse acronym) and that would be the popular KISS (Keep it Simple, Stupid) acronym, which nearly everyone embraces, so we’ll use “Kiss” as the first word. The third word in our acronym should be a short, ideally three-letter, word that describes people who write things like “I’m sorry, but I hate HDR images.” So now, when someone writes something mean about an HDR you post online, you can respond by simply saying, “If you don’t like HDR, you can KMA!”
Shooting HDR: The Gear
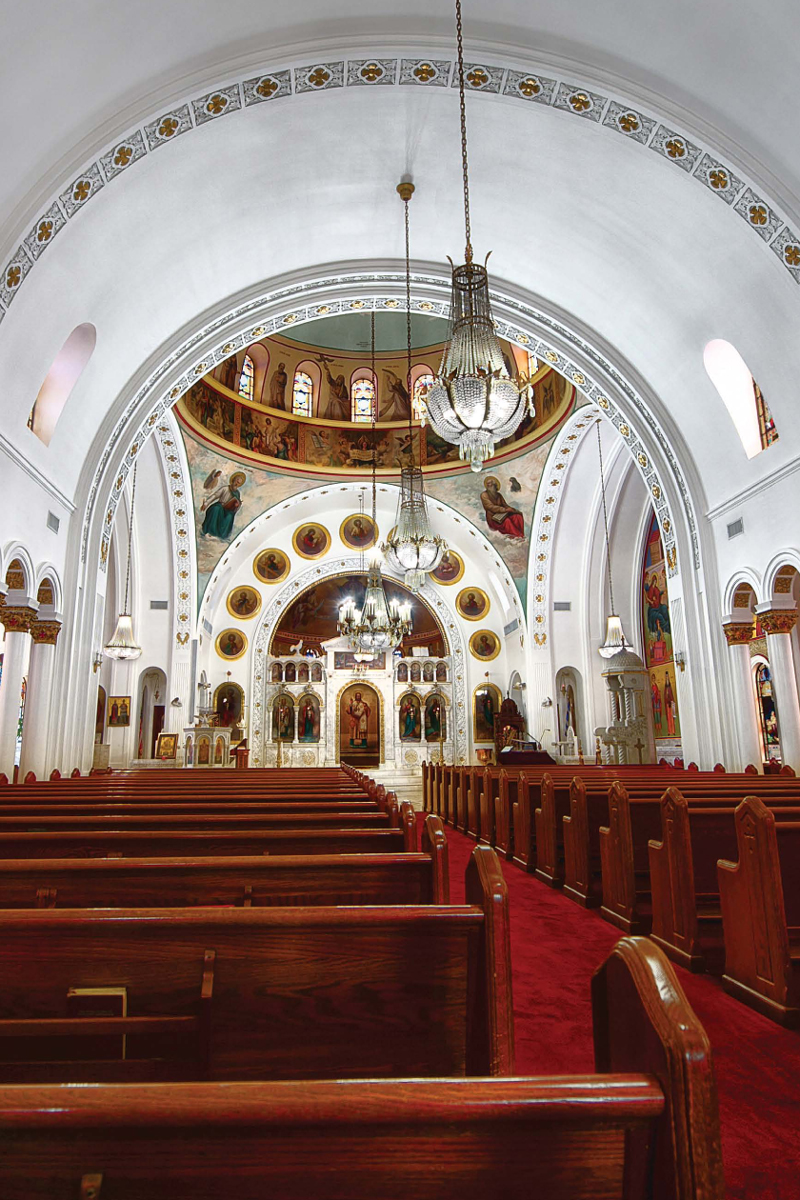
I was going to call this “The Essential Gear,” but thanks to some pretty significant improvements in the software we use to create our HDR images, they’re only essential if you’re going to become a serious HDR shooter. You no longer absolutely need this gear to successfully shoot an HDR image, especially if you’re just giving it a drive around the block to see if you like it. Now, if you try a few HDR shots, and you fall hopelessly and deeply in love with HDR (hey, this has happened to some of my friends—people who otherwise led normal, everyday lives until that point), then you should definitely invest in at least two pieces of gear that will give you better-quality HDR images. They are: (1) a decent tripod, unless you only plan on shooting HDR shots in really bright sunlight (which won’t actually be the case, because some of the coolest HDR stuff is shot indoors), and (2) a cable release, so you don’t wind up adding any extra vibration that might mess up your image. Now, there’s a reasonable chance you already have both of these (especially if you’ve read any of the previous books in this series), and if you do, you should definitely be using both of these when you shoot your first HDR shot, because they will give you sharper images, and with HDR that sharpness is key. Also, since you might be considering just dipping your toe into the HDR pool of love, I want to let you know what the basic workflow will be, because it’s a two-part process: the first part is shooting a particular way (hopefully using the gear just mentioned), because you know, up front, you want to create an HDR image, and the other part is combining these images into a single image and then adjusting that image so it looks good to you (more on all this on the following pages).
Shooting HDR: The Basic Idea
Before I get into specifics, I just want you to know two things: (1) shooting and toning HDR is actually fairly easy and probably way easier than you’d think, and (2) within the HDR community of photographers, no two seem to ever agree on anything, during any phase of this process, when it comes to making an HDR image. (Congress agrees more than HDR photographers do, as does the UN. Even lead singers and their bands agree more.) That being said, the first part of this process is shooting. You’re going to set your camera up to shoot a series of shots of the same thing—without moving at all—and what you basically need is one regular shot, one shot that is underexposed (darker) by 2 stops of light, and one that is overexposed (brighter) by 2 stops of light—three images total of the exact same scene (some photographers shoot seven bracketed photos, or even 11, but for our purposes here, we’re just going to use those three, which are enough to create a good-looking HDR image). If you use a Canon camera, and switch your camera to Av mode, set your f-stop to something like f/8 (see page 141), turn on Exposure Bracketing, and take three shots in a row, you’ll have exactly what you need (one regular shot, one 2 stops darker, and one 2 stops brighter). That’s the way Canon cameras and some Nikons (like the D7000) bracket—2 stops at a time. Some Nikons, however, only do 1 stop at a time, so you’ll have to take five bracketed shots, even though you’ll only use the first shot (normal), the second shot (2 stops darker), and the fifth shot (2 stops brighter). On the next page, we’ll look at how to turn this bracketing on.
Setting Up Your Camera to Shoot Bracketing
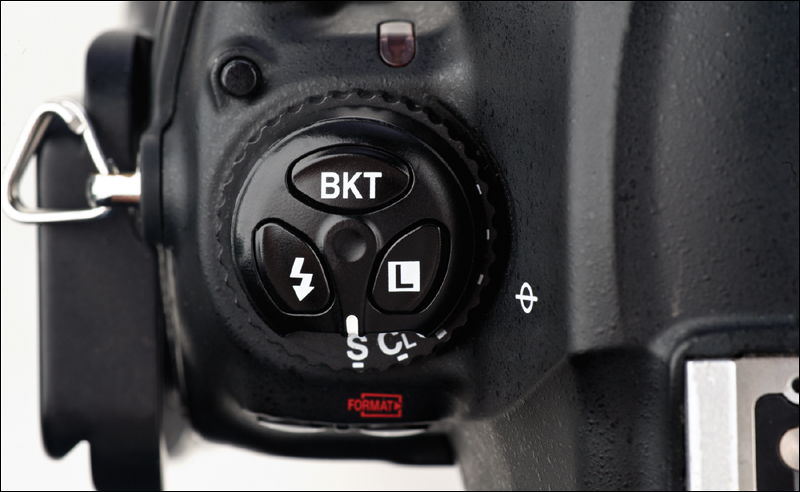
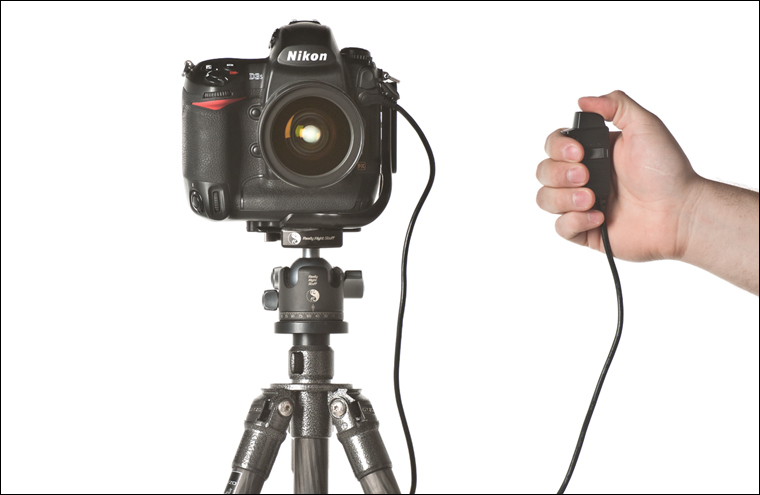
First, I recommend setting your camera to aperture priority mode, so change your Mode dial to Av on a Canon DSLR or change your exposure mode to A on a Nikon. Okay, onto the bracketing: Exposure bracketing was actually designed to help us out in sticky lighting situations by taking more than one exposure of the same image. So, if you were off with your exposure by a stop or two (either you were too dark or too light), you could use one of those other images with the darker or lighter exposure—pretty clever when you think about it. Anyway, we use this feature to automatically take the exposures we need for HDR photos, because we actually need to combine a really dark photo, a regular photo, and a really bright photo into just one photo that will capture a larger range of light than our camera can capture in one single frame. Today, most DSLR cameras have built-in exposure bracketing, so all you have to do is turn it on. Of course, to make it extra fun for book authors, just about no two cameras turn this feature on in the same way. For Canon shooters (using a 50D, 60D, or a 7D), go to the second Shooting tab menu, and choose Exposure Compensation/AEB. Then, use the main dial on top of your camera to choose 2 stops in your LCD as the amount, and press the Set button. If you’re a Nikon shooter, shooting a D4, D3, or D3S, there’s a BKT button on the top left of your camera (shown above). Press-and-hold that button, then turn the main command dial on the back top right until it reads +1 in your LCD (this will take five shots. If you’re using something like a Nikon D300, D300S, or D700, then just hold the (Fn) function button on the bottom left front of your camera (near the lens itself), and turn the main command dial on the back top right until it reads +5 (that chooses a five-shot exposure bracket). You are now set up to take your bracketed images for HDR.
A Canon Shooter’s HDR Helper
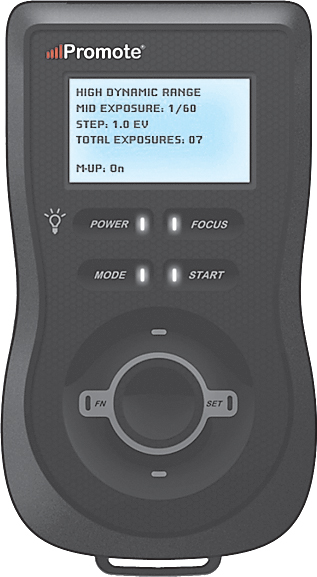
COURTESY OF PROMOTE SYSTEMS
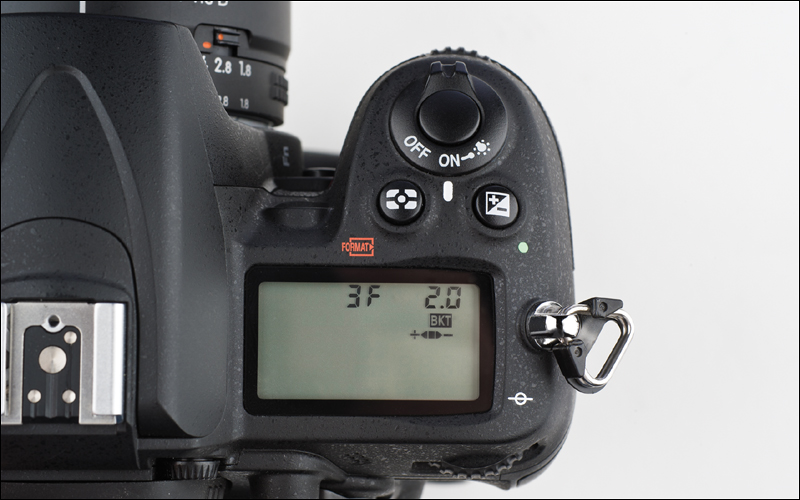
The nice thing about being a Canon shooter when it comes to HDR is that you can do exposure bracketing in 2-stop increments (where most Nikon shooters can only bracket in 1-stop increments, which means they have to take five shots to create an HDR image, where Canon shooters can take just three). However, what if you’re a Canon shooter and you actually want to take a wider range of bracketed images, like five shots or nine shots? If that’s the case, you’ll want to get a Promote Control (from http://promotesystems.com), which lets you do those wider range brackets on Canon cameras, like the 7D, 50D, and 5D Mark II. The shackles have been lifted—overshoot away! (Just kidding.)
What If Your Camera Doesn’t Have Bracketing?
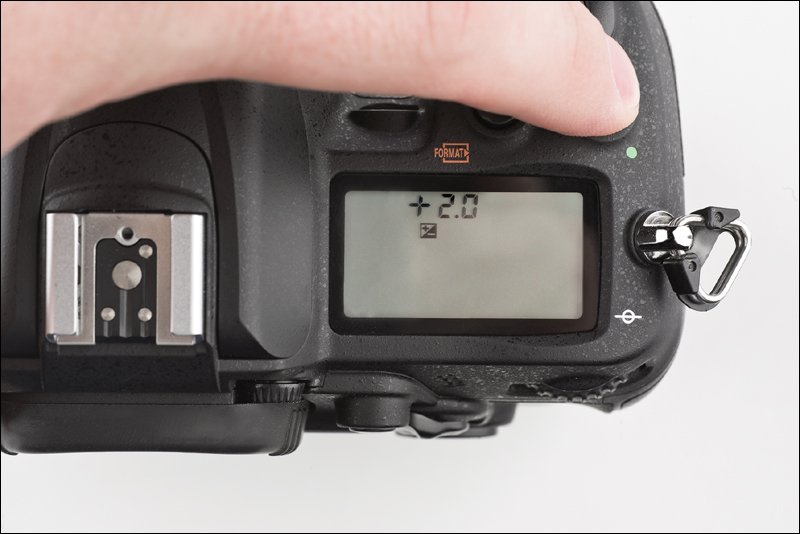
Don’t worry, even if your camera doesn’t have built-in bracketing, you can still shoot bracketed frames to create your HDR image—you just need to know the trick. Of course, start by setting your camera to aperture priority mode (A on Nikons, or Av on Canons), then choose your f-stop for your HDR shots (I usually shoot at f/11). Now, take one shot, then use the exposure compensation control for your camera to take the next shot at –2 EV (that gives you the 2-stops-darker shot you need), then go the opposite direction to +2 EV and take your third shot (that gives you the 2-stops-brighter shot that you need). That’s it—you’ve got all three images you need to make your HDR shot. Now, if you haven’t used exposure compensation before, here’s how to turn it on: On Nikon cameras, hold the exposure compensation (+/–) button on the top of your camera, and then move the main command dial on the back to the right until it reads –2.0 on the LCD on the top. Then do the same thing for your next photo, but change it to read +2.0. On Canon DSLRs, turn the power switch to the second On position, then use the quick control dial on the back of your camera to lower the exposure to –2.0 EV, and take a shot. Then, do the same thing for your next photo, but change it to +2.0 EV.
Which F-Stop to Use for HDR
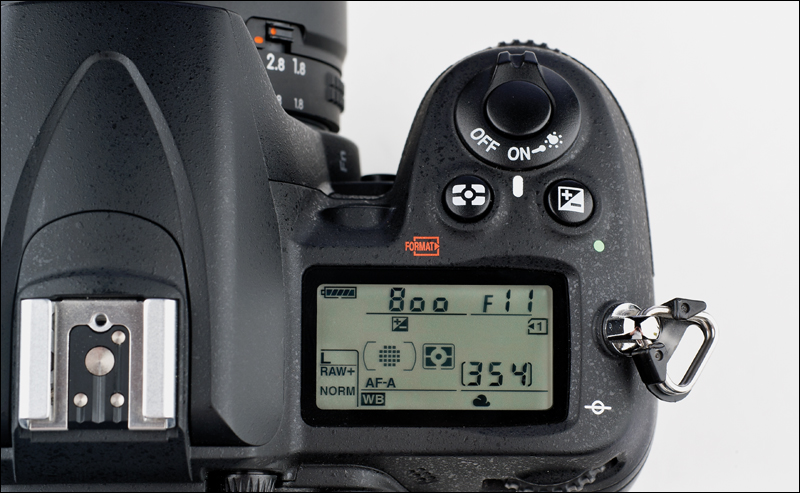
Another thing photographers don’t agree on is exactly which f-stop to use, but everybody pretty much agrees you need to use an f-stop that keeps a lot of your image in focus. Personally, I generally shoot my HDR shots at f/11 and most of the pros I know use f/8, but if you go on the web and search for this, you’ll find people touting everything from f/1.8 to f/32. So, who is right? That’s easy. Me! (Kidding. Totally a joke.) People make great cases for all different f-stops for the particular subject they’re shooting, but if you’re new to this, why not try f/11 for starters? If you’re shooting indoors, though, try f/8 as f/11 may overexpose your images.
Don’t Shoot One Bracketed Shot at a Time
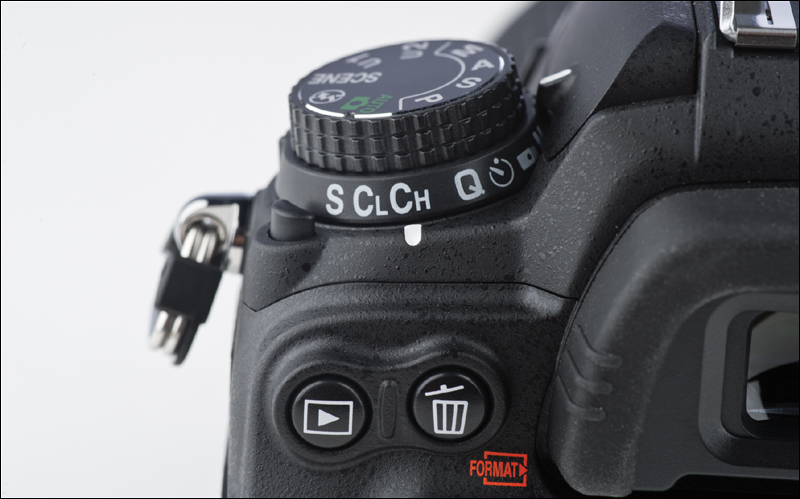
If you’re going to shoot a series of bracketed HDR shots (like three or five bracketed frames), don’t shoot them one at a time. Instead, switch your camera to automatically shoot a burst of all three (or all five) when you press-and-hold the shutter button down just once. Here’s how: On Nikon DSLRs, you choose burst mode (called “Continuous High Speed”) by going to the release mode dial on the top left of your camera and switching to CH mode. On Canon cameras, you press the AF•Drive button on the top right side of your camera, then rotate the quick control dial on the back until you see a little symbol that looks like a stack of photos next to an H on your LCD (this is called “High-Speed Continuous Shooting”). Now, once you’ve turned bracketing on, you just press-and-hold the shutter button until you hear that all three (or five, or more) bracketed shots have been taken. Besides just being plain easier to do it this way, you’ll get less camera vibration and the shots will fire faster in burst mode than they would having to manually press the shutter button three or five times in a row. Plus, using this method, you won’t forget how many frames you’ve taken and won’t have to ask yourself, “Did I just shoot four or five?” (Hey, it happens.) Now, if you’re shooting HDR at twilight/night, oftentimes the exposures are going to get longer. By using a cable release (with your camera on a tripod), you can take advantage of its lock switch (just press the cable release button and lock it into place). While it’s easy to press-and-hold the shutter button for three or five shots during the day, you may introduce shake for the night shots.
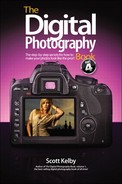
Shooting Hand-Held HDR Shots
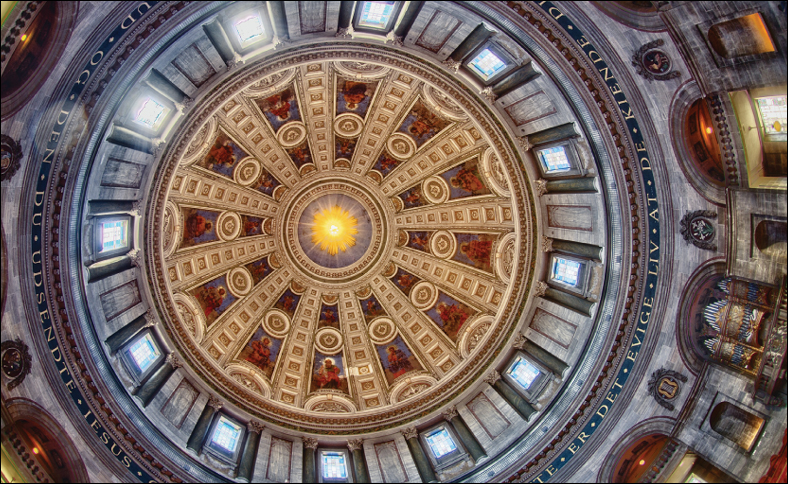
I mentioned at the beginning of this chapter that you don’t have to shoot your HDR shots on a tripod thanks to some advances in the HDR software that actually align your images and remove any “ghosting” that might happen from movement (and both work amazingly well). Now, whether you can get away with hand-holding really comes down to just one thing: how much light there is where you’re shooting. If you’re shooting outside in the day, it’s probably not going to be a problem, so just hold your camera steady and fire away. If you’re indoors, or it’s stormy out, or if it’s night, then it gets tricky. Now, I’ve hand-held five bracketed HDR shots inside a church, and they all came out pretty sharp. However, since I knew the light was low, I did two things that helped a lot: (1) I leaned on a column in the church to help steady me and my camera—this makes a bigger difference than you’d think. (2) I broke one of the big rules of HDR, which is to also shoot at the lowest ISO possible, because in the low light of the church, the lowest possible ISO for me to hand-hold was 800 ISO. So, the shot does look a bit noisy (grainy), but at least it’s sharp. I would say at this point, I probably shoot more hand-held HDR shots than I do on a tripod. But, if I have a tripod handy, then I usually put my camera on it and use a cable release (the problem is my tripod isn’t always handy). So, in short, don’t let the fact that you don’t have a tripod keep you from shooting bracketed HDR shots—just do your best (and use tricks like leaning against solid objects) to keep yourself still through three or five frames. Then let the software do the rest (aligning and removing ghosting).
Which Types of Scenes Make Good HDR Shots
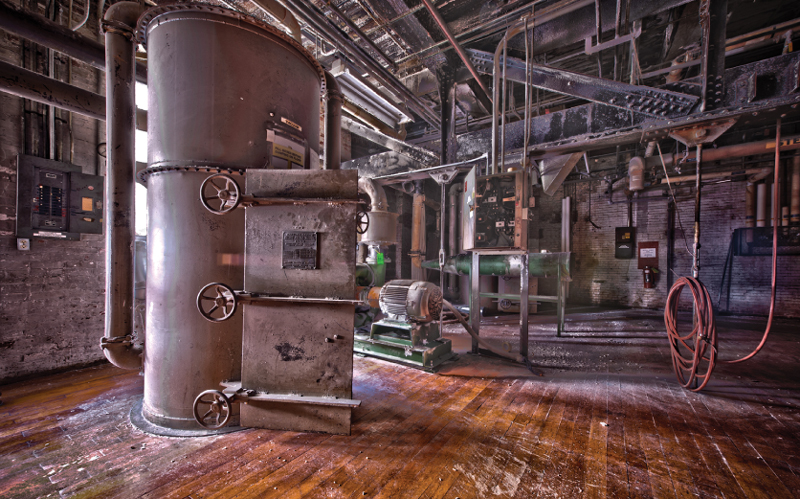
Since the process of shooting HDRs is pretty mechanical (the camera does most of the work), the real creativity of HDR photography is finding shots that look great as HDR images, because not everything makes a great HDR image. In fact, some types of images just look fantastic as HDR, while others, like photos of people, well...in short, I’d just avoid shooting HDR shots of people. So, what does look good? Start by looking for scenes that have a wide range of light—really dark areas and other parts that are really bright. HDR was made for situations like this (which is why you see a lot of dawn and dusk landscape shots in HDR). So, extreme changes in light will give you the expanded range part, but you’ll still need subjects that make for great HDR images. Scenes with lots of texture (like metal, wood, old paint, fabric, concrete, aluminum, and so on) really look great for this, which is why you see so many great HDR shots of old buildings, factories, old restaurants, airplanes, classic cars, old motels from the 1950s, and anything run down. Also, sometimes really modern things make great HDR too, like buildings with wild architecture, airports, etc. Finding these things is really an art, and it’s a lot of the fun of creating HDR images. If you want to see what kind of cool scenes are popular for HDR, visit a site called http://500px.com (go to the Popular Photos link). You will see some amazing images, including lots of HDR photography that will inspire you to search for places you’ve probably driven by a hundred times and never thought anything about (except maybe, “When are they going to tear down that old building?”). Now you’ll be wrangling to find a way to get inside to shoot it!
Shooting HDR Panos
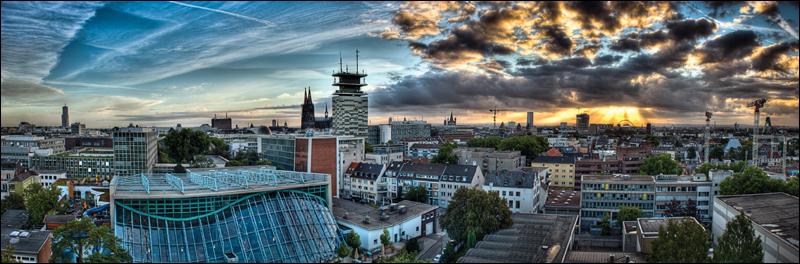
BRAD MOORE
Okay, this isn’t hard to pull off (you absolutely can), but you’ve really got to want to do it, because it takes some time—both in the shooting phase and the post-processing phase. Here’s why: First, you’re shooting a pano, which means you’re probably going to be shooting anywhere between eight and 12 images already, right? But, if you want it to be an HDR pano, you’ll then have to shoot bracketed for three to five frames each (minimum) of those eight to 12 images. So, for example, if you shoot a Nikon D3S and your pano is going to be eight frames wide (moving from left to right), each of those eight frames will be bracketed at five frames each, so this one HDR pano will be comprised of 40 photos! (I told you this would take a while.) Anyway, here’s how it’s done: Step One: When you’re ready to take the first frame, turn your exposure bracketing on (see page 138). Take the shot, but remember to press-and-hold the shutter button until it takes all five frames (or three; see page 137). Now, move to your second frame and repeat the process, shooting multiple bracketed photos each time you rotate your camera over a bit for the next frame, until you’re done. Step Two: Process each frame individually (take the first three or five images and combine them into one HDR image, and so on). Once all your images have been combined, you should be back down to just eight frames that are all HDR single images. Now, open just those eight HDR images in Photoshop. Go under the File menu, under Automate, choose Photomerge, and ask it to use the images already open in Photoshop. Click OK to merge those HDR images into one wide panoramic image. Crop it down to size and add any additional post-processing to finish it off (see page 151).
Easily Find the Images You Bracketed for HDR
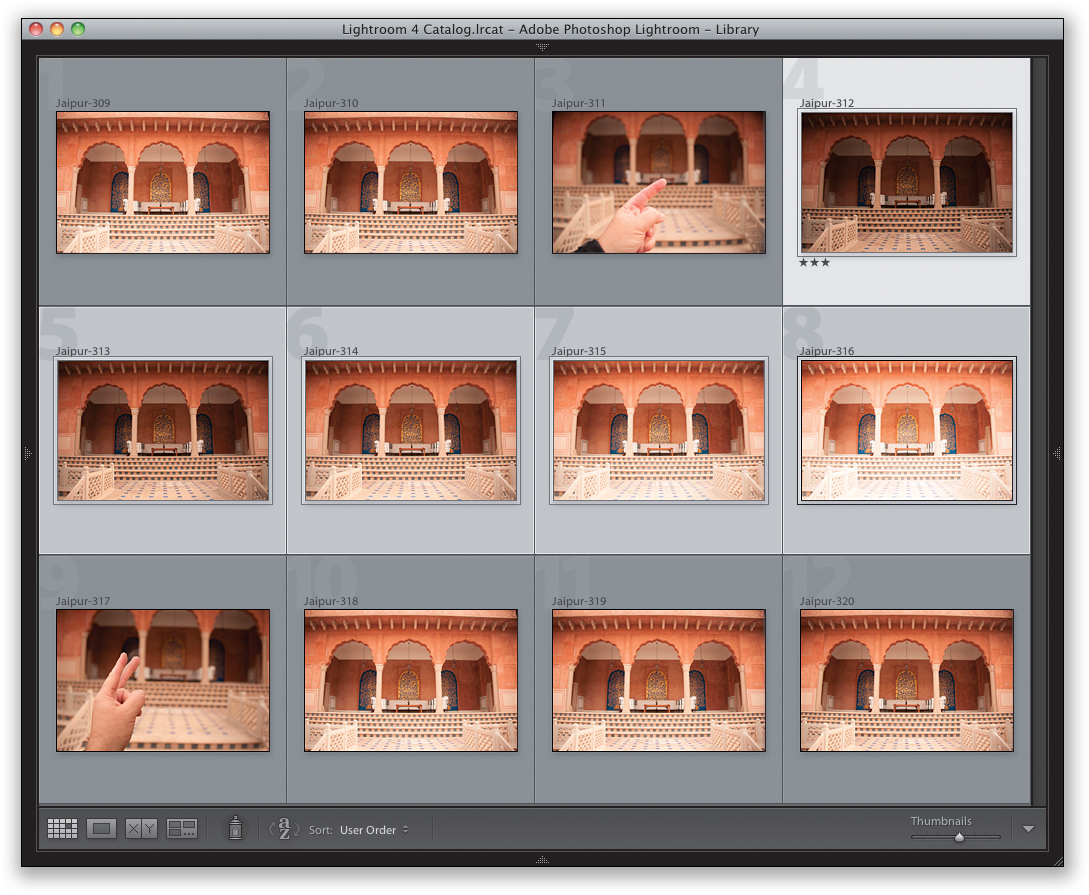
I hear from people all the time who shoot HDR images that they forget that they shot them because, in the hundreds of images they import into their computer (using anything from Bridge to Lightroom to iPhoto to Photo Mechanic), they can’t instantly tell if their exposure was off a bit or if it’s an HDR shot. This is particularly bad if you don’t get a chance to look at your images the same day you shoot them, because there’s a good chance you’ll miss some here and there. That’s why this tip, which I actually started using first when shooting panos, is so handy for making it easy to find your HDR-bracketed images When you’re about to shoot your HDR image, before you turn on bracketing, hold one finger up in front of your lens and take a shot. Then, turn on bracketing, shoot your HDR-bracketed images, and then turn off bracketing. Now, hold two fingers up in front of your lens and take another shot. That way, when you’re looking through the hundreds of shots you imported from your memory card, when you see a shot with you holding up your finger, that means, “Here comes an HDR.” Now, if you shoot panos and HDRs, then put up three fingers to start your HDR and four when you’re done. This is much handier than you’d think.
The Programs We Use for Creating HDR

Once you’ve taken your exposure-bracketed shots, you need a piece of software to combine these separate images into one single HDR image. Although there are a number of HDR programs out there, everybody seems to use the same three: (1) Photomatix Pro (shown above; http://hdrsoft.com), which is made by a French company (but the program is in English) and is the most popular HDR application out there. Its advantages are that it definitely has its own signature look, and it creates your HDR image quicker than any other HDR application I’ve tried. (2) Photoshop CS5’s (or higher) HDR Pro (www.adobe.com/photoshop). In Photoshop CS5, Adobe overhauled their HDR capabilities and now it does a pretty decent job—especially on hand-held HDRs or photos with ghosting. The presets it comes with are very, very lame, but see page 148 for help with that. The advantages are, if you already have Photoshop CS5 or higher, you already own a program that creates HDR images. And, finally, (3) Nik Software’s HDR Efex Pro (www.niksoftware.com). This one is fairly new, but photographers have really flocked to it. Its advantages are that is has a great, easy-to-use interface, lots of presets, and features like built-in vignetting and the ability to tweak individual parts of your images. It wins the feature war for sure. So, which one is the right one for you? You can download demo versions of each of them for free (including Photoshop), so try them out and see for yourself. Try each on the same HDR image, so you can compare the results side by side. Since they all work a little differently and all three have their own look, you’ll quickly find out which one is the one for you.
A Good Preset for Photoshop’s HDR Pro
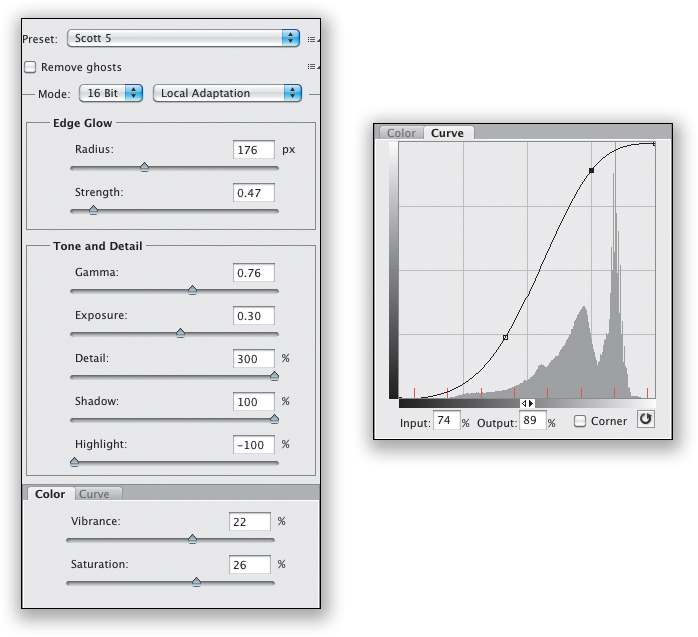
If you need to combine your bracketed images into a single HDR image, but you don’t have either Photomatix Pro or Nik Software’s HDR Efex Pro, but you have Photoshop CS5 (or higher), then you can use Photoshop’s built-in HDR Pro feature (found under the File menu, under Automate) to combine the images and add the tone mapping. (Warning: If you have an earlier version of Photoshop [like CS4, CS3, or earlier], don’t use the HDR feature at all. It’s...it’s...well...awful [sorry Adobe].) Back when CS5 first came out, the presets for tone mapping that came with HDR Pro were so lame that they were basically unusable, so I created one of my own that actually works pretty well for most images. I call it “Scott 5” (I know, it’s a very creative name, but is it possible that I stole the name from the band Maroon 5? No, that would be too creative). Anyway, I’m going to share my settings with you here, so you can give it a try. You can see the settings above, but just in case, they are (from top to bottom): under Edge Glow, Radius: 176 px, and Strength: 0.47; under Tone and Detail, Gamma 0.76, Exposure 0.30, Detail: 300%, Shadow: 100%, and Highlight: –100%; under Color, Vibrance: 22%, and Saturation 26%. Lastly, I click on the Curve tab and add an S-curve like the one you see above on the right. This just adds an extra bit of contrast. You add points to the curve by clicking on the diagonal line, then dragging up or down. If you make a mistake, just click on a point and then press Delete (PC: Backspace). Now, once you enter these settings, you can save them as your own “Scott 5” preset by clicking on the icon to the right of the Preset pop-up menu up top and choosing Save Preset. That’s it—you’re all set.
Sharpening HDR Photos
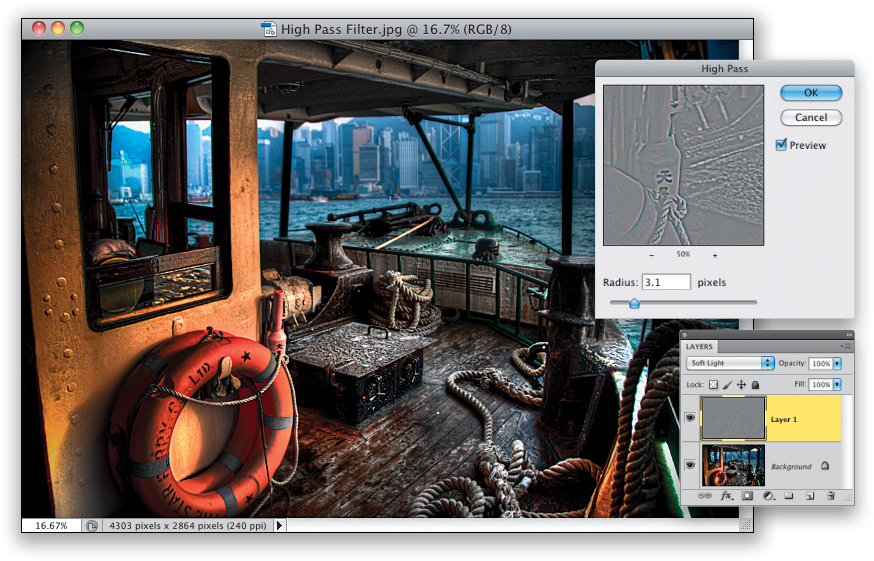
HDR pros get pretty aggressive when it comes to sharpening their images, because one of the hallmarks of a good HDR image is the overall sharpness. That’s why a lot of HDR pros use High Pass sharpening in Photoshop, which is just another form of sharpening, but the type of sharpening it applies is really punchy, and it’s easy to adjust right after you’ve applied it to your image. Here’s how to apply High Pass sharpening: Step One: In Photoshop, duplicate your Background layer. Step Two: Go under the Filter menu, under Other, and choose High Pass. Step Three: Drag the Radius slider all the way to the left, until the screen turns solid gray, then drag it back to the right until you see a decent amount of detail appear, but not so much that you start to see halos around the edges of everything. Step Four: At the top of the Layers panel, change the blend mode from Normal to Hard Light (for extreme sharpening) or for a little more subtle sharpening (and the one I prefer to use myself), choose Soft Light. If that still seems like too much sharpening, just lower the Opacity of this High Pass layer until it looks right to you. That’s it.
The HDR Look Without Shooting HDR
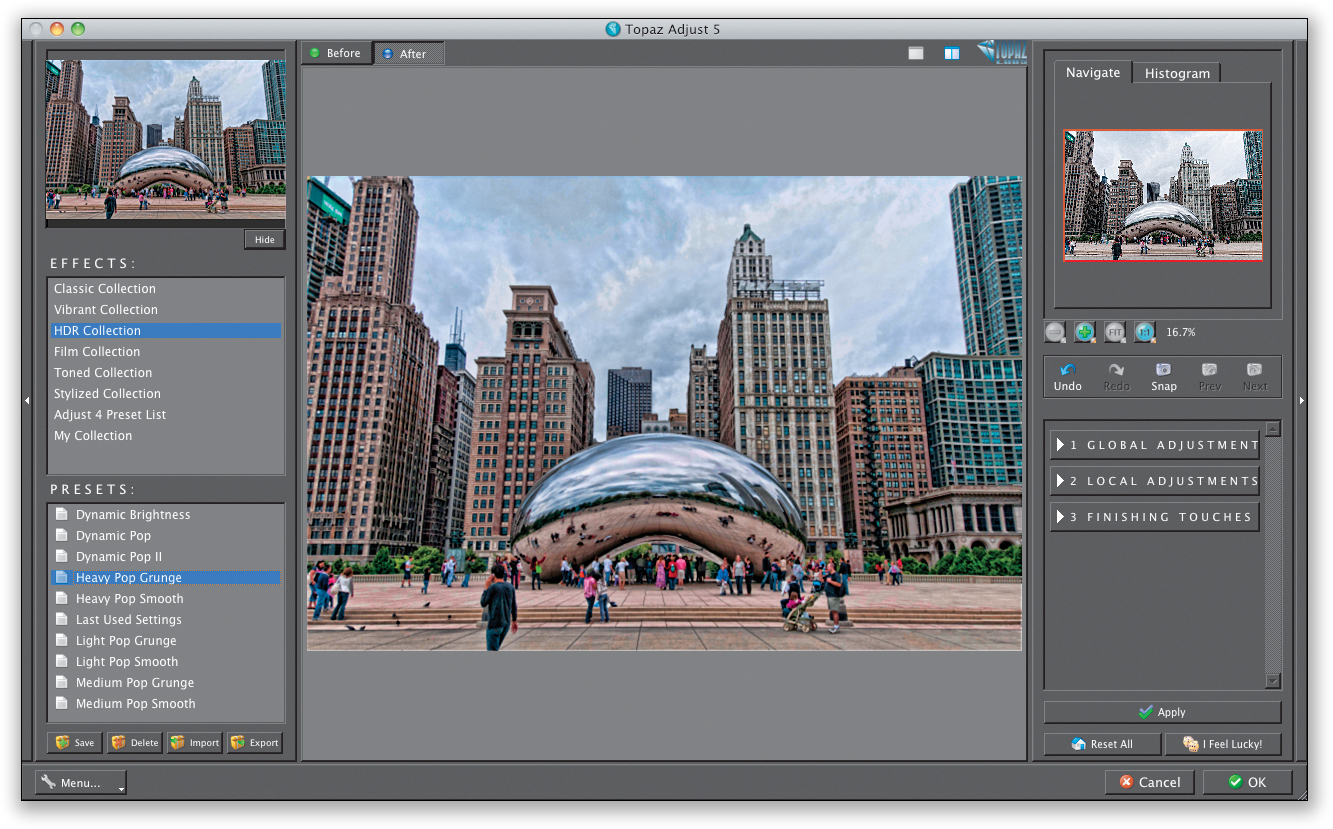
If you want a very HDR “look” to your images, but without actually shooting multiple images, download a Photoshop plug-in called Topaz Adjust (www.topazlabs.com) for around $50. Now you’re just one click away from that look, because the plug-in has a bunch of built-in presets. For example, try Detail, or perhaps Clarity, or even Portrait Drama (found under the Vibrant Collection effects), which all have different HDR-type looks. If you really like that “Harry Potter surreal look” (as we like to call it), then try either Psychedelic or HDR Sketch, under the Stylized Collection effects (oddly enough, Psychedelic looks less psychedelic than HDR Sketch). Here, I chose the Heavy Pop Grunge preset found under the HDR Collection effects. So, if this plug-in does the trick, why shoot the three- or five-image regular HDR shots at all? Well, the plug-in doesn’t capture any additional range of light, so it doesn’t expand the range of what your camera captured—it just mimics the tone-mapping (the special effect part) of HDR photos. So, you really don’t have an HDR photo—just one that most folks would assume is an HDR, especially at first glance.
What They’re Not Telling You About HDR
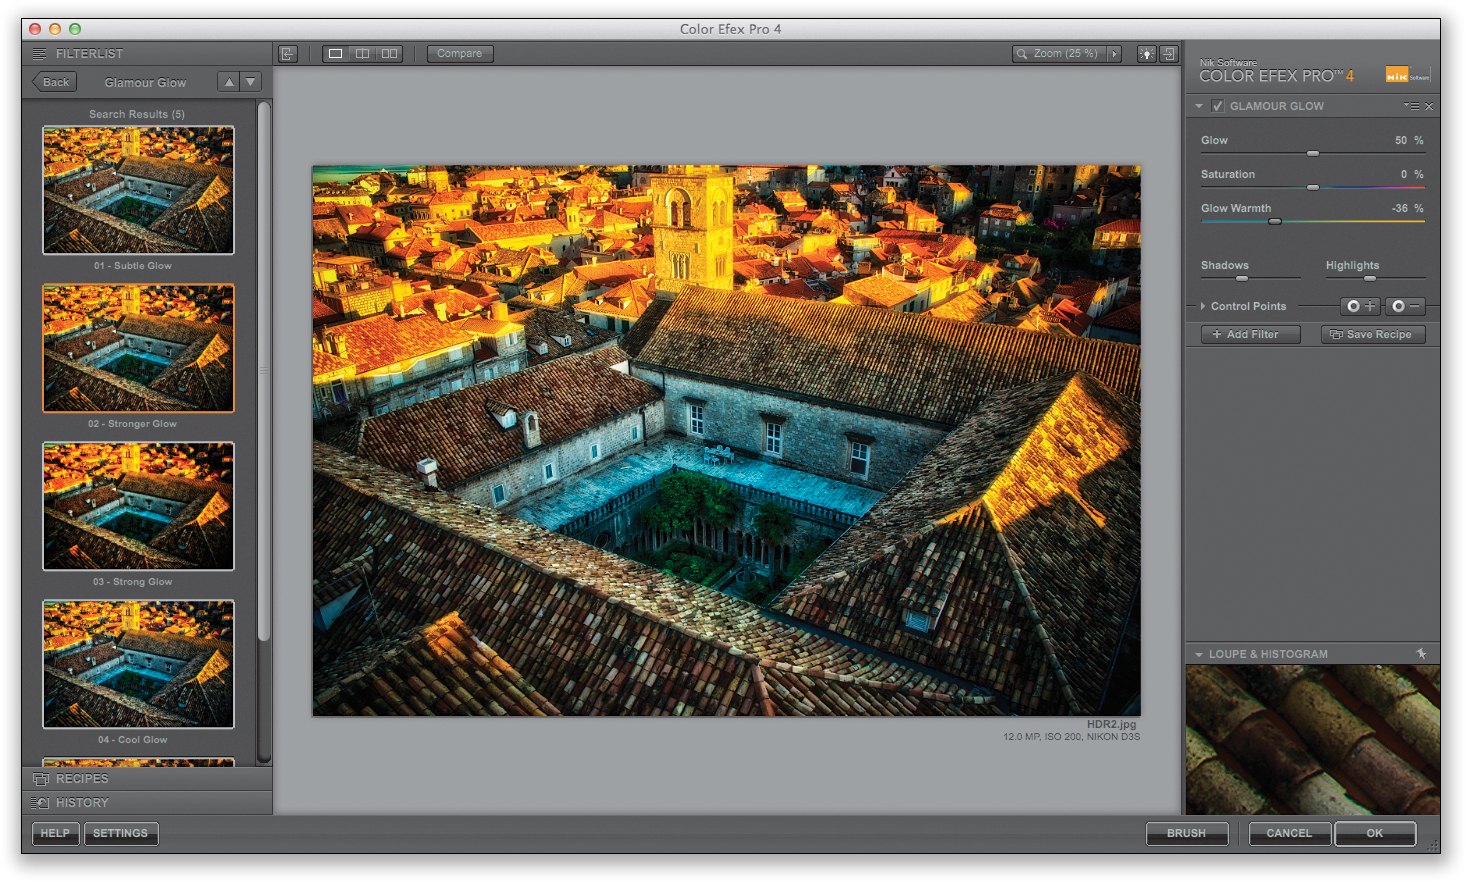
If you’ve done any research on shooting and processing HDR images, you probably know that you have to shoot bracketed photos, and then you need some program to combine those bracketed photos into one single image (like Photomatix Pro, or Photoshop’s built-in HDR Pro, or whatever). But, a lot of folks are disappointed once they’ve combined their bracketed frames into one HDR image, because they say, “My shots really don’t look like the ones I see on the web and in books. What am I doing wrong?” It’s not that they’re doing something wrong, it’s just that there’s something the pros do that few are willing to talk about. They take their compiled HDR images into Photoshop and do quite a lot of post-processing there, tweaking everything from the color to the sharpness, adding Clarity, and even running plug-ins like Nik Software’s Color Efex Pro (in particular their Tonal Contrast and Glamour Glow presets, which are very popular for finishing off HDR images). They probably spend more time in Photoshop than they do in the HDR software itself. So, if you’re wondering why your images don’t look like theirs, it’s because they’re doing one more big step to finish off their photos. Just so you know.
Fixing Halos & Other HDR Problems
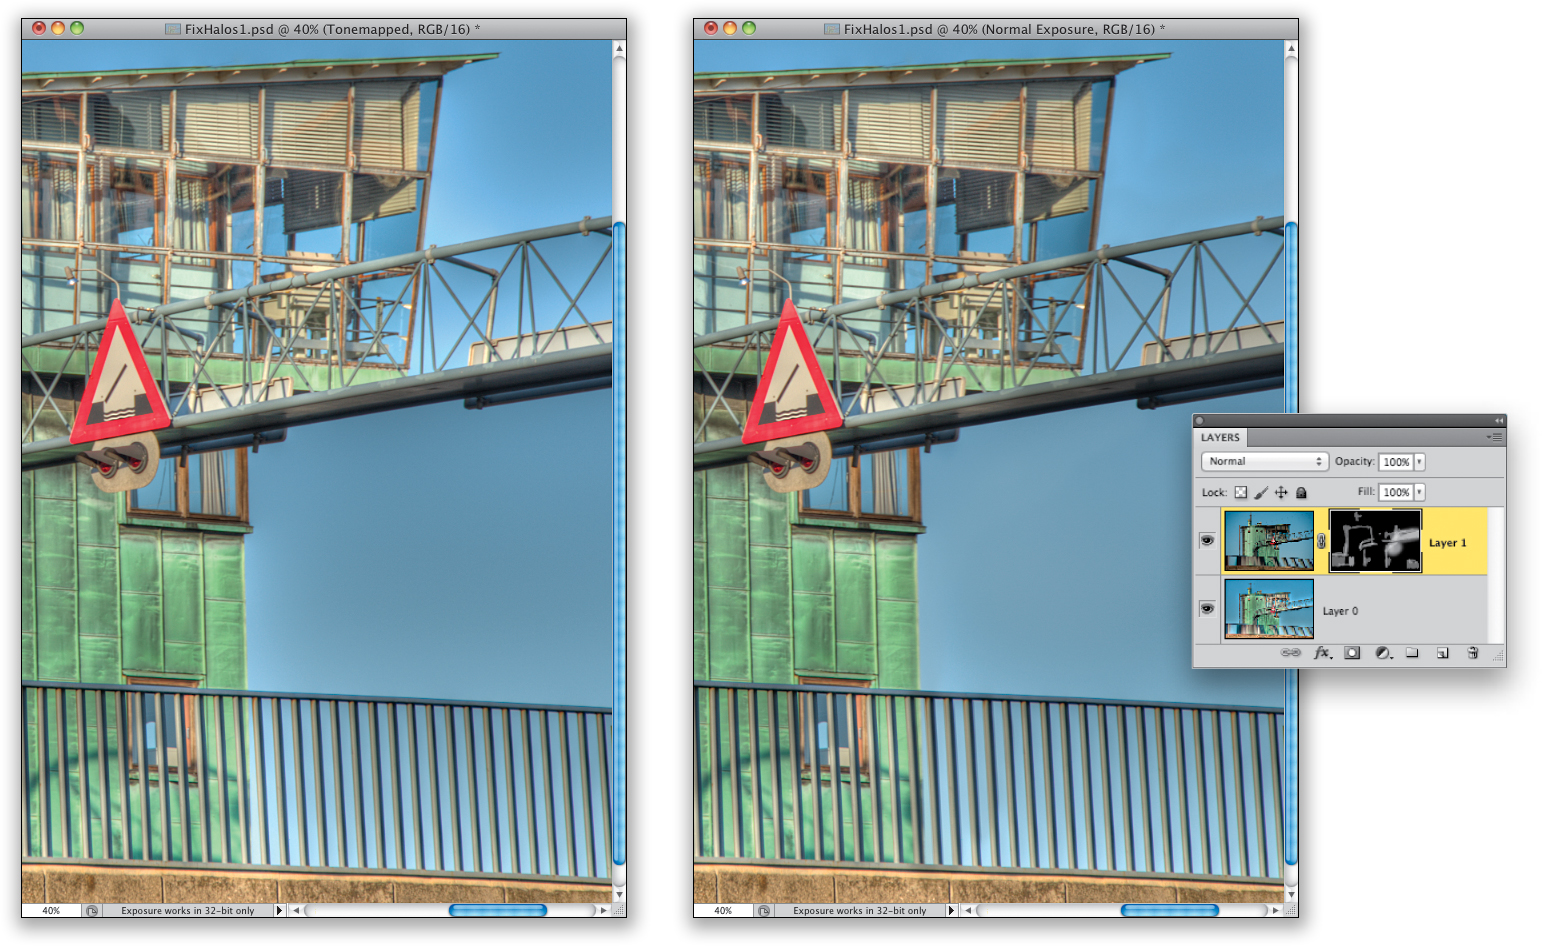
If you create an HDR image and see halos around parts of the image that look bad, or you have an area with some ghosting that wasn’t fully removed by your HDR software, here’s a trick to deal with these problem areas: Open your HDR image in Photoshop, then re-open the normal exposure image from your bracketed shots (before you converted it to HDR) in Photoshop’s Camera Raw. We want to give it a little “HDR feel” before we use it, so increase the Clarity and Contrast quite a bit (use your judgment to get it looking nice and crisp), then click Open. Now, press-and-hold the Shift key and drag that normal image right over on top of your HDR image (holding the Shift key aligns this image perfectly with the HDR shot below it). Option-click (PC: Alt-click) on the Add Layer Mask icon at the bottom of the Layers panel to put a black layer mask over your normal image, and hide it from view. Get the Brush tool and choose a small, soft-edged brush, set white as your Foreground color, and paint directly over the problem areas (with halos or ghosting), and it paints back in the normal photo in just those areas (which is why you want to use a pretty small brush—this is supposed to be a subtle touch-up). This can really work wonders, because the problems only came about once you combined the images into an HDR, so that original shot is pretty clean. If, when you paint, the original areas look too obvious, try lowering the Brush’s Opacity amount to 50% (up in the Options Bar) and try again. If you need to erase something, switch your Foreground color to black and paint it away. By the way, if you drag the original image on top and it doesn’t precisely line up with the HDR shot (which is likely), then select both layers in the Layers panel, go under the Edit menu, choose Auto-Align Layers, and click OK in the dialog to use the Auto mode (you might have to re-crop a tiny bit after it does its alignment thing).