Chapter Twelve. Yet Even More Photo Recipes to Help You “Get the Shot”: The Simple Ingredients to Make It All Come Together
SHUTTER SPEED: 1/4000 SEC F-STOP: F/2.8 ISO: 200 FOCAL LENGTH: 70MM PHOTOGRAPHER: SCOTT KELBY

The most popular chapter in the previous three books in this series has been this chapter—Photo Recipes—and I have to tell you, as an author that really makes me happy, because I always like to add something at the end of my books that takes it up a notch. Kind of the “icing on the cake,“ or the “crème de la crème,” or the “maple syrup on the spaghetti.” Anyway, these photo recipes have become so popular that I actually created a DVD/book combo called (wait for it...wait for it...) Photo Recipes Live: Behind the Scenes, where I take the same photos I featured in volume 1 of this book series and recreate how to do them live, from scratch, all filmed in a very cool New York City studio. It turned out to be a huge hit, but of course, it would be inappropriate for me to mention that here (or that it’s published by Peachpit Press, ISBN: 0-321-70175-5, street price around $30), so I won’t mention it or its hugely successful follow-up, Photo Recipes Live, Part 2: Behind the Scenes (also published by Peachpit Press, ISBN: 0-321-74971-5, also street-priced around $30). Plugging those would be out of the question, so if you think that for one minute I’m going to mention that both of these have been made available by Peachpit Press (Pearson Education) as downloadable apps for the iPad (where they both only cost $19.99, which is insanely cheap by the way), then man are you way off. You see, I think that using what should be an utterly nonsensical page in the book and turning that into a thinly veiled advertisement for other training products I’ve produced, and then using that as a springboard to promote my daily blog at www.scottkelby.com, where you can find out when and where I’m teaching the live seminars I do for http://kelbytraining.com/live, well, you’re just not going to see that type of stuff from me, because frankly, I deplore it when other authors do stuff like that. Not me, mind you. Just other authors. ;-)
The Recipe for Getting This Type of Shot
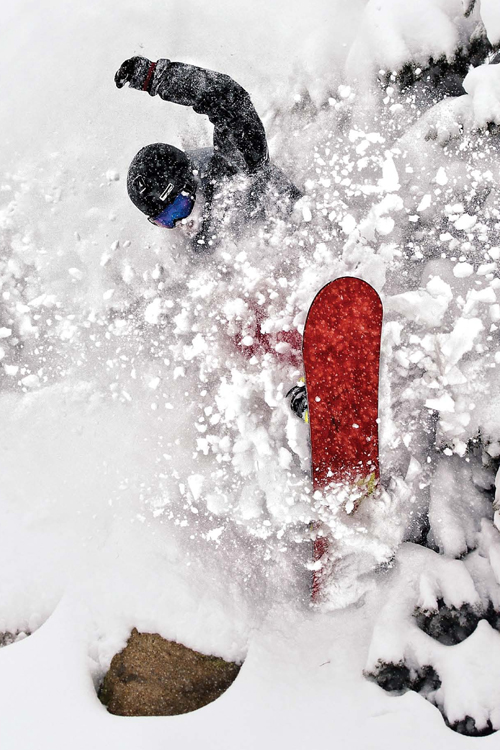
Characteristics of this type of shot: A soft, glamorous look, with the background way out of focus, and a soft-creamy look to the entire image.
(1) For this look, you’re going to need a telephoto lens (this was shot with a 70–200mm lens out at around 200mm). By zooming in tight like this, it helps to put the background out of focus, but that alone isn’t enough to make the background this out of focus. The other thing you need to do is shoot in aperture priority mode and use the smallest number f-stop you can, like f/2.8 or f/4 (if your lens will let you go that low).
(2) This is actually a natural-light shot, but the reason the light is so beautiful is because it’s taken outdoors very late in the afternoon, maybe an hour and a half before sunset. To give the shot a bit more energy, tilt the camera at a 45° angle when you take the shot.
(3) To make the light even softer, have a friend hold up a 1-stop diffuser between your subject and the sun (it’s large, round, and basically looks like a reflector, but instead of being silver or gold and reflecting light, it’s white and translucent, so it allows some of the sunlight to come through, but spreads and softens it quite a bit). Have them hold the diffuser as close to your subject’s head as they can get without it actually being in your frame, and it creates the beautiful, soft, diffused light you see here (the diffuser is above the left side of her head at a 45° angle). These diffusers are collapsible just like a reflector, and they’re fairly inexpensive, too.
The Recipe for Getting This Type of Shot
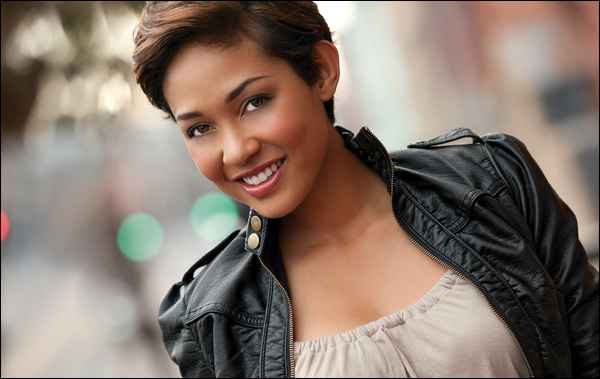
Characteristics of this type of shot: A sweeping wide-angle shot that makes the clouds look like they’re arcing out from the center.
(1) You need to use a very-wide-angle lens (the wider the better), so the minimum would be an 18mm, but ideally a little wider, like a 14mm or 12mm. When you go this wide, it really spreads the clouds out, which is part of the effect.
(2) To give the subject that larger-than-life look, get down really low (I was on my knees when I took this shot) and get really close to the subject (I was right at the edge of the wing). This exaggerates the size of your subject when you shoot up close like this with a wide-angle lens.
(3) To get soft light like this on the plane and still have a blue sky, you’ll need to shoot this just after sunrise, which means you’ll probably be shooting in lower light than you would even an hour later. So, since you’re shooting at a slower shutter speed, you’ll want to be on a tripod. That way, your image is tack sharp.
(4) Lastly, to make the chrome really pop on this image, I used the Photoshop plug-in Nik Color Efex Pro (download the free demo from www.niksoftware.com), and I used their built-in preset called “Tonal Contrast.”
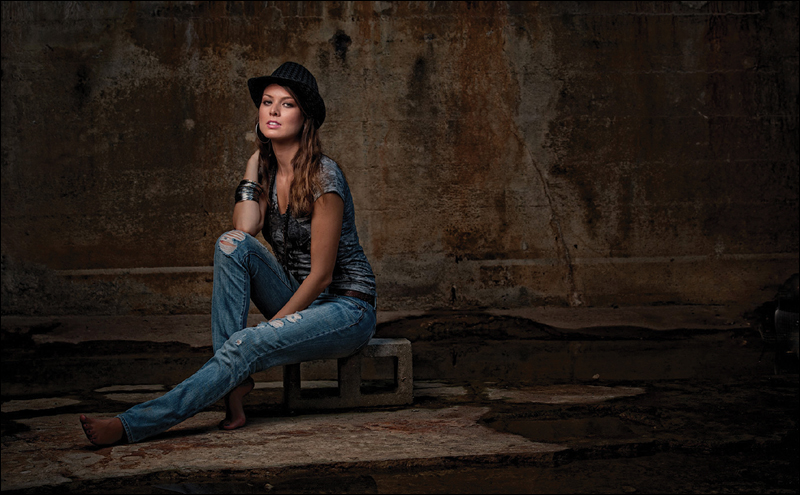
The Recipe for Getting This Type of Shot

Characteristics of this type of shot: Dark, dramatic lighting that lights your subject’s face, but then falls off very quickly (notice how the light falls off to black as it gets near the bottom of the photo, which adds to the drama).
(1) To get this type of shot, you just need one light with a small-to-medium-sized softbox, up high and aiming straight down at the floor (think of aiming the light like it’s a showerhead—tilted down as far as it will tilt on a regular light stand). Keep the power on the light about as low as it will go, since it will be so close to the subject.
(2) Start by positioning the light directly beside your subject, then slide it forward just a foot or two, and then angle it back toward your subject. Since this is only lighting one side of your subject, make sure your subject turns their body toward the light and keeps their chin up a bit, as well.
(3) To add to the drama, either use black seamless paper or position your subject at least 8 to 10 feet from the background, so your main light doesn’t spill onto the background (that way, as long as it’s dark in the room where you’re shooting, the background will still be black). Lastly, to get the “hair in the face” look, have your subject bend over, then give them a cue to snap back up straight and shoot while their hair is still moving. It’ll take a few tries to get a good shot, but luckily, the film is free.:)
The Recipe for Getting This Type of Shot
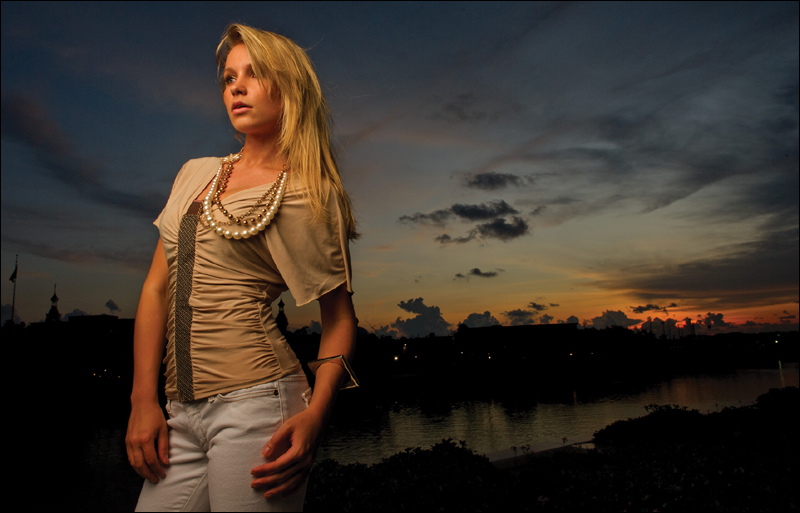
Characteristics of this type of shot: A dramatic sunset shot where your subject is lit with a single off-camera flash and the light falls off quickly from their face.
(1) The key to this shot is turning your subject into a silhouette, and then using the flash to do all of the front lighting for them. Position your subject so the setting sun is behind them. To see both your subject and a lot of the rest of the scene, use a wide-angle lens and put your subject off-center to the left or right (but don’t get them too close to the edge or they’ll distort).
(2) Next, your job is to make the sky much darker than it really is. Start by making sure your flash is turned off, then switch your camera to shutter priority mode (S), and set your shutter speed to ![]() of a second. Now, take a photo and look on the LCD on the back of your camera to see what f-stop your camera chose to make a normal exposure of the photo (let’s say it reads f/5.6). Switch to manual mode (M), set your shutter speed to
of a second. Now, take a photo and look on the LCD on the back of your camera to see what f-stop your camera chose to make a normal exposure of the photo (let’s say it reads f/5.6). Switch to manual mode (M), set your shutter speed to ![]() of a second, then enter an f-stop that is at least 2 stops darker than what it just read (so, if you were at f/5.6, try f/10 or f/11). This makes the sky much darker than it would be.
of a second, then enter an f-stop that is at least 2 stops darker than what it just read (so, if you were at f/5.6, try f/10 or f/11). This makes the sky much darker than it would be.
(3) Take another test shot, and now your subject should be a solid black silhouette against the setting sun. Turn your flash on and keep your flash power way down low (you only need a little bit of light), and take your shot. Also, either put an orange gel in front of your flash or change your White Balance to Cloudy.
The Recipe for Getting This Type of Shot
Characteristics of this type of shot: A “beauty style” shot with soft, bright light that limits the amount of shadows on the face.
(1) There are just two lights on the subject: the main light is a beauty dish that’s directly in front of the subject, but up about two feet above her face, aiming down at her at a 45° angle. The other light is a large softbox (although the size doesn’t really matter), aiming up at her at a 45° angle. Position the camera height right at her eye level.
(2) To keep everything in focus, from front to back, you’ll need to use an f-stop that holds details (like f/11) and a long enough lens (like a 200mm) to give nice perspective.
(3) To make the background pure white, you’ll need to aim a single strobe at it. It can be a bare bulb with a reflector (well, that’s what I used anyway), and put it about 4 feet from the background, down low on a light stand, aiming upward at the background.
(4) If you don’t have three lights, then use a reflector panel for the bottom light instead—just have your subject hold it flat at their chest level, as high as possible without being seen in the frame.
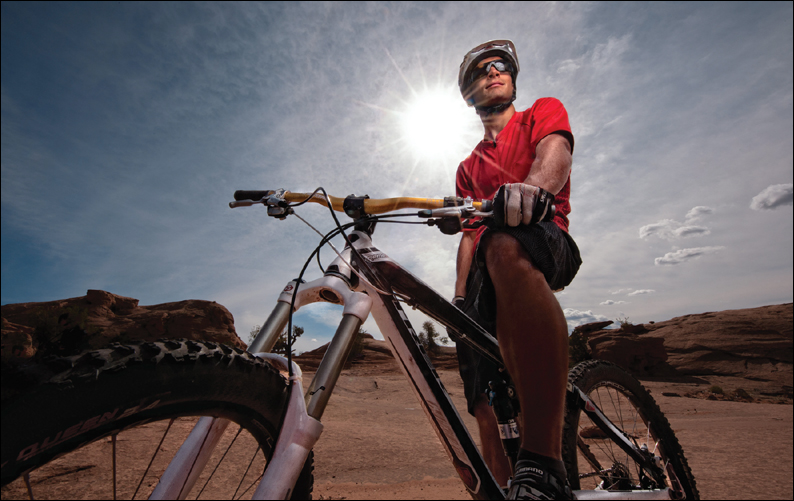
The Recipe for Getting This Type of Shot
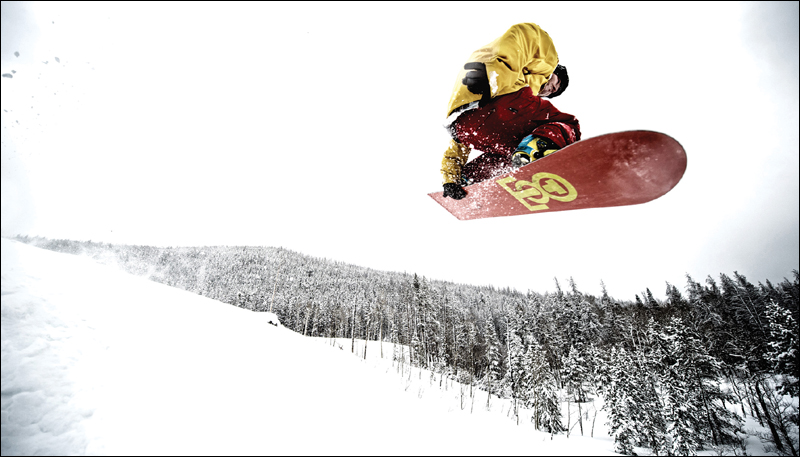
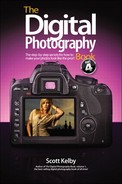
Characteristics of this type of shot: An action sports shot with the motion frozen, a larger-than-life perspective, and with a popular sports special effect to finish it off.
(1) The key to this shot is getting a low perspective with a wide-angle lens, like a 14mm or 12mm lens, and then literally lying on the ground, shooting up at the subject (in this case, a snowboarder).
(2) This was taken in the middle of the day, in direct sunlight, in aperture priority mode, at f/2.8, and at that wide-open an f-stop, you get around ![]() of a second, which is more than enough to freeze the athlete in mid-air (you only need around
of a second, which is more than enough to freeze the athlete in mid-air (you only need around ![]() of a second or so to freeze action). Because your shutter speed is so fast, you can hand-hold a shot like this, no problem (plus, it would be really hard to pan along with the snow-boarder if you were on a tripod).
of a second or so to freeze action). Because your shutter speed is so fast, you can hand-hold a shot like this, no problem (plus, it would be really hard to pan along with the snow-boarder if you were on a tripod).
(3) To get that “blown-out” special effect look, you can use one of the built-in presets in the Photoshop plug-in Nik Color Efex Pro from www.niksoftware.com (you can download a fully working demo version from their site). The particular preset I used here is called “Bleach Bypass” and it replicates a popular traditional darkroom effect.
The Recipe for Getting This Type of Shot
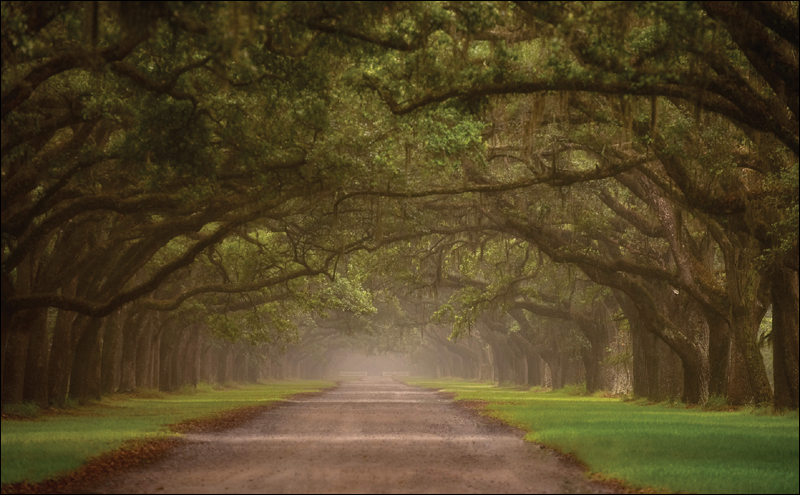
Characteristics of this type of shot: A soft, misty landscape with lots of depth and dimension.
(1) To get a shot like this, you have to either get up early and be in position before dawn (that’s when this shot was taken) or shoot it late in the day, right around sunset. The foggy mist you see is a big part of landscape photography—it’s called luck. You can increase your luck by visiting the same location more than once. This was taken the second day of shooting in the exact same location—the previous day had no mist whatsoever.
(2) This is shot in fairly low light (maybe 30 minutes after sunrise), so you’ll need to be on a tripod to keep your camera still enough for a really sharp shot. You’ll also need to use a cable release, so you don’t introduce even a tiny bit of vibration by touching the camera when you press the shutter button. Also, shooting from a low perspective gives the shot its “bigness,” so put your tripod down so low you have to shoot on your knees.
(3) To have detail throughout the image, I recommend shooting at f/22, an ideal f-stop for telling a big sweeping story. Also, to add visual interest, don’t put the road in the dead center of the photo (because that’s dead boring—notice how it’s cheated over to the left a bit?) and don’t put your horizon line in the middle of the photo, because that’s what your average person would do, and you don’t want your images to look average.
The Recipe for Getting This Type of Shot
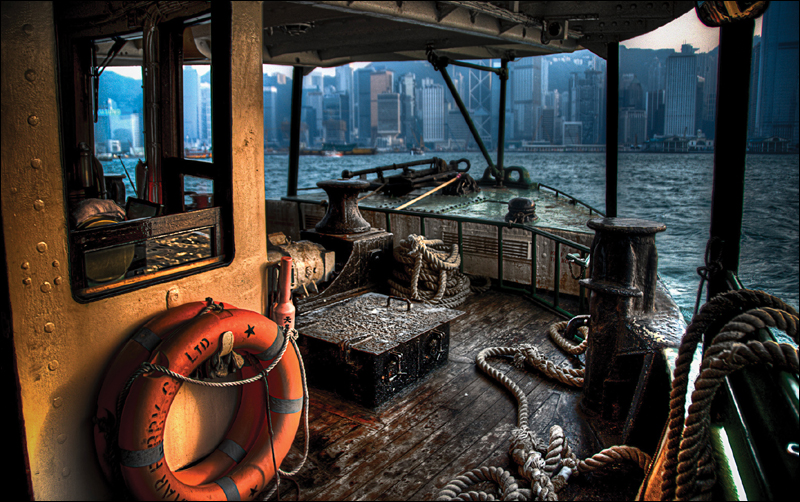
Characteristics of this type of shot: A dark, gritty, tone-mapped HDR shot taken on a moving boat.
(1) Part of the art of shooting any HDR photo is finding an image that makes a good HDR image. Anything with a wide range of brightness (the dark interior of the boat, versus the bright outdoors), along with features that have a lot of texture (note the wood floor, rope, the old metal on the boat, the life preserver, and the rusty boat parts that just scream, “Make me an HDR shot!”), generally works well.
(2) Because the boat is moving, you’re going to need to steady yourself by leaning on a pole or a railing. You’re going to need at least three bracketed frames to create a shot like this (see page 137)—one normal exposure, one that’s 2 stops darker, and one that’s 2 stops brighter. Because the boat is moving, you’re going to need to shoot this same exact scene over and over, and hope that you have one set of shots where all three (or five) shots are in focus. Every set won’t be, but just remember, you only need one. Don’t be afraid to raise the ISO a little to get a faster shutter speed.
(3) Once you’ve got a set in focus, you’ll need to combine those bracketed photos into one single HDR image using either Photoshop CS5’s built-in HDR Pro or a Photoshop HDR plug-in (see page 147) and add the tone mapping that gives it that “HDR’d” look.
The Recipe for Getting This Type of Shot
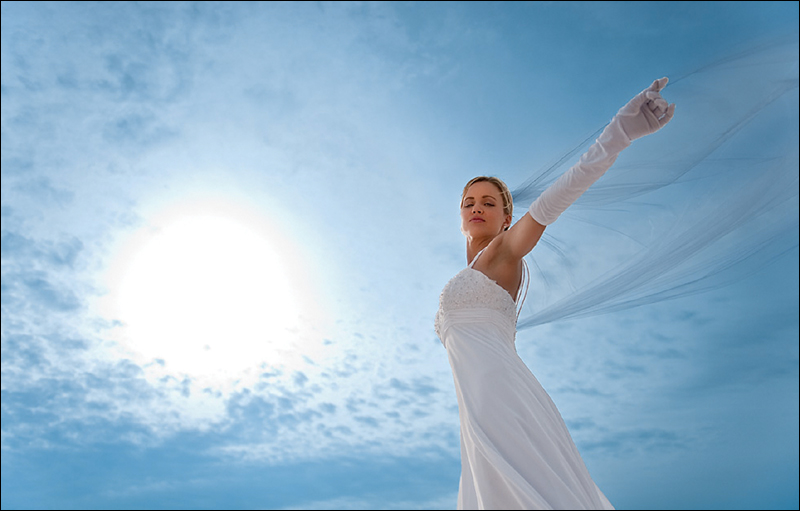
Characteristics of this type of shot: A bright, sunny shot with the sun clearly visible, but your subject isn’t lost in the shadows.
(1) This is a very easy shot to pull off—you just need a simple pop-up reflector. Position your subject so the sun is behind them or to the side (in this case, it’s beside her, but when she faces the camera, she’s fully in shadows. That’s what the reflector panel is for—to bounce some of that sunlight back into your subject’s face). The reflector should be to the left of you, held up high over the head of a friend or assistant and angled toward your subject.
(2) This was taken on a beach, but the beach wasn’t very pretty at all, with lots of vegetation right at the shoreline. So, the trick is to get down low, very low—lying down, in fact—and shoot upward at your subject with a wide-angle lens. Make sure you put your subject to one side or the other—don’t center her.
(3) This is going to sound silly, but if you’re shooting outdoors, buy a long veil. You’ll thank me, because if any tiny bit of wind comes along, it does beautiful things all by itself. If there is no wind, create your own using a second reflector panel—literally have a second friend (or assistant, or passerby) fan your subject with that large reflector. It doesn’t take much to make that veil take flight, and it creates a beautiful look.
The Recipe for Getting This Type of Shot
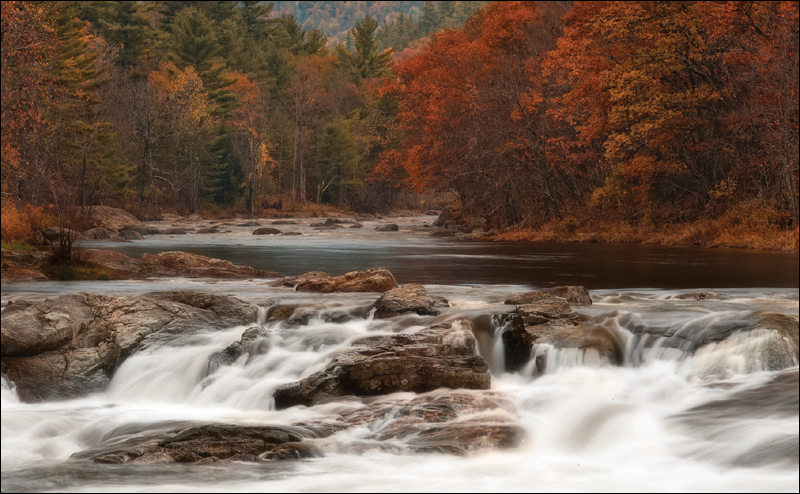
Characteristics of this type of shot: A soft-light landscape with smooth, silky water and lots of depth and dimension.
(1) To get soft light like this, you need to shoot about 30 minutes before sunset, or during a very overcast day (or, ideally, both). Here’s why: you’re going to need to use a slow shutter speed to make that water smooth and silky, so an f-stop like f/22 or even f/32 (if your lens will go that high) would be great.
(2) Because you’re using a slow shutter speed (shoot this in aperture priority mode—set your f-stop to f/22 and your camera will pick a slow shutter speed), of course you’re going to need to be shooting on a tripod, and I would recommend a cable release, as well. If you have a neutral density filter (an ND filter; see page 90), you can put it on your lens to darken the scene and make your shutter speed even longer (for a scene like this, just a 2- or 3-stop ND would do it). If you don’t have an ND filter, just put a polarizer on your lens—it will darken the scene and slow things down, as well.
(3) The compositional key here is to make the rocks in the photo the stars of the show. Make them the subject and compose the scene, so they’re right down in front. The way to shoot this, without risking life and gear by getting right in front of the stream, is to shoot it safely from the shore with a telephoto lens and close in tight on the rocks.
The Recipe for Getting This Type of Shot
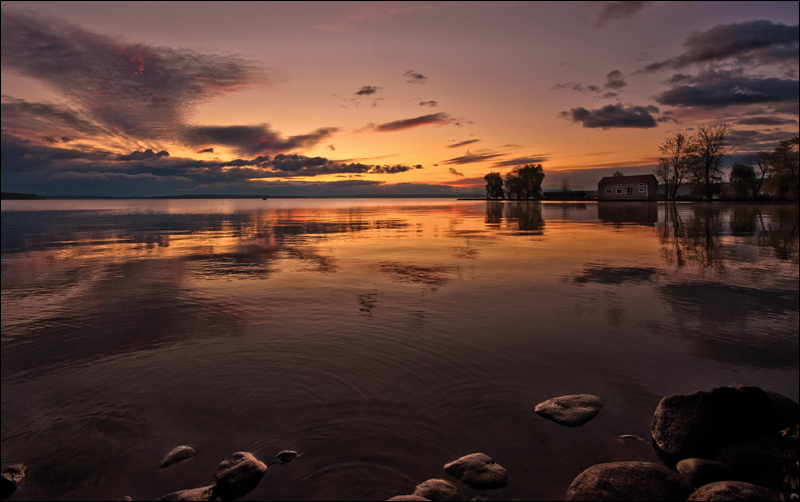
Characteristics of this type of shot: A sweeping landscape scene with a clear foreground, middle ground, and background.
(1) As you can tell, this is going to be a sunset or dawn shoot (pretty standard for great landscape photography), but the key to this shot is the composition. What makes a shot like this work is those rocks in the foreground of the shot. Without those rocks, it’s just another shot of a lake. You need those rocks to anchor the shot with a foreground, so your shot has that depth that only happens when you have all three things in place: a foreground (the rocks), the middle ground (the lake, the trees to the right of center, and the boat house), and then the clouds in the background.
(2) Dawn or dusk shots like these always need to be shot on a tripod with a cable release to limit any vibration, so everything is tack sharp. To get those rocks in the shot, you need a very-wide-angle lens, like a 12mm or 14mm ideally (although an 18mm would still work), and you have to splay your tripod legs out and get down really low to capture those rocks at that low perspective. The best thing to do is sit on the rocks and get that tripod as low as it can go. Yes, it makes that big a difference.
(3) To keep everything in focus, from front to back, use an f-stop like f/22, which is perfect for these types of shots. Now, keep your fingers crossed for a cloudy morning.
The Recipe for Getting This Type of Shot
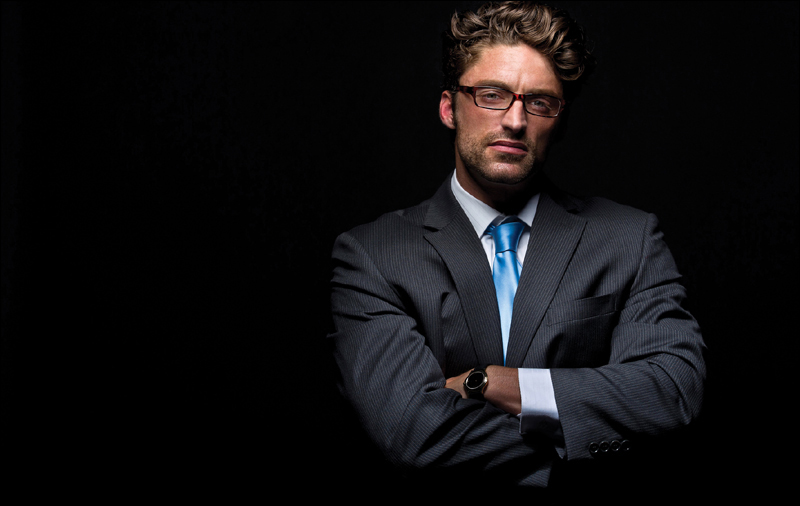
Characteristics of this type of shot: A dramatic corporate portrait with an editorial cover-shot look to it, with a fast falloff of light, where the subject’s face is lit, but then it falls off to dark very quickly.
(1) This is an amazingly simple, one-light shoot. The light is a studio strobe with a beauty dish that’s about 1 foot directly in front of the subject, but up about 2 feet above his head, aiming back at him at a 45° angle. That’s it.
(2) Because this is supposed to be a dramatic portrait, you don’t want to kill him with light, so keep the power of your strobe just about all the way down (if you’re using a hot shoe flash instead, switch the flash to Manual mode and use ¼ power, and then see if it needs to be a tad brighter or if that’s okay).
(3) Your subject isn’t moving, and you’re using flash, so you don’t have to shoot this on a tripod. I would recommend shooting in manual mode. For your starting place settings, try f/11, so everything is perfectly in focus, and set your shutter speed to ![]() of a second (that way, you don’t have any sync speed issues). Lastly, move your camera’s focus point directly onto his eye (the one closest to the camera), press-and-hold your shutter button halfway down to lock the focus, and keep it held down. Now, compose the shot the way you want (here, I put him way over to the right) and take the shot.
of a second (that way, you don’t have any sync speed issues). Lastly, move your camera’s focus point directly onto his eye (the one closest to the camera), press-and-hold your shutter button halfway down to lock the focus, and keep it held down. Now, compose the shot the way you want (here, I put him way over to the right) and take the shot.
The Recipe for Getting This Type of Shot
Characteristics of this type of shot: A location shoot with hot shoe flash, taken in bright, harsh mid-day sun.
(1) When shooting in the mid-day sun, the first thing to do is place the sun behind your subject (as seen here). At this point, your job is to make the sky behind your subject darker than it really is. To do that, start by turning your flash off. Then, switch to shutter priority mode, set your shutter speed to ![]() of a second, and take a shot. Now, look at the photo on the back of your camera and make note of the f-stop your camera chose at that shutter speed.
of a second, and take a shot. Now, look at the photo on the back of your camera and make note of the f-stop your camera chose at that shutter speed.
(2) Switch to manual mode, enter ![]() of a second for your shutter speed, then enter an f-stop that’s 2 stops darker than what your camera chose in the previous shot (your flash is still turned off at this point). Let’s say your f-stop was f/8. You’ll need to change it to f/11 or f/13. Now, take another shot. The sky should be darker and your subject should be a backlit silhouette.
of a second for your shutter speed, then enter an f-stop that’s 2 stops darker than what your camera chose in the previous shot (your flash is still turned off at this point). Let’s say your f-stop was f/8. You’ll need to change it to f/11 or f/13. Now, take another shot. The sky should be darker and your subject should be a backlit silhouette.
(3) Turn on your hot shoe flash and crank it up to full power. Make sure your flash has some thing in front of it to soften the light from it (a small softbox, a shoot-through umbrella, etc.). Move that flash in close to your subject (just outside your frame), then get down low on one knee with a wide-angle lens, and take a test shot. If the flash is too bright, lower the power and try again, until the light looks natural.
The Recipe for Getting This Type of Shot
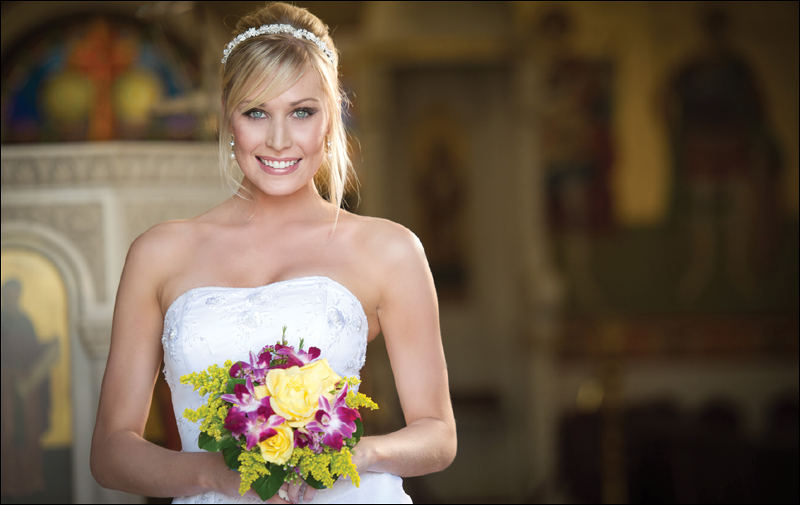
Characteristics of this type of shot: A mixture of natural light and a strobe create dimension and a feeling that the shot is all natural light.
(1) This is one you can try in the doorway of a church, but make sure the doors are pulled back enough so that you don’t see them (this was a double-door opening here). Ideally, you’d want to find a door that is not facing directly into the sun, and then place your bride just inside the door, as seen here. Since there’s no harsh light falling directly on her, the light is soft (like window light), but at the same time, it’s kind of flat, which is why we want to add a strobe on one side to add dimension.
(2) The strobe, with a square 27" softbox, is just off the right side of the photo and behind the bride at a 45° angle, and it adds just enough light to make it look like natural light streaming in through a window.
(3) The strobe is running off a battery pack (it’s often hard to find convenient power outlets in a church), is connected to a monopod (held by a friend), and is up higher than the bride, aiming down at an angle, like the sun would aim. To get the background out of focus, shoot at an f-stop like f/2.8 or f/4, if possible (use the lowest number you can). We generally shoot strobes in manual mode and, to make sure the strobe stays in sync with your camera, set your shutter speed at ![]() of a second.
of a second.
The Recipe for Getting This Type of Shot
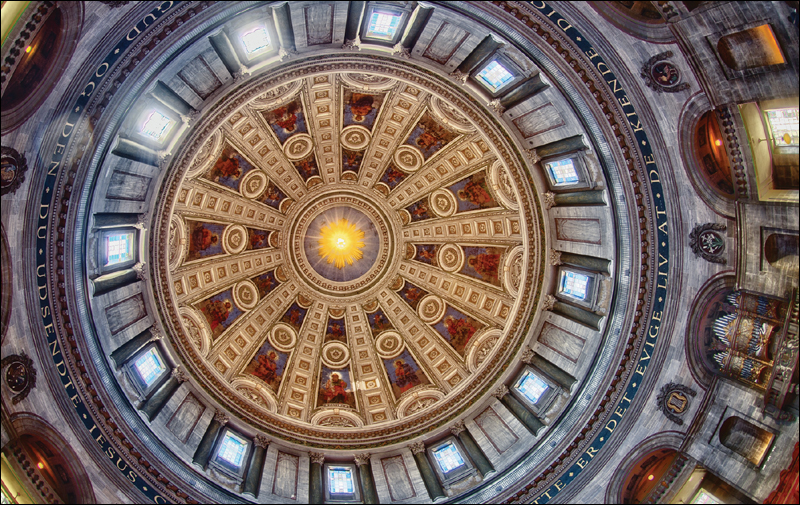
Characteristics of this type of shot: An HDR shot taken inside a dimly lit church, aiming straight up to capture the detail in the ceiling.
(1) This is trickier than it looks because: (a) most buildings that have a ceiling you actually want to shoot won’t let you use a tripod; and (b) even if you could use a tri pod, it’s not easy to set one up with your camera aiming straight up (in fact, for many, it’s impossible), so this is one indoor HDR shot you often have to hand-hold.
(2) Hand-holding in a dark church means you’re going to need to raise the ISO quite a bit, or one or more of your frames is going to be blurry. Also, you won’t be able to shoot at f/8 when it’s kind of dark like this, so use the lowest number f-stop you can (in this case, it was f/3.5).
(3) To get this sweeping of an expanse, this was shot with a 10.5mm fisheye lens, but you could get almost as much from a 12mm or 14mm lens. The problem isn’t how wide the lens is; the problem is keeping it still while you’re taking the shot.
(4) You can get step-by-step details in Chapter 9, but set up your camera to shoot in burst mode and then turn on Exposure Bracketing. Gently press-and-hold the shutter button and hold as still as you can until all three (or five) exposures are complete. If there’s anything to lean against to help steady yourself, that will make a big difference. To get the HDR look, you’ll need to compile the bracketed frames into one single image (see page 147) and then finish them off in Photoshop or Photoshop Elements.
The Recipe for Getting This Type of Shot
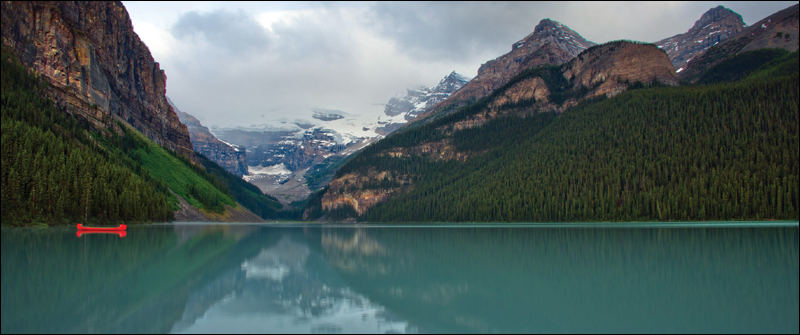
Characteristics of this type of shot: Still, glassy water and a sweeping landscape.
(1) The key to this type of shot is to shoot it at dawn or just after dawn, because that’s the most likely time to find glassy water with reflections like this. Literally an hour or so later, and in many cases, you will have missed your chance as the winds pick up and the water gets choppy. (Note: In this location, the water was only still right around dawn—by 10:00 a.m., it was so choppy you wouldn’t want to shoot it even if the light was good.)
(2) Of course, in the low light of dawn, you’ll need to be shooting on a tripod, using a cable release to minimize vibration, and you’d shoot at f/22 to take it all in.
(3) Besides the still, glassy water, what makes this shot is the lone red canoe off to the left. It helps to make up for the fact that there’s nothing at the bottom of the frame to act as a foreground element. The red pulls your eye and gives the shot some visual interest, but it’s still not as strong as a foreground element. Your job when composing a shot like this is to position your composition so the canoe appears in an interesting place in the photo (like off to the left). I could have just as easily walked to the left a bit and put that canoe right in the center of my image, which would have made it too obvious and drained all the energy out of the composition with its placement.
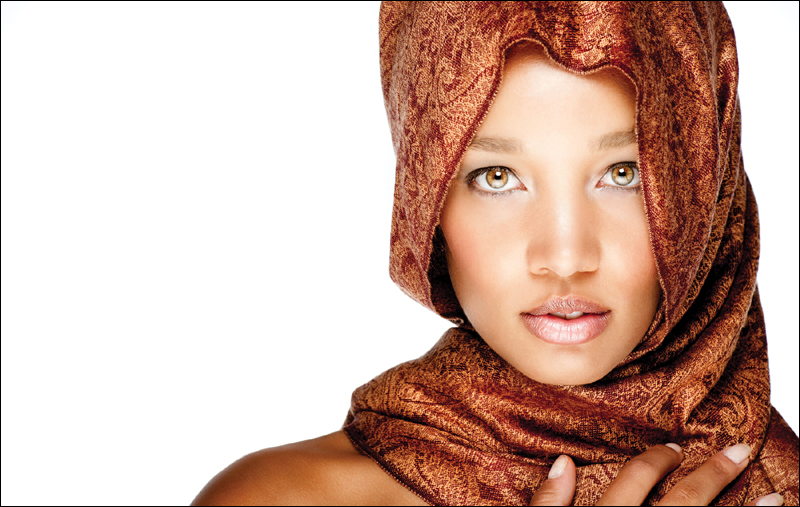
The Recipe for Getting This Type of Shot
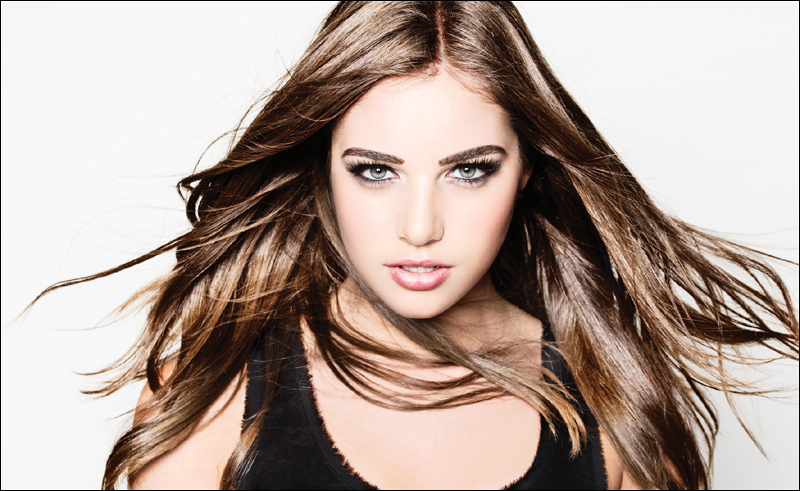
Characteristics of this type of shot: The shadowless look of a ring light without the dark shadow glows and overly punchy light.
(1) If you want all the good stuff of the ring-light look (bright, fashion-looking lighting) without the halo shadows and super-punchy, not particularly flattering light, just position a very large softbox directly in front of your subject, aiming straight back at them (don’t tilt it—it should be flat, straight up and down).
(2) Position your subject in front of a white seamless paper background (the light from the front light will light the white seamless since it’s aiming directly at it, so don’t position your subject any farther than about 4 to 6 feet in front of the softbox).
(3) Now, you are actually going to stand in front of that large softbox (one reason why it needs to be large), and then squat down a little so you are at your subject’s eye level and the only part of you that is sticking up in front of the softbox is your head.
(4) Shoot in manual mode and use f/8 or f/11, so everything is perfectly in focus, and set your shutter speed to ![]() of a second. Aim your focus point at the eye closest to the camera, then press-and-hold your shutter button halfway down to lock the focus. Now, compose the shot the way you want and shoot. Start with your strobe at ½ power and see if that’s bright enough. If not, crank it up a bit until it looks like what you see above. I also added the Bleach Bypass filter in Nik Software’s Color Efex Pro to finish it off.
of a second. Aim your focus point at the eye closest to the camera, then press-and-hold your shutter button halfway down to lock the focus. Now, compose the shot the way you want and shoot. Start with your strobe at ½ power and see if that’s bright enough. If not, crank it up a bit until it looks like what you see above. I also added the Bleach Bypass filter in Nik Software’s Color Efex Pro to finish it off.
The Recipe for Getting This Type of Shot
Characteristics of this type of shot: On-location flash, with just a hint of light.
(1) The key to this shot is how you position the flash. Mount your flash on a light stand and use a small softbox (or shoot-through umbrella, but I really think you get much better, more concentrated results from a small softbox like a Lastolite EzyBox).
(2) You want to position the light up higher than your subject, aiming down, so it’s aimed at your subject’s face, but the angle is such that the light then falls on the ground and doesn’t spill too much on the background, so the rest of the scene falls to black. To keep from having the ground too bright, you’re going to pull a trick that is half a camera trick, and half a Photoshop trick (like I mentioned in Chapter 2).
(3) Set your camera to continuous shooting (or burst) mode (you’ll need to press-and-hold the shutter button until your camera takes two rapid-fire shots). The flash will fire with the first shot, but won’t have time to recycle for the second shot, which is great, because you need one that shows the ground below your subject without flash. Open both photos in Photoshop. Get the Move tool, press-and-hold the Shift key, and drag the shot without flash on top of the one with flash. Option-click (PC: Alt-click) on the Add Layer Mask icon at the bottom of the Layers panel to hide the one without flash behind a black mask. Take the Brush tool, set your Foreground color to white, choose a medium-sized, soft-edged brush, and paint over the ground to bring the ground without the flash back in, for a very natural-light look.