
A UITableView displays a list of UITableViewCells. For many applications, the basic cell with its textLabel, detailTextLabel, and imageView is sufficient. However, when you need a cell with more detail or a different layout, you subclass UITableViewCell.
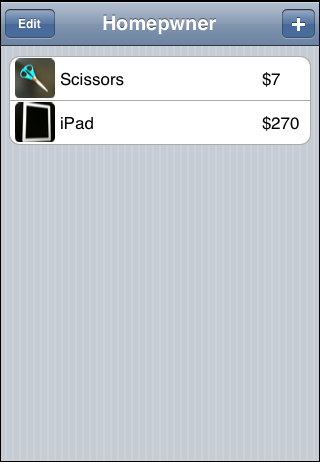
In this chapter, you will create a custom subclass of UITableViewCell to display Possession instances more eloquently. Each of these cells will show a Possession’s name, its value in dollars, and a thumbnail of its image (Figure 16.1).
Open Homepwner.xcodeproj. Create a new NSObject subclass and name it HomepwnerItemCell. In HomepwnerItemCell.h, change the superclass to UITableViewCell and import the header file from UIKit.
#import <Foundation/Foundation.h> #import <UIKit/UIKit.h> @interface HomepwnerItemCell : UITableViewCell
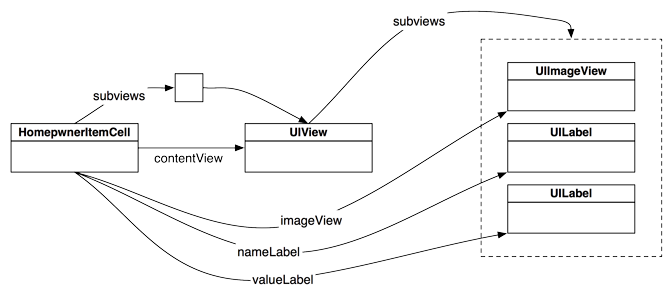
UITableViewCell is a UIView subclass. When subclassing UIView (or any of its subclasses), you typically override its drawRect: method to customize the view’s appearance. However, when subclassing UITableViewCell, you don’t change the cell’s appearance directly. Each cell has a subview named contentView, which is a container for the view objects that make up the layout of a cell subclass (Figure 16.2). You subclass UITableViewCell by changing the view objects in a cell’s contentView. For instance, you could create instances of the classes UITextField, UILabel, and UIButton and add them to the contentView. (If you wanted something even more daring, you could create a UIView subclass, override its drawRect:, and add an instance of it to the contentView.)
Adding subviews to the contentView instead of directly to the UITableViewCell subclass is important because the cell will resize the contentView at certain times. For example, when a table view enters editing mode, the contentView redraws itself to make room for the editing controls (Figure 16.3). If you were to add subviews directly to the UITableViewCell, these editing controls would obscure the subviews. The cell doesn’t know to adjust its size when entering edit mode, but the contentView does.

In your cell subclass, you need an instance variable for each subview so that you can set its content as it is displayed in a table view. In HomepwnerItemCell.h, create instance variables for the necessary subviews.
#import <UIKit/UIKit.h>
@interface HomepwnerItemCell : UITableViewCell
{
UILabel *valueLabel;
UILabel *nameLabel;
UIImageView *imageView;
}
@end
When an instance of HomepwnerItemCell is created, it will instantiate its valueLabel, nameLabel, and imageView. Then, these subviews will be added to the cell’s contentView. Override the designated initializer in HomepwnerItemCell.m to do this. HomepwnerItemCell.m should now look like this:
#import "HomepwnerItemCell.h"
#import "Possession.h"
@implementation HomepwnerItemCell
- (id)initWithStyle:(UITableViewCellStyle)style
reuseIdentifier:(NSString *)reuseIdentifier
{
self = [super initWithStyle:style reuseIdentifier:reuseIdentifier];
if (self) {
// Create a subview - don't need to specify its position/size
valueLabel = [[UILabel alloc] initWithFrame:CGRectZero];
// Put it on the content view of the cell
[[self contentView] addSubview:valueLabel];
// It is being retained by its superview
[valueLabel release];
// Same thing with the name
nameLabel = [[UILabel alloc] initWithFrame:CGRectZero];
[[self contentView] addSubview:nameLabel];
[nameLabel release];
// Same thing with the image view
imageView = [[UIImageView alloc] initWithFrame:CGRectZero];
[[self contentView] addSubview:imageView];
// Tell the imageview to center its image inside its frame
[imageView setContentMode:UIViewContentModeCenter];
[imageView release];
}
return self;
}
@end
When a table view’s data source is asked for a cell, it creates a cell, configures its content, and returns it to the table view. The table view then adds the cell as a subview of itself and positions and sizes the cell. Therefore, when you first create a cell, it doesn’t know its size quite yet. For this reason, you do not set the frames of a cell’s content view at initialization time. Instead, you wait until the cell knows how big it is.
When a view changes size, it is sent the message layoutSubviews. Because UITableViewCell (and therefore HomepwnerItemCell) is a subclass of UIView, it also is sent layoutSubviews when its size changes.
In HomepwnerItemCell.m, override layoutSubviews to give each of the subviews a frame. (If you have a hard time picturing the sizes of frame rectangles in your head, draw them out on a piece of paper first.)
- (void)layoutSubviews
{
// We always call this, the table view cell needs to do its own work first
[super layoutSubviews];
// We'll use this to add spacing between borders
float inset = 5.0;
// How much space do we have to work with?
CGRect bounds = [[self contentView] bounds];
// Let's pull out of the height and width
// into easier-to-type variable names
float h = bounds.size.height;
float w = bounds.size.width;
// This will be a constant value for the valueField's width
float valueWidth = 40.0;
// Create a rectangle on the left hand side of the cell for the imageView
CGRect imageFrame = CGRectMake(inset, inset, 40, 40);
[imageView setFrame:imageFrame];
// Create a rectangle in the middle for the name
CGRect nameFrame = CGRectMake(imageFrame.size.width + imageFrame.origin.x + inset,
inset,
w - (h + valueWidth + inset * 4.0),
h - inset * 2.0);
[nameLabel setFrame:nameFrame];
// Create a rectangle on the right side of the cell for the value
CGRect valueFrame = CGRectMake(nameFrame.size.width + nameFrame.origin.x + inset,
inset,
valueWidth,
h - inset * 2.0);
[valueLabel setFrame:valueFrame];
}
This method is fairly ugly, but let’s look at it more closely. First, you always invoke the superclass’ implementation of layoutSubviews. Invoking this method allows the UITableViewCell to layout its subview, the contentView. Then, you get the bounds of the contentView to find out how much area you have to work with when sizing and positioning all of the subviews. (If you don’t invoke the superclass’ implementation of layoutSubviews, the bounds of the contentView may not be correct.) Finally, you set the frame of each subview relative to the contentView’s bounds. This process ensures that instances of HomepwnerItemCell will have an appropriate layout regardless of the size of the UITableViewCell.
Now let’s look at the two options for setting the content of the subviews (imageView, nameLabel, and valueLabel). The first option is to create a property for each subview to use when you set the cell content in tableView:cellForRowAtIndexPath: (like you are currently accessing the textLabel property of each cell). The second option is to pass the cell an instance of Possession and have it fill its own subviews. In this chapter, you will use the second option. Either way is perfectly reasonable; however, in the second option, the HomepwnerItemCell is made specifically to represent a Possession instance, so the code is written in a way that’s easier to follow. (The drawback is that HomepwnerItemCell will only be able to represent Possession instances.)
In HomepwnerItemCell.m, implement the method setPossession: to extract values from a Possession instance and display them in the cell.
- (void)setPossession:(Possession *)possession
{
// Using a Possession instance, we can set the values of the subviews
[valueLabel setText:
[NSString stringWithFormat:@"$%d", [possession valueInDollars]]];
[nameLabel setText:[possession possessionName]];
}
Note that we’re not setting the imageView yet. We’ll get to that in the next section.
Also, declare setPossession: in HomepwnerItemCell.h:
@class Possession;
@interface HomepwnerItemCell : UITableViewCell
{
UILabel *valueLabel;
UILabel *nameLabel;
UIImageView *imageView;
}
- (void)setPossession:(Possession *)possession;
@end
You can build the application to make sure there are no compile errors. Running it won’t show anything new because you aren’t yet returning HomepwnerItemCells from the UITableView data source method implemented by ItemsViewController. In ItemsViewController.m, import the header file for HomepwnerItemCell.
#import "HomepwnerItemCell.h" @implementation ItemsViewController
In ItemsViewController.m, update the method tableView:cellForRowAtIndexPath: to return instances of your new cell subclass.
- (UITableViewCell *)tableView:(UITableView *)tableView
cellForRowAtIndexPath:(NSIndexPath *)indexPath
{
// Get instance of a HomepwnerItemCell - either an unused one or a new one.
// The method returns a UITableViewCell; we typecast it as a HomepwnerItemCell.
HomepwnerItemCell *cell = (HomepwnerItemCell *)[tableView
dequeueReusableCellWithIdentifier:@"HomepwnerItemCell"];
if (!cell) {
cell = [[[HomepwnerItemCell alloc]
initWithStyle:UITableViewCellStyleDefault
reuseIdentifier:@"HomepwnerItemCell"] autorelease];
}
NSArray *possessions = [[PossessionStore defaultStore] allPossessions];
Possession *p = [possessions objectAtIndex:[indexPath row]];
// Instead of setting each label directly, we pass it a possession object
// it knows how to configure its own subviews
[cell setPossession:p];
return cell;
}
Notice that the dequeueReusableCellWithIdentifier: method returns a UITableViewCell that we typecast as a HomepwnerItemCell because we know that’s what we’re getting back. Remember that typecasting does not change anything about the object; it only helps the compiler know what messages are valid.