
Now that CocoaServer has the device token of its client application, it can send a notification package to Apple’s push notification server. The first step in this process is connecting to the notification server with NSStream. Once we have a connection, we’ll pack up and send the notification data that will eventually be sent to the device.
Apple requires that the data sent to its server from the provider be encrypted. This is where the SSL certificate you downloaded comes into play – the provider must encrypt its outgoing data with this certificate.
Locate the aps_developer_identity.cer file that you downloaded earlier. Double-click on it to add it to your Login keychain. In Keychain Access, you should see this certificate and its private key (Figure 29.6). Remember that the certificate that signs your application for deployment is different than the certificate used to encrypt data.

To make it easy for CocoaServer to find this certificate, you will bundle it with the application. Drag aps_developer_identity.cer to CocoaServer’s project navigator and check the box to copy it to the project’s directory. Now, when CocoaServer is built, it will have access to this certificate.
The provider will make a connection to Apple’s push notification server and secure the data it sends by signing it with this certificate. This connection to the notification server should stay open even if you aren’t currently sending push notifications; if you close and re-open the connection multiple times, Apple may think you are trying to flood the server and reject your connection. Therefore, when CocoaServer starts, you will initiate a connection to the notification server and keep it open.
In CocoaServerAppDelegate.h, declare three new methods and two new instance variables.
NSOutputStream *writeStream; NSInputStream *readStream; } - (void)configureStreams; - (NSArray *)certificateArray; - (void)connectToNotificationServer;
The implementation of connectToNotificationServer will open a streaming connection to the notification server. A streaming connection is kept alive, and the two connected machines are free to send data to each other whenever they please.
Let’s get some network theory out of the way. In Unix (on which iOS is built), we use file descriptors to transfer data. We can think of a file descriptor as a wormhole. We put data into it, and that data appears at the other end. Data arrives the same way. The operating system handles where that data goes to or comes from; we just interface with our end of the file descriptor. The other side of a file descriptor may be connected to a file on the filesystem or to the network hardware that talks to the Internet. This is low-level stuff, and a number of abstractions have been built on top of it to make our lives easier. You don’t have to know about file descriptors to load a file, but that’s what is happening underneath the hood.
When a file descriptor is used to channel data to and from the network hardware, we call it an internet socket (or more commonly, just a socket). When you put data into an internet socket, it ends up on another machine. When that machine sends back data, you can read that data from a socket. Thus, a streaming connection is really just two sockets: one that you put data on and one that you take data from.
In connectToNotificationServer, you’re going to create your sockets and connect them using the C-level Core Foundation framework. The function CFStreamCreatePairWithSocketToHost returns two stream objects of type CFWriteStreamRef and CFReadStreamRef.
These Core Foundation classes are toll-free bridged with the two classes from Apple’s streaming API: NSOutputStream and NSInputStream. You will use instances of these classes to manage your connected sockets.
In CocoaServerAppDelegate.m, implement connectToNotificationServer.
- (void)connectToNotificationServer
{
// Connect to push notification server, we get back two stream objects
// that will allow us to write to and read from that server
CFStreamCreatePairWithSocketToHost(NULL,
(CFStringRef)@"gateway.sandbox.push.apple.com",
2195,
(CFReadStreamRef *)(&readStream),
(CFWriteStreamRef *)(&writeStream));
// Open up the streams
[readStream open];
[writeStream open];
// Make sure that opening didn't fail
if ([readStream streamStatus] != NSStreamStatusError
&& [writeStream streamStatus] != NSStreamStatusError) {
[self configureStreams];
}
else {
NSLog(@"Failed to connect to Apple.");
}
}
You can see in the CFStreamCreatePairWithSocketToHost function that the host name of the development push notification server is gateway.sandbox.push.apple.com and it accepts connections on port 2195.
Since these streams need to encrypt their data, you must load the certificate into memory and hand it to them. First, add Security.framework to your project. Then, at the top of CocoaServerAppDelegate.m, import the top-level header for this framework.
#import <Security/Security.h>
Next, in CocoaServerAppDelegate.m, implement certificateArray to load the certificate from the bundle, establish its private key (also called its identity) from the Keychain, and then return an array containing the certificate and its key.
- (NSArray *)certificateArray
{
// Get the path of the certificate in the bundle
NSString *certPath =
[[NSBundle mainBundle] pathForResource:@"aps_developer_identity"
ofType:@"cer"];
// Pull the data from the filesystem and create a SecCertificate object
NSData *certData = [NSData dataWithContentsOfFile:certPath];
SecCertificateRef cert = SecCertificateCreateWithData(NULL, (CFDataRef)certData);
// Create the identity (private key) which requires
// that the certificate lives in the keychain
SecIdentityRef identity;
OSStatus err = SecIdentityCreateWithCertificate(NULL, cert, &identity);
if (err) {
NSLog(@"Failed to create certificate identity: %d", err);
return nil;
}
// Put the key and certificate into an array
return [NSArray arrayWithObjects:(id)identity, (id)cert, nil];
}
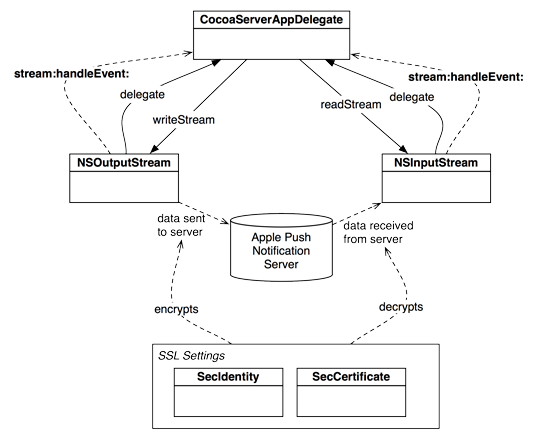
Now, the implementation of configureStreams will configure the streams with the encryption certificate. In the same method, you will give the streams delegates and schedule them into the run loop so that they are monitored for data (Figure 29.7). Implement this method in CocoaServerAppDelegate.m.
- (void)configureStreams
{
NSArray *certArray = [self certificateArray];
if(!certArray)
return;
// Give the streams their SSL settings so they can encrypt/decrypt
// data to/from the server
NSDictionary *sslSettings =
[NSDictionary dictionaryWithObjectsAndKeys:[self certificateArray],
(id)kCFStreamSSLCertificates,
(id)kCFStreamSocketSecurityLevelNegotiatedSSL,
(id)kCFStreamSSLLevel, nil];
[writeStream setProperty:sslSettings
forKey:(id)kCFStreamPropertySSLSettings];
[readStream setProperty:sslSettings
forKey:(id)kCFStreamPropertySSLSettings];
// Give streams a delegate so we can monitor them
[readStream setDelegate:self];
[writeStream setDelegate:self];
// Schedule the streams into the run loop so that they can do their work
[writeStream scheduleInRunLoop:[NSRunLoop currentRunLoop]
forMode:NSDefaultRunLoopMode];
[readStream scheduleInRunLoop:[NSRunLoop currentRunLoop]
forMode:NSDefaultRunLoopMode];
}
Once the streams have been opened and scheduled into the run loop, they will start telling their delegate (the CocoaServerAppDelegate) what’s going on in their lives. For example, a read stream might say, “I have some new data sitting on the socket. Would you like to read it?” A write stream might say, “I just sent a bunch of data, and now I’m ready for more.” Also, if a stream encounters a problem, it will report an error to its delegate.
In CocoaServerAppDelegate.h, declare that CocoaServerAppDelegate conforms to the NSStreamDelegate protocol.
@interface CocoaServerAppDelegate : NSObject <NSApplicationDelegate, NSNetServiceDelegate, NSTableViewDataSource, NSTableViewDelegate, NSStreamDelegate>
Then, in CocoaServerAppDelegate.m, implement the event-handling delegate method.
- (void)stream:(NSStream *)aStream handleEvent:(NSStreamEvent)eventCode
{
switch(eventCode)
{
case NSStreamEventHasBytesAvailable:
{
NSLog(@"%@ has bytes", aStream);
} break;
case NSStreamEventOpenCompleted:
{
NSLog(@"%@ is open", aStream);
} break;
case NSStreamEventHasSpaceAvailable:
{
NSLog(@"%@ can accept bytes", aStream);
}break;
case NSStreamEventErrorOccurred:
{
NSLog(@"%@ error: %@", aStream, [aStream streamError]);
} break;
case NSStreamEventEndEncountered:
{
NSLog(@"%@ ended - probably closed by server", aStream);
} break;
}
}
Finally, at the end of applicationDidFinishLaunching:, kick off the whole process of connecting to the Apple push notification server.
service = [[NSNetService alloc] initWithDomain:@"" type:@"_http._tcp." name:@"CocoaHTTPServer" port:[server port]]; [service setDelegate:self]; [service publish]; [self connectToNotificationServer]; }
Build and run CocoaServer. Mac OS X will ask if it is okay to use the private key to securely speak with the notification server. Select Always Allow. After a moment, your console should report that both streams have opened and that the write stream can accept bytes. The console will look something like this:
<SSCFInputStream: 0x10044d580> is open <NSCFOutputStream: 0x10044d650> is open <NSCFOutputStream: 0x10044d650> can accept bytes
You now have an encrypted connection to the push notification server. In the next section, you’ll format and send the notification data.
Once you have a connection to the notification server, you can send it notifications to forward to devices. There are two formats for the notification data sent to the server: simple and enhanced. We will use the enhanced format because it can inform the provider of any error in the data and it allows the provider to include an expiration date for the notification.
The data will be a packed binary buffer, so we will use an instance of NSMutableData to put together this information (Figure 29.8). The first byte of the data is called the command and it is either 1 or 0. If the notification data is in the enhanced format, the command is 1, otherwise, it’s 0.

Next is a 32-bit value that identifies this notification. If there is an error delivering the notification, your application will be given back this identifier along with the error so you can decide what to do next.
Another 32-bit integer follows the identifier, and it specifies an expiration date. If a push notification cannot be delivered to a device (most likely because it does not have an Internet connection), the notification server will try to re-send it later. The expiration date says, “If you still haven’t delivered this notification by this time, then just trash it.” The value of expiration date is the number of seconds past the epoch (Jan 1, 1970) at which the server should trash the notification. If you wanted, for example, to have the notification expire in a day, you will call the function time to get the current number of seconds since the epoch and then add a day’s worth of seconds to that value.
Next comes the device token: first a 16-bit integer to specify the length of the device token data (which at this point is always 32 bytes, but in the future may vary) and then the token data itself. The token data information is the same value the iOS application receives after it registers. It allows the push notification server to route the notification to the correct device.
Last is the actual notification payload (and a 16-bit integer before it to specify its size). The payload is the notification data that will make it to the device. It can include alert text, the name of a sound file to play, or a badge number to place on the application’s icon. This data will be binary-encoded JSON. JSON is like XML; it is a platform-independent mark-up language used to transport data. There is no built-in JSON generator in the iOS SDK, but constructing it by hand for simple things like delivering a notification is easy enough.
In the JSON payload, there are a few reserved keys. The first is aps, which is the top-level container for standard notification key-values. The standard notification keys are alert, sound, and badge. Therefore, a simple notification that sends an alert to a device looks like this:
{
"aps":
{
"alert":"Here's a simple message"
}
}
If you want to include a sound file to play with the alert, you would add the name of that file to the aps container.
{
"aps":
{
"alert":"Here's a simple message",
"sound":"Sound12.aif"
}
}
The alert can also be a container if you need to add supported customizations to your notification, like localizing the text or providing a special launch image for a notified application. You can check the documentation for all of these keys. Furthermore, you can specify your own keys outside of the aps container for use by your application. These keys will be available to the iOS application when it is awoken by a notification, but they will not be visible to the user.
However, you should never rely on the delivery of a push notification. Therefore, do not relay critical information in customizations of a notification; instead, indicate to the application that it should fetch critical information from the server. Also, do not include confidential information, like passwords or credit card numbers, in the payload.
Time to make the data. In CocoaServerAppDelegate.h, declare a new method to construct the notification data.
- (NSData *)notificationDataForMessage:(NSString *)msgText token:(NSData *)token;
Implement this method in CocoaServerAppDelegate.m.
- (NSData *)notificationDataForMessage:(NSString *)msgText token:(NSData *)token
{
// To signify the enhanced format, we use 1 as the first byte
uint8_t command = 1;
// This is the identifier for this specific notification
static uint32_t identifier = 5000;
// The notification will expire in one day
uint32_t expiry = htonl(time(NULL) + 86400);
// Find the binary lengths of the data we will send
uint16_t tokenLength = htons([token length]);
// Must escape text before inserting in JSON
NSMutableString *escapedText = [[msgText mutableCopy] autorelease];
// Replace with
[escapedText replaceOccurrencesOfString:@""
withString:@""
options:0
range:NSMakeRange(0, [escapedText length])];
// Replace " with "
[escapedText replaceOccurrencesOfString:@"""
withString:@"""
options:0
range:NSMakeRange(0, [escapedText length])];
// Construct the JSON payload to deliver to the device
NSString *payload =
[NSString stringWithFormat:@"{"aps":{"alert":"%@"}}", escapedText];
// We'll have to encode this into a binary buffer, so NSString won't fly
const char *payloadBuffer = [payload UTF8String];
// Note: sending length to an NSString will give us the number
// of characters, not the number of bytes, but strlen
// gives us the number of bytes. (Some characters
// take up more than one byte in Unicode)
uint16_t payloadLength = htons(strlen(payloadBuffer));
// Create a binary data container to pack all of the data
NSMutableData *data = [NSMutableData data];
// Add each component in the right order to the data container
[data appendBytes:&command length:sizeof(uint8_t)];
[data appendBytes:&identifier length:sizeof(uint32_t)];
[data appendBytes:&expiry length:sizeof(uint32_t)];
[data appendBytes:&tokenLength length:sizeof(uint16_t)];
[data appendBytes:[token bytes] length:[token length]];
[data appendBytes:&payloadLength length:sizeof(uint16_t)];
[data appendBytes:payloadBuffer length:strlen(payloadBuffer)];
// Increment the identifier for the next notification
identifier++;
return data;
}
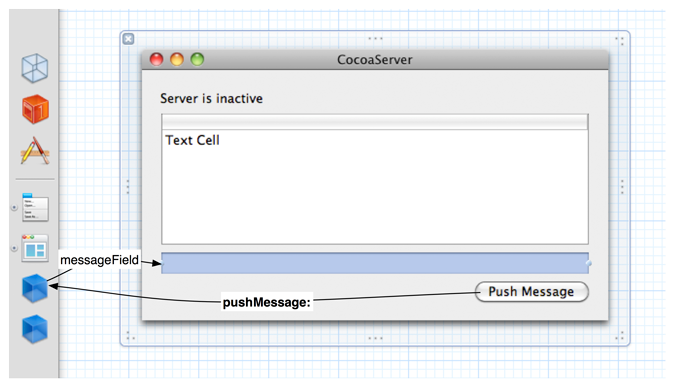
Now we need some way for the CocoaServer to specify the text of the message it sends to registered users. In the CocoaServer project, open MainMenu.xib. Add an NSTextField (not a label) and an NSButton to the interface. Then make outlets and actions and connect them as shown in Figure 29.9.
In CocoaServerAppDelegate.m, implement pushMessage: so that it sends the contents of the messageField to the device that is currently selected in the table view.
- (IBAction)pushMessage:(id)sender
{
// If you haven't selected a row, there is no one to send
// the message to
NSInteger row = [tableView selectedRow];
if (row == -1)
return;
// Pull the message out of the text view and the token
// of the device we are going to talk to
NSString *msgText = [messageField stringValue];
NSData *token = [[registeredUsers objectAtIndex:row] objectForKey:@"token"];
NSData *data = [self notificationDataForMessage:msgText token:token];
// Send this data out to Apple's server
[writeStream write:[data bytes] maxLength:[data length]];
}
Notice the use of write:maxLength: at the end of this method. To send data to a server with NSOutputStream, you send it this message. The write:maxLength: method takes a buffer of bytes and the length of that buffer as arguments. It returns the actual number of bytes written (or -1 if there was an error).
When you write to a stream, the data is essentially “queued up” for transfer. The stream will make the transfer when it can. In this case, the stream is scheduled into the main run loop. Therefore, when the main run loop is not processing another event, it will spend time flushing the output to the network interface. When the data has made its way out to the Internet, the write stream indicates to its delegate that it is ready to accept bytes again by sending the message stream:handleEvent: with NSStreamEventHasSpaceAvailable as the event type.
Now it’s time to see what you have wrought. Build and run CocoaServer. Then, build and run Notified. After the device appears in CocoaServer’s table view, exit Notified by pressing the Home button. In CocoaServer, select the device in the table view, enter a message into the text field, and press Push Message. Wait a moment for the notification server to do its part, and then check your device for the notification. How awesome is that?
If there is an error delivering an enhanced notification, the server will respond with an error. This data will be 6 bytes long. The first byte is a command and will always be the value 8. The second byte is a status code that indicates the type of the error. (You can see all of the status codes in the documentation.) The final 4 bytes is the identifier of that notification.
When a read stream has data available, it sends the message stream:handleEvent: to its delegate. Then, you send the message read:maxLength: to the stream that has the data, passing an allocated buffer to hold the result of the read along with the size of that buffer. The NSInputStream will take the bytes off the stream and put them into the buffer until it reaches the number of bytes you specified. The value returned by this method is a number. A positive number indicates the number of bytes that were actually transferred to the buffer. The value is 0 if there are no bytes left to read and -1 if there was an error.
Typically, when you read from an input stream, you pick a reasonable size (based on the size of the data you are planning to receive) for a buffer, read that many bytes, and then repeat until the buffer returns 0.
We know that a notification delivery error is always 6 bytes. Thus, we can read 6 bytes at a time from the stream. In CocoaServerAppDelegate.m, locate the method stream:handleEvent: and add the following code:
case NSStreamEventHasBytesAvailable:
{
if (aStream == readStream)
{
// If data came back from the server, we have an error
// Let's fetch it out
NSUInteger lengthRead = 0;
do
{
// Error packet is always 6 bytes
uint8_t *buffer = malloc(6);
lengthRead = [readStream read:buffer maxLength:6];
// First byte is command (always 8)
uint8_t command = buffer[0];
// Second byte is the status code
uint8_t status = buffer[1];
// This will be the notification identifier
uint32_t *ident = (uint32_t *)(buffer + 2);
NSLog(@"ERROR WITH NOTIFICATION: %d %d %d",
(int)command, (int)status, *ident);
free(buffer);
} while(lengthRead > 0);
}
} break;
Now, if there is an issue with your notification data, the console will show you why.
This stream-reading technique is sufficient for our application because we know the exact size of the data we will get back from the server. In general, however, you have to take more precautions. Sometimes, you will get more than one packet, a partial packet, or a combination of the two (e.g., one and a half packets). Sometimes, data of variable sizes will be sent. The solution to these problems is creating a packet format that both the client and server agree upon. Take a look at the notification data you prepare for the notification server: it has a format that is set-in-stone and you always pass the size of the variable parts of that data. By being a notification provider, you have agreed to this format.
A typical format uses the first byte as a command that indicates the format of the data. Since you always receive at least one byte when the stream informs its delegate that it has bytes available, you can safely read this byte and determine what to do next. Many formats use the next chunk of bytes to indicate the length of the rest of the packet. So, the stream will check the command and say, “Oh, this is a Message command, so I know that the next 2 bytes will be the length of the packet. I’ll read those two bytes to figure out how large the packet is.”
The delegate will then attempt to read that many bytes from the stream. If there are exactly that many bytes left in the read stream, you have a single and complete packet from the server and can use that data in your application.
In practice, though, that doesn’t always happen. If the data you read is not the exact length you are expecting, you will have to store that data for later. Let’s consider two examples:
- You read the first three bytes of a stream, and they indicate that there are 40 more bytes in the packet. You allocate a buffer that is 40 bytes and attempt to read 40 bytes from the stream – but the stream only has 32 bytes available. In this situation, you keep that data around. Then, the next time a stream informs its delegate that bytes are available, you immediately lop off the first 8 bytes and append them to the stored data. Now, you have a complete packet.
- You read the first three bytes and again know that there are 40 bytes left in the packet. But, there are actually 60 bytes available. The first 40 bytes are a complete packet – you can use that data immediately. However, the last 20 bytes belong to another packet. So, you grab the first byte to determine the format. Let’s assume the same format, so you check the next two bytes for the length and see that the packet is 36 bytes. You keep the extra bytes around, and the next chunk of data that comes in will be appended to it.